1
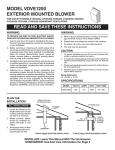
INSTALL THE VENTILATOR
INSTALL THE VENTILATOR
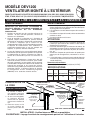
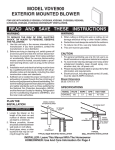
ROOF INSTALLATIONS
WALL INSTALLATIONS
1. Remove the cover and screws.
1. Place a large bead of caulk on the back side of the
housing all along the outer edges.
2. Attach an appropriate U.L. approved cable connector
in the hole at the rear of the wiring box.
2. Center the ventilator ring in the 11" diameter hole, making
sure that the 1¼" diameter electrical wiring hole aligns
with the hole in the wiring box.
3. Remove roofing nails from shingles around the TOP and
SIDES of the cutout area only.Carefully lift the shingles
to allow the back flashing sheet on the ventilator housing
to fit under them.
3. Attach ventilator to the wall with the six (6) screws
provided. It is recommended that the screws be located
inside the ventilator housing. Drill pilot holes if necessary.
4. Center the ventilator ring in the 11" diameter hole, making
sure that the 1¼" diameter electrical wiring hole aligns
with the hole in the wiring box.
4. Using a good grade of caulk, seal all around the
mounting screw heads.
5. Attach the ventilator to the roof with six (6) screws
provided. It is recommended that the screws be located
inside the ventilator housing. Drill pilot holes if necessary.
5. Bring electrical wiring through the hole in the wiring box
and secure it according to local codes.
6. Using a good grade of roofing cement, seal all of the
shingles around the housing and flashing sheet as well
as the mounting screw heads.
7. Bring electrical wiring through the hole in the wiring box
and secure it according to local codes.
GROUND
TO
GROUNDING
SCREW
WHITE
TO
BLUE
GROUND
TO
GROUNDING
SCREW
120 VAC
LINE
IN
WHITE
TO
BLUE
BLACK
TO
BLACK
120 VAC
LINE
IN
6. Make the electrical connections with the proper connector for the type of wire being used. Connect black to
black, white to blue, and green or bare wire to grounding
screw.
BLACK
TO
BLACK
7. Replace cover and screws. Do not pinch wiring under
cover.
8. Make the electrical connections with the proper connector for the type of wiring being used. Connect black to
black, white to blue, and the green or bare wire to
grounding screw.
8. Make sure damper opens and closes freely.
9. Top and side flanges of the back plate may be covered
with trim strips. Do not block grille opening at bottom with trim. It will adversely affect performance of the
ventilator.
9. Replace cover and screws. Do not pinch wiring under the
cover.
10. Make sure damper opens and closes freely.
3