1
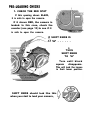
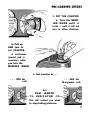
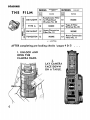
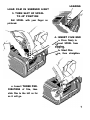
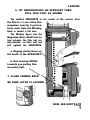
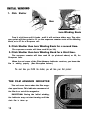
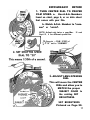
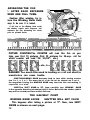
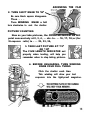
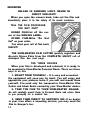
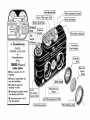
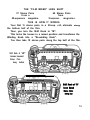
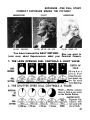
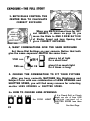
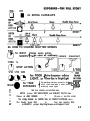
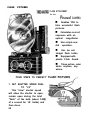
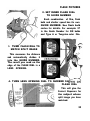
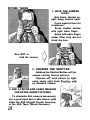
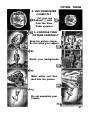
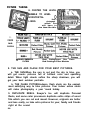
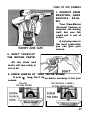
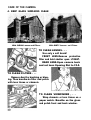
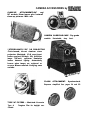
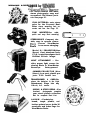
PHOTOGRAPHY
You have added another dimension (stereo)
and the colors of the rainbow to your everyday
picture taking. You will be one of the first to enjoy
your own “Personal”, full color, three dimension
pictures,
To insure your enjoyment,
1. We have made this camera - this whole
system of photography - as simple and easy to use
as we possibly could, and,
2. We have written this instruction book to
tell you, and show you with pictures, everything
you must know to start taking pictures that will be
truly satisfying and everywhere admired.
SAWYER’S INC.
Home Office
chicogo Office
Box 4903500 No.
Portland 7, Ore.
3500 No. Kostner
Chicago 41, Ill
Ave.
Copyright 1952 by Sawyer’s Inc.-Revised Edition 1953
Printed in U. S. A. ® Sawyer’s Inc., Portland 7. Oregon
Trade-Mark Reg. U.S. Patent Office-Marca Registrada
PRICE 25c
lNSTRUCTlONS
PRE-LOADING CHECKS
Illustrated
Instructions
Page
Turn SHIFT KNOB to “A” . . . . . . . . . . . . 4
Lock WINDING KNOB by turning.
Set COUNTER to 20X OR 36X . . . . . . . . . . 5
LOADING
Open camera and lay it face down on a table . . . 6
Insert three perforations of film in slot of SPOOL . .
7
Engage magazine on slotted shaft . . . . . . . . . 8
Fit film on SPROCKET and pull film tight.
Close back of camera . . . . . . . . . . . . . . . 9
INITIAL
WINDING
Turn WINDING KNOB three full turns . . . . . . . 10
Check FILM ADVANCE INDICATOR . . . . . . . 10
EXPOSURE - EASY METHOD
Set CENTER DIAL for FILM SPEED.
Set SHUTTER at 1/50.
Match proper SKY BRIGHTNESS to correct SUBJECT
COLOR by turning the LENS OPENING DIAL . . 11
lNSTRUCTlONS
illustrated
Instructions
Page
ADVANCING THE FILM
Turn WINDING KNOB a full turn after each exposure.
When Winding Knob LOCKS and
Shutter will not CLICK, you have
reached the important HALFWAY POINT. . . . 12
. . . then . . .
Turn SHIFT KNOB to “B”.
Take last picture when COUNTER reads “19” or “36”.
Wind FOUR times before unloading . . . . . . . . 13
UNLOADING
Unload in subdued light.
Tell processor, “Don’t cut my roll” . . . . . . . . . 14
PERSONAL REEL MOUNTING. . . . . . . . 14 & 15
LABELLED
VIEW OF CAMERA. . . . . . . . 16 & 17
Part Two
INFORMATION SECTION
See Page 18 for Table of Contents
1. CHECK THE RED SPOT
If this opening shows BLACK,
it is safe to open the camera.
If it shows RED, the camera is
loaded. In this case, check the
counter (see page 13) to see if it
is safe to open the camera.
SHIFT KNOB IS
“B” . . . . . .
2.
TURN
SHIFT KNOB
TO “A”
Turn until black
square
disappears.
This will lock the lenses
in their lower position.
SHIFT KNOB should look like this
when you start to load your camera,
3. SET THE COUNTER
a. Turn the WINDING KNOB until it
locks - until it will not
turn in either direction.
b. Pull up
AND turn to
set COUNTER.
A continuous
upward pull is
necessary while
you turn the
WINDING KNOB.
c. Set counter to . . .
. . . 20X for
20-exposure roll.
. . . 36X for
36-exposure roll.
Set
FILM LENGTH
19- INDICATOR -35
This will remind you when
to stop taking pictures.
LOAD FILM IN SUBDUED LIGHT
LOADING
3. TURN SLOT OF SPOOL
TO 45º POSITION
Roll SPOOL with your finger as
pictured.
4. INSERT FILM END
a. Press firmly to
event SPOOL from
b. Start film cornerse, then straighten.
c. Insert THREE PERFORATIONS of film, then
slide film to the left as far
as it will go.
.,.
5. INSERT THE FILM MAGAZINE
a. Draw magazine towards the slotted shaft on
which it fits. By holding
film flat in the film channel, the amount of extra
film which will be pulled
out of the magazine can
held to a minimum.
b. Tilt magazine down
UNDER the bracket.
HOW MAGAZINE
FITS SHAFT.
a. Turn the small end of
the magazine and push
until it pops into place.
LOADING
6. FIT PERFORATIONS ON SPROCKET THEN
PULL FILM TAUT AS SHOWN
The toothed SPROCKETS in the center of the comera drive
the film in and out of the film
magazine exactly 8 perforations each time the Winding
Knob is turned a full turn.
The Wind-up Spool and the
Magazine Drive Shaft turn to
help advance the film, but are
slip-clutched so thev will not
pull against the SPROCKETS.
a, Engage perforations on
the teeth of the SPROCKET.
b. Roll wind-up SPOOL
towards you pulling film
reasonably tight.
7. CLOSE CAMERA BACK
BE SURE LATCH IS LOCKED!
NOW, SEE NEXT PAGtJ
1. Click Shutter
then
turn Winding Knob
Turn it a full turn until it locks - until it will not turn either way. The reference point will then point to 21 on the exposure counter scale of the Winding
Knob, or to 37 for a 36-exposure roll.
2. Click Shutter then turn Winding Knob for a second time.
The exposure counter will then read 20 (or 36).
3. Click Shutter then turn Winding Knob for a third time.
The exposure counter will then read 19 (as pictured above) or 35, for
36-exposure rolls.
film
When the red cross of the Film Advance Indicator revolves, you know the
is winding properly. (See Exception below.)
The next time you CLICK the shutter, you will take your first picture!
THE FILM ADVANCE INDICATOR
The red cross turns when the film magazine spool turns. This indicates movement of
the film in or out of the magazine.
EXCEPTION: During the initial winding,
the indicator may not start turning until the
slack film is taken up.
10
EXPOSURE-EASY
METHOD
1. TURN CENTER DIAL TO PROPER
FILM SPEED- a. Use A.S.A. Numbers
found on chart, page 6, or on data sheet
that comes with your film.
b. Match A.S.A. Number to “summer” or “winter”.
NOTE: Adjust only twice a year-Mar.
Sept. 22, or for different speed film.
22 and
1
Example - FILM SPEED of
“10” set to “SUMMER” .
3. ADJUST LENS OPENING
DIAL
This will move the CENTER
DIAL and allow you to
MATCH the proper
SUBJECT COLOR to
the existing SKY
i
BRIGHTNESS.
SKY BRIGHTNESS
Pictured on Page 20.
11
ADVANCING THE FILM
1 . AFTER EACH EXPOSURE
WIND ONE FULL TURN.
Caution: After winding, try to
turn the Winding Knob both
ways to be sure it is locked.
A full turn of the Winding Knob cocks
the shutter, counts each exposure, and
advances the film alternating the stereo
pairs as pictured below.
;;, 1q<<&<4
33
..
.
c
il
/
PICTURE COUNTING-The COUNTER will look like this as you
take your first 19 pictures (first 35 pictures for 36-exp. roll for
which counter will read “34, 33,32”. etc.).
-etc., to DANGER! Too much film used in loading or a roll cut short in
manufacture can cause trouble.
SYMPTOM-WINDING KNOB becomes hard to turn while turning counter
from 3 to 2, or 2 to 1. This means that all of the film but the attached end is out of
the magazine: forcing the WINDING KNOB may tear free this end making it
impossible to re-wind.
CURE-Turn SHIFT KNOB to “B”, then, carefully. turn WINDING KNOB
in the opposite direction (clockwise) until it locks. Now click the shutter (which
may not be cocked) and turn another full turn.
THE HALFWAY POINT
WINDING KNOB LOCKS & SHUTTER WILL NOT CLICK
This happens after taking a picture at “1”. Now, turn SHIFT
KNOB OS shown on next page.
12
ADVANCING THE FILM
2. TURN SHIFT KNOB TO “B” ‘\
Be sure black square disappears.
Then . . .
Turn WINDING KNOB a full
turn clockwise to cock the shutter.
PICTURE‘ COUNTING
Now as you take pictures, the COUNTER INDICATOR will
point successively at 2, 3, 4 , . . etc. to . . . 16, 17, 18; or (for
36-exposure rolls) to . . . 32, 33, 34,
3. TAKE LAST PICTURE AT “19”
OR “35”
The FILM LENGTH INDICATOR set
properly when loading, will help you
remember when to stop taking pictures.
4. BEFORE UNLOADING, TURN WINDING
KNOB FOUR FULL TURNS
Click the shutter each time.
This winding will draw your last
exposure into the light-proof magazine.
UNLOADING
UNLOAD IN SUBDUED LIGHT- NEVER IN
DIRECT SUNLIGHT!
When you open the camera back, take out the film and
immediately place it in the safety of its metal container.
TELL THE FILM PROCESSOR,
“DO NOT CUT!”
KODAK FILM-Cut off the corner of the MAILING LABEL.
OTHER FILM-Write “Do Not
Cut” on your order.
You want your roll of film bock
UNCUT!
THE VIEW-MASTER FILM CUTTER quickly registers and
die-cuts Stereo Pairs from the COMPLETE, UNCUT roll of
developed film. See next page.
THE THREE CHOICES
When your film is developed and returned, it is ready to
be mounted in View-Master Personal Reels. There ore three
ways to do this.
1. MOUNT THEM YOURSELF - It is easy and economicolthe equipment will soon pay for itself. You will enjoy and
appreciate your pictures more if you edit and mount them
yourself. You need only the inexpensive View-Master Film
Cutter and blank Reels carried by your View-Master dealer.
2. TAKE THE FILM TO YOUR VIEW-MASTER DEALERHe will carefully mount them in Personal Reels and return them
to you promptly for a modest fee.
3, SEND THEM DIRECT TO SAWYER’S INC.-lf no dealer
in your area offers a mounting service, you moy send the
film to Sawyer’s Inc.
14
PERSONAL REEL MOUNTING
MAKE YOUR OWN REELS! IT’S EASY! IT’S FUN!
Each Reel of 7 Stereo Pairs can be a “production” that
“stars” your family and friends. More than just a photographer,
you will be author, director and film edifor. Your Reels will
be picture stories admired by everyone.
THE VIEW-MASTER
FILM CUTTER DOES
THE WORK
You just fit the proper
f i l m perforations on a
sprocket-press downand an accurately die-cut
Stereo Pair falls from the
machine.
Turning the Film Advance Knob automatically
.
THE ##ES, AND ##Y, MARKS \Tpa’r*
These marks are photographic
etched into each picture. To mount,
you simply match a “I” marked picture to a “3” marked pocket. Then
put the other half of the Stereo Pair,
a “C” marked picture, into the opposite “C” marked pocket.
DIE-CUT
FILM
zi%
DIEFORMED
POCKETS
’
INFORMATION
SECTION
Pager
How the Lens Shift Works . . , . . , . 19
Sky Brightness Pictures . . . . . . , .20
Exposure-the Full Story . . . 21,22,23
Flash Pictures . . . . . . . . . . 24 & 25
Picture Taking Hints . . . . . 26,27,28
Care of the Camera . . . . . . . 29 &
& 30
Camera Accessories . . . . . . . . . . 31
Viewing Accessories . . . . . . . . . . 32
THE “FILM MISER” LENS SHIFT
69 Stereo Pairs
37 Stereo Pairs
from a
from a
36-exposure
magazine.
20-exposure magazine.
THIS IS HOW IT WORKS
Your first 19 stereo pairs, in a 20-exp. roll, alternate along
the bottom half of the film.
Then, you turn the Shift Knob to “B”.
This locks the lenses in a raised position and transforms the
Winding Knob into a “Re-winding Knob”.
You then take 18 stereo pairs along the top half of the film.
Shift Knob at “A”
lenses lowered
Stereo Pairs
along bottom
Shift Knob at “B”
lenses Raised
Stereo Pairs
along top
19
EXPOSURE --THE FULL STORY
CALCULATOR BASED ON FRONT-LIGHTED
SUBJECTS
SUBJECT COLOR
For dark complexions, dark foliage,
subjects in light shade, etc.
U s e this mark for most subjects
nd when in doubt.
For clouds, foaming water, delicate
flesh tones, white buildings, etc.
NOTE: Use DARK or beyond for
heavy shade. Use LIGHT or beyond for snow or beach scenes.
BACK-LIGHTED SUBJECT
B r i g h t S u n - O p e n 2 full
stops
Hazy Sun-Open a full
stop
SKY BRIGHTNESS
BRIGHT SUN
Sun in clear sky or
f clouds not near sun.
Sun‘s disk shows
through haze or
light clouds.
CLOUDY BRIGHT
Clouds hide sun but
bright area shows
sun’s approximate
position.
SIDE-LIGHTED SUBJECT
Bright S u n - O p e n a f u l l
Stop
H a z y S u n - O p e n 1/2 s t o p
20
CLOUDY DULL
Heavy clouds nearly
cover the sky.
EXPOSURE --THE FULL STORY
CORRECT EXPOSURE MAKES THE PICTURE!
UNDEREXPOSED
COLORS
DARKENED
CORRECT
COLORS BRIGHT AND TRUE
OVEREXPOSED
COLORS FADED OUT
You have learned the EASY METHOD. Now you want to
learn more about Exposure-more abdut your Personal Camera.
1. THE LENS OPENING DIAL CONTROLS A LIGHT VALVE
3. BOTH DIALS CONTROL THE
CENTER DIAL TO CALCULATE
CORRECT EXPOSURE
When you MATCH these lines for SKY
and SUBJECT, OS shown on page 20, you
move the Dials to ONE C O M B I N A T I O N
of Shutter Speed and Lens Opening that
gives CORRECT EXPOSURE.
4, MANY COMBINATIONS GIVE THE SAME EXPOSURE
Set these Dial Settings on your camera. Notice that both
give the same exposure -MATCH the same lines.
1/100 sec.
0 at f’4
1/25 sec. e at f/8
q
q
gives a lot of light
for a short time.
gives l/4 as much light
for 4 times as long.
5. CHOOSE THE COMBINATION TO FIT YOUR PICTURE
After you hove correctly MATCHED Sky Brightness and
Subject Color with one combination of LENS OPENING and
SHUTTER SPEED, you will find many reasons for selecting
another LENS OPENING or SHUTTER SPEED.
6a. HOW TO CHOOSE LENS OPENINGS
f/3.5 f/4
f/4*5
for POOR
on0
22
If it is Cloudy Dull, or Cloudy
Bright, use one of these LENS
LlGHT
OPENINGS instead of a
1 SHUTTER SPEED less than
1 /25
See Next Page
f/16
f/11
q n
for EXTRA CLOSE-UPS
6b. HOW TO CHOOSE SHUTTER SPEEDS
1/50
for MOST
Stops some action
i Tak
SHOTS
camera movement
0
76 5
1/100
to
STOP ACTION
0
1/10 1/15 1/25
@ @ 0
BULB
R
E
V
I
E
W
0
0
l/100
m
~E~~~~r 4 EE-$?iZi$ F$Z
g;
~11~
By holding shutter open for 80 secs.
at f/l 1 you can take a color shot in THESE
i ordinary room light.
SPEEDS
I
FILM SPEED on CENTER DIAL
for TIME
EXPOSURES
Set
MATCH p r o p e r SKY BRIGHTNESS and SUBJECT COLOR lines
or
Choose a LENS OPENING
Choose a SHUTTER SPEED
This may move the CENTER DIAL off CORRECT EXPOSURE, so:-or
Turn lens Opening DIAL
Turn Shutter Speed DIAL
to RE-MATCH proper Sky Brightness and Subject Color
23
FLASH
PICTURES
FLASH ATTACHMENT
for the
n
Enables YOU to
take wonderful flash
pictures.
n
Calculates correct
exposure with an
optical rangefinder.
n
dial
Has simple oneoperation.
n
Uses low east
midget flash bulbs.
n
Equipped with
plastic Flash Guard.
n
Takes action, color
shots anytime, anywhere.
FOUR STEPS TO PERFEC T
1. SET SHUTTER SPEED DIAL
TO “25”
This “slow” shutter speed
will allow the shutter to open,
remain open during the brief
“flash” of the bulb (about 1/20
of a second for S M bulbs) and
then close.
24
FLASH PICTURES
2. SET INNER FLASH DIAL
TO GUIDE NUMBER
Each combination of film, flash
bulb and shutter speed has its own
GUIDE NUMBER. See flash bulb
carton for details. For example: 57
is the Guide Number for SM bulbs
and Type A or Tungsten color film.
3 . TURN FLASH DIAL TO
MATCH SPLIT IMAGE
This measures the distance
and automatically divides it
into the GUIDE NUMBER.
The result you read on the
edge of the FLASH DIAL is a
LENS OPENING.
MATCH ED
4. TURN LENS OPENING DIAL TO NUMBER SH
FLASH DIAL
This will give the
Correct Exposure for
the subject whose
split image you have
matched.
25
PICTURE TAKING
1. HOLD THE CAMERA
RIGHT
Grip firmly, thumbs upright along camera back.
Press against face for
steadiness.
Press shutter button
with right index finger.
Keep left index finger
under filter ring -do not
block the lens.
How NOT to
hold the camera
2. SQUEEZE THE SHUTTER
Jabbing the Shutter Button will jar
camera causing blurred pictures.
“Squeeze off” each picture by tightening whole right hand.
an unloaded camera.
3. USE A TRIPOD AND CABLE RELEASE
FOR EXTRA SHARP PICTURES
To eliminate ALL camera movement,
use a good tripod and a cable release (with
either the ASA Straight Thread, American,
or the ASA Taper Thread, European).
r*
LO
PICTURE TAKING
m
4. USE VIEWFINDER
CORRECTLY
Put your eye
‘“” about ½ inch 1
from the Viewfinder eyepiece.
4 THIS
5. COMPOSE YOUR
PICTURE CAREFULLY
I
Keep the picture simple.
Do not center your subject.
__ %G~EI
-4
Watch your backgrounds.
Make action and lines
lead into the picture.
Do not amputate your
friends.
NOT
THIS
27
PlCTURE
TAKING
6. CENTER THE LEVEL
BUBBLE TO LEVEL
HORIZONTAL
LINES.
0
Don’t
photograph
varticrls. You
will have to
view them like this.
7.
CHECK
YOUR
FILTERS
* COLOR COWERSION
FILTERS
Black Printing-Correct Filter Choice
Red Printing-A Filter Mistake
8. THE SUN AND FLASH FOR YOUR BEST PICTURES.
a. THE SUN-When the sun is out and the sky is blue, you
will get scenic pictures full of brilliant color and sparkling
detail. When light clouds soften the sharp shadows, you will
get your best outdoor portraits.
b. THE FLASH PICTURE-Indoors, flash shots are the easiest,
most satisfying way to take pictures. Your indoor action shots
will make photography a year ‘round hobby.
9. DUPLICATE REELS. Sawyer’s Inc. will duplicate Personal
Reels, and some color processors duplicate entire strips of uncut
film which you can cut and mount. However, originals are better
and less costly, so take extra pictures for your, family and friends
right at the scene!
28
CARE OF THE CAMERA
1. PROTECT FROM
DROPPING, HARD
KNOCKS, RAIN,
ETC.
Your View-Master
Personal Camera is
all-metal, ond durably
built but one fall
could put it out of
action.
A carrying case is
the best protection
you can give your
camera.
2. DON’T “MUSCLE”
THE MOVING PARTS!
All the dials and
knobs will turn easily or
not at all.
3. CHECK LENGTH OF Y ‘OUR TRIPOD SCREW.
If over ¼ long, file it do wn before screwing it into your
camera.
THIS LOCKS
FOR FIRM SUPPORT.
THIS RESULTS IN A WOBBLY,
OR EVEN BROKEN CAMERA.
CARE OF THE CAMERA
4. KEEP GLASS SURFACES CLEAN
With CLEAN Lenses and Filters
With DIRTY Lenses and Filters
TO CLEAN LENSES . . .
Use only a soft brush!
FRONT LENS-Remove protective
filter and hold shutter open to”BULB”.
REAR LENS-Open camera bock
and set Lens Opening Dial to f/3.5.
TO CLEAN FILTERS . . .
Remove dust by brushing or blowing. Then breathe-on filter and polish
with lens tissue or chamois.
TO CLEAN VIEWFINDER , . .
Wrap chamois or lens tissue on o
paper match. Breathe on the gloss
and polish front and back window.
CAMERA ACCESSORIES by B
CLOSE-UP
ATTACHMENTS-24”
and
36” models. Prism lenses give “natural”
close-up pictures. With case.
CAMERA CARRYING CASE -Top grade
cowhide. Detachable, drop front.
“STEREO-MATIC 500” 3-D PROJECTOR
-Twin-lensed, die-cast aluminum stereo
projector. Matched, f/3.0 anastigmat
lenses project 5O-inch. 3-D, full-color
image. 500-watt. split-beam illumination
insures balanced lighting. Automatically
focuses when images are registered on
screen. Blower-cooled. Carrying case
available.
FLASH ATTACHMENT- Synchronized.
Exposure simplified. See pages 24 and 25.
TYPE “A” FILTERS - Matched. Corrects
Type A or Tungsten Film for daylight use.
Coated.
7
&REELS-T~~ prtented 7-scene mounts that make
stereo photography easy and
economical. Die-formed pockets. See page 15.
FILM
pairs
Makes
curate
CUTTER-Die cuts stereo
for the Personal Reel.
stereo mounting fast, acand fun. See Page 15.
FILM
INSERTER-for
safe,
quick and easy Reel mounting.
STEREOSCOPE -Compact, durable, easy to operate viewer.
i:,“;,
‘I-scene
View-Master
Lever scene changing.
.
Model S-l PROJECTOR (NonStereo) -Cast aluminum body.
F/3.0, coated Anastigmat lens.
Brilliant 36-inch image.
LIGHT ATTACHMENT - Provides proper light source for
viewing Reels in View-Master
Stereoscope.
Battery-powered.
JUNlOR PROJECTOR (NonStereo) -Low cost, plastic projector. F/3.0 Doublet lens.
TRANSFORMER & CORD-Replaces the batteries in the Light
Attachment. Plugs into any
11O-volt, A.C. source.
SCENIC & STORY REELS --Pro
fessional
photographs complete
your stereo picture collection.
Ask for complete Reel List.
A L B U M - Pocket-size, spiralbound, tough. pliable, red
leather-grained cover. holds 30
envelopes and Index Page for
View-Master Reels.