1
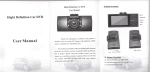
Ilight Definition Car DVR
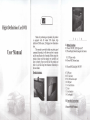
Thanks for purchasing our products, this product
equipped with All winner F20 chipset, high
definition CMOS sensor, 120 degrees low illumination
is
lens.
User Manual
This manual is provided to help you getting good
command of product, it will show you how to operate
and the specification list ofproduct. Before using this
product, please read this manual very carefully and
keep it properly. Hope you will like this product and
then we can build long term business relationship in
i
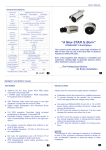
II. Button tr'unctions
ot:TowE oN/oFFJ.ED light on/off
02: Photo/Replay/Menr/Emergent lock button
03: UP/Lens switch
04: Down/MlC/Motion detect
Record/OK/Backlight ON/OFF
the near future.
05 :
Product structure:
07: GPS port
08: TF card slot
09: AV lN/back lens port
l0: USB port
I l: 4.3 inch Screen
12: Lens
l3: Loud speaker
l4: Car bracket
III. Operation Instructions
':' '.,..'
.:,''
:
.
'.'i::l]
l.Power ON/OFF button:
:i:iiii::i::i:l::ll::::i::l:i,:,,:,,?,ltillllllll,ltilitll1l1::r:r,
:"4:l;ii:.-rrr': li ::. ,
,
,.
,
rrill'
@Power orVoff the DVR: Keep pressing 3 seconds
to power on/off the DVR, it will enter into the
recording mode automatically. Meanwhile the DVR
will read the TF card, the big capacity card will takes
more time to get read. Keep pressing again the Power
ON/OFF button, the recording will be stopped and the
video files set saved.
@Power'ON/OFF back light: After rhe DVR
powered on, slightly press the Power ON/OFF button
to choose: LED light onL/off/auto; in the mode of LED
light auto, the LED light is controlled by
photoconductive resistance or the brightness of light
sensed by the camera lens.
2. PhotoiReplay(Modes switch)/lVlenu/Emergent
when the Car is in emergent situations, slightly press
this button, the DVR will save the video file which is
started from 10 seconds before the accidents and
ended 20 seconds after the accidents and will not be
covered by circle recor?ling.
3. UP/Lens switch button:
@Page Up function: when in the mode of Menu or
Replay, press this button to scan up sub- menu or
video files accordinsly.
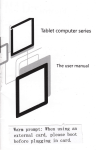
@Lens Switch finction: When the back lens had
been plugged into the DVR, the LCD screen will
appear a icon which shows it has been well connected.
Press this button to switch screen display as below:
1, Front lens, 2, Back lens, 3, Picture in picture, 4,
lock button:
@Photo function: In the standby mode, slightly
Split screen.
press this button to enter into the photo mode, press
4.
OK button to take ohotos.
@Replay function: In the standby mode, press this
button twice to enter into the mode of replay. Press
UP/Down button the scan the files which you have
recorded and press OK button to choose open the file
or pause. Press Modes switch button to exit this mode.
@Menu function: ln the standby mode. keep
pressing this button for 3 seconds to enter into the
Menu settings, press IJP/Down to choose setting your
DVR accordingly: you will see Resolution, White
balance, Exposure, Color, Time stamp, Language
option, Frequency, LED light, Keypad tone, Format,
System info, Reset to Default, press OK to enter in,
the sertings.
'press Menu to exit
@Emergent lock functiin: In the video mode,
Down/MlC/Motion detect button:
@Page Down function: when in the mode of Menu
or Replay, press this button to scan down sub- menu or
video fi1es accordinslv.
@One press to r-ecord voice: In the video mode,
press this button to choose whether to record with
voice or not, also the LCD screen will appear the icon
of voice accordinslv.
@lvlotion deteiffunction: In the standby mode,
keep pressing this button for 3 seconds to tum on the
motion detect function, keep pressing 3 seconds to
tum offthis function, the LCD will show icon on the
top left comer which means you was in the motion
detect mode.
5. Record/OK/LCD back ltght ON/OI'F button:
]it:i1
@Press to record: In the stand by mode, press this
button to record videos or take photos, press again the
button to stop the recording and the video file will be
saved.
@OK function: In the mode of Menu/Replay, press
this button to choose OK.
@Back light ON/OFF: Keep pressing 3 seconds to
tum offthe backlight, then press any buttons to tum on
the backlight.
6. Reset
crashed.
button: Choose to restart the DVR when it is
7. Time&Date update function:
When the DVR is in the video mode, press Menu
button to find the System Menu, press Down/Up
button to select "Time Set", press OK./Emergent button
to choose OK, press Menu button to set Yeaq Month,
Date, Hour, Min, Sec; press Down/Up to set correct
time&date; press OK/Emergent button to save, also it
will back to the video standby mode.
8. Circle recording and seamless recording
function:
In the Menu mode, find out circle recording then
choose 1 min, 2mins, 5mins as each video time or
Close the circle recording. The circle recording
support ..u.1.::.,l:,::rding tunction.
be saved automatically.
10.U Disk/Webcam/Charging mode:
When the DVR had been plugged into the PC by
USB cable, the DVR screen will appear 3 option for
your choice, press Down/Up button to choose which
mode you want to enter into. After choosing wel[, the
LCD of DVR will appear icons of U Disk/ Webcam/
Charging respectively.
11. G-Sensor
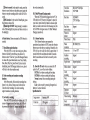
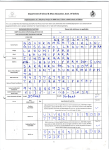
Front lens
Resolution
r.ru(rz6u. /ZUyJurps
ljacK lens
tl.zo4MUv
1920* 1080
720*576/30fps
IJacK lens
motion detect
Plcture m
function:
The G-Sensor function can measure the
gravitational acceleration ofDVR, sense the vibration
between cars when they are crashing. Meanwhile, the
DVR will save the video flle which is started from 10
seconds before the accidents and ended 20 seconds
after the accidents and will not be covered by circle
recording.
Support
Support
nichrre
Photo format
JPEG
rnoto
HD 2048X1536
resolution
Screen size
4.3 inch TFT
seamless
Support
recordins
Night vision
12. About the TF card: when you connect the TF
card to the PC, you will see below folders:
DCIMA: the videos recording by front lens;
DCIMB: the videos recording by back lens;
Normal: normal videos recording during the
driving;
Lock: videos record by pressing Emergent lock
button or G-sensor function.
Motlon detect
Support
urcle
Support
recordino
Voice
recnrdinq
G-Senor
Support
Support
Emergent
G-Sensor
Video chatting
Specification list:
Support/optional
Support
.
9.
Low battely wariiitrgi."'.'i.::':..
....
When tlie DVR.detected the low I
screen wl
be
LCD
w!.b,.qry.,::
I
Stock
,will
temperature
,will
I
ii'l
r I
i)!r 'r,
'ff,!f1---!
n"lr'-; i-rYlqfifluq,I,
lfrl'l-{l--wsr
Operattng
lPmnerehlre
Operating
humiditv
Support card
Support TF
aqtd
Battery
-f5-65%E{
-16'g-69'C
card
512MB-64GB
o
-600-mAH--
G
o
t-T.s trours
Recordmg flme
Consumption
crrnenf
DC tn
I)
a
-TF
200ffi:600m
DC5V
!
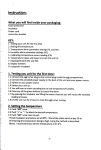
l.Accessories:
DVR
3.Manual
2. Back lens
1,
4-Car charger
6. Color box
S-IJSB
us
no" frur. any question, please free feel to contact
tle customers to use TF card
ihrnerior than class 6.
G
G
3
cab'ie
f
il#;ti;;#gdest
o
o
3
E
o
I
o
.#
,"s
3
lw
{.w