1
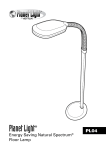
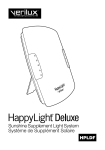
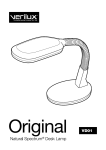
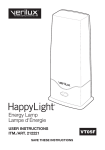
Planet Light
®
PL04
®
Energy Saving Natural Spectrum
Floor Lamp
Dear Customer,
Thank you for purchasing the Planet Light® Energy Saving
Natural Spectrum® Floor Lamp. You have received a quality
product, backed by a one-year limited warranty. As a Verilux
customer, your satisfaction means everything to us. We look
forward to serving you now and in the future.
Many other healthy lighting products are available through our
catalog and online. Visit us on the web at www.Verilux.com
to request a free catalog and learn more about all our quality
Verilux products.
Have a Bright Day!
Nicholas Harmon
President, Verilux, Inc.
2
IMPORTANT SAFETY INSTRUCTIONS
SAVE THESE INSTRUCTIONS
Thank you for purchasing the Planet Light® Energy Saving Natural
Spectrum® Floor Lamp. Please read the following safety information
before using. To reduce the risk of fire, electrical shock or injury to
persons:
• Do NOT dismantle.
• Do NOT alter power cord.
• Turn off/unplug and allow to cool before replacing bulb or cleaning.
GENERAL PRECAUTIONS
• For indoor use only.
• The lamp is an electrical device. DO NOT USE NEAR WATER.
• Before plugging in the lamp, check to make sure the voltage of the
wall socket does not exceed 120 volts.
• Not for use with light dimmers, timers, motion detectors or extension
cords.
• This product may cause interference with radios, cordless
telephones or devices that use a wireless remote control, such as
televisions. If interference occurs, move the product away from the
device, plug the product or device into a different outlet or move the
lamp out of the line of sight of the remote control receiver.
• Unplug from electrical outlet for extended periods of non-use or
during lightning storms to ensure protection of the electronics.
• WARNING: Do NOT use lubricating agent in assembly; please see
troubleshooting section if you are having difficulty assembling your
lamp.
• WARNING: Do not use the lamp outside or in wet locations such as
bathrooms. It is intended for indoor, dry use only.
• WARNING: This product contains Mercury in the bulb. Dispose of
bulb per local regulations.
3
GETTING STARTED
Main Parts & Controls
A.
B.
C.
D.
E.
F. Polarized Plug
G. Bulb
H. On/Off Switch
Lamp Head
Gooseneck
Shaft
Lamp Base
Power Cord
Close-up of Lamp Head
A
B
G
H
C
E
D
F
CAUTION:
DO NOT LIFT THE LAMP BY THE GOOSENECK. THE LAMP SHOULD
BE LIFTED BY THE SHAFT.
4
UNPACKING YOUR LAMP
1. Remove all pieces from box. Locate 2 Phillips head screws.
2. Detach red plastic pieces and store them in the event you need to
return the lamp.
3. Important: To avoid scratching the metal shaft, do not use a sharp
object to cut the plastic covering. The clear plastic covering on the
shaft is specially designed to tear away easily.
IMPORTANT NOTE:
Remove red plastic protective pieces prior to assembly.
5
ASSEMBLY INSTRUCTIONS
Read Instructions Carefully Before
Assembly:
1. Connect the two ends of the Power
Cord (between the Base and the
Shaft) using the lock connectors.
2. Carefully tuck excess Power
Cord into the Shaft. DO NOT
CUT OR SHORTEN THE POWER
CORD.
3. Insert the Flex Pole and the Shaft
into the Base.
4. Check direction of the lamp and
the hole on the Base, then use
a Philips Head Screwdriver (not
included) to tighten the screw into
the hole. CAUTION: BE VERY
CAREFUL NOT TO PINCH ANY
PART OF THE CORD BETWEEN
ANY METAL PIECES.
Fig. 1
6
ASSEMBLY INSTRUCTIONS cont.
5. To prevent damage during shipping, the Verilux bulb is surrounded
by protective padding. Carefully remove and dispose of the
protective padding. Check to ensure that the bulb is fully seated
and has not come loose from the socket during shipping. There
should be no gap between the bulb and socket.
6. Plug lamp into outlet and turn on. If bulb does not illuminate
instantly, please refer to the troubleshooting section of this manual.
7
BULB REPLACEMENT INSTRUCTIONS
Removal
1. Unplug lamp from power source.
C
2. Firmly hold bulb base (B) and pull
bulb (C) from the socket (A) in
an outward motion.
A
B
Installation
1. Unplug lamp from power source.
C
2. Firmly hold base (B) and push bulb
(C) into the socket (A).
3. Be sure bulb is firmly seated in the
socket (see below) and snapped
into the metal bulb clip (D).
A
YES
B
NO
D
Notice
large gap
No
gap
Correctly seated bulb
Incorrectly seated bulb
CAUTION: ALWAYS UNPLUG LAMP BEFORE PERFORMING BULB
REPLACEMENT OR INSTALLATION.
8
TROUBLESHOOTING
Before requesting service on your Planet Light® lamp, please read
the following:
• Make sure all power connectors, cords and plugs are inserted fully
and securely.
• Be sure the bulb is securely seated into the socket. (See page 8)
• Make sure there is power to the wall outlet or try another outlet.
• CAUTION: DISCONNECT LAMP BEFORE PERFORMING
ALIGNMENT ACTIVITY. Problem with aligning screw holes? Always
start with the base and work your way up the shaft and attach the
head last. Place your foot on the base of the lamp on the floor. While
holding the shaft with your hand, gently rock the unit back and forth.
Shaft should ease into socket and screw holes will align.
Be sure the bulb is securely seated into the socket, repeat the bulb
installation process. CAUTION: DISCONNECT LAMP FROM OUTLET
PRIOR TO REPEATING THE BULB INSTALLATION PROCESS.
9
CARE & CLEANING
Your lamp is made from high quality materials that will last for many
years with minimum care. You may want to periodically clean the lamp,
using a mild non-abrasive cleaner and soft cloth. When cleaning, make
sure you have turned off and unplugged the unit, and allowed sufficient
time for the unit to cool. All liquid should be properly wiped away and
dried prior to restoring power.
CAUTION: DO NOT USE SOLVENTS OR CLEANERS CONTAINING
ABRASIVES, OR AMMONIA BASED CLEANERS
WARNING: All moisture should be properly wiped away and dried prior
to restoring power.
10
One Year Limited Warranty
ATTENTION! ONCE OPENED, PLEASE DO NOT RETURN THIS PRODUCT TO THE
STORE WHERE IT WAS PURCHASED FOR REPAIR OR REPLACEMENT!
Many questions may be answered by visiting www.verilux.com, or you may call our
Customer Service Department at 802-496-3101 during normal business hours.
This limited warranty is provided by: Verilux®, Inc., 340 Mad River Park, Waitsfield, VT 05673
Verilux warrants this product to be free from defects in material and workmanship for a
period of one year from the date of the original retail purchase from Verilux or an authorized
Verilux distributor. Proof of purchase is required for all warranty claims. During the
limited warranty period, Verilux, Inc. will, at its option, repair or replace defective parts of
this product, at no charge to the customer, subject to the following limitations: This limited
warranty does not include any postage, freight, handling, insurance or delivery fees. This
warranty does not cover damage, defect or failure caused by or resulting from accident,
external destruction, alteration, modification, abuse, misuse or misapplication of this
product.
This warranty does not cover damage to the product resulting from return shipping or
handling. The use of shipping insurance is recommended to help protect your product.
Return Authorization is required for all returns. To obtain a Return Authorization, please
contact the Verilux Customer Service Department at 802-496-3101.
If, during the first year of ownership, this product fails to operate properly, it should be
returned as specified at www.verilux.com/warrantyreplacement or as instructed by a Verilux
customer service representative at 802-496-3101.
Note: Verilux recommends using a quality surge suppressor on all electronics equipment.
Voltage variations and spikes can damage electronic components in any system. A quality
suppressor can eliminate the vast majority of failures attributed to surges and may be
purchased at electronics stores.
Due to ongoing improvements, actual product may have slight variations from the product described in this manual.
11
PL04-MAN-Rev9
Printed in China for Verilux, Inc.
© Copyright 2010 Verilux, Inc. All rights reserved.