1
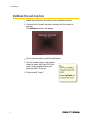
release 4.6 Contents Contents Remote Control Functions ............................................. iii 1. Initial Startup ............................................................. 1 Program the remote control .......................................................................... 1 Validate the set-top box ................................................................................ 2 Log in ............................................................................................................ 3 2. Basic TV Controls ........................................................ 4 Change the channel ...................................................................................... 4 View Current Channel Information ................................................................ 4 Set Favorites ................................................................................................. 5 View the channel guide ................................................................................. 6 Autotune ........................................................................................................ 7 Search for programs ..................................................................................... 8 Access menus ............................................................................................... 9 Log out ........................................................................................................ 10 3. “My Services” Menu Options .................................... 11 Telephony ................................................................................................... 11 Messages .................................................................................................... 12 Chat ............................................................................................................ 13 Register your existing account ................................................................. 13 Activate fs|cdn Chat username................................................................. 14 Add a Chat buddy .................................................................................... 14 Start chatting ............................................................................................ 15 Preferences ................................................................................................. 16 Favorite Channels .................................................................................... 16 Alerts ........................................................................................................ 17 Menu Language ....................................................................................... 17 Appearance.............................................................................................. 18 Help ............................................................................................................. 19 4. Paid Programming (PPV, PPB) ................................. 20 Pay per View ............................................................................................... 20 Pay per Block .............................................................................................. 21 5. Video on Demand (VOD)........................................... 22 Rent a Video on Demand movie ................................................................. 22 Quick search by category......................................................................... 22 Search by expanded category list ............................................................ 23 Advanced Search ..................................................................................... 24 Navigate in a Video on Demand movie ....................................................... 25 i Contents / Introduction 6. Account Services ...................................................... 26 Access the Account menu .......................................................................... 26 Change Manager User’s password ............................................................. 27 Activate PIN Protection ............................................................................... 27 Set Purchase PIN .................................................................................... 27 Set Rating PIN ......................................................................................... 28 Create a user .............................................................................................. 29 Set parental controls (Locks) ...................................................................... 31 Lock user out of TV for a set time ............................................................ 31 Lock user out of a program/channel......................................................... 32 Lock user out of TV indefinitely ................................................................ 32 Purchase subscription packages ................................................................ 33 Chat and Email ........................................................................................ 34 Manage Subscriptions ................................................................................ 35 View Purchased Subscriptions................................................................. 35 Manage user actions .................................................................................. 36 Set Autologin .............................................................................................. 37 View subscriber details ............................................................................... 37 View billing activity ...................................................................................... 38 TV Brand Codes ............................................................ 39 Index ............................................................................ 42 Technical Support......................................................... 44 Introduction The set-top box is your gateway to the Full-Service Content Delivery Network (fs|cdn®) interactive television service including Favorite Channels Video on Demand Pay per View Parental Locks Chat TV Caller ID alert This manual is your guide to accessing these services through the remote control unit. ii Remote Control Functions Remote Control Functions Remote Control iii Remote Control Functions Button Function power Put set-top box in/out of Standby mode. STB Activate the set-top box mode on the remote control. TV Activate the TV mode on the remote control. 1, 2,..0 number Select channel or enter login password. LAST CH LAST CH Move to the previous menu. At the main menu, hides the menu. MUTE Mute the volume. Press again to resume previous volume setting. A/V Select audio/video sources for your TV. +/– VOL Raise or lower TV volume. +/– CH Switch the channel number up or down. MENU Display the Main menu. Hide Clear the menu or screen. Home Reload the set-top box. Info Display current program information. Tools Display fs|cdn Help. Guide Display the interactive Channel Guide and Favorites. Exit Display the previous menu/window. STB TV MUTE AV MENU SHORTCUTS MENU NAVIGATION OK arrow Navigate among selectable items on the screen. OK Select a highlighted item. Scroll through options. CHANNEL GUIDE CONTROLS Pg Up/Down Display previous/next group of channels. Pg Back clears the last channel number. Pg Back/Fwd Display the previous/next time period. Rewind/Fast Fwd Jump to previous/next day. VOD CONTROLS iv Rewind Move video backward. (In Channel Guide, displays previous day.) Play Play video. Resume normal play from Rewind, Fast Fwd, or Pause. Pause Pause the video. (Press Fast Fwd Move through video quickly. Press repeatedly to increase speed. Record Record video to a personal video recorder (PVR). Stop Stop the video. to resume where you paused.) 1. Initial Startup 1. Initial Startup When you connect power to your set-top box for the first time, you’ll configure the set-top box and log in to fs|cdn. IMPORTANT: Do not disconnect power to the set-top box until Startup is complete. This will take up to 10 minutes. During this time the settop box will shut down and start up again, lights may flash or blink, and messages will appear on your TV screen. Startup is complete when the Welcome screen on your TV screen prompts you for your password (see “Log in” on page 3). Follow the instructions below to set up your system. Program the remote control Before you can use the remote control, you’ll need to program it for your TV brand. 1 Determine the brand of your TV (for example, Sony). 2 Find the brand in the list in “TV Brand Codes,” on page 39. 3 Simultaneously press and hold down the TV and OK buttons on the remote until the TV button stays lit. 4 Use the number keys to enter the first 3-digit brand code listed for the TV manufacturer. If the TV button flashes rapidly for a second and then stays lit, it means the remote doesn’t recognize the brand code you entered. Enter the next code listed for this brand, and continue down the list until one works. 5 Verify that the power ( ) and VOL buttons work. 6 Continue with “Validate the set-top box” on the next page. 1 1. Initial Startup Validate the set-top box 1 Install the set-top box according to the installation manual. 2 Connect the AC power and wait a moment for the screen to activate. The Validation screen will appear. Validation screen 3 On the remote control, press the STB button. 4 Use the number keys on the remote control to enter the 8-digit PUK (pin unlock code) available from your fs|cdn provider. Press OK. 5 Continue with “Log in.” 2 1. Initial Startup Log in 1 If the set-top box is off, turn it on by pressing STB and then (Power). The Welcome screen will appear. Welcome screen 2 To log in as another user, press to select a different name. Press OK. 3 Enter the numeric password for the selected user (using the number keys). Press OK. The default password is 1 2 3 4. 3 2. Basic TV Controls 2. Basic TV Controls You can control all fs|cdn services from the remote control. Change the channel 1 sym b ol 4 ghi 7 pqrs 2 ab c 5 jk l 8 tu v 3 def 6 m no Using Number buttons, enter the channel number. 9 w xyz ~ OR~ + CH On the CH (Channel) buttons, press + or – to scroll up or down one channel at a time. View Current Channel Information See a description of the program you’re watching as well as Current Channel Information. INFO Info 4 Tools Guide Exit Press the red (Info) button. 2. Basic TV Controls Set Favorites When you set Favorite channels, you create a separate program guide just for the channels you watch the most – your Favorites! Press the Guide button twice to see My Channels program guide. GUIDE Info Tools Guide Exit Press the red (Info) button to see program information. INFO Info Use and buttons to select a channel you want to add to your Favorites program guide. Tools Guide Exit With ‘Add Channel to Favorites’ selected, press OK on the remote control. 5 2. Basic TV Controls View the channel guide Press the Guide button to see a Channel Guide. GUIDE Info Tools Guide Exit Press once for Offered Channels (all channels available from your Service Provider). Press twice for My Channels (channels you subscribe to currently). Press three times for Favorites (channels you’ve set as favorites). The Help Bar (below the guide) provides a key to the remote control buttons that navigate through channels and program times.* Buttons Arrows ( Function ) Scroll through channels and times. Pg Up/Down ( ) Jump to previous/next channels. Pg Back/Fwd ( ) Jump to previous/next times. Rewind/FastFwd ( ) Jump to previous/next day. * Help Bar appears only if activated. Refer to “Appearance” on page 18 for more information. In the Help Bar, “mine” denotes the Favorites guide. EXIT Info Tools Guide Exit Press Exit to clear the channel guide. If you don’t exit, the Guide window will time out after a few moments of inactivity. Channel Guide shows programming and a description of the selected program. 6 2. Basic TV Controls Autotune You can set your TV to tune to a later program automatically. Use your remote control to set it up. Press the Guide button to see the Channel Guide. Press as many times as needed to see later programming. guide Using arrow buttons ( ), navigate to the program you want your TV to tune to later. Press OK. guide / [selected program] + ok Press to select Autotune. Press OK. guide In the Channel Guide, the clock icon indicates that the program is selected for Autotune. guide / [selected program] + ok To cancel an Autotune selection, navigate to the program, press OK, select Cancel Autotune, and press OK again. 7 2. Basic TV Controls Search for programs Search for a specific program in the Channel Guide. MENU Press MENU to access the Main Menu. menu Press to select Search and then press OK. menu / search 8 Press arrow buttons to select one or more categories: Genre, Day, From (start time), To (end time), Channel, Title. Press OK to scroll through options in the fields on this screen. 2. Basic TV Controls Search for programs If you search by Title, you’ll spell the program name in the pop-up keyboard. (Partial title is okay.) Use arrow buttons to select the letters and press OK after each. Select the check mark and press OK. In the Search Channel Guide window, select Search and then press OK. View the Search Results. Select an individual line to see the program description near the top of the window. Access menus The Main Menu is the gateway to most fs|cdn features. On the remote control, press arrow keys ( selection, and then press OK. MENU EXIT Info Tools Guide Exit ) to make your menu Press MENU to access the Main Menu. Press the blue Exit button to return to the previous menu. Continue to press Exit to clear all menus from the screen, or press Refresh once. 9 2. Basic TV Controls Log out Normally you’ll remain logged in to the fs|cdn set-top box, and simply turn off your TV when you’re not watching. However, to log in as a different user, you must first log out. MENU Press MENU to access the Main Menu. Press to select Logout. Press OK. The screen will go blank as the set-top box goes into Standby mode. ~ OR ~ Press Power. 10 3. “My Services” Menu Options 3. “My Services” Menu Options My Services are optional services you can purchase from your service provider. menu Services are available through My Services on the Main Menu. Sample Main Menu (your menu may look different) Telephony The Telephony feature displays a Caller ID pop-up alert at the top of your TV screen when you have an incoming phone call. The alert shows phone numbers for the receiver and the caller. caller id pop−up When the call alert appears, simply wait for it to time out, or press OK on the remote control to close the alert. To activate Caller ID, refer to “Alerts” on page 17. 11 3. “My Services” Menu Options Messages The Messages feature lets you read Email messages on your TV screen. Only Messages subscribers can use this feature. To subscribe, refer to “Purchase subscription packages” on page 33, or call Customer Service. menu / my services / messages Press to select a message to read. Press OK. View the message you selected. To keep the message viewable in the ‘Unread’ message list, click OK to select Set To Unread. Otherwise, press Exit. menu / my services / messages To view all messages, press OK to change from Unread Only to All. Then select Get Messages and press OK. To set the system to display on-screen alerts of incoming messages and remember your password, click Messages Settings and select Remember. Select Don’t Remember to disable on-screen email alerts and require a password for viewing messages. 12 3. “My Services” Menu Options Chat The Chat feature lets you chat on-line on your TV. You may register an existing instant message (IM) account or use an fs|cdn Chat username. Only Chat subscribers can use this feature. To subscribe, refer to “Purchase subscription packages” on page 33, or call Customer Service. Register your existing account Register your existing instant message (IM) account with AOL, Google, MSN, or Yahoo to chat with your own user name and password. menu / my services / chat Select Registration and press OK. menu / my services / chat / registration On the Chat registration window, press repeatedly to highlight the Service field. Press OK to scroll and select MSN, AOL, Yahoo, or Google. For UserID, Password, Nickname: Select ABC and press OK. In the keyboard, press arrows ( ) to select letters and press OK after each. When done, select the check mark and press OK. Complete registration: Select Register, and then OK. Press OK. 13 3. “My Services” Menu Options Chat Activate fs|cdn Chat username If you are an fs|cdn user, you automatically have a Chat username: It is username@chatserver. (For example, if your fs|cdn username is Fred, then your Chat username is Fred@chatserver.) Before you use your fs|cdn Chat username for the first time, activate it as follows. menu / my services / chat Log in as the user you wish to register. In the Chat screen, use the arrow buttons to select the Function field. Press until you select Connect and then press OK. Add a Chat buddy You will add each of your Chat buddies once only, before you chat with that buddy for the first time. menu / my services / chat In the Function field, select Add Buddy and press OK. Use the on-screen keyboard to compose the buddy’s IPTV username. (You do not need to add “@chatserver”.) DO NOT select the check mark. Instead, use the up arrow ( ) to return to the function field. With Add Buddy selected, press OK. 14 3. “My Services” Menu Options Chat menu / my services / chat Start chatting In the Function field, press to select Available and press OK. In the Buddies field, select a Chat partner and press OK. Compose the message: In the keyboard, select letters and press OK after each. As you compose the message, it appears in the Input field. Send the message: Select the check mark and press OK. Chat window 1 2 3 4 5 6 Status Number of unread messages Buddies Conversation box Function Minimize/Maximize Chat window 7 8 9 Erase Conversation box Input (the message you are composing) Formatting tools — capital/small letters, English/Spanish, erase previous letter/number, space, check mark (to post the message) 15 3. “My Services” Menu Options Preferences Preferences include general settings for customizing fs|cdn service. menu Preferences settings are available through Settings on the Main Menu. Sample Main Menu (your menu may look different) Favorite Channels The channels you set up as Favorites will appear in a separate program guide. This way, you’ll avoid scrolling through dozens of channels to find your favorite programs. menu / settings / preferences / favorite channels Click a channel in the left column to add it to your Favorites list. Click a channel in the right column to remove it from your Favorites. 16 3. “My Services” Menu Options Preferences Alerts Alerts lets you activate or deactivate on-screen notification for Telephony (Caller ID), Chat, and Message services, if you are a subscriber. menu / settings / preferences / alerts Press to select a service. Press OK to deactivate/activate the service. A check mark indicates service is activated. Select OK and press OK. Menu Language Menu Language lets you choose the language for on-screen menus and windows. menu / settings / preferences / menu language Press to select a language. Press OK. 17 3. “My Services” Menu Options Preferences Appearance Appearance lets you choose the on-screen format for menus and windows. menu / settings / preferences / appearance Press arrow buttons to move through Appearance options. Press OK to make a selection. Menu Help Bar Channel Guide Help Bar Transparency Transparent – Current program shows through onscreen windows. Opaque – On-screen windows are opaque. Color Schemes View samples below. Font Size Size of the type in windows (higher is bigger). Font Weight Bold or plain. Font Shadow On or off. Help Bar (at left) Key to the shortcut buttons. When “on,” it appears below Channel Guide and menus. With your selections made, arrow to the Apply box and press OK. Color Scheme 1 Color Scheme 2 Color Scheme 3 Color Scheme 4 Color Scheme 5 Color Scheme 6 18 3. “My Services” Menu Options Sample color schemes Help Help provides instructions on your TV screen for using the remote control and fs|cdn features. menu / settings Help is available through Settings on the Main Menu, or press the Tools button. menu / settings / help Press or to select a topic. Press OK. 19 4. Paid Programming (PPV, PPB) 4. Paid Programming (PPV, PPB) Pay per View and Pay per Block services give you access to special broadcasting. Pay per View Pay to view specific paid programming broadcasts. MENU Access the Channel Guide. guide In the Pay per View channel listing, select the program you wish to view. Press OK. Use the number keys to enter your PIN and then select Buy. Press OK. You will be able to view the selected broadcast on this channel at its scheduled time. 20 4. Paid Programming (PPV, PPB) Pay per Block Purchase blocks of viewing time on specified channels [where available]. MENU Access the Channel Guide. guide Select a Pay per Block channel. Press OK. Use the number keys to enter your PIN and then select Buy. Press OK. 21 5. Video on Demand (VOD) 5. Video on Demand (VOD) Video on Demand (VoD) lets you rent movies for immediate viewing. Rent a Video on Demand movie Quick search by category main menu / video on demand In the Main Menu, select Video on Demand. Press or to select a movie category. Press OK. Press or to scroll through the Search Results. Select a movie and press OK. main menu / video on demand / search Press or to select Rent (order movie), Plot (read movie plot), or Trailer (view movie trailer, when available). Press OK and follow the onscreen instructions. 22 5. Video on Demand (VOD) Rent a Video on Demand movie Search by expanded category list Use this method to narrow your search by category and/or rating. main menu / video on demand With Search selected, press OK. main menu / video on demand / search Press arrow buttons to select Genre and Rating categories. Press OK to scroll through category options. Select Search and press OK. Press or to scroll through Search Results. Select a movie and press OK. Follow instructions on the bottom of page 22 to rent the movie. 23 5. Video on Demand (VOD) Rent a Video on Demand movie Advanced Search Advanced Search is useful to find movies that meet specific criteria. You can search by title, director, or actor. main menu / video on demand / search Press to select Advanced Search and press OK. main menu / video on demand / search / advanced search Press the arrow keys to select the ABC box at the category you want to search: Title, Director, or Actor. Press OK. In the pop-up keyboard, select and press OK for each letter to spell the movie title, director last name, or actor last name (partial spelling is okay). When you’re done, select the check mark symbol and press OK. Select Search and press OK. Press or to scroll through Search Results. Select a movie and press OK. Follow instructions on the bottom of page 22 to rent the movie. 24 5. Video on Demand (VOD) Navigate in a Video on Demand movie When you navigate with the remote control in a VOD movie, the Progress Bar appears. Button Play ( Function ►) Start or resume the movie. Stop () Pause ( Pause the movie. Press ) Pause the movie. Press ► to resume. ► to resume. Progress Bar Indication Shows current place in the movie by section and minute (mm:ss). Shows the section and time (mm:ss) where paused. Shows the section and time (mm:ss) where paused. Rewind / Fast Fwd ( / ) Rewind / fast-forward the movie. Press repeatedly to increase speed. Indicates Rewind or Fast Forward mode and rate; 2x = twice as fast as Play speed, 4x = four times as fast, and so on. Number keys (0–9) OR arrow keys ( ) Skip among the ten movie sections. Number keys: Press the number of sections to skip over; for example, press 6 to start at section 7 of the movie. (0 takes you to the beginning.) Arrow keys: Press right or left arrow key ( ) to skip forward or back among movie sections; press OK. Shows the selected movie section and minutes transpired in the movie (mm:ss). Menu View Progress Bar. MENU Refresh ( Exit ( ) ) Hide Progress Bar. Exit the VOD movie and return to regular programming. To return to the VOD movie, press Menu and select the movie as you did when you rented it. Movies are available for viewing during the 24 hours after purchase. 25 6. Account Services 6. Account Services Account setup may include some or all of these procedures, depending on the services you’ve ordered: Access the Account menu (page 26) Change password (page 27) Activate PIN Protection (page 27) Create a user (page 29) Set parental controls (Locks) (page 31) Purchase subscription packages (page 33) Manage subscriptions (page 35) Manage user actions (page 36) Set Autologin (page 37) View subscriber details (page 37) View billing activity (page 38) Access the Account menu To set up or change your services, first access the Account menu: MENU Press MENU to access the Main Menu. Press to select Settings. Press OK. With Account selected, press OK. 26 6. Account Services Change Manager User’s password These instructions will change the Manager User’s password. To change another user’s password, refer to “Manage user actions” on page 36. menu / settings / account / change password Access the Account menu (page 26) and select Change Password. Complete the fields: Old – Use number buttons to enter old password. New – Use number buttons to enter new password. Confirm – Enter the password numbers again. Press to select OK. Press OK. Activate PIN Protection fs|cdn features two types of optional personal identification numbers (PINs): Purchase PIN allows secure purchase of subscriptions or services, and Rating PIN allows parental controls. Set Purchase PIN When activated, a Purchase PIN is required to purchase subscriptions and Video on Demand, Pay per View, and Pay per Block services. menu / settings / account / purchase pin Access the Account menu (page 26) and select Purchase PIN. Complete the fields: New PIN – Use number buttons to enter 4-digit PIN. Confirm new PIN – Enter the PIN again. Password – Enter your 4-digit numeric password. Enable PIN Protection – Press OK to select Yes or No. (Will appear only if PIN Protection is activated.) Click Apply and press OK. 27 6. Account Services Activate PIN Protection Set Rating PIN A Rating PIN allows a user to view programming with a higher rating than the rating specified when the user was created (see “Create a user” on page 29). The manager user may set Rating PINs. menu / settings / account / rating pin Access the Account menu (page 26) and select Rating PIN. Complete the fields: New PIN – Use number buttons to enter the 4-digit PIN. Confirm new PIN – Enter PIN again. Password – Enter your 4-digit numeric password. Enable PIN Protection – Press OK to select Yes or No. (Will appear only if PIN Protection is activated.) If No, then this user cannot view programming with a higher rating under any circumstances. PIN Protected Rating – Press OK to select the highest rating user can view without a Rating PIN. Select Apply and press OK. Example: John is a 13-year-old user specified with a TV-14 rating. His parents also assigned John a PINProtected Rating of R. The following rules apply to John: 28 PIN-Protection enabled (option ‘Yes’) 9 May view programming as high as PIN-Protection disabled (option ‘No’) 9 May view as high as TV-14 only TV-14 without PIN 9 May view R with PIN 9 May not ever view higher than R 6. Account Services Create a user The Manager User for a subscriber account can create additional users in the account. menu / settings / account / manage users Access the Account menu (page 26) and select Manage Users. Select Create New and press OK. With ABC selected, press OK. 29 6. Account Services Create a user In the pop-up keyboard, press arrow buttons ( ) to select letters and press OK after each to spell the new username. Select the check mark and press OK. Complete the remaining fields: Password Press number buttons on the remote to enter a numeric password of your choice. [If you make a mistake, press Pg Back ( ) to erase.] Confirm Enter the password numbers again. Rating Press OK to scroll through ratings. Stop at the highest rating level you want this user to view. Users will need a Rating PIN to view programming higher than the rating you specify here. See page 28 for details. Sp.Limit Press number buttons to enter amount this user may spend per billing period (for VoD, PPV, etc.). Can(not) Subscribe Press OK to toggle between Can and Cannot Subscribe. Can Subscribe means this user will be able to add subscription services. Select OK and press OK to save settings. 30 6. Account Services Set parental controls (Locks) The manager user can control user viewing in several ways: Lock user out of TV for a set time (page 31) Lock user out of a program / channel (page 32) Lock user out of TV indefinitely (page 32) For all Lock settings, access the Account menu (page 26) and select Manage Users. menu / settings / account / manage users For all Lock settings, begin by selecting Manage Users, and then select the user you wish to control. Press OK. menu / settings / account / manage users / [username] Select Locks and press OK. Continue with the instructions below for the action you want (lock user out of program, out of channel, or out of TV). Lock user out of TV for a set time menu / settings / account / manage users / [username] / locks Choose the lockout period: Complete the From, Duration, and Daily fields by pressing OK to scroll through options. With the fields set, select Lock and press OK. 31 6. Account Services Lock user out of a program/channel menu / settings / account / manage users / [username] / locks Select the user account as described above. Select Channel Locks and press OK. Select the program to lock, or any program in the channel to lock, and press OK. Select Lock Program or Lock Channel, and press OK. To unlock, repeat these steps, except select Unlock. The channel guide will show a padlock symbol to identify the program or channel as locked. Lock user out of TV indefinitely menu / settings / account / manage users / [username] / locks Select the user account as described on page 31. Select Lock Now and press OK. This user will be blocked from logging in. To unlock the user, repeat these steps, except select Unlock Now. 32 6. Account Services Purchase subscription packages The fs|cdn provider offers packages of programming. When you subscribe to a package, you may purchase any or all entertainment options (such as channels and services) that the package offers. You may have set up subscriptions with a Customer Service Representative at the time you ordered fs|cdn. The manager user (and other users if designated) can add subscription features using the set-top box (refer to “Create a user” on page 29 to designate ‘Can Subscribe’). The following instructions are for adding a subscription for the user logged in. Manager users can add subscriptions for other users by starting with the Manage Users function (refer to “Manage user actions” on page 36). menu / settings / account / available subscriptions Access the Account menu (page 26) and select Available Subscriptions. The Subscription Bundles menu shows product bundles available from your service provider. To view the content of a bundle, select the bundle and press OK. The system will show available subscriptions in the bundle you selected. A check mark indicates that the subscription is already purchased for the user logged in. Select the subscription you wish to purchase now. Press OK. Follow the on-screen instructions. If you’re buying Chat or Email service, the system will request additional information. Refer to “Chat and Email” on page 34. Sample subscriptions in a Subscription Bundle. Your menu may look different. 33 6. Account Services Purchase subscription packages When prompted, enter your 4-digit PIN. Select Buy and press OK. Confirm that a check mark appears beside each purchased subscription. Chat and Email menu / settings / account / available subscriptions / other services When you purchase Chat or Email (Messages) service, the system will request additional information. In the window that appears, select ABC beside each field. Use the keyboard pop-up to complete the Username and Password fields: Select the check mark and press OK for each field before starting the next. Complete any remaining fields. Select Buy and press OK. Refer to pages 12 and 13 for more information about Email (Messages) and Chat service. 34 6. Account Services Manage Subscriptions To purchase a subscription, refer to “Purchase subscription packages” on page 33, or contact Customer Service. View Purchased Subscriptions View subscription bundles already purchased for the user logged in. menu / settings / account / my own subscriptions Access the Account menu (page 26) and select My Own Subscriptions. Select a subscription and press OK. View the description of the subscription you chose above. 35 6. Account Services Manage user actions The Manager User can set or modify settings for all users in the account. User settings include subscriptions, parental locks, password, and Autologin. menu / settings / account / manage users Access the Account menu (page 26) and select Manage Users. Select the user name and press OK. Changes you make in the next screens will be for the user you select here. Select a User Action category to view or modify. Press OK. The manager user may take these actions for the selected user: 36 Avail. Sub. Follow steps in “Purchase subscription packages” on page 33. My Own Sub. View current subscriptions for the selected user. Locks Activate/deactivate parental control for programs or channels. Follow steps in “Set parental control (Locks)” on page 31. Modify View or change user info including password and rating. Activity View billing activity. Autologin Set the user login so it doesn’t require a password. Delete Delete selected user. (Select Yes or No.) 6. Account Services Set Autologin When you set Autologin, the login procedure becomes disabled and no password is required. menu / settings / account / autologin Access the Account menu (page 26) and select Autologin. Press to select Set Autologin User. Press OK. Use the same steps to turn off Autologin. View subscriber details View subscriber settings for the user who is currently logged on. menu / settings / account / details Access the Account menu (page 26) and select Details. To change settings, please contact Customer Service. 37 6. Account Services View billing activity View current billing activity for a specific user or for all of the users in an account. menu / settings / account / activity Access the Account menu (page 26) and select Activity. If you have questions about your bill, please contact Customer Service. 38 TV Brand Codes TV Brand Codes Brand Code Brand Code A TANDY ABEX ADMIRA ADVENTURA AIKO AIWA AKAI ALARON ALBA ALLERON AMBASSADOR AMERICA AMPRO AMSTRAD ANAM ANAM NATIONAL AOC ARCHER AUDIOSONIC AUDIOVOX BAUER BAUR BAYSONIC BEIJING BELCOR BELL & HOWELL BEON BRADFORD BROCKWOOD BROKSONIC BUSH CANDLE CAPEHART CARNIVALE CARVER CATHAY CELEBRITY CENTURION CHANGHONG CINERAL CITIZEN 094 115 114, 127, 200 113 105, 112, 197 148 033, 110, 111, 157 109, 217 043 109 108 105 234 048, 108 025, 104, 105, 106, 107 104, 214 036, 041, 102, 103, 111, 116 116 100 105, 116, 197, 199 044 100 105 151, 155, 156 036, 103, 157 038, 098, 099 100 105 036, 103 083, 116, 200 100 035, 036, 041, 096, 097, 111, 113, 215 102 041, 157 010, 163, 213 100 095, 195, 232 041 154, 155, 156, 162 105, 197, 199 035, 036, 041, 092, 093, 094, 096, 097, 105, 111, 112, 113, 149, 197, 215 101 100 035, 097, 215 175 090, 091, 101, 105 CORANDO CRAIG CROSLEY CROWN CURTIS MATHES 094 025, 105 163, 213 094, 105 016, 036, 038, 041, 055, 069, 075, 093, 094, 098, 111, 114, 127, 149, 163, 196, 198, 212, 213, 215, 219, 228, 229, 231, 233 105 029, 030, 033, 036, 072, 094, 100, 103, 105, 112, 119, 153, 157, 158, 159, 160, 197, 199 100 036, 094, 103 069 027, 100 033, 100, 107 001, 036, 089, 103 076 088 095, 101, 195, 232 094 094 100 033 000, 002, 006, 007, 008, 009, 011, 036, 038, 041, 081, 082, 083, 084, 085, 086, 087, 090, 092, 094, 098, 101, 103, 105, 108, 109, 200, 217 036, 041, 111 100 033 100 100 017, 038, 080, 098 044 100 114 109, 217, 224 048, 105, 109, 141, 150, 152, 217 105 013, 016, 020, 036, 041, 075, 076, 077, 078, 079, 081, 086, 104, 114, 127, 196, 199, 212, 214, 228, 229, 231, 233 027, 100 039 043 089, 103, 111 027, 066, 100 CLAIRTONE CLARIVOX CONCERTO CONROWA CONTEC CXC DAEWOO DANSAI DAYTRON DENON DECCA DIXI DUMONT DWIN DYNATECH ELECTROBAND ELECTROHOME ELECTRON ELIN ELTA EMERSON ENVISION ERRES ETRON FERGUSON FINLUX FISHER FORMENTI FORMONTI FORTRESS FUJITSU FUNAI FUTURETECH GE GEC GEMINI GENEXXA GIBRALTER GOODMANS/ TASHIKO GRADIENTE GRANADA 028, 065, 157, 215 100 39 TV Brand Codes Brand Code Brand Code GRUNDIG 178, 179, 180, 181, 182, 183, 184, 185, 186, 187, 188 105, 109, 217 072 036, 041, 086 100 109, 217 MEGATRON MEI M-ELECTRONIC MEMOREX 036, 041, 069, 086, 116 101 100, 075, 089, 196 022, 033, 036, 038, 041, 057, 086, 097, 098, 099, 177, 215, 217 179, 183, 189, 190, 191, 192, 193, 194 022, 036, 041, 056, 057, 086, 103, 111 001, 019, 075, 076, 089, 094, 115, 200, 212, 228, 233 079 022, 032, 036, 056, 057, 066, 079, 086, 103, 110, 114, 138 109 022, 041, 104, 114, 127, 157, 214 035, 036, 041, 088, 093, 097, 101, 103, 111, 149, 215 088, 105, 127 036, 055, 062, 086, 105 024, 035, 036, 041, 066, 097, 103, 105, 111, 132, 171, 215 100 100 027, 043, 100, 115 036, 041, 086, 105, 111, 112, 197 053 072 105, 112, 157 041, 105, 157, 197 038, 055, 105 019, 054, 098, 114, 198 083, 100, 127, 217 027,115 100 010, 019, 025, 075, 083, 104, 109, 131, 137, 143, 200, 212, 214 154, 172 016, 019, 036, 041, 052, 053, 062, 073, 075, 076, 078, 079, 086, 093, 094, 103, 104, 111, 115, 116, 212, 215, 228, 231, 233 156, 162 036, 041, 058, 059, 060, 061, 062, 063, 069, 075, 079, 096, 103, 111, 149, 157, 196, 213 010, 040, 069, 100, 157, 163, 200, 213 100 010, 036, 041, 094, 103, 111, 163 051, 055, 087, 157, 223 036, 094, 103, 105, 112, 198 093 227 075, 157, 197, 212 075, 076, 228, 233 100 036, 050, 086, 094, 102, 116, 196, 219 001, 036, 041, 089 103 GUNPY H/K HALLMARK HANSEATIC HARLEY DAVIDSON HARMAN/KARDO N HARVARD HINARI HITACHI HYPSON IMA INDIANA INFINITY INFINITY REFERENCE INTERFUNK INTEQ ITT JANEIL JBL JCB JENSEN JINXING JVC KAWASHO KAYPANI KEC KENWOOD KLOSS KONKA KTV LEYCO LG (GOLDSTAR) LIESENK & TTER LLOYTRON LOEWE LOGIK LUXMAN LXI MAGNAVOX MAJESTIC MARANTZ MARK MATSUSHITA MATSUI MEDIATOR 40 163, 213 105, 106 100, 109 018, 035, 067, 068, 069, 070, 071, 087, 094, 097, 135, 215 100 105 100 163, 213 010 100 001, 089 061 113 010, 163, 213 095, 195, 232 031 153, 154, 155, 156, 157, 162, 163, 164, 165, 169, 173 026, 028, 064, 065, 066, 084 090 102 105 036, 041, 103, 111 063, 072, 113 221, 222, 225, 226 041, 092, 094, 101, 105, 111 100 003, 012, 035, 036, 041, 073, 074, 086, 094, 097, 100, 103, 111, 115, 215 100 094 100 099, 177 035, 097, 215 010, 036, 038, 041, 062, 076, 086, 098, 163, 196, 213, 228, 233 010, 034, 039, 040, 041, 042, 058, 059, 060, 061, 063, 066, 096, 111, 163, 213, 217, 218, 230 099 010, 022, 036, 041, 100, 111, 213 100 019 027, 033, 100 100 METZ MGA MIDLAND MINUTZ MITSUBISHI MONTGOMERY MOTOROLA MTC MULTITECH NAD NEC NECKERMANN NEI NIKKAI NIKKO NOSHI NOVABEAM NTC ONWA OPTIMUS OPTONICA ORION OSAKI OTTO VERSAND PANASONIC PANDA PENNY PEONY PHILCO PHILIPS PHONOLA PILOT PIONEER PORTLAND PRICECLUB PRINCETON PRISM PROSCAN PROTECH PROTON PULSAR PULSER TV Brand Codes Brand Code Brand Code QUASAR QUELLE RADIO SHACK 025, 075, 089, 104, 157, 212, 214 100 036, 041, 038, 054, 075, 094, 103, 105, 112, 115, 127, 157, 196, 215, 228, 233 100 005, 014, 015, 018, 019, 036, 041, 049, 053, 075, 076, 077, 087, 103, 114, 212, 216, 223, 228, 229, 231, 233, 235, 236, 237 036, 038, 041, 054, 086, 094, 097, 098, 103, 105, 111, 115, 157, 196, 215 101 100 001, 041, 089, 098, 105, 111, 157, 220 033, 108 036, 041, 094, 102, 105, 111, 115 033, 034, 035, 036, 041, 086, 093, 094, 097, 100, 103, 111, 115, 149, 215 094 199 200 017, 023, 027, 038, 066, 080, 091, 098, 123, 125, 126, 202, 203, 204, 205, 206, 207, 208, 209, 210, 211 100 100 036, 103, 157 036, 041, 086 036, 041, 083, 086, 094, 103, 105, 109, 217 010, 016, 017, 035, 036, 038, 041, 048, 052, 062, 076, 080, 086, 097, 098, 109, 141, 163, 196, 213, 215, 217, 228, 233 105 062 156, 168 046, 047, 054, 066, 091, 111, 114, 127 036, 103, 157 099, 177 058, 096, 218 115 100 100 037, 045, 066, 084, 095, 128, 144, 195, 232 036, 041, 086, 096, 105, 109, 217 100 116 048, 141 036, 089, 103, 105, 157 105 095, 195, 232 113 SURPA SYLVANIA 035, 097 010, 036, 041, 044, 058, 059, 060, 061, 063, 096, 111, 157, 163, 213 048, 141 100 027, 043, 114, 127 027, 088, 100, 104, 116, 214 156, 163, 170 109, 217 019, 075, 212 035, 075, 097, 157, 212, 215 010, 022, 035, 036, 057, 093, 094, 096, 097, 099, 103, 105, 109, 112, 113, 157, 163, 177, 197, 213, 215, 217 157, 215 033 050 167 100 035, 036, 041, 086, 097, 108, 215 001 038, 052, 062, 066, 093, 130, 149 101 094 091 078, 079 100 036, 041, 111 RADIOLA RCA REALISTIC RHAPSODY R-LINE RUNCO SAISHO SAMPO SAMSUNG SAMSUX SANSEI SANSUI SANYO SBR SCHEIDER SCIMITSU SCOTCH SCOTT SEARS SEMIVOX SEMP SHANGHAI SHARP SHOGUN SIGNATURE SIMPSON SOLAVOX SONOKO SONTEC SONY SOUNDESIGN SOUNDWAVE SPECTRICON SQUAREVIEW SSS STAR-LITE SUPREM SUPRE-MACY SYMPHONIC SYSLINE TANDY TATUNG TCL TECHNOL ACE TECHNICS TECHWOOD TEKNIKA TELEFUNKEN TELETECH TERA THAKRAL THORM TMK TNCI TOSHIBA TOSONIC TOTEVISION TRICAL UNIVERSAL UNIVERSUM VECTOR RESEARCH VESTEL VICTOR VIDEO CONCEPT VIDIKRON VIDTECH VIKING WARDS WATSON WHITE WESTINGHOUSE XOGEGO YAMAHA YOKO ZENITH ZONDA 100 028, 065 110 010, 021, 163, 213 036, 041, 086, 103 113 010, 036, 041, 045, 054, 058, 059, 060, 061, 077, 078, 079, 086, 097, 099, 103, 109, 111, 177, 213, 215, 217 100 200 161, 162, 166, 174, 176 036, 041, 103, 111 100 001, 004, 089, 099, 105, 177, 197, 200 116 41 Index Index A Account menu, 26 account services, setting up, 26 actor, search for VOD movie by, 24 advanced Search for VOD movie, 24 alerts, activating, 17 appearance, choosing, 18 Autologin, setting, 37 Autotune, 7 B G genre search for program by, 8 search for VOD movie by, 23 guide. See Channel Guide. H Help Bar, 6 turning on, 18 Home button, iv I billing activity, viewing, 38 brand codes, 39 buddy, adding for Chat, 14 IM. See Chat service. instant messages. See Chat service. C L Caller ID, 11 category, search for VOD movie by, 22 change password Manager User’s, 27 user’s, 36 channel changing, 4 locks, 31 viewing information for, 4 Channel Guide controls, iv search for programs in, 4, 8 viewing, 6 Chat buddy, addding, 14 Chat service activating fs|cdn username for, 14 adding a buddy for, 14 how to use, 15 purchasing, 34 registering an Email account for, 13 Chat window, field definitions, 15 color schemes, 18 D director, search for VOD movie by, 24 E Email messages, 12 Email service, purchasing, 34 Exit fs|cdn, 10 F Favorite channels, setting, 16 font, 18 42 language for menus, 17 lock user out of a program/channel, 32 out of TV, 31 out of TV indefinitely, 32 locks, program/channel, 31 log in, 1, 3 log out, 10 M Main Menu, accessing, 9 manager user actions, 36 menu appearance, choosing, 18 menu, accessing, 9 Messages service, purchasing, 34 messages, Email, 12 My Services. See services. P paid programming, 20 parental control, 31 password changing Manager User’s, 27 changing user’s, 36 default, 3 Pay per Block, 21 Pay per View, 20 PIN activating, 27, 28 Protection, setting, 28 Purchase, setting, 27 Rating, setting, 28 using for Pay per Block, 21 using for Pay per View, 20 Index plot, view for a VOD movie, 22 PPB, 21 PPV, 20 program the remote control, 1 programs, searching for, 8 Purchase PIN, setting, 27 purchase subscription packages, 33 R ratings assigning level to user, 30 definitions, 30 search for VOD movie by, 23 setting a PIN for, 28 remote control, 2 button definitions, iv illustration, iii programming for the TV brand, 1 rent a VOD movie, 22 reset, iv S search advanced, for VOD movie, 24 for programs, 8 for VOD movie, 22, 23 services activating alerts, 17 Messages, 12 setting up, 26 Telephony, 11 Settings menu, 26 set-top box exiting, 10 validating, 2 shortcut controls, iv spend limit, setting, 30 startup, 1 stop a VOD movie, 25 subscribe, assigning privilege to user, 30 subscriber details, viewing, 37 subscription packages, purchasing, 33 subscriptions purchasing, 33 viewing purchased, 35 T technical support, 44 Telephony service, 11 television. See TV. title search for program by, 8 search for VOD movie by, 24 trailer, view for a VOD movie, 22 TV basic controls, 4 brand codes, 39 programming the remote for, 1 U user actions, managing, 36 modifying settings for, 36 setting program/channel locks for, 31 users creating new, 29 V validate the set-top box, 2 Video on Demand. See VOD movie VOD control buttons, iv VOD movie advanced search for, 24 pausing, 25 quick search for, 22 resuming, 25 rewinding, 25 search for by actor, 24 search for by category, 22 search for by director, 24 search for by genre, 23 search for by title, 24 starting, 25 stopping, 25 W Welcome screen, 3 43 Technical Support Technical Support This user manual is intended for use by Owner personnel and fs|cdn end users. If you have questions or problems please contact Conklin-Intracom Customer Technical Support: Phone: 800-877-5228 770-295-2500 E-mail: [email protected] Website: www.conklin-intracom.com 44 Information included in this document is correct at time of release. © 2007–2008 Conklin Corporation, all rights reserved. Printed in the USA. For further information, contact Customer Technical Support at: Phone: 800-877-5228 E-mail: [email protected] Website: www.conklin-intracom.com fs|cdn is a registered trademark of Conklin Corporation. Intelligent Personal|TV is a trademark of Conklin Corporation. The Amino logo is a trademark of Amino Communications Limited. AmiNet Set-Top Boxes are used under license from Amino Communication Limited. All other trademarks are the properties of their respective owners. UM-CDNSTB-77 45