1
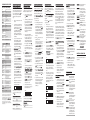
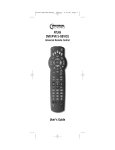
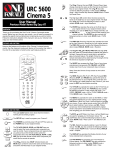
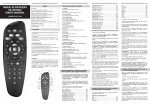
DRC-400
UNIVERSAL REMOTE CONTROL
Use ENTER/MUSIC to
display menu of digital
music channels, or to
enter channels on
some TV models.
Press POWER once to
turn on or offthe
selected home entertainment component.
Press HELP once to
display the help screen.
In the VCR and TV
modes, use the STOP,
PAUSE, PLAY, REW.,
RECORD, and F.FWD.
keys to control VCR. To
record a program, press
RECORD once.
Press MUTE once to
turn sound offor on.
Use PAGE (or
PAGE ) to page up
(or down) through
menu screens and the
program guide.
Use LOCK/PPV* to
restrict viewing of
selected programs or
to view the PPV menu.
Use EXIT to exit menu
or guide.
Use INFO to display
current channel and
program information.
In the CABLE mode,
press DAY> (or <DAY)
once to move the pro
gram guide ahead (or
back) 24 hours.
OVERVIEW
The Seaside Communications Universal
Remote Control will control up to four
devices, including your Digital Cable SetTop Box and most TVs and VCRs, and
auxiliary components.
INSTALLING BATTERIES
The DRC requires two fresh AA alkaline
batteries and easy programming to control
all functions of your Digital Cable Set-Top
Box, as well as all of the basic functions of
your other original remote controls.
For best results, please read and perform
all instructions listed here. Also, keep these
instructions for future reference.
FEATURES AND FUNCTIONS
Use the DRC mode keys (i.e.,AUX,VCR,
CABLE,or TV) to control a desired device.
When pressed, the selected mode key will
light,confirming your choice.Use the other
keys to perform desired actions (see the
following key chart).
NOTE: The selected mode will remain active
until you press another mode key.
Press AUX,VCR, CABLE,
or TV once to select a
home entertainment
component to control.
Use MENUto display
the main menu.
Use LAST to recall last
channel or go back one
screen in the menu.
In the CABLE mode,
press FAVORITE once
to display preset
favorite cable channels.
These functions are
set by your cable
system operator.
Use the keypad (0 ~ 9)
to directly select
channels (e.g., 09 or 31).
Press TV/VCR BYPASS
once to switch VCR to
view TV or tape (not
supported by all
applications).
-digit code for
your TV. If you perform this procedure correctly, the TV light will blink
three times.
NOTE: If you enter an invalid code, the
TV light will turn off. In that case,
repeat steps 2 through 4 with a valid
code.
5.
Aim the DRC at your TV and press
POWER once. The TV should turn
off. Ifi t does not respond, repeat
steps 2-4, trying each code listed for
your brand until you
the one
that operates your TV. If your TV
still does not work with the DRC, try
searching for the code (see Searching
For Your Code on the back side).
6.
Write your TV code in the boxes
below for future reference.
Setup Codes for TVs:
Use GUIDE to display
the program guide.
Use CHANNEL + (or
CHANNEL-) to select
the next higher (or
lower) channel.
Locate the code for your TV in Setup
Codes for TVs below. Brands are listed
in alphabetical order with the most
popular codes listed
NOTE: Remember, to use the DRC to operate
your TV, press TV first.
Use OK/SELECT* to
select menu options,
PPV events, and to
tune programs from
the program guide.
In TV or CABLE mode,
use VOLUME + (or
VOLUME -) to raise
(or lower) sound
volume.
4.
*NOTE: Functionality oft he LOCK/PPV
and SELECT /OK keys are dependent on the
software and the model of converter.
Use cursor keys to
move the cursor in the
program guide and
menu screens.
USER GUIDE
3.
1.
On the DRC’s back, pull back the battery cover and remove it.
2.
Obtain two (2) fully-charged AA
alkaline batteries. Match the +
and - marks on the batteries to the
+ and - marks in the battery case,
then insert the batteries.
3.
Push the battery cover back
into place.
4.
Test the unit by pressing POWER
and any mode key (e.g.,AUX,VCR,
CABLE, or TV). Ift he batteries are
inserted correctly, the selected mode
key will be lit.
NOTE: Removing the batteries WILL NOT
require you to reprogram your DRC. A selected
mode key will blink two times with each key
press when batteries need replacing.
PROGRAMMING TV CONTROL
1.
Turn on the TV.
2.
On the DRC, press and hold TV (at
least 6 seconds) until you see the programming mode start. Each mode
key light will turn offa nd on sequentially, starting with AUX on through
TV, and the sequence will repeat
twice. At this time,release TV and
wait until it’s lit continuously.
A-Mark
AOC
Abex
Admiral
Adventura
Aiko
Akai
Alaron
Ambassador
Ampro
Anam
Anam National
Archer
Astro Text
Audiovox
Baysonic
Belcor
Bell & Howell
Bradford
Brockwood
Broksonic
CCE
CXC
Candle
Carnivale
Carver
Celebrity
Cineral
Citizen
Clairtone
Concerto
Contec
Craig
Crosley
Crown
Curtis Mathes
Daewoo
Daytron
Denon
Dumont
Dwin
Dynatech
Electroband
Electrohome
0003
0030, 0019, 0003, 0052, 0137, 0185
0032
0093
0046
0092
0030, 0098
0179, 0183, 0216
0177
0751
0180, 0004, 0009, 0068
0055, 0161
0003
0379
0451, 0180, 0003, 0092, 0623
0180
0019
0154, 0016
0180
0019
0236, 0463, 0003
0217, 0329
0180
0030, 0056, 0046, 0186
0030
0054
0000
0451, 0092
0060, 0030, 0056, 0039, 0046, 0092,
0186, 0280
0185
0056
0180, 0157, 0158, 0185
0180, 0161
0054
0180, 0039
0047, 0054, 0154, 0051, 0451, 0093,
0060, 0030, 0145, 0056, 0016, 0039,
0166, 0466
0451, 0019, 0039, 0091, 0092, 0623,
0624
0019
0145
0017, 0019
0720, 0774
0049
0000, 0185
0381, 0389, 0409
Emerson
0154, 0236, 0463, 0180, 0282, 0178,
0019, 0179, 0039, 0038, 0158, 0177,
0181, 0182, 0183, 0185, 0270, 0280,
0623, 0624
Envision
0030
Fisher
0154, 0159
Fujitsu
0179
Funai
0180, 0179, 0171
Futuretech
0180
GE
0047, 0051, 0451, 0093, 0282, 0178,
0021, 0055, 0027, 0029, 0135, 0174,
0251, 0279
Gibralter
0017, 0030, 0019
GoldStar
0030, 0178, 0019, 0056, 0001, 0002,
0032, 0106, 0409
Gradiente
0053, 0056, 0392
Grunpy
0180, 0179
Hallmark
0178
Harley Davidson 0179
Harman/Kardon 0054, 0078
Harvard
0180, 0068
Hitachi
0145, 0056, 0032, 0038, 0097, 0151,
0279, 0409,0413
0054
Inteq
0017
JBL
0054
JCB
0000
JVC
0053, 0036, 0069, 0160, 0169, 0182
Janeil
0046
KEC
0180
KMC
0106
KTV
0180, 0030, 0039, 0183, 0185, 0217,
0280
Kamp
0216
Kawasho
0158, 0216, 0308
Kaypani
0052
Kenwood
0030, 0019
Kloss
0024, 0046, 0078
LG
0056
LXI
0047, 0054, 0154, 0156, 0178, 0148
Logik
0016
Luxman
0056
MEI
0185
MGA
0150, 0030, 0178, 0019, 0155
MTC
0060, 0030, 0019, 0056, 0049, 0091,
0185, 0216
0054, 0030, 0179, 0020, 0024, 0028,
Magnavox
0036, 0096, 0186, 0187, 0230, 0386
Majestic
0016, 0015
Marantz
0054, 0030
Matsushita
0250
Megatron
0178, 0145, 0003
Memorex
0154, 0250, 0150, 0178, 0056, 0016,
0106
Midland
0047, 0017, 0051, 0039, 0032, 0135
Minutz
0021
Mitsubishi
0093, 0150, 0178, 0019, 0014, 0098,
0155, 0331, 0358
Motorola
0093, 0055
Multitech
0180, 0049, 0217
NAD
0156, 0178, 0166
NEC
0030, 0019, 0056, 0036, 0497
NTC
0092
Nikko
0030, 0178, 0092
Noblex
0430
Noshi
0018
Onwa
0180
Optimus
0154, 0250, 0166
Optonica
0093, 0165
Orion
0236, 0463, 0179
Panasonic
0051, 0250, 0055, 0162, 0226
Penney
0047, 0156, 0051, 0060, 0030, 0178,
0021, 0019, 0018, 0056, 0039, 0002,
0003, 0027, 0032, 0110, 0135
Philco
0054, 0463, 0030, 0145, 0019, 0020,
0028, 0096
Philips
0054
Pilot
0030, 0019, 0039
Pioneer
0038, 0166
Portland
0019, 0039, 0092
Prism
0051
Proscan
0047
Proton
0178, 0003, 0031, 0052, 0466
Pulsar
0017, 0019
Quasar
0051, 0250, 0165, 0055, 0219
RCA
0047, 0051, 0093, 0019, 0018, 0029,
0038, 0090, 0135, 0174, 0278
Radio Shack
0047, 0154, 0165, 0180, 0030, 0178,
0019, 0056, 0039, 0032, 0409
0154, 0165, 0180, 0030, 0178, 0019,
0056, 0039, 0032
Rhapsody
0183, 0185, 0216
Runco
0017, 0030, 0251, 0497, 0603
SSS
0180, 0019
Sampo
0030, 0039, 0032, 0052, 0110
Samsung
0060, 0030, 0178, 0019, 0056, 0032,
0329, 0427, 0482
Samsux
0039
Sansei
0451
Sansui
0463
Sanyo
0154, 0146, 0159, 0484
Scimitsu
0019
Scotch
0178
Scott
0236, 0180, 0178, 0019, 0179
Sears
0047, 0054, 0154, 0156, 0178, 0179,
0056, 0015, 0146, 0148, 0159, 0168,
0171, 0281
Semivox
0180
Semp
0156
Sharp
0093, 0165, 0039, 0153, 0157, 0281,
0386, 0491
Shogun
0019
Signature
0016
Simpson
0186, 0187
Sony
0000, 0011, 0080, 0111
Soundesign
0180, 0178, 0179, 0186
Spectricon
0003, 0137
Squareview
0171
Starlite
0180
Supre-Macy
0046
Supreme
0000
Sylvania
0054, 0030, 0020, 0028, 0065, 0096,
0381
Symphonic
0171
TMK
0178, 0056, 0177
Tandy
0093
Tatung
0055, 0003, 0049, 0396
Technics
0051, 0250
Technol Ace
0179
Technovox
0007
Techwood
0051, 0056, 0003
Teknika
0054, 0180, 0150, 0060, 0019, 0179,
0056, 0016, 0039, 0092, 0186, 0312
Telefunken
0056
Tera
0031
Toshiba
0154, 0156, 0060, 0036
Tosonic
0185
Totevision
0039
Trical
0157
Universal
0027
Vector Research 0030
Victor
0053
Video Concepts 0098
Vidikron
0054, 0242
Vidtech
0178, 0019, 0036
Viking
0046, 0312
Wards
0054, 0165, 0030, 0178, 0021, 0019,
0179, 0056, 0016, 0020, 0027, 0028,
0029, 0080, 0096, 0111, 0174
White Westinghouse 0623, 0624
Yamaha
0030, 0019
Zenith
0017, 0016, 0092
Zonda
0003
3.
Realistic
PROGRAMMING VCR CONTROL
1.
Turn on your VCR and insert a video
cassette.
2.
On the DRC, press and hold VCR (at
least 6 seconds) until you see the
programming mode start.Each of
the mode key lights will turn off and
on sequentially,starting with AUX
on through TV, and the sequence will
repeat twice. During this time, release
VCR and wait until it’s lit
continuously.
Locate your VCR brand in the
SETUP CODES FOR VCRs below.
Brands are listed in alphabetical
order with the most popular codes
listed
-digit VCR code
for your VCR. If you perform this
procedure correctly, the VCR light
will blink three times.
NOTE: If you enter an invalid code, the
VCR light will turn off. In that case,
repeat steps 2 through 4 with a valid
code.
5.
Aim the DRC at your TV and and
press POWER once.Your VCR should
turn off. If your VCR remote control
does not have a POWER key, press
PLAY. Ifi t does not respond, repeat
steps 2-4, trying each code listed for
the one
your brand until you
that operates your VCR. If your VCR
still does not work with the DRC, try
searching for the code (see Searching
For Your Code on the back side).
6.
Write your VCR code in the boxes
below for future reference.
NOTE: Remember, to use the DRC to operate
your VCR, press VCR first.
Setup Codes for VCRs:
Action
Admiral
Adventura
Aiko
Aiwa
Akai
American High
Asha
Audiovox
Beaumark
Bell & Howell
Broksonic
CCE
Calix
Canon
Capehart
Carver
Cineral
Citizen
Colt
Craig
Curtis Mathes
Cybernex
Daewoo
Daytron
Denon
Dynatech
Electrohome
Electrophonic
Emerex
Emerson
Fisher
Fuji
Funai
GE
Garrard
Go Video
GoldStar
Gradiente
Grundig
0317
0048
0000
0278
0037, 0000, 0307, 0468
0041, 0049, 0053, 0061, 0106, 0156,
0242
0035
0240
0037
0240
0104
0184, 0121, 0209, 0002, 0211, 0295,
0361, 0479
0072, 0278
0037
0035, 0102, 0167
0020
0081
0278
0037, 0278
0072
0037, 0047, 0240, 0072, 0271
0060, 0035, 0041, 0162
0240, 0051
0045, 0278, 0017, 0020, 0087, 0561
0020
0042
0000
0037
0037
0032
0037, 0184, 0000, 0121, 0043, 0209,
0002, 0278, 0036, 0061, 0068, 0088,
0208, 0211, 0212, 0294, 0295, 0361,
0479, 0510, 0561
0047, 0104, 0054, 0066
0035, 0033
0000
0060, 0035, 0048, 0240, 0065, 0202
0000
0232, 0279, 0350, 0432, 0526
0037, 0038, 0018, 0471, 0480
0000, 0008, 0408
0195
HI-Q
Harley Davidson
Harman/Kardon
Harwood
Headquarter
Hitachi
0047
0000
0081, 0038, 0075
0072, 0068
0046
0000, 0042, 0041, 0065, 0082, 0105,
0166, 0292, 0396
JVC
0067, 0041, 0008, 0206, 0207, 0384
Jensen
0041
KEC
0037, 0278
KLH
0072
Kenwood
0067, 0041, 0038, 0384
Kodak
0035, 0037
LXI
0037
Lloyd’s
0000, 0208
Logik
0072
MEI
0035
MGA
0240, 0043, 0061
MGN Technology 0240
MTC
0240, 0000
Magnasonic
0278
Magnavox
0035, 0039, 0081, 0000, 0149, 0103,
0110
Magnin
0240
Marantz
0035, 0081
Marta
0037
Matsushita
0035, 0162, 0454
Memorex
0035, 0037, 0048, 0039, 0047, 0240,
0000, 0104, 0162, 0046, 0299, 0307
Minolta
0042, 0105
Mitsubishi
0048, 0067, 0043, 0061, 0075, 0173,
0214, 0242,0443
Motorola
0035, 0048
Multitech
0000, 0072
NAD
0058
NEC
0104, 0067, 0041, 0038, 0040, 0050,
0082
Nikko
0037
Nikon
0034, 0253
Noblex
0240
Olympus
0035, 0226
Optimus
0037, 0048, 0104, 0162, 0058, 0432,
0454
Optonica
0062
Orion
0184, 0002, 0295, 0479
Panasonic
0035, 0162, 0077, 0102, 0225, 0226,
0227, 0246, 0378, 0454
Penney
0035, 0037, 0240, 0042, 0038, 0040,
0054
Pentax
0042, 0065, 0105
Philco
0035, 0209, 0479
Philips
0035, 0081, 0062, 0110, 0403
Pilot
0037
Pioneer
0067, 0058, 0168
Portland
0020
Profitronic
0240
Proscan
0060, 0202
Protec
0072
Pulsar
0039, 0051
Quarter
0046
Quartz
0046, 0155
Quasar
0035, 0162, 0077, 0454
RCA
0060, 0035, 0048, 0240, 0042, 0149,
0065, 0077, 0105, 0106, 0202, 0277
Radio Shack
0000
Radix
0037
Randex
0037
Realistic
0035, 0037, 0048, 0047, 0000, 0104,
0062, 0046, 0066
Ricoh
0034, 0253
Runco
0039
STS
0042
Salora
0075
Samsung
0240, 0045, 0051, 0053
Sanky
0048, 0039
Sansui
0000, 0067, 0041, 0082, 0271, 0479
Sanyo
0047, 0240, 0104, 0046
Scott
0184, 0045, 0121, 0043, 0210, 0211,
0212
Sears
0035, 0037, 0047, 0000, 0042, 0104,
0046, 0054, 0057, 0066, 0105
Semp
0045
Sharp
0048, 0062
Shintom
0072
Shogun
0240, 0051
Singer
0072
continued on back side...
TV/VCR combo does not
respond properly.
PROGRAMMING VCR CONTROL
Setup Codes for VCRs (continued):
Sony
0035, 0032, 0000, 0033, 0034, 0011,
0253
Sunpak
0253
Sylvania
0035, 0081, 0000, 0043, 0103, 0110
Symphonic
0000
TMK
0240, 0036, 0208
Tatung
0041
Teac
0000, 0041
Technics
0035, 0162, 0246
Teknika
0035, 0037, 0000, 0052
0000
Toshiba
0045, 0043, 0057, 0066, 0210, 0212,
0366
Totevision
0037, 0240
Unitech
0240
Vector
0045
Vector Research 0038, 0040
Video Concepts 0045, 0040, 0061, 0221
Videosonic
0240
Wards
0060, 0035, 0048, 0047, 0081, 0240,
0000, 0042, 0072, 0149, 0062, 0212
White Westinghouse 0278
XR-1000
0035, 0000, 0072
Yamaha
0038
Zenith
0039, 0000, 0033, 0034
0002, 0479 (for TV use 0463)
0278
0072
0035 (for TV use 0051)
0278 (for TV use 0624)
0002, 0278 (for TV use 624),
0479 (for TV use 0463)
Funai
0000
GE
0240, 0035 (for TV use 0051),
0048 (for TV use 0093),
0060 (for TV use 0047)
Goldstar
0037 (for TV use 0056)
Harley Davidson 0000
Hitachi
0000
Lloyds
0000
Magnasonic
0278
Magnavox
0000, 0081 (for TV use 0054)
Magnin
0240
Memorex
0037
MGA
0240
Mitsubishi
0048 (for TV use 0093)
Orion
0002, 0479 (for TV use 0463)
Panasonic
0035 (for TV use 0051)
Radio Shack
0037
RCA
0240, 0035 (for TV use 0051),
0060 (for TV use 0047),
0048 (for TV use 0093)
Sansui
0000, 0240, 0479 (for TV use 0463)
Sanyo
0240
Sears
0000, 0037 (for TV use 0056)
Sharp
0048 (for TV use 0093)
Sony
0000, 0032 (for TV use 0000)
Sylvania
0081 (for TV use 0054)
Symphonic
0000
0000
White Westinghouse 0278 (for TV use 0624)
Zenith
0000, 0479
When you received your DRC remote control, it was already programmed to operate
your GI Cable Converter. However, if you
want to control a DBS receiver or a erent
Cable Converter, perform the following
instructions (otherwise skip to the next
topic):
1.
Turn on the Cable Converter or DBS
Receiver.
2.
On the DRC, press and hold CABLE
(at least 6 seconds) until you see the
programming mode start. Each of
the mode key lights will tu
on sequentially, starting with AUX
on through TV, and the sequence
will repeat twice. During this time,
release CABLE and wait until it’s lit
continuously.
3.
Brocksonic
Citizen
Colt
Curtis Mathes
Daewoo
Emerson
NOTE: Some TV/VCR Combo codes may require
a separate TV code to control volume. Check the
codes above and follow the instructions in the
“Programming TV Control”section (on the front
side) using the supplied TV
TV code listed for your TV/VCR Combo’s operating code, you will need to use the volume
control capabilities of your General Instrument
Cable Converter.
Locate your Cable Converter or DBS
brand in theSETUP CODES FOR
CABLE CONVERTERsor SETUP
CODES FOR DBSsbelow. Brands are
listed in alphabetical order with the
most popular codes listed
To program the DRC to control an auxiliary
component (e.g., a second TV or VCR, a GI
DBS Receiver, or Digital Audio Tuner):
1.
2.
3.
4.
-digit code for
your Cable Converter or DBS.If
you perform this procedure correctly, the CABLE light will blink three
times.
6.
Aim the DRC at your Cable Converter
or DBS Receiver and and press
POWER once.Your Cable Converter
or DBS
does not respond, repeat steps 2-4,
trying each code listed for your
the one that
brand until you
operates your Cable Converter or
DBS Receiver. If your unit still does
not work with the DRC, try searching
for the code (seeSearching For Your
Code).
Write down the Cable Converter or
DBS Receiver code in the boxes
below for future reference.
NOTE: Remember, to use your DRC to operate
your Cable Converter or DBS Receiver, press
CABLE
General Instrument 0000, 0001, 0002, 0003, 0004, 0005,
0006, 0008
Tocom
0005, 0007
General Instrument 0100, 0101, 0102, 0103, 0104, 0105,
0106, 0107
Primestar
0100, 0101, 0102, 0103
On the DRC, press and hold AUX (at
least 6 seconds) until you see the
programming mode start. Each of
the mode key lights will tu
on sequentially, starting with AUX
on through TV, and the sequence
will repeat twice. During this time,
release AUX and wait until it’s lit
continuously.
Locate the brand in theSETUP
CODES listed for your type of auxiliary unit (e.g.,VCRs, TVs, Cable
Controllers, or DBS Receivers) or
audio service listed below. Brands
are listed in alphabetical order with
the most popular codes listed
NOTE: If you enter an invalid code, the
AUX light w
that case,
repeat steps 2 through 5 with a valid
code.
6.
Aim the DRC at your auxiliary component and press POWER once (or
CR
tape)
uxiliary component
does not respond, repeat steps 2-6,
trying each code listed for your
brand until you
the one that
operates your auxiliary component.
es not work with the DRC,
try searching for the code (see
Searching For Your Code).
7.
For exa
for your TV, you still cannot get the DRC to
operate your TV, then:
1.
Turn on your TV.
2.
On the DRC, press and hold TV (at
least 6 seconds) until you see the
programming mode start. Each of
d
the mode key lights will tu
on sequentially, starting with AUX
on through TV, and the sequence
will repeat twice. During this time,
release TV and wait until it’s lit continuously.
3.
Write down the auxiliary component type and its code in the spaces
below for future reference.
4.
5.
Press POWER
light on and
code has been sent.
Perfo
have set up your
nd out
which four-digit code is operating your
equipment.
out which code is
For example, to
operating your TV:
1.
Turn on your TV.
2.
On the DRC, press and hold TV (at
least 6 seconds) until you see the
mode light sequence start. Each of
the mode key lights will tu
on sequentially, starting with AUX
on through TV, and will repeat twice.
During the sequence, release the TV
key and wait until it stays lit continually.
three times.
4.
ey will
that an IR
If your television still does not turn
peat step 5 as many times as
needed until your TV tu
7.
When your
working code has been found. Press
OK once to save the code and the TV
key will blink three times, co rming
the selection.
To search for the codes of your other
components, repeat steps 1 through
7, but substitute the appropriate
device key (i.e.,VCR, CABLE, or
AUX) for the component you are
searching for.
Your new DRC is set to control volume of a
component through its associated mode
(i.e., through thecable in the Cable mode,
through theTV in the TV mode, and
through theauxiliary devicein the Aux.
mode). If your TV is not remote controllable, or if you would like the volume to be
controlled by a erent component, you
can change the Volume Lock setting to control a volume through a non associated
mode (e.g., through thecable in the TV
mode).
Changing the Volume Lock setting to the
Cable or TV mode will change the volume
control for all modes except Aux., which
will continue to control its own volume. If
you change the Volume Lock setting to the
Aux.mode, all modes (i.e.,Aux., Cable, and
TV) will be controlled by the Aux.mode.
NOTE
me controls will not operate if
Volume Lock is set to VCR mode.
ey will blink
To view the code fo
digit,
press and release 1. Count the number of TV key blinks (e.g., 3 blinks
= 3) and write down the number in
elow.
1.
NOTE
will not blink if
the code digit is a “0”.
If your television does not tu
press the UP cursor key once again
to call up the next IR code and press
POWER once again.
6.
8.
If you have set up the DRC using the
Searching For Your Codeprocedure, you
may need to
out which four-digit code
is operating your equipment.
Press the (UP) cursor key once to
start the search mode.
NOTE: In the search mode, the DRC will
send IR codes from its library to the
selected component, starting with the
en the component responds to a subsequent key
command (e.g., POWER), the correct
device code will be found.
Press AUX,VCR, CABLE, or TV once
to let the DRC know what type of
device you want to assign to the AUX
mode.
-digit code for
your auxiliary component. If you perform this procedure correctly, the
AUX light will blink three times.
NOTE: If you enter an invalid code,
the CABLElight w
steps 2 through 4 with a valid code.
5.
Turn on your auxiliary component
CR, insert a video cas(and
sette).
If your TV,VCR, Cable Converter or
Auxiliary Component does not respond to
listed
for your brand, or if your brand is not
listed at all, try searching for your code.
TV
2.
5.
6.
Repeat step 4 three more times for
each successive digit by pressing and
releasing 2, 3, and then 4. Finish
writing down the code in the boxes
above.
To check for the codes of your other
components, repeat steps 1 through
5, only substitute the appropriate
device key (i.e.,VCR, CABLE, or
AUX) for the component you are
checking.Write down the codes in
the boxes below.
4.
Now, whenever you press
VOLUME +,VOLUME-, or MUTE
on the DRC, volume will be controlled by your TV.
On the DRC, press and hold AUX (at
least 6 seconds) until you see the
programming mode start. Each of
the mode key lights will tu
on sequentially, starting with AUX
on through TV, and the sequence
will repeat twice. During this time,
release AUX and wait until it’s lit
continuously.
Use the VCR codes for
your brand. Some combo
units may require both a
TV code and a VCR code
for full operation.
Press and release VOLUME +.
CHANNEL+ ,
CHANNEL- , and LAST
do not work for your RCA
TV.
UX key light will blink three
times, indicating volume has been
locked to the AUX mode.
4.
1.
2.
Now, whenever you press
VOLUME +,VOLUME-, or MUTE
on the DRC, volume will be controlled by your Auxiliary Device.
On the DRC, press and hold a mode
key (at least 6 seconds) until you see
the programming mode start. Each
mode
and on
sequentially, starting with AUX on
through TV, and the sequence will
repeat twice.During this time, release
the mode key and wait until it’s lit
continuously.
Press and release VOLUME-.
ey light will blink three
times, indicating volume has been
unlocked for the selected mode.
4.
Now, whenever you press
VOLUME +,VOLUME-, or MUTE
on the DRC, the volume controls will
reset to their original device.
A mode key does not
blink or blinks 2 times
when you press a key.
1.
2.
On the DRC, press and hold CABLE
(at least 6 seconds) until you see the
programming mode start. Each of
the mode key lights will tu
on sequentially, starting with AUX
on through TV, and the sequence
will repeat twice. During this time,
release CABLE and wait until it’s lit
continuously.
Press and release VOLUME +.
CABLE key light will blink three
times, indicating volume has been
locked to the CABLE mode.
___________________
4.
General Instrument 0201, 0200
Scienti Atlanta 0202
2.
Press and release VOLUME +.
light will blink three
times, indicating volume has been
locked to the TV mode.
TYPE: __________________
NOTE: Remember, to use the DRC to operate
your auxiliary component, pressAUX
On the DRC, press and hold TV (at
least 6 seconds) until you see the
programming mode start. Each of
the mode key lights will tu
on sequentially, starting with AUX
on through TV, and the sequence
will repeat twice. During this time,
release TV and wait until it’s lit continuously.
1.
Now, whenever you press
VOLUME +,VOLUME-, or MUTE
on the DRC, volume will be controlled by your Cable Converter.
Replace the batteries with
two (2) new AA alkaline
batteries.
A mode key blinks when
you press a key, but home
entertainment component
does not respond.
Make sure the DRC is
aimed at your home
entertainment component
and is not farther than
15 feet away.
DRC does not control
home entertainment components or commands are
not working properly.
Try all listed codes for the
component brands being
set up. Make sure they
can be operated with an
infrared remote control.
No volume on a 2nd TV.
Follow instructions in
Changing Volume Lock.
Due to RCA design (19831987), only the original
remote control will operate these functions.
Changing channels does
not work properly.
If original remote control
required pressing ENTER
to change channels, press
ENTER on the DRC
channel number.
ADDITIONAL INFORMATION
Incase of malfunction, return remote
control to Seaside Communications for
replacement.