1
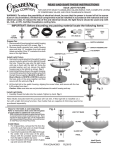
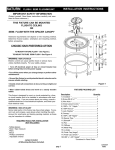
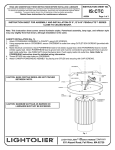
Installation Instructions
Disconnect power at main electrical panel before installation.
Thread the mounting Screws(A) into the opposite side of the Mounting Strap(B) from the GREEN ground
Screw(C).
3. Insert the fixture wire and the ground wire up through the center hole of Mounting Strap (B).
4. Split the end of power supply wire about 4 inches from the end. Being careful not to expose any of the wire
inside of the insulation.
5. Connect the white or ribbed wire from the fixture to the white wire of the supply circuit. Connect the black or
smooth wire(s) from the fixture to the black wire of the supply circuit. (Use wirenuts provided)
6. Connect the Fixture Ground Wire(E) to the Outlet Box Ground Wire(F) using wire Nut. Connect outlet box
ground wire to mounting plate with GREEN hex-head ground screw to tapped hole in mounting plate marked
”GND”. (Use wirenuts provided)
7. Attach Mounting Strap (B) to Outlet Box(H) using box Screws(I) provided with Outlet Box(H).
8. Thread Hex Nut (J) onto mounting Screws(A).
9. Mount fixture by aligning mounting Holes(K) in Canopy (M) with mounting Screws(A) and threading Ball
Nuts(L) onto mounting Screws(A). Tighten to firmly hold Canopy(M) in place against wall (mounting screws
may require adjustment).
1.
2.
Assembly Instructions
This lamp uses two (2) 75-watt
maximum Type A bulbs (Not included).
Cleaning Instructions
Do not use polish or cleaners.
Wipe clean with a soft cloth.
1. Thread the Nipple ( P ) to Bottom Coupler (N) then screw the Hex Nut(O) until tight. (Nipple may
require adjustment)
2. Attach the Tube (Q), Metal Cap ( R ) , Glass Cap(S), Glass (T) and Washer (U) then secure by Hex
Nut( V).
3. Attach the Cap (W) to the Glass (T) and secure by Finial(X).
4. Install the light bulb (not provided) in accordance with the fixture specification.
5. Restore electricity and check the operation of your new light fixture.
33161
Typical Assembly Time: 15 minutes