1
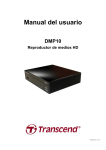
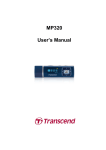
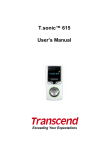
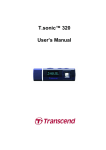
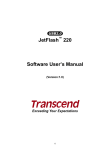
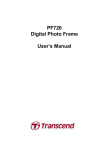
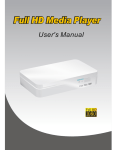
User’s Manual
DMP10
HD Media Player
Version 1.0
Table of Contents
Introduction︱
︱ .........................................................................................................................2
Package Contents︱
︱ ...............................................................................................................2
Features︱
︱ ...............................................................................................................................2
︱..............................................................................................................3
Safety Precautions︱
General Use .............................................................................................................................. 3
Backing Up Data....................................................................................................................... 3
Getting Started︱
︱ ....................................................................................................................4
Set Up........................................................................................................................................ 4
Controls .................................................................................................................................... 6
Connecting a USB Flash Drive or USB Hard Drive ................................................................ 7
Locating Movies, Photos, and Music files .............................................................................. 7
︱ .......................................................................................................................10
Setup Menu︱
Audio Settings........................................................................................................................ 10
Video Settings ........................................................................................................................ 12
System Settings ..................................................................................................................... 15
Misc. Settings ......................................................................................................................... 18
Browser Screen︱
︱ ................................................................................................................22
Specifications︱
︱ ...................................................................................................................29
Ordering Information︱
︱ ........................................................................................................29
Transcend Limited Warranty︱
︱ ...........................................................................................30
Introduction︱
Congratulations on purchasing Transcend’s DMP10 HD (High Definition) HD Media Player. Transcend’s
DMP10 features high-resolution digital video and audio output that provides an incredible multimedia
entertainment experience. Now you can playback home videos or high definition movies easily on your living
room TV without having to connect a computer! The DMP10 has two high-speed USB ports for external hard
drives or USB flash drives for easy plug-and-play file browsing and playback.
Package Contents︱
Upon purchasing your Transcend HD Media Player, please make sure each of the following is included:
HD Media Player
Remote control
AAA Battery
Power Adapter
Composite Cable
Analog Audio Cable
User’s Manual CD
Quick Start Guide
Warranty Card
Features︱
HDMI 1.3 and S/PDIF output delivers an incredible all-digital entertainment experience
FullHD 1920x1080 video playback with H.264/AVC, VC-1, MPEG1/2/4, Xvid, and DivX decoding
1080p 24Hz display mode for smooth 24fps movie playback
Supports popular HD file formats: MKV / AVI / WMV / RMVB / M2TS
Multi-language subtitle and audio track switching
Full-screen 4:3, Letterbox, and 16:9 aspect ratio modes
Display photo slideshows with background music
Two USB 2.0 ports for USB hard drives and flash drives
Compatible with new high-capacity USB hard drives
Colorful user-friendly menus and wireless remote control
2
Safety Precautions︱
These usage and safety guidelines are IMPORTANT! Please follow them carefully to ensure your own
personal safety and help protect your HD Media Player from potential damage.
General Use
•
For indoor use only.
•
Avoid using or storing the HD Media Player in an extreme temperature environment.
•
Never allow the HD Media Player to come in contact with water or any other liquids.
•
Do not use this product in environments with strong magnetic fields or excessive vibration.
•
Only use the Transcend provided AC adapter with the HD Media Player. Use of other adapters
may cause fire or explosion.
•
Never cover or seal any of the holes on the HD Media Player.
•
Unplug the HD Media Player if you do not plan to use for an extended period of time. This
prevents accidental damage or corrosion.
Backing Up Data
Transcend does NOT take any responsibility for data loss or damage during operation. If you
plan to plug USB flash drive or USB hard drive into HD Media Player, we strongly advise that you first
backup the data in those storage devices to a computer or other storage medium before using them
in HD Media Player.
3
Getting Started︱
A
B
C
D
E
F
G
H
I
Front USB Port
USB Status LED
Power LED
Stereo Audio Output
Composite Video Output
Optical S/PDIF Digital Audio Out
HDMI Digital Video/Audio Output
Rear USB Port
DC Power Input
Set Up
1. Use an HDMI cable to connect the HD Media Player to your TV/monitor or home theater receiver
(AVR).
Note:
• If your home theater receiver does not support HDMI audio, please use an optical S/PDIF (Toslink)
cable to connect the HD Media Player to your audio system (Connection Method #3)
• Older TVs that do not have an HDMI port can be connected via the included Composite Video Cable
(Connection Method #4)
4
Connection Method #1:
HD Media Player →→→→→→→→→→→→→→→ TV
HDMI
*Recommended Audio Setting: Setup>Audio>Digital Output>“HDMI LPCM 2CH”
Connection Method #2:
HD Media Player →→→→→→ AVR →→→→→→ TV
HDMI
HDMI
*Recommended Audio Setting: Setup>Audio>Digital Output> “HDMI RAW (bistream)”
Connection Method #3:
HD Media Player
→→→→→→→→→→→→→→ TV
HDMI
→→→→→→→→→→→→→→ Surround Sound Receiver
Optical
*Recommended Audio Setting: Setup>Audio>Digital Output>“S/PDIF RAW (bistream)”
Connection Method #4 (for older TVs)
HD Media Player
→→→→→→→→→→→→→→ TV
Composite Video
→→→→→→→→→→→→→→ TV
Stereo (L/R) Audio
*Recommended Video Setting: Setup>Video>Display Format/Resolution>“NTSC” or “PAL”
2. Plug the Power Adapter cord into the DC 5V power input jack on your HD Media Player and plug it
into your home’s AC outlet.
3. The HD Media Player will automatically turn on and the power status LED will light up. If it is already
plugged in, press the
button on the remote control.
4. The first time you turn on the HD Media Player, you will be prompted to set the menu interface
language. Use the UP and DOWN buttons on the remote to select your desired menu language and
press OK.
5
Controls
Use the included remote control to operate the HD Media Player. To navigate the HD Media Player’s
on-screen menus, press the UP, DOWN, LEFT, or RIGHT keys to highlight a function and click OK to play,
access or confirm. Press BACK
Note:
Always aim the remote directly at the front of the player and ensure no obstacles in the way
POWER: Turn the HD Media Player on and off.
HOME: Go back to the Home Menu.
MOVIES: Browse storage device for video files.
PHOTOS: Browse storage device for image files.
MUSIC: Browse storage device for music files.
PLAY: Play movies, photos, and music.
STOP: Stop playback.
PAUSE: Pause movies, photos, and music.
REWIND: Rewind the current playback. Press
repeatedly to select faster rewind speeds.
FAST FORWARD: Increases the playback
speed. Press repeatedly to select faster speeds.
PREVIOUS: Return to the previous file when
playing music, viewing pictures, watching a
video, or to the previous chapter in a movie.
NEXT: Go to the next file when playing music,
viewing pictures, watching a video, or to the next
chapter in a movie.
REPEAT: Select the repeat mode for slide show
and music playback
DISPLAY OUTPUT MODE: Change the output
resolutions and refresh rate to match your TV.
SETUP: Go to the Setup Menu.
INFO: Displays detailed information about the
currently displayed video or photo. Press again
to close the Info window.
DVD MENU / LIST MODE:
Switch list view and thumbnail view when
browsing for Photos
Open the title menu of a DVD iso file.
6
ZOOM: Zoom in or out when playing movies or
pictures. Press repeatedly to change zoom
levels.
Video Zoom levels: 2x, 3x, 4x, 8x
Photo Zoom levels: 2x, 4x, 8x, 16x
RETURN: Go back to the previous menu
AUDIO LANGUAGE: Press to activate available
audio tracks when playing a video file.
SUBTITLES: Press to display the subtitles menu
when playing a video file.
MUTE: Press to mute audio output; press again
to resume audio.
VOLUME UP: Press to increase volume.
VOLUME DOWN: Press to decrease volume.
Connecting a USB Flash Drive or USB Hard Drive
1. Insert your USB storage device into one of the two USB ports on the HD Media Player.
2. Once a USB device is plugged in, the HD Media Player will automatically scan and mount your USB
device. The USB status LED will light up when your USB device is successfully mounted.
Note: Never plug two USB hard drives into the HD Media Player at the same time (unless
the second drive is an externally powered 3.5" hard drive).
Locating Movies, Photos, and Music files
Once you connect a USB storage device, you can use the HD Media Player to browse the contents of the
drive and search for multimedia files to play on your TV.
From the Home menu:
7
Choose Movies and click OK key to browse the USB storage device using the Movies filter. Only compatible
movie files will be displayed.
Choose Photos to browse the USB storage device using the Photos filter. Only compatible image files will
be displayed.
8
Choose Music to browse the USB storage device using the Music Filter. Only compatible audio files will be
displayed.
Choose Browse to search the USB storage device for all available files, with no filters enabled.
9
Setup Menu︱
The Setup menu allows you to configure audio, video, system, slideshow, language and playback settings.
To open the Setup menu, press
or from the Home menu, use the
buttons to select the “Setup” icon
and click OK.
When in the Setup menu, use the
Video, System, and Misc. Use the
and
keys to switch between the four settings menus—Audio,
and
buttons to select the item you want to adjust and press
OK to display available options for the selected item.
Audio Settings
Night Mode
This function reduces the maximum dynamic audio rage. Night mode can be used to avoid
disturbing others when watching movies or listening to music at night.
Off: Audio will be played with the full dynamic range of the source material
On: Low bass frequencies will be attenuated
Comfort: Advanced dynamic range compression that raises the volume for quiet
passages (such as dialog-only scenes) and lowers the volume for loud content (such as
explosions or action sequences)
10
Digital Output
This setting allows you to change the output format of the HD Media Player’s HDMI and SPDIF
(Optical) digital audio connections.
HDMI LPCM 2CH: All audio formats will be decoded internally and output through the
HDMI port as 2-channel audio. If you do not have a surround-sound speaker system
and are connecting the HD Media Player directly to your TV via HDMI, this is the
preferred setting.
HDMI Passthrough: Use this setting if connecting the HD Media Player to an
HDMI-equipped multi-channel home theater receiver (AVR). In this mode, the raw
bitstream audio will be sent to the receiver to be decoded externally. This will provide
optimal sound quality when playing content that contains multichannel audio tracks
such as DTS or Dolby Digital.
S/PDIF LPCM 2CH: All audio formats will be decoded internally and output through the
SPDIF optical port as 2-channel audio. If your home stereo system or TV has SPDIF
input but is not able to decode certain formats, this is the preferred setting.
S/PDIF Passthrough: Choose this setting if connecting the HD Media Player to a multi
-channel surround sound system that has optical input but not HDMI. In this mode, the
raw bitstream audio will be sent to the receiver to be decoded externally. This will
provide optimal sound quality when playing content that contains multichannel audio
11
tracks such as DTS or Dolby Digital.
Video Settings
Aspect Ratio
This function adjusts the way movie content is displayed on your TV screen.
Pan & Scan 4:3: Select if connecting the HD Media Player to an older non-widescreen
TV. In this mode, 4:3 aspect ratio non-widescreen video content will fill the entire screen.
Note: when watching High definition widescreen content in this mode, the extreme left
and right portions of the image will be cut off.
Letterbox 4:3: Select if connecting the HD Media Player to an older non-widescreen TV.
In this mode, widescreen video content will be displayed with two black borders on the
top and bottom of the screen.
Widescreen 16:9: Select when a 16:9 widescreen TV is connected. (Recommended for
best image quality)
Brightness
Adjusts the brightness of the displayed image. Use this control if the black level is too high (black
appears washed out) or too low (black appears crushed or overly-dark).
12
Contrast
Adjusts the contrast of the displayed image. Use this control if the white level is too high (white
highlights are not visible) or too low (image appears flat or too dim).
Digital Noise Reduction
Use this setting to turn Digital Noise Reduction on and off. If your TV already has this feature, we
recommend you leave this setting to Off.
13
Display Resolution
To experience the full benefit and clarity of Full HD 1080p video content, you need to select the
correct output setting for your TV. Most newer TVs are capable of displaying 1080p 60Hz or 50Hz,
which will provide the best image quality when watching Full HD movies or displaying
high-resolution picture slideshows.
HDMI Auto
NTSC: For Composite Video output on North American standard (480i) televisions
PAL: For Composite Video output on European standard (576i) televisions
480P
576P
720 50Hz
720 60Hz
1080i 50Hz
1080i 60Hz
1080p 50Hz
1080p 60Hz
1080p 24Hz
This function will enable 1920x1080 24Hz output display to your TV. Turn this feature on for smooth playback
of 24fps video content such as Bluray movie files.
14
System Settings
Menu Language
Change the language of the HD Media Player’s OSD (On Screen Display).
select a language. Press OK to confirm.
English
繁體中文
Español
Français
Deutsch
简体中文
日本語
Italiano
한한한
Nederlands
15
Use the UP and DOWN keys to
Text Encoding
Select this option to choose the text encoding language that best matches the text of your file names and
subtitles. Tip: you can also change the text encoding while watching a movie by pressing the
Unicode (UTF8)
简体中文 (GBK)
繁體中文 (BIG5)
Western
Turkish
Central European
Greek
Cyrillic
Hebrew
SE European
button.
System Update
Transcend occasionally releases new firmware updates for its products. Firmware updates can include bug
fixes, compatibility improvements and even new features.
How to use System Update:
1. Download the latest firmware file from www.transcend.com.tw/downloads
16
2. Copy the “install.img” update file to a USB flash drive or hard drive
3. Connect your USB storage device to the HD Media Player
4. Select System Upgrade to begin the software upgrade process
Caution: NEVER disconnect the power cord or remove any storage devices while the
firmware is being upgraded. If firmware upgrade fails and your HD Media Player will not turn
on, please contact Transcend customer support.
Firmware Version
Select this option to display the Firmware Version currently installed in the HD Media Player.
Restore Default
This option will restore the HD Media Player’s settings to factory defaults.
To use System Restore:
1. Highlight “OK” and press the OK button
2. A confirmation message will appear.
3. Select CONFIRM and click OK
4. After reverting the player to its factory default state, the language selection screen will appear.
5. Choose your desired language to start using the HD Media Player
17
Misc. Settings
Resume Play
When this option is enabled, the HD Media Player will remember the playback position of movie files when
you stop the movie before the end of the file has been reached.
To use the Resume Play function:
1. Browse to a move that you have previously opened and press OK or
.
2. A “Resume Playback” message will appear.
3. Select CONFIRM to continue watching the movie from the point the movie was stopped at the last
time the file was opened
4. Select CANCEL to start the movie from the beginning
18
Slideshow Timing
Adjust the amount of time each picture stays on the screen when displaying a slideshow.
2 Seconds
5 Seconds
10 Seconds
30 Seconds
1 Minute
2 Minutes
Slideshow Effects
Change the way the screen transitions between each photo when displaying a slideshow.
Cross Fade: Displayed image fades out, next image fades in
Left to Right: Standard left to right screen wipe
Top to Bottom: Screen wipe from top to bottom
Waterfall: New image descends onto the screen like a waterfall
Snake: Horizontal interleaved lines cross in the middle of the screen
Dissolve: Small particles dissolve the current image and gradually display the next one
Diagonal: Screen wipe from top left to bottom right
All Effect Shuffle: Randomly switch between all available effects
19
Background Music
Enable or disable background music while viewing photos.
Note:
Music files must be stored in the same folder as the slideshow images.
Screen Saver
This option enables and disabled the screen saver. When set to On, the screen saver will
automatically start after a few minutes of inactivity.
Movie Preview
This option lets you turn off the movie preview function when browsing a USB storage device for
video files. Browsing will be faster when Movie Preview is set to “Off.”
20
21
Browser Screen︱
The Browser allows you explore the contents of your USB storage device(s) to locate movies,
photos, and music files to play. The Browser will open when you choose “Movies”, “Photos”,
“Music”, or “Browse” from the Home menu, or when you press the
,
,
shortcut buttons
on the remote.
Filters
To make it easier to locate certain types of media files, there are four browsing filters:
All: Displays all types of media files at the same time.
Movies: Only shows movie type files
Photos: Only shows photo type files
Music: Only shows music type files
Whether you choose Movies, Photos or Music, once you enter the Browser mode you can use the
and
keys at any time to switch to a different filter (or press the
,
,
shortcut buttons
on the remote).
Browse All
All directories and supported contents will be displayed. Use the
and
keys to select
the folder or file you wish to open, and press OK key to see the contents of the folder or play the
selected file.
Movies
Selecting Movies (
) will apply the movie filter, which means only video-type files will be displayed when you
browse the contents of your USB storage device. Use the
and
keys to select the folder you want to
open or movie you want to play. When you highlight a compatible movie file, a preview of the movie will begin to
22
play on the right side of the screen (to disable the preview function, use the Setup menu). Press OK or
to
play the movie in full screen.
In-movie Controls
Play / Pause / Frame Step / Stop
Play: Click
or OK buttons on the remote control to play a highlighted movie file
Pause: Click
Frame Step: When paused, press the
to pause the video, and press
to continue.
button repeatedly to advance forward
frame-by-frame
Stop: No matter what type of file is playing, clicking the
button will stop and close
the currently playing video. The Browser will reappear, showing the location of the file
that was just played.
Fast Forward / Rewind
The
and
buttons adjust playback speed so you can skip to an earlier or later part of the
currently playing movie or song. Clicking these buttons repeatedly increases or decreases the
speed to the next level of intensity. To return to normal playback speed, keep pressing the same
button until 1x speed is reached or simply press
.
Fast Forward speed levels: 1.5x, 2x, 4x, 8x, 16x, 32x, 1x
Rewind speed levels: -1x, -1.5x, -2x, -4x, -8x, -16x, -32x, -1x
23
Next / Previous
When playing a DVD file, press
to advance to the next chapter, and press
to go back to the
previous chapter.
For all other video files that do not contain chapter positions, pressing the
go to the next file, or press
button two times to
two times to go back to the previous file in the folder.
Zoom & Pan
While a movie is playing, clicking the
While zoomed in, use the
/
button on the remote will zoom the video image larger.
/
/
keys to pan around the image.
The zoom magnification sequence is 2x, 3x, 4x, 8x, and 1x. Continue pressing the
button
repeatedly to increase the amount of zoom and eventually return to 1x screen size.
Note: The small zoom location display window that is shown when viewing photos will not appear when zooming in movies.
DVD Menu
When playing a full DVD ISO, click the
/
button to open the DVD menu. Use the
/
/
and OK buttons to navigate the menu.
Audio Language
Some movie files contain multiple language or special commentary audio tracks. When playing a
movie, click the
button to select from different available audio tracks. Some files have 5.1 and
2.0 audio tracks. If you connected the HD Media Player to a surround-sound home theater audio
system, use the
button to switch to the high-quality DTS or Dolby Digital audio track (if
available).
Subtitles Menu
The HD Media Player is capable of displaying many different subtitle formats and languages. When
a movie is playing, click the
button to display the Subtitles menu. Use the
/
buttons
to select on option and press OK to adjust its setting.
Language: Select an available subtitle language or turn subtitles off
Text Encoding: Adjust this setting if subtitle text characters are displayed incorrectly
Time Sync: If subtitles appear out of sync with the movie video and dialog, use this
setting to adjust the subtitle speed in 100ms increments
Color: Change the color of the subtitles on the screen
Size: Adjust the text size of the subtitles
Offset: Change the vertical location of the subtitles on the screen.
24
Note:
To display external (non-embedded) subtitles such as SRT, or SSA, the name of the subtitle file
must match the video filename and be placed in the same folder of the movie you want to play.
For example, if the movie file is “The Great Adventure-1080p.mkv”, the subtitle file should be
named “The Great Adventure-1080p.srt”
Supported subtitle file types are:
Embedded Subtitles (if available within the movie file)
SubRip (.srt)
MicroDVD (.sub)
VobSub (.idx + .sub)
SAMI (.smi)
Advanced SubStation Alpha (.ass)
SubStation Alpha (.ssa)
Video File Information
When playing a video in full screen, click the
button on the remote control to view information
about the currently playing video file. Press the
button again to reveal more technical details
about the file, and press it once more to close the information window.
Photos
Selecting Photos (
) will apply the Photo filter, which means only image-type files will be
displayed when you browse the contents of your USB storage device. Use the
and
keys
to select the folder you want to open or photo you want to view. When you highlight an image file, a
to view the image
preview will be displayed on the right hand side of the screen. Press OK or
in full screen. If the Slideshow Timing is enabled in the Setup menu, a slideshow of all available
photos in the current folder on your USB storage device will be played.
25
Tip:
• To enable automatic slideshow playback, press and select Misc>Slideshow Timing
• You can view photos while playing MP3 music at the same time
• If there are music files in the same folder as the pictures you are viewing, music will auto play during
full-screen slideshow playback (this function can be set in Setup>Misc>Background Music).
Thumbnail View
When browsing through pictures with the Photo browse mode, press the
control to change to thumbnail view. Use the
click OK to display it in full-screen. Press
simply press the
/
/
/
key on the remote
buttons to select a photo and
to return to the thumbnail list. To browse in list view,
button again.
Rotate
While viewing a photo in full screen, you can press
enabled) will pause. Click
and
to rotate the photo. The slideshow (if
to continue the slideshow.
Zoom & Pan
While viewing a full-screen image or slideshow, clicking the
the currently displayed image larger. While zoomed in, use the
button on the remote will zoom
/
/
/
keys to pan
around the image. A zoom-location display window containing a representation of the whole image
will be displayed in the bottom right corner of the screen. A small rectangle will be shown in the
overlay that indicates which part of the image is currently visible on the screen.
The zoom magnification sequence is 2x, 4x, 8x, 16x and 1x. Continue pressing the
button
repeatedly to increase the amount of magnification and eventually return to 1x screen size.
26
Repeat
During full-screen slideshow playback, click the
button repeatedly to cycle through different repeat
modes. Available repeat modes are:
Off: Display all pictures in the current folder just once (default)
Repeat All: Continuously display (in order) all songs in the current folder
Shuffle: Randomly play all songs in the current folder
Music
) will apply the Music filter, which means only music-type files will be displayed when
Selecting Music (
you browse the contents of your USB storage device. Use the
and
keys to select the folder you
want to open or song you want to play. When you highlight a music file, detailed information about the song
(ID3 Tag) will be displayed on the right hand side of the screen. Press OK or
to view the image in full
screen.
Music File Information
When playing a music file, click the
Press the
button on the remote control to view playback status of the song.
button again to close the information window.
Fast Forward / Rewind
The
and
buttons adjust playback speed so you can skip to an earlier or later part of the currently
playing movie or song. Clicking these buttons repeatedly increases or decreases the speed to the next level
of intensity. To return to normal playback speed, keep pressing the same button until 1x speed is reached or
simply press
.
Fast Forward speed levels: 1.5x, 2x, 4x, 8x, 16x, 32x, 1x
27
Rewind speed levels: -1x, -1.5x, -2x, -4x, -8x, -16x, -32x, -1x
Repeat
During music playback, click the
button repeatedly to cycle through different repeat modes.
Available repeat modes are:
Off: Play all songs in the current folder just once (default)
Repeat All: Continuously play (in order) all songs in the current folder
Repeat [1]: Continuously repeat the currently playing song
Shuffle: Randomly play all songs in the current folder
28
Specifications︱
Dimensions:
146 mm × 35 mm × 122 mm
Power Supply:
Input: 100V~ 240V 0.3A, Output: DC5V 2.0A
Display Resolution: (*1)
NTSC, PAL, 480p, 576p, 720p, 1080i, 1080p
Display Output:
HDMI / Composite
Audio Output
HDMI / Optical / Stereo
Video Formats:
H.264, VC-1, RMVB, MPEG1, MPEG2, MPEG4,
DivX, XviD, WMV9, MJPEG, FLV
Image Formats:
JPEG, BMP, PNG, GIF, TIFF
Audio Formats:
MP3, WMA, AAC, OGG Vorbis, RA, FLAC, WAV,
LPCM(*2), Dolby Digital(*2), DTS(*2)
Subtitle Formats
SRT, SUB, IDX+SUB, SMI, ASS, SSA
Certificates:
CE, FCC, BSMI
Warranty:
2 Years
*1. HDMI compatible TV or monitor required for 720p, 1080i and 1080p playback.
*2. Dolby Digital, DTS and LPCM audio only supported within video content
Ordering Information︱
Device Description
Transcend P/N
DMP10 HD Media Player
TS-DMP10
29
Transcend Limited Warranty︱
“Above and Beyond” is the standard we set ourselves for customer service at Transcend. We consistently
position ourselves to be significantly above the industry norm, which is all part of our commitment to
Customer Satisfaction.
All Transcend information, Inc. (Transcend) products are warranted and tested to be free from defects in
material and workmanship and to conform to the published specifications. During the warranty period should
your Transcend HD Media Player fail under normal use in the recommended environment due to improper
workmanship or materials, Transcend will repair the product or replace it with a comparable one. This
warranty is subject to the conditions and limitations set forth herein.
Warranty Period: The Transcend HD Media Player warranty period is two years from the date of purchase
Transcend reserves the right to determine whether repair or replacement is suitable upon inspection of the
product. The decision made by Transcend whether to repair or replace the product will be final. Additionally,
Transcend reserves the right to provide a functionally equivalent refurbished replacement product.
Limitations: This warranty does not apply to product failure caused by accidents, abuse, mishandling,
improper installation, alteration, acts of nature, improper usage, or problems with electrical power. In
addition, opening or tampering with the product casing, or any physical damage, abuse or alteration to the
product’s surface, including all warranty or quality stickers, product serial or electronic numbers will also void
the product warranty. This warranty only applies to the product itself, and excludes all product accessories,
including, but not limited to: cables, power adapters, and remote controls, which must be exchanged within
seven days of the purchase date if defective. Transcend is not responsible for recovering any data lost due
to the failure of a hard drive device. Transcend’s HD Media Player must be used with devices that conform to
the recommended industry standards. Transcend will not be liable for damages resulting from a third party
device that causes the Transcend HD Media Player to fail. Transcend shall in no event be liable for any
consequential, indirect, or incidental damages, lost profits, lost business investments, lost goodwill, or
interference with business relationships as a result of lost data. Transcend is also not responsible for
damage or failure of any third party equipment, even if Transcend has been advised of the possibility.
Disclaimer: The foregoing limited warranty is exclusive. There are no other warranties, including any implied
warranty of merchantability or fitness for a particular purpose. This warranty is not affected in any part by
Transcend providing technical support or advice. Please read Transcend’s Warranty Policy in full to
understand your rights.
Transcend Warranty Policy: http://www.transcendusa.com/Support/Warranty.asp
Online Registration: To expedite the warranty service, please register your Transcend Product within 30
days of purchase.
Register online at http://www.transcendusa.com/productregister
The specifications mentioned above are subject to change without notice.
Transcend Information, Inc.
www.transcendusa.com
*The Transcend logo is a registered trademark of Transcend Information, Inc.
*All logos and marks are trademarks of their respective companies.
30