1
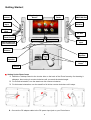
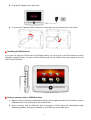
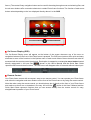
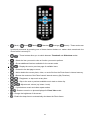
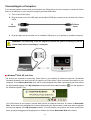
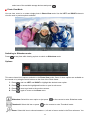
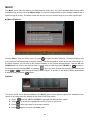
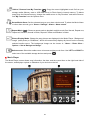
PF720 Digital Photo Frame User’s Manual Table of Contents Introduction︱ ︱ .........................................................................................................................3 ︱ ...............................................................................................................3 Package Contents︱ Features︱ ︱ ...............................................................................................................................3 System Requirements︱ ︱ ........................................................................................................4 ︱..............................................................................................................5 Safety Precautions︱ General Use ............................................................................................................................... 5 Cleaning ..................................................................................................................................... 5 Backing Up Data ........................................................................................................................ 5 Getting Started︱ ︱ ....................................................................................................................6 Installing the FM Antenna ........................................................................................................ 7 Using a memory card or USB flash drive ............................................................................... 7 Volume control and headphones ............................................................................................ 8 Navigation and Menu Buttons ................................................................................................. 8 On Screen Display (OSD)......................................................................................................... 9 Remote Control ........................................................................................................................ 9 ︱ ...............................................................................................11 Connecting to a Computer︱ Windows 2000, XP and Vista................................................................................................ 11 Mac® OS 10.0 or later ............................................................................................................ 12 Linux® Kernel 2.4 or later ...................................................................................................... 13 The Home Menu︱ ︱ ................................................................................................................14 Photo....................................................................................................................................... 14 Video ....................................................................................................................................... 14 Music....................................................................................................................................... 14 Radio........................................................................................................................................ 14 Clock and Calendar.................................................................................................................. 14 Settings .................................................................................................................................... 15 Photo︱ ︱..................................................................................................................................15 Thumbnail Mode..................................................................................................................... 15 Photo View Mode.................................................................................................................... 17 Slideshow Mode ..................................................................................................................... 18 Video︱ ︱ ..................................................................................................................................20 Video Explorer ........................................................................................................................ 20 Video Player............................................................................................................................ 21 MUSIC︱ ︱ ................................................................................................................................23 Music Explorer........................................................................................................................ 23 Music Player ........................................................................................................................... 24 Radio︱ ︱ ..................................................................................................................................26 Selecting a Radio Station: ..................................................................................................... 26 Adjusting the Volume: ........................................................................................................... 28 Calendar︱ ︱ ............................................................................................................................30 ︱..............................................................................................................................32 Settings︱ Troubleshooting︱ ︱................................................................................................................38 Specifications︱ ︱ ...................................................................................................................39 ︱ ........................................................................................................39 Ordering Information︱ Transcend Limited Warranty︱ ︱ ...........................................................................................40 2 Introduction︱ Congratulations on purchasing Transcend’s Photo frame. Now you can easily display your entire photo collection at home or at the office. The Photo frame includes a built-in FM radio and can conveniently playback videos, photos and music from a variety of sources: USB flash drives, memory cards, or the Photo frame’s own on-board memory. You can operate the Photo frame by using the navigation buttons on the front of the Photo frame or with its full-featured wireless remote control. The Photo frame is also equipped with a rotation sensor that automatically adjusts your pictures to portrait or landscape position when you turn the Photo frame. The Photo frame’s 2GB of built-in storage space lets you save your favorite videos, pictures and music inside Photo frame for instant playback without even having to use a memory card. You can also connect the Photo frame to a PC via the USB port for direct access to its internal memory or any memory cards that are plugged into it. This User’s Manual will give you step-by-step instructions and advice to help you get the best experience your new device. Please read it in carefully before using the Photo frame. Package Contents︱ Upon purchasing your Transcend Photo frame, please make sure each of the following is included: Photo frame Remote Control (battery included) Tabletop Stand DC Power Adapter USB Cable FM Antenna Cable User’s Manual CD Quick Start Guide Warranty Card Features︱ Bright 7” high-resolution widescreen color TFT LCD panel Built-in stereo speakers and headphone jack View photos with background music from MP3s or the radio Supports USB flash drives and microSD/SD/SDHC/MMC/MS/M2/CF memory cards 2GB of internal memory – works even without a memory card Built-in FM radio with programmable station presets Full Motion video playback Automatic rotation sensor for easy Landscape or Portrait setup Fully compliant with Hi-Speed USB 2.0 and backwards compatible with USB 1.1 Direct USB connection to your PC for easy file transfers Select multiple photos for convenient one-step transfer to internal memory Slideshow, thumbnail, still picture, and zoom-in viewing options Attractive frame themes to accent your pictures with Important date/event reminder 3 Clock, alarm and calendar functions Automatic Power-ON/OFF and Sleep timers Custom alarm clock settings - wake up to your favorite FM radio station or MP3 song System Requirements︱ System requirements for connecting Photo frame to a computer: 100~240V voltage power outlet for the DC adaptor Desktop or notebook computer with a working USB port One of the following Operating Systems: • Windows 2000 • Windows XP • Windows Vista • Mac OS 10.0 or later • Linux Kernel 2.4 or later 4 Safety Precautions︱ These usage and safety guidelines are IMPORTANT! Please follow them carefully to ensure your own personal safety and help protect your Photo frame from potential damage. General Use • For indoor use only. • Avoid using or storing the Photo frame in an extreme temperature environment. • Never allow the Photo frame to come in contact with water or any other liquids. • Do not use this product in environments with strong magnetic fields or excessive vibration. • Only use the Transcend provided DC adapter with the Photo frame. Use of other adapters may cause fire or explosion. • Never cover or seal any of the holes on the Photo frame. • Unplug the Photo frame if you do not plan to use if for an extended period of time. This prevents accidental damage or corrosion. • To protect your health and your hearing, keep the Photo frame’s music volume below 80 decibels and do not listen for an extended period of time. Cleaning • The screen is very delicate and can be damaged by pressing on it with excessive force. • Use a soft non-abrasive cloth, such as for cleaning camera lenses to gently wipe the screen Backing Up Data • Transcend does NOT take any responsibility for data loss or damage during operation. If you plan to plug a memory card or USB pen drive into Photo frame, we strongly advise that you first backup the data in those storage devices to a computer or other storage medium before using them in Photo frame. • To ensure Hi-Speed USB 2.0 data transfer rates when connecting your Photo frame to a computer, please check that the computer has the relevant USB drivers. If you are not sure how to check this, please consult the computer or motherboard User’s Manual for USB driver information. 5 Getting Started︱ Volume control 5-Way Navigation Button LCD Panel Antenna Input SD/SDHC/ MMC/ MS Slot microSD / M2 Slot Headphone Jack CF Slot USB Port (Flash Drives) DC Power Input Mini-B USB Port (PC Connection) Menu Buttons Right Speaker Left Speaker Wall-Hanging Holes Stand Socket Setting Up the Photo frame 1. Attach the Tabletop Stand to the circular hole on the back of the Photo frame by first inserting it sideways, then turning it counter-clockwise until you reach the desired angle. 2. For Portrait orientation, turn the stand one click counter-clockwise. 3. For Horizontal orientation, turn the stand five full clicks counter-clockwise until it stops. 4. Connect the DC adapter cable to the DC power input jack on your Photo frame. 6 5. Plug the DC adapter into a wall outlet. 6. To remove the Tabletop Stand, simply turn it clockwise until it pulls freely out of its socket. Installing the FM Antenna If you plan on using the Photo frame’s FM Radio feature, you must plug in the FM Antenna to assure adequate reception quality. Plug the included FM Antenna into the small 2.5mm jack located on the left side of the Photo frame. Using a memory card or USB flash drive 1. Insert a memory card into its appropriate card slot on the right-hand side of Photo frame or plug a USB flash drive to the USB port on the left-hand side. 2. Once a memory card or USB flash drive is plugged in, Photo frame will automatically begin slideshow playback of all photos available on your memory card or flash drive. 7 3. The Photo frame will revert to the Home menu if you unplug a memory card or USB flash drive while in use. Volume control and headphones The volume control wheel is located on the upper left side of the Photo frame. Move it up to increase volume, and scroll down to decrease volume. Press inward on (click) the volume control wheel to mute. You can plug headphones into your Photo frame’s headphone jack to enjoy your music more personally. The built-in speakers will be disabled while headphones are plugged in. Navigation and Menu Buttons On the front of the Photo frame, there are six convenient menu buttons and a 5-way navigation button, which are represented in this manual with capital letters (ex: EXIT = the menu button on the far left of the Photo 8 frame.) The central 5-way navigation button can be used for browsing through menus and selecting files, and the six menu buttons offer convenient shortcuts to certain Photo frame functions. The function of each menu button varies depending on the icon displayed directly above it in the OSD. On Screen Display (OSD) The On-Screen Display menu will appear on the bottom of the screen whenever any of the menu or navigation buttons on the front of the Photo frame is pressed. The OSD menu buttons offer quick and easy shortcuts to some of the functions in the Options menu of each mode. Most of these shortcuts can also be accessed with the remote control (see below). Each option is mapped to a rectangular menu button located directly underneath it. All icons like shown in this User’s Manual and the Quick Start Guide represent OSD menu button functions. The OSD menu will disappear after 10 seconds without button input. Remote Control Your Photo frame comes with a compact, easy-to-use remote control. You can operate your Photo frame with either the navigation and menu buttons on the front of the Photo frame or by using the remote control. Note that when using the remote control you should always aim it directly at the front of your Photo frame and make sure there are no obstacles in the way. All icons like shown in this User’s Manual and the Quick Start Guide represent functions that you can access directly from the remote control for easy, straightforward operation of your Photo frame. 9 • (Music) (Video) (Radio) (Calendar) (Settings) (Home) : These modes can be directly accessed by pressing one of these shortcut buttons no matter what menu/mode the Photo frame is currently in. • : These buttons allow you to switch between Thumbnail and Slideshow modes. • : Select the item you want to view or function you want to perform. • : Shows additional functions available for the current mode. • : Display the next or previous page of available items • : Go back to the last page or menu. • : Add or delete the current photo, video, or music file from the Photo frame’s internal memory. • : Browse the contents of the Photo frame’s internal memory (My Favorites) • : Play/pause, or stop music at any time. • : Skip to the next or previous available music track or video clip. • : Adjust music volume (up / down / mute). • : Cycle between music and video repeat modes. • : Rotate or zoom-in on photos displayed in Photo View mode. • : Change the brightness of the screen. • : Enable the sleep timer to automatically shut down the Photo frame. 10 Connecting to a Computer︱ If you want to transfer pictures and music between the Photo frame and your computer, connect the Photo frame to a USB port on your computer using the provided USB cable. 1. Turn on the Photo frame. 2. Plug the small end of the USB cable into the Mini-B USB port located on the left side of the Photo frame. To computer To Photo frame 3. Plug the large end of the cable into an available USB port on your desktop or notebook computer. WARNING! You must plug in the DC adapter to provide the power necessary to run the Photo frame when connecting to a computer. Windows 2000, XP and Vista No drivers are required for connecting Photo frame to your desktop or notebook computer. Windows® Operating Systems have built-in drivers to support your Photo frame. Upon successful connection to your computer, a new Removable Disk drive with a newly assigned drive letter representing the Photo frame will automatically appear in the My Computer window and a Removable Hardware icon will appear in the Windows System Tray. Your Photo frame is now ready to transfer data just like an external hard drive. A number of Removable Disk* drives with newly assigned drive letters representing the Photo frame’s card slots (and its onboard memory) will appear in the My Computer window. You can transfer your pictures and music to the Photo frame by simply dragging-and-dropping files or folders onto these Removable Disk drive letters. 11 *Note: E:,F:,G:, and H: are example drive letters - the letters in your “My Computer” window may differ Proper removal of your Photo frame (from Windows): 1. Click once on the Removable Hardware icon in the system tray. 2. The Safely Remove Hardware pop-up window will appear. Select it to continue. 3. A window will appear stating, “The ‘USB Mass Storage Device’ device can now be safely removed from the system.” Unplug your Photo frame from the USB port after this message appears. Mac® OS 10.0 or later No drivers are required. Plug your Photo frame into an available USB port and your computer will automatically detect it. Proper removal of your Photo frame (from Mac OS): 12 First drag-and-drop the Disk icon corresponding to your Photo frame into the trashcan then unplug your Photo frame from the USB port. Linux® Kernel 2.4 or later No drivers are required. Plug your Photo frame into a USB port and mount it. 1. First create a directory for the Photo frame. Example: mkdir /mnt / Photo frame 2. Then, mount the Photo frame. Example: mount –a –t msdos /dev/sda1 /mnt / Photo frame Proper removal of your Photo frame (from Linux): Execute umount /mnt/ Photo frame to un-mount the device. Then unplug your Photo frame from the USB port. 1. WARNING! To prevent data loss, always follow the proper removal procedures when disconnecting the Photo frame from your computer 2. When Photo frame is connected to a computer, it can only be used for transferring files. You will not be able to use any of the Photo frame’s audio or video at this time. Please disconnect your Photo frame from the computer to resume normal viewing or listening. 3. The USB flash drive port will not function while the Photo frame is connected to your computer via the Mini-USB port. 4. NEVER format your Photo frame. 13 The Home Menu︱ The Home menu acts as a convenient gateway to access all of Photo frame’s functions. Use the UP / DOWN / LEFT / RIGHT buttons to select one of the six icons listed in Home menu (shown below) and press OK. Photo This option lets you display photos in Thumbnail, Photo view or slideshow mode with special effects. You can also copy multiple photos to and from the internal memory in this mode. Use the OSD to select the “Photo” icon or press to enter the Thumbnail mode directly. Video The convenient Video function lets you use your Photo frame to playback your favorite movies, music videos, home movies, and more. Use the OSD to select the “Video” icon or press to open the Music Explorer. Music By selecting the Music option, you can playback music on your Photo frame, and even choose your favorite song to wake you up in the morning as your alarm clock sound. Use the OSD to select the “Music” icon or press to open the Music Explorer. Radio Photo frame also features a built-in FM radio tuner. By selecting the “Radio” option or pressing on the remote, you can program and listen to your favorite radio stations while viewing your photos at the same time. Clock and Calendar The Clock and Calendar option turns your Photo frame into an attractive desk clock/calendar with pictures. In this mode you can mark important dates and holidays, and even choose a festive theme to go with them (i.e. a heart theme for Valentine’s Day). Use the OSD to select “Clock and Calendar” or press 14 . Settings This option allows you to adjust the Photo frame’s numerous settings, such as switching languages or setting the clock. Use the OSD to select the “Settings” icon or press to enter this menu option. Photo︱ The Photo function has three modes: (Thumbnail mode, Photo View mode and Slideshow mode). You can use the remote control to access these modes directly or navigate to them using the OSD. Thumbnail Mode Select Photo from the Home menu or press to enter this mode. The Thumbnail Mode allows you to browse thumbnails of all photos in the current source (memory card, USB flash drive, etc.). 24 thumbnails per page will be displayed. Use the UP, DOWN, LEFT and RIGHT buttons to navigate to the thumbnail you want to view, then press to view the selected photo in Photo View mode. Switching to Photo View mode: 1. Navigate to the photo you want to view by using the UP, DOWN, LEFT and RIGHT buttons. 2. Press to view the selected image in Photo View mode. Options: This menu shows list of options available in the Thumbnail mode. Some of these options are available on the remote or by using the menu buttons on the front of the Photo frame. 1. Press the button. 2. Use the LEFT and RIGHT buttons to highlight the desired menu option and press 3. Sub-menu items can also be selected with the LEFT and RIGHT buttons. 15 . 4. Press 5. Press once to go back to the previous screen. again to revert to the Home menu. Add to / Remove from My Favorites ( ): Copy the currently selected photo in the Thumbnail viewer to the Photo frame’s internal memory (when the viewing source is a memory card or USB flash drive). To remove a photo from the internal memory, select “My Favorites” as the viewing source, navigate to the desired thumbnail to remove, and then choose “Remove from My Favorites.” Slideshow ( ): Switch to Slideshow mode. Photo View: Switch to Photo View mode. Select Multiple Photos: This option lets you select multiple photos to copy to the Photo frame’s internal memory. 24 thumbnails with check boxes will be displayed per page. Use the UP, DOWN, LEFT and RIGHT buttons to move between images and press to check/uncheck individual photos. • Select All: Select all items in current media source. • Deselect All: Deselect all items in current media source. • Select All On Page: Select all items on current page. • Deselect All On Page: Deselect all items on current page. • Select Inverse: Select all un-selected items, and deselect all selected items. • Slideshow of Selected Photos: Start a slideshow with currently selected photos. • Add to / Remove from My Favorites ( ): Copy the currently selected photo(s) to or remove from the Photo frame’s internal memory. Note: the “Remove” option will be shown when the viewing source is set to “My Favorites.” Select Source: Change the media source to browse thumbnails from. Use LEFT and RIGHT to 16 select one of the available storage devices and press . Photo View Mode You can view, zoom-in, or rotate a single photo in Photo View mode. Use the LEFT and RIGHT buttons to view the next or previous photo available. Switching to Slideshow mode: Press at any time while viewing a photo to switch to Slideshow mode. Options: This menu shows list of options available in the Photo View mode. Some of these options are available on the remote or by using the menu buttons on the front of the Photo frame. 1. Press and use LEFT and RIGHT to highlight the desired menu option. 2. Press to access the highlighted function or open its sub-menu. 3. Press once to go back to the previous screen. 4. Press again to revert to the Home menu. Slideshow: Select this menu option or just press Thumbnail: Select this item or press on the remote to enter Slideshow mode. on the remote to enter Thumbnail mode. Zoom: Select this item to choose between x1, x2 and x4 zoom modes in the Zoom submenu. You 17 can also press on the remote to automatically zoom-in on the current photo. You can go back to Photo View mode by pressing . Rotate: Select this item and choose between clockwise 90o, 180o and 270o in the Rotate submenu. Pressing will rotate the current photo clockwise 90o each time you press it. (Rotate function only enabled at x1 zoom) Themes: This option brings up a submenu that lets you select theme frames to wrap around your photos while viewing in Slideshow or Photo View. Use the LEFT or RIGHT buttons to highlight None, X-mas, Halloween, Valentine’s Day or New Year, then press to confirm. Background Music: Enable or disable background music while viewing photos. • On (Music): Turn on mp3 music. The Photo frame will automatically find and play music files on the same memory device that is being used to display photos. Playback settings (repeat, EQ, etc.) applied in MUSIC mode will be used. Use / on the remote to skip through available songs. If there are no music files on the current storage media, no music will be played. • On (Radio): Turn on the FM radio. The Photo frame will either use the saved radio station last listened to in RADIO mode or the first available FM frequency. Skip through saved stations by pressing • / on the remote. Off: Turn off all background music Set as Background Image: Use the current photo as a wallpaper image in Clock and Calendar mode, Music Player mode and Radio mode (will also copy the picture to internal memory). Save to file: Copy the current photo (with theme) to “My Favorites.” The photo will be resized to fit the Photo frame’s screen resolution and its theme will be saved as a new file in the internal memory for future access. Slideshow Mode This mode starts slideshow playback of all photos in the selected source. Slideshow mode will play based on the settings in the Options menu. 18 O p Switching to Thumbnail mode: Press while viewing a slideshow to switch to Thumbnail mode. Options: This menu shows list of options available in the Slideshow mode. Some of these options are available on the remote or by using the menu buttons on the front of the Photo frame. 1. Press 2. Press 3. Press 4. Press and use LEFT and RIGHT to highlight the desired menu option. to access the highlighted function or open its sub-menu. once to go back to the previous screen. again to revert to the Home menu. Thumbnail: Select this item or press on the remote to jump to Thumbnail mode. Photo View: Select this item to switch to Photo View mode for zoom-in and other functions. Background Music: Enable or disable background music while viewing photos. • On (Music): Turn on mp3 music. The Photo frame will automatically find and play music files on the same memory device that is being used to display photos. Playback settings (repeat, EQ, etc.) applied in MUSIC mode will be used. Use / on the remote to skip through available songs. If there are no music files on the current storage media, no music will be played. • On (Radio): Turn on the FM radio. The Photo frame will either use the saved radio station last 19 listened to in RADIO mode or the first available FM frequency. Skip through saved stations by / / pressing on the remote or press and hold to manually scan for frequencies. • Off: Turn off all background music Slideshow Order: Change the order that photos are displayed in. In the Slideshow Order submenu, use the LEFT or RIGHT buttons to select Normal (continuous sequential playback) or Random (continuous random playback), and press to confirm. Slideshow Interval: Adjust the amount of time each picture stays on the screen. In the Slideshow Interval submenu, use LEFT or RIGHT to highlight either: 5 sec, 10 sec, 30 sec, 1 min, 10 min or 30 min. Press to confirm. Slideshow Transition Effects: Change the way the screen transitions between each photo. In the Transition Effects submenu, use the LEFT or RIGHT buttons to select the desired effect and press to confirm. Video︱ The Video function is a convenient way to playback videos and movies on your Photo frame. There are two Video modes: (Video Explorer and Video Player). You can use the remote control to access these modes directly or navigate to them using the OSD. Video Explorer Select Video from the Home menu or press to enter this mode. The Video Explorer allows you to browse thumbnail previews (24 per page) of all video files on the current media source. Use the UP, DOWN, LEFT and RIGHT buttons to navigate to the thumbnail of the video you want to view. Press selected video in the full-screen Video Player. Options: 20 to view the This menu shows list of options available in the Video mode. Some of these options are available on the remote or by using the menu buttons on the front of the Photo frame. 1. Press and use LEFT and RIGHT to highlight the desired menu option. 2. Press to access the highlighted function or open its sub-menu. 3. Press once to go back to the previous screen. 4. Press again to revert to the Home menu. Add to / Remove from My Favorites ( ): Copy the currently selected video to the Photo frame’s internal memory (when the viewing source is a memory card or USB flash drive). To remove a photo from the internal memory, select “My Favorites” as the viewing source, navigate to the desired thumbnail to remove, and then choose “Remove from My Favorites.” Repeat Mode: Adjust the way Photo frame plays your video files: Normal, Repeat one, Repeat all. • Normal (plays once and returns to the Video Explorer) • Repeat One (continuously replays the selected video) • Repeat All (continuously replays all available video files on the current source media) Select Source: Change the media source to browse videos from. Use LEFT and RIGHT to select one of the available storage devices and press . Video Player 21 To start playing a video, press 1. Press or on a highlighted file in the Video Explorer. to pause and again to resume. 2. Adjust the volume by using the Volume Control Wheel on the left side of Photo frame or by pressing 3. Press 4. Press 5. Press , or on the remote. to go back to the previous video and to play the next available file. to open the Video Explorer and select another to play. on the remote to quickly switch between video repeat modes. 22 MUSIC︱ The Music mode has two ways to find and playback music files. You can individually skip through each available song, one-by-one in the Music Player, or you can browse folders on your storage media to find a specific song file to play. The Music mode also lets you set your favorite song as your alarm clock ringer. Music Explorer Choose “Music” from the Home menu or press to open the Music Explorer. The Music Explorer lets you browse for individual songs in specific folders. The directory path is shown at the top of the screen. In the Music Explorer you will see all file folders available on the current storage device. Use the UP and DOWN buttons to move to the desired folder. You can enter a folder by pressing RIGHT or , and exit or move up a level by pressing LEFT or selecting . Once you have located the music file you want to play, press or to start playing the song in Music Player. To go back to the Music Explorer and choose a different song, press the button. Options: This menu shows list of options available in the Music mode. Some of these options are available on the remote or by using the menu buttons on the front of the Photo frame. 1. Press and use LEFT and RIGHT to highlight the desired menu option. 2. Press to access the highlighted function or open its sub-menu. 3. Press once to go back to the previous screen. 4. Press again to revert to the Home menu. 23 Add to / Remove from My Favorites ( ): Copy the current highlighted music file from your storage media (Memory card or USB flash drive) to Photo frame’s internal memory. To delete songs from the internal memory, change the media source to “My Favorites” and select Remove from My Favorites from the Options menu. Set as Music Alarm: Set the selected song as your alarm clock sound. To select the Music Alarm or other alarm sounds, go to “Home > Settings > Alarm > Alarm sound.” Repeat Mode ( ): Choose a repeat mode to playback multiple music files: Normal, Repeat one, Repeat all, Random, Normal in folder, Repeat in folder and Random in folder. Picture Display Mode: Change the way pictures are displayed in the Music Player: “Background Image” (static photo) or “Slideshow,” which will consecutively display all pictures on the currently selected media source. The background Image can be chosen in: “Home > Photo View > Options > Set as Background Image.” Select source: Select the media source to browse and play music from. Use LEFT and RIGHT to select one of the available storage devices and press . Music Player The Music Player screen shows song information, the date, and the current time on the right-hand side of the screen, and displays a photo or slideshow of your choice on the left. 24 ICON INDICATION A Picture Display B Date Displays either a single background image or a photo slideshow Displays today’s date and day of the week C Repeat Mode Normal Repeat One Repeat All Random Normal in Folder Repeat in Folder Normal Jazz Pop Rock Bass Classical Random in Folder C Equalizer Mode D Album / Artist / Song Displays album title, artist name, and song title (respectively) E Track Time & Indicates the track length and current position Progress Bar F Play Status G Play Pause Stop Rewind Fast-Forward AM / PM & Displays AM or PM (when 12Hr time format is enabled). And display a Alarm on / off alarm icon while alarm on. H Time Displays the current time To start playing music, press or on a highlighted song in the Music Explorer. The Music Player functions are familiar and easy - just like any other player: 1. Press to play music and again to pause. 2. Press to stop the music. 3. Adjust the music volume by using the Volume Control Wheel on the left side of Photo frame or by pressing 4. Press or on the remote. to go back to the previous track and to play the next song available. 5. To fast-forward to your favorite section of the current song press and hold press and hold 6. Press 7. Press . To rewind, . to switch between available Equalizer modes. on the remote or the button to quickly switch between music Repeat modes. 8. Press to open the Music Explorer and select folders or songs to play. Music will keep playing unless you press to stop the music. 25 Radio︱ By selecting the Radio option or pressing , you can listen to your favorite radio stations from the built-in FM tuner and browse your photos at the same time. The Radio mode also lets you set your favorite station as your alarm clock ringer. ICON INDICATION A Picture Display Displays either a single background image or a photo slideshow B Date Displays today’s date and day of the week C Stereo Icon Indicates reception of a strong FM stereo station D Frequency Displays the currently selected FM radio frequency E Saved Stations Displays all saved stations, and highlights currently selected channel Lights up when switching between station presets or manually adjusting F/G Station / Frequency AM / PM & H Alarm on / off I Time the frequency Displays AM or PM (when 12Hr time format is enabled). And display a alarm icon while alarm on. Displays the current time Selecting a Radio Station: There are two ways to change stations: You can adjust the frequency manually from the Radio screen or you can choose one of the preset stations in “Saved Stations” list. To adjust the frequency manually: 26 1. In Radio mode, press the LEFT or RIGHT buttons (the FM frequency will increase or decrease in 0.1MHz increments) until you reach the desired frequency. 2. You can also press and hold either LEFT or RIGHT to auto-scan for the next available station. To select a preset station: 1. In Radio mode, press DOWN to skip forward to the next saved station in the station list. 2. Press UP to go back to the previous saved station in your station list. Options: This menu shows list of options available in the Radio mode. Some of these options are available on the remote or by using the menu buttons on the front of the Photo frame. 1. Press and use LEFT and RIGHT to highlight the desired menu option. 2. Press to access the highlighted function or open its sub-menu. 3. Press once to go back to the previous screen. 4. Press again to revert to the Home menu. Auto Scan: Automatically scan all FM frequencies and save the first 20 stations with strong signals to the Station List. Note: performing an Auto Scan will reset all previously saved stations in the Station List. Save Station: This option lets you save your 20 favorite radio stations from in the Photo frame’s memory. 1. Select the radio station (FM frequency) that you wish to save. 2. Highlight Save Station in the Options menu and press . 3. A list of station presets from “Station 01” ~ “Station 20” will appear. 4. Use the UP / DOWN buttons to highlight one of the 20 station presets and press the current FM frequency to that preset station number. 27 to save 5. Your new saved station will now be highlighted in the Radio screen’s list of saved stations. Station List: This option displays a list of all 20 preset stations and their frequencies. Use the UP / DOWN buttons to navigate to the station that you want to listen to and press . Note: you must first use Auto Scan or Save Station to add stations to this list. Set as Radio Alarm: Set current radio frequency as your alarm clock sound. Radio alarm can be chosen in “Home > Settings > Alarm > Alarm sound.” Picture Display Mode: Change the way pictures are displayed in Radio mode: “Background Image” (static photo) or “Slideshow,” which will consecutively display all pictures on the currently selected media source. The background Image can be chosen in: “Home > Photo View > Options > Set as Background Image.” FM Region: Change the FM broadcast frequency band. If you live in the Japan region, set the FM Region to “Japan.” For all other countries (87.5 MHz – 108.0 MHz), “World” should be used. Adjusting the Volume: 1. Locate the Volume Control Wheel on the upper-left side of the Photo frame 2. Gently rock the wheel up or down with your thumb or fingertip to increase or decrease volume. 3. Alternatively, press or on the remote until you reach a comfortable volume level. 28 Note: • To improve FM reception, extend the FM antenna wire to its full length and point it in the direction that gives the strongest signal. Signal strength may also depend on the location of your home. • We recommend performing an Auto Scan the first time you use the Radio, and then adjusting the Saved Stations list to your preference. 29 Calendar︱ In the Calendar mode, your Photo frame becomes an attractive desktop calendar and clock that lets you set important date reminders and display your favorite photos, too. The Calendar mode displays a monthly calendar and digital clock on the right-hand side of the screen and a selected photo or slideshow on the left. Press UP or DOWN to switch to the previous or next month. Options: This menu shows list of options available in the Calendar mode. Some of these options are available on the remote or by using the menu buttons on the front of the Photo frame. 1. Press and use LEFT and RIGHT to highlight the desired menu option. 2. Press to access the highlighted function or open its sub-menu. 3. Press once to go back to the previous screen. 4. Press again to revert to the Home menu Important Dates: You can earmark your important dates on the calendar screen. Follow the steps below to highlight important dates on the calendar: 1. Select Important Dates from the Options menu. 2. Press UP and DOWN to select a different month or year. 3. Move the cursor on the desired date and press to mark that day. 4. Four mark types are available and are represented by different colors: None, Birthday, Party, and Date. Choose one and press to confirm. 30 Picture Display Mode: Change the way pictures are displayed in the Clock and Calendar mode: “Background Image” (static photo) or “Slideshow,” which will consecutively display all pictures on the currently selected media source. The background Image can be chosen in: “Home > Photo View > Options > Set as Background Image.” First Day of the Week: Set the calendar to display either “Sunday” or “Monday” as the first day of the week. 31 Settings︱ In the Settings menu, you can inspect your Photo frame’s current device status – Product name, Firmware version, and free space of My Favorites (onboard memory). You can also adjust Photo frame’s interface settings like setting the clock and changing languages. O 1. Select the “Settings” icon from the Home menu or press on the remote. 2. Use LEFT and RIGHT to highlight the desired menu option. 3. Press 4. Press 5. Press to access the highlighted function or open its sub-menu. once to go back to the previous screen. again to revert to the Home menu. Language Use this function to change the interface language of Photo frame (13 languages are currently available). The default language is “English.” To change the Language: 1. Select the Language option from the Settings menu. 2. Use LEFT or RIGHT to highlight the desired language. 3. Press to confirm the new language setting. The new setting will be applied immediately. 32 Alarm The alarm function lets you use your Photo frame like a clock radio – you can even wake up to your favorite MP3 song or radio station in the morning. 1. Select Alarm from the Settings menu, and use the UP or DOWN buttons to select between alarm on/off, alarm time, alarm sound, alarm volume and sleep timer. 2. Press to modify the selected item (except Alarm Volume). • Alarm On/Off: Press UP or DOWN to enable (on)or disable (off)the alarm. • Alarm Time: Press LEFT or RIGHT to switch between hour and minute, and UP or DOWN to adjust the value. NOTE: “24H” or “AM/PM” can be changed in “Home > Settings > Date/Time-> 12H/24H” • Alarm Sound: Press UP or DOWN to select from a choice of five default alarm sounds or your own personalized “Music Alarm” or “Radio Alarm” (can be any song or radio station you want). The “Music Alarm” sound can be chosen in: Home > Music > Options > Set as Music Alarm and the “Radio Alarm” sound can be chosen in: Home > Radio > Options > Set as Radio Alarm. • Alarm Volume: Press UP or DOWN to adjust the alarm volume. • Sleep Timer: Press UP / DOWN to enable a sleep timer to shutdown the Photo frame after a specified amount of time. Available options are: 15 / 30 / 45 / 60 / 90 / 120 minutes and Disable. You can also enable the sleep timer by pressing on the remote. When the specified time is about to expire, a “Press [SLEEP] button on remote to disable” message will appear. NOTE: To set Photo frame to turn on or off automatically on a daily basis, please use the “Auto-ON/OFF” feature in: Home > Settings > Date / Time > Auto ON/OFF 3. After making adjustments, press to save. 33 Date / Time This option lets you adjust the current date and time and set your Photo frame to automatically turn on and off every day at a specific time. The Auto-ON/OFF timer is a convenient way to save power at night. 1. Select Date/Time from the Settings menu, and use the UP or DOWN buttons to select between date, time, 12H/24H, auto-on, auto-off or auto-on/off timer. 2. Press • to modify the selected item. Current Date: Press LEFT or RIGHT to select between year month or day, and press UP / DOWN to adjust the value. • Current Time: Press LEFT or RIGHT to select hour or minute and UP / DOWN to adjust the value. • 12H / 24H: Press UP or DOWN to switch between 12-Hour (AM/PM) and 24-Hour clock display. This setting affects all time displayed in Photo frame (alarm, system time, auto-on/off). • Auto On at: Set a daily auto power-on time. Press LEFT or RIGHT to select hour or minute and UP or DOWN to adjust the value. • Auto Off at: Set a daily auto power-off time. Press LEFT or RIGHT to select hour or minute and UP or DOWN to adjust the value. • Auto On/Off timer: Press UP or DOWN to enable or disable the auto power on/off function. 3. After making adjustments, press to save. 34 Display This menu lets you change the way photos are displayed on the Photo frame’s screen. 1. Select Display from the Settings menu to open the Display settings menu, and use the UP and DOWN buttons to highlight “brightness”, “contrast” , “fullscreen” and “orientation.” 2. Press to modify the selected item (Brightness and Contrast changes take effect immediately) 3. After making your adjustments, press • to save. Brightness: press LEFT / RIGHT or on the remote to fine-tune the brightness of the screen. • Contrast: Press LEFT or RIGHT to make adjustments to the screen’s contrast. • Fullscreen: Press UP or DOWN to enable or disable. If disabled, Photo frame will preserve the original dimensions of the image on the screen. If enabled, Photo frame will enlarge the photo to fit the screen, while preserving its original aspect ratio. Depending on its dimensions, some parts of the photo may not be displayed in fullscreen mode. Note: fullscreen is only applied on horizontal photos displayed in landscape orientation or vertical photos displayed in portrait orientation. Fullscreen displayed image Undisplayed portion Fullscreen disabled Fullscreen enabled 35 • Optimize My Favorites Image Size: When this option is enabled, the “Add to My Favorites” funtion will resize all photos to the Photo frame ’s native 800x480 resolution to maximize storage space. NOTE: The Photo frame always preserves the original aspect ratio of all images based on each picture file’s orientation information (EXIF), and NEVER stretches them to fill the entire screen. An easy, distortion-free way to remove the black bars from the top/bottom or sides of an image is to use the Fullscreen option mentioned above, or the Zoom function. The way photos are displayed depends on the Photo frame’s orientation (see graph below) Detected Photo Horizontal Type (EXIF) Fullscreen Mode Photo frame Orientation Disabled Vertical Enabled Disabled Enabled Landscape (A) Portrait (B) Restore Defaults This function is available if you want to reset your Photo frame’s settings. Note: All settings that have been changed will return to the factory defaults. 1. Select Restore defaults from the Settings menu. 2. Use LEFT or RIGHT to highlight “Yes.” 3. Press to confirm. 4. After the process is finished, the Settings menu will be displayed again. Upgrade Firmware Use this function to keep your Photo frame up to date with the latest version from Transcend (available on the Transcend website. 1. Insert a storage device such as a USB flash drive or SD/SDHC/MMC/MS/CF memory card that contains a newer version of firmware. 2. Select Firmware upgrade from the Settings menu and press 36 to start the firmware detection process. Photo frame will automatically find the new firmware file. 3. If Photo frame finds that a newer version of firmware is available, a “Yes / No” selection message will be shown. Use LEFT or RIGHT to select “Yes” and press to perform the system upgrade. If you do not want to upgrade, press “No” to return to the Settings menu. Note: NEVER remove the power cord or any storage devices while the firmware is being upgraded. If firmware upgrade fails and the Photo frame will not turn on, please Photo frame contact Transcend customer support. 37 Troubleshooting︱ If a problem occurs with your Photo frame please first check the information listed below before sending your Photo frame in for repair. If you are unable to remedy a problem from the following hints, please consult your dealer, service center, or local Transcend branch office. We also have FAQ and Support services on our websites. For any Hardware issues please consult the Photo frame User’s Manual. I cannot turn my Transcend Photo frame on You may not be holding down the Power button long enough. Please press and hold the Power button for at least 2 seconds. If that doesn’t solve the problem, please check to make sure your Photo frame is connected securely to the DC adapter, and that the adapter is plugged into a wall socket. My computer’s operating system cannot detect my Photo frame Check the following: 1. Is your Photo frame properly connected to the USB port? If not, unplug it and plug it in again. Make sure the USB port is connected on both ends, as shown in the User’s Manual. 2. Is your Photo frame connected to the Mac keyboard? If yes, unplug it and plug it into an available USB port on your Mac Desktop. 3. Is the USB port enabled? If not, refer to the user’s manual of your computer (or motherboard) to enable it. I was using my Photo frame, now no buttons are responding (hangs/lags/stalls) Try unplugging the DC adapter from your Photo frame, then reconnecting it to your Photo frame again. I have connected my Photo frame to the computer, but the Photo frame does not appear as a new drive in my operating system? Verify the DC adapter is connected to your Photo frame and that the Photo frame power is turned on. If not, turn it on and then connect the Photo frame to the computer again. Please make sure your operating system meets the Transcend Photo frame system requirements described in the “Introduction” section. My Photo frame cannot read photos on my memory card or the built-in memory 1. Make sure the Photo frame supports the memory card type (CF/SD/MMC/MS). 2. Ensure that the memory card is correctly inserted all the way into its appropriate slot. 3. Edited and deformed photos may not display properly on Photo frame. Some digital cameras save images into non-standard formats - please check your camera’s user manual for specifics. How can I display video files on my Photo frame? The Photo frame only displays certain video formats. Please see the Photo frame FAQ on the Transcend website for instructions how to encode your video files to the Photo frame’s format. Can I delete files on my USB flash drive or memory card with the Photo frame? The Photo frame cannot directly delete any files on a USB flash drive or memory card. However, you can connect the Photo frame to a computer and use the computer to delete files on memory devices that are plugged-in to the Photo frame. Why does the time and date reset after unplugging the DC adapter? If you unplug the Photo frame for a long time, its internal backup battery will eventually drain. Typically, the Photo frame can keep your time and date for about 2~3 days after unplugging the DC power adapter. 38 Specifications︱ Panel: 7” TFT LCD, 800x480 pixels Speakers: L / R stereo speakers, 1.5w each Headphone Jack: 3.5mm, 32 ohm FM Jack 2.5mm USB Interface: 1x standard A-Type, 1x mini B-Type Internal Storage: 2GB NAND Flash Data Retention: Up to 10 years Navigation: 5-way navigation button, 6 menu buttons, volume control wheel, remote control Remote Control: Infrared, NEC protocol Dimensions: 197mm × 157mm × 25mm Power Supply: Input: 100 ~ 240 V 0.3A, Output: 5V DC 2.0A Picture Formats: DSC JPEG (up to 8000 x 8000), BMP (800 x 600), MPEG1/4 (SP/ASP), Motion JPEG. Video Formats: (AVI, MOV, MPG, MP4, 3GP; Up to 720x576 @ 30FPS) Music Formats: MP3, WMA (Non-DRM), WAV Supported Music Bit Rates: 32Kbps–320Kbps World: 87.5 ~ 108.0 MHz FM Frequency Range Certificates: Japan: 76 ~ 90 MHz CE, FCC, BSMI, C-Tick, KCC, GOST-R Panel: 1-year, (maximum 4 defective pixels) Warranty: Device: 2-years Ordering Information︱ Memory Size Device Description Transcend P/N PF720 Digital Photo Frame - Black 2GB TS2GPF720K PF720 Digital Photo Frame - White 2GB TS2GPF720W 39 Transcend Limited Warranty︱ “Above and Beyond” is the standard we set ourselves for customer service at Transcend. We consistently position ourselves to be significantly above the industry norm, which is all part of our commitment to Customer Satisfaction. All Transcend information, Inc. (Transcend) products are warranted and tested to be free from defects in material and workmanship and to conform to the published specifications. During the warranty period should your Transcend Photo frame fail under normal use in the recommended environment due to improper workmanship or materials, Transcend will repair the product or replace it with a comparable one. This warranty is subject to the conditions and limitations set forth herein. Warranty Period: The Transcend Photo frame warranty period is two years from the date of purchase (One-year screen warranty: Within one year of the purchase date, Transcend will replace or repair Photo frame screens with four or more defective pixels). Transcend reserves the right to determine whether repair or replacement is suitable upon inspection of the product. The decision made by Transcend whether to repair or replace the product will be final. Additionally, Transcend reserves the right to provide a functionally equivalent refurbished replacement product. Limitations: This warranty does not apply to product failure caused by accidents, abuse, mishandling, improper installation, alteration, acts of nature, improper usage, or problems with electrical power. In addition, opening or tampering with the product casing, or any physical damage, abuse or alteration to the product’s surface, including all warranty or quality stickers, product serial or electronic numbers will also void the product warranty. This warranty only applies to the product itself, and excludes all product accessories, including, but not limited to: card adapters, cables, earphones, power adapters, and remote controls, which must be exchanged within seven days of the purchase date if defective. Transcend is not responsible for recovering any data lost due to the failure of a hard drive device. Transcend’s Photo frame must be used with devices that conform to the recommended industry standards. Transcend will not be liable for damages resulting from a third party device that causes the Transcend Photo frame to fail. Transcend shall in no event be liable for any consequential, indirect, or incidental damages, lost profits, lost business investments, lost goodwill, or interference with business relationships as a result of lost data. Transcend is also not responsible for damage or failure of any third party equipment, even if Transcend has been advised of the possibility. Disclaimer: The foregoing limited warranty is exclusive. There are no other warranties, including any implied warranty of merchantability or fitness for a particular purpose. This warranty is not affected in any part by Transcend providing technical support or advice. Please read Transcend’s Warranty Policy in full to understand your rights. Transcend Warranty Policy: http://www.transcendusa.com/Support/Warranty.asp Online Registration: To expedite the warranty service, please register your Transcend Product within 30 days of purchase. Register online at http://www.transcendusa.com/productregister The specifications mentioned above are subject to change without notice. Transcend Information, Inc. www.transcendusa.com *The Transcend logo is a registered trademark of Transcend Information, Inc. *All logos and marks are trademarks of their respective companies. 40