1
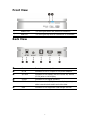
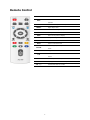
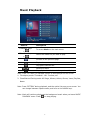
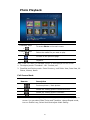
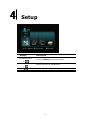
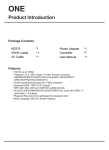
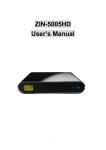
Safety Instructions
This product has been engineered and manufactured to assure your personal safety. However,
improper use can result in potential electric shock or fire hazards. In order not to defeat the
safe-guards incorporated in this instrument and its accessories, please adhere to the following
instructions when installing, operating and servicing.
Power Source Warning
A marking label attached on the rear side of the adapter (supplied) indicates the correct
power source for this equipment. Operate this product only from an electrical outlet with
the voltage and frequency indicated on the product label.
Incorrect power source may
result in a risk of electric shock or fire. If you are uncertain of the type of power supplied
to your home, consult your local power company or appliance dealer.
Only use the power cord and adapter provided by the manufacturer. Internal component
may be damaged if you use a different adapter to power this product. To avoid electric
shock and fire hazard, match the plug and outlet connections carefully, then fully insert. If
the plug fails to fit the outlet, please contact an electrician to update your power outlets.
Do not overload electrical outlets, extension cords, or integral convenience receptacles as
this can result in a risk of fire or electric shock.
And to prevent power cord damage,
arrange all power cords so that people cannot walk on the cords. Do not place objects on the
cords.
Place this product in a location that is close enough to an electrical outlet and where the
power cord is easily accessible to be disconnected from the wall outlet.
Usage Warning
To reduce the risk of electric shock, do not remove the cover or attempt to disassemble this
product.
There are no user-serviceable parts inside. Please refer all servicing to qualified
service personnel.
Protect this product from foreign objects.
Never push object of any kind into this product
through openings as they may touch dangerous voltage points or short-out parts that could
result in a fire or electric shock.
Do not expose this product to liquids, rain or moisture.
This product has ventilation openings that protect it from overheating.
cover these openings.
Never block or
And do not place this product near heat sources such as radiators,
heat registers, stoves or other products producing heat.
Before cleaning or wiping this product, make sure your power cord is already unplugged
from the electrical outlet. Only use damp cloth to clean this product, and never use a liquid
cleaner or an aerosol cleaner.
During a thunderstorm, or when this product is unused for long periods of time, unplug
power cord from the wall outlet. This will prevent damage to the product due to lightning
and power-line surges.
Service Warning
Refer all servicing to qualified service personnel.
For damage that requires service, please
unplug your power cord from the AC outlet first, and contact your dealer or servicing
personnel to obtain service for the following conditions.
If there is damage to the adapter, power cord or plug.
If liquid enters this product.
If you drop this product, a heavy object falls on this product, or
damage occurs to the cover of this product.
If you expose this product to rain or water.
If this product does not operate normally by following the operating
instructions.
If this product exhibits a distinct change in performance.
Caution
Risk of explosion if battery is replaced by an incorrect type. Dispose of used batteries
according to the instructions.
Copyright Notice
No part of this user’s manual may be copied, translated, or reproduced including
electronic form without permission from the copyright owner.
We have made
effort to ensure the accuracy and completeness of this document. However, as
ongoing development is continually improving the capabilities of our products and
the content described in this manual may be changed at any time, we cannot
guarantee the accuracy of the content of this document.
We disclaim liability for
errors, omissions, or future changes. The information of this document is subject
to change without notice.
This device complies with Part 15 of the FCC Rules. Operation is subject to the following
two conditions:
(1) This device may not cause harmful interference.
(2) This device must accept any interferences received, including interference that may
cause undesired operation.
License Notice and Trademark Acknowledgement
Dolby Digital:
Manufactured under license from Dolby Laboratories. Dolby and the double-D symbol are
trademarks of Dolby Laboratories.
Table of Contents
1 Introduction .......................................................................................1
Package Content .......................................................................................................1
Specification .............................................................................................................2
Front View ................................................................................................................3
Back View .................................................................................................................3
Remote Control .........................................................................................................4
2 Installation .........................................................................................5
3 Play Media ..........................................................................................6
Video Playback..........................................................................................................8
Music Playback..........................................................................................................9
Photo Playback ....................................................................................................... 10
4 Setup ................................................................................................11
System .................................................................................................................... 12
Audio ...................................................................................................................... 13
Video....................................................................................................................... 14
Other ...................................................................................................................... 15
5 Troubleshooting................................................................................16
1
Introduction
Package Content
Please make sure the following items are included within your new product package. If any
item is missing or damaged, please contact your local distributor/dealer. The Product might
not be compatible with some accessories made by other manufacturers. We highly
recommend that you use only the specific accessories we suggest.
- Remote Control Unit with Battery
- AC Power Adaptor
- 3.5mm 1 to 3 RCA AV Cable
- Quick Installation Guide
- Compact Disc (User Manual Included)
Note: The specification of the 3.5mm 1 to 3 RCA AV Cable is below
Pin 1: CVBS
Pin 2: Audio L
Pin 3: Audio R
Pin 4: GND
1
Specification
Interfaces
Video Output
HDMI、Composite Video (3.5mm Jack)
Audio Output
Audio L/R (3.5mm Jack)、S/P DIF (Optical)
Data Transfer
USB Port
General Specifications
MPEG1 (AVI/MKV/TS/DAT/MPG/MPEG/VOB)
MPEG2 (MKV/DAT/MPG/MPEG/VOB/ISO/IFO/
TS/TP)/M2TS
MPEG4 (AVI/MP4/MKV/MOV/WMV/ASF)
DivX 3/4/5/6、DivX Plus HD、
Video
Xvid (AVI/MKV/MP4/MOV)
H.264/AVC (TS/AVI/MP4/MKV/MOV/FLV)/M2TS
VC-1 (TS/AVI/ASF/WMV)/M2TS
Support Media
Format
WMV9 (ASF/WMV)
AVS (MP4/MOV/TS)
Real Video 8/9/10 (RM/RMVB)
Audio
MP3、MPEG Audio、Dolby Digital、DTS 、WMA、
PCM、LPCM、ADPCM、FLAC、WAV、AAC、RA、
OGG、MKA
Photo
HD JPEG、GIF、PNG、BMP、TIF、TIFF
Subtitle
SRT、SMI、SUB、SSA、IDX+SUB
HDD Device
File Systems
EXT3、NTFS、FAT16/32、HFS+
Decoding
Up to 1080p
Output
Up to 1080p
Power Supply
100~240V ±10% input voltage/ 12V @ 1.0A
2
Front View
①
Power LED
The LED lights when the product is turned on.
②
USB LED
The LED lights up when a USB device is connected.
Back View
Reset
Touch for power on / off.
DC IN
Connects to the DC output of the power adapter.
A/V OUT
Connects to the display with the VIDEO IN/ AUDIO
L/R IN jacks on the display.
S/PDIF
Connects to the digital speakers
HDMI
Connects to the HDMI jack on the display; a single
cable transmits both audio and video data.
USB
Connects to the supported USB storage devices.
3
Remote Control
POWER
Press to turn on the Product.
Press to see detailed information of the video at
INFO.
playback
GOTO
Video/movie chapter and time point selection.
ASPECT
Adjust aspect ratio
ZOOM
Zoom video or image display on screen.
HOME
Hot key to the main OSD menu.
BACK
Return to the previous display.
Navigate through menu screen or media libraries.
OK
Confirm or select.
MUTE
Press to mute the sound.
Press to pop up the special function list on different
OPTION
mode.
Play/pause selected file.
MULTI-FUNCTION: Refer to the instructions in the
screen.
Return to previous file. / Go to next file.
Stop playback and return to the previous screen.
VOL + / -
Increase/decrease the volume.
4
2
Installation
Plug the power
adapter into the AC outlet, and then connect the adapter into DC IN port.
For analog output, connect the AV output to the VIDEO/AUDIO L/R input jacks on your
display.
For multichannel digital audio, connect a digital audio cable to an external digital audio
system.
For combined digital video/audio output, connect an HDMI cable between the Product’s
HDMI output and HDMI input of your display.
Plug in the supported USB storage device into the USB port.
5
3
Play Media
Remote
Direction Keys
+
Direction Keys
+
Description
To access File Management on the main menu.
To select available media source.
Return to previous display.
Full screen mode.
Note: Press “OPTION”, the option list will be shown on the screen.
1. Display mode: Thumbnails, List, Preview.
2. Sorting mode: Movies, Photos, Music,
> USB Media
The Product searches and plays all available photos, music and video files
on the external USB device.
Note: Depends on the specification of USB that each USB port provide 0.5A to USB
device, please use with extra power-provided USB device if the USB device
needs more electricity.
6
> Playlist and Album Setting
You can save your favorite music to a playlist, or add photos to an album
when you are viewing files on the USB device.
Remote
+
Description
Save to Playlist or Album
7
Video Playback
Remote
Direction Keys
+
Direction Keys
+
Description
To access Video on the main menu.
Select the media file you want to play.
Go back to the previous page.
Playback.
Note: Press “OPTION” for available options to be displayed on the screen.
1. File display mode: Thumbnail、List、Preview, etc.
2. Classified and Sorting mode: All Videos, Show DVDs, Go To Folder, Name, Size,
Most Viewed.
Note: Press “OPTION” during playback, and the option list pops up on screen. You
can select Subtitle, change Audio, turn on the GOTO function, select DVD
Menu (only available with ISO files), switch between different “Repeat
modes”, and adjust the Video Setting.
8
Music Playback
Remote
Direction Keys
+
Direction Keys
+
Description
To access Music on the main menu.
Select the media file you want to play.
Go back to the previous page.
Playback.
Play/pause selected file.
Rewind/Forward
Stop playback and return to the previous display
Note: Press “OPTION” for available options to be displayed on the screen.
1. File display mode: Thumbnail、List、Preview, etc.
2. Classified and Sorting mode: All Songs, Albums, Artists, Genres, Years, Playlists,
Name.
Note: Press “OPTION” during playback, and the option list pops up on screen. You
can change between repeat modes, and turn on the shuffle loop.
Note: Music will continue playing as the background music when you leave MUSIC
PLAYBACK menu. Press
to stop playing.
9
Photo Playback
Remote
Direction Keys
+
Direction Keys
+
Description
To access Photo on the main menu.
Select the media file you want to play.
Go back to the previous page.
Playback.
Note: Press “OPTION” for available options to be displayed on the screen.
1. File display mode: Thumbnail、List、Preview, etc.
2. Classified and Sorting mode: Photo Directory, Leaf Folder View, Date View, All
Photos, Albums, Name.
Full Screen Mode
Remote
Description
Previous picture. / Next picture.
Rotate the viewing picture counterclockwise
Rotate the viewing picture clockwise.
Leave full screen mode.
Note: Press “OPTION” during the photo slideshow, and the option list pops up on
screen. You can select Slide Timing and Transition, change Repeat mode,
turn on Shuffle Loop, Select Music and adjust Video Setting.
10
4
Setup
Remote
Direction Keys
+
Direction Keys
+
Description
To access Setup on the main menu.
Select the item for adjustment.
Return to previous display.
11
System
Remote
+
Description
Enter “System” setup menu.
Select the item for adjustment.
Confirm the change.
Return to previous display.
Item
Options
Menu Language
English/ Traditional Chinese/ Japanese/ Spanish/
French/ German/ Dutch/ Russian/ Simplified
Chinese
Subtitle Encoding
Unicode(UTF8)/ Simplified Chinese(GBK)/
Traditional Chinese(BIG5)/ Western/ Turkish/
Central European/ Greek/ Cyrillic/ Hebrew/ SE
European/ Japanese(S-JIS)
R/RW Auto-Play
Off/ On
Screen Saver
Timing: Off/ 2 Minutes/ 5 Minutes/ 10 Minutes
Options: Default/ Photo Album
Scan Storage
Auto Scan On/ Auto Scan Off/ Resume Scan
Resume Play
Off/ On
Default Setting
Yes/ No
Note: Depending on the capacity of the USB storage and number of files on disk, the
time it takes to scan the storage device varies.
Note: “Resume Play” only works when pressing
12
key to stop video playback.
Audio
Remote
+
Description
Enter “Audio” setup menu.
Select the item for adjustment.
Confirm the change.
Return to previous display.
Item
Options
Night Mode
Off/ On/ Comfort
HDMI Output
LPCM
LPCM Multi-Ch
RAW
SPDIF Output
LPCM
RAW
Note: LPCM / RAW Mode
LPCM mode means decoding the audio then and down-mixing it to 2 CH output.
RAW mode means passing the audio data through to the amplifier for audio
decoding.
LPCM mode: Choose it when the content supports LPCM Multichannel.
Note: “AUDIO SETUP-“Night Mode” (aka Dynamic Range Control)
When the Night Mode is enabled the sound level of compatible audio soundtracks
will be dynamically compressed. Dynamic range control (DRC) increases low-level
audio content (such as the dialog in the movies),
making it easier to be heard at
low volume levels while reducing the intensity of higher-level audio content at the
same time.
“When you're listening to movie dialogue late at night and have to turn down the
volume during loud scenes, the dynamic range suffers and you may miss some
dialogue and other sounds. With the Night Mode on, you can reduce the volume but
still enjoy proper tonal balance and dynamic range.”
13
Video
Remote
+
Description
Enter “Video” setup menu.
Select the item for adjustment.
Confirm the change.
Return to previous display.
Item
Options
Aspect Ratio
Pan Scan 4:3
Letter Box 4:3
16:9
16:10
Resolution
HDMI Auto/ NTSC/ PAL/ 480p/ 576p/
720p 50HZ/ 720p 60HZ/ 1080i 50HZ/
1080i 60HZ/ 1080p 50HZ/ 1080p 60HZ
Video
Reduce Size
Digital Noise
Reduction
Off / On
Off / Auto
1080P 24Hz
Off / On
Deep Color
Auto/ 12bit/ 10bit/ Off
Note: When using the composite connection only (not HDMI), the only available
resolution adjustments are “NTSC” or PAL“mode”.
Note: When 1080P 24Hz is selected as the desired resolution, the product can
output 24Hz video when the following conditions are met:
1. HDMI connected.
2. The TV supports 1080p 24Hz by EDID (Extended Display Identification)
3. The file is 23.976 or 24 fps.
Note: Turn “Video Reduce Size” mode “On” to reduce about 10% of image on screen
(in case of overscan).
Note: Deep Color function increases the precision of brightness.
14
Other
Remote
+
Description
Enter “Other” setup menu.
Select the item for adjustment.
Confirm the change.
Return to previous display.
Item
Options
System info
Software version/ Custom ID/ Box ID/ Audio
version/ Video version
Software Update
Yes/ Cancel (By USB updating)
Note: The procedure of USB updating
1. Download software from official website to the root folder of the supported USB
storage device.
2. Plug the USB device into the product.
3. Update software by following instructions shown on OSD.
Please do not turn off the product during the software update. The process may take
up to 5 minutes.
15
5
Troubleshooting
The following reference list represents situations that you may encounter, and
methods for remedy. Please refer to this checklist prior to contacting qualified service
personnel.
Symptom
No picture is displayed.
Remedy
Check the power cord connection. Or
connect the power cord to another power
outlet.
Are the VIDEO/ AUDIO cables or HDMI
Cable loose or disconnected? Make sure one
of connections is correct.
Try the “SOURCE” button on the remote
control of the external display/ TV, to select
the correct input source.
No USB device is
searched.
Check
USB
device
is
already
firmly
connected.
Check the format of your USB drive.
Check whether the Product’s and your TV's
volume are properly set and not in "MUTE"
mode.
No audio.
Check
that
the
audio
connectors
are
properly connected.
Check if the format is supported.
Check the digital audio output is set up on
the correct mode.
Check that the Product’s output and the TVs
input are properly set.
No video.
Check
that
the
video
connectors
properly connected
Check if the format is supported.
16
are
17