1
DVD player
SD1020KB
Owner’s Manual
Contents
English
1 Important....................................................................................................3
Safety and important notice................................................................................3
Disposal of your old product and batteries.........................................................3-4
Notice for Trademark.........................................................................................5
2 Your Product...............................................................................................5
Regions codes...................................................................................................5
Product overview...............................................................................................6
Remote control..................................................................................................7
3 Connections.................................................................................................8
Connecting to a TV............................................................................................8
Connecting to a Stereo System.............................................................................................8
Connecting to the digital amplifier/receiver...........................................................8
Connecting Power..............................................................................................8
4 Preparation.................................................................................................9
Prepare the remote control.................................................................................9
Setting up the player..........................................................................................9
5 Playback..............................................................................................10-11
Playback Functions......................................................................................10-11
6 Customizing.........................................................................................12-14
General...........................................................................................................12
Audio.........................................................................................................12-13
Video..............................................................................................................13
Preference.................................................................................................13-14
7 Specifications............................................................................................15
8 Troubleshooting..................................................................................16
9 Glossary....................................................................................................17
2
Safety and important notice
Warning:
• Risk of overheating! Never install the product
in a confined space. Always leave a space of at
least 10cm around the product for ventilation.
Ensure curtains or other objects never cover the
ventilation slots on the product.
• Never place the product, remote control or
batteries near naked flames or other heat
sources, including direct sunlight.
• Only use this product indoors. Keep this product
away from water, moisture and liquid-filled
objects.
• Never place this product on other electrical
equipment.
• Keep away from this product during lightning
storms.
• Where the mains plug or an appliance coupler
is used as the disconnect device, the disconnect
device shall remain readily operable.
• A l way s c o n s i d e r t h e e nv i r o n m e n t w h e n
disposing of batteries.
• The use of apparatus in moderate climate.
LASER CAUTION:
USE OF CONTROLS OR ADJUSTMENTS OR
PERFORMANCE OF PROCEDURES OTHER THAN
THOSE SPECIFIED HEREIN MAY RESULT IN
HAZARDOUS RADIATION EXPOSURE.
CAUTION:
VISIBLE AND INVISIBLE LASER RADIATION
WHEN OPEN AND INTERLOCKS DEFEATED. DO
NOT STARE INTO BEAM.
LOCATION:
INSIDE, NEAR THE DECK MECHANISM.
The rating plate and the safety caution
are located on the rear enclosure of the
player.
EU Conformity Statement
This product is labeled with the CE Mark in
accordance with the related European Directives,
notably Low Voltage Directive 2006/95/EC,
Electromagnetic Compatibility Directive 2004/108/
EC and RoHS Directive 2011/65/EU. Furthermore
the product complies with the Ecodesign Directive
2005/32/EC (EuP) and 2009/125/EC (ErP) and its
related implementing measures.
Responsible for CE-marking is
TOSHIBA EUROPE GMBH
Hammfelddamm 8, 41460 Neuss, Germany
REACH information
The European Union (EU) chemical regulation,
REACH (Registration, Evaluation, Authorization
and Restriction of Chemicals), entered into force
on 1 June 2007, with phased deadlines to 2018.
Toshiba will meet all REACH requirements and
is committed to provide our customers with
information about the presence in our articles
of substances included on the candidate list
according to REACH regulation.
Please consult the following website www.
toshiba.eu/reach for information about the
presence in our articles of substances included
on the candidate list according to REACH in a
concentration above 0.1 % weight by weight.
Disposal of your old product and
batteries
Following information is only valid for EUmember States:
Disposal of products
The crossed out wheeled dust bin symbol indicates
that products must be collected and disposed
of separately from household waste. Integrated
batteries and accumulators can be disposed of
with the product. They will be separated at the
recycling centres.
The black bar indicates that the product was
placed on the market after August 13, 2005. By
participating in separate collection of products
and batteries, you will help to assure the proper
disposal of products and batteries and thus help
to prevent potential negative consequences for
the environment and human health.
For more detailed information about
the collection and recycling
programmes available in your country,
please visit our website (http://
www.recycle-more.co.uk/) or
alternatively, please contact your
retailer where the product was purchased.
Disposal of batteries and/or accumulators
The crossed out wheeled dust bin symbol
indicates that batteries and/or accumulators must
be collected and disposed of separately from
household waste. If the battery or accumulator
contains more than the specified values of lead
3
English
1 Important
English
(Pb), mercury (Hg), and/or cadmium (Cd) defined
in the Battery Directive (2006/66/EC), then the
chemical symbols for lead (Pb), mercury (Hg) and/
or cadmium (Cd) will appear below the crossed
out wheeled dust bin symbol. By participating
in separate collection of batteries, you will help
to assure the proper disposal of products and
batteries and thus help to prevent
potential negative consequences for
the environment and human health.
For more detailed information
about the collection and recycling
programmes available in your country, Pb,Hg,Cd
please visit our website (http://
www.recycle-more.co.uk/) or alternatively,
please contact your retailer where the product
was purchased.
General Information
This appliance may be fitted with a non-rewireable
plug.
If it is necessary to change the fuse in a nonrewireable plug the fuse cover must be refitted. If
the fuse cover is lost or damaged, the plug must
not be used until a replacement available from the
appliance manufacturer is obtained. If the plug
has to be changed because it is not suitable for
your socket, or becomes damaged, it should be
cut off and an appropriate plug fitted following
the wiring instructions below.
The plug removed must be disposed of safely as it
is hazardous if inserted into a live socket.
IMPORTANT
The wires in this mains lead are coloured in
accordance with the following code:
BLUE: NEUTRAL
BROWN: LIVE
As the colours of the wires in the mains lead of
this unit may not correspond with the coloured
markings identifying the terminals in your plug,
proceed as follows:
The wire that is coloured blue must be connected
to the terminal in the plug which is marked with
the letter N or coloured black.
The wire that is coloured brown must be
connected to the terminal which is marked with
the letter L or coloured red.
Do not connect either wire to the earth terminal
which is marked by the letter E or by the safety
earth symbol
or coloured green or green-andyellow. Use a 5A BS1362 fuse which is approved
by ASTA or BSI. Always replace the fuse cover
after changing the fuse.
4
The symbol for CLASS II (Double Insulation)
Copyright notice
This product incorporates copyright protection
technology that is protected by U.S. patents
and other intellectual property rights. Use of
this copyright protection technology must be
authorized by Rovi Corporation, and is intended
for home and other limited viewing uses only
unless otherwise authorized by Rovi Corporation.
Reverse engineering or disassembly is prohibited.
Notice for Trademark
2 Your Product
Manufactured under license from Dolby
Laboratories. Dolby and the double-D symbol are
trademarks of Dolby Laboratories.
‘DVD Video Logo’ is a trademark of DVD Format/
Logo Licensing Corporation.
Both the DVD Player and the discs are coded by
region. These regional codes must match in order
to play the disc. If the codes do not match, the
disc will not play. The Region Number for this DVD
Player is described on the rear panel of the DVD
player.
Region
DVD discs that can
be played
U.S.A. and Canada
regions
U.K., Europe regions
and Japan
Asia Pacific, Taiwan,
Korea
Australia, New Zealand,
Latin America
Russia and India
regions
China, Calcos Islands,
Walls and Futuna
Islands
5
English
Regions codes
Product overview
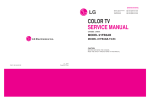
Front panel
English
1
2
3
4
5
6
(Sample Illustration) Front panel controls
Item
Description
Function
1
Disc compartment
Load a disc into the disc drive.
2
IR Sensor
Point the remote control at the IR sensor.
3
Z
Open or close the disc compartment.
4
r
Stop playback.
5
u
Playback/pause.
6
1
Turn the power on (indicator glows green) or restore the unit to the
standby mode (indicator is off).
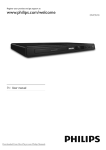
Back panel
2
1
4
5
3
(Sample Illustration) Back panel connections
Item
6
Description
Function
1
AC power cord
Connect to a standard AC outlet.
2
VIDEO OUT jack
(CVBS)
Connects to CVBS Video input of a TV.
3
COAXIAL DIGITAL
OUT jack
Output digital audio signals when connecting the coaxial digital cable.
4
AUDIO OUT jacks
Connects to Audio input of a TV, an amplifier, receiver or stereo system.
5
SCART OUT jack
Connects to Scart input of a TV.
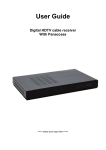
Remote control
OPEN/CLOSE
Opens/closes the disc tray
Number Buttons
Selects numbered items in
a menu
Enters track/chapter/title
numbers/password directly
+10 button
Enters number greater
than 9
Press +10 button repeatedly
to select 10,20,30...etc
MENU
Enters the disc menu
Switches Playback Control
(PBC) On/Off (for VCD 2.0/
SVCD only)
RETURN
Returns to previous menu.
Returns to disc menu during
VCD 2.0/SVCD playback if
PBC is On
F.R & F.F
Fast reverses/ fast forwards
playback
PREV & NEXT
Skips to previous/next
chapter/title/track
REPEAT
Selects various repeat modes
A-B
Repeats from A to B
SLOW
Do a slow forward during
normal playback
CLEAR
Delete the mistyped entries
or cancel some functions
RANDOM
Toggles between Normal
and Random during Audio
CD playback
PROG
To create or cancel a
program playback list
REMOTE SIGNAL EMITTER
Point remote control to the
sensor on the front panel
ON / STANDBY
Turns the unit to ON or
standby mode
English
DISPLAY
Displays a window to locate
a title, chapter or track
T-SEARCH
Start playback from a
designated point
SETUP
Opens the system setup
menu
Navigation/Cursor buttons
for moving to the left / right
/up/down
Press /
/ during JPEG
playback to rotate the current
photo
OK
Acknowledges/Confirms menu
selection
TITLE
Show title menu
STEP
Advances the video frameby-frame during pause mode
PLAY/PAUSE
Starts/Pauses playback
STOP
Stops playback
Press to view a page of 12
thumbnail images during
JPEG playback
SUBTITLE
Displays subtitle; press
repeatedly to select different
subtitles available in your disc
ANGLE
Switches the camera angle
during playback
AUDIO
Selects the sound stream;
press repeatedly to select
different audio streams
available in your disc (DVD)
or an audio mode (VCD)
ZOOM
Zooms in
7
3 Connections
Make the following connection to use this product.
English
Connecting to a TV
IN or SCART IN) on the TV and use the audio
cables (white/red) to connect AUDIO OUT (L/
R) jacks of the DVD player to the corresponding
AUDIO IN jacks on the Stereo System (cable not
supplied).
AUDIO IN
VIDEO IN
Connecting to the Composite Video/Audio
(CVBS) jack
Use the composite video cable (yellow) to connect
the DVD player's VIDEO (CVBS) jack to the video
input jack (or labelled as A/V in, Video In or
Composite) on the TV (cable not supplied).
To hear the sound of this DVD player through your
TV, use the audio cables (white/red) to connect
AUDIO OUT (L/R) jacks of the DVD player to
corresponding AUDIO IN jacks on the TV (cable
not supplied).
AUDIO IN
VIDEO IN
Audio cable
(not supplied)
(Sample Illustration) Connecting to a TV - Composite
Video/Audio (CVBS) jack
AUDIO IN
Audio cable
(not supplied)
(Sample Illustration) Connecting to a Stereo System
Connecting to the digital amplifier/
receiver
Route the sound from this player to other device
to enhance audio output.
Connect a coaxial cable from the COAXIAL
DIGITAL OUT jack on this product to the COAXIAL
jack on the device.
Digital audio coaxial
cable (not supplied)
VIDEO IN
Connecting to the SCART jack
Use the scart cable to connect the DVD SCART
OUT to the corresponding SCART input jack on
the TV (cable not supplied).
If your DVD player will not be connected to a
Stereo System or AV Receiver to hear better
sound, SCART is enough for both audio and video
connections.
Scart cable
(not supplied)
(Sample Illustration) Connecting to a TV - SCART jack
Connecting to a Stereo System
Select one of the video connections (CVBS VIDEO
8
Digital AV receiver/amplifier
(Sample Illustration) Connecting to a digital AV
receiver/amplifier
Connecting Power
After all the AV connections are made, connect
the AC power cable to the wall socket.
• The product is ready to be set up for use.
Notes:
• Before connecting the AC power cord, ensure
you have completed all other connections.
• Risk of product damage! Ensure that the power
supply voltage corresponds to the voltage
printed on the back of the unit.
• The type plate is located on the back of the
unit.
4 Preparation
Note:
- Use of controls or adjustments or performance
of procedures other than herein may result in
hazardous radia on exposure or other unsafe
opera on.
Prepare the remote control
Find the correct viewing input
1.P ress 1 ON/STANDBY to turn on this
product.
2.Turn on the TV and switch to the correct videoin input (refer to the TV user manual on how to
select the correct input).
Use the SETUP menu
1.P ress SETUP to display the setup screen in
stop mode or no disc playback.
1. Open the battery cover down.
2. Insert two AAA batteries with correct polarity
(+ / -) as indicated.
3. Close the battery cover.
Notes:
- If you are not going to use the remote control
for a long time, remove the batteries.
- Do not use old and new or different types of
batteries in combination.
- Risk of explosion! Keep battery away from heat,
sunshine or fire. Never discard battery in fire.
• T
he maximum operable ranges from the
unit are as follows.
- Line of sight: approx. 10 m (original state)
- Either side of the centre: approx. 7 m within 30°
(original state)
- Above: approx. 7 m within 30° (original state)
- Below: approx. 7 m within 30° (original state)
7m
10m
7m
9
English
Setting up the player
Always follow the instructions in this chapter in
sequence.
5 Playback
Playback Functions
English
Basic Playback
1.Press 1 ON/STANDBY button on the front
panel or the remote control, your DVD player
will turn on.The unit will take around 10
seconds to warm up.
2.Turn on the TV, and then select the input
setting on the TV that matches the connection
method you used to connect your player.
3.Press OPEN/CLOSE to slide out the disc tray.
4.Place a disc on the disc tray with the label
facing up, and then press OPEN/CLOSE
to close the disc tray. The disc loading time
depends on the types of disc you are loading.
5.If the disc does not start playing automatically,
please press PLAY/PAUSE u to start
playback.
6.If a DVD menu displays, use cursor buttons to
select PLAY. Then, press OK button to confirm.
7.To eject the disc, press OPEN/CLOSE.
to skip back to the beginning of the current chapter or track or the previous chapter or
track.
2. Press the button NEXT M_ during playback
will allow you to skip the playback to next
chapter or track.
Slow Forward
1. Press the SLOW button during normal
playback. The slow forward speed is 1/2 in
default.
2. To change slow forward speed, press the
SLOW button repeatedly, and the slow
forward speed will be changed in the following
sequence: 1/2, 1/4, 1/8, normal.
3. To exit slow forward mode and return to
normal playback, press the PLAY/PAUSE u
button.
Pause playback
1. Press PLAY/PAUSE u button to pause playback.
2.Press PLAY/PAUSE u button to resume the
playback.
Step Forward
Use this feature to help you to enjoy the video
frame by frame.
1. Press the PLAY/PAUSE u button during
normal playback, then playback will change to
pause state.
2. Press the STEP button repeatedly to advance
the picture frame by frame.
3. Press the PLAY/PAUSE u button to resume
normal playback.
Stop playback
1.Press the STOP r button once to go to resume
mode, the TV screen will show the resume logo.
Press the PLAY/PAUSE u button to resume
playback from the point where playback is
stopped.
2. Press the STOP r button twice to stop the playback
completely.
Advanced Playback
DISPLAY
Press the DISPLAY button and the screen will
display some information about disc, such as: Title
number, Chapter number, Track number, Elapsed
Time.
Press this button repeatedly to turn off the
information display.
Fast Forward and Fast Reverse
1.Press the F.F M button to fast forward through
the disc. The fast forward speed changes based
on how many times you pressed the button.
2.Press the F.R m button to fast reverse through
the disc. The fast reverse speed changes based
on how many times you pressed the button.
The speed will increase through the following
sequence: 2X, 4X, 8X, 16X, 32X.
3.Press the PLAY/PAUSE u button to resume
normal playback.
Previous and Next
1. During playback, press the button PREV _m
10
REPEAT
Press the REPEAT button repeatedly to select
different repeat modes.
DVD: Repeat Chapter, Title and All.
VCD PBC Off/CD-DA: Repeat Track and All.
A-B
1.To play certain section within the video or song,
press the A-B button to set the start point.
2.Press A-B button again to set the end point
and complete the setting. The selected section
will be played repeatedly.
3.Press the A-B button the third time to cancel
this function.
Not all DVD discs support the repeat A-B feature.
TITLE
During VCD playback and PBC On is selected,
Press the TITLE button to display PBC Menu.
MENU
During VCD or SVCD playback, press MENU to
switch PBC On/Off.
During DVD playback, press MENU button to
open the disc menu.
RETURN
Press the RETURN button to return to the
previous on-screen menu in setting menu such as
Password Change, Parental, etc.
During VCD disc playback and PBC On is selected,
press the RETURN button to return to PBC Menu.
PROG
During DVD/VCD playback, you can press the
PROG button to edit the sequence of the playlist.
1.Press PROG button to enter the Program
playlist setting menu.
2.Press the numeric buttons to set your desired
title/chapter/track.
3.After finish inputting , select "Start" and press
OK button to start playback the disc based on
the Program playlist.
4.To clear the Program playlist, press PROG,
select "Stop" and press OK. To exit, press
PROG or select "Exit".
ZOOM
Press the ZOOM button repeatedly to Zoom in
playback in the video.
Zoom mode:
2x ->
3x ->
4x
SUBTITLE
Press the SUBTITLE button repeatedly and
the screen will display "Subtitle X/XX XXX" or
"Subtitle Off".
"X" indicates the current number of this language;
"XX" indicates the total number of language;
"XXX" indicates the language.
The number of available languages depends on
the disc.
AUDIO
Press the AUDIO button on the remote control to
select the audio streams that set within the DVD
disc or an audio channel (VCD).
During VCD playback, the screen will display
"Mono Left", "Mono Right", "Mix-Mono" or "Stereo".
During DVD playback, the screen will display:
AUDIO: X / XX XXX XXXX
“X” - The current audio stream number
“XX” - The total number of audio streams
"XXX" - Audio Technology
"XXXX" - Audio Language
ANGLE
During DVD playback, press this button to change
the angle of the picture. The screen will display
"
X/X".
The first “X” indicates the current number of
angle, and the second “X” indicates total number
of angles.
SETUP
Press the SETUP button, and the screen will
display some information about the player, such
as: General; Audio; Video; Preference.
RANDOM
When playing the Audio CD, press the RANDOM
button, the audio will play randomly and the
screen will display the "Random" prompt.
Playing JPEG files
You can play JPEG files that have been recorded
on a disc on the player.
1.Load a disc that contains JPEG files.
2.Press the v/V button to select a file (or folder)
and press OK or PLAY/PAUSE u to start
playback.
Note:
- Not all media formats are supported.
11
English
T-SEARCH
During DVD playback, press the T-SEARCH
button to edit Title, Chapter, Audio, Subtitle,
Angle, TT (Title), CH (Chapter) Time, Repeat and
Time Disp. (Display) menu.
During VCD playback, press the T-SEARCH
button to edit Track, Disc Time, Track Time,
Repeat and Time Display menu.
1.Press v/V and OK button on the remote control
to select Title, Chapter, or Time etc.
2.Press the numeric buttons or v/V and then
press OK. The playback will skip to the desired
location.
3.Press T-SEARCH to exit and resume full
screen.
Note:
- Playback will not be stopped even when the
menu is on the screen.
6 Customizing
English
This section describes the various setting option
of this DVD player.
1.If the setup option is greyed out, it means the
setting cannot be changed at the current state.
2.P ress the SETUP button in stop mode to
display the setup screen.
General
Audio
Video
Preference
- - General Setup Page - TV Display
Angle Mark
OSD Lang
Screen Saver
Full
On
Eng
On
Go To Setup Page
General
1.In Setup menu, use b/B to select General
and press OK.
2.Press v/V to select an option and press OK.
3.Press b or the RETURN button to return to
the previous menu.
[TV Display]
Select the screen format according to how you
want the picture to appear on the TV.
{4:3 Pan Scan} - For standard TV, it displays a
wide picture on the entire screen and cuts off the
redundant portions.
{4:3 Letter Box} - For standard TV, it displays
a wide picture with two black borders on the top
and bottom of 4:3 screen.
{16:9 Full} - For a disc with the aspect ratio of
4:3, the output video is stretched into 16:9 full
screen.
{16:9 Normal} - For a disc with the aspect ratio
of 4:3, the output video is resized vertically to
match what will be seen on the display.
[Angle Mark]
Some DVDs contain the scenes recorded with
multiple angles, which allow you to enjoy the
videos with your desired angles, therefore the
angle mark is displayed only when the DVD disc is
supportable for multi-angle and Angle Mark is set
to ON.
{On} - Display the angle mark.
{Off} - Hide the angle mark.
[OSD Lang]
Select the on-screen menu language.
12
[Screen Saver]
Turn On or Off the screen saver mode. It helps to
protect the TV screen.
{On} - Set the screen saver active after
approximately 2 minutes without operation.
-- The DVD player will switch to standby mode if
there is no operation after the screen saver is
engaged for approximately 18 minutes.
{Off} - Turn off the screen saver mode.
-- The DVD player will not switch to standby mode
automatically.
Audio
1.In Setup menu, use b/B to select Audio and
press OK.
2.Press v/V to select an option and press OK.
3.Use v/V to select the desired Audio setting
and press OK.
4.Press b or the RETURN button to return to
the previous menu.
Analog Setup
[Analog]
{Down Sampling} - Downmixes the multichannel audio into two channel surround
compatible stereo. Choose when the unit is
connected to equipment that support virtual
surround function such as Dolby Pro Logic. This
mode make a downmix as decode surround
elements when the original audio does include
channel mode such as surround elements.
{Stereo} - Downmixes the multi-channel audio
into two channel stereo. Choose when the unit
is connected to equipment that does not support
virtual surround function such as Dolby Pro Logic.
This mode make a stereo mix audio when the
original audio does not include channel mode such
as surround elements.
{Surround} - Downmixes the multi-channel
audio into two channel virtual surround stereo.
Choose when the unit is connected to equipment
that does not support virtual surround function
such as Dolby Pro Logic.
[DRC]
Select the Dynamic Range Control mode which
makes it available to listen to a movie at a low
volume without losing sound clarity.
{On} - Dynamic range compress.
{Off} - Non-dynamic range compress.
SPDIF Setup
[SPDIF Output]
When you connect an audio system to the
COAXIAL DIGITAL OUT jack, the options are:
[LPCM Out]
Selects LPCM Out (Linear Pulse Code Modulation)
sampling rate. The higher the sampling rate, the
better the sound quality.
{48k} - For discs recorded at sampling rate of 48
kHz.
{96k} - For discs recorded at sampling rate of 96
kHz.
3D Processing
[Reverb Mode]
Use the v/V button to view the reverb mode
available in the player and select your desired
reverb mode.
{Off } - Turn the reverb mode off.
{Concert} - Select Concert mode.
{Living Room} - Select Living Room mode.
{Hall} - Select Hall mode.
{Bathroom} - Select Bathroom mode.
{Cave} - Select Cave mode.
{Arena} - Select Arena mode.
{Church} - Select Church mode.
Video
1. In Setup menu, use b/B to select Video and
press OK.
2. Press v/V to select an option and press OK.
3. Use v/V to select the desired Video setting
and press OK.
4. Press b or the RETURN button to return to
the previous menu.
[SCART]
Select the scart out mode of the Video.
{Video} - Select Video mode.
{RGB} - Select RGB mode.
Quality
Select the Quality according to how you want the
picture to appear on the TV.
[Sharpness]
Select the level of sharpness: High, Medium, Low.
{High} - Select High sharpness level.
{Medium} - Select Medium sharpness level.
{Low} - Select Low sharpness level.
[Brightness]
Press b/B to adjust the brightness of display,
goes left means dark and right means bright.
[Contrast]
Press b/B to adjust the contrast of display, goes
left means low contrast and right means high
contrast.
[Gamma]
Select the level of gamma: None, Low, Medium,
High.
{None} - No gamma function selection.
{Low} - Select Low gamma level.
{Medium} - Select Medium gamma level.
{High} - Select High gamma level.
[Hue]
Press b/B to adjust the Hue of display, goes left
means low hue and right means high hue.
[Saturation]
Press b/B to adjust the saturation of display, goes
left means low Saturation and right means high
saturation.
Preference
1.In Setup menu, use b/B to select Preference
and press OK.
2.Press v/V to select an option and press OK.
3.Use v/V to select the desired Preference
setting and press OK.
4.Press b or the RETURN button to return to
the previous menu.
[TV Type]
The video standard of the DVD player output can
be selected from NTSC, PAL or Multi.
{PAL TV} - Select if your TV system is PAL.
{Multi} - The DVD video player automatically
identifies PAL or NTSC video system of a disc.
Connect a multisystem TV (PAL/NTSC compatible)
to view a picture.
{NTSC TV} - Select if your TV system is NTSC.
Note:
- A playback picture may be distorted when
detected a signal change between PAL and NTSC
on the disc.
[PBC]
Select to display or skip the content menu for VCD
13
English
{SPDIF Off} - No audio will be output via
COAXIAL DIGITAL OUT jack.
{Bitstream} - Selects Bitstream output if
your receiver SPDIF (Coaxial) IN only supports
Bitstream stereo audio signal.
{SPDIF/PCM} - Selects SPDIF/PCM output if
your receiver SPDIF (Coaxial) IN only supports
SPDIF/PCM stereo audio signal.
and SVCD.
{On} - Display the content menu
{Off} - Hide the content menu.
English
[Audio]
Select the audio language of your preference.
[Subtitle]
Select your preferred subtitle language.
[Disc Menu]
Select the disc menu language.
[Parental]
Restricts access to discs that are unsuitable
for children. These discs must be recorded with
rating.
{Kid safe} - Safe for kids.
{G} - All children and general guidance.
{PG} - Parental guidance.
{PG-13} - Parental guidance for children under 13.
{PG-R} - Parental guidance recommended.
{R} - Restricted viewing.
{NC-17} - No one 17 and under allowed.
{Adult} - Adult only.
Note:
- Rated discs above the level you set in [Parental]
require a password to be entered.
Password
[Password Mode]
{On} - To turn on the password mode. You will
be prompted to enter the password, key in the
default password or the password which you have
set.
- During disc playback, rated disc above the level
you set in [Parental] will require a password to be
entered.
{Off} - To turn off the password mode. You will
be prompted to enter the password, key in the
default password or the password which you have
set.
- You will not be required to enter the password
when setting the level in [Parental] but during
disc playback with the rated disc above the level
you set in [Parental] will still require a password
to be entered.
[Password]
To change the password for playing restricted
DVDs.
{Change} 1.Use NUMBER keys to enter six digit old
password. The default password is "136900".
2. Enter the new password.
14
3. E
nter the new password again to confirm.
If you forget the password, you can erase
your current password by entering the default
password.
[Default]
Reset all settings of DVD player to initial default
state.
7 Specifications
English
Playable media
This product can play:
• DVD, DVD-Video, DVD-R/-RW, DVD-R DL (Dual Layer)
• Video CD/SVCD
• Audio CD, CD-R/CD-RW
Video
• Signal system: PAL/NTSC
Audio
• Digital output (Coaxial): 0.5 Vp-p (75 Ω)
Main Unit
• Power supply rating: 110V-240V, 50/60Hz
• Power consumption: 8W
• Power consumption in standby mode: <0.5W
• Dimensions (w x h x d): 270 x 38 x 200 (mm)
• Net Weight: 0.95 kg
• Operating temperature: 5°C to 35°C
• Operating humidity: Less than 80% (no condensation)
Accessories supplied
• Remote control (SE-R0301)
• Two AAA size batteries
• Quick start Guide
Compatible file formats
JPEG
• Supported file extension: '.jpg' or '.jpeg'
• JPEG/ISO format
• Support Picture CD
Other formats
• CD-DA, AC-3, MPEG-1, MPEG-2, AVI ('.avi'), MPEG ('.mpg', '.mpeg'), DAT, VOB
Note:
- Product specifications, configurations, prices, system/component/options availability are all subject to
change without notice.
15
8 Troubleshooting
If you experience any of the following difficulties while using this unit, check the list below before
consulting your nearest TOSHIBA dealer.
English
Problem
Tip
N o r e a c t i o n t o t h e r e m o t e Connect the product to the power outlet.
control.
Point the remote control at the product.
Insert the battery correctly.
Insert new battery in the remote control.
No video signal on the display Turn on the TV.
device.
Set the TV to the correct external input.
Select the correct video resolution.
Set TV System of TV correctly.
N o a u d i o s i g n a l f r o m t h e Turn on the audio system.
loudspeakers of the audio
Set the audio system to the correct external input.
system.
Increase the volume level of the audio system.
Cannot play back a disc.
Make sure that the DVD player supports the disc.
Make sure that the DVD player supports the region code of
the DVD.
For DVD+RW/+R or DVD-RW/-R, make sure that the disc is
finalized.
Clean the disc.
Cannot play back JPEG files from Make sure that the disc was recorded in the JPEG/ISO format.
a disc.
Cannot find a JPEG file.
Make sure that the selected group (folder) does not contain
more than 2,000 files.
Make sure that the file extension is .jpg, .JPG, .jpeg or .JPEG.
Sometimes the options of setup When playing a DVD disc, press STOP button once, the player
menu cannot be selected.
will go into stop resume mode, meanwhile you cannot change
some settings in setup menu such as language subitem
menu, audio, subtitle etc. If you want to change that, press
STOP button twice, the player will go into full stop mode,
then you can do it.
16
Aspect ratio
Aspect ratio refers to the length to height ratio
of TV screens. The ratio of a standard TV is 4:3,
while the ratio of a high definition or wide TV is
16:9. The letterbox allows you to enjoy a picture
with a wider perspective on a standard 4:3
screen.
AVI
Audio Video Interleave, known by its acronym
AVI, is a multimedia container format. AVI files
can contain both audio and video data in a file
container that allows synchronous audio-withvideo playback.
Chapter
Just as a book is split up into several chapters,
a title on a DVD-video is usually divided into
chapters.
Digital Audio
Digital Audio is a sound signal that has been
converted into numerical values. Digital sound
can be transmitted through multiple channels.
Analogue sound can only be transmitted through
two channels.
Region code
A system that allows discs to be played only in
the region designated. This unit only plays discs
that have compatible region codes. You can find
the region code of your unit on the product label.
Some discs are compatible with more than one
region (or ALL regions).
Sampling Frequency
The rate which sound is measured by a specified
interval to turn into digital audio data. The
numbers of sampling in one second defines as
sampling frequency. The higher the rate, the
better the sound quality.
Title
A collection of chapters on DVD-video.
Track
Audio CD use tracks to divide up the content of a
disc. The DVD-video equivalent is called a chapter.
See also "Chapter".
Dolby® Digital
The system to compress digital sound developed
by Dolby Laboratories. It offers you sound of
stereo (2ch) or multichannel audio.
HDCP
High-bandwidth Digital Content Protection. This is
a specification that provides a secure transmission
of digital contents between different devices (to
prevent unauthorized copyright.)
JPEG
A very common digital still picture format. A stillpicture data compression system proposed by the
Joint Photographic Expert Group, which features
small decrease in image quality in spite of its high
compression ratio. Files are recognized by their
file extension '.jpg' or '.jpeg'.
PCM
Pulse Code Modulation. A digital audio encoding
system.
17
English
9 Glossary