1
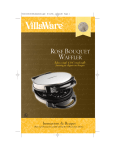
TMBL1134 Manual
8/24/06
2:08 PM
Page 1
OWNER’S MANUAL
Model Nos. TMBL1134, TMBL1134 RA
Toastmaster
®
BLENDER
TMBL1134 Manual
8/24/06
2:08 PM
Page 2
IMPORTANT SAFEGUARDS
When using electrical appliances, basic safety precautions should
always be followed including the following:
1. Read all instructions.
2. To protect against risk of electrical shock do not put cord, plugs,
or appliance in water or other liquid.
3. Close supervision is necessary when any appliance is used by
or near children.
4. Unplug from outlet when not in use, before putting on or taking
off parts, and before cleaning.
5. Avoid contacting moving parts.
6. Do not operate any appliance with a damaged cord or plug or
after the appliance malfunctions, or is dropped or damaged in
any manner. Contact Consumer Service for examination, repair
or electrical or mechanical adjustment.
7. The use of attachments, including canning jars, not
recommended by the manufacturer may cause a risk of injury
to persons.
8. Do not use outdoors.
9. Do not let cord hang over edge of table or counter.
10. Do not let cord contact hot surface, including the stove.
11. Keep hands and utensils out of the Blending Jar while blending
to reduce the risk of severe injury to persons or damage to the
Blender. A scraper may be used but must be used only when
the Blender is not running.
12. Blades are sharp. Handle carefully.
13. Always operate Blender with Blending Jar Lid in place.
14. Do not blend hot liquids.
SAVE THESE INSTRUCTIONS
THIS PRODUCT IS FOR HOUSEHOLD USE ONLY
ADDITIONAL IMPORTANT SAFEGUARDS
1. All users of this appliance must read and understand this
Owner’s Manual before operating or cleaning this appliance.
2. The cord to this appliance should be plugged into a 120V AC
electrical outlet only.
3. Do not leave this appliance unattended during use.
4. If this appliance begins to malfunction during use, immediately
press the OFF button and unplug the cord. Do not use or
attempt to repair the malfunctioning appliance.
5. If this appliance falls or accidentally becomes immersed in
water, unplug it immediately. Do not reach into the water!
Do not use this appliance after it has fallen into or becomes
immersed in water.
6. To reduce the risk of injury to persons or property, never use
this appliance in an unstable position.
7. Do not use this appliance for other than its intended use.
8. Do not use if the Blending Jar is cracked or chipped.
POLARIZED PLUG
This appliance has a polarized plug (one blade is wider than the
other). To reduce the risk of electric shock, this plug is intended to
fit into a polarized outlet only one way. If the plug does not fit fully
in the outlet, reverse the plug. If it still does not fit, contact a
qualified electrician. Do not attempt to modify the plug in any way.
SHORT CORD INSTRUCTIONS
A short power supply cord is provided to reduce the risk resulting
from becoming entangled in or tripping over a longer cord.
Do not use an extension cord with this product.
PLASTICIZER WARNING
CAUTION: To prevent Plasticizers from migrating from the finish of
the counter top or table top or other furniture, place
NON-PLASTIC coasters or place mats between the appliance
and the finish of the counter top or table top.
Failure to do so may cause the finish to darken, permanent
blemishes may occur or stains can appear.
ELECTRIC POWER
If the electrical circuit is overloaded with other appliances, your
appliance may not operate properly. It should be operated on a
separate electrical circuit from other appliances.
2
3
TMBL1134 Manual
8/24/06
2:08 PM
Page 4
GETTING TO KNOW YOUR
TOASTMASTER® BLENDER
PRODUCT MAY VARY SLIGHTLY FROM ILLUSTRATIONS
2.
1.
3.
1. Lid Assembly
2. Lid Insert (P/N 71257)
3. Lid (P/N 71258)
4. Blending Jar (P/N 71259)
5. Gasket (P/N 71260)
4.
1500
6. Blades
BEFORE USING FOR THE FIRST TIME
CAUTION: Use extreme care when handling the Blade. Do not
touch the Blades with your fingers. The Blades are very sharp
and can cause injury if touched.
1. Carefully unpack the Blender, Blending Jar, and all parts.
2. Wash the Lid Insert, Gasket, Blending Jar, Lid, and Collar
Assembly in warm soapy water. Rinse and dry thoroughly.
3. Make sure the cord is unplugged and the OFF button has
been pressed.
CAUTION: To protect against risk of electrical shock, do not place
Motor Housing, plug or cord in water or any other liquid.
4. Wipe the Motor Housing clean with a moistened cloth. Dry
thoroughly.
NOTE: Collar Assembly with Blades is a fixed part and cannot be
disassembled.
1250
7. Collar Assembly (P/N 71262)
1000
750
8. Collar
500
9. Motor Housing
250
10. Control Panel
5.
6.
7.
8.
9.
OFF
1
2
3
BLENDER ASSEMBLY INSTRUCTIONS
NOTE: Before assembling, make sure the cord is unplugged.
CAUTION: Use extreme care when handling the Blades. Do not
touch Blades with your fingers. The Blades are very sharp and
can cause injury if touched.
1. Carefully place the Gasket over the Collar Assembly.
2. Set the Blending Jar on top of the Gasket and Collar Assembly.
3. Carefully hold the Collar Assembly with one hand and turn the
Blending Jar clockwise to firmly secure it in position.
NOTE: The Gasket and Collar Assembly must be firmly attached
to the Blending Jar before putting any foods or liquids into
the Blending Jar.
OPERATING INSTRUCTIONS
CAUTION: Keep hands and utensils out of the Blending Jar while
blending to prevent the possibility of severe injury to persons
or damage to the unit. A scraper may be used but must only be
used when the unit is not running.
CAUTION: Use extreme care when handling the Blades. Do not
touch Blades with your fingers. The Blades are very sharp and
can cause injury if touched.
1. Before starting, make sure power cord is unplugged and the
OFF button has been pressed.
PULSE
10.
Figure 1
4
5
TMBL1134 Manual
8/24/06
2:08 PM
Page 6
OPERATING INSTRUCTIONS
(CONTINUED)
2. Make sure that the Collar Assembly and Gasket are properly
assembled and securely fastened to the Blending Jar. See
Assembly Instructions for details.
3. Place the Blending Jar on top of the Motor Housing making sure
it is firmly seated and not tilting to one side. Hold the Motor
Housing and turn the Blending Jar clockwise until it locks into
position.
CAUTION: Never place the Collar Assembly on the Motor
Housing without the Blending Jar being completely assembled
and securely tightened.
4. Add ingredients to the Blending Jar.
NOTE: Do not fill the Blending Jar more than 3⁄4 full. Never
operate when the Blending Jar is empty.
5. Place Lid with Lid Insert on Blending Jar.
IMPORTANT: Always hold Lid in place during processing.
6. Plug the power cord into a 120V AC electrical outlet. Press
buttons 1-3 for desired speed setting: 1 is the lower speed; 2
is the middle speed and 3 is the highest speed. Blend until
ingredients have reached desired consistency.
CAUTION: If Blending Jar rotates during blending, immediately
press the OFF button, then secure by tightening the Gasket
and Collar Assembly on Blending Jar.
•Do not touch Blades
•Do not interfere with the Blade movement
•Do not remove Blending Jar Lid
7. When blending is completed, press the OFF button to stop the
Blender and unplug the unit.
8. Grasp container handle, turn container counter-clockwise and
lift off of Motor housing. Remove Lid Assembly. Pour.
USER MAINTENANCE INSTRUCTIONS
This appliance requires little maintenance. It contains no user
serviceable parts. Do not try to repair it yourself. Any servicing that
requires disassembly must be performed by a qualified appliance
repair technician.
CARE AND CLEANING
1. Unplug the appliance.
2. Grasp Blending Jar handle, turn counter-clockwise and lift off
of Motor Housing. Remove Lid Assembly and pour processed
food out of container. Unscrew Collar Assembly from Blending
Jar and carefully remove.
CAUTION: Blades are sharp. Handle carefully.
CAUTION: Never place Motor Housing in water or
other liquids.
3. Immediately after each use, disassemble Lid and Blending Jar.
Carefully wash all parts in warm sudsy water. Rinse and dry
thoroughly. Do not wash parts in dishwasher.
4. Do not use a harsh abrasive on any part of the Blender.
5. Clean exterior of Motor Housing with a soft damp cloth
and dry.
6. Reassemble Gasket and Collar Assembly onto Blending Jar.
Place onto Motor Housing and cover with Lid Assembly. Spin
dry for 10 seconds. Store with Lid Assembly ajar.
CAUTION: Always assemble clean and dry blender parts correctly
before storing on the Motor Housing. Severe injury
can result if Blender is accidentally turned ON when not
properly assembled.
HELPFUL HINTS
PULSE SETTING
This setting can be used for such food items as crumbling crackers,
grating cheese or chopping vegetables.
1. Press the PULSE button repeatedly until desired consistency has
been reached.
2. When pulsing is completed, unplug the unit.
6
DO
• Always place liquid ingredients into the container first, unless
recipe directs otherwise.
• Most foods require only seconds, not minutes, to process.
• Blend small amounts of solid food at a time for best results.
7
TMBL1134 Manual
8/24/06
2:08 PM
HELPFUL HINTS
Page 8
(CONTINUED)
• Break or cut food into uniform 1”– 2” size pieces and hard
fibrous food into uniform 1⁄2” pieces before processing. This
will allow the food to drop down around the blades for faster,
more thorough blending action.
• Always place Lid Assembly on Blending Jar before turning
Blender on to prevent splattering.
• To add foods while Blender is operating, remove small clear
insert on Lid and slowly add ingredients.
• Always remove bones, pits, hard shells, seeds, and cores before
processing to avoid damaging the unit.
• If food sticks to sides of container and blending action stops,
turn the unit off, remove the Lid Assembly and carefully push
food down using a rubber spatula. Remove spatula, replace Lid
Assembly and continue blending.
• If motor labors while processing, turn knob to higher speed or
remove part of contents and blend in small batches.
DO NOT
CAUTION: Do not attempt to operate without the Collar
Assembly, Gasket, Blending Jar and Lid inserted properly
in place.
• Do not attempt to process extremely hard food which is difficult
to cut with a kitchen knife.
• Do not fill the Blending Jar more than 3⁄4 full.
• Do not store foods in the Blending Jar.
• Do not process ice without liquids.
• Do not attempt to use the Blender to mash potatoes, whip egg
whites or cream, grind raw meat, knead heavy doughs, or
extract juices from fruits and vegetables.
• Do not use the Blender to process hot foods.
• Do not remove Blending Jar from Motor Housing or replace it
until motor has stopped.
• Do not remove Lid Assembly while processing. Use removable
insert on Lid to add ingredients.
8
RECIPES
BEVERAGES
Place all the ingredients in the container in the order listed.
Cover and blend on speed 3 until smooth, from 15 – 60 seconds.
Serve immediately. Each recipe makes 2 – 4 servings.
COTTAGE CHEESE COCKTAIL
1 cup chilled V-8® vegetable
juice
1
⁄2 cup cottage cheese
CHOCOLATE MILK SHAKE
2 cups cold milk
1
⁄4 cup chocolate syrup
11⁄2 cups vanilla or chocolate
ice cream
CRANAPPLE COCKTAIL
PINEAPPLE JUICE
1 1⁄2 cups cold cranapple juice
2 TBL lemon juice
8 – 10 ice cubes, added one
at a time
1 can (51⁄4 oz.) crushed pineapple
w/juice
1 cup cold milk
2 drops maple extract
8 – 10 ice cubes, added one
at a time
BANANA SMOOTHEE
2 cups cold milk
2 ripe bananas
1
⁄4 tsp cinnamon
8 – 10 ice cubes, added one
at a time
YOGURT PEACH SHAKE
1 cup frozen sliced peaches
w/juice (slightly thawed)
1 cup yogurt
1 TBL powdered sugar
sprinkle of cinnamon
MOCHA FRAPPE
11⁄2 cups cold milk
2 tsp instant coffee
1
⁄4 tsp cinnamon
1
⁄2 pint chocolate frozen yogurt
CRANBERRY REFRESHER
1 cup cold cranberry juice
1 cup cold milk
2 TBL powdered sugar
1
⁄4 tsp vanilla
ORANGE FROSTY
1 can (6 oz.) frozen orange
juice concentrate
1 cup cold water
1 cup cold milk
1
⁄2 cup sugar
1 tsp vanilla
8 – 10 ice cubes, added one
at a time
FRUIT SHAKE
1 cup ice cream
1 cup cold milk
1 cup frozen strawberries
(slightly thawed)
3 TBL powdered sugar
9
TMBL1134 Manual
8/24/06
2:08 PM
Page 10
SALAD DRESSINGS
MARINADES
MAYONNAISE
1 egg
2 TBL vinegar
1 tsp sugar
1
⁄2 tsp dry mustard
1
⁄2 tsp salt
1 cup salad oil — divided
SPICY COTTAGE CHEESE DRESSING
⁄2 cup salad oil
8 oz. tomato juice
1
⁄2 tsp Tabasco® pepper sauce
1 green onion, cut into pieces
1 cup cottage cheese
1
Place ingredients into Blender
in order listed. Cover and mix on
speed 3 for 15 – 30 seconds or until
smooth. Makes 11⁄2 cups.
Place egg, vinegar, sugar,
mustard, salt and 1⁄4 cup of the oil
into Blender. Cover and mix on
speed 3 until smooth, about 5
seconds. Without stopping
Blender, remove lid insert and
gradually pour in remaining oil.
Stop Blender when all oil has
been added. Makes 11⁄4 cups.
HIDDEN VALLEY DRESSING
⁄2 cup milk
1 cup yogurt
1 pkg. (1.1 oz.) Original Hidden
Valley Ranch® dressing
1
⁄2 cup carrots, cut into pieces
1
⁄2 cup cucumber, cut into pieces
Place all ingredients into Blender in order listed. Mix on speed
3 for 30 seconds. Coat meat, chicken or fish with mixture.
Marinate in refrigerator at least 30 minutes. Quantities will
marinate 1 – 11⁄2 pounds of meat.
RED WINE
(Use with beef and lamb)
1
⁄4 cup red wine vinegar
2 TBL vegetable oil
1 TBL Dijon mustard
1 clove garlic
1
⁄2 tsp dried Italian seasoning
1
⁄8 tsp pepper, coarsely ground
1
SANTA FE DRESSING
⁄2 cup soy sauce
1
⁄4 cup lemon juice
1
⁄4 cup peanut oil
1
⁄4 cup olive oil
1 jalapeno pepper, cut into pieces
1
⁄2 cup cucumber, cut into pieces
1
⁄2 cup red onion, cut into pieces
8 cilantro sprigs
1
Place ingredients into Blender in
order listed. Cover and mix on speed
3 for 15 – 30 seconds or until smooth.
Makes 11⁄2 – 2 cups.
CURRY YOGURT (Use with
chicken, lamb and pork)
⁄3 cup plain yogurt
2 TBL lemon juice
1 TBL vegetable oil
2 cloves garlic
1
⁄2 tsp curry powder
1
⁄8 tsp crushed red pepper
1
LEMON ORIENTAL
(Use with chicken and fish)
1
⁄4 cup lemon juice
1 TBL soy sauce
1 TBL vegetable oil
1
⁄4 onion, cut into pieces
1
⁄4 tsp ground ginger
1
⁄8 tsp crushed red pepper
Place ingredients into Blender
in order listed. Cover and
mix on speed 3 for 15 – 30
seconds or until smooth.
Makes 2 cups.
10
SPICY HERB
(Use with any type of meat)
⁄4 cup dry wine
⁄4 cup vegetable oil
1 TBL lemon juice
1
⁄4 tsp Tabasco® pepper sauce
1
⁄4 onion, cut into pieces
1 clove garlic
1
⁄8 tsp dried basil leaves
1
⁄8 cup dry mustard
1
1
SZECHWAN
(Use with any type of meat)
⁄4 cup soy sauce
3 TBL dry sherry
1
⁄4 TBL sesame oil
2 TBL sugar
2 TBL corn starch
1
MEXICALI
(Use with any type of meat)
⁄2 cup prepared salsa
2 TBL lime juice
1 TBL vegetable oil
2 TBL cilantro
1
11
TMBL1134 Manual
8/24/06
2:08 PM
Page 12
DESSERTS
LIMITED ONE-YEAR WARRANTY
CINNAMON PEACH COBBLER
1
⁄4 cup milk
2 TBL vegetable oil
1
⁄4 cup sugar
1 cup biscuit mix (like Bisquick®)
BLENDER BROWNIE
2 eggs
2
⁄3 cup applesauce
1 tsp vanilla
3
⁄4 cup sugar
1
⁄2 cup flour
1
⁄4 cup cocoa
1
⁄2 tsp baking soda
1 can (21 oz.) peach pie filling
cinnamon for topping
Preheat oven to 350°F/177°C.
powdered sugar
Place milk, oil, sugar and biscuit
mix into Blender in order listed.
Cover and mix on speed 3 for
15 – 20 seconds, scrape sides if
necessary. Remove batter through
bottom of container after removal
of cutting unit assembly.
Warranty Coverage: This product is warranted to be free from defects in materials or workmanship for a period of one (1) year from the original purchase date. This product warranty is
extended only to the original consumer purchaser of the product and is not transferable. For a
period of one (1) year from the date of original purchase of the product, our Repair Center will,
at its option, either (1) repair the product or (2) replace the product with a reconditioned comparable model. These remedies are the purchaser's exclusive remedies under this warranty.
Warranty Service: To obtain warranty service, you must call our warranty service number at
1-800-947-3744 for return instructions on how to deliver the product, in either the original packaging or packaging affording an equal degree of protection to the Repair Center specified below.
You must enclose a copy of your sales receipt or other proof of purchase
to demonstrate eligibility for warranty coverage.
Preheat oven to 350°F/177°C.
Place ingredients into Blender in
order listed. Cover and mix on
speed 3 for 15 seconds. Scrape
sides and mix on speed 3 for 45 – 60
seconds. Pour into a greased 8”
cake pan. Bake 45 – 50 minutes or
until done. After cooled, dust with
powdered sugar.
FROZEN FRUIT CUPS
1 can (151⁄4 oz.) pineapple
chunks, with juice
1 banana, sliced
1 cup frozen strawberries (slightly
thawed)
1
⁄3 cup sugar
To return the appliance, ship to:
To contact us, please write to, call, or email:
ATTN: Repair Center
708 South Missouri Street
Macon, MO 63552 USA
Consumer Relations Department
PO Box 7366
Columbia, MO 65205-7366 USA
1-800-947-3744
E-mail: [email protected]
What Is Not Covered: This warranty does not cover damage resulting from misuse, accident,
commercial use, improper service or any other damage caused by anything other than defects
in material or workmanship during ordinary consumer use. This warranty is invalid if the serial
number has been altered or removed from the product. This warranty is valid only in the
United States and Canada.
LIMITATION ON DAMAGES: THERE SHALL BE NO LIABILITY FOR ANY INCIDENTAL OR
CONSEQUENTIAL DAMAGES FOR BREACH OF ANY EXPRESS OR IMPLIED WARRANTY OR
CONDITION ON THIS PRODUCT.
Place ingredients into Blender
in order listed. Cover and stir
on speed 1 or 2 for 30 seconds
or until smooth. Pour into cups
and freeze.
DURATION OF IMPLIED WARRANTIES: EXCEPT TO THE EXTENT PROHIBITED BY APPLICABLE
LAW, ALL IMPLIED WARRANTIES AND CONDITIONS, INCLUDING, WITHOUT LIMITATION,
IMPLIED WARRANTIES AND CONDITIONS OF MERCHANTABILITY AND FITNESS FOR A PARTICULAR PURPOSE OR USE ON THIS PRODUCT ARE LIMITED IN DURATION TO THE DURATION OF THIS WARRANTY.
Some jurisdictions do not allow the exclusion or limitation of incidental or consequential damages, or allow limitations on how long an implied warranty lasts, so the above limitations or
exclusions may not apply to you. This warranty gives you specific legal rights and you
may have other rights under the laws of your jurisdiction.
For more information on our products, visit our website: www.maxim-toastmaster.com.
© 2006 Toastmaster Inc.
All Rights Reserved
12
Rev. 08/06
Printed in China
13
TMBL1134 Manual
8/24/06
2:08 PM
Page 1
OWNER’S MANUAL
Model Nos. TMBL1134, TMBL1134 RA
Toastmaster
®
BLENDER