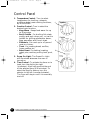
1
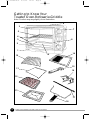
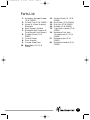
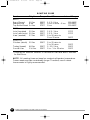
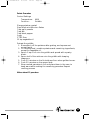
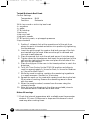
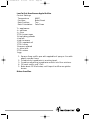
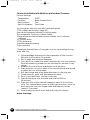
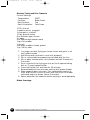
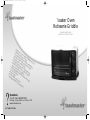
337/337CAN
TOB Cover
6/11/01
16:51
Page 1
Toaster Oven
Rotisserie Griddle
USE AND CARE GUIDE
MODELS 337 AND 337CAN
•L
ar
chi ge .6
• 6 cken cu. f
t.
,r
co
Ro oking oast o interio
• D ast, G fun r 9” r ha
ndl
• C ouble rill, R ctions pie
es a
ur v
:
w
oas
n8
Bak
a
•3
l
e
l
t
lb.
e, R
0-m d gla con , Br
wh inute ss do struc oil an otiss
d T erie
• F en co tim or f tion
oas
,
ully
o
e
o
r
r
kin
t
•4
wit
eas
a
g
d
h
• P rack p justab is com auto y view
ow
l
o
e
ple -off ing
si
e
t
•R
sign
em r ligh tions her mo te
al
•S
t
o
s
v
tat
abl
tor
u
e
age
p to
dra crum
450
wer b tr
°F
a
y
for
acc
ess
ori
es
?
Questions
Call toll free 1-800-947-3744
Monday – Friday, 8:00 a.m. - 5:30 p.m. CST
www.toastmaster.com
337 AND 337CAN
337/337CAN E/F
6/11/01
16:51
Page 1
READ AND SAVE
THESE INSTRUCTIONS
WARNING: A risk of fire and electrical shock exists in all electrical
appliances and may cause personal injury or death. Please follow all
safety instructions.
IMPORTANT SAFEGUARDS
When using electrical appliances, basic safety precautions should
always be followed, including the following:
◆ Read all instructions.
◆ Do not touch hot surfaces. Use handles or knobs.
◆ Close supervision is necessary when any appliance is used by or
near children.
◆ To protect against electric shock, do not immerse cord, plug or any
parts of the oven in water or other liquids.
◆ Do not let cord hang over edge of table or counter, or touch hot
surfaces.
◆ Do not operate appliance with damaged cord or plug or after the
appliance malfunctions, or has been damaged in any manner.
Return appliance to the nearest Authorized Service Center for
examination, repair, or adjustment.
◆ The use of accessory attachments not recommended by the
appliance manufacturer may cause hazard or injury.
◆ Do not place on or near a hot gas or electric burner, or in a heated
oven or in a microwave oven.
◆ When operating the oven keep at least four inches of space on all
sides of the oven to allow for adequate air circulation.
◆ Unplug from outlet when not in use and before cleaning. Allow to
cool before putting on or taking off parts, and before cleaning.
◆ To disconnect, turn the control to OFF, then remove the plug.
Always hold the plug, but never pull the cord.
◆ Extreme caution must be used when moving an appliance
containing hot oil or other hot liquids.
◆ Do not cover CRUMB TRAY or any part of the oven with metal
foil. This may cause overheating of the oven.
◆ Use extreme caution when removing tray or disposing of hot
grease or other hot liquids.
1.
337/337CAN E/F
6/11/01
16:51
Page 2
◆ Do not clean with metal scouring pads. Pieces can break off the
pad and touch electrical parts, creating a risk of electric shock.
◆ Oversized foods or metal utensils must not be inserted in a toaster
oven as they may create a fire or risk of electric shock.
◆ A fire may occur if the oven is covered or touching flammable
material, including curtains, draperies, walls, and the like, when in
operation. Do not store any item on the oven during operation.
◆ Extreme caution should be exercised when using containers
constructed of anything other than metal or glass.
◆ Do not place any of the following materials in the oven: cardboard,
plastic, paper, or other flammable materials.
◆ Do not store any materials, other than manufacturers
recommended accessories, in this oven when not in use.
◆ Always wear protective, insulated oven mitts when inserting or
removing items from the hot oven.
◆ This appliance has a tempered, safety glass door. The glass is
stronger than ordinary glass and more resistant to breakage.
Tempered glass can break, but the pieces will not have sharp
edges. Avoid scratching door surface or nicking edges. If the door
has a scratch or nick, contact our toll-free consumer relations line
before using the oven.
◆ Do not use outdoors.
◆ Do not use appliance for other than intended use.
◆ This appliance is for HOUSEHOLD USE ONLY.
◆ CAUTION: To reduce the risk of fire or shock do not operate the
unit unless the removable top tray is in place.
SAVE THESE INSTRUCTIONS
CAUTION: A short power supply cord is provided to reduce the risk of
personal injury resulting from becoming entangled in or tripping over
a longer cord. Extension cords are available from local hardware stores
and may be used if care is exercised in their use. If an extension cord
is required, special care and caution is necessary. Also the cord must
be: (1) marked with an electrical rating of 125 V, and at least 10 A.,
1250 W., and (2) the cord must be arranged so that it will not drape
over the countertop or tabletop where it can be pulled on by children
or tripped over accidentally.
2.
Toaster Oven Rotisserie Griddle Use and Care Guide
337/337CAN E/F
6/11/01
16:51
Page 3
POLARIZED PLUG: This appliance has a polarized plug, (one blade is
wider than the other). As a safety feature to reduce the risk of electrical
shock, this plug is intended to fit in a polarized outlet only one way. If
the plug does not fit fully in the outlet, reverse the plug. If it still does
not fit, contact a qualified electrician. Do not attempt to defeat this
safety feature.
ELECTRIC POWER: If electric circuit is overloaded with other
appliances, your appliance may not operate properly. It should be
operated on a separate electric circuit from other appliances.
This product is for household use only.
CAUTION: UNPLUG APPLIANCE FROM ELECTRICAL OUTLET
WHEN ASSEMBLING, REMOVING PARTS OR CLEANING. NEVER
PLACE BASE OR CORD IN WATER OR OTHER LIQUIDS.
Note: Product may vary slightly from illustrations.
3.
337/337CAN E/F
6/11/01
16:51
Page 4
Getting to Know Your
Toaster Oven-Rotisserie-Griddle
Note: Product may vary slightly from illustration.
6
3
7
5
4
8
3
2
1
10
14
9
15
11
16
12
13
17
18
4.
Toaster Oven Rotisserie Griddle Use and Care Guide
337/337CAN E/F
6/11/01
16:51
Page 5
Parts List
1. Accessory Storage Drawer
(P/N 21425)
2. Crumb Tray (P/N 21426)
3. Upper & Lower Heating
Elements
4. Rack Support Guides
5. Rotisserie Spit Support &
Drive Socket (not shown)
6. Griddle Cover (P/N
21427)
7. Control Panel
8. Door Handle
9. Curved Glass Door
10. Bake Rack (2) (P/N
21428)
11. Cookie Sheet (2) (P/N
21429)
12. Broil Rack (P/N 21430)
13. Drip Pan (P/N 21431)
14. Griddle (P/N 21432)
15. Tray/Rack Handle (P/N
21433)
16. Rotisserie Fork with
Thumbscrew (2) (P/N
21434)
17. Rotisserie Spit (P/N
21435)
18. Rotisserie Handle (P/N
21436)
5.
337/337CAN E/F
6/11/01
16:51
Page 6
Control Panel
1. Temperature Control - Turn to select
temperature for broiling, rotisserie,
griddle or bake/roast cooking functions,
up to 450º MAX.
2. Function Control - Turn to select the
desired cook function:
• Keep Warm - Keeps food warm for up
to 30 minutes.
• Broil/Griddle - For broiling fish, steak,
poultry and pork chops, etc., or use the
griddle for grilling sandwiches, bacon,
eggs, pancakes, and French toast.
• Rotisserie - Can cook up to a 5-pound
roast or chicken.
• Toast - For toasting bread, muffins,
frozen waffles, etc.
• Bake/Roast - For baking/roasting
cakes, pies, cookies, poultry, beef, pork,
etc.
3. Power On Light - The Power-On Light
will illuminate whenever the oven is
turned on.
4. Time Control - To activate the timer or to
toast, turn the dial to the right
(clockwise). A bell will sound at the end
of the selected time (0-30 minutes). To
select the Stay-On feature, turn the
selector to the left (counterclockwise).
The Oven will stay on until it is manually
shut off.
6.
Toaster Oven Rotisserie Griddle Use and Care Guide
1
2
3
4
337/337CAN E/F
6/11/01
16:51
Page 7
Introduction
Congratulations on your purchase of the Toastmaster 337 Oven with
Rotisserie and Griddle. This state-of-the-art appliance is complete with
accessories that allow you to bake/roast, toast, broil/grill, keep foods
warm and roast using the heavy duty Rotisserie Bar Assembly; all
within a large capacity non-stick interior. Clearly marked control
knobs allow you to quickly set up your oven to take advantage of its
many features.
Most unique to your Toastmaster Oven, however, is the built-in
Griddle. This feature allows you to grill your favorite foods or side
dishes on the top griddle while cooking in the oven below.
Before Using for the First Time
1.
2.
Read all of the instructions included in this manual.
Remove all packaging materials including the sticker from the
door.
3. Make sure oven is unplugged and the Time Control in in the
OFF position
4. Wipe Oven exterior with a damp cloth. Dry thoroughly with a
soft cloth. DO NOT use harsh or abrasive cleansers as these can
damage the exterior surface.
CAUTION: DO NOT IMMERSE CORD, PLUG OR APPLIANCE
INTO WATER OR ANY OTHER LIQUID.
5.
6.
7.
Remove the racks, pans, cookie sheets, rotisserie spit, and the
griddle. Wash them in hot sudsy water or in the dishwasher.
Thoroughly dry all accessories and re-assemble in oven. Plug
oven into outlet and you are ready to use your new Toastmaster
Toaster Oven-Rotisserie-Griddle.
We recommend that you run the oven at the MAX temperature
on the Toast function for approximately 15 minutes to eliminate
any packing oil that may remain after shipping.
7.
337/337CAN E/F
6/11/01
16:51
Page 8
Accessories
BAKE RACKS - May be positioned in the upper or lower Rack
Support Guides for toasting, baking, and general cooking in casserole
dishes and standard pans. Note: When reference is made throughout
this manual to the chrome Bake Racks facing up or down, please
refer to the following:
Rack Facing Up
Rack Facing Down
COOKIE SHEETS - Each cookie sheet holds approximately 9-12
medium size cookies.
DRIP PAN & BROIL RACK - For use in broiling and roasting meat,
poultry, fish, and various other foods. The Broil Rack allows fat
drippings to drip into the Drip Pan and away from the food. This will
help prevent spattering that could result in smoking and flare-ups.
Note: Always use the Drip Pan with the Broil Rack when roasting and
broiling meats, fish and poultry.
TRAY/RACK HANDLE - The Tray/Rack Handle can be used to
remove the Bake Rack, Broil Pan & Rack, and Cookie Sheets when
they are hot.
GRIDDLE - Excellent for cooking breakfast, lunch, snacks, and
dinners or just as a keep-warm area for already cooked foods.
ROTISSERIE - Roasts a variety of meats and poultry that are very
tender and juicy inside, and browned to perfection outside.
ROTISSERIE HANDLE - Used for removing the Rotisserie spit from
the oven after your roast is done.
NOTE: Sugar and salt based foods have a tendency to stick to all
surfaces and are very hard to clean. When cooking these types of
foods with the Drip Pan, Broil Rack and Griddle, soak and clean
them immediately after each use.
8.
Toaster Oven Rotisserie Griddle Use and Care Guide
337/337CAN E/F
6/11/01
16:51
Page 9
Instructions for Use
CAUTION: Appliance surfaces are hot during and after use. Always
wear protective, insulated oven mitts when touching hot oven or hot
dishes and food, or when inserting or removing Bake Rack, Broil
Rack, or other baking dishes.
ROTISSERIE COOKING
We recommend that you do not cook a roast larger than 5 pounds on
the Rotisserie. Season with salt and pepper, your favorite seasonings,
or baste with barbecue sauce or vegetable oil, as desired.
1. Set the Temperature Control to MAX.
2. Turn the Function Control To
Fork
Rotisserie. Insert pointed end of
Spit through Fork, making sure the
points of the Fork face in the same
Spit
direction as pointed end of the
Spit. Slide Fork towards square of
the Spit and secure with
thumbscrew.
3. Place food to be cooked on the
Spit by running the Spit directly
Thumbscrew
through the center of the food.
4. Place the second Fork into the
other end of the roast or poultry and secure Fork with the
thumbscrew.
5. Check that the food is centered on the Spit.
6. Insert the pointed end of the Spit into the Drive Socket located
on the right-hand side of the oven wall. Make sure the square
end of the Spit rests on the Spit Support, located on the lefthand side of the oven wall.
7. Slide a Bake Rack, facing down, into the lowest position and
place the Drip Pan on this rack to catch the food drippings.
8. Turn the Time Control to the STAY ON position.
9. Use the Rotisserie Guide for suggested roast times. Check
doneness with a reliable meat thermometer. Use an
independent timer to remind you to check the meat
temperature.
10. When complete, turn the Time Control to the OFF position.
11. Remove the Spit by placing the hooks of the Rotisserie Handle
under the grooves on either side of the Spit. Lift the left side of
the Spit first by lifting it up and out. Then, pull the Spit out of
the Drive Socket and carefully remove the roast from the oven.
Take the meat off the Spit and place on cutting board or platter.
12. For delicious gravy, skim the fat from the drippings of the Drip
Pan and add water or broth to make 11⁄2 cups gravy. Thicken
with cornstarch or flour.
9.
337/337CAN E/F
6/11/01
16:51
Page 10
ROTISSERIE GUIDE
Food
Weight
Temp.
Approx. Time
Chicken
4-5 lbs.
MAX
1 hr. 30 mins.
Pork Roast
4-5 lbs.
MAX
1 hr. 45 mins.
Roast Beef*
3-4 lbs.
MAX
1 hr. 30 mins.
Cornish Hen (2)
11⁄2 lbs. ea.
MAX
1 hr.
Pork Spareribs (1 rack)
3-4 lbs.
MAX
2 hrs.
Smoked Ham (Boneless)
4-5 lbs.
MAX
1 hr. 45 mins. - 2 hrs.
Veal Roast (Boneless)
4-5 lbs.
MAX
2 hr. 30 mins.
*Times are for Rare, add 15 minutes for Medium and 30 Minutes for Well
Done.
GRIDDLE COOKING
The Griddle, located on top of the oven, is a very convenient way to
cook a large variety of foods without having to use many pots and
pans. It is also perfect for cooking your dinner side dishes while using
the Rotisserie or broiling meat, fish, or poultry. Food can be kept
warm while cooking items within the oven itself or while cooking
elsewhere. The Griddle is ideal for grilled cheese sandwiches, bacon,
eggs, French toast, pancakes, hamburgers, or hot dogs.
Note: Pull the oven out from under the cabinets when using the
Griddle because its is possible to get some spatter on the underside of
cabinets. Care should be taken not to use the Griddle near things
that you don't want spattered, such as curtains or other appliance.
1.
2.
3.
4.
5.
6.
10.
Set the Temperature Control to MAX.
Turn the Function Control to Broil/Griddle.
Turn Time Control to the STAY ON position. Preheat for 5
minutes, then begin cooking.
When complete, turn Time Control to the OFF position.
Use extreme caution when removing the Griddle for cleaning.
Wait until it cools down then remove it, being careful not to spill
any hot liquid that may be in the Griddle.
The Griddle is dishwasher safe.
Toaster Oven Rotisserie Griddle Use and Care Guide
337/337CAN E/F
6/11/01
16:51
Page 11
CAUTION: Appliance surfaces are hot during and after use. Always
wear protective, insulated oven mitts when touching hot oven or hot
dishes and food, or when inserting or removing Bake Rack, Broil
Rack, or other baking dishes.
ROASTING
Roast your favorite cut of meat to perfection. The oven can cook up
to an 8 pound chicken or turkey and up to a 6 pound roast. A guide
has been provided to assist you with roasting times. However, we
suggest that you periodically check the cooking progress with a
thermometer.
1. Place the Bake Rack in the oven at the lowest position, facing
down.
2. Place the Broil Rack onto the Drip pan and then place food to
be cooked on the Broil Rack.
3. Place the Drip Pan on the Bake rack.
4. Set the Temperature Control to the desired temperature.
5. Turn the Function Control to Bake/Roast.
6. Turn the Time Control to the STAY ON position.
7. To check or remove the roast, us the Tray/Rack Handle
provided to help you slide the roast in and out.
8. Turn the Time Control to OFF when cooking is complete.
11.
337/337CAN E/F
6/11/01
16:51
Page 12
ROASTING GUIDE
Food
Weight
Temp. Roast Time
Internal Temp.
BEEF*
Eye of Round
3-5 lbs.
Standing Rib
4 lbs.
Top Round Roast 3-1⁄2 lbs.
325°F
325°F
375°F
1 1/2 - 2 hrs.
2 hrs. 25 mins. - 3 hrs.
2 hrs.
150-160°F
150-160°F
150-160°F
325°F
325°F
325°F
2 1/2 - 3 hrs.
2 1/2 - 3 hrs.
1 hr. 50 mins. to
2 hrs. 25 mins.
170°F
170°F
PORK
Loin (boneless) 3-5 lbs.
Loin (with bone) 3-5 lbs.
Ham (smoked)
5-7 lbs.
140°F
POULTRY
Chicken (whole) 3-5 lbs.
350°F
Turkey (breast)
Cornish Hen
350°F
350°F
6-8 lbs.
1-11⁄2 lbs.
1 hr. 25 mins. to
1 hr. 50 mins.
2 - 2 1/2 hrs.
1 hr. - 1 hr. 25 mins.
190°F
190°F
190°F
*Times are for Medium. Subtract 15 minutes for Rare and add 15 minutes
for Well-Done.
NOTE: All roasting times are based on meats at refrigerator temperature.
Frozen meats may take considerably longer. Therefore, use of a meat
thermometer is highly recommended.
12.
Toaster Oven Rotisserie Griddle Use and Care Guide
337/337CAN E/F
6/11/01
16:51
Page 13
BROILING/TOP BROWNING
For best results, it is recommended that you preheat the oven for 5
minutes on MAX, trim excess fat from meat and dry any moisture
that may be on the food.
CAUTION: Never leave oven unattended while in use.
1. Set the Temperature Control to MAX.
2. Turn the Function Control to Broil/Griddle.
3. Turn the Time Control ON to preheat the oven for 5 minutes.
4. Place the Bake Rack in the upper Rack Support Guide, facing
up.
5. Place the Broil Rack onto the Drip Pan.
6. Place the food on the Broil Rack. Brush food with sauces or oil,
as desired. Then slide the Drip Pan and Broil Rack with food
onto the Bake Rack.
7. Food should be placed as close as possible to the top heating
element without touching it.
8. Turn the Time Control to the STAY ON position.
9. Turn food over midway through the prescribed cooking time.
10. Turn the Time Control to OFF when broiling is complete.
BROILING GUIDE
Food
Weight/
Thickness
Desired
Doneness
Broil Time
1 inch
1 inch
1 inch
8 ounces
Medium
Medium
Medium
Medium
15-20 mins.
15-20 mins.
15-20 mins.
20-25 mins.
BEEF*
Porterhouse/Sirloin
London Broil
Rib Eye
Hamburger
PORK
Chops
Ribs
3
⁄4 inch
1 rack
Well
Well
20-25 mins.
25 mins.
Chicken (whole)
pieces
Well
30-40 mins.
⁄2 inch
1 inch
Well
Well
10-15 mins.
18-20 mins.
FISH
Fillets*
Steak
1
*Fish fillets are delicate and should be broiled directly in the Drip Pan without
the Broil Rack. Turn Fillets over carefully midway through broiling.
13.
337/337CAN E/F
6/11/01
16:51
Page 14
BAKING
Bake your favorite cookies, cakes, pies, brownies, etc. The bakeware
that will fit in your oven are: a bundt pan, 6 cup muffin pan, 9-inch
pie pan, 9-inch square pan, 9-inch loaf pan, or an Angel Food cake
pan. We do not recommend the use of roasting bags or plastic or
glass containers in the oven.
NOTE: When using a single rack, position the Bake Rack in the
bottom Support Guide, facing up.
1.
2.
3.
4.
5.
6.
7.
Place the Bake Rack in the lower Rack Support Guide,
depending on the height of the pan or according to recipe
directions.
Preheat the oven as directed in the recipe.
Place item to be baked on the Bake Rack.
Set the Temperature Control to the desired temperature.
Turn the Function Control to Bake/Roast.
Turn the Time Control to the STAY ON position.
When baking is complete, turn the Time Control to OFF.
Baking on 2 Racks
Two racks of cakes, cookies, or pies can be baked at the same time.
However, it is necessary to rotate them (i.e. move the top to the
bottom and the bottom to the top) halfway through the cooking
time.
Positioning the Bake Racks
Cookies can be baked using either or both Rack Support Guides with
Racks face up.
Layer cakes can be baked on the lower position with the Bake Rack
face down, and on the upper position with the Bake Rack face up.
Pies can be baked in either or both positions with the Bake Racks
face down. Be sure to place Cookie Sheets under the pies to catch
any spills or drips.
Baking Guide
Follow the package or recipe instructions for baking times and
temperature.
14.
Toaster Oven Rotisserie Griddle Use and Care Guide
337/337CAN E/F
6/11/01
16:51
Page 15
TOASTING
The large capacity oven allows for toasting: 4 to 6 slices of bread, 6
English muffin halves, frozen waffles, or frozen pancakes. When
toasting only 1 or 2 items, place the food in the center of the oven.
1. Insert Crumb Tray in place.
2. Set the Temperature Control to MAX.
3. Turn the Function Control to Toast.
4. Place food to be toasted on the Bake Rack.
5. Turn the Time Control to the desired darkness.
6. Bell will signal at the end of the Toast cycle.
NOTE: Bake Rack should be positioned in the upper Rack Support
Guide, face up.
KEEP WARM
Keeps cooked food warm for up to 30 minutes. Longer periods of
time are not recommended as food will become dry or spoil.
1. Set the Temperature Control to 175ºF.
2. Turn the Function Control to Keep Warm.
3. Turn the Time Control to the STAY ON position.
4. Turn the Time Control to OFF when finished with the Keep
Warm feature.
SLOW COOKING
This cooking process is an excellent way to attain very juicy and
tender meals from cuts of meat such as rump roasts and briskets. You
can also cook spare ribs, stews, soups, and a large variety of other
foods. This is done by cooking 6-10 hours at the Bake/Roast setting
(between 225ºF - 250ºF). Use cooking times given in your favorite
recipe.
1. Set the Temperature Control to 225Fº.
2. Turn the Function Control to Bake/Roast.
3. Place food to be cooked in a covered casserole dish and place it
within the oven.
4. Turn the Time Control to the STAY ON position.
5. Time the cooking according to the recipe.
6. Turn the Time Control to OFF when you have completed slow
cooking.
15.
337/337CAN E/F
6/11/01
16:51
Page 16
Care and Cleaning
CAUTION: Do not immerse Cord, Plug, or appliance into water or
any other liquid.
CAUTION: Do not use metal scouring pads to clean the oven. Pieces
of the pad may break off and touch electrical parts.
1.
2.
3.
4.
5.
6.
7.
16.
Unplug the oven and allow all parts to cool completely before cleaning
or moving.
All accessories should be washed in hot sudsy water or can be cleaned in
the dishwasher. Rinse and dry all accessories thoroughly.
Do not us an abrasive cleaner or steel wool scouring pad on the Drip
Pan as this may damage the porcelain enamel finish.
Your oven features a non-stick coating. To clean any spattering that may
occur while cooking, wipe the walls with a damp sponge, cloth or nylon
scouring pad, and mild detergent. DO NOT USE STEEL WOOL
SCOURING PAD, ABRASIVE CLEANERS OR SCRAPE THE WALLS
WITH A METAL UTENSIL, AS ALL OF THESE METHODS MAY
DAMAGE THE NON-STICK COATING.
The Glass Door can be wiped clean with a damp sponge and wiped dry
with a paper or cloth towel.
Clean the outside with a damp sponge. DO NOT USE AN ABRASIVE
CLEANER, AS IT MAY DAMAGE THE EXTERIOR FINISH.
Let all parts and surfaces dry thoroughly prior to plugging oven in and
using.
Toaster Oven Rotisserie Griddle Use and Care Guide
337/337CAN E/F
6/11/01
16:51
Page 17
Recipes
Fruit Glazed Rotisserie Ribs
Control Settings:
Temperature:
Function:
MAX
Rotisserie
1 rack (3-31⁄2 lb.) pork spareribs
1
⁄4 c peach preserves
1
⁄4 c apricot preserves
1
⁄2 c ketchup
2 TBL orange juice
1 TBL soy sauce
1 tsp lemon juice
1 tsp Dijon mustard
1
⁄2 tsp garlic powder
1
⁄2 tsp onion powder
1. Position 1 rotisserie fork at the opposite end of the spit from
where the point is located and secure into position by tightening
the thumbscrew.
2. Thread the fork through the ribs using an over and under
method.
3. Place the second rotisserie fork onto the spit and secure it into
the meat.
4. Tighten down the thumbscrew. Insert the pointed end of the spit
into the right side of the oven and place the left side of the spit
into the spit support.
5. Place the drip pan in the oven in the lowest position to catch the
drippings.
6. Turn the Time Control to the STAY ON position and allow to
cook for 13⁄4 to 2 hours.
7. Combine the remaining ingredients in a small saucepan and
heat until the preserves melt. Stir until blended.
8. Simmer for about 20 minutes.
9. Brush the sauce on the ribs with a pastry brush during the last
30 minutes of cooking.
10. When the meat is cooked, remove from the oven using the
rotisserie handle. Reserve remaining sauce to serve with the
ribs*.
Makes 4 servings.
*Recipe makes about 1 cup of sauce. It can be doubled if more sauce
is desired.
17.
337/337CAN E/F
6/11/01
16:51
Page 18
Griddle Corn Cakes with Tomato Salsa
Control Settings:
Temperature:
Function:
MAX
Griddle
1 can (1 lb.) whole kernel corn, drained
1 egg
2 tsp vegetable oil
1
⁄3 c low-fat milk
1
⁄4 tsp garlic powder
2 tsp dried minced onion flakes
1
⁄2 c flour
1 tsp salt
1 tsp baking powder
2 tsp vegetable oil
Salsa
1 large tomato, chopped
1 tsp chili powder
1 tsp dried minced onion flakes
1
⁄2 tsp salt
1
⁄4 tsp garlic powder
1
⁄2 tsp dried cilantro or parsley
Preheat the griddle.
1. Combine corn, egg, oil, and milk in a mixing bowl.
2. Combine dry ingredients and stir into the corn mixture.
3. Spoon 1 tsp of oil onto the griddle and spread with a pastry
brush.
4. Spoon half of the mixture onto the griddle with heaping TBL.
5. Cook 3-5 minutes on the first side and turn when golden brown.
6. Cook 3-5 minutes on the second side.
7. Wrap cooked pancakes in foil and keep warm in the oven while
making remaining pancakes. Repeat cooking process.
8. While pancakes are cooking, combine salsa ingredients.
9. Top each corn cake with salsa or serve separately.
Makes about 12 griddle cakes and 1 cup salsa.
18.
Toaster Oven Rotisserie Griddle Use and Care Guide
337/337CAN E/F
6/11/01
16:51
Page 19
Potato Pancakes
Control Settings:
Temperature:
Function:
MAX
Griddle
2 large potatoes, grated
2 tsp dried minced onion flakes
1
⁄4 tsp garlic powder
1
⁄2 tsp salt
1
⁄8 tsp black pepper
1 egg
1 TBL flour
1-2 tsp vegetable oil
Preheat the griddle.
1. Rinse starch off the potatoes after grating, and squeeze out
excess liquid.
2. In a mixing bowl, combine potatoes and remaining ingredients,
except for vegetable oil.
3. Spoon 1 tsp of oil onto the griddle and spread with a pastry
brush.
4. Spoon half of the mixture onto the griddle with heaping
teaspoons.
5. Cook 3-5 minutes on the first side and turn when golden brown.
6. Cook 3-5 minutes on the second side.
7. Wrap cooked pancakes in foil and place them in the oven to
keep warm while making the remaining pancakes. Repeat
cooking process.
Makes about 12 pancakes.
19.
337/337CAN E/F
6/11/01
16:51
Page 20
Teriyaki Rotisserie Beef Roast
Control Settings:
Temperature:
Function:
MAX
Rotisserie
3-4 lb. top round or sirloin tip beef roast
1
⁄4 c soy sauce
1
⁄2 c water
1 TBL ketchup
1 tsp honey
1
⁄4 tsp onion salt
1
⁄4 tsp garlic powder
2 TBL apricot, peach, or pineapple preserves
2 tsp cornstarch
1. Position 1 rotisserie fork at the opposite end of the spit from
where the point is located and secure into position by tightening
the thumbscrew.
2. Insert the spit through the roast so that both prongs of the fork
are inserted into the meat. Make sure the spit is centered and
the roast is well balanced.
3. Place the second fork onto the spit and secure it into the meat.
4. Tighten down the thumbscrew, and insert the pointed end of the
spit into the right side of the oven and place the left side of the
spit into the spit support.
5. Place the drip pan in the oven in the lowest position to catch the
drippings.
6. Turn the Time Control to the STAY ON position and allow to
cook for approximately 11⁄2 hours for Rare, 13⁄4 hours for Medium
or 2 hours for Well Done**.
7. While the meat is cooking, combine the remaining ingredients
in a small saucepan. Simmer for 10 minutes.
8. Spread the sauce on the roast with a pastry brush during the last
30 minutes of cooking. Reserve the remaining sauce to serve
with the meat.
9. When the meat is cooked, remove from the oven using the
rotisserie handle.
10. Skim fat from the drippings in the drip pan and add juices to
the reserved sauce. Heat and serve with meat.
Makes 6-8 servings.
** Check the internal temperature with a reliable oven thermometer
at about 11⁄4 hours. Differences in shape and thickness of cuts of
meat may alter cooking times.
20.
Toaster Oven Rotisserie Griddle Use and Care Guide
337/337CAN E/F
6/11/01
16:51
Page 21
Jeweled Breakfast Muffins
Control Settings:
Temperature:
Function:
Rack Position:
Rack Orientation:
375ºF
Bake/Roast
Top
Face Down
⁄4 c flour
11⁄2 tsp baking powder
1
⁄2 tsp salt
1
⁄4 c sugar
2 TBL vegetable oil
1 egg
2
⁄3 c low-fat milk
1 tsp vanilla
1
⁄2 c chopped dried fruit*
(such as mixed apricots, cherries, apples, and raisins)
3
1. Spray a 6-cup muffin pan with vegetable oil spray or line with
paper cupcake liners.
2. Combine dry ingredients in a mixing bowl.
3. Combine remaining ingredients and stir into the flour mixture
just until blended.
4. Fill each cup to within 1 inch of the top.
5. Bake 18-20 minutes, until tops of muffins are golden brown.
Makes 6 muffins.
*Substitute candied fruit (citron) for special holiday muffins.
21.
337/337CAN E/F
6/11/01
16:51
Page 22
Peach Melba Pie
Control Settings:
Temperature:
Function:
Rack Position:
Rack Orientation:
400ºF
Bake/Roast
Bottom
Face Up
2 9-inch prepared pie crusts
1 lb. frozen peach slices
10 oz frozen raspberries, thawed and drained
1
⁄4 c sugar
1
⁄4 c flour
1
⁄2 tsp almond extract
1
⁄4 tsp ground cinnamon
1.
2.
3.
5.
Line a 9-inch pie plate with one of the pie crusts.
Combine all the remaining ingredients in a large bowl.
Pour into the pie plate and top with the remaining crust.
Place the pie onto the cookie sheet and bake for 40-50 minutes,
until golden brown.
Makes one 9-inch pie.
22.
Toaster Oven Rotisserie Griddle Use and Care Guide
337/337CAN E/F
6/11/01
16:51
Page 23
Low-Fat Oat Bran Banana Apple Muffins
Control Settings:
Temperature:
Function:
Rack Position:
Rack Orientation:
400ºF
Bake/Roast
Top
Face Down
⁄4 c applesauce
⁄4 c oat bran
1
⁄2 c flour
3 TBL brown sugar
11⁄2 tsp baking powder
1
⁄2 tsp salt
1
⁄4 tsp cinnamon
1 TBL vegetable oil
1 TBL honey
1 banana, mashed
1
⁄4 c skim milk
2 TBL raisins
1 egg
1
3
1. Spray a 6-cup muffin pan with vegetable oil spray or line with
paper cupcake liners.
2. Combine dry ingredients in a mixing bowl.
3. Combine remaining ingredients and stir into flour mixture.
4. Fill each muffin cup 2⁄3 full.
5. Bake about 15-18 minutes, until tops of muffins are golden
brown.
Makes 6 muffins.
23.
337/337CAN E/F
6/11/01
16:51
Page 24
Chicken Rolls Stuffed with Wild Rice and Sun-dried Tomatoes
Control Settings:
Temperature:
Function:
Rack Position:
Rack Orientation:
350ºF
Bake/Roast & Broil
Top
Face Down
4 oz long grain wild rice mix with herbs and spices*
1 TBL pesto (see recipe on page 25)
6 sun-dried tomatoes, softened in boiling water
8 oz mozzarella, Fontina or havarti cheese
3 large whole skinless boneless chicken breasts, cut in half and
flattened
2 c chicken broth
2 TBL white wine
1 tsp Worcestershire sauce
1 tsp cornstarch
*Substitute desired flavor of long grain rice for herb and spice long
grain wild rice.
1. Follow package directions for the preparation of the rice mix.
Allow to cool for about 10 minutes.
2. Stir in pesto and sun-dried tomatoes.
3. Cut half of the cheese into small cubes and stir into rice mixture.
Slice the remaining cheese into six portions for use later in the
recipe.
4. Measure the rice mixture and divide into 6 portions.
5. Place a portion of rice on each of the chicken pieces and spread
to within an inch of the edges.
6. Roll each breast and place seam side down on the drip pan.
7. Combine broth, wine, and Worcestershire sauce.
8. Pour 1 cup liquid over chicken in the pan.
9. Place the drip pan into the oven and roast at 350º for
30 minutes.
10. Place one slice of the reserved cheese on each of the chicken
rolls. Turn temperature control to MAX and function control to
broil and cook until the cheese melts and begins to brown
(about 5-7 minutes).
11. Heat remaining cup of broth and pour over the chicken.
Makes 6 servings.
24.
Toaster Oven Rotisserie Griddle Use and Care Guide
337/337CAN E/F
6/11/01
16:51
Page 25
Crostini
Control Settings:
Temperature:
Function:
Rack Position:
Rack Orientation:
MAX
Toast
Top
Face Up
6 slices Italian or other crusty bread
6 slices tomato, roasted red or green peppers or pimiento
6 slices mozzarella, Fontina, or Havarti cheese
1. Toast the bread for 3 minutes and carefully remove from oven.
2. Spread each slice with about 1 tablespoon of pesto
(see recipe below).
3. Top each slice of bread with tomato or pepper, and then with
cheese.
4. Return to oven and toast for 5-7 minutes, or until the cheese is
melted and lightly browned.
Makes 6 open-faced sandwiches.
Pesto
1 c basil, parsley or spinach leaves, firmly packed
1 clove garlic
2 TBL grated Parmesan cheese
1 TBL pignoli nuts
1 TBL olive oil
In a food processor, combine all pesto ingredients until the greens
are chopped and the mixture is smooth.
25.
337/337CAN E/F
6/11/01
16:51
Page 26
Mexican Turkey and Rice Casserole
Control Settings:
Temperature:
Function:
Rack Position:
Rack Orientation:
350ºF
Bake/Roast
Top
Face Down
1 TBL olive oil
1 medium onion, chopped
1 clove garlic, crushed
11⁄2 lbs. ground turkey
8 oz Mexican style rice mix
2 c water
8 oz Spanish-style tomato sauce
1 tsp chili powder
1
⁄2 tsp salt
4 oz sharp cheddar cheese, grated
1 jar (14 oz) salsa
1. In a large non-stick frying pan, brown onion and garlic in oil
until golden brown.
2. Add turkey and continue to cook until browned.
3. Stir in rice and add any seasonings included with the rice.
4. Stir in water, tomato sauce, chili powder, and salt. Simmer for
2 minutes.
5. Pour contents of the frying pan into an 8-inch square baking
dish or 11⁄2 quart casserole dish.
6. Cover tightly with foil and bake for 20 minutes.
7. Remove casserole from the oven and top with grated cheese.
8. Place casserole back into oven. Turn temperature control to
MAX and function control to broil and cook until the cheese
melts and begins to brown (about 5 minutes).
9. Spoon salsa over the casserole before serving or serve separately.
Makes 6 servings.
26.
Toaster Oven Rotisserie Griddle Use and Care Guide
337/337CAN E/F
6/11/01
16:51
Page 27
Lemon & Lime Broiled Salmon
Control Settings:
Temperature:
Function:
Rack Position:
Rack Orientation:
MAX
Broil
Top
Face Up
1 TBL olive oil
2 TBL lemon juice
2 TBL lime juice
1 tsp honey
1 tsp Worcestershire sauce
2 TBL mayonnaise
1
⁄4 tsp garlic powder
1
⁄4 tsp onion powder
2 tsp freshly chopped parsley
1 tsp freshly chopped dill
1
⁄2 tsp salt
1 tsp pepper
4 salmon steaks cut 3⁄4-1 inch thick
1. Combine all ingredients, except for the fish.
2. Place salmon in a deep dish or sturdy plastic bag and pour
combined mixture over fish. Cover and refrigerate. Marinate for
several hours, if time permits.
3. Preheat oven.
4. Place broil rack onto the drip pan.
5. Place fish on the rack.
6. Slide drip pan into the oven at the top position. If fish touches
the elements, place the pan in the lower rack position.
7. Broil for 15-20 minutes, turning the fish over midway through
cooking time. Test fish for doneness at 12 minutes. Fish is done
when it is lightly browned and flakes easily with a fork.
Makes 4 servings.
27.
337/337CAN E/F
6/11/01
16:51
Page 28
In-Warranty Service Information
Please refer to warranty statement to determine if in-warranty service
applies. This appliance must be serviced by a Toastmaster authorized
service center. Unauthorized service will void warranty.
If an authorized service center is not available locally, your appliance
may be returned postage prepaid to our National Service Center at the
address shown on the back of this book. Call Consumer Service for
return authorization.
Products must be adequately protected to avoid shipping damage.
Surround your appliance with three inches of protective padding and
include a copy of your dated sales receipt and a note explaining the
problem you have experienced. We recommend insuring your package.
No CODs accepted.
28.
Toaster Oven Rotisserie Griddle Use and Care Guide
337/337CAN E/F
6/11/01
16:51
Page 29
LIMITED ONE YEAR WARRANTY
Warranty: This Toastmaster® product is warranted to be free from defects in materials or workmanship for a
period of (1) year from the original purchase date. This product warranty covers only the original consumer
purchaser of the product.
Warranty Coverage: This warranty is void if the product has been damaged by accident in shipment,
unreasonable use, misuse, neglect, improper service, commercial use, repairs by unauthorized personnel,
normal wear and tear, improper assembly, installation or maintenance abuse or other causes not arising out of
defects in materials or workmanship. This warranty is effective only if the product is purchased and operated in
the USA, and does not extend to any units which have been used in violation of written instructions furnished
with the product or to units which have been altered or modified or to damage to products or parts thereof which
have had the serial number removed, altered, defaced or rendered illegible.
Implied Warranties: ANY IMPLIED WARRANTIES WHICH THE PURCHASER MAY HAVE ARE LIMITED IN
DURATION TO ONE (1) YEAR FROM THE DATE OF PURCHASE. Some states do not allow limitations on how
long an implied warranty lasts, so the above limitation may not apply to you.
Warranty Performance: During the above one-year warranty period, a product with a defect will be either
repaired or replaced with a reconditioned comparable model (at our option) when the product is returned to the
Repair Center, or the purchase price refunded. The repaired or replacement product will be in warranty for the
balance of the one-year warranty period and an additional one-month period. No charge will be made for such
repair or replacement.
Service and Repair: Should the appliance malfunction, you should first call toll-free 1 (800) 947-3744 between the
hours of 9:00 am and 5:00 pm Central Standard Time and ask for CONSUMER SERVICE stating that you are a
consumer with a problem. Please refer to model number 337 when you call.
In-Warranty Service (USA): For an appliance covered under the warranty period, no charge is made for service
or postage. Call for return authorization (1 800 947-3744).
Out-of Warranty Service: A flat rate charge by model is made for out-of-warranty service. Include $ 10.00 (U.S.)
for return shipping and handling. We will notify you by mail of the amount of the charge for service and require you
to pay in advance for the repair or replacement.
For Products Purchased in the USA, but Used in Canada: You may return the product insured, packaged
with sufficient protection, and postage and insurance prepaid to the USA address listed below. Please note that
all customs duty / brokerage fees, if any, must be paid by you and we will require you to pay the cost of customs
duty / brokerage fees to us in advance of our performing any service.
Risk During Shipment: We cannot assume responsibility for loss or damage during incoming shipment. For
your protection, carefully package the product for shipment and insure it with the carrier. Be sure to enclose the
following items with your appliance: any accessories related to your problem, your full return address and
daytime phone number, a note describing the problem you experienced, a copy of your sales receipt or other
proof of purchase to determine warranty status. C.O.D. shipments cannot be accepted.
To return the appliance, ship to:
Attn: Repair Center
Toastmaster Inc.
708 South Missouri Street
Macon, MO 63552
Email: [email protected]
www.toastmaster.com
To contact us, please write to or call:
Toastmaster Inc.
P.O. Box 6916
Columbia, MO 65205-6916
1 (800) 947-3744
Limitation of Remedies: No representative or person is authorized to assume for us any other liability in
connection with the sale of our products. There shall be no claims for defects or failure of performance or
product failure under any theory of tort, contract or commercial law including, but not limited to negligence, gross
negligence, strict liability, breach of warranty and breach of contract. Repair, replacement or refund shall be the
sole remedy of the purchaser under this warranty, and in no event shall we be liable for any incidental or
consequential damages, losses or expenses. Some states do not allow the exclusion or limitation of incidental or
consequential damages, so the above limitation or exclusion may not apply to you.
Legal Rights: This warranty gives you specific legal rights, and you may also have other rights which vary from
state to state.
© 2001 Toastmaster Inc.
All Rights Reserved
P/N 60851A
Printed in China
29.
337/337CAN E/F
6/11/01
16:51
Page 30
Keep Dated Sales Receipt for Warranty Service.
Keep this booklet. Record the following for reference:
Date purchased _______________________________________________
Model number _______________________________________________
Date code (stamped on bottom)________________________________
EVERYBODY EATS. It’s a fact of life.
But sometimes preparing
meals can become a chore.
That’s why TOASTMASTER has been invited
into millions of kitchens just like yours
so we can HELP YOU MASTER your
mixing, baking, grilling, toasting,
brewing, heating and serving
tasks WITH EASE AND STYLE.
The TOASTMASTER name stands for a
CELEBRATION of INNOVATION designed
to serve your life and keep you
COOKIN’ IN STYLE.
30.
Toaster Oven Rotisserie Griddle Use and Care Guide
337/337CAN
TOB Cover
6/11/01
16:51
Page 1
Toaster Oven
Rotisserie Griddle
USE AND CARE GUIDE
MODELS 337 AND 337CAN
•L
ar
chi ge .6
• 6 cken cu. f
t.
,r
co
Ro oking oast o interio
• D ast, G fun r 9” r ha
ndl
• C ouble rill, R ctions pie
es a
ur v
:
w
oas
n8
Bak
a
•3
l
e
l
t
lb.
e, R
0-m d gla con , Br
wh inute ss do struc oil an otiss
d T erie
• F en co tim or f tion
oas
,
ully
o
e
o
r
r
kin
t
•4
wit
eas
a
g
d
h
• P rack p justab is com auto y view
ow
l
o
e
ple -off ing
si
e
t
•R
sign
em r ligh tions her mo te
al
•S
t
o
s
v
tat
abl
tor
u
e
age
p to
dra crum
450
wer b tr
°F
a
y
for
acc
ess
ori
es
?
Questions
Call toll free 1-800-947-3744
Monday – Friday, 8:00 a.m. - 5:30 p.m. CST
www.toastmaster.com
337 AND 337CAN