1
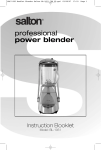
Booklet_TBL634_EN.qxd:Salton Booklet
3/23/11
2:47 PM
Page 1
CLASSIC POWER
BLENDER
Instruction Booklet
Model: TBL634
Booklet_TBL634_EN.qxd:Salton Booklet
3/23/11
2:47 PM
Page 2
IMPORTANT SAFEGUARDS
When using electrical appliances, basic safety precautions should always be
followed including the following:
1. Read all instructions.
2. To protect against electrical hazards, do not immerse cord, plugs, or the
appliance in water or other liquid.
3. Close supervision is necessary when any appliance is used by or near children.
4. Unplug from outlet when not in use before putting on or taking off parts
and before cleaning.
5. DO NOT operate any appliance with a damaged cord or plug or after the
appliance malfunctions, or is dropped or damaged in any manner. Return
appliance to TOASTESS for examination, repair or electrical or mechanical
adjustment. See Warranty.
6. Avoid contacting moving parts.
7. Keep hands and utensils out of Glass Blender Jar while blending to reduce
the risk of severe injury to persons or damage to the Blender. A scraper
may be used but must be used only when the blender is not running.
8. Blades are sharp. Handle carefully.
9. To reduce the risk of injury, never place the Cutter Blade Assembly on the
base without the jar properly attached.
10. Always operate the blender with the cover in place.
11. When blending hot liquids, remove the Filler Cap.
12. The use of accessories or attachments, not recommended or sold by
TOASTESS may cause fire, electric shock or injury.
13. DO NOT use outdoors.
14. DO NOT let cord hang over edge of table or counter, or touch hot surfaces.
15. DO NOT place on or near a hot gas or electric burner, or in a heated oven.
16. Always attach plug to appliance first, then plug cord into the wall outlet. To
disconnect, turn any control to ‘OFF’, then remove plug from wall outlet.
17. Extreme caution must be used when moving an appliance containing hot
liquids.
18. This appliance is for Household Use Only. DO NOT use appliance for other
than intended use.
19. Do not leave unit unattended while in use.
SAVE THESE INSTRUCTIONS
HOUSEHOLD USE ONLY
2
Booklet_TBL634_EN.qxd:Salton Booklet
3/23/11
2:47 PM
Page 3
POLARIZED PLUG
This appliance has a polarized plug (one blade is wider than the other). To
reduce the risk of electric shock, this plug will fit in a polarized outlet only
one way. If the plug does not fit fully in the outlet, reverse the plug. If it still
does not fit, contact a qualified electrician. DO NOT modify the plug in any way.
1
DESCRIPTION OF PARTS
2
1. Filler Cap
2. Lid
3
3. Glass Blender Jar
4. Cutting Blade Assembly
4
5. Rubber Gasket
5
6. Jar Base
0
6
7. Blender Base
8. Speed Control/Pulse Dial
7
8
BEFORE FIRST USE
1. Read all instructions carefully and keep them for future reference.
2. Remove all packaging.
3. Remove the Jar Base & Cutting Blade Assembly (see the Care and Cleaning
Section). Wash the Jar, Lid, Filler Cap, Jar Base, Gasket and Cutting Blade
Assembly in warm soapy water.
NOTE: Use extreme caution when handling the Cutting Blade Assembly, the
blades are very sharp.
Rinse, dry and reassemble.
4. Wipe the Blender Base with a damp cloth.
DO NOT IMMERSE THE BLENDER BASE IN WATER OR ANY OTHER LIQUID.
DO NOT use harsh detergents or abrasive cleaners on any part of the
appliance.
3
Booklet_TBL634_EN.qxd:Salton Booklet
3/23/11
2:47 PM
Page 4
Speed Settings
Low – for mixing and light blending including drinks, sauces, scrambled
eggs and berries.
High – for heavier mixing such as whole fruit, soups, mayonnaise and solid
ingredients
Pulse – for quick bursts of power and to crush ice
HOW TO USE
1.
2.
3.
4.
5.
Place the Blender Jar securely on the Blender Base.
Plug into a 120V AC wall outlet.
Add ingredients and replace the Lid.
Turn the Speed Control/Pulse Dial to the desired setting.
When the ingredients have been blended, turn the Speed Control/Pulse
Dial to ‘OFF’. Unplug from the wall outlet
6. Remove the Blender Jar by lifting up - do not twist. NOTE: Wait until the
Cutting Blades have stopped before removing the Blending Jar.
HELPFUL HINTS
•
•
•
•
•
•
•
•
Prepare solid ingredients by cutting into small pieces 1”-1-1/4” (2-3 cm).
Add a small amount of liquid and place small portions into the Blender
Jar instead of large quantity all at once. Gradually add more liquid
through the Filler Cap opening.
Allow hot liquids to cool to a lukewarm temperature before processing.
Always place your hand on top of the Lid when operating.
While the motor is running, ingredients can be added through the Filler
Cap opening in the center of the Blender Lid.
When chopping nuts or other dry mixtures use 3/4 cup (180 ml) at a
time, to ensure even chopping.
To crush ice, place the ice cubes into the Jar with the motor switched off.
Close the Lid and turn the Speed Control to the Pulse setting. Add a little
water through the Filler Cap opening for more even ice crushing.
DO NOT operate the Blender for more than 90 seconds when
processing dry ingredients.
4
DO NOT run the Blender when empty
Booklet_TBL634_EN.qxd:Salton Booklet
3/23/11
2:47 PM
Page 5
CARE AND CLEANING
1. Unplug from wall outlet.
2. Remove Blender Jar from Blender Base.
3. Empty the Blender Jar completely. Rinse the inside with water, then remove
the black plastic Jar Base and Cutting Blade Assembly by turning the Jar
Base counterclockwise.
4. Remove the Cutting Blades and Gasket. NOTE: Use extreme caution when
handling the Cutting Blade Assembly, the blades are very sharp.
5. Wash the Blender Jar, Lid, Filler Cap, Jar Base, Gasket and Cutting Blades in
warm soapy water. Rinse, air dry thoroughly and reassemble.
6. To reassemble, place the Gasket over the top of the Cutting Blades
(BECAREFUL AS THE BLADES ARE SHARP) and slide the Gasket to the bottom
edge of the Cutting Blade assembly. Fit the Cutting Blades through the hole
in the Blender Jar. Place the Jar Base over the bottom of the Jar and turn
clockwise.
7. Wipe the Blender Base with a damp cloth. If necessary, you can use a little
mild detergent. DO NOT IMMERSE IN WATER OR ANY OTHER LIQUID.
DO NOT use harsh detergents or abrasive cleaners on any part of the
appliance.
5
Booklet_TBL634_EN.qxd:Salton Booklet
3/23/11
2:47 PM
Page 6
RECIPES
Raspberry Salad Dressing
1/2 cup (125g)
fresh or frozen raspberries, thawed
2 tbsp. (30 ml)
vegetable oil
2 tbsp. (30 ml)
Balsamic vinegar
1 tsp. (5 ml)
chopped mint
2 tsp. (10 ml)
sugar (add up to 1 tbsp. (15 ml) depending on
sweetness of raspberries)
Place raspberries into Blender Jar. Blend on low speed until smooth. If
desired, push through a sieve to remove seeds. Return raspberry puree to
Blender Jar and add oil, vinegar, mint and sugar. Pulse until combined.
Avocado Salad Dressing
1 tbsp. (15 ml)
lemon juice
3 tbsp. (45 ml)
plain yogurt
1/2 cup (125 ml)
sour cream
1 tsp. (5 ml)
honey
1/2 tsp. (5 ml)
crushed garlic
1
avocado, peeled, stoned and chopped
Add all ingredients to the Blender Jar. Blend on high speed until smooth.
Crepes with Strawberry Sauce
1-1/4 cups (310 ml)
milk
1 cup (250 ml)
all purpose flour
2
eggs
1 tbsp. (15 ml)
melted butter or margarine
Place milk, flour eggs and butter in the Blender Jar. Blend on high speed until
smooth. Pour 1/4 cup (60 ml) batter into a non-stick frying pan and cook
over a medium heat until golden brown. Turn and cook for 30 seconds
longer. Remove from pan and keep warm. Repeat with remaining mixture.
Strawberry Sauce
1/2 lb. (225 g)
strawberries, fresh or frozen
1/4 cup (60 ml)
icing sugar
2 tbsp. (30 ml)
Grand Marnier
2 tbsp. (30 ml)
water
Place strawberries, icing sugar, Grand Marnier and water into the Blender Jar.
Blend until smooth on high speed. Pour over crepes. If desired, top with
6
a few sliced strawberries, a dollop of whipped cream and sprinkle with
icing sugar.
Booklet_TBL634_EN.qxd:Salton Booklet
Banana Shake
2 cups (500 ml)
2
1/4 cup (60 ml)
1 tbsp. (15 ml)
1 tsp. (5 ml)
1 cup (250 ml)
nutmeg - garnish
3/23/11
2:47 PM
Page 7
milk
bananas, peeled and cut in chunks
yogurt
honey
lemon juice
ice cubes
Place milk, bananas, yogurt, honey, lemon juice and ice cubes in Blender Jar.
Blend on high speed until well combined and ice is crushed. If necessary,
Pulse a few times to crush ice. Pour into glasses and sprinkle with nutmeg.
Strawberry Daiquiri
2 tbsp. (30 ml)
1/4 cup (60 ml)
1 tbsp. (15 ml)
2 cups (500 ml)
2 cups (500 ml)
white rum
lime juice
sugar
strawberries
ice cubes
Place rum, lime juice, sugar, strawberries and ice cubes into Blender Jar. Pulse
until ice is crushed and ingredients are combined. Pour into glasses.
Margarita
2 tbsp. (30 ml)
2 tbsp.
1 cup (250 ml)
2 cups (500 ml)
tequila
Triple Sec
lime juice
ice cubes
Place tequila, Triple Sec, lime juice and ice cubes into Blender Jar. Pulse until
ice is crushed and ingredients are combined. Pour into glasses.
7
Booklet_TBL634_EN.qxd:Salton Booklet
3/23/11
2:47 PM
Page 8
A short supply cord is provided to reduce the hazards of becoming entangled
in or tripping over a long cord. Extension cords may be used if care is exercised
in their use. If an extension cord is used, the marked electrical rating of the
detachable power-supply cord or extension cord should be at least as great as
the electrical rating of the appliance. If the appliance is of the grounded type,
the extension cord should be a grounded 3-wire cord. The extension cord
should be arranged so that it will not drape over the counter top or table top,
where it can be pulled on by children or tripped over.
LIMITED WARRANTY
Toastess International warrants that this appliance shall be free from defects in
material and workmanship for a period of one year from the date of purchase.
During this ‘in-warranty’ period, defective products will be repaired or replaced at
the discretion of the retailer and/or Toastess International. This warranty covers normal
domestic usage and does not cover damage which occurs in shipment or failure
which results from alteration, accident, misuse, abuse, glass breakage, neglect,
commercial use or improper maintenance.
A defective product should be returned to the original place of purchase within the
retailer’s stipulated return/exchange period*. If you are unable to have a defective
product replaced under warranty by the retailer, please check our website at
“www.toastess.com” for the service centre nearest you or you may contact us for
assistance by mail, e-mail, fax or telephone as listed below.
To ensure prompt ‘in-warranty’ service, securely package and return the product
to us prepaid. Be sure to include the original proof of purchase and a description of
the defect along with your address and zip/postal code.
For repairs not covered by the warranty, please contact us for assistance.
TOASTESS INTERNATIONAL
Customer Service Department
81A Brunswick,
Dollard-des-Ormeaux,
Quebec, Canada H9B 2J5
E-mail: [email protected]
Fax: 514-685-8300
Tel: 514-685-2820 Ext. 226
* Return/exchange policies at each retailer vary and may differ from the Toastess International 1 year limited
warranty period.
8