1
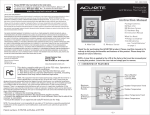
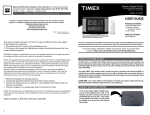
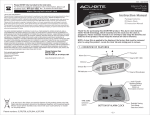
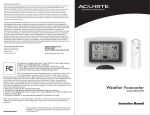
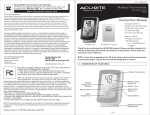
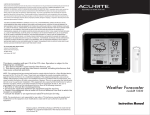
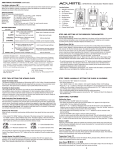
Atomic Digital Clock Please DO NOT return product to the retail store. For technical assistance and product return information, please call customer care @ 877-221-1252 Monday - Friday -- 8:00 a.m. - 4:30 p.m. CST with indoor/outdoor temperature, calendar and moon phase MODEL # 75328T www.chaneyinstrument.com USER GUIDE Timex® is a registered trademark of Timex Corporation in the U.S. and other countries. Package Contents: Manufactured and serviced by Chaney Instrument Co. Lake Geneva, WI 53147 www.chaneyinstrument.com (1) Atomic Digital Clock (1) Wireless Outdoor Temperature Sensor (1) User Guide © 2010 Chaney Instrument Co. INST - 75328T 070110 NOTE: A clear protective film is applied to the LCD at the factory that must be removed prior to using this product. Locate the clear tab and simply peel to remove. What You’ll Need: (8) AA Batteries This device complies with part 15 of the FCC rules and RSS-210 of IC rules subject to the following two conditions: 1- This device may NOT cause harmful interference, and 2- This device must accept any interference received, including interference that may cause undesired operation. Thank you for purchasing this quality TIMEX® brand product. Please read these instructions COMPLETELY to fully understand the features and functions of this clock, and to enjoy its benefits. Make sure to keep this guide handy for future reference. WARNING: Changes or modifications to this unit not expressly approved by the party responsible for compliance could void the user’s authority to operate the equipment. To receive product information, register your product online. It's quick & easy! Log on to http://www.chaneyinstrument.com/ProductReg.aspx NOTE: This equipment has been tested and found to comply with limits for a Class B digital device, pursuant to Part 15 of the FCC rules. These limits are designed to provide reasonable protection against harmful interference in a residential installation. This equipment generates, uses and can radiate radio frequency energy and, if not installed and used in accordance with the instructions, may cause harmful interference to radio communications. However, There is no guarantee that interference will not occur in a particular installation. If this equipment does cause harmful interference to radio or television reception, which can be determined by turning the equipment off and on, the user is encouraged to try to correct the interference by one or more of the following measures: • • • • Reorient or relocate the receiving antenna. Increase the separation between the equipment and the receiver. Connect the equipment into an outlet on a circuit different from that to which the receiver is connected. Consult the dealer or an experienced radio/TV technician for help. NOTE: The manufacturer is not responsible for any radio or TV interference caused by unauthorized modifications to this equipment. Such modifications could void the user authority to operate the equipment. Patent numbers: 5.978.738: 6.076.044: 6.597.990 8 WHAT IS AN ATOMIC CLOCK? An Atomic clock is a timepiece that maintains accuracy up to one second per million years using the most precise method of time synchronization, radio signals. In North America, the National Institute of Standards and Technologies (NIST) operates an Atomic clock in Fort Collins, Colorado, that transmits the time codes via the radio station WWVB. This quality TIMEX® clock includes a built-in receiver that picks up the Atomic radio signal from WWVB. To maintain the best possible reception, place the unit so that the backside faces in the general direction of Colorado. What's more, the IntelliTime® technology built into this clock makes for hassle-free automatic setting and resetting for daylight saving time. PLEASE NOTE: Due to solar radiation in the atmosphere, the atomic clock signal is weaker during the day. Most synchronization will happen at night when there is less interference. 1 BASIC SETUP Product Specifications 1. Battery Installation - BEGIN WITH THE OUTDOOR WIRELESS SENSOR 1 REMOVE BATTERY COMPARTMENT COVER 2 INSTALL 2 “AA” BATTERIES. alkaline or lithium Indoor Temp. Range = 32°F to 140°F (0°C to 60°C) *NOTE: indoor unit should not be placed in conditions Outdoor Temp. Range = -40°F to 158°F (-40°C to 70°C) under 32˚F Atomic Clock Frequency = WWVB 60Khz 433Mhz - Radio Signal Synchronizes daily 100' (30m) Radio Frequency Transmission Range Power Requirements = (8) "AA" Alkaline Batteries BATTERY SAFETY: Clean the battery contacts and also those of the device prior to battery installation. Remove batteries from equipment which is not to be used for an extended period of time. Follow the polarity (+/-) diagram in the battery compartment. Promptly remove dead batteries from the device. Dispose of used batteries properly. Only batteries of the same or equivalent type as recommended are to be used. DO NOT incinerate used batteries. DO NOT dispose of batteries in fire, as batteries may explode or leak. DO NOT mix old and new batteries or types of batteries (alkaline/standard). DO NOT use rechargeable batteries. DO NOT recharge non-rechargeable batteries. DO NOT short-circuit the supply terminals. PLEASE DISPOSE OF OLD OR DEFECTIVE BATTERIES IN AN ENVIRONMENTALLY SAFE WAY AND IN ACCORDANCE WITH YOUR LOCAL LAWS AND REGULATIONS. Wireless Sensor Atomic digital clock 3 Remove the battery compartment cover on the back of the clock and install 6 FRESH “AA” Alkaline (only) batteries as shown here 2. Initial Setup - once the batteries are installed, the clock will power up. The display will appear as follows: Atomic Clock Signal Indicator Time Zone Indicator (Defaults to Eastern Standard Time) AM / PM Indicator EST Outdoor Temperature with Trend Arrow (Defaults to Fahrenheit) Indoor Temperature with Trend Arrow Day/Date Calendar Moon Phase Indicator Outdoor Temperature Sensor Signal Indicator The clock will initially set itself to the correct time and date, defaulting to EST (Eastern Standard Time). It will also begin displaying the temperatures. The clock will begin searching for the Atomic signal. Note: The clock will adjust for daylight saving time, even if it is unable to receive the WWVB signal After the clock acquires the Atomic signal (this may take 24-48 hours) the time, date and daylight saving time changes will update automatically, giving you maintenance-free operation and accuracy to the split second 2 LIMITED ONE YEAR WARRANTY - Chaney Instrument Company warrants that all products it manufactures to be of good material and workmanship and to be free of defects if properly installed and operated for a period of one year from date of purchase. REMEDY FOR BREACH OF THIS WARRANTY IS EXPRESSLY LIMITED TO REPAIR OR REPLACEMENT OF DEFECTIVE ITEMS. Any product which, under normal use and service, is proven to breach the warranty contained herein within ONE YEAR from date of sale will, upon examination by Chaney, and at its sole option, be repaired or replaced by Chaney. In all cases, transportation costs and charges for returned goods shall be paid for by the purchaser. Chaney hereby disclaims all responsibility for such transportation costs and charges. This warranty will not be breached, and Chaney will give no credit for products it manufactures which shall have received normal wear and tear, been damaged, tampered, abused, improperly installed, damaged in shipping, or repaired or altered by others than authorized representatives of Chaney. 7 TROUBLESHOOTING PROBLEM Poor Atomic Clock Reception (No bars) Poor Outdoor Sensor Reception (No bars) Bad Temperature Reception (blank or flashing temperature) Display Not Working 6 3. Choosing Your Time Zone POSSIBLE SOLUTIONS Relocate or reposition the clock, making sure the backside of the unit is facing in a direction toward Colorado from your location. Heavy stone or metal walls can obstruct the signal and disrupt reception. Place the clock at least 3 feet (0.91 m) from other electronic devices (i.e. TV’s, microwaves, computers, etc.) that can interfere with wireless signals. You may be experiencing interference from other wireless devices using the same radio frequency channel. Relocate the main unit and/or the wireless sensor. Both units must be within 100 feet (30m) of each other. Make sure units are placed at least 3 feet from other electronic devices or appliances that may interfere with the wireless communication (i.e. TV’s, microwaves, computers, etc.) You may need to reset both units by removing and re-installing the batteries. Relocate the main unit and/or the wireless sensor. Both units must be within 100 feet (30m) of each other. Make sure units are placed at least 3 feet from other electronic devices or appliances that may interfere with the wireless communication (i.e. TV’s, microwaves, computers, etc.) You may need to reset both units by removing and re-installing the batteries. 1. Press and HOLD the SET button until you see the selection of seven time zones flashing on the LCD screen, then release. 2. Press the UP (s) ARROW repeatedly until you reach your time zone, then press SET HAST hawaii aleutian standard time AKST alaska standard time PST pacific standard time MST mountain standard time CST central standard time EST eastern standard time AST atlantic standard time In the event you wish to manually change the clock settings, please use the instructions on page 5. Battery Choice & Temperature Range: Extended periods of extreme cold temperatures (below -4°F/ -20°C) can cause alkaline batteries to function improperly. This may cause the outdoor wireless sensor to stop transmitting temperature readings. We recommend using lithium batteries in extreme low temperature conditions to ensure continued operation of the outdoor sensor. For the digital atomic clock we recommend only alkaline batteries. Check to make sure the batteries are installed correctly. Use only fresh STANDARD “AA” batteries, not generic or extra strength. Make certain that the batteries are FRESH. If the expiration date on your batteries is less than 6 years away, they may not contain a full charge and can be weak. 3 SETTING THE CLOCK MANUALLY Place the clock in an area free of dirt and dust. To help ensure an accurate indoor temperature measurement, be sure to place the main unit out of direct sunlight, and away from any heat sources or vents in your home. Up Arrow This clock may be hung on a wall using the integrated wall-hanging hole, or you may place the unit on a tabletop or other flat surface using the swing-out stands. SET Placement of the Clock: “Set” to confirm manual settings Down Arrow Back of Clock 1) SETTING YOUR TIME ZONE Placement of the Outdoor Sensor: The wireless temperature sensor MUST BE PLACED OUTDOORS to capture and relay the outdoor temperature to the clock display unit. You may place your wireless temperature sensor outside up to 100 feet (30m) from the clock, as shown. a) Press and HOLD the SET button until you see the selection of seven time zones Then RELEASE. b) Press the UP (s) ARROW repeatedly until you reach your time zone, then press SET and release. 2) TURNING ATOMIC CLOCK FEATURE ON/OFF NOTE: You do NOT need to turn off the atomic clock to set the time manually. Once the clock receives the signal, it will adjust the clock accordingly. However, you may choose to deactivate the atomic clock feature completely if you prefer to manually control the clock or if you live in a remote area that does not readily receive the atomic signal. As long as the atomic clock is ON, it will automaticlly adjust itself to the correct time, overriding your manual setting. The sensor is water resistant and is designed for outdoor use. However, to extend the life of the product, place it in an area protected from harsh weather elements. To ensure an accurate temperature reading, be sure the sensor is out of direct sunlight and away from any heat sources. 100’ Feet Wireless Signal Reception Icons The main unit has a signal reception icon near the outdoor temperature display area. If there are a low number of “bars” present, you may experience no temperature display (“--”) or inaccuracy. In either case, you may need to relocate one of both of the units. If most or all 4 of the bars are present, wireless reception is good and no action is required. Press the UP (s) ARROW to or DOWN (t) ARROW buttons to turn OFF Atomic signal. This will stop the clock from searching for the Atomic radio signal. 3) SETTING THE CLOCK & CALENDAR a) Press the UP (s) ARROW to turn DST (Daylight Saving Time) function on or off. Press “SET” to confirm and RELEASE. b)The HOUR will flash Press the UP (s) ARROW repeatedly, Press “SET” to confirm until the correct hour (AM or PM) is displayed. c)The MINUTE will flash Press the UP (s) ARROW repeatedly, Press “SET” until the correct minute is displayed. to confirm Press the UP (s) ARROW repeatedly, Press “SET” to confirm until the correct year is displayed. Press the UP (s) ARROW repeatedly, Press “SET” to confirm until the correct month is displayed. Press the UP (s) ARROW repeatedly, Press “SET” to confirm until the correct date is displayed. d)The YEAR will flash e)The MONTH will flash f)The DATE will flash DAY OF THE WEEK AND MOON PHASE WILL UPDATE AUTOMATICALLY AS YOU SET THE DATE e)The °F will flash NO Reception 4 Press the UP (s) ARROW to change between °F and °C. Press “SET” to confirm Strong Reception 5