1
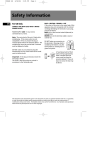
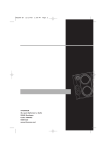
PDP2069 EN
4/17/03
4:56 PM
Page 2
u
s
e
r
m
a
n
PR +
u
PR -
a
ENTER
CD• RADIO
DSP
MENU•
l
PRESET
ON
STEREO
30
PRESET
mp
THOMSON
46/47 quai A. Le Gallo
92648 Boulogne Cedex
FRANCE
RCS nanterre
B322 019 464
55756080
www.thomson-multimedia.com
a
3 • fm
ic b
• dynam
ss
bo
os
t
PDP2069
PDP2069 EN
4/17/03
4:56 PM
Page 4
Thomson multimedia pack
Safety information
The Thomson Multimedia Pack is an offer that includes the MusicMatch jukebox Music
Management software, to be installed on your PC.
Thanks to this software, you will enter the digital music world and benefit from numerous features :
- MusicMatch Jukebox allows to compress music files into mp3 & WMA* (Windows Media
Audio) formats recorded from your audio CDs, and to keep them on your PC. You could also
use other audio sources for your recordings (vynil, tape),
- It makes the search and download of internet music easier,
- It allows the management of your compressed music and the creation of your own playlists,
- The Jukebox is a true audio player installed on your PC,
- It gives access to thousands of net radios today available on the web.
You can listen and share the compressed music files played by MusicMatch jukebox directly on
your Thomson audio system, and thus to enjoy the digital music with your system’s rich features.
- Simply plug the 3.5mm PC-pin end of the cable into the speaker or headphone jack of your
PC, and insert the twin RCA ends to the @/AUX connection of your Thomson audio system.
- Select the audio source on your system with the switch located on @ AUX.
You can download music files encoded in mp3 or WMA* from several internet sites.
Here a few sites to discover :
- www.emusic.com
- www.real.com
- www.mp3.com
- www.mpeg.org
- www.windowsmedia.com
CAUTION!
Invisible laser radiation when open. Avoid
exposure to beam. Class I laser product. This
system must be opened only by qualified
technicians to prevent accidents caused by the
laser beam.
LASER λ = 780 nm, P max = 5 mW
Rating Information: At bottom of the unit
this unit comply with the existing requirements
ADVARSEL!
USYNLIG LASERSTRÅLNING VED ÅBNING NAR
SIKKERHEDSAFBRYDERE ER UDE AF FUNKTION.
UNGDÅ UDSAETTELSE FOR STRÅLNING.
VORSICHT!
UNSICHTBARE LASERSTRALUNG
WENN ABDECKUNG GEÖFFNET UND SICHERHEITS–
VERRIEGELUNG ÜBERBRÜCKT.
NICHT DEM LASERSTRAHL AUSSETZEN!
CAUTION – INVISIBLE LASER RADIATION
WHEN OPEN AND INTERLOCKS FAILED OR
DEFEATED. AVOID EXPOSURE TO BEAM.
ATTENTION – RAYONNEMENT LASER INVISIBLE
DANGEREUX EN CAS D'OUVERTURE ET LORSQUE
LA SECURITE EST NEUTRALISEE.
EXPOSITION DANGEREUSE AU FAISCEAU.
In accordance with the rating plate of the
unit, this unit complies with current standards
concerning electrical safety and electromagnetic compatibility.
CLASS 1 LASER PRODUCT
LASER KLASSE 1
APPAREIL A LASER DE CLASSE 1
LUOKAN 1 LASERLAITE
KLASS 1 LASERAPP ARAT
VARNING–
OSYNLIG LASERSTRÅLNING NÄR DENNA DEL
ÄR ÖPPNAD OCH SPÄRRAN ÄR URKOPPLADE.
BETRAKTA EJ STRÅLEN.
VARO!
AVATTAESSA JA SOUJALUKITUS OHITETTAESSA
OLET ALTTIINA NÄKYMÄTTÖMÄLLE.
LASERSÄTEILYLLE ÄLÄ KATSO SÄTEESEEN.
* Windows Media is a registered trademark of Microsoft Corporation.
CAUTION
RISK OF ELECTRIC SHOCK
DO NOT OPEN
THE LIGHTNING
FLASH AND ARROWHEAD WITHIN THE
TRIANGLE IS A
WA R N I N G S I G N
ALERTING YOU OF
"DANGEROUS
VOLTAGE" INSIDE
THE PRODUCT.
CAUTION: TO REDUCE THE
RISK OF ELECTRIC SHOCK,
DO NOT REMOVE COVER
(OR BACK). NO USERS E RV I C E A B L E PA R T S I N S I D E . R E F E R S E RV I C I N G
TO QUALIFIED SERVICE
PERSONNEL.
THE EXCLAMATION
POINT WITHIN THE
TRIANGLE IS A
WARNING
SIGN
ALERTING YOU OF
I M P O R TA N T
INSTRUCTIONS
A C C O M PA N Y I N G
T H E P R O D U C T.
SEE MARKING ON BOTTOM / BACK OF PRODUCT
WARNING: TO PREVENT FIRE OR ELECTRICAL
SHOCK HAZARD, DO NOT EXPOSE THIS PRODUCT
TO RAIN OR MOISTURE.
Have a Blast- Just Not in
Your Eardrums
Make sure you turn down
the volume on the unit
before you put on
headphones. Increase the volume to the
desired level only after headphone are in
place.
Please respect the environment!
Before throwing any batteries
away, consult your distributor
who may be able to take them
back for specific recycling.
The descriptions and characteristics given in this document are given as a general indication and not as a guarantee.
In order to provide the highest quality product possible, we reserve the right to make any improvement or modification without prior notice. The English version serves as the final reference on all products and operational details
should any discrepancies arise in other languages.
EN
PDP2069 EN
4/17/03
4:56 PM
Page 6
Contents
. . . . . . . . . . . . . . . . . . . . . . . . .7-9
EN
AC outlet power supply
You can power your CD player with the
supplied AC/DC Adapter. Refer to the
table for details of the operating voltage of the Adapter supplied with your
unit.
AC/DC Adapter is purposed for indoor
use in dry rooms only. Remove the jack
from the device to use it with the batteries.
AA
Playing mp3/ WMA files with SmartTrax
Playlist . . . . . . . . . . . . . . . . . . . .10
Playmode . . . . . . . . . . . . . . . . .11
Other functions . . . . . . . . . . . .12
MusicMatch Jukebox . . . . .13-15
Troubleshooting . . . . . . . . . . .16
More information . . . . . . . . . .17
AA
Safety Information
Power supply
Before you begin . . . . . . . . . . . .1
Main unit . . . . . . . . . . . . . . . . . .2
Listening to the radio . . . . . . . .3
CD player . . . . . . . . . . . . . . . . . .4
Playing mp3/ WMA files . . . . . . .5-6
Power supply
Note : Power is fed to the unit even
when it is not functioning. To cut
the power supply off, the AC/DC
Adapter must be unplugged.
The unit will turn off automatically if left
idle for a while.
Model Number
AC/DC Adapter
Batteries
PDP2069
Input: 230V 50Hz
AAx2
Output : 4.5VDC@600mA
Recharge function
To charge Ni-Cd/Ni-MH batteries
(not included):
1. Insert 2 rechargeable batteries in
the main unit compartment.
2. Connect the main adapter.
3. Power on the unit , press
CD•RADIO/RECHARGE to select
RECHARGE MODE to start battery
charging
4. An animated battery logo will be
displayed when charging is in
progress.
5. When the batteries are fully
charged, charging will automatically stop.
6. You can also stop recharge operation by pressing STOP button/
removing the AC / DC adapter.
PDP2069 EN
4/17/03
4:56 PM
Page 8
Before You Begin
EN
Main Unit
2. Slide the ear hook behind the ear with
the ear pad on the front of the ear.
Rotate the clip phone so the ear pad fits
closely with the ear.
Unpacking Your Unit
You should have the following:
• one main unit
• one carrying strap
• one set of clip phones
• one user’s guide
• MusicMatch CD
EN
PR +
How to Use Your Clip Phones
(The e.clipz)
4. 5 V
dc
PR -
CD•RADIO
DSP
11
MENU•
7
ENTER
t
ne ou
R
L
3. Lock the clip phone in place by
pushing down on the top of the ear hook
until it locks.
9
12
li
The right ear clip phone is labeled R
3
8
4
PRESET
6
1
2
ON
volume
S TER E O
5
while the left ear clip phone is labeled L.
30
PRESET
m
p3
• fm
s
• dynamic ba
o
s b
os
t
10
open
1. Pull the ear hook away from the ear
CLICK
pad slightly. You will hear a click sound.
1
4. For best sound quality, make sure the
earpad fits closely with your ear.
1. PLAY/PAUSE -- plays disc, or pauses during playback, power on.
2. STOP -- stops playback, return to
home/ root position in stop mode
(Folder mode and SmartTrax mode
only), press and hold more than 2
seconds in stop mode to power off.
3. Directions key -- skips
forward/backward (CD mode); songs
selection (mp3 disc mode); setting
preset station (radio mode).
4. DSP -- toggles dsp modes:
In CD mode - (Flat/ Bass Boost/ Rock/
Pop/ Jazz).
In Radio mode - (Flat/ Bass Boost).
5. VOL+/VOL- -- increases/decreases
volume level (from 0 to 30).
6. MENU•HOLD -- accesses MENU
mode; press and hold to lock keys.
7. ENTER -- confirms selection.
8. PHONES / LINE OUT -- jack for
headphones and signal output.
9. DC in -- jack for external power.
10. OPEN -- slides to open the door.
11. SHUFFLE•PRESET -- press to
activate Shuffle function in CD
mode, or to set preset station (refer
to radio section).
12. CD•RADIO/RECHARGE -- press
to switch between radio, Cd and
recharge mode.
2
PDP2069 EN
4/17/03
4:57 PM
Page 10
Listening to the radio
EN
Listening to the radio
Auto search
1. Press CD•RADIO button to toggle
between CD mode and RADIO mode.
2. When in RADIO mode, You can tune to
your desired radio station by pressing
or
button.
3. If you have preset radio stations, you can
press PR+
or PRto choose among
them.
1. In RADIO mode, press and hold
or
, when the “Release key now for auto
search up” shows on display, release key to
search up / down for a radio station. If you
ignore the message and keep pressing the
button, the tuning will stop whenever you
release the button.
2. Once a station is found, the search will
automatically stop.
3. You can store it as one of your preset stations.
How to program a preset station
1. When in RADIO mode, press
and
to select frequencies.
2. Choose a frequency you want to store,
the press SHUFFLE•PRESET button.
3. “Preset” will flash on display, press PR+
or PRto select the preset station number you want to store in.
4. Press ENTER button to confirm, and the
selected frequency will be saved.
Note: you can stored up to 30 preset stations .
How to delete a preset station
1. Press PR+
or PRto choose
among preset stations in radio mode.
2. Choose the preset station you want to
delete, then press SHUFFLE•PRESET button, “PRESET” will blink on display.
3. Press STOP button to delete the station.
4. Or you can select “Reset Preset” in radio
mode menu, then press PLAY button to
reset all preset stations.
3
FM stereo / mono mode
In RADIO mode, you can toggle between
FM stereo and mono signal.
1. In RADIO mode, press MENU•HOLD button to access menu.
2. Select “Radio mode” and press ENTER
button.
3. Select “Stereo” and press ENTER button.
4. Press PR+
and PRto select
ON/OFF.
5. Press ENTER button to confirm selection.
CD player
1
ARTIST GENRE ALBUM YEAR PLAYLIST
1.Repeat entire disc
2. Repeat current track
3. Shuffle tracks play
PLAYLIST 4. Program mode
5. Shows when the keys lock function is enabled.
6. Shows battery level
DBBS 7. DBBS ON
8. SmartTrax mode
9. Folder icon.
1
1. Slide the OPEN switch to the right to
open the door. Insert a disc and press
lightly on the centre to lock. Close the
door.
2. Press PLAY/PAUSE button, then the
total number of tracks and time of the
CD will be displayed on the display.
3. Press PLAY/PAUSE to start CD playback.
4. You can skip to next track by pressing
the
or
button.
Track Search
1. When a CD is inserted, press
or
to select a track .
2. During playback, press and hold
or
to search forward and backward.
10. Repeat folder
11. Shuffle folder
12. Shuffle folder repeatedly
Selecting frequency step
1. In RADIO mode, press MENU•HOLD button to access menu.
2. Select “Radio mode” and press ENTER
button.
3. Select “FREQ. step” and press ENTER
button.
4. Press PR+
and PR+
to select
US200KHz/ Europe 50KHz.
5. Press ENTER button to confirm selection.
EN
Listening to a Compact Disc
DBBS
EQ
ARTIST
GENRE
ALBUM
YEAR
13. Shuffle disc repeatedly
14. Shows when playing Artist category.
15. Shows when playing Genre
category.
16. Shows when playing Album
category.
17. Shows when playing Year category.
4
PDP2069 EN
4/17/03
4:57 PM
Page 12
Playing mp3/ WMA files
EN
Playing mp3/ WMA files
File navigation
Playlist
Display Options
When the disc TOC and the file system
are read, the system enters either PLAY
or STOP mode, depending on the
Autoplay setting in the SETUP menu.
During playback, the song details are
displayed on the screen.
This function lets you listen to the tracks
you selected in the order you want.
1. Press MENU•HOLD button to select
"PLAYLIST" in the STOP mode. If one or
more songs have been added to the
playlist, the Playlist mode will be automatically switched on.
2. To return to normal mode, press
MENU•HOLD button in STOP mode to
select "PLAYLIST", then select “Disable /
Enable”.
3. Press
to select “Set Playlist? On
(Play key), Off (stop key)”.
4. Press PLAY or STOP button to confirm
selection.
Note: The playlist will not be erased if
user returns to normal mode, user can
re-enter the Playlist mode with the
same playlist as they desire.
When a mp3 audio disc is read, the title
of the folder or the song name in the
home directory will show on the display.
In playing mode
• Press
or
once to skip to the
previous/next track; or keep pressing to
search backward/forward.
In stop mode
• Press
or to select song / file.
• If the cursor points to a file, press
to play.
• If the cursor points to a folder, press
to play the first song in that folder.
Within menu mode
• Press
to enter the next/inner
layer; or press
to enter the previous/upper layer.
• Press
for up navigation, or press
for down navigation.
“
“
” will indicate the title is a folder.
“ will indicate the title is a file.
Back to
previous page
Back to
previous
menu
Go to
next menu
PR
Go to
next page
Folder – files are placed into their appropriate folder.
File – all files on the mp3 disc will be
arranged alphabetically.
Folder mode / SmartTrax
mode display
00:00
Title Name
Artist Name
Album/ Genre/ Year
Adding songs to a playlist
1. In the PLAYLIST menu, select ADD
SONG by pressing ENTER button.
2. You can select either a file or folder in
mp3 mode (songs only in CD mode).
Press
or
to go in or out a folder,
and
or to select song / file.
3. Press ENTER button to confirm selection.
4. Press MENU•HOLD button to exit the
"PLAYLIST" menu or the unit will exit
menu automatically after a few seconds.
Album/ Genre/ Year/
(Scrolling)
elapsed time
CDDA mp3 (32- WMA
Audio 320 kbps (64-192
&VBR)
kbps)
Mixed
mode
format
Direct CD
CD Extra
format
Compressed Uncompressed
Audio Tracks Only
Audio Tracks Only
X
Commercial
CD
Audio Tracks Only
N/A
Supported
X
un-supported
N/A
Multi-sessions
Open Closed
Disc Disc
X
CD-R
CD-RW
Remarks:
5
EN
Navigation keys
N/A
N/A N/A
no such option
6
PDP2069 EN
4/17/03
4:57 PM
Page 14
Playing mp3/ WMA files with SmartTrax
EN
SmartTrax is a music management system
that allows for the organization of mp3
or WMA files into 7 standardized categories. The categories include My
Selection, Artist, Title, Genre, Album,
Year and CD Playlist.
This systematic arrangement makes the
navigation easier and faster as songs are
placed into categories (e.g. Artists,
Album, Genre, etc.)
To enjoy SmartTrax navigation experience, please make sure your mp3 disc is
burnt with SmartTrax feature switched
ON. You can still go back to folder mode
navigation by choosing “Browse mode”
and select “folder mode” option in the
menu, you may access the menu by pressing MENU•HOLD button.
Playing mp3/ WMA files with SmartTrax
Smart Resume Plus
The unit is equipped with Smart resume
plus features, if the newly inserted CD is
considered as the same as the former
one, the Smart Resume Plus feature will
automatically activate. The last playback
song and playmode will be restored.
NOTE: When reading a SmartTrax disc
which is different from the former one,
the unit will automatically enter the
Artist Category.
EN
Navigation chart (SmartTrax mode)
SMART TRAX
HOME DIRECTORY
My Selection
Artist
Title
ARTIST
ARTIST
Artist1 Song1
Artist1 Song2
Artist1 Song3
Artist1
Artist2
Artist3
My Selection
Artist
Title
Title1
Title2
Title3
Genre
Album
Ye a r
Genre1
Genre2
Genre3
Genre
Album
Ye a r
Album1
Album2
Album3
Genre
Album
Ye a r
1999
2000
2001
GENRE
GENRE
Genre1 Song1
Genre1 Song2
Genre1 Song3
Navigation chart (Folder mode)
Tr a c k 1
Tr a c k 2
Folder 1
Press NEXT
to enter Folder 1
Press PREV.
go back to the
previous Folder 1
Press
to move
down the list
Press
to move
down the list
Tr a c k 1
Tr a c k 2
Folder 1
Folder 1.1
Folder 2.1
Folder 3.1
Press PREV.
go back to the
previous Folder 1.1
ALBUM
ALBUM
Press NEXT
to enter Folder 1.1
Folder 1.1
Folder 2.1
Folder 3.1
T r a c k 1 . 1. 1
Tr a c k 2 . 1 . 1
Folder 1.1.1
Album1 Song1
Album1 Song2
Album1 Song3
Press PLAY/PAUSE
to begin playback
YEAR
00:01
Title
Artist
Album
YEAR
Song1
Song2
Song3
Press PLAY/PAUSE
to begin playback
P L AY L I S T
00:01
Title
Artist
Album
7
CD Playlist
--------------------------Clear Selection
Default
Artist-Album-T
Artist-song
P L AY L I S T
Song1
Song2
Song3
8
PDP2069 EN
4/17/03
4:57 PM
Page 16
Playing mp3/ WMA files with SmartTrax
EN
My Selection (In stop mode)
View My Selection
Selected categories and tracks can be
bookmarked and placed into My
Selection. The selected categories / tracks
will be marked as below:
1. Press
or
to scroll the home
directory to select the My Selection.
Not selected
Selected
Partially selected
ALBUM
Album1
Album2
Album3
1. Enter SmartTrax mode if the unit is currently in folder mode.
NOTE: The unit must be in SmartTrax
mode in order to select tracks to be
placed in My Selection.
2. Press
to enter.
3. Press
gory.
or
or
to select the category
to enter / exit cate-
4. Once you have entered one of the
home directory categories, press ENTER
to select the category or individual title
to place into My Selection.
9
2. Press
or
to enter category.
Clear My Selection
1. Press
or to scroll the home directory to select the Clear Selection.
2. Press
to enter category.
3. Follow the instructions to clear My
Selection.
Playlist
Erasing songs / folders / playlist
To erase the whole playlist:
1. Press MENU•HOLD button to select
"ERASE..." in the Playlist menu.
2. Select “ERASE ALL”.
3. Press
to select “Set Playlist? On
(Play key), Off (stop key)”.
4. Press PLAY or STOP button to confirm selection.
5. After erasing all items in the playlist,
the unit will automatically reset to
Normal mode.
Note: Normal, Intro, Repeat Disc,
Repeat Folder, Repeat Track, Shuffle
Disc, Shuffle Folder, Shuffle folder
repeatedly, Shuffle disc repeatedly
modes are mutually exclusive, selecting
one mode will automatically cancel the
other mode.
If playlist is enabled for mp3 disc, the
repeat folder and shuffle folder are not
available.
To erase songs / folders:
1. Press ENTER button to select
“ERASE...” in the PLAYLIST menu.
2. Select “ERASE SONG”.
3. You can select either a file or folder in
mp3 mode (songs only in CD mode).
Press
or to select folder / file.
4.Press ENTER button to confirm selection.
5. Press MENU•HOLD button to exit the
"Playlist" menu.
To disable / enable playlist:
After you create a playlist, you can disable or enable it in stop mode.
1. Press MENU•HOLD button to select
“Playlst”
2. Press
to select “Disable / Enable”.
3. Press
to select “Set Playlist? On
(Play key), Off (stop key)”.
4. Press PLAY or STOP button to confirm selection.
EN
To view playlist:
After you create a playlist, you can view
it in stop mode.
1. Press MENU•HOLD button to select
“view list” in the PLAYLIST menu. And
use
and
buttons to view.
2. Press MENU•HOLD button to exit the
menu.
Note: The maximum number of items
(not nessessarily be the same as the
total number of files / songs) in the
playlist is 30. When the playlist is full, a
warning message will be displayed.
You cannot access the playlist menu
during playback.
10
PDP2069 EN
4/17/03
4:57 PM
Page 18
Other functions
Playmode
EN
Repeat and Shuffle Playback
in Folder mode
You can replay the entire CD or one
track as many times as you wish as well
as listen to the beginning of each track
for 10 seconds.
Within play mode, press MENU•HOLD
to enter playback menu, select Play
mode, then use the directions key to
select among:
• Normal playback.
• Play the beginning of each files for 10
seconds. (INTRO)
• Repeat the current track.
• Repeat the current directory. (mp3
disc only)
• Repeat the entire CD
• Randomly play files in the current
directory. (mp3 disc only)
• Randomly play all files.
• Randomly play all files in the current
folder repeatedly. (mp3 disc only)
• Randomly play all files repeatedly.
Repeat and Shuffle Playback
in SmartTrax mode
You will have different choice when
playing a mp3 disc with SmartTrax.
In play mode, press MENU•HOLD to
enter playback menu, select Play mode,
then use the directions key to select
among:
11
• Normal playback.
• Play the beginning of each files for 10
seconds. (INTRO)
• Smart Repeat - repeat files in the
selected category.
• Smart shuffle - randomly play files in
the selected category.
• Repeat the current file.
• Smart shuffle repeat - play random
files in the selected category repeatedly.
Note: During INTRO mode, you can
press STOP key to stop, or press PLAY
key to play the current track. And
INTRO mode will automatically cancelled when all songs are played.
Smart repeat and Smart shuffle in SmartTrax mode
Smart repeat and smart shuffle are the
newly invented way, which are cursor
position dependent, of repeating and
shuffling songs in SmartTrax mode.
For smart shuffle, for example, if the
cursor is at the middle level where all
the artists are listed, then an artist is
picked at random and his/her songs will
be played randomly before picking
another artist randomly.
For smart repeat, for example, if the
cursor is at the bottom level where the
first song in the POP category, then all
the songs in this category will be played
repeatedly, starting from the first song.
Keys lock
To Lock: Press and hold the MENU•HOLD
button for 2 seconds, the "LOCK" icon
appears and the words "Keys Locked"
will show on display.
To Unlock: Press MENU•HOLD button
once, then press the ENTER button within 3 seconds.
EN
To select the browse mode:
1. Press MENU•HOLD button.
2. Use the DIRECTIONS KEY to select
Setup, and press ENTER to confirm.
3. Select “Browse mode”.
4. Select SmartTrax mode / Folder mode.
5. Press ENTER button to confirm selection.
ESP Extreme (audio CD only)
Other functions
You can turn on / off autoplay, beep
sound, and select the browse mode.
To turn on / off the autoplay:
1. Press MENU•HOLD button.
2. Use the DIRECTIONS KEY to select
Setup, and press ENTER to confirm.
3. Select “Auto play”.
4. Select ON / OFF.
5. Press ENTER button to confirm selection.
To turn on / off the beep:
1. Press MENU•HOLD button.
2. Use the DIRECTIONS KEY to select
Setup, and press ENTER to confirm.
3. Select “Beep”.
4. Select ON / OFF.
5. Press ENTER button to confirm selection.
The unit is equipped with ESP-extreme,
which prevents sound interruptions
when impacts or vibrations occur. You
can disable / enable this function with
the following steps:
1. In CD mode, press MENU•HOLD button.
2. Use the DIRECTIONS KEY to select
Setup, and press ENTER to confirm.
3. Select ESP.
4. Select ON / OFF.
5. Press ENTER button to confirm selection.
12
PDP2069 EN
4/17/03
4:57 PM
Page 20
MusicMatch Jukebox
EN
Music management softTM
ware - MusicMatch
Jukebox
The software version number can be
seen on the top left corner of the information window.
Upon
unpacking
the unit, you
should find
the music
management software MusicMatch Jukebox enclosed. Insert the
software disc into your computer and
click on “MusicMatch User’s Guide” if
you need assistance on installation of the
software and creating mp3 discs for your
enjoyment with this unit.
Update MusicMatch Jukebox
You need the latest MMJB Software to
enjoy all the features.
To check which version of MusicMatch
Jukebox you are currently using:
1. Click on Help to access help menu.
2. Select About MUSICMATCH Jukebox.
13
Once you have installed the MusicMatch
Jukebox software included with your
unit, follow the steps below to update
your software version.
1. Select Update Software from the
Options menu.
2. Select Update Software to Latest
Release.
3. Click Continue.
It will automatically download and install
the latest MusicMatch Jukebox software.
Close the window that asks you to Get
your Plus Upgrade Key Now.
MusicMatch Jukebox
Creating a CD
Troubleshooting
After placing tracks in the playlist, click
Burn on the top menu bar.
(Included with the package is a trial version of MusicMatch burner Plus. After
the trial burns are used up, you can still
burn CDs, but at a slower rate and without some features. You can upgrade to
MusicMatch Plus to get faster burning
and additional features.)
Problem
Can not burn SmartTrax CD in
MusicMatch Jukebox
CD-R / RW
This unit is compatible with CD-RW/ CDR discs for playback.
Notes on CD-R/RW Disc:
• Do not affix any type of labels to
either side (recordable or labeled side)
of a CD-R/RW disc as this may result in
the unit malfunctioning.
• To avoid damages to the CD-R/RW
disc, do not open the disc compartment door while the disc is being read.
• Do not load an unrecorded CD-R/RW
disc into the unit. This may take a
longer time to read the disc.
• Playback capability for CD-RW
discs may vary due to variations in
the quality of the CD-RW disc and
the recorder used to create the
disc.
EN
Solution
You may have exceeded the number of
burns. Upgrade to MusicMatch Jukebox
Plus to get unlimited burns.
Check that MusicMatch Jukebox settings are correct.
1. Click the BURN button from the
Main window to display Burn window.
2. Click the mp3 button on the top of
the Burn window to change to mp3
audio disc.
14
PDP2069 EN
4/17/03
4:57 PM
Page 22
MusicMatch Jukebox
EN
3. Select Options from Options menu in
the Burn window.
6. Click on the mp3 folder.
Make sure Add MultiAudio Tracklist
(MAU) box is checked.
4. Select Settings to display Burn settings.
Troubleshooting
Troubleshooting Tips
No power, does not work?
• Batteries may be inserted incorrectly.
• Batteries may be empty. Recharge
(only Ni-Cd/Ni-MH battery) or replace
new batteries.
• Connection may be loose if using
AC/DC transformer.
Disc cannot be played?
• Disc may not be inserted correctly with
label side facing upward.
• CD-RW (or CD-R) disc may not be
recorded properly.
5. Click on the General folder.
Make sure “mp3 disc” is selected under
Disc type at Startup.
7. Click OK when finished.
• Check that the recorded bit rate is within 32kbps and 320kbps.
• Only audio CD track will be played in
mixed mode disc.
Cannot play WMA songs?
• Check that the WMA bit rate is within
64 kbps and 192 kbps and sampling rate
is within 44 kHz and 48kHz.
• DRM not supported.
The display shows strange characters?
• Check that file names are created using
the ASCII-ISO 8859-1 (Latin - 1) Table.
Skipping tracks or bad sound quality?
• Disc may be dirty or scratched badly.
• Disc lens may be dirty and need cleaning.
• There may be strong magnetic fields
(e.g. too close to TV) near the unit.
Cannot play mp3 disc?
• Clean the disc.
• Make sure files are saved under .mp3
extension. e.g. Rocky08.mp3
15
16
EN
PDP2069 EN
4/17/03
4:57 PM
Page 24
More information
EN
17
Useful advice
Maintenance
• Do not store CDs in damp areas.
• Do not expose CDs to high
temperatures or direct sunlight.
• Do not put any tape or adhesives on
either side of the disc.
• You should avoid leaving the CD
door open. Dust is liable to impair
performance of the laser optical unit.
• Do not use your set immediately
after transport from a cold place to a
warm place : there may be
condensation problems.
• Do not touch the playing surface.
Make sure that you keep your set
away from water and high
temperatures.
• If you do not use your set on battery
power for more than one month, we
advise you to take out all the
batteries.
• To prevent personal injury, do not
reverse any battery and do not mix
battery types.
• Discard leaking batteries immediately.
Leaking batteries can cause skin burns
or other personal injury.
• Prolonged use of the CD player at full
volume can damage the user’s ear.
• The apparatus shall not be exposed to
dripping and splashing.
Clean the player with a soft cloth, or a
damp chamois leather. Never use
solvents.
SPC: Sound Pressure Control at 100dB
maximum (only for Thomson models)
Please respect the environment!
Before throwing any batteries away,
consult your distributor who may be
able to take them back for specific recycling.
Technical specifications:
* Frequency response: 20Hz to
20kHz
Power Supply
• 4.5V DC (through AC/DC adapter)
• 2 AA batteries