1
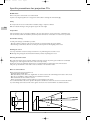
ETC210_en
2/05/03
17:51
Page 1
Precautions
Safety
The television’s components are sensitive to heat.The maximum ambient temperature should not exceed 35° Celsius.
Do not cover the vents at the back or sides of the television.
Leave sufficient space around it to allow adequate ventilation.
Damp in rooms where the set is installed should not exceed 85% humidity.
If you have to use the television outdoors, do not expose it to water from rain or splashing.
Therefore be careful not to place any object containing a liquid (vase, glass, bottle,...) on or near your appliance.
Moving it from a cold atmosphere into a warm one can cause condensation on the screen (and on some components inside the television).
Leave the condensation to evaporate before turning the television on again.
If you are away for a long period, switch the set off at the on/off switch.
Even when off, some components remain in contact with the mains electricity supply.
To completely isolate it you must remove the plug from the mains supply socket.
According to the model dependent, the on/off switch is located at the front or side of the television.
During thunder storms, we recommend that you disconnect the television from the mains and aerial so that it is not affected by
electrical or electromagnetic surges that could damage it.
For this reason, keep the mains socket and aerial socket accessible so they can be disconnected.
Immediately disconnect the television if you notice it giving off a burning smell or smoke.
You must not under any circumstances open the television yourself.
You are at risk of electrocution if you do so.
The set is provided with adequate shielding to avoid the emission of X-rays.
Work by unqualified persons, modifications to the high voltage or replacement of the tube by a model not complying with the
manufacturer’s recommendations may cause a sharp increase in X-ray emissions.
A set modified in this way no longer meets the original specifications and should not be used.
Care
Clean the screen with a glass care cleaner and the rest of the set with a soft cloth and neutral detergent.
Regularly dust the vents at the back or sides. Using solvents, abrasive or alcohol based products risks damaging the television.
Demagnetization
Badly shielded loudspeakers or other strong magnetic fields near the TV can cause patches of colour to appear on the screen.
Move any magnetised materials away from the TV, switch the set off and switch it on fifteen minutes later.
THOMSON is not liable if the television is used other than in accordance with this manual.
In our efforts to improve the quality of our products, we reserve the right to change their features.The information contained in these instructions are
therefore liable to change and are not contractual.
The pages of this publication are printed on recycled paper
1
EN
ETC210_en
2/05/03
17:51
Page 2
Specific precautions for projection TVs
On/Off switch
Refer to the picture on the inside cover of this manual.
If you are not using the appliance for a long period of time switch it off using the on/off switch (A).
Safety
Do not place the TV set on a surface which is unstable, sloping or subject to vibration.
Make sure that the flooring is strong enough to support the set’s weight.
EN
Temperature
If the temperature in the room changes suddenly or the set is moved from a cold to a warm place, condensation may
form on the lenses, which can distort the picture.The picture will return to normal after one or two hours’ operation.
Comfortable viewing
To make your viewing as comfortable as possible:
- Close the curtains or shutters in the room to avoid the screen being directly exposed to sunlight.
- Avoid flooring or wall surfaces which are too shiny, as well as any form of direct lighting on the screen.
Cleaning the screen
Use a dry soft, lint-free cloth, if necessary, moistened in a very mild detergent to clean the screen.
Note: using strong detergents, alcohol-based and abrasive products may damage the screen.
Choosing the ideal location
One of the main assets of your projection television is its large screen. It can provide good conditions for comfortable
viewing at up to an 80° angle from the centre of the screen (see below).
However, to ensure your maximum enjoyment, it is recommended that you sit directly in front of the television,
with your eyes level with the centre of the screen at a distance of no less than 3 metres.
Other recommendations
Before moving your projection television set:
- Unplug the power and RF cables.
- Make sure that the power cable is not caught under one of the castors as this could damage it and cause a short circuit.
- Move the set carefully. It is equipped with castors to facilitate its movement.
- Make sure that the screen is not hit or scored.
- Lift the set up when moving it on bumpy surfaces to prevent damage to the castors.
It is recommended that a test card or any other fixed picture should not be left on the screen for more than 15 minutes
to prevent damage to the tubes. For this reason, games consoles are not recommended for use with this television.
25°
3m
2
ETC210_en
2/05/03
17:51
Page 3
Contents
Precautions ..........................................................1
Everyday use..............................................10
Safety ............................................................................1
Care ..............................................................................1
Demagnetization........................................................1
Switching the TV set on and off ..........................10
Volume ......................................................................10
Displaying status information ..............................10
Accessing programmes ..........................................10
Accessing AV programmes....................................10
Specific precautions for Projection TVs ............2
On/Off switch ............................................................2
Safety ............................................................................2
Temperature ..............................................................2
Comfortable viewing ................................................2
Cleaning the screen ..................................................2
Choosing the ideal location ....................................2
Other recomendations ............................................2
Time setting - List of programmes ........11
Time ..........................................................................11
List of programmes ..................................................11
Picture and Preferencess ........................12
Picture ........................................................................12
Preferences ................................................................12
Customizing ..............................................................12
Contents................................................................3
Using remote control for TV ............................4
Sound setting ..........................................13
Using RC for other equipment ......................5
Teletext ......................................................14
Programmer la télécommande ..............................5
Programmation manuelle ........................................5
Program info ........................................15-16
Switching on ................................................6
Other connections ....................................17
Initial set-up ................................................7
AV1 SCART socket ................................................17
AV2 SCART socket ................................................17
AV3 Audio/Video RCA sockets ..........................17
AV3 S socket and Audio RCA sockets ..............17
Headphone socket ..................................................17
Connecting a video recorder ..............................18
Organizer ....................................................................7
Adjusting the convergence ........................................8
Manual channel set-up................................9
3
EN
ETC210_en
2/05/03
17:51
Page 4
Using remote control for TV
Most of your television’s functions are available via the menus that appear on the screen.The remote control supplied with your set can be used
to navigate through the menus and to configure all the general settings.The remote control and its functions may vary depending on the model
of television. RC 311TA1G operate most DVD players and recent video recorders made by Thomson, Saba, Brandt, Ferguson and Telefunken.
RC 311TAM1 is programmable, refer to page 5.
To operate your TV, press TV key
(RC 311TA1G et RC 311TAM1).
EN
To switch your set off (stand-by).
- Personal Adjustments (PRESETS).
- Channels list (ZZZ/LIST).
- Display of channel, stand-by time (INFO).
- Programme guide (GUIDE)
- Videotext keys (TEXT).
The colour keys can also be used to operate teletext.
Directional keys Up/Down, Left/Right for selection and validation key (OK).
EXIT for erasing the menu windows or information from the screen.
MENU is for calling up the menu windows.
- Volume control.
- Mute :
Programme change.
For channel selection and number input in the menus.
For 2-digit channels (10,11,12, etc.), first press on key 0 of the remote control (for
ex. for 12 , press 00 then 12).
To select one of the appliances connected via the AV sockets.
Video recorder play and record functions and DVD player play functions
(RC 311TA1G only).
More info
Install two LR03 or AAA batteries in the remote control as
indicated below.
Precautions on using batteries :
- Only use the battery types specified.
- Make sure you use the correct polarity.
- Do not mix new and used batteries.
- Do not use rechargeable batteries.
- Do not expose batteries to excessive heat, throw them on the fire, recharge them or try to open
them, as this could cause them to leak or explode.
- Remove the batteries from the remote control if you are not using it for a long period of time (several weeks).
Please respect the environment and the relevant regulations. Before you dispose of batteries or accumulators, ask your dealer whether
they require special recycling and if he is able take them back.
4
ETC210_en
2/05/03
17:51
Page 5
Using remote control for other equipment (RC 311TAM1)
This remote control is supplied with some TV sets models, it can operate other equipment, such as video recorders, DVD players,
satellite receivers or hi-fi systems.This page provides information concerning the remote control’s use with these other types of
equipment.
Programming the remote control
Video recorder
DVD player
Automatic code search
This method can be used to automatically find the
most appropriate code for your appliance.
Press VCR button
Press DVD button
On/Standby
To display the main
menu.
To display the main
menu.
1. Switch on the appliance you wish to use the
remote control with.
2. Press the relevant button for this appliance on the
remote control, and while holding this button
down, press the
standby button until the
remote control light comes on. Release the two
buttons.
Vertical scrolling in menus
Horizontal scrolling in menus
To confirm an action.
To close a menu.
To directly access
channels or enter
numeric values.
To enter numeric values
or select options in
menus.
Changement de chaîne
3. Point the remote control at the appliance and
press PLAY.Wait until the light stops flashing. If the
appliance has not gone into standby mode after
five seconds, press the PLAY button again to
continue the search for the next set of codes.
Repeat this operation until the appliance goes into
standby mode.There are 20 sets of codes.
4. When the appliance goes into standby mode, press
the standby button on the front to switch it on
again.Then press the REV button to put it back in
standby mode, and if necessary, keep pressing until
the appliance goes into standby.
Sélection de l’entrée AV
Rewind
Play
Fast forward
Stop
Pause
Rewind
Play
Fast forward
Stop
Pause
5.
Press the STOP button and hold it down until the
remote control light goes off.
Note: you can cancel the programming operation at any
time by pressing the EXIT button.
Only makes of apparatus of the THOMSON group benefit from the actions of all the
buttons
Manual programming
This method involves carrying out a manual search for the codes to be used for controlling your other appliances.
1. Switch on the appliance you wish to use the remote control with.
2. Press the relevant button for this appliance on the remote control, and while holding this button down, enter one of the
codes relevant to your make of appliance (there is a list of codes at the end of this manual). If the remote
control light flashes you have entered the wrong code or it is not possible to program the remote control.
3. Point the remote control at the appliance and press the relevant button (VCR or DVD). Press the
standby button.
If the appliance does not go into standby mode, try another code.
Depending on the year of manufacture and the type of appliance, some functions may not be available.
Certain codes may cover more functions than others.Test the functions you can control and, if appropriate, try other codes.
Note here the code(s) which work best.
VCR
DVD/LD
When you change the remote control’s batteries, remember to reprogram it.
5
EN
ETC210_en
2/05/03
17:51
Page 6
Switching on
Follow the instructions on this page to use your TV set and the remote control unit before entering the channel set-up procedure
described on the next page.
SIZE AAA 1,5 V
0%MERCURY
EXTRA HEAV
Y DUTY
GREENE
LL
2
Connect the TV to a mains socket.
GR
EE
EX
TR
NE
AH
EA
SIZ
VY LL
E AA
A 1,5
DU
V
TY
+
-
Install two LR03 or AAA batteries in the remote control as indicated below.
(see page 5).
-
+
1
0%ME
RCUR
Y
EN
It is used to supply power to your TV which must only be supplied with
220 - 240 V ~ 50 Hz. It must not be connected to a D.C. network.
If the plug is detached from the wire, do not plug it into the mains under
any circumstance as there is a danger of electrocution.
3
Connect the outside aerial or cable network to the g socket at
the back of the TV set.
The aerial socket (75 Ohms VHF/UHF/Cable) located at the rear of the TV set is
intended for the connection of an antenna or another set fitted with a modulator
(videorecorder, satellite receiver, etc.)
We recommend that you do not initially connect other equipment to your TV (VCR,
decoder, etc.) so as not to complicate the set-up procedure with additional factors.
Connect them up when you have finished setting up the channels by referring to page
16 of the manual.
4
Switch the TV on by pressing the on/off button (A).
Depending on the model, this button is located on the front or side of
the set.
The first time you switch on the television, the language selection menu appears.
5
Now go to page 7 for information on the Initial set-up, or page 9 for
information on how to update your channels if the channels have already
been set up (if you have moved house, for instance).
Information about connecting other equipment to the AV (Audio-Video) sockets is given on
page 16.
Before referring to it, complete the initial channel set-up procedure on the next page to
avoid any problems with equipment selection.
More info
UK SOCKET
Equipment for the UK is supplied with a mains cable fitted with a
moulded plug.
5A
The plug contains safety components and must not be replaced by one sold by
general retailers. It is fitted with a fuse that protects your television.
If your set has stopped working, the fuse may have blown.
If it has, replace it with an identical ASTA certified or BSI (BS1362) 5-amp fuse.
6
ETC210_en
2/05/03
17:51
Page 7
Initial set-up
The initial set-up consists of carrying out all the necessary settings to search and store all the channels you can receive in your
area. Make sure that the TV is switched on and follow steps 1 to 6 on this page.
When you first switch the TV on, the language selection menu appears.
If this does not happen, refer to Manual channel set-up section to find out how to carry out an Autosearch.
B
1 Choose the language from the menus with the
> English
B
B
O
B
button.
2 Confirm with OK. A list of countries appears.
3 Choose the country with the
or
button.
This is the country you are in, or the country whose channels you want to receive if you live near
B
B
it borders.
B
O
4 Confirm with OK. A welcoming message appears.
B
Français
Deutsch
Italiano
Español
Português
Nederlands
Svenska
Dansk
Norsk
……
……
or
5 Start auto installation by pressing OK.
The menu that appears tells you how set-up is progressing. Wait for the end of set-up mes
sage before leaving the menu, otherwise the channels will not all be memorised.
Depending on the number of programmes available, auto installation can take up to 10 minutes.
COUNTRY SELECTION
>
Return
United Kingdom
Eire
France
Germany
Italy
Spain
Por tugal
Holland
Belgium and Luxembourg
Switzerland
Austria
……
Channels are arranged in a pre-set order. To modify this order, name and rename channels
or delete channels stored twice, press OK and go to step 6.
OR
If you do not want to reorganise the channels, press EXIT to close the menu.
6 The PROGRAMME ORGANISATION menu allows you to name channels, change
the sequence of channels and delete channels stored twice or with poor reception
quality.
Follow the instructions on the screen. Use a TV programme magazine to identify the various channels.
Other
PROGRAMME ORGANISATION
Return
Select program. <I> 02
Swap with PR :
-Change pr. name
FR2
Delete program.
02
01
01
02
03
04
05
06
07
08
09
TF1
FR2
FR3
C+
FR5
M6
• Organising your channels:
Select the Select program. line.
Look for the channel that you want to assign the number 1 to with the PR + and PR or
buttons using the channel logos to help you.The number already assigned appears
on the Select program. line. Select the Swap with PR line, key in 01
and press OK.The channel goes to first position: the two channels are swapped..
Repeat this procedure for the other channels.
• Deleting a channel:
Select the Select program. line and scroll through the channels using the PR + and PR or
buttons .
When you come to a channel to be deleted, select Delete program, and press OK.
Confirm by pressing again OK button.
• Changing the name:
Select the Change pr. name line and choose the character to be altered with the
buttons. Scroll through the alphabet using the 1 and 2 buttons.
The name will be changed when you change line or leave the menu with EXIT button.
You may subsequently return to this menu by selecting the Programme organisation line
in the INSTALLATION MAIN MENU.
O During the initial set-up for projection televisions, a menu for setting the convergence
appears at the end of the automatic set-up process.
Refer to the next page for information on configuring these settings.
More info
Missing channels:
Decoder:
Channels are searched for according to the country selected, refer to the “Manual
set-up” chapter to set up channels that have not been found.
If you have connected a decoder to the AV 1 socket, after the initial set-up you should
display the MANUAL PROGRAMMING menu and confirm the Decoder
option for concerned channels.
For cable networks, if some channels have not been found, select Other instead of
the country and re-start an Auto update.
Refer to page 9.
7
EN
ETC210_en
2/05/03
17:51
Page 8
Adjusting the convergence
Your projection television is equipped with three coloured projection tubes, one each for red, green and blue.The images (red, green
and blue) are projected onto the screen where they converge to form a single colour image. It occasionally happens that after a
certain period of operation or as a result of vibration (if you have moved the television, for instance), the convergence goes out of
alignment.This results in coloured contour appearing around people and objects, requiring the convergence to be adjusted.This
page explains this procedure.
These settings only apply to projection televisions.
EN
CENTRE CONVERGENCE
CENTRE CONVERGENCE
Red convergence adjustment
+
+
+
In order to achieve an efficient setting, leave your projection television on the same
channel for about ten minutes before starting this procedure.
The CENTRE CONVERGENCE menu appears automatically at the end of the
automatic channel set-up process.
Press Red button to ajust red convergence.
Usings Up, Down, Left, Right buttons, superpose red crosses with green crosses.
CENTRE CONVERGENCE
Press Blue button to ajust blue convergence.
Blue convergence adjustment
+
+
+
Usings Up, Down, Left, Right buttons, superpose blue crosses with green crosses.
Once the settings have been configured, press EXIT button to close this screen.
More info
During initial set-up the Centre convergence menu appears automatically at
the end of automatic channel set-up.
If you press OK button to leave the menu, you return :
- to INSTALLATION MAIN MENU if you accessed the
CENTRE CONVERGENCE menu from INSTALLATION MAIN MENU.
If you wish to access this menu later on, display the OVERVIEW menu by pressing
the menu button, select the option Installation and press OK to confirm.
- to PROGRAMMME ORGANISATION menu if you accessed the
CENTRE CONVERGENCE menu at the end of automatic channel set-up
process.
When the Installation main menu appears, select Centre convergence
and press OK.
The Centre Convergence menu appears.
8
ETC210_en
2/05/03
17:51
Page 9
Manual channel set-up
The information provided on this page is useful if you find that some channels have not been stored during the initial
set-up or automatic update processes.This can happen if you are setting up cable network channels.
Setting up channels manually requires every setting for every channel to be entered, one at a time.
Display the OVERVIEW by pressing MENU button, select Installation line
and confirm with OK.
OVERVIEW
Exit
Program Info
Sound
Picture
Time
Preferences
> Installation
The INSTALLATION MAIN MENU is displayed.
Select the Manual installation line. Confirm with OK to display the menu.
Define all the settings in turn for each channel to be stored.
Follow the instructions appearing at the bottom of the screen.
Standard: select the standard for your country (see More info).
INSTALLATION MAIN MENU
Exit
> Manual installation
Auto update
Auto installation
Programme organisation
Personnal settings
Autosearch: key in the channel number or start a search with the
Return
<I >
buttons.
Your television will stop at the first channel found. If you want to memorise the
corresponding channel, select the Store on PR number line.
Otherwise, continue the search using the
buttons.
MANUAL INSTALLATION
Standard
Reception
Autosearch
Fine tuning
Store on PR number
Name
Decoder
External sound path
Reception: choose the reception method (terrestrial aerial or cable network).
Some cable networks use the same frequencies as land based transmissions.
If this is the case, select Aerial instead of Cable.
EURO BG
Antenne
CH - ----þ
þ
Fine tuning: if the picture is not sharp, try to improve it with the
buttons.
Store on PR number: to confirm your settings, key in the number that you want
to assign to the channel (e.g. 01 for BBC1). Store it with OK.
Name: if the station is recognised, its name is detected automatically, otherwise change the
name suggested or enter a name.
Select the character to be altered with the
buttons.
Scroll the alphabet with the 1 and 2 keys.
Once the name is changed, repeat the Store on PR number step.
Decoder : if the channel is encrypted and if you want to connect a decoder to the AV1
socket (see page 16), tick the box with the
buttons and repeat
the Store on PR number step.
External sound path : this option is only available if you have ticked the box under the Decoder
option.
Switch the decoder on. Using the
buttons, tick or untick the box if there is no sound or
if the sound is scrambled.
Then repeat the Store on PR number step.
When you have finalised all the settings for a particular station, select the Store on PR number
option to store them. Then go on to the next channel.
Press EXIT to close the menu.
More info
Standard - The following standards are available: France for France and
Luxembourg, DKK’ for Eastern Europe and the Middle East, I for the United
Kingdom and Eire, Euro BG for Western Europe.
Subsequent set-ups: display the INSTALLATION MAIN MENU menu
(see above) and select Auto update or Auto installation as appropriate.
Then follow the instructions at the bottom of the screen.
• Auto update allows you to set up channels just launched or any channels that
are missing or wrongly set up.
• Auto installation is used for setting up channels after the initial set-up
(e.g. after moving house).
This process deletes all channels previously stored.To set up a new channel, it is
better to use Auto update or Manual installation.
9
EN
ETC210_en
2/05/03
17:51
Page 10
Everyday use
This page describe the basic features of your TV.
Switching the TV set on and off :
To switch the TV set on, press the A button on the keyboard.
The red indicator in front blinks then remains light.
Standby mode: press the
button on the remote control.
When the TV set is in standby mode, the indicator on the front remains light.
The TV set remains powered up, but with low energy consumption.
EN
To switch on from standby, you can:
- press any numeric button on the remote control,
press the OK button to switch the television on at the last channel or AV programme you
were watching,
- press the AV button to switch the television on at the last AV input.
- press PR + or PR - button on the keyboard.
Volume control: use the
buttons on the remote control or VOL + / VOL - buttons
of the keyboard to increase and decrease the volume.
Sound mute (
) : press this button to temporarily mute the sound.
Press again to restore it.
Displaying status information:
Press the yellow INFO button on the remote control to display the number and name of the
channel you are watching, the time, the zoom format and the type of sound.
If the channel you are watching has a Programme guide, the name, the start time and the
duration will also be displayed for the current and next programmes.
The number and name of the channel are displayed whenever you turn on the TV set or
change channels.
If you select the Show program. number option in the Preferences menu, the channel number
will be displayed permanently (see. page 12).
Accessing programmes:
- Using the numeric buttons: for programmes 1 to 9, press the corresponding button.
For two-digit programmes, first press the 0/-- button, then the programme number
(e.g. type 012 for channel 12).
- Using the PR +/PR - buttons: scan through the programmes.You cannot access AV
programmes but these are accessible using the PR+/PR- buttons on the TV set.
- Using the list of programmes: see page 11.
Zoom: on 16/9 models you are able to enlarge pictures broadcast in 4/3 or letterbox format
(black strips at the top and bottom of the screen) to fit the picture to your screen.
First press EXIT if a menu is on the screen and select the magnification required with
the
buttons:
ZOOM 0: 4/3 picture (black strips at the sides).
ZOOM 1: for pictures in letterbox centred on the screen (without sub-titles).
ZOOM 1: for pictures in letterbox offset to see sub-titles.
CINERAMA 4/3: picture filling the screen.
If Auto zoom function is enable in Preferences menu, your choice will be valid till you change
channel.
Accessing AV programmes
Press the AV button to display the last selected AV programme, press again to access the other
AV programmes.
You can also access AV programmes using the list of programmes (see page 11).
More info
Child lock
You can disable the TV buttons so that your children cannot switch the television
on without your permission. The TV set can then only be switched on using the
remote control.This function is activated:
• after the sleep timer has been set.
• if a wake-up time has been set (TIME menu).
• if you put the TV into Standby mode by pressing the standby button B on the
remote control for 4 seconds.
When the television set is in standby and locked, the indicator on the front panel
flashes red.
Keep the remote control out of the reach of children.
Sound and Picture preferences
Display the menu with the red button, select the desired line and adjust to your
liking
10
ETC210_en
2/05/03
17:51
Page 11
Setting the time – List of programmes
The information on this page explains how to use the TIME menu functions (Setting the time, Sleep timer,Wake-up), as well as those for the LIST OF PROGRAMMES menu.
Time
OVERVIEW
Display the OVERVIEW menu using the MENU button and select the Time option.
Press OK to confirm.The TIME menu is displayed.
Exit
Program Info
Sound
Picture
> Time
Preferences
Installation
EN
Return: returns to the OVERVIEW menu.
• Sleep timer: set an automatic shut-off time (0 to 4 hours, with 5 minute steps) using
the
buttons.
Set --:-- to cancel this function.
When the sleep timer is on, a message appears one minute before the TV set goes into
standby mode.
Press any button on the keyboard or on the remote control to cancel standby mode.
TIME
Return
Sleep timer
< I > 00:00
Current time
11:28
Wake-up timer
Wake-up time
Programme number
Daily
þ
07:07
08 EURO
þ
Current time: enables the time to be adjusted if it is not correct.
Enter four digits using the remote control numeric buttons.
Once you have set the time, you can use the Wake-up timer feature.
Time entered manually will be lost in the case of a power cut. You must then re-enter it.
Wake-up timer: press OK to check the box in order to enable this function and display the
menu options.
Wake-up time: enter the wake-up time using the numeric buttons.
Programme number: use the buttons
or numeric buttons (2digits) to enter the
number of the programme you want to wake you up.
Daily: press OK to check the box if you want a daily wake-up.
Press EXIT to close the menu.
A message informs you that the wake up timer has been programmed.
Put the TV set into standby mode using the B button on the remote control.The indicator on the front
panel starts flashing slowly.The TV set will automatically switch on at the programmed time and for 1 hour
duration if you do not interrupt it by using the remote control.
Excepted volume buttons, keyboard is locked until you change channel.
List of programmes
Press the LIST (green) button on the remote control to display the LIST of
programmes. It has a maximum of 11 pages and shows the name and the number of each
programme.The last page lists units connected to the AV sockets.
LIST
>
Exit
01
02
03
04
05
06
07
08
09
Page - / +
Programme
TF1
FR2
FR3
C+
FR5
M6
TV
It opens on the page where the programme you are currently watching is listed.
To watch one of the programmes on the displayed page, use the PR + / PR - or
buttons and press OK.
You can also enter the last digit of the programme number (for example, 5 for 25).
You can scroll through the pages using the
</>
0-9
Leave the list with EXIT.
11
buttons.
or
ETC210_en
2/05/03
17:51
Page 12
Picture and Preferences
The information on this page allows you: to adjust your television’s picture to better suit your preference, the type of programme
you are watching and the ambient lighting and to set preferences for some features of your TV.
Display the OVERVIEW with the MENU button.
Select Picture line and press OK to display PICTURE menu.
PICTURE
Return
EN
Picture preset
Brightness
Colour
Contrast
Sharpness
Tone
Noise reduction
Return: returns to the OVERVIEW menu.
<I >
Film
------------------------Neutral
þ
Picture preset: use the
buttons to select the appropriate setting
(Standard, Personal, Film, Studio, Sport) for the programme you are watching.
Personal stores all your preferred settings.
Brightness, Colour, Contrast and Sharpness: adjust the picture to your liking.
These settings are automatically stored under Personal under the Picture preset option.
Tone controls colour temperature (Warm, Neutral or Cold).
Noise reduction: improves the quality of the picture in case of poor reception.Tick the box with
buttons.
Preferences
Display the OVERVIEW with the MENU button.
Select Preferences line. Confirm with OK.
The PREFERENCES menu appears with the following options.
Return: returns to the OVERVIEW menu.
Show program. number: tick the box to permanently display the number of the channel you are watching.
AV1 video input: using the
buttons, state the type of video signal transmitted by the equipment connected to AV1.
Proceed similarly for the AV2 and AV3 Video input lines.
Auto zoom (Only for 16/9 TV sets): using
buttons,Tick the box to enable automatic zoom.
This function detects black stripes at the top and bottom of the screen and automatically enables the zoom function to fill the screen.
In case of subtitles, it is recommended to set the zoom manually.
Format control: choose the format for the on-screen picture.
• Auto: the TV (16/9) adapts to the broadcast picture format if the broadcaster or equipment connected via a Euro-AV (scart) socket provides
a control signal.
• 16/9 or 4/3: choose the format if the picture is not automatically adapted.
The format returns to Auto if you change channel or switch off the TV set.
Maximum volume: set the maximum volume level as you require.
Leave the menu with EXIT.
Customizing
Display the OVERVIEW by pressing MENU button,
select Installation line and confirm with OK.
The INSTALLATION MAIN MENU is displayed.
Select the Personal settings line. Confirm with OK to display the menu.
Return: returns to INSTALLATION MAIN MENU.
Menu language: select your preferred language for menus.
Country: the choice of country is important for the correct display of Teletext screens in the corresponding language.
Picture Rotation: this option is only available on 16/9 and 4/3 large screen televisions. It is used to compensate the effects of the earth’s
magnetic field and to produce a perfectly aligned horizontal picture.
Auto volume level: tick the box if you want to keep the same sound level on all channels.
AV1,AV2,AV3 name: give a name to the socket according to the equipment that you are connecting to it.
Choose the character to be altered with the
buttons. Using the 1 or 2 keys, display the character you want.
Prog. to be used for reference time: scroll the channels with the
number. Setting the time is only possible with channels broadcasting.
Leave the menu with EXIT.
12
buttons until the time and date are displayed below the channel
ETC210_en
2/05/03
17:51
Page 13
Virtual Dolby Surround
Dolby Virtual is a technology certified by Dolby Laboratories, that creates a virtualized surround sound experience from two
speakers.The Virtual Dolby Surround function works in multi-channel and Dolby Surround encoded audio sources.
Virtual Dolby Surround retains all of the original multichannel audio information and provides the listener with the sensation of
being surrounded by additional speakers.
Display the OVERVIEW by pressing MENU button.
Select the Sound line. Confirm with OK.
The SOUND menu appears with the following options.
OVERVIEW
Exit
Program Info
> Sound
Picture
Time
Preferences
Installation
EN
Return: returns to the OVERVIEW menu.
Sound type: select the relevant sound type.
The available options depend on the programme you are watching. Refer to the table opposite to find
out about the various options available according to the type of sound transmitted by the channel.
Sound Mode: select a mode.The available modes depend on the sound type selected.
See «More info» below.
Magic and Dolby Virtual modes are only available for stereo audio sources.
SOUND
Return
Sound type
Sound mode
Surround effect
Balance L/R
Dynamic bass
Sound preset
10 kHz Treble
5 kHz
1,5 kHz Medium
500 Hz
100 Hz Bass
<I> Stereo
Dolby Virtual
.............
.............
Off
Film
..............
.............
..............
.............
.............
Sound type
BROADCAST
Mono
Stereo
Dual
NICAM - 3
AV
CHOICE
Automatic - Mono
Mono - Stereo
Sound 1 - Sound 2
Sound 1 - Sound 2 - Sound 3
Stereo - Sound 1 - Sound 2
Surround effect: adjust the surround effect using the bargraph.
This line only appears if you have selected Dolby Virtual under the Sound mode line.
Balance L/R: balance the sound between the Left and Right speakers.
Dynamic Bass : using
buttons, select the Bass dynamic amplification level.
Sound preset: use the
buttons to select the appropriate setting
(Standard, Film,Voice, Music, Flat, Personal) for the programme you are watching.
The Personal setting stores your graphic equalizer settings.
Graphic equalizer: select each band in turn using the
or
button and make the
necessary adjustments.
Once you have set the equalizer, the Sound Preset option goes automatically to Personal.
Your settings are stored as the new personal settings.
Leave the menu with EXIT.
“Dolby”, and the double D
symbol are trademarks of Dolby Laboratories.
Manufactured under licence from Dolby Laboratories.
More info
Mode
Nicam
The NICAM process consists of sending digital stereo sound
comparable to that from an audio CD via a land based transmitter
in addition to its usual mono equivalent. So by means of the NICAM
process, you can get digital sound with the quality of a compact
disc.
SOUND TYPE
Mono
Stereo
Sound 1
Sound 2
MODES
Normal - Wide
Normal - Magic
Dolby Virtual
Normal - Wide
Normal - Wide
Explanations
Normal
Wide
Magic
Dolby Virtual
13
original sound
stereo effect for mono sound
accentuated stereo effect +
surround effect
Virtual Dolby Surround.
ETC210_en
2/05/03
17:51
Page 14
Teletext
Used in many countries under various names (TOP Text, Fastext, FLOF text,Videotext),Teletext is a free service offered by
television channels.The service consists of information database (weather, sports results, news, games, etc.) available at all times.
102
EuroNews
16 : 02 : 99
12 : 00 : 40
Press the TEXT button to display the Teletext Index page (page 100) or the last called page.
A message will tell you if there is no Teletext on the channel that you are watching.
EN
DEUTSCH
101
Display a page: key in the 3 figures of its page number.
After a moment the page appears.
FRENCH
102
Use
ENGLISH
103
SPANISH
104
or PR + / PR - buttons to display following or previous pages.
Display the Index page: using
of the page and confirm with OK.
or
buttons select 100 in the bottom left window
Wintersport
Rolling pages: some types of information may take several pages.
They appear on the screen as become available.
Using
or
buttons select STOP in the bottom left window of the page
and confirm with OK to stop paging.
To resume paging, press OK.
Hidden message: to reveal a hidden answer (games), using
and press OK. Press ok, to hide it again.
or
buttons select ? ? ? in the bottom left window of the page
Zoom : using
or
buttons select ZOOM in the bottom left window of the page and press OK,
once to enlarge the top of the screen, twice to enlarge the bottom of the screen, or three times to restore the original size.
Mixed screen: to overlay a teletext page onto the channel picture, using
page and confirm with OK.
One further press on OK returns to normal display.
or
buttons select MIX in the bottom left window of the
Sub-page: to access a sub-page directly, using
or
buttons select - - - - in the bottom left window of the page.
Key in the sub-page’s 4-digit number (e.g. : 0003).
With some channels, it may take several minutes to display the sub-page on the screen.
Some channels transmit warning pages which may be displayed in a desired time.
Example: dial 1530 as a sub-page number for 15:30, then press EXIT.
The unit should be on, tuned at the station transmitting the warning page.
The display of the last line differs according to the type of teletext received. Your TV automatically detects the type of teletext received.
Direct access: the yellow and blue buttons allow direct access to the pages whose numbers are displayed in yellow and blue
at the bottom of the screen.
Fastext: Fastext contains 4 colour subject headings which appear at the bottom of the screen.
Select the desired page by the colour buttons on remote control.
After you have made your choice, additional subject headings may appear.
TOPtext:TOP text contains pages arranged in subject headings with articles.
Press blue button to select the heading displayed at the bottom of the page.
The following heading is then displayed in blue at the bottom of the page.
Press yellow button to select the article displayed at the bottom of the page.
The following article is then displayed in blue at the bottom of the page.
Additional functions
Some channels transmit via teletext subtitles of their programmes, as well as the latest newsletters.
The numbers of appropriate pages are to be found in the Teletext table of contents.
Once found, the subtitles or a newsletter are overlaid onto the picture.The reference line will vanish in seconds.
To recall it up, press TEXT button.
To leave Teletext, press EXIT.
Page mode
This mode allows a quick access to the pages whose numbers are displayed on the screen.
If the current page contains references to other page numbers, press TEXT to switch to the Page mode.
Select the desired page number by pressing
or
button. Confirm your choice by OK.
You can call up the next or previous page by pressing the
buttons.
Press TEXT button to leave the page mode.
To leave Teletext, press EXIT.
14
ETC210_en
2/05/03
17:51
Page 15
Program info
The programme guide is prepared by your television from Teletext information broadcast on certain channels. You are only able
to access the programme guide with the channels memorised by your television. Depending on the services offered by the
channels in Teletext, it is possible that the programme guide may not be available.The programme guide enables you to find
out about programmes or make a list of programmes that you want to watch.You are also able to automatically start your television at the beginning of the chosen programme.
01 BBCW
20:02
Mon 15
PROGRAM INFO
E m i s s i o n s
o n
M o n .
1 5
2 0 : 0 0 T h e Wo r l d To d ay
>
2 0 : 5 5 C o r re s p o n d e n t : I r a k
The programme guide is not available on all channels.
In this case, a message will inform you that the guide is not available.
Press the blue key to display the programme guide, the first page appears.
The first programme on this page is the one in progress.
2 3 : 0 5 The Travel show
2 3 : 3 0 E u ro p e D i re c t
To display the previous or next page, use the
buttons.
Options (Memo,Wake-up, etc.) are suggested for you on the last line of the menu.
Select them with the
buttons .
00:05 Radical Highs
0 2 : 2 5 B B C N ew s a n d We a t h e r
Memo
Memorise: to be alerted while you are watching one programme that another programme is starting, select the Memo option with
or
button.
buttons . Choose the programme to be memorised with the
Confirm with the OK key.The REVIEW screen appears. Check your settings.
Alarm call: to program the television to come on at the start of a chosen programme, select Wake-up.
Choose the programme with the
or
button.
Confirm with the OK key.The REVIEW screen appears. Check your programming.
Put the television into stand-by with the
key on the remote control unit.
The TIMER FULL message means that the programme guide’s 4 timers are full. Refer to the REVIEW paragraph (Clear) to free up memory.
Set-up: if the broadcaster changes its teletext pages, your TV set is no longer able to display the Program Guide and the message
“No Program Info data found on this station.” tells you so.
Delete the message with the EXIT key, then call up the teletext and note down the number of the daily programme page.
Leave the teletext with EXIT, call up the Program Guide again and immediately the message
“No Program Info data found on this station.” will come up on the screen, press OK to access menu PROGRAM INFO SET-UP.
Select line TV guide page number and with the number keys of your remote control, enter the number of the programme page which you
have previously searched for in the teletext.
Confirm with OK and leave the menu with EXIT. Your TV set should now display the Program Info.
REVIEW
Return
TV
T
06 : 02
Mon15
REVIEW :
BBC World News
This menu lists programmes chosen for an alarm call or for a start-of-programme warning.
TV
08 : 00>08 : 15
05 BBCWMon15
MUNDIAL : FIRST ROUND
09 : 15>10 : 30
02 BBC 1 Tue 16
TV
T
USA Direct
10 : 15>10 : 30
01 BBC1 Tue 16
Hard talk
11 : 35>11 : 40
04 BBCW Tue 16
TIMER FULL
The menu is automatically displayed once you have confirmed the choice of a programme in
the PROGRAM INFO menu.
You can also display it by selecting Review on the options line in the PROGRAM INFO menu
and confirming with OK.
The REVIEW menu lets you access the following functions:
Clear: allows you to delete one of the programmes from the list.
To do this, select the last line of the menu with the
or
button and display Clear with the
Then use the
with OK.
or
buttons.
button to put the cursor on the programme to be deleted and confirm
Memo lets you enable (or disable) the display of a message at the start of a programme on the list.
To do this, select the last line on the menu with the
or
button and display Memo with the
button.
Then use the
or
button to put the cursor on the programme that you want to be alertedabout and confirm with OK.
A TV is displayed in front of the programme.
You can then watch another channel but will be alerted by a message when the selected programme begins.
Press the EXIT key to clear the message from the screen.
Alarm call : lets you enable (or disable) the automatic switch on of the TV at the start of a programme on the list.
To do this, select the last line of the menu with the
or
button and display Wake-up with the
buttons.
Then use the
or
button to put the cursor on the programme to switch on with and confirm with OK.
Put the television into stand-by with the
key on the remote control unit. It will switch on at the beginning of the selected programme.
15
EN
ETC210_en
2/05/03
17:51
Page 16
Other connections
Your TV has a number of sockets which can be used to connect different types of equipment.
This page contain a description of the various sockets and relevant connections.
AV1 SCART socket (input-output)
At the back of the TV. This socket can be used to connect a VCR or a camcorder
(VHS or 8 mm), a satellite receiver, a DVD player, a games console or any device producing an
RGB signal.
AV2
AV2 SCART socket (input-output)
At the back of the TV. This socket can be used to connect a VCR or a camcorder
(VHS, S-VHS, 8 mm ou Hi 8), a decoder, a satellite receiver, a DVD player, a games console.
Device producing an RGB signal must be connected to AV1.
This SCART socket can be used for S-Video signals but only in input.
EN
Audio / Video RCA sockets - AV3 (input)
At the front or side of the television set.
These can be mainly used to connect camcorders (VHS or 8 mm format).
S socket and Audio RCA sockets - AV3 (input)
At the front or side of the television set.
These can be mainly used to connect camcorders (S-VHS or Hi 8 format).
L.
R.
VIDEO
S
AUDIO
To display images using the equipment connected, press the AV button on the remote
control: once to select AV1, twice to select AV2 and three times to select AV3.
For some equipment (connected to the sockets), this selection is done automatically.
Headphone socket
Use the relevant socket to connect stereo headphones or earphones.
Connecting a video recorder
Video recorder
P
L
A
Y
Equipment
To obtain optimum picture quality, use a SCART cable. However, you can also connect
a video recorder to the television using the aerial socket.
The diagram on the inside cover at the end of the manual illustrates how this is done.
Socket
Equipment
R
E
C
O
R
D
Camcorder
Socket
Call up
Scart AV1
RCA sockets
Video recorder
or
Camcorder
Video recorder
or
Camcorder
Scart AV2
Scart AV2
AV1
AV3
If you connect a video recorder only via the aerial socket (without any AV socket
connection), switch it on and play a cassette.
Then use the Auto-update option of the Install menu to search for the video
recorder signal (refer to the Manual channel set-up section on page 9).
A video recorder connected by aerial socket should be stored on a Programme ending with a
9 (9, 19, 29.....) which has special processing to improve the picture quality during videotape
playback and pause modes. However, we recommend to connect your video recorder by
SCART socket for even better picture and stereo sound quality.
Copying tapes:
Connect the record unit to the AV2 Euro-AV (scart) connector.
Connect the playback unit to the AV1 Euro-AV (scart) connector if it is a video recorder
or to the AV3 RCA sockets if it is a camcorder.
More info
Home Cinema
You can connect a Home cinema amplifier to your TV set.
- either to the headphone socket using a jack - RCA cable
- either to the AV2 SCART socket using a SCART - RCA cable.
16