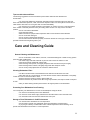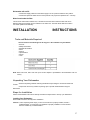
1
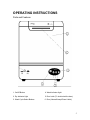
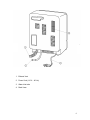
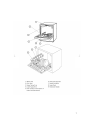
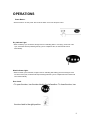
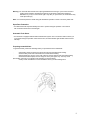
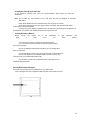
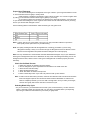
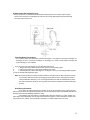
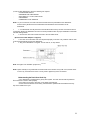
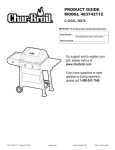
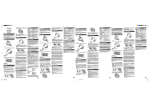
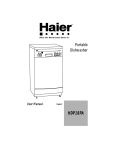
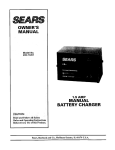
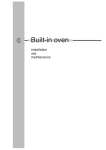
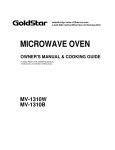
Compact Table Top Dishwasher
User Manual – Model TDT4030B
& TDT4030W
IMPORTANT SAFETY INSTRUCTIONS
Warning – To reduce the risk of fire, electric shock, or injury to persons when using your
appliance, follow basic precautions, including the following:
1.
Read all instructions before using the appliance.
2.
3.
Use this appliance only for its intended purpose as described in this use and care guide.
Use only detergents recommended for use in this appliance and keep them out of the reach of
children.
This appliance must be properly installed in accordance with the installation instructions before it is
used.
Never unplug your appliance by pulling on the power cord. Always grasp the plug firmly and pull
straight out from the outlet.
Replace immediately worn power cords, loose plugs/power outlets.
Unplug your appliance before cleaning or before making any repairs.
If your old appliance is not being used, we recommend that you remove the door. This will reduce
the possibility of danger to children.
Do not operate your appliance in the presence of explosive fumes.
Do not add or mix any flammable or explosive substances to the wash.
Appliance loading door must be closed during the operation of the machine.
Do not operate your appliance when parts are missing or parts are broken.
Do not use this appliance for commercial dishwashing purpose.
Do not operate this appliance unless all enclosure panels are properly in place.
Do not tamper with controls.
To reduce risk of injury do not allow children to play in or on the appliance. Close supervision of
children is necessary when the appliance is used near children.
This appliance must be connected to proper electrical outlet with the correct electrical supply.
Proper grounding must be ensured to reduce the risk of shock and fire. DONOT CUT OR
REMOVE THE GROUNDING PLUG. If you do not have a three-prong electric receptacle outlet in
the wall, have a certified electrician install the proper receptacle. The wall receptacle MUST be
properly grounded.
Hydrogen gas may be produced if the water heater has not been used in more then 2 weeks. This
could be explosive and can explode under certain circumstances. If this is the case, before using
this appliance turn on all the hot
faucets and let the hot water run for a few minutes. This will let the trapped hydrogen escape.
During this process do not turn on an electric appliance, smoke, light a match/lighter or use a
flame to avoid an accident, as hydrogen gas is flammable and can explode.
4.
5.
6.
7.
8.
9.
10.
11.
12.
13.
14.
15.
16.
17.
18.
19.
20.
21.
22.
23.
24.
25.
Do not repair or replace any part of the appliance or attempt any servicing unless specifically
recommended in the user-repair instructions that you understand and have skills to carry out.
To reduce the risk or electric shock or fire, do not use extension cords or adapters to c
connect
the unit to electrical power source.
Do not go behind the dishwasher during the operation because of hot steam that is being
discharged from the back vent.
Do not wash any heat sensitive or any other items that are not designed for automatic dishwasher.
Do not use this dishwasher outdoors.
Do not leave the dishwasher door open to dry dishware while children are around the counter top.
Close supervision and observation needed when children are around the dishwasher.
2
SAVE THESE INSTRUCTIONS
DANGER
Risk of child entrapment. Before you throw away your old
appliance, take off the door so that children may
not easily get trapped inside.
Thank you for purchasing our Tappan® product.
This easy-to-use manual will guide you in getting
the best use of your dishwasher.
Remember to record the model and serial number.
They are on a label in back of the dishwasher.
Model number
____________________
Serial number
____________________
Date of Purchase
Staple your receipt to your manual. You will need it
to obtain warranty service.
3
Table Of Contents
PAGE
Safety Instructions………………………………………………….
2
Operating Instructions…………………………………………….
5
Parts and Features……………………………………………...…..
5
Operations…………………………………………………………….
78
Tips to Avoid Stains and Films……………………………….…
14
Care and Cleaning Guide………………………………………….
14
General Cleaning and Maintenance……………………………….
14
Preventing Your Dishwasher From Freezing……………………..
14
Storage of your Dishwasher in Cold Environment………………….
14
Troubleshooting………………………..……………………………
15
Installation Instructions…………………………………………….
17
Tools and Materials Required……………………………………..
17
Unpacking Your Dishwasher………………………………………
17
Steps for Installation…………………………………………………
17
Electrical Connections……………………………………………....
19
Grounding Instructions………………………………………………
19
Power Interruptions…………………………………………………..
19
Warranty………………………………………………………………… 20
4
OPERATING INSTRUCTIONS
Parts and Features
1. On/Off Button
4. Wash Indicator Light
2. Dry Indicator Light
5. Door Latch (To lock/unlock the door)
3. Wash Cycle Select Buttons
6. Door (Normal/Heavy/Rinse & hold)
5
1. Exhaust Vent
2. Power Cord (115 V – 60 Hz)
3. Water Inlet tube
4. Drain Hose
6
7
OPERATIONS
Power Button:
• Push the button in to have power "ON". Push the button out to have the power "OFF".
Dry Indicator Light:
• When Vented dry cycle is selected, the light comes on indicating that it is now drying. At the end of the
cycle, the buzzer will beep indicating that dry cycle is completed. Also, the machine will shut off
automatically.
Wash Indicator Light:
• When the wash cycle is selected, the light comes on indicating that washing process has begun. At the
end of the wash cycle, the buzzer will beep indicating that wash cycle is completed and the machine will
shut off automatically.
Door Latch:
• To open the door, turn the door latch to the left position. To close the door, turn
the door latch to the right position.
8
Warning: You must wait few seconds when opening dishwasher door during a cycle to allow cold air to
expand slowly inside the dishwasher because of hot air/steam is still present inside the
dishwasher. If you try to remove items right a way after you open a door, the hot air/steam may
cause personal injury.
Note: You must keep the door closed during the dishwasher operation in order to avoid any water leak.
Open Door Protection:
• Your dishwasher will stop automatically if the door is opened during the operation. The machine
will not restart until the door is closed again.
Automatic Fault Alarm:
• Your machine is equipped with automatic fault detection system. This convenience feature informs you
of any faults during the operation. When fault occurs, the wash indicator light will flash and the buzzer
will beep.
Preparing to wash dishes:
To get best results, practice the following before you put dishware in the dishwasher:
.
• Discard big chunks of food such as bones and pits from the plate before loading.
.
• Remove sticky foods and loosened burned-on foods before loading.
.
• Empty liquids such as juice, soup, soda, coffee or tea from glasses and cups before loading.
.
• Rinse off acid based liquid, such as vinegar or lemon juice right a way. This may cause
discoloration over time to your plates, food containers or internal cabinet.
.
• Always check manufacturer’s recommendations before you start washing items.
9
Loading the lower & Upper half rack:
To get maximum cleaning result, follow the recommendations below before you start the
dishwasher:
Note: Do not wash any heat sensitive or any other items that are not designed for automatic
dishwasher.
.
• Keep all tall dishware and food containers away form the spray arm rotation.
.
• Place food containers such as cups, glasses, bowls, saucepans and casseroles with soiled
surface facing in downward position.
.
• To avoid any type of damage to glassware such as coffee/tea cups, beverage or wineglasses, do
not load them on the bottom rack. Place these items on the upper half rack.
Loading Silverware Basket:
Simply
place
remove
the
it
basket
back
out
of
the
once
dishwasher
you
to
load
silverware
and
finish
loading.
.
• To avoid any type of injury, load knives and forks face down.
.
• Try to mix spoons, knives and forks for better cleaning and drying
and to prevent nesting.
.
• Do not mix stainless and silver items because you may damage silver
finish on silver items.
.
• Do not load tall items next to upper spray arm because it could be blocked.
.
• Do not load dishware or food containers that are made of wood or iron.
These items are not considered dishwasher safe.
.
• Do not load tin, pewter and non-dishware filters. These items are not
considered dishwasher safe.
Pouring Dishwasher Detergent:
Use proper recommended amount of detergent for your wash loads.
Pour in detergent into open compartment that is located on the inside of the door.
10
Proper Use of Detergent:
.
• The amount of detergent to use depends on the type of water in your living area whether it is hard
or soft and whether items are lightly or heavily soiled.
.
• Water softness or hardness is measured in grains content per gallon. You can find out grains level
by calling your local Environmental Protection Agency (EPA) in your county.
.
• If you find that "grains" level is higher in the water then the water will be harder in your living area
so you will need more detergent to clean. If "grains" level is lower then the water will be softer in your living
area so you will need less detergent to clean.
See the following table to understand the "water hardness type" and "grains" level.
Note: If "grains" level is over 12 then water is very hard. You may need water softener to improve the
water quality and the performance of your dishwashing.
Note: The quality of detergent will make the big difference of cleaning your dishes. If you are using
detergent that is damp, clumsy or too old then this type of detergent will not be as effective to clean
because of active ingredients are phased off and the detergent will not work properly.
Note: Use only manufacturer’s recommended "Automatic Dishwasher Detergent" only for your dishwasher.
Other types of detergents that are not for dishwasher use may cause oversudsing and foaming. Do not use
detergents that are dried, caked or moist. These types of detergents will not dissolve properly and clean
effectively.
Check List for Wash Process:
1.
2.
3.
4.
5.
6.
1. Make sure all items are loaded in the racks properly.
2. Pour in detergent into open compartment that is located on the inside of the door.
3. Close the door and latch safely.
4. Select the desired wash cycle.
5. Press "ON" button to start the wash process.
6. Select "Vented Dry" button if you want to dry after the wash cycle is finished.
Note: To add or remove items after cycle starts, unlock the door latch and wait a few seconds until wash
action has stopped. Open the door and let hot steam inside the dishwasher out. After the hot
steam is completely released, you can now add or change items. Once you make your changes,
close the door gently and lock the door latch to resume the cycle.
Selecting Wash & Dry Cycle:
• For your convenience, your dishwasher has two wash cycles, normal and heavy. You also have two
options, "vented dry On/Off" and "rinse & hold". You can select your desired wash cycle depending
upon the type of dishware and whether they are heavily or lightly soiled.
11
Normal Wash Cycle:
• This is used for regular loads for medium soiled dishware, silverware and glassware. The total time for
"Wash Only" cycle is approximately 27 minutes. When "Dry Cycle" is selected, the total time for the
whole cycle will be approximately 42 minutes.
Heavy Wash Cycle:
• This cycle is used for heavily soiled dishware, glassware, silverware and pots & pans, and cookware with
dried soils. The total time for "Wash Only" cycle is approximately 42 minutes. When "Dry Cycle" is
selected, the total time for the whole cycle will be approximately 53 minutes.
Rinse & Hold Cycle:
• This cycle is used for rinsing partial loads that will be washed later. The total wash time for "Wash Only"
cycle is approximately 6 minutes.
Note: Do not use detergent with this cycle.
Vented Dry (On/Off):
• You can select this option at the beginning of the wash cycle to dry your dishware items. Press the
button in to have vented dry option "On" or press the out to have vented dry option "Off".
Note: When selecting any of the above cycles or options, you will see the following:
.
• It will take approximately 60 seconds to begin the wash cycle.
.
• In wash mode, light will come on indicating that wash cycle is selected.
.
• In dry mode, light will come on indicating that dry cycle is selected.
.
• The buzzer will beep at the end of the cycle indicating that cycle is completed.
Warning: When you leave the door open to air dry those washed items, make sure there are no
children around to go near the dishwasher to climb over. If there are children around near
the dishwasher, pay careful attention and observation toward children.
12
Understanding the Venting Process:
• In this process, the hot steam from the dishwasher is being drawn into the drain pump through its
vacuum force and the mix condensation of water and air is being discharged through the discharge
hose from the back of the unit.
Checking Water Temperature:
• Your incoming water must be between at least 120 Degree F / 49 Degree C and most 150 Degree F /
66 Degree C but no more than 150 Degree F / 66 Degree C in order to have effective cleaning and
prevent damage to your dishware.
If you are not sure of what degree your hot water temperature is at:
1.
1. Simply open the hot water faucet and let it run for a minute and fill a glass.
2.
2. Take a thermometer and check the temperature of the water.
3.
3. If the temperature is below 120 Degree F / 49 Degree C, then you need toadjust water regulator
in order to maintain that temperature level.
Note: We recommend that you select hot water instead of cold water from the faucet to reduce the time
to heat up the water and to have the detergent properly dissolve in the water quickly in order to
clean the dishware effectively. Your unit is equipped with heater that will automatically increase
the water temperature quickly to remove grease and soil off the dishware and dissolve detergent
properly.
Overflowing Protection:
.
• In the event the water flowing into the machine is not cut off as foreseen by the program and the
water level rises above the highest acceptable point, the security pressure switch automatically activates the
drainage pump which immediately empties the water.
.
• This happens when the machine is operating (ON). When the machine is on "OFF" position, the
water supply to the dishwasher must be shut at the end of the program in order to isolate the machine from
the pressure in the network. This is especially necessary if you will be absent from your home.
13
Tips to avoid stains and films:
The following suggestions are recommended to prevent stains and films from dishware and
utensils items:
.
• You must rinse all dishware, silverware, glassware and food containers right a way after use.
Some citric based food products, coffee, tea and iron deposits in water can cause yellow or brown film on
inside surface when left on for a long time and not rinsed immediately.
.
• You must check your water hardness to see whether you need to use more or less detergent to
wash. If water is extremely hard then it may be causing stains on items. You may need to use water
softener.
.
• Do not over load the dishwasher.
.
• Avoid improper loading.
.
• Make sure there is a proper water temperature that is recommended to wash dishware.
.
• Do not use too little detergent.
.
• Do not use old or damp powder detergent.
.
• Do not load aluminum utensils improperly. Aluminum utensils can cause gray or black marks to
porcelain utensils if touching during wash cycle.
Care and Cleaning Guide
General Cleaning and Maintenance:
.
• Do not use abrasive, harsh cleaners, solvents, concentrated detergents or metal scouring pads to
clean the inside of dishwasher.
.
• Use warm soapy water with soft brush or piece of cloth to clean the interior of a tub.
.
• Clean around the tub gasket with a damp cloth.
.
• When cleaning control panel, use a lightly dampened cloth around it then dry thoroughly.
.
• When cleaning exterior cabinet, use lightly soapy water with soft piece of cloth.
.
• Do not use any sharp objects that can scratch the cabinet surface.
Cleaning Dishwasher Filter:
.
• The filter is located inside of the dishwasher at the bottom front below the lower rack.
.
• After wash and dry cycle is finished, you must wait few minutes until the dishwasher is completely
cooled off in order to remove the filter to clean.
.
• Remove the lower rack first in order to take the filter out.
.
• Remove and clean any residue off the filter using soap and water; then wipe it off with a soft piece
of cloth.
.
• After you finish cleaning the filter place it back to its original position in the dishwasher.
Preventing Your Dishwasher from Freezing:
You must protect your dishwasher if it is left in an unheated place during the winter.
.
.
.
• You must cut off electrical power to the dishwasher.
• You must turn off the water supply and disconnect the water inlet line from the water valve.
• You must drain water from the water inlet into the sink or pan.
Storage of Your Dishwasher in Cold Environment:
.
• You must store the dishwasher at room temperature.
.
• Do not install or operate your dishwasher where the temperature is below freezing.
.
• If you just got a delivery of a dishwasher when outside temperature is below freezing, do not
operate until dishwasher has warmed to a room temperature.
14
Troubleshooting
Dishwasher does not work:
.
.
.
.
.
• Check if the unit is plugged in. The plug may have come loose.
• Check if the electrical wall receptacle is of proper voltage.
• Check if circuit breaker needs to be reset or if the fuse needs to be replaced.
• Check if the unit is on "Off" mode.
• Check if the door is open. You may have to close the door properly.
Dishware and glassware/flatware are cloudy and not cleaned:
.
• Use of old or poor detergent. You need to make sure that detergent is fresh.
.
• The water may be hard in your area. You may need to install water softener.
.
• Spray arms may be blocked. You may need to rearrange dishware and utensils.
.
• Water pressure may be low. You may need to adjust the water pressure. Make sure it is between
20 to 120 (PSI).
.
• Water temperature may be lower than what is recommended. (120 Degree F / 49 Degree C) You
may need to adjust water regulator.
.
• Overloading of dishware. You may need to rearrange or remove some dishware from the load.
.
• May have selected wrong cycle. You may need to select proper cycle.
Dishes are not dry:
.
• Vented dry option is off. You need to check if vented dry option is "ON" position.
.
• Low water temperature. You may need to regulate water temperature to 120 Degree F / 49
Degree C.
Dishware chipped:
• This is due to poor loading or overloading. You need to be careful when loading. Do not overload. You
need to place glassware securely against pins. Make sure delicate items are on the side rack. We
recommend that fine chinaware or crystal items should be hand washed.
Noise:
Some of the sounds you will hear are normal.
.
.
.
.
tub.
• You will hear sound of the water fill and rinse.
• You will hear drain valve opening to pump water out.
• You will hear motor stopping at the end of the cycle.
• If some utensils are not secure in the rack, you will hear that they are being tossed around the
Steam is coming out from back of the unit:
This is normal.
You will see that steam is coming out through the back exhaust outlet during the dry cycle and when the
hot/warm water is being pumped out through the drain hose.
Oversudsing:
This is due to use of regular hand washing detergent.
You may need to check if the detergent is for "Automatic Dishwasher Use". If not then you need to
use the proper detergent that is for dishwasher.
15
Dishware has an odor:
.
• This is due to incomplete cycle. You need to allow cycle to be fully completed.
.
• New scented detergent used. This is normal because different types of detergents may have
different frgrances.
Etching:
.
• Too much detergent used.
Use the appropriate amount of detergent. Reduce amount of detergent
used per load.
.
• The water temperature is too hot.
You need to lower water temperature.
.
• Use of old detergent.
Avoid using old detergent. Read expiration date. Use only fresh detergent.
.
• Vented dry heat is too harsh on some dishware.
You may need to use air dry option by leaving your door open for a while.
Stained in interior tub:
.
• Some detergents contain colorant known as "pigment" or "dyes" that will discolor the tub with
extended use. You need to change detergent without any colorant. Read container label carefully before use
of the detergent.
.
• Some "acid based" and "paste based" foods may discolor the tub. Use of rinse cycle helps to
decrease the level of staining.
Spots & filming found on flatware/glassware:
This is due to:
.
.
.
.
.
• Use of too little detergent.
• Low incoming water temperature and pressure.
• Improper loading.
• Use of old, moist and damp powder detergent.
• Hard water in you area.
Water
Draining Problem:
.
• Drain hose may be removed from the back of the unit. Check if the drain hose is removed. It may
have come loose and need to be tightened.
.
• Check the level of the drain hose. The drain hose should be positioned above the drain in order to
drain properly.
.
• If the drain hose is bent or shrunken, it may affect water draining.
.
• If water can not be drained out smoothly, the dishwasher operation will be disturbed and it may
stop in the middle of the cycle.
Water is not pumping out of the tub:
• Drain is clogged. Make sure that your kitchen sink is draining well. If not, call a plumber.
Dishwasher is leaking:
.
• Dishwasher is not leveled properly. You need to place the dishwasher on the flat hard surface.
Avoid uneven surface.
.
• The tub may be cracked. If the tub is cracked then you need to call for service.
16
Dishwasher will not fill:
.
.
• Check water supply. Make sure that water supply is at "On" position instead of "Off" position.
• Check water pressure. Make sure the water pressure is at proper level. (Between 20 – 120 PSI)
Water found under the filter:
This is normal. After water is drained out, a small amount of water found under the filter area due to
different settings and shapes of food containers in the lower rack. The water will be drained out first in
next wash operation automatically.
INSTALLATION
INSTRUCTIONS
Tools and Materials Required
You will need to have following tools to help you in the installation of your Washer:
.
.
.
.
.
.
.
.
• Scissors
• Phillips Screwdriver
• Standard Screwdriver
• Pliers
• Wrench
• Tape Measure
• Gloves
• Level
Note: Water Inlet hose, drain hose and quick connect adapter is preinstalled to the dishwasher from the
factory.
Unpacking Your Dishwasher
.
• Remove all packing materials including all adhesive tape holding the accessories inside and
outside.
.
• Inspect and remove any remains of packing, tape or printed materials before using the
dishwasher.
Steps for Installation
Please read installation instructions carefully and follow the steps below to hook up your dishwasher.
Installing Your Dishwasher:
Read install instructions carefully before installation.
Caution: If, after completing these steps, you are unsure that unit is properly installed, contact a
qualified installer. To ensure that your appliance is properly installed it is recommended
that it be installed by a certified installer.
17
In order for this dishwasher to work, the following are required:
.
• COLD WATER SUPPLY
.
• DRAINAGE FOR USED WATER
.
• ELECTRICITY: 115 VOLT, 60Hz Outlet
.
• GROUNDING
.
• HORIZONTAL FLAT SURFACE
Note: For your convenience, the water inlet hose and drain hose are preinstalled to the dishwasher
from the factory. Both hoses are located behind the dishwasher at the left bottom of the
dishwasher.
1.
1. You dishwasher must be placed on horizontal flat surface near by the sink on the kitchen bench
(countertop). Placing the dishwasher as near to a sink as possible to allow for proper installation of the water
inlet and drainage hoses.
2.
2. Connect the other end of water inlet hose to the cold water faucet.
(Quick Connect Sink Adapter is supplied)
1.
3. The other end of the drain hose must be placed properly in the sink or at yourdrain outlet in order
to let used water drained out from the dishwasher.
2.
4. Plug in the dishwasher to a regular 115 Volt / 60 Hz, 15 Amp. Outlet.
Drain Hose
Note: This figure is for illustration purpose only.
Note: Inspect carefully for any water leak around and back of the machine. If any leak occurs, double check
to see if any connections are loose. You may need to tighten any loose connections.
Understanding the Drain Hose Hook Up:
.
• Your dishwasher is equipped with a gravity drain system. The drain hose should be positioned
above the drain in order to drain properly.
.
• If the drain hose is bent or shrunken, it may affect water draining.
.
• If water cannot be drained out smoothly, the dishwasher operation will be disturbed and it may
stop in the middle of the cycle.
18
Electrical Connections
Grounding Instructions
This appliance must be grounded. In the event of an electrical short circuit, grounding reduces the risk
of electric shock by providing an escape wire for the electric current. This appliance is equipped with a
cord having a grounding wire with a grounded plug. The plug must be inserted into an outlet that is
properly installed and grounded.
.
• Improper use of the plug can result in a risk of electric shock.
.
• Consult a qualified electrician or service person if the grounding instructions are not completely
understood or if doubt exists as to whether the appliance is properly grounded.
Wiring Requirements:
• This appliance must be plugged into at least 15 AMP 115-120 VOLT, 60 HZ GROUNDED
OUTLET.
Note: Where a standard two-prong outlet is encountered, it is the
personal responsibility and obligation of the consumer to have it
replaced with a properly grounded three-prong outlet.
Extension Cords:
We do not recommend that you use an extension cord.
Power Interruptions
Occasionally there may be power interruptions due to thunderstorms or other causes. Remove the power
cord from AC outlet when a power outage occurs. When power has been restored re-plug power cord to
AC outlet. If outage is for a prolonged period, clean washer before using it again.
19
Limited Warranty
Full ONE Year Warranty
THE SELLER NAMED BELOW MAKES THE FOLLOWING WARRANTY WITH
RESPECT TO THIS APPLIANCE OR PRODUCT
Carry-In ServiceFor 12 months from the date of original retailpurchase, InterCon Marketing will repair or replace anypart
free of charge including labor that failsdue to a defect in materials or workmanship.
Exceptions: Commercial or Rental Use Warranty
90 days labor from date of original purchase 90 days parts from date of original purchase No other warranty applies
1.
2.
3.
4.
5.
This Warranty is made only to the first retail purchaser (hereinafter called the “Original Purchaser”)
who obtains this product for personal use. It is made with the approval and cooperation of the
manufacturer.
This Warranty will be in effect for one year from the date of purchase by the Original Purchaser. It
is suggested that the Original Purchaser retain proof of direct purchase or a copy of the vehicle or
vessel bill of sale as evidence of purchase.
This Warranty specifies that this appliance shall be free from defect in material and workmanship
under normal use. This warranty does not apply to any appearance item nor to any product
damaged or defaced, nor to any product subject to misuse, abnormal service, improper installation
or handling, operation contrary to or not in accordance with the specific operating instructions, nor
to any items used in conjunction with or attached to this product.
This Warranty entitles the Original Purchaser to have the defective product repaired or replaced, at
seller’s discretion, at no cost with respect to parts and labor.
In order to obtain the benefits of this Warranty, the seller named below should be notified as soon
as defect is observed while Warranty is in effect. The Original Purchaser will be given coded
authorization to return the product to the seller. All charges incurred in shipment of the product
between the Original Purchaser and the seller shall be the responsibility of the Original Purchaser.
THIS SHALL BE THE EXCUSIVE WRITTEN WARRANTY OF THE ORIGINAL PURCHASER AND
NEITHER THIS WARRANTY NOR ANY OTHER WARRANTY, EXPRESSED OR IMPLIED, SHALL
EXTEND BEYOND THE PERIOD OF TIME INDICATED ABOVE. IN NO EVENT SHALL THE
MANUFACTURER, THE SELLER, THE SERVICE AGENT, THEIR ASSOCIATES, DEALERS,
DISTRIBUTORS, OR AFFILIATES BE LIABLE FOR CONSEQUENTIAL ECONOMIC DAMAGE OR
CONSEQUENTIAL DAMAGE OF PROPERTY. SOME STATES DO NOT ALLOW THE ABOVE
LIMITATION; THEREFORE THE EXCULSION MAY NOT APPLY TO YOU. IN ADDITION, THIS
WARRANTY GIVES SPECIFIC LEGAL RIGHTS, AND YOU MAY HAVE OTHER RIGHTS, WHICH VARY
FROM STATE TO STATE.
For Warranty Service
CONTACT / SELLER
InterCon Marketing
1540 Northgate Blvd.
Sarasota, Fl.34234
PH: 941-355-4488
Email: [email protected]
Before calling please have availablethe following information:
Model number and serial number of your appliance (found on the rear of the unit on the upper left hand side).The name
and address of the dealer youpurchased the unit from and the date of purchase. A clear description of the problem. A
proof of purchase (sales receipt).
This warranty covers appliances within the continental United States, Puerto Rico and Canada.
20
What is not covered by this warranty:
Replacement or repair of household fuses,
circuit breakers, wiring or plumbing.
A product whose original serial number has
been removed or altered.
Any service charges not specifically
identified as normal such as normal
service area or hours.
Damage to clothing.
Damage incurred in shipping.
Damage caused by improper installation
or maintenance.
Damage from misuse, abuse accident, fire,
flood, or acts of nature.
Damage from service other than an
authorized InterCon Marketing dealer or service center.
Damage from incorrect electrical current,
voltage or supply.
Damage resulting from any product
modification, alteration or adjustment
not authorized by InterCon Marketing.
Adjustment of consumer operated controls as
identified in the owners manual.
Hoses, knobs, lint trays and all attachments,
accessories and disposable parts.
Labor, service transportation, and shipping
charges for the removal and replacement
of defective parts beyond the initial
12-month period.
Damage from other than normal
household use.
Any transportation and shipping charges.
implied warranty lasts, so the above
limitations may not apply to you.
This warranty gives you specific legal rights,
and you may have other rights, which vary,
from state to state.
IMPORTANT
Do Not Return This Product To The Store
If you have a problem with this product, please contact:
Intercon Marketing at 941-355-4488.
Dated Proof of Purchase Required for Warranty Service
21