1
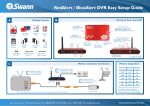
DVR4 - PRO-NET, 4 Camera & LCD
Easy Setup Guide
A
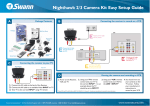
Package Contents
C
DVR & Camera Connections
Camera 1
Camera 2
Camera 3
Camera 4
1. Connect Camera cables
to Extension Cables x 4
DVR Unit
Packaging
4 x Maxi Day/Night
Cameras
Extension Cables x 4
Software CD
Camera Power
Supply
Power Cable for
DVR Power Supply
DVR Power
Supply
B
8” Monitor and
Remote
Manual
Camera Power
Splitter
Ethernet
Cable
BNC to
RCA Cable
3. Connect Power end of
Extension Cable to
Camera Power Splitter
DVR
Power Supply
SPARE
BNC end to
2. Connect
Monitor on DVR
Back of DVR
1.
to camera inputs on back
of DVR
Monitor Power
Supply
Connecting the Monitor to DVR
Right side of Monitor
2. Connect extension cables
Security
Stickers
Connect Mini Jack to
right side of montior
Monitor to
4. Tune
AV1 using controls
Yellow RCA
3. Connect
cables together
Camera Power Splitter
4. Plug in DVR Power
& Camera Power
Camera
Power Supply
Audio
Swann Communications • Toll Free Technical Support: USA - 1-800-627-2799, 1-877-274-3695, Australia - 1300 13 8324 • Email: [email protected]
www.swannsecurity.com
DVR4 - PRO-NET, 4 Camera & LCD
Easy Setup Guide
D
Remote Viewing Setup Guide
This is a general setup guide for preparing the DVR for viewing over a network/inernet. This guide will assume a common setup for PC or MAC, connected to a router/modem which is
connected to the internet. If the general router settings below differ from yours, contact your router manufacturer or visit www.portforward.com for more specific information
3
2
1
Connect the Ethernet Cable from the back of the DVR into your Router
4
Press the MENU button and go to ADVANCE and then NETWORK
Set the NETWORK TYPE to DHCP. Restart the DVR and go back to the
NETWORK settings. The DNS is the IP address assigned to your DVR
5b
5a
Login to your router by typing the “Default Gateway” in Internet
Explorer or Safari. In our example this is 192.168.1.1 another
common gateway is 10.1.1.1
NOTE: If you are unfamiliar with networking or forwarding ports
we recommend you contact your router manufacturer or
internet provider as router options and features vary by
model. The following are general steps for the most
common routers
For most Linksys routers you will find Port Forwarding options
in “Applications & Gaming” under “Port Range Forward”
Create an entry for the DVR port to be forwarded. By default, the DVR is set to port 80. Create
a name in “Application” such as “DVR1”. Start and End ports must be set to 80. The IP address
will be the IP address given to your DVR as in step 3. Do not forward the port in a range
6
5a
For some D-Link routers, port forwarding
can be found under “Advanced” > “Virtual
Server” Make a rule for port 80 and ensure
“Port Start, End, Map” are set to 80. Save
the rule and apply it to the IP address of the
DVR, i.e. 192.168.1.4 in our example
7
Your IP Address Is ***.***.***.***
To login remotely we will need to find your internet IP
address. You can find this at www.whatismyip.com This
will NOT be the same as your IP address or Default
Gateway in step 3
Swann Communications • Toll Free Technical Support: USA - 1-800-627-2799, 1-877-274-3695, Australia - 1300 13 8324 • Email: [email protected]
Finally, back in Internet Explorer/Safari - type in
your IP address found in step 6. Your IP will be
different from the above. Follow the prompts
to automatically download and login to the DVR
www.swannsecurity.com