1
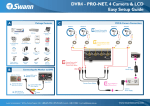
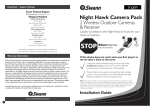
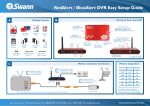
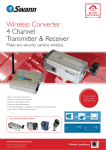
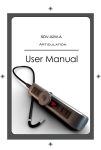
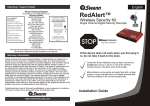
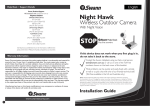
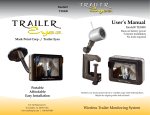
Nighthawk 2/3 Camera Kit Easy Setup Guide A Package Contents B Connecting the receiver to record on a VCR RECEIVER Packaging Quick Start Manual TV D. Plug the power supply into the receiver Receiver Power Supply Component INPUTS 1 Video INPUTS 2 or 3 NightHawk Cameras 1 Connect the A/V cable from the receiver to the VCR Receiver Hardware AUDIO VIDEO LINE IN LINE OUT C. C Video OUTPUT VCR Camera Power Supplies AV Cable Remote Control 3 2 Connect the A/V cable to the INPUT on the back of the TV Connecting the receiver to your TV B. Back of Receiver Back of TV Connect an A/V cable from the Line OUTPUT on the back of the VCR INPUTS 1 3 D Viewing the cameras and recording to VCR 2. Using your TV’s remote 3. Using your VCR’s remote 4. You should now see control tune your TV to control tune your VCR to your cameras on the the correct INPUT*. In our the LINE 1 INPUT* TV screen. Follow example above the TV your manufacturer’s should be set to INPUT 1 instructions to record to your VCR *Some VCR’s and TV’s will list this as INPUT, A/V, SOURCE, L1, Channel 0 - Consult your manufacturer’s manual for more information 1. Power on the Receiver, VCR and TV 1. Connect the AV cable to the back of the Receiver 2. Connect the AV cable to an available Video INPUT on TV 3. Tune TV to the correct INPUT* using TV remote 6ZDQQ&RPPXQLFDWLRQV7ROO)UHH7HFKQLFDO6XSSRUW86$1 877 274 3695$XVWUDOLD1300 13 8324([email protected] www.swannsecurity.com Nighthawk 2/3 Camera Kit Easy Setup Guide G E Setting the Camera Channel F Camera Positioning Cordless Phones/Mobiles Note: If your camera has a hood, remove the 2 screws first 1. Find the seam running around the middle of the camera 2. Twist the front half of the camera counter-clockwise to remove the outer casing 3. Locate the small white dip switches in the upper left region of the camera Wireless Internet Channel and Frequency Settings 4. G Using your fingernail or pen, move the dip switches up or down to change to the appropriate channel 1 2 Channel 1 2414MHz 1 2 Channel 2 2432MHz 1 2 Channel 3 2450MHz 1 2 Channel 4 2468MHz Some wireless devices can be set to different frequencies. Consult the manufacturer’s manual for details Achieving the highest quality signal A clear line of sight with little wireless interference will always give you the strongest picture Walls and floors can also limit range and image results. Place the receiver in a location that is relatively close to the camera’s position Some Electronic Devices Note: Wireless and electronic devices such as these can interfere with camera transmission if they are within the cameras range. If you are still receiving interference change the camera’s channel as per step E then switch the receiver to the correct channel H If possible turn off or keep the camera and receiver away from wireless devices General Installation Notes and Tips 1. Test the camera signal before permanently installing the cameras. 2. Using battery power is only recommended for testing purposes as the cameras do require constant power to operate. 3. IR or night vision will reflect off of glass or windows and overexpose the picture. Try placing cameras in direct line of sight of your subject. 4. Never aim the camera directly at the sun as this can permanently damage the lens. 5. Never submerge the camera in water. Some shelter is recommended such as an awning or eave. 6ZDQQ&RPPXQLFDWLRQV7ROO)UHH7HFKQLFDO6XSSRUW86$1 877 274 3695, Australia - 1300 13 8324([email protected] www.swannsecurity.com