Transcript
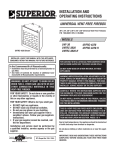
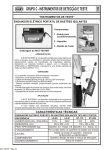
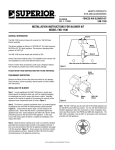
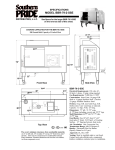
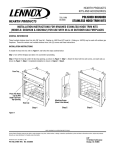
-0
6
A
23 FT
03
-
DR
HEARTH PRODUCTS
KITS AND ACCESSORIES
750,195M
Rev. NC, 03/2006
CHARCOAL CANOPY HOOD KITS
INSTALLATION INSTRUCTIONS FOR CANOPY HOOD KITS
FOR USE WITH UVF-36, UVFRC-3628, UVFRC-3628-H
UVFRC-4228 & UVFRC-4228-H UNIVERSAL VENTFREE FIREBOXES
KIT CONTENTS:
GENERAL INFORMATION
1 ea. Charcoal Canopy Hood
3 ea. Screws
1 ea. Instruction Sheet
These canopy hood kits are design to be fitted to the face of the appliance
directly above the firebox opening. In addition to providing an aesthetically
pleasing appearance to your appliance installation, the canopy reduces
heat effects to decorative mantels and finish materials located directly
above the fireplace and reduces the Mantel / Trim clearances (see Figure
4 in the Installation and Operation Manual).
Charcoal Canopy Hood Kits
CAT. NO.
MODEL NO.
WHERE USED
H1989
FC36
UVF-36, UVFRC-3628,
UVFRC-3628-H (UVF-36 standard part)
H1990
FC42
UVFRC-4228 & UVFRC-4228-H
Table 1
NOTE: A canopy hood is a standard part for model UVF-36. This
model requires a canopy hood on all installations.
The manufacturer recommends that the installation and Operation Manual
provided with the appliance be read completely and understood thoroughly
before proceeding with the installation of these kits. ALL WARNINGS AND
PRECAUTIONS IN THAT DOCUMENT APPLY TO THESE INSTRUCTIONS.
TOOLS NEEDED:
INSTALLATION INSTRUCTIONS
5/16" Nut Driver or Socket
The factory-supplied canopy must be installed on the firebox for safe
operation for model UVF-36 (this part is optional for other models).
Step 1. Remove screen and rod assemblies as shown in Figure 1.
Step 2. Align the canopy with the holes in the side frames.
Step 3. Install three screws as shown in Figure 2.
Step 4. Make sure canopy is level and secure.
Step 5. Reinstall screen and rod assemblies (see Figure 1)
INSTALL ONLY WHEN APPLIANCE IS OFF AND COLD!
Removing Screens & Rods:
Remove screws (see dotted
lines). Pull out rods from
locating holes on side of firebox
opening.
Reinstalling Screens & Rods:
Insert rods into corresponding
locating holes on sides of firebox
opening, then reinstall screws
as shown.
Figure 1
Canopy
Figure 2
NOTE: DIAGRAMS & ILLUSTRATIONS ARE NOT TO SCALE.
LHP reserves the right to make changes at any time, without notice, in design, materials, specifications, prices and the discontinuance of colors, styles and products. Consult your local
distributor for fireplace code information.
LHP
Printed in U.S.A. © 2006 by LHP
P/N 750,195M REV. NC 03/2006
NOTE: DIAGRAMS &Page
ILLUSTRATIONS
1 of 1 NOT TO SCALE.
1110 West Taft Avenue
Orange, CA 92865