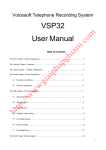
1
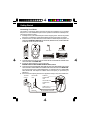
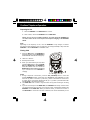
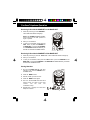
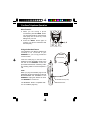
OWNER'S MANUAL
58
GHz
58
GHz
Cordless
Phone
In Use
Low Batt.
PA GE
PAU SE
RED IAL
VO L
MUT E
CH
FLA SH
MEM O
TAL K
DEF
ABC
3
2
1
MNO
JKL
GHI
6
5
4
WXY
TUV
PRS
7
8
*
0
9
OPER
#
chg /
in use
5.8 GHz Cordless Telephone
PLEASE READ BEFORE OPERATING THIS EQUIPMENT
Model : STC580
Contents
Safety Instructions..................................................................................................... 2
Handset Controls....................................... .............................................................. 4
Base unit Controls.................................................................................................... 6
Getting Started........................................................................................................... 7
Cordless Telephone Operation.............................................................................. 9
Preparing for Use............................................................................................... 9
Placing Calls....................................................................................................... 9
Receiving Calls with the HANDSET on the BASE UNIT................................. 10
Receiving Calls with the HANDSET off the BASE UNIT................................. 10
Storing Numbers................................................................................................ 10
Recalling Stored Numbers from Memory....................................................... 11
Redial Feature.....................................................................................................11
Mixed Mode (Temporary Tone) Dialing............................................................ 11
Mute Function...................................................................................................... 12
Using the Headset Feature...............................................................................12
Security System......................................................................................................... 13
Recharging the BATTERY PACK............................................................................. 14
Changing the BATTERY PACK................................................................................ 14
Problem Solving Section..........................................................................................15
Technical Information........................................................................................................16
FCC Requirements.............................................................................................................17
1
Safety Instructions
IMPORTANT SAFETY INSTRUCTIONS
To reduce the risk of fire, electric shock and/or injury, always follow these
basic safety precautions when using your cordless telephone equipment.
1. Read and understand all instructions.
2. Follow all warnings and instructions marked on the telephone.
3. Do not use this telephone near a bathtub, wash bowl, kitchen sink, or laundry tub, in a
wet basement, near a swimming pool, or anywhere else where there is water.
4. Avoid using a telephone (other than a cordless type) during an electrical storm. There
may be a remote risk of electric shock from lightning.
5. Do not use the telephone to report a gas leak in the vicinity of the leak.
6. Use only the power cord and BATTERY PACK indicated in the Owner’s Manual. Do not
dispose of the BATTERY PACK in a fire. The BATTERY PACK may explode. Check with
local codes for possible special disposal instructions.
7. Operate this telephone using the electrical voltage as stated on the BASE UNIT or in the
Owner’s Manual. If you are not sure of the voltage in your home, consult your dealer or
local power company.
8. Unplug this telephone from the wall outlet before cleaning or replacing the BATTERY
PACK. Do not use liquid cleaners or aerosol cleaners on the telephone. Use a damp cloth
for cleaning.
9. Place this telephone on a stable surface. Serious damage and/or injury may result if the
telephone falls.
10. Do not cover the slots and openings on this telephone. This telephone should never be
placed near or over a radiator or heat register. This telephone should not be placed in a
built-in installation unless proper ventilation is provided.
11. Do not place anything on the power cord. Install the telephone where no one will step or
trip on the cord.
12. Do not overload wall outlets or extension cords as this can increase the risk of fire or
electric shock.
13. Never push any objects through the slots in the telephone. They could touch dangerous
voltage points or short out parts that could result in a risk of fire or electric shock. Never
spill liquid of any kind on the telephone.
14. To reduce the risk of electric shock, do not take this telephone apart. If service or repair
work is required on this telephone, take it to a qualified service representative.
Opening or removing covers may expose you to dangerous voltage or other
risks. Incorrect reassembly can cause electric shock when the appliance is
subsequently used.
15. Unplug this telephone from the wall outlet and consult a qualified service
representative in any of the following situations.
A. When the power supply cord is frayed or damaged.
B. If liquid has been spilled into the telephone.
C. If the telephone has been exposed to rain or water.
2
Safety Instructions
16.
17.
18.
19.
D. If the telephone does not operate normally by following the operating instructions.
Adjust only those controls that are covered by the operating instructions. Improper
adjustment may require extensive work by a qualified technician to restore the
telephone to normal operation.
E. If the telephone has been dropped or the case has been damaged.
F. If the telephone exhibits a distinct change in performance.
Never install telephone wiring during a lightning storm.
Never install telephone jacks in wet locations unless the jack is specifically designed for
wet locations.
Never touch uninsulated telephone wires or terminals unless the telephone line has
been disconnected at the network interface.
Use caution when installing or modifying telephone lines.
Battery Safety
CAUTION:
Danger of explosion if BATTERY PACK is incorrectly replaced. Replace only
with the same or equivalent type. To reduce the risk of fire or personal
injury, read and follow these instructions:
1. Use only the following type and size of BATTERY PACK:
3.6V, 600mAh Rechargeable Ni-MH BATTERY PACK
2. Do not dispose of the BATTERY PACK in a fire. It may explode. Check with local codes for
possible special disposal instructions.
3. Do not open or mutilate the BATTERY PACK. Released electrolyte from a BATTERY PACK
is corrosive and may cause damage to the eyes or skin. Electrolyte may be toxic if
swallowed.
4. Exercise care in handling the BATTERY PACK to prevent shorting the BATTERY PACK
with conductive materials such as rings, bracelets and keys. The BATTERY PACK or
conductor may overheat and cause burns.
5. Charge the BATTERY PACK provided with (or identified for use with) this telephone only
in accordance with the instructions and limitations specified in this manual.
6. Observe proper polarity orientation between the BATTERY PACK and BATTERY
CHARGER.
SAVE THESE INSTRUCTIONS
ATTENTION:
The telephone that you have purchased contains a rechargeable BATTERY PACK. The
BATTERY PACK is recyclable. At the end of its useful life, under various state and local
laws, it may be illegal to dispose of this BATTERY PACK into the municipal waste stream.
Check with your local solid waste officials for details in your area for recycling options or
proper disposal.
3
HANDSET Controls
58
8. ANTENNA
GHz
1. REDIAL/ PAUSE
BUTTON
In Use
Low Batt.
2. VOL (VOLUME)
BUTTON
3. CH (CHANNEL)
BUTTON
REDIAL
PAUSE
VOL
CH
MUTE
MEMO
11. FLASH BUTTON
DEF
ABC
1
3
2
5
4
MNO
JKL
GHI
6
9
8
OPER
6. TEMPORARY TONE
BUTTON
*
0
12. TALK BUTTON
WXY
TUV
PRS
7
10. MUTE BUTTON
FLASH
TALK
4. MEMO BUTTON
5. HEADSET JACK
9. IN USE/LOW BATT.
LED INDICATOR
#
13. RINGER ON/OFF
SWITCH
7. MICROPHONE
14. CHARGE
CONTACTS
4
HANDSET Controls
1. REDIAL/PAUSE Button: (REDIAL) Press to REDIAL the last number you called.
(PAUSE) Press to insert a PAUSE while dialing. (You will need the PAUSE
button to dial numbers which use an alternative Long Distance Access Code.)
2. VOL (VOLUME) Button: During a call, press the (+) button to increase the
receiver volume level from LOW, MEDIUM, HIGH, or MAXIMUM. Press the (-)
button to decrease the receiver volume level.
3. CH (CHANNEL) Button: Press to change the operating channel when you hear
interference.
4. MEMO Button: Press to store phone numbers in memory or to call a number
you have previously stored.
5. HEADSET JACK: For connecting your headset plug to enjoy hands-free
communication. (See page 12 for detail).
6. TEMPORARY TONE (*) Button: Press to temporarily change the dialing mode
from PULSE to TONE for Rotary Service Users. (Press once before entering
numbers to access the Answering System or electronic banking services, etc.)
7. MICROPHONE
8. ANTENNA
9. IN USE/LOW BATT LED Indicator: (IN USE) Lights up when the HANDSET is in
TALK mode. (LOW BATT) Blinks when the battery charge is low (See page 14
for detail.)
10. MUTE Button: Press to mute the HANDSET microphone while having a phone
conversation.
11. FLASH Button: Press to answer an incoming call if you have Call Waiting.
12. TALK Button: Press to answer an incoming call or to place a call. Press to end
a call.
13. RINGER ON/OFF Switch: Set switch to ON to activate the ringer on the
HANDSET. Set switch to OFF to deactivate the HANDSET ringer.
14. CHARGE CONTACTS: For charging the BATTERY PACK inside the HANDSET.
We recommend cleaning the CHARGE CONTACTS periodically with a damp
cloth.
5
BASE UNIT Controls
1. POWER-IN CONNECTION JACK
(LOCATED AT THE BOTTOM SIDE)
58
GHz
Cordless
Phone
2. TELEPHONE LINE CONNECTION
JACK (LOCATED AT THE
BOTTOM SIDE)
3. BASE UNIT ANTENNA
PAGE
4. PAGE BUTTON
5. CHARGE TERMINALS
6. TONE/PULSE SELECT SWITCH
LOCATED AT THE LEFT SIDE)
chg/
in use
7. CHARGE/IN USE LED INDICATOR
BASE UNIT Controls
1. POWER-IN CONNECTION JACK
2. TELEPHONE LINE CONNECTION JACK
3. BASE UNIT ANTENNA
4. PAGE Button: Press to page the HANDSET.
5. CHARGE TERMINALS: For charging the HANDSET BATTERY PACK. For best
performance, clean the CHARGE TERMINALS periodically with a damp cloth.
7. TONE/PULSE Select Switch
8. CHARGE/IN USE LED Indicator: (CHARGE) Lights up when the HANDSET is
placed on the BASE UNIT for charging.(IN USE) Lights up to indicate that the
HANDSET is in TALK mode.
6
Getting Started
Connecting Your Phone
This section is a reference guide to the basic functions and operations of your cordless
telephone. For more detailed descriptions of the operations and features of this telephone,
refer to the Contents on page 1.
1. Carefully remove your cordless telephone from its shipping carton. If there is any visible
damage, do not attempt to operate this equipment. Return it to the place of purchase.
2. Check to be sure you have all items that come with this cordless telephone system. You
should have a HANDSET, BASE UNIT, AC ADAPTOR, BATTERY PACK, TELEPHONE LINE
CORD, BELT CLIP, and Owner’s Manual.
58
GHz
58
GHz
Cordless
Phone
In Use
Low Batt.
PAGE
REDIAL
PAUSE
VOL
CH
BELT CLIP
BATTERY PACK
TELEPHONE LINE CORD
AC ADAPTOR
MUTE
MEMO
FLASH
TALK
DEF
ABC
1
2
GHI
4
3
MNO
JKL
5
PRS
7
6
WXY
TUV
8
9
OPER
*
0
#
HANDSET
chg/
in use
BASE UNIT
3. Insert the small plug on the end of the AC ADAPTOR into the POWER-IN CONNECTION
JACK at the back of the BASE UNIT.
4. Plug the AC ADAPTOR into a 120V AC wall outlet.
USE ONLY WITH CLASS 2 POWER SOURCE 12V DC, 200mA.
5. Insert one plug of the TELEPHONE LINE CORD into the house TELEPHONE JACK and the
other end into the TELEPHONE LINE CONNECTION JACK at the back of the BASE UNIT.
(If you have an older 4-prong TELEPHONE JACK, you will need an RJ-11C TELEPHONE
JACK ADAPTOR. This adaptor is available at the same place you purchased your
telephone.)
6. We recommend not placing this unit next to appliances. Doing so may cause interference.
120V WALL
TELEPHONE
POWER-IN
OUTLET
JACK
CONNECTION
JACK
TELEPHONE LINE
CONNECTION
JACK
AC
ADAPTOR
TONE/PULSE
SELECT SWITCH
TELEPHONE LINE CORD
7
Getting Started
7. Install the HANDSET BATTERY PACK by
plugging it into the BATTERY
CONNECTOR inside the BATTERY
COMPARMENT.
8. Place the BATTERY PACK inside the
BATTERY COMPARTMENT.
BATTERY PACK
9. Slide the HANDSET BATTERY
COMPARTMENT COVER firmly into
place in its closed position.
10. IMPORTANT: Before initial use, charge
the HANDSET for 12 hours. Place the
HANDSET on the BASE UNIT and
BATTERY
make sure that the CHARGE LED
COMPARTMENT
indicator on the BASE UNIT lights
COVER
up and a “beep” confirmation tone is
heard.
11. TONE/PULSE Select Switch:
A. If your home is equipped with a tone dialing system, set the TONE/PULSE
Select Switch to the TONE position.
B. If you have a rotary dialing system, set the TONE/PULSE Select Switch to
the PULSE position.
C. If you are not sure which system you have, set the TONE/PULSE Select
Switch to the TONE position. Press the TALK button on the HANDSET
and make a call. If the call connects, leave the switch as is; otherwise set
to the PULSE position.
Belt Clip Installation
BELT CLIP
HOOK
HEADSET
With the back of the HANDSET facing up,
insert one side of the BELT CLIP HOOK into
the matching slot at the top side of the
HANDSET. Press down on the opposite side
of the BELT CLIP until the other hook locks
into the slot on the side of the HANDSET.
CAUTION: The cordless telephone operates at a frequency that cause interference
to nearby TVs and VCRs; the base phone should not be placed near, or on top of a
TV or VCR. If interference is experienced, moving the cordless telephone farther
away from the TV or VCR will often reduce or eliminate the interference.
8
Cordless Telephone Operation
Preparing for Use
1. Place the HANDSET on the BASE UNIT for 12 hours.
2. After 12 hours, remove the HANDSET from the BASE UNIT.
Before you can use your cordless telephone, you must charge the HANDSET for
12 hours. Failure to do so will require more frequent charging of the BATTERY
PACK.
NOTE:
Depending on the frequency of use, once the HANDSET is fully charged, it remains
func-tional for approximately 6 hours of continuous use and approximately 6 days when the
HANDSET is off the BASE UNIT in STANDBY mode.
Placing Calls
1. Press the TALK button. The HANDSET IN
USE LED indicator and the BASE UNIT IN
USE/CHARGE LED indicator will light up.
2. Listen for a dial tone.
3. Dial the phone number.
4. When you have finished your call, either
press the TALK button or place the HANDSET on the BASE UNIT. The HANDSET IN
USE LED indicator will turn off and the
BASE UNIT IN USE/CHARGE LED will light
up to indicate that the HANDSET is
charging.
VOL
NOTES:
1. During a telephone conversation, press the VOL (VOLUME) button to select the
desired HANDSET receiver volume level from MAXIMUM, HIGH, MEDIUM, or LOW.
Press the (+) button to increase, or press the (-) button to decrease the volume level.
A double “beep” sound will be heard when the (+) or (-) button is pressed further after
the MAXIMUM or the LOW volume level.
2. The BASE UNIT does not have a ringer and does not ring when receiving an incoming
call.
3. If you are too far away from the BASE UNIT, the HANDSET emits “beep” sounds to warn
you that the background noise level is too high for proper communication between the
HANDSET and the BASE UNIT. When you hear this sound, you should move closer to
the BASE UNIT to reduce the noise level. Otherwise, the call will automatically cut off.
9
Cordless Telephone Operation
Receiving Calls with the HANDSET on the BASE UNIT
1. When the phone rings, lift the HANDS E T.
The IN USE LED indicator will light up.
NOTE: The HANDSET RINGER ON/OFF
switch must be in the “ON” position for
ringer to operate.
In Use
Low Batt.
2. Start your conversation.
REDIAL
3. To end your conversation, either press the
TALK button or place the HANDSET on
the BASE UNIT. If you place the HANDSET
on the BASE UNIT CHARGE CRADLE, you
activate the automatic STANDBY feature.
CH
PAUSE
VOL
MUTE
MEMO
FLASH
TALK
3
Receiving Calls with the HANDSET off the BASE UNIT
1. When the phone rings, press the TALK button. The IN USE LED indicator will light up.
2. Start your conversation.
3. To end your conversation, either press the TALK button or place the HANDSET on the
BASE UNIT. If you place the HANDSET on the BASE UNIT CHARGE CRADLE, you activate
the automatic STANDBY feature.
Storing Numbers
1. Be sure the BASE UNIT IN USE LED
indicator is off and the HANDSET is in
STANDBY mode.
2. Press the MEMO button.
3. Dial the number you want to store.
4. Press the MEMO button again.
5. Dial the TELEPHONE KEYPAD 0~9
button where you want to store that
number.
You
will
hear
one
confirmation “beep.”
6. Repeat steps 1 through 5 to store other
telephone numbers.
10
VOL
Cordless Telephone Operation
EXAMPLE : To store the number 115-1968 under the TELEPHONE KEYPAD 1 button:
1 - Press the MEMO button.
4 - Press the TELEPHONE KEYPAD 1 button.
2 - Dial 115-1968.
5 - You have stored 115-1968 under
TELEPHONE KEYPAD 1 button.
3 - Press the MEMO button again.
A total of 10 telephone numbers can be programmed in memory.
IMPORTANT: The maximum number of digits that can be stored for any phone number is 16
in PULSE or TONE mode. The maximum number of digits for mixed (TONE and PULSE in
combination) dialing is 15. If you are using a switchboard system to access an outside line
(such as an 8 or 9), press the PAUSE button to store a PAUSE.
Recalling Stored Numbers from Memory
1. Press the TALK button.
2. Press the MEMO button.
3. Press the TELEPHONE KEYPAD button for the number you have stored. The stored
number will be dialed automatically.
EXAMPLE: To recall number 115-1968 stored under the TELEPHONE KEYPAD 1 button:
1 - Press the TALK button.
3 - Press the TELEPHONE KEYPAD 1 button.
2 - Press the MEMO button.
Redial Feature
1. If you get a busy tone, press the TALK button to hang up.
2. Later, press the TALK button again.
3. Listen for a dial tone.
4. Press the REDIAL button. This will automatically redial the last telephone number you
called.
Mixed Mode (Temporary Tone) Dialing
If you only have Pulse (rotary dialing) service in your area set the TONE/PULSE select switch
at the left side of the BASE UNIT to PULSE position. If you want to access tone dialing mode,
press the Temporary Tone (*) button on the HANDSET and dial the desired number,
subsequent digits will be dialed into Tone mode. Pulse mode will reset after the HANDSET is
returned on-hook.
11
Cordless Telephone Operation
Mute Function
1. While you are having a phone
conversation, press the MUTE button.
The microphone will be muted and the
other party will not hear any voice/
talking from your end.
In Use
Low Batt.
REDIAL
2. Press the MUTE button again to
continue your phone coversation with
the other party.
CH
PAUSE
VOL
MEMO
MUTE
1, 2
FLASH
TALK
Using the Headset Feature
Your telephone can utilize a headset (not
included) to be connected to your
HANDSET for you to enjoy hands-free
communication.
HEADSET
MICROPHONE
Insert the small plug on the end of the
headset into the HEADSET JACK at the
left side of the HANDSET. Follow the
procedures discussed in “Receiving Calls”
and “Placing Calls” to receive and place a
call.
The HEADSET JACK is compatible with
2.5 mm headset plugs only.
12
HEADSET
NOTE:
When you plug the headset plug into the
HEADSET JACK it automatically mutes the
MICROPHONE and SPEAKER of the
HANDSET. Unplug the headset to return
the HANDSET to normal use.
SPEAKER
HEADSET PLUG (2.5mm)
HEADSET JACK
Security System
Security System
Your cordless telephone uses a digital coding security system to prevent
unauthorized use of your telephone line by another nearby cordless telephone.
The system has its own identifying signal created by microcomputers in both the
BASE UNIT and the HANDSET.
Security Code
This telephone has an internal security code with 65,536 possible combinations.
Resetting Security Code and Channel Information
Communication between the HANDSET and the BASE UNIT may not be possible in
any of the following situations:
1. After a power failure.
2. After relocating the BASE UNIT by disconnecting the AC ADAPTOR.
3. After replacing the HANDSET BATTERY PACK.
To reset, place the HANDSET on the BASE UNIT for 2 to 5 seconds.
Multi-Channel Access
Your cordless telephone lets you select a channel from the 40 frequencies
available to transmit signals between the BASE UNIT and the HANDSET. When you
notice interference from other cordless telephones, change to another channel by
pressing the CH (CHANNEL) button on the HANDSET.
13
Recharging the BATTERY PACK
Recharging the BATTERY PACK
The nickel metal hydride (Ni-MH) BATTERY PACK in the HANDSET can be
recharged many times using the built-in charger in the BASE UNIT.
When the BATT LOW LED indicator starts to blink rapidly, a “beep”sound will be
heard every 12 seconds. This indicates that the BATTERY PACK needs to be
recharged.
Charge the BATTERY PACK at least once every 90 days of non-use to avoid battery
failure. When the BATTERY PACK can no longer be charged, replacement of the
BATTERY PACK will be necessary.
NOTES:
1. During a power interruption, the BASE UNIT does not operate, and a
phone conversation cannot be made on the HANDSET.
2. To ensure your phone charges properly, place the HANDSET on the
BASE UNIT and make sure that the CHARGE LED indicator on the BASE
UNIT lights up and a “beep” confirmation tone is heard.
Changing the BATTERY PACK
The BATTERY PACK provides power for the HANDSET of your cordless telephone.
To Replace the BATTERY PACK:
1. Remove the HANDSET BATTERY COMPARTMENT COVER by sliding it down.
2. Pull out the BATTERY PACK PLUG and remove the BATTERY PACK.
3. Plug the new BATTERY PACK into the BATTERY CONNECTOR.
4. Slide the HANDSET BATTERY COMPARTMENT COVER firmly into place in
its closed position.
5. Before use, charge the new BATTERY PACK for 12 hours.
ATTENTION:
The telephone that you have purchased contains a rechargeable BATTERY
PACK. The BATTERY PACK is recyclable. At the end of its useful life, under
various state and local laws, it may be illegal to dispose of this BATTERY
PACK into the municipal waste stream. Check with your local solid waste
officials for details in your area for recycling options or proper disposal.
14
Problem Solving
Problem Solving Section
For your assistance, we have listed below a few common problems.
Phone does not work, check the following:
1.
2.
3.
4.
BASE UNIT is plugged into a power source.
HANDSET is charged.
TONE/PULSE Select Switch is in the right position.
TELEPHONE LINE CORD is plugged into the TELEPHONE JACK.
Range of phone limited, check the following:
1. BASE UNIT is centrally located in your residence.
2. BASE UNIT is not located near appliances.
No dial tone, check the following:
1. TELEPHONE LINE CORD plugs are connected to the TELEPHONE JACK and TELEPHONE
LINE CONNECTION JACK.
2. BASE UNIT is plugged into a power source.
3. If you had a power failure or had unplugged the BASE UNIT, replace the HANDSET on the
BASE UNIT for 2 to 5 seconds to reset the system.
Received signal flutters or fades, check the following:
1. BATTERY PACK in the HANDSET is fully charged.
2. HANDSET is not too far from the BASE UNIT.
Interference on reception, check the following:
1. Noise may be picked up from electrical products in the home or electrical storms. Generally, this noise is a minor annoyance and should not be interpreted as a defect in your
system. (See Technical Information on page 16.)
2. Choose an alternate channel using the CH (CHANNEL) button on the HANDSET.
Excess static, check the following:
1. Check to see that the ANTENNA is not touching another metal object.
If after pressing the TALK button, you receive three “beeps” and no dial tone, check the
following:
1. BASE UNIT is plugged into a power source.
2. If you had a power failure or had unplugged the BASE UNIT, replace the HANDSET on the
BASE UNIT for 2 to 5 seconds to reset the system.
NOTE:
If none of the telephones in the house are working, disconnect one set at a time to verify that
none of the telephones are causing the problem. If you still have a problem after doing this,
and your telephone still does not work, please contact your local phone company.
15
Technical Information
Technical Information
This cordless telephone uses radio frequencies to allow mobility. There are
certain difficulties in using radio frequencies with a cordless telephone. While
these are normal, the following could affect the operation of your system.
Noise
Electrical pulse noise is present in most homes at one time or another. This noise
is most intense during electrical storms. Certain kinds of electrical equipment
such as light dimmers, fluorescent bulbs, motors, and fans also generate noise
pulses. Because radio frequencies are susceptible to these noise pulses, you
may occasionally hear them in your HANDSET. Generally they are a minor
annoyance and should not be interpreted as a defect in your system.
Range
Because radio frequency is used, the location of the BASE UNIT can affect the
operating range. Try several locations in your home or office and pick the one that
gives you the clearest signal to the HANDSET.
Interference
Electronic circuits activate a relay to connect the cordless telephone to your
telephone line. These electronic circuits operate in the radio frequency spectrum.
While several protection circuits are used to prevent unwanted signals, there may
be periods when these unwanted signals enter the BASE UNIT. You may hear
clicks or hear the relay activate while you are not using the HANDSET. If the
interference occurs frequently, it can be minimized or eliminated by relocating the
BASE UNIT. You can check for interference before selecting the final BASE UNIT
location by plugging in the telephone.
NOTICE:
This cordless telephone uses radio communication between the HANDSET and
the BASE UNIT and may not ensure privacy of communication. Other devices,
including other cordless telephones, may interfere with the operation of this cordless
telephone or cause noise during operation. Units not containing coded access
may be accessed by other radio communication systems. Cordless telephones
must not cause interference to any licensed radio service.
16
FCC Requirements
FCC NOTICE
The FCC requires that you be advised of certain requirements involving the use of
this telephone.
1. This telephone is hearing aid compatible.
2. This equipment complies with Part 68 of the FCC Rules. A label on the
BASE UNIT of this equipment contains, among other information, the ACTA
Product Number and the Ringer Equivalence Number (REN) for this
equipment. You must, upon request, provide this information to your
telephone company.
3. The REN is also useful in determining the quantity of devices that you
may connect to your telephone line and still allow these devices to ring
when your telephone number is called. In most areas, but not all, the sum
of the RENs for all devices connected to one line should not exceed five
(5.0). To be certain of the number of devices that you may connect to your
line, you should contact your local telephone company.
4. If your telephone causes harm to the telephone network, the telephone
company may temporarily disconnect your service. If possible, they will
notify you in advance that temporary discontinuance of service may be
required. However, when advanced written notice is not possible, the
telephone company may temporarily discontinue service without notice if
such action is necessary under the circumstances.
5. The telephone company may make changes in its communication
facilities, equipment, operations, or procedures that could affect the proper
operation of your equipment. If they do, you will be provided with advance
notice as to give you an opportunity to maintain uninterrupted service.
6. This equipment may not be used on coin service provided by the telephone
company. Connection to party lines is subject to state tariffs. (Contact your
state public Utility Commission or Corporation Commission for
information.
7. An FCC compliant telephone cord and modular plug is provided with this
equipment. This equipment is designed to be connected to the telephone
network or premises wiring using a compatible modular jack which is Part
68 compliant. See Installation Instructions for details.
8. Please follow instructions for repairing if repairing any (e.g. battery
replacement section), otherwise do not alter or repair any parts or device
except specified.
9. The USOC number of the registration jack for this equipment is RJ11C.
17
FCC Requirements
RINGER EQUIVALENCE NUMBER
NOTICE: The Ringer Equivalence Number (REN) assigned to each terminal device
provides an indication of the maximum number of terminals allowed to be
connected to a telephone interface. The termination on an interface may consist of
any combination of devices subject only to the requirement that the sum of the
ringer equivalence numbers of all devices does not exceed 5.
CAUTION:
Users should not attempt to make such connections themselves, but should
contact the appropriate electric inspection authority, or electrician, as appropriate.
18
FCC Requirements
NOTE: This equipment has been tested and found to comply with the limits for a class B
digital device, pursuant to Part 15 of the FCC Rules. These limits are designed to
provide reasonable protection against harmful interference in a residential installation.
This equipment generates, uses, and can radiate radio frequency energy and, if not
installed and used in accordance with the instructions, may cause harmful interference
to radio communications.
However, there is no guarantee that interference will not occur in a particular installation.
If this equipment does cause harmful interference to radio or television reception, which
can be determined by turning the equipment off and on, the user is encouraged to try to
correct the interference by one or more of the following measures:
Changes or modifications not expressly approved in writing by
the users authority to operate this equipment.
may void
Some cordless telephones operate at frequencies that may cause interference to
nearby TVs and VCRs. To minimize or prevent such interference, the base of the
cordless phone should not be placed near or on top of a TV or VCR. If interference is
experienced, moving the cordless telephone farther away from the TV or VCR will often
reduce or eliminate the interference.
If trouble is experienced with this equipment, for repair or warranty information, please
contact service center at the below. If the equipment is causing harm to the telephone
network, the telephone company may request that you disconnect the equipment until
the problem is resolved.
Service can be obtained at:
Curtis International Ltd.
c/o Vision Transportation
4600, Witmer Industrial Estate
Unit 12, Niagara Falls, N.Y. 14305, USA
Tel: 1-800-968-9853
AC ADAPTOR: Use only with class 2 Power Source, 12V DC output, 200mA,
center pin positive