1
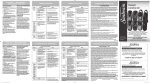
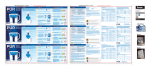
CLEANING / MAINTENANCE
A U T O S A F E T Y S H U T- O F F
CLEANING/MAINTENANCE
Always unplug the heater before cleaning and allow the heater to cool down.
1. Clean the unit with a soft cloth moistened with a mild soap and water solution.
2. NEVER use abrasive or flammable solvents to clean the unit.
3. After cleaning, be sure to completely dry the unit with a cloth or towel.
4. Store heater in a cool, dry location.
5. It is recommended that you store the unit in its original carton.
TIP: Over time, dust may accumulate on the front grills. This can be removed by wiping the unit with a damp cloth.
Trouble
• Heater
Does Not
Turn On.
AUTO SAFETY SHUT-OFF
TROUBLESHOOTING
TROUBLESHOOTING
Troubleshooting for your Heater
Probable Cause
Troubleshooting for your Heater
Probable Cause
☛ Timer activated (only applicable on
models with Timer feature).
☛ Tip-over switch engaged (only
applicable on models with Tip-over
protection).
☛ Manual user reset is activated.
☛ Not plugged in properly.
This heater is equipped with a technologically-advanced safety system that requires the user to reset the heater if
there is a potential overheat situation. When a potential overheat temperature is reached, the system will
automatically shut the heater off. It can only resume operation when the user resets the unit.
☛ Electrical outlet does not hold plug
in securely.
☛ Thermostat set too low.
If the heater shuts down and the Power Light Ring is flashing:
☛ Obstruction causing the heater not
to operate.
☛ Circuit breaker trips.
1. Stand the heater upright.
2. Unplug the heater and allow 30 minutes for the heater to cool down.
3. After 30 minutes plug the heater in and operate normally.
4. If the heater does not work normally, repeat steps 1, 2 and 3 again.
NOTE: If the heater is plugged in again and Power On/Off Button is pressed within the 30-minute cool down period,
heater will run at Max Heat setting, but shut down in 2 seconds with the Power Light Ring flashing. Please repeat the
above 4 steps to reset the heater again and ensure to allow sufficient time for the thermostat to cool down.
FOR MODELS WITH TIP OVER PROTECTION
Tip Over Shut-Off:
When the unit is accidentally knocked over, it will instantly shut off and the Power Light Ring will flash. The unit may
also shut off if it is moved or bumped. To reset, simply place the heater in an upright position, the Power Light Ring
will stop flashing and it will operate normally.
NOTE: If unit does not turn on when placed in the upright position, press Power On/Off Button once and heater will
resume operation.
TROUBLESHOOTING
General Information:
Environmental Factors - There are a number of factors that will affect your desired comfort level. These factors can
include insulation, open or drafty doors and windows, and outside temperature. Please check and take action if any of
these potential problems are affecting your heaters ability to adequately warm your room.
Supplemental Heat - Portable electric heaters are intended for supplemental heating of rooms to heat the room your
in and turn down the central heat thermostat. They are not intended to replace central heating systems.
Do NOT attempt to repair or adjust any electrical or mechanical functions on this heater. Doing so
will void warranty. The inside of the heater contains no user serviceable parts. All servicing should
be performed by qualified personnel only.
• Heater
Cycles ON
and OFF
Frequently.
✔ To make this occur less frequently turn the Dial
Knob clockwise to the highest setting.
Généralités
Conditions du milieu - Plusieurs facteurs affectent le niveau de confort désiré. Parmi ceux-ci, mentionnons l’isolation, les fenêtres
et portes ouvertes ou mal assujetties ainsi que la température extérieure. Vérifiez si ces facteurs empêchent le radiateur de
chauffer convenablement la pièce et, le cas échéant, prenez les dispositions nécessaires pour les rectifier.
Chaleur d’appoint - Les radiateurs électriques portatifs sont conçus pour réchauffer les pièces fraîches et vous aider à
baisser le thermostat du chauffage central. Ils ne remplacent aucunement le chauffage central.
N’essayez PAS de réparer ou d’ajuster une fonctionnalité électrique ou mécanique du radiateur sous
peine d’annulation de la garantie. Le radiateur ne contient pas de pièces que puisse réparer
l’utilisateur. Confiez toujours les réparations au personnel compétent.
Sun-CN_platformHH_LED_09EFM2.indd 1
☛ The thermostat automatically turns
the heater on and off to maintain
selected comfort level.
☛ Every 10-15 minute the heater
turns on and runs for a minute.
Trouble
• Remote (if
applicable)
Does Not
Work.
☛ Battery low.
☛ Distance too far.
• Heater is
Blowing
Cold Air.
☛ When the heater is in Thermostat
Mode and reaches the set
temperature it will automatically
perform a 15 second cool down
(blowing cold air) to ensure
thermostat accuracy.
☛ Unit is in the Fan Only setting.
☛ Power Button may have been
pressed to turn off the heater.
• Fan Speed
Doesn't
Change.
☛ Control Panel Display dirty.
☛ Max and Low/
Heat & $aveTM settings control the
heat output of the heater and not
the fan speed. Fan runs at the
same speed on all settings.
TRUSTED FOR OVER
100 YEARS
Heater with Digital Thermostat
1 YEAR LIMITED WARRANTY
Solution
✔ Change battery (Description type, 3 volt, CR2025).
✔ Remote works up to 20 feet (6m).
✔ Be sure to point remote at control panel on heater
and there are no obstructions.
✔ Make sure display panel is clean.
✔ Raise the temperature higher or change setting to
Low/Heat & $aveTM or Max.
✔ Press the Max or Low/Heat & $aveTM Buttons.
✔ Press the Power Button to turn on the heater.
✔ Run heater in Max for maximum heat output.
• Unexpected ☛ You may hear a popping or
Noise.
crackling sound as the heater heats
up. This is normal and safe
operation. Once the heater heats up,
the crackling sound will go away.
✔ If the noise persists call Sunbeam at
1-888-264-9669.
• Unexpected ☛ There may be an odor or vapor
coming from the heater the first
Smell.
time you use it or after prolonged
or seasonal storage.
✔ This is normal and is the result of dust or other
debris accumulating on the heating element.
Make sure the heater is in a well ventilated area
and continue running until the odor or vapor goes
away.
If you have any questions regarding your product or would like to learn more about other SunbeamTM products,
please contact our Consumer Service Department at 1-888-264-9669 or visit our website at www.sunbeam.ca.
✔ This is normal operation to ensure the heater is
maintaining the room temp accurately.
Sunbeam Products, Inc. doing business as Jarden Consumer Solutions or if in Canada, Sunbeam Corporation (Canada) Limited
doing business as Jarden Consumer Solutions (collectively “JCS”) warrants that for a period of one year from the date of
purchase, this product will be free from defects in material and workmanship. JCS, at its option, will repair or replace this
product or any component of the product found to be defective during the warranty period. Replacement will be made with a
new or remanufactured product or component. If the product is no longer available, replacement may be made with a similarr
product of equal or greater value. This is your exclusive warranty. Do NOT attempt to repair or adjust any electrical or
mechanical functions on this product. Doing so will void this warranty.
This warranty is valid for the original retail purchaser from the date of initial retail purchase and is not transferable. Keep the
original sales receipt. Proof of purchase is required to obtain warranty performance. JCS dealers, service centers, or retail
stores selling JCS products do not have the right to alter, modify or any way change the terms and conditions of this warranty.
This warranty does not cover normal wear of parts or damage resulting from any of the following: negligent use or
misuse of the product, use on improper voltage or current, use contrary to the operating instructions, disassembly,
repair or alteration by anyone other than JCS or an authorized JCS service center. Further, the warranty does not
cover: Acts of God, such as fire, flood, hurricanes and tornadoes.
What are the limits on JCS’s Liability?
JCS shall not be liable for any incidental or consequential damages caused by the breach of any express, implied or
statutory warranty or condition.
Except to the extent prohibited by applicable law, any implied warranty or condition of merchantability or fitness for
a particular purpose is limited in duration to the duration of the above warranty.
JCS disclaims all other warranties, conditions or representations, express, implied, statutory or otherwise.
JCS shall not be liable for any damages of any kind resulting from the purchase, use or misuse of, or inability to use
the product including incidental, special, consequential or similar damages or loss of profits, or for any breach of
contract, fundamental or otherwise, or for any claim brought against purchaser by any other party.
Some provinces, states or jurisdictions do not allow the exclusion or limitation of incidental or consequential damages
or limitations on how long an implied warranty lasts, so the above limitations or exclusion may not apply to you.
This warranty gives you specific legal rights, and you may also have other rights that vary from province to province,
state to state or jurisdiction to jurisdiction.
How to Obtain Warranty Service
In the U.S.A.
If you have any question regarding this warranty or would like to obtain warranty service, please call
1-888-264-9669 and a convenient service center address will be provided to you.
In Canada
If you have any question regarding this warranty or would like to obtain warranty service, please call
1-888-264-9669 and a convenient service center address will be provided to you.
In the U.S.A., this warranty is offered by Sunbeam Products, Inc. doing business as Jarden Consumer Solutions located
in Boca Raton, Florida 33431. In Canada, this warranty is offered by Sunbeam Corporation (Canada) Limited doing
business as Jarden Consumer Solutions, located at 20 B Hereford Street, Brampton, Ontario L6Y 0M1. If you have anyy
other problem or claim in connection with this product, please write our Consumer Service Department. PLEASE DO
NOT RETURN THIS PRODUCT TO ANY OF THESE ADDRESSES OR TO THE PLACE OF PURCHASE.
© 2009 Sunbeam Products, Inc. doing business as Jarden Consumer Solutions. All rights reserved. Imported and
distributed by Sunbeam Corporation (Canada) Limited doing business as Jarden Consumer Solutions, 20B Hereford
Street, Brampton, Ontario L6Y 0M1.
Printed In China
* Fan-Forced Heaters may appear with a different grill design
Instruction Leaflet
PLEASE READ AND SAVE THESE IMPORTANT INSTRUCTIONS
INSPIRE CONFIANCE
D É PA N N A G E
Problème
• Le
radiateur
ne se met
pas en
marche.
Dépannage du radiateur
Cause Probable
☛ Minuterie en fonction (modèles à
minuterie seulement).
☛ L’interrupteur de basculement est en
fonction (modèles à sécurité antibasculement seulement).
☛ La réinitialisation manuelle par
l’utilisateur est activée.
☛ Le radiateur n’est pas correctement
branché.
☛ La fiche ne s’assujettit pas
convenablement dans la prise.
☛ Le thermostat est réglé trop bas.
☛ Une obstruction empêche le
radiateur de fonctionner.
☛ Le disjoncteur est déclenché.
Le radiateur s’est éteint et la bague lumineuse d’alimentation clignote:
DÉPANNAGE
✔ Turn the Dial Knob clockwise to the highest
temperature setting.
✔ Unplug the heater and remove all obstructions. Position
your heater 36 inches (0.9m) away from all objects.
✔ Make sure no other high wattage appliances are
operating on the same circuit and reset breaker if
needed.
✔ Change setting to Max.
✔ Turn the Dial Knob clockwise to the highest
temperature setting.
Ce radiateur est doté d’un système de sécurité breveté et de technologie d’avant-garde. Ce système exige que
l’utilisateur réinitialise le radiateur si une situation de surchauffe potentielle existe. Si le radiateur atteint une
température de surchauffe potentielle, le système arrête automatiquement l’appareil. Il ne peut reprendre le
fonctionnement qu’après la réinitialisation par l’utilisateur.
MISE HORS DE SERVICE EN CAS DE RENVERSEMENT:
Si l’appareil est renversé accidentellement, il s’arrête automatiquement et le bague lumineuse d’alimentation clignote.
Il peut également s’éteindre s’il est déplacé ou heurté. Pour réinitialiser le radiateur, remettez-le d’aplomb et le
fonctionnement normal reprendra.
REMARQUE : Si l’appareil ne se remet pas en marche après avoir été mis d’aplomb, pressez la touche
d’alimentation une fois et le fonctionnement reprendra.
✔ Follow reset instructions listed in this manual.
✔ Ensure plug is properly inserted. Make sure
electrical outlet and circuit breaker are working.
✔ Have outlet replaced by a licensed electrician.
• Not Enough ☛ Heater is in Low or Fan Only setting.
Heat.
☛ Thermostat set too low.
ARRÊT AUTOMATIQUE DE SÉCURITÉ
MODÈLES À SÉCURITÉ ANTI-BASCULEMENT
✔ Set heater upright on a level surface.
✔ Follow Auto Safety Shut-off instructions to reset
the heater and allow sufficient time for the heater
to cool down before plugging in again.
✔ Set heater upright on a level surface.
NETTOYAGE/ENTRETIEN
1. Remettez le radiateur d’aplomb.
2. Débranchez l’appareil et attendez 30 minutes jusqu’à ce que l’appareil soit refroidi.
3. Après les 30 minutes, branchez le radiateur et utilisez-le normalement.
4. Si le radiateur ne fonctionne pas normalement, répétez les instructions des paragraphes 1, 2 et 3.
REMARQUE : Si le radiateur est rebranché et si la touche d’alimentation est pressée durant les 30 minutes de
refroidissement, le radiateur chauffera à grande chaleur mais s’éteindra après 2 secondes et la bague lumineuse
d’alimentation clignotera. Répétez les instructions des paragraphes de 1 à 4 pour réinitialiser le radiateur et laissez
écouler un laps de temps suffisant afin que le thermostat refroidisse.
✔ Press the Power Button to turn on the heater.
• Power Light ☛ Auto Safety Shut-off system is
activated when there is potential
Ring is
overheat.
Flashing or
☛ Tip-over switch engaged (only
in some
applicable on models with Tip-over
cases,
protection).
Heater Turns
On at Max
setting but
then Shuts
Off in 2
seconds with
Power Light
Ring
Flashing.
N E T T O YA G E / E N T R E T I E N
A R R Ê T A U T O M AT I Q U E D E S É C U R I T É
Débranchez et laissez toujours refroidir le radiateur avant d’entreprendre son nettoyage.
1. Nettoyez l’appareil à l’aide d’un chiffon doux, humecté d’une solution de savon doux.
2. N’utilisez JAMAIS des produits abrasifs ou des solvants inflammables pour nettoyer l’appareil.
3. Après le nettoyage, séchez l’appareil avec un chiffon ou une serviette.
4. Rangez le radiateur dans un endroit frais et sec.
5. Le fabricant vous recommande d’entreposer l’appareil dans sa boîte d’origine.
Conseil : Après un certain temps, de la poussière peut s’accumuler sur les grilles avant. Vous pouvez enlever la
poussière avec un chiffon humecté.
Solution
WA R R A N T Y I N F O R M AT I O N
D É PA N N A G E
Solution
✔ Pressez la touche d’alimentation pour allumer le
radiateur.
✔ Mettez le radiateur d’aplomb sur une surface plane.
✔ Observez les instructions de réinitialisation
données dans le manuel.
✔ Assurez-vous que la fiche soit bien branchée et que la
prise et le disjoncteur soient en bon état de marche.
✔ Demandez à un électricien de remplacer la prise
de courant.
✔ Tournez le bouton du cadran en sens horaire pour
le mettre au réglage le plus haut.
✔ Débranchez le radiateur et retirez toute obstruction.
Placez l’appareil à 36 po (0,9 m) de tous articles.
✔ Assurez-vous qu’aucun autre appareil de haute
puissance ne soit branché sur le même circuit et
réenclenchez le disjoncteur si nécessaire.
• La bague
☛ Le système d’arrêt automatique de ✔ Observez les instructions concernant l’arrêt
lumineuse
sécurité est activé et il y a un risque
automatique de sécurité pour réinitialiser le
d’alimende surchauffe.
radiateur; avant de rebrancher l’appareil, laissez
tation
écouler un laps de temps suffisant pour le
clignote ou
refroidissement.
parfois, le
☛ L’interrupteur de basculement est
✔ Posez le radiateur d’aplomb sur une surface
radiateur
enclenché (modèles à sécurité antiplane.
s’allume au
basculement seulement).
réglage haut
puis s’éteint
après 2
secondes et
la bague
d’alimentation
clignote.
• La chaleur
produite est
insuffisante.
☛ Le radiateur est réglé à bas ou à
ventilateur seulement.
☛ Le thermostat est réglé trop bas.
✔ Réglez-le au chauffage maximal.
• Le radiateur
fonctionne
souvent de
façon intermittente.
☛ Le thermostat met automatiquement
le radiateur sous et hors tension pour
maintenir le niveau de confort choisi.
☛ Toutes les 10 à 15 minutes le
radiateur se met en marche et
fonctionne pendant une minute.
✔ Pour réduire les intermittences, tournez le bouton
du cadran en sens horaire jusqu’au réglage le
plus haut.
✔ Ceci est normal et a pour but de maintenir la
température ambiante choisie avec précision.
✔ Tournez le bouton du cadran en sens horaire, au
réglage le plus haut.
Problème
Dépannage du radiateur
Cause Probable
• La télécom- ☛ La pile est presque épuisée.
mande (s’il ☛ La distance est trop grande.
y a lieu) ne
réagit pas.
☛ Le tableau de commande est sale.
• Le
radiateur
souffle de
l’air froid.
• La vitesse
du
ventilateur
ne change
pas.
I N F O R M AT I O N S U R L A G A R A N T I E
Solution
✔ Changez la pile (pile CR2025 de 3 volts).
✔ La télécommande a une portée de 6 m (20 pi).
✔ Pointez toujours la télécommande vers le tableau
de commande du radiateur; vérifiez qu’il n’y ait
pas d’obstructions.
✔ Vérifiez la propreté du tableau de commande.
✔ Faites fonctionner le radiateur à Max pour obtenir
la chaleur maximale.
• Il se produit ☛ Les crépitements marquent le début du ✔ Si le bruit persiste, communiquez avec Sunbeam
des bruits
chauffage. Ils sont normaux et n’ont
au 1 888 264-9669.
inattendus.
pas lieu de vous inquiéter. Le bruit
cessera une fois le radiateur chaud.
• Il se produit ☛ Il peut se dégager une odeur ou
une odeur
des vapeurs lors du tout premier
imprévue.
emploi du radiateur et après son
rangement prolongé ou de hors
saison.
100 ANS
Radiateur à Thermostat Numérique
GARANTIE LIMITÉE DE 1 AN
☛ Quand le radiateur est au mode
✔ Augmentez la température ou bien mettez
thermostat et atteint la température
l’appareil à bas/Heat & $aveMC ou à Max (chaleur
choisie, il exécute automatiquement
maximale).
un refroidissement de 15 secondes
(souffle de l’air froid) pour assurer
l’exactitude du thermostat.
✔ Pressez la touche Max (chaleur maximale) ou
☛ L’appareil est réglé à ventilateur
Low/Heat & $aveMC (bas/éconergétique).
seulement.
✔ Pressez la touche d’alimentation pour allumer le
☛ La touche d’alimentation a peutradiateur.
être été pressée.
☛ Les réglages Max et Low/Heat &
$aveMC contrôlent la chaleur que
produit le radiateur, non la vitesse
du ventilateur. Celui-ci tourne à la
même allure à tous les réglages.
DEPUIS PLUS DE
✔ Ceci est normal et provient de la poussière ou de
débris accumulés sur l’élément. Placez le
radiateur dans un endroit bien ventilé et faites-le
fonctionner jusqu’à ce qu’il n’y ait plus trace
d’odeur ou de vapeurs.
Si vous avez des questions sur le produit ou que vous voulez en savoir plus sur d’autres produits SunbeamMC, veuillez
vous adresser à notre Service client au 1-888-264-9669. Vous pouvez aussi vous rendre sur notre site Web, à
www.sunbeam.ca.
Sunbeam Products, Inc. faisant affaires sous le nom de Jarden Consumer Solutions ou, si au Canada, Sunbeam Corporation
(Canada) Limited faisant affaires sous le nom de Jarden Consumer Solutions (collectivement « JCS ») garantit que pour une
période de un an à partir de la date d’achat, ce produit sera exempt de défauts de pièces et de main-d’oeuvre. JCS, à sa
discrétion, réparera ou remplacera ce produit ou tout composant du produit déclaré défectueux pendant la période de garantie.
Le produit ou composant de remplacement sera soit neuf soit réusiné. Si le produit n’est plus disponible, il sera remplacé par un
produit similaire de valeur égale ou supérieure. Il s’agit de votre garantie exclusive. N’essayez PAS de réparer ou d’ajuster toute
fonction électrique ou mécanique de ce produit, cela annulera cette garantie.
Cette garantie n’est valable que pour l’acheteur au détail original à partir de la date de l’achat au détail initial et elle
n’est pas transférable. Veuillez conserver le reçu d’achat original. La preuve d’achat est exigée pour tout service
couvert par la garantie. Les concessionnaires JCS, les centres de service et les détaillants qui vendent des articles JCS
n’ont pas le droit d’altérer, de modifier ou de changer d’une manière quelconque les modalités de cette garantie.
Cette garantie ne couvre pas l’usure normale des pièces ou l’endommagement attribuable à la négligence, à l’utilisation
abusive du produit, au branchement sur un circuit de tension ou courant inapproprié, au non-respect du mode d’emploi,
au démontage et à la réparation ou à l’altération par quiconque, sauf JCS ou un centre de service agréé JCS. Cette
garantie ne couvre pas non plus les cas de force majeure comme incendies, inondations, ouragans et tornades.
Quelles sont les limites de la responsabilité de JCS?
JCS n’assume aucune responsabilité pour les dommages accessoires ou indirects résultant du non-respect de toute
garantie ou condition explicite, implicite ou générale.
Sauf dans la mesure interdite par la législation pertinente, toute garantie implicite de qualité marchande ou
d’application à un usage particulier est limitée à la durée de la garantie ou condition ci-dessus.
JCS décline toutes autres garanties, conditions ou représentations expresses, sous-entendues, générales, ou autres.
JCS n’assume aucune responsabilité pour les dommages, quels qu’ils soient, résultant de l’achat, de l’utilisation
normale ou abusive ou de l’inaptitude à utiliser le produit, y compris les dommages accessoires, les dommages-intérêts
particuliers, les dommages immatériels et les dommages similaires ou pertes de profits; ou bien pour les violations de
contrat, fondamentales, ou autres, ou les réclamations contre l’acheteur par un tiers.
Certaines provinces ou juridictions et certains états interdisent d’exclure ou de limiter les dommages accessoires ou
indirects, ou ne permettent pas la limitation de la durée d’application de la garantie implicite, de sorte que vous
pouvez ne pas être assujetti aux limites ou exclusions énoncées ci-dessus.
Cette garantie vous confère des droits juridiques précis et vous pouvez avoir d’autres droits, ces droits variant d’une
province, d’un état ou d’une juridiction à l’autre.
Comment obtenir le service prévu par la garantie
Aux États-Unis
Si vous avez des questions sur le produit ou la garantie, ou si vous voulez bénéficier d’un service dans le cadre de la
garantie, veuillez appeler le 1 888 264-9669 pour obtenir l’adresse d’un centre de service agréé.
Au Canada
Si vous avez des questions sur le produit ou la garantie, ou si vous voulez bénéficier d’un service dans le cadre de la
garantie, veuillez appeler le 1 888 264-9669 pour obtenir l’adresse d’un centre de service agréé.
Aux États-Unis, cette garantie est offerte par Sunbeam Products Inc. faisant affaires sous le nom de Jarden Consumer Solutions, située
à Boca Raton, Floride 33431. Au Canada, cette garantie est offerte par Sunbeam Corporation (Canada), Limited faisant affaires sous
le nom de Jarden Consumer Solutions, située au 20 B Rue Hereford, Brampton, (Ontario) L6Y OM1. Si vous éprouvez tout autre
problème ou si vous désirez effectuer toute autre réclamation quant à ce produit, veuillez écrire à notre service à la clientèle.
VEUILLEZ NE RETOURNER CE PRODUIT À AUCUNE DE CES ADRESSES NI À L’ÉTABLISSEMENT D’ACHAT.
© 2009 Sunbeam Products, Inc. faisant affaires sous le nom de Jarden Consumer Solutions. Tous droits réservés. Importé et
distribué par Sunbeam Corporation (Canada) Limited faisant affaires sous le nom de Jarden Consumer Solutions, 20B Herefordd
Street, Brampton (Ontario) L6Y 0M1.
134410/9100020010710
Sun-CN_platformHH_LED_09EFM2
Imprimé en Chinee
GCDS-SUN14651-RW
* La grille des radiateurs à air pulsé peut différer
Guide d’utilisation
VEUILLEZ LIRE ET GARDER CES DIRECTIVES IMPORTANTES
9/17/09 6:38:34 PM
P L E A S E R E A D A N D S AV E T H E S E
I M P O R TA N T S A F E T Y I N S T R U C T I O N S
V E U I L L E Z L I R E E T C O N S E RV E R C E S
D I R E C T I V E S D E S É C U R I T É I M P O R TA N T E S
Il faut toujours respecter les mesures de sécurité de base, y
compris celles stipulées ci-dessous, en utilisant un appareil
électrique afin de réduire le risque d'incendie, de chocs
électriques et de blessures corporelles:
1. Lisez toutes les instructions avant d'utiliser l'appareil.
2. Afin d'éviter le risque d'incendie ou de chocs
électriques, branchez l'appareil directement dans une
prise électrique de 120 volts. c.a.
3. Le radiateur est chaud lorsqu'il est en marche. Pour éviter
le risque de brûlures, NE touchez PAS aux surfaces
chaudes avec la peau nue. Si elles sont fournies, utilisez
les poignées pour déplacer ce radiateur. Gardez les
articles combustibles, tels que les meubles, oreillers,
literies, papiers, vêtements et rideaux, à une distance
d'au moins 3 pi (0,9 m) de la partie avant du radiateur
et gardez également ces articles éloignés des côtés et
de la partie arrière du radiateur.
4. NE placez PAS le cordon sous un tapis. Évitez de
placer le cordon dans un endroit passant ou à un
endroit où on risque de trébucher dessus.
5. Ce radiateur n’est pas conçu pour être utilisé dans
une salle de bain, une salle de lavage ou tout endroit
intérieur semblable. NE placez jamais le radiateur à
un endroit où il peut tomber dans une baignoire ou
autre contenant d’eau.
6. Observez les précautions supplémentaires d’usage si
un radiateur est utilisé par ou à proximité des
enfants ou par une personne handicapée et si le
radiateur reste en marche sans surveillance.
7. Débranchez toujours le radiateur lorsqu’il n’est pas
en usage.
8. Pour débrancher l’appareil, saisissez la fiche ellemême et non le cordon.
9. N'insérez PAS d'objets étrangers dans les ouvertures
d'aération ou d'échappement puisque cela peut
endommager le radiateur et risque de causer des
chocs électriques ou un incendie.
10. N'utilisez PAS le radiateur si le cordon ou la fiche est
endommagé, si le radiateur ne fonctionne pas de
manière appropriée ou s'il a été endommagé de
quelque façon que ce soit. Retournez l'appareil au
fabricant pour une vérification, une réparation ou un
réglage électrique ou mécanique.
11. Un radiateur comporte des pièces internes chaudes,
parfois produisant des étincelles. NE l'utilisez PAS dans
un endroit où de l'essence, des peintures ou d'autres
liquides inflammables sont utilisés ou entreposés.
12. N'utilisez cet appareil que dans une résidence, pour
le but proposé, en suivant les directives de ce guide.
L'utilisation pour un but non recommandé par le
fabricant risque de causer un incendie, des chocs
électriques ou des blessures corporelles. L'utilisation
d'accessoires non recommandés ou non vendus par
le fabricant peut être dangereuse.
13. N'utilisez PAS cet appareil à l'extérieur.
14. Pour éviter un incendie, NE bloquez PAS les prises
d'air et les sorties d'air de quelque manière que ce
soit. NE placez PAS l'appareil sur une surface molle,
telle qu'un lit, où les ouvertures peuvent être bloquées
15. Avant de débrancher l’appareil, placez les
commandes à la position d’arrêt « OFF » et
débranchez-le ensuite de la prise de courant.
16. Évitez d’utiliser une rallonge puisque celle-ci peut
surchauffer et provoquer un incendie. Toutefois, si
vous devez utiliser une rallonge, celle-ci doit être de
calibre n° 14 AWG au minimum et supporter une
puissance nominale de 1 875 watts.
17. Si le radiateur ne fonctionne pas, voyez les directives
spécifiques à la rubrique « Arrêt de sécurité automatique ».
18. NE tentez PAS de réparer ou d'ajuster les fonctions
électriques ou mécaniques de cet appareil puisque
cela annulera la garantie. Il n'y a aucune pièce qui
peut être entretenue par l'utilisateur à l'intérieur de
l'appareil. Seul un personnel qualifié devrait
effectuer le service d'entretien requis.
CET APPAREIL EST DOTÉ D'UN CORDON À FICHE POLARISÉE (une lame est
plus large que l'autre). Afin de réduire les risques d'électrocution, cette
fiche n’enfonce que dans un sens dans la prise électrique. Si la fiche ne
s'insère pas dans la prise, retournez la fiche. Si elle ne s'adapte toujours
pas, contactez un électricien qualifié afin d'installer la prise appropriée.
NE CONTOURNEZ PAS CE DISPOSITIF DE SÉCURITÉ
ET N'ALTÉREZ LA FICHE EN AUCUNE FAÇON.
Sun-CN_platformHH_LED_09EFM2.indd 2
Figure 2
REMOTE CONTROL (IF APPLICABLE)
Figure 3
If your heater comes with a remote control, unpack the
remote control from box. This includes one lithium
battery, CR2025/3V. Please note this remote control will
not work through walls. Remove battery before
discarding the remote.
NOTE: REMOVE THE PROTECTIVE COVER FROM THE
BATTERY PRIOR TO BEGINNING OPERATION.
Battery Replacement
1. Locate the battery cover on the back of the remote
control handset. Slide the battery cover out with
your thumb.
2. Place battery into battery compartment.
3. Slide battery cover closed.
4. For your convenience, a remote control holder is
integrated into the back of the heater housing.
NOTES
• Remove the battery from the equipment when it is
not being used for an extended period of time.
• Remove the used battery promptly.
• Do not discard used batteries into household trash
containers. Contact your local government for
disposal or recycling practices in your area.
This Class B digital apparatus complies with Canadian
ICES-003.
ASSEMBLY INSTRUCTIONS
Unpack your heater from box, being careful to remove
all parts from plastic bags and remaining packaging.
Please save the carton for off-season storage.
Some models are packed with separate base and pedestal
in the box. Carefully remove all parts from plastic bags.
To prevent scratches, place all parts onto a cloth before
assembly. Follow the below instructions for Pedestal/Base
assembly:
Pedestal Assembly (if no pedestal is included in this
model, move to Base Assembly)
Step 1: Run the power cord through the center of the
assembled pedestal. Snap pedestal into the
bottom of the heater housing. Refer to Figure 1, 2.
Base Assembly
Step 1: If the base is in two halves, snap them
together by sliding slots of one base half into
slots of second base half. Refer to Figure 3.
Step 2: Run the power cord through the center of the
assembled base. To assemble the base to the
unit (either one or two-piece base) first make
sure the side marked “Rear” is facing the
back of the heater. Line up holes of the base
with holes on bottom of pedestal (or heater
housing if no pedestal is included), and secure
with 4 provided screws. Refer to Figure 4.
Step 3: Lace the power cord through the cord minders
on the underside of the base. Refer to Figure 5.
Step 4: Turn the heater right side up on a flat level
surface prior to beginning operation.
Figure 4
OPERATING INSTRUCTIONS
1. Place heater on a firm, level surface.
2. Plug heater into a standard outlet. Once plugged in,
the Power Light Ring will illuminate.
NOTE: Avoid overloading your circuit by not using
other high wattage appliances in the same outlet. At
1500 watts, this unit draws 12.5 Amps.
3. Operate heater by pressing the Power Button ( ) and
selecting modes and settings according to your preference.
NOTE: Remove the plastic film from the control
panel before using (if included).
INSTRUCTIONS D’ASSEMBLAGE
VEUILLEZ LIRE ET
CONSERVER CES
CONSIGNES DE SÉCURITÉ
IMPORTANTES
SPÉCIFICATIONS TECHNIQUES
le côté marqué «Rear» est orienté vers
l’arrière du radiateur. Faites concorder les
trous du socle avec ceux de la partie
inférieure du pied (ou du boîtier si le
radiateur n’a pas de pied), puis immobilisezles avec les 4 vis fournies à cet effet. Voyez la
figure 4.
Étape 3: Enroulez le cordon sur les crochets, sous le
socle. Voyez la figure 5.
Étape 4: Mettez le radiateur d’aplomb sur une surface
plane, avant de commencer à l’employer.
Figure 1
Sortez le radiateur de sa boîte d’emballage, en faisant bien
attention de ne pas laisser de pièces dans les poches en plastique,
ou autres. Gardez la boîte pour y ranger le radiateur hors saison.
Pour certains modèles, le socle ou le pied peut être
empaqueté séparément dans la boîte. Sortez
soigneusement toutes les pièces des poches de plastique.
Pour ne pas risquer de les rayer, placez toutes les pièces
sur un linge jusqu’à leur assemblage. Observez les
instructions ci-après pour assembler le pied ou le socle:
Assemblage du pied (si le modèle n’a pas de pied,
procédez à l’assemblage du socle)
Étape 1: Enfilez le cordon d’alimentation dans le pied
assemblé. Enclenchez le pied dans la partie
inférieure du boîtier du radiateur. Voyez la
figure 1, 2.
Assemblage du socle
Étape 1: Si le socle est en deux parties, enclenchez
celles-ci en glissant les fentes de l’une dans
les fentes de l’autre. Voyez la figure 3.
Étape 2: Passez le cordon d’alimentation au milieu du
socle assemblé. Pour assembler le socle (qu’il
se compose d’une ou de deux pièces) à
l’appareil, commencez par vous assurer que
Press the Max Button to run the heater continuously at
1500W. The Stay On temperature indicator light will
remain illuminated.
D
LOW Heat Setting (if applicable)
E
Press the Low Button to run the heater continuously at
750W. The Stay On temperature indicator light will
remain illuminated.
A
G
Select your desired heat settings by pressing the
corresponding buttons as located on your heater or press
the Mode button on remote control (if applicable) to cycle
through the heat settings. An indicator light will
illuminate next to each button to indicate that the
selected setting/mode is activated.
NOTE: Settings and control buttons may vary slightly
between models.
B
Thermostat Control
C
Your heater is equipped with a digital thermostat that
allows you to set your heater to a precise comfort level
by turning the Dial Knob or pressing the arrow buttons on
the remote control (if applicable).
NOTE: If your heater comes with a Thermostat Button
( ) on the control panel or remote control (if
applicable), you may either press the button or turn the
Dial Knob to activate.
D
E
F
A. Control Buttons
B. Temperature
Indicators
C. Timer Indicators (if
applicable)
D. Dial Knob
C A R A C T É R I S T I Q U E S – U T I L I S AT I O N
INSTRUCTIONS D’UTILISATION
Figure 4
1. Placez le radiateur sur une surface solide et de niveau.
2. Branchez le radiateur sur une prise de courant
standard; le bague lumineuse d’alimentation luira.
REMARQUE : Évitez de surcharger le circuit
électrique en branchant d’autres appareils haute
puissance sur le même circuit. À 1500 watts, cet
appareil tire un courant de 12,5 ampères.
3. Pour l’utilisation, pressez la touche d’alimentation
( ) puis choisissez le mode et le réglage désirés.
REMARQUE : Retirez, s’il y a lieu, la pellicule de
plastique qui recouvre le tableau de commande avant
l’utilisation.
Figure 5
Figure 2
TÉLÉCOMMANDE (S’IL Y A LIEU)
Figure 3
Déballez la télécommande, s’il y a lieu. Une pile au lithium
CR2025 de 3 volts est incluse. Notez que la télécommande
ne fonctionne pas à travers les murs. Retirez la pile avant
de mettre la télécommande au rebut.
REMARQUE: ENLEVEZ LE PROTECTEUR DE LA PILE
AVANT DE DÉBUTER L’UTILISATION.
Remplacement des piles
1. Repérez le couvercle du compartiment des piles, à
l’arrière de la télécommande. Du pouce, faites glisser
le couvercle pour le retirer.
2. Placez la pile dans le compartiment.
3. Refermez le couvercle.
4. Par mesure de commodité, l’arrière du boîtier du
radiateur comprend un porte-télécommande.
REMARQUES
• Retirez la pile du boîtier si l’appareil ne sert pas
pendant une période prolongée.
• Retirez la pile épuisée dans le plus bref délai.
• Ne jetez pas de piles usées avec les ordures ménagères.
Communiquez avec la mairie pour tous renseignements
quant à l’élimination ou au recyclage.
Cet appareil numérique de la classe B est conforme à la
norme NMB-003 du Canada.
Pressez la touche d’alimentation pour allumer le
radiateur. Une fois allumé, le radiateur fonctionnera au
mode de chauffage maximal et le voyant Stay On
(fonctionnement continu) luira. Pressez de nouveau la
touche d’alimentation pour éteindre manuellement le
radiateur, quel que soit le réglage.
REMARQUE : La bague lumineuse d’alimentation
restera allumée tant que l’appareil est branché.
Sélection du mode
Choisissez le réglage de chaleur voulu à l’aide des
touches correspondantes sur le radiateur ou bien pressez
la touche «Mode» de la télécommande (s’il y a lieu) pour
faire défiler les réglages. Un témoin lumineux luira à
côté de la touche pour indiquer que le réglage ou le
mode choisi est activé.
REMARQUE : Les réglages et boutons de commande
peuvent légèrement varier d’un modèle à l’autre.
Heat & $ave™ Setting (if applicable)
Press the Heat & $ave™ Button to activate the energy
efficient Heat & $ave™ Mode. The heater will now
cycle between high (at 1500W) and low (at 750W) heat
settings to provide heat.
Mode Selection
Touche d’alimentation
• Ampères: 12.5
• Puissance: 1500 W (+5 % -10 %)
• Tension de service: 120 V CA/60 Hz
REMARQUE: Pour certains modèles, le réglage bas peut
être de 1000 watts.
INSTRUCTIONS D’ASSEMBLAGE
HIGH Heat Setting
B
E. Power Light Ring
F. Remote Control (if
applicable)
G. Mode Selection
Indicator Lights
Figure 6
Réglage ventilateur seulement
Pressez la touche Fan Only (ventilateur seulement) pour
faire fonctionner le radiateur à froid. Le voyant de
température Stay On (fonctionnement continu) restera
allumé.
B
Réglage de GRANDE chaleur
Pressez la touche Max (chaleur maximale) afin que le
radiateur fonctionne continuellement à 1500 watts. Le
voyant de température Stay On (fonctionnement
continu) restera allumé.
D
E
Réglage de chaleur BASSE (s’il y a lieu)
G
Pressez la touche Low (chaleur basse) afin que le
radiateur fonctionne continuellement à 750 watts. Le
voyant de température Stay On (fonctionnement
continu) restera allumé.
Réglage éconergétique
Heat & $aveMC (s’il y a lieu)
B
MC
Pressez la touche Heat & $ave pour mettre ce mode
éconergétique en fonction. Le radiateur cyclera entre haut
(1500 watts) et bas (750 watts) pour fournir la chaleur
voulue.
C
D
Thermostat
E
Le radiateur est équipé d’un thermostat numérique
permettant de régler le niveau de confort avec précision,
en tournant le bouton du cadran ou bien en pressant les
touches à flèche de la télécommande (s’il y a lieu).
REMARQUE : Si le tableau de commande ou la
télécommande (s’il y a lieu) du radiateur présente une
touche de thermostat ( ), vous pouvez soit presser la
touche, soit tourner le bouton du cadran pour l’activer.
F
A. Touches de
commande
B. Voyants de
température
C. Voyants de durée
(s’il y a lieu)
D. Bouton du cadran
To prevent frost, you may turn the Dial Knob to the
FrostProtect™ setting ( ), the heater will turn on
automatically when the room temperature drops below 5°C.
NOTE: It is normal for the heater to cycle on and off to
maintain the preset temperature. Raise the thermostat
setting to prevent the heater from cycling. When the
preset temperature is reached or when the heater is shut
off, the fan will run for 15 seconds without heat. This
cool down process ensures an accurate and consistent
temperature reading.
NOTE: To shut the heater off at any setting, press the
Power Button ( ) until all indicator lights go off. The
heater will cool down for 15 seconds, and the Fan Only
indicator light will blink in Amber until cool down is
completed. The digital thermostat has memory; it will
remember the last temperature setting before the heater
is turned off. However, if the heater is unplugged, the
digital thermostat will no longer remember the previous
temperature setting. You will need to reset the digital
thermostat if the heater is unplugged.
Oscillation (if applicable)
Timer (if applicable)
Some models are equipped with 12-Hour Auto Shut-off Timer
feature. This allows you to program your heater to shut off
automatically after running for 4-hour, 8-hour or 12-hour
intervals.
1. Press the Timer Button ( ) once. The indicator light and
the Power Light Ring will begin to blink for 5 seconds.
2. Turn the Dial Knob to cycle through the below
sequence:
3. Select your desired interval for the heater to shut-off
automatically. The corresponding hour indicator light will
illuminate, the Timer indicator light and the Power Light
Ring will stop blinking and become illuminate in 3 seconds
to indicate that the selected timer is activated.
4. To cancel the Timer feature, press the Timer Button
( ) twice within 5 seconds, and all Timer indicator
lights will go off.
NOTE: The timer does not work with the FrostProtectTM
Setting.
Press the Oscillation Button (
) on control panel or
remote control (if applicable) to activate or stop the
oscillation feature.
NOTE: Please do not manually turn the heater on the
base. It is designed to turn only by motorized oscillation.
To preset a precise comfort level, turn the Dial Knob to
adjust the temperature level ranging from 21°C to
30°C. The corresponding Temperature Indicator will
illuminate once selected. When the preset temperature is
reached, the heater will shut off and cool down for 15
seconds. When the room temperature drops below the
preset temperature, the heater will automatically turn on
again to maintain the preset temperature level.
C A R A C T É R I S T I Q U E S – U T I L I S AT I O N
A
F E AT U R E S - O P E R AT I O N S
FrostProtect™ Setting
Press the Fan Only Button to run the heater without
heat output. The Stay On temperature indicator light will
remain illuminated.
Power On/Off
Press the Power On/Off Button to turn the heater on. Once on,
the heater will run in the Max Heat mode and the Stay On
temperature indicator light will illuminate. Press the Power
On/Off button to manually turn off the heater at any setting.
NOTE: The Power Light Ring will remain illuminated
while unit is plugged in.
Figure 1
19. Arrêtez l’appareil et ne l’utilisez plus si la fiche ou la
prise de courant est chaude. Nous recommandons de
faire remplacer la prise de courant si la fiche ou la
prise est chaude au toucher.
Fan Only Setting
Figure 6
Figure 5
AR
THIS APPLIANCE HAS A POLARIZED PLUG (one blade is wider than the
other). To reduce the risk of electric shock, this plug is intended to fit in a
polarized outlet only one way. If the plug does not fit fully in the outlet,
reverse the plug. If it still does not fit, contact a qualified electrician to
install the proper outlet.
DO NOT ATTEMPT TO MODIFY THIS PLUG OR DEFEAT THIS
SAFETY FEATURE IN ANY WAY.
• Amps: 12.5
• Wattage: 1500W (+5% –10%)
• Working voltage: 120V AC/60Hz
NOTE: Low Heat setting may be 1000W on some models.
RE
PLEASE READ AND SAVE
THESE IMPORTANT
SAFETY INSTRUCTIONS
TECHNICAL SPECIFICATIONS
AR
flammable liquids are used or stored.
12. Use appliance only for intended household use as
described in this manual. Any other use not
recommended by the manufacturer may cause fire,
electric shock, or injury to persons. The use of
attachments not recommended or sold by the
manufacturer may cause hazards.
13. DO NOT use outdoors.
14. To prevent a possible fire, DO NOT block air intakes or
exhaust in any manner. DO NOT use on soft surfaces,
like a bed, where openings may become blocked.
15. To disconnect heater, turn controls to OFF, then
remove plug from outlet.
16. Avoid the use of an extension cord because the
extension cord may overheat and cause a risk of
fire. However, if you have to use an extension cord,
the cord shall be No. 14 AWG minimum size and
rated not less than 1875 watts.
17. If the heater will not operate, see specific instructions
on Auto Safety Shut-off.
18. DO NOT attempt to repair or adjust any electrical or
mechanical functions on this unit. Doing so will void
your warranty. The inside of the unit contains no user
serviceable parts. All servicing should be performed
by qualified personnel only.
19. Discontinue use if plug or outlet is hot. It is
recommended that the outlet be replaced if plug or
outlet is hot to touch.
RE
When using electrical appliances, basic safety precautions
should always be followed to reduce the risk of fire, electric
shock, and injury to persons, including the following:
1. Read all instructions before using the appliance.
2. To avoid fire or shock hazard, plug the appliance
directly into a 120V AC electrical outlet.
3. The heater is hot when in use. To avoid burns, DO NOT let
bare skin touch hot surfaces. If provided, use handles
when moving this heater. Keep combustible materials,
such as furniture, pillows, bedding, papers, clothes, and
curtains at least 3 ft (0.9 m) from the front of the heater
and keep them away from the sides and rear.
4. DO NOT run cord under carpeting. DO NOT cover
cord with throw rugs, runners, or the like. Arrange
cord away from traffic area and where it will not be
tripped over.
5. This heater is not intended for use in bathrooms,
laundry areas and similar indoor location. NEVER
locate heater where it may fall into a bathtub or
other water container.
6. Extreme caution is necessary when any heater is
used by, or near children or invalids, and whenever
the heater is left operating and unattended.
7. Always unplug the heater when not in use.
8. When unplugging, be sure to pull by the plug and
not the cord.
9. DO NOT insert or allow foreign objects to enter any
ventilation or exhaust opening as this may cause an
electric shock or fire, or damage the heater.
10. DO NOT operate heater with a damaged cord or
plug, or after the heater malfunctions, has been
dropped or damaged in any manner. Return
appliance to manufacturer for examination, electrical
or mechanical adjustment, or repair.
11. A heater has hot and arcing or sparking parts inside.
DO NOT use it in areas where gasoline, paint, or
F E AT U R E S - O P E R AT I O N S
F E AT U R E S - O P E R AT I O N S
A S S E M B LY I N S T R U C T I O N S
E. Bague lumineuse
d’alimentation
F. Télécommande
(s’il y a lieu)
G. Voyants de sélection
de mode
C A R A C T É R I S T I Q U E S – U T I L I S AT I O N
Fonction hors-gel FrostProtectMC
Pour éviter le gel, réglez le bouton du cadran à la position
FrostProtect MC ( ); le radiateur se mettra
automatiquement en marche si la température ambiante
baisse au-dessous de 5 °C.
REMARQUE : Il est normal que le radiateur fonctionne
de façon intermittente pour maintenir la température
choisie. Monter le thermostat empêchera le radiateur de
cycler. Quand la température choisie est atteinte ou le
radiateur est éteint, le ventilateur tourne 15 secondes
sans chaleur. Ce processus de refroidissement assure un
relevé de la température précis et constant.
REMARQUE : Pour éteindre le radiateur, quel que soit
le réglage, pressez la touche d’alimentation ( ) jusqu’à
ce que les voyants s’éteignent. Le radiateur refroidira
pendant 15 secondes et le voyant Fan Only (ventilateur
seulement) clignotera (ambre) jusqu’à la fin du
refroidissement. Le thermostat numérique ayant une
mémoire, il se rappellera du réglage de température du
radiateur avant que celui-ci ne soit éteint. Si vous
débranchez le radiateur, le thermostat ne se rappellera
pas du réglage. Le thermostat doit être reréglé à chaque
fois que le radiateur est débranché.
Oscillation (s’il y a lieu)
Minuterie (s’il y a lieu)
Certains modèles comprennent une minuterie de 12
heures qui vous permet de programmer le radiateur afin
qu’il s’éteigne automatiquement après 4, 8 ou 12 heures
de fonctionnement.
1. Pressez la touche ( ) une fois. Le voyant et la
bague lumineuse d’alimentation clignoteront pendant
5 secondes.
2. Tournez le bouton du cadran pour choisir l’option
voulue.
3. Choisissez la durée de fonctionnement désirée avant
l’arrêt automatique. Le voyant correspondant luira;
le voyant de la minuterie et la bague lumineuse
d’alimentation cesseront de clignoter puis luiront
après 3 secondes, signe de la mise en fonction.
4. Pour annuler le réglage de la minuterie, pressez la
touche ( ) à deux reprises sous 5 secondes et tous
les voyants de la minuterie s’éteindront.
REMARQUE : La minuterie n’est pas utilisable avec le
réglage hors-gel FrostProtect MC.
Pressez la touche d’oscillation (
) du tableau de
commande ou de la télécommande (s’il y a lieu) pour
faire démarrer l’oscillation ou l’arrêter.
REMARQUE : Ne tournez pas manuellement le
radiateur sur son socle. Il est uniquement conçu pour
tourner par oscillation motorisée.
Pour choisir un niveau de confort précis, tournez le bouton du
cadran et réglez le degré entre 21 et 30 °C. Le témoin
correspondant de la température s’allumera à la sélection.
Une fois la température choisie atteinte, le radiateur s’éteindra
puis refroidira 15 secondes. Quand la température ambiante
a baissé au-dessous de la température réglée, le radiateur se
remettra automatiquement en marche pour maintenir le
niveau sélectionné.
9/17/09 6:38:45 PM