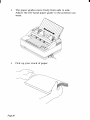
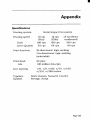
1
U
M
NX-2450EY!RH”
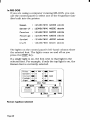
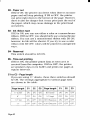
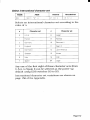
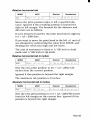
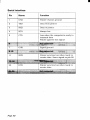
You can print at either 50V0(half) or 67Y0(two-thirds)
normal size by using the Zoom mode. This is useful for
printing wide documents, such as spreadsheets, on a
single sheet.
Change the zoom size as follows. Put the printer in
n
m
Hold down the [~)
key and press
the [TiEXEV_]
key to cycle through the three zoom settings.
The zoom light indicates the current selection as shown
in the table below.
I
I
Z
l
Z
I
I
50Y0
F
6
10
o
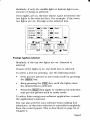
Press the [_’)
key to confirm your selection and put
the printer back in r
m
The printer beeps once to indicate that 500/0
zoom has
been selected, twice for 670A,or sounds a very short
beep, to indicate that Zoom mode has been cancelled;
that is, 100?Ao
has been selected.
You can disable the Zoom feature by setting Electronic
DIP Switch setting A4 to OFF (see page 41).
N
T
r
s
h
W
n
e
i y
a
p
f
ac
e
u
o
i
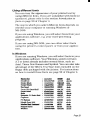
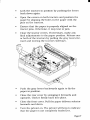
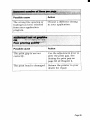
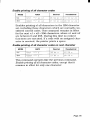
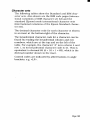
To reduce the level of noise generated by the printer
during operation, you can put the printer into Quiet
mode. To do this, put the printer in r
m
and
press the [~]
key. The printer will beep once and the
Page61
I
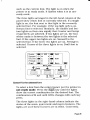
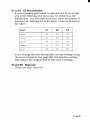
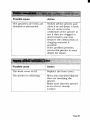
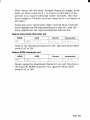
Adjusting vertical alignment
Note:
Youmayneverhaveto usethisfunction.Useit onlyif graphicsprint-outsappearstrange(asin the illustrations
below).
After you have been using your printer for some time,
you may find that when you print graphics, the printed
dots are slightly out of line with each other. For example, what you intend to look like this:
11111
may come out like this:
or like this:
1,1,1,1,1,
,1,1,1
,1,1
11111
11111
This is due to the mechanical parts of the printer working slightly out of alignment. It happens very rarely and
you may never meet this problem. However, if it does
occur, you can cure it as follows:
●
Turn the printer off and make sure that it is loaded
~th paper (cut sheet or fanfold).
●
Hold down both the [m]
Q
Turn on the printer. The printer will beep once.
●
After a second or two, release both keys.
and the [-]
keys.
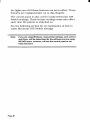
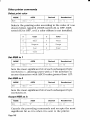
The printer will then print something like
***
LQ
DOT
JiJ)JIJs
TMENT
–3
:
SETTING
* * *
111111111111111111111
111111111111111111111
(The number before the vertical bars may not be “-3”).
After printing the bars, the printer will feed the paper so
that you can see the print-out clearly.
Each vertical bar is actually two bars. You can use the
[=]
key to move the bottom row of bars to the left, and
the [=]
key to move them to the right.
Page65
***
DOT
ADJUSTMENT
SETTING
***
Each time you press either of these two keys, the printer
prints a new test line and a new offset value.
If you are using fanfold paper, the printer will reverse
feed the paper before printing the test pattern again.
After printing the pattern, the printer will feed the fanfold paper back up again so that you can see it clearly.
In the illustration above, you would want to move the
bottom row to the right; pressing the [=]
key would
give you the following print-out:
●
The bars are better aligned now. Keep using the
m
keY until the two rows are aligned.
●
You have now aligned the printer in Letter Quality
(LQ) ,mode. By pressing the [-]
key, you can now
correct the dot alignment of draft mode.
There are five modes in which the dot alignment may
need’to be corrected: LQ, DRAFT, DRAFT COND (condensed), GRAPHICS A and GRAPHICS B. Each mode
must be adjusted separately. Cycle through these modes
by pressing the [m]
key (“cycling” means that if you
are in the last mode, GRAPHICS B, and you press the
[m]
key, the printer will go back to LQ mode). The different modes may have different alignments because of
the way in which the printer’s electronics drive the moving parts.
●
When you have adjusted all the dot alignments, hold
down the [=]
key and press the [=]
key. The
printer will print “*** END ***”, eject the current
page and go into ready mode.
Page66
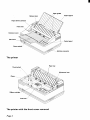
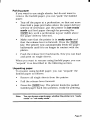
Testing the printer
Short test
A short test prints out the version number of the software contained in the printer’s ROM, followed by seven
lines of text. Each line is offset by one character from
the line above. If the color ribbon is in use, each line will
be printed in a different color.
To perform a short test, power up the printer while holding-down the [m]
key: The te~t pri~t out should
appear as shown below.
Note:
Thistestprintsacrossthe entirewidthof the carriage.It is a
goodideato makesurethatthe printeris loadedwiththe
widestpossiblepaperavailableto avoidthe possibilityof
damageto theprintheador the platen.
Long test
A long test prints out the version number of the software
in the printer’s ROM, followed by the current Electronic
DIP Switch settings, the current vertical alignment
adjustment settings and the complete character set in
each available font and pitch setting. The printer prints
this sequence repeatedly until powered off.
To perform a long test, power up the printer while holding down the [m]
key.
Page67
I
This test prints across the entire width of the carnage. It
is a good idea to make sure that the printer is loaded
with the widest possible paper available to avoid the
possibility of damage to the print head or the platen.
This test can generate many lines of text and graphics,
so it is a good idea to use continuous fanfold paper
rather than single sheets. The test continues indefinitely
until the printer is turned off.
Printing out a hexadecimal dump
If you are writing your own programs to send output to
the printer, it is sometimes useful to print out the raw
data that the printer is receiving.
When you perform a hexadecimal dump, all codes (character codes and control codes) are printed out in hexadecimal format. The printer does not execute any of the
normally executable codes it receives (such as OA - line
feed). It simply prints them out.
Perform a hexadecimal dump as follows:
●
Turn off the printer.
●
Turn on the printer while holding down the [=]
and [FXWQ keys. The printer beeps once.
●
Begin printing from your computer. Instead of a normal print-out, data will be printed in sixteen columns (two groups of eight) of hexadecimal numbers.
The equivalent printable characters, or dots for
unprintable codes, are printed to the right of each
row of hexadecimal numbers.
Page68
●
When the printer stops printing, put the printer in
not-ready-mode. The printer now prints the final
line of the hexadecimal dump.
●
To resume normal operation, turn the printer off
and on again. (Unless you switch it off and on the
printer will continue to print in hexadecimal).
Page70
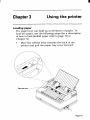
Chapter 5
Options
The two optional accessories that you can purchase with
your NX-2450 Rainbow/Colour printer are the push
tractor unit (PT- 10Q), which allows you to print on fanfold paper (continuous stationery), and the serial-to-parallel interface converter (SPC-8K), which allows you to
connect the printer to your computer via your computer’s 25-pin serial port.
Note:
Makesurethatthe printeris switchedoff,wheninstalling
eitherthe pushtractorunitor the serial-to-parallel
interface
converter.
Page71
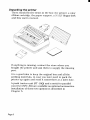
I
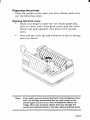
Push tractor unit
Installing the push tractor unit
The push tractor unit allows you to print on continuous
fanfold paper up to 10” wide. The push tractor unit consists of two end pieces joined by two silver metal rods.
The metal rods have two black sliding tractor units and
a black sliding support piece mounted on them.
Install the push tractor unit using the following steps:
●
Make sure the printer is switched off.
●
Open the front cover by hooking your fingers under
the two small projecting tabs on either side of the
front cover. Grip the cover firmly and pull upwards.
The front cover will come loose.
●
Now pull the cover up and forwards so that it swings
open.
●
Open the rear cover by pushing it backwards so that
it folds back and down.
●
Pull the release lever forward.
Page72
●
Hold the push tractor unit with your thumb and
forefinger on the ridges near the top and with the
slot facing towards you.
Ridges-
●
Hook the slots in the end pieces over the shaft just
behind and above the platen roller.
/‘1
As seen from behind the printer
Page73
I
●
Using your forefinger and thumb squeeze the end
piece levers against the rear part of the end pieces.
Rotate the tractor feed unit downwards until the
bottom of the levers fit snugly into the indentations
in the metal plate inside the printer body.
End pie
Bonom of Iev
Indentation
metal plate
As seen from behind the printer
As seen from behind the printer
Page74
●
Release the two levers and check that the tractor
unit is properly secured. The unit is now locked in
place. Make sure that the covers on both tractors
are closed.
●
Close the rear cover by swinging it forwards and
upwards. Click it firmly back into place.
●
Close the front cover.
Page75
Loading fanfold paper
●
Position the stack of fanfold paper behind the
printer.
●
Turn the printer off.
●
Pull the release lever forward.
●
If there is a single sheet that has been fed into the
printer, remove it.
●
Open the front cover by hooking your fingers under
the two small projecting tabs on either side of the
front cover. Grip the cover firmly and pull upwards.
The front cover will come loose.
●
Now pull the cover up and forwards so that it swings
open.
●
Pass the fanfold paper through the horizontal slot in
the back of the printer.
●
Open the rear cover by pushing it backwards so that
it folds back and down. Pull the paper through.
●
Pull the gray levers on the tractors forward and
adjust the tractors’ positions by sliding them sideways.
Page76
●
✌☛
Lock the tractors in position by pushing the levers
back down again.
Open the covers on both tractors and position the
paper by aligning the holes in the paper with the
pins on the tractors.
●
Ensure that the paper is properly aligned on the
tractor pins. Otherwise, it may tear or jam.
●
Close the tractor covers. If necessary, make any
final adjustments to the paper position. Release one
or both of the tractors by pulling the gray levers forward and moving the tractors sideways.
●
Push the gray levers backwards again to
paper in position.
●
Close the rear cover by swinging it forwards and
upwards. Click it firmly back into place.
●
Close the front cover. Pull the paper delivery selector
forwards and down.
●
Turn the printer on. The printer will beep to indicate
that the paper is not completely loaded yet.
fix the
Page77
●
Press the [-)
key. The fanfold paper will be fed in
to the starting position (if you want to adjust this
position, use the procedure for setting the auto load
position, described on page 60 of Chapter 4).
Note:
Page78
Keepthe releaseleverin theforwardpositionwhileprinting
on fanfoldpaper.
I
Printing on fanfold paper
Two useful features of the NX-2450 Rainbow/Colour
that facilitate the use of continuous stationery are paper
parking (fanfold paper can remain installed in the
printer while you temporarily switch to printing on single sheets), and the tear-off function (you can remove
printed output without losing the current paper position). These are described in the following sections.
You can also use the same paper position adjustment
techniques, such as line feed and form feed, that you
use with single cut sheets. These are described on
page 59 of Chapter 4.
You can also set a new auto load position (the distance
from the top of each new page at which the printer automatically starts printing) specifically for fanfold paper.
This is independent of the cut sheet auto load position.
Both auto load positions can be saved as part of a
macro, so that you do not have to reset them each time
you switch the printer off and on again.
Setting the auto load position is described on page 60 of
Chapter 4. Saving macro settings is described on
page 62 of Chapter 4.
When printing on continuous stationery, take care not
to print too close to the perforations which separate
each sheet. This can cause poor quality output, paper
misalignment or paper jamming. The recommended
printable area for fanfold paper is shown in the following
diagram.
Page79
If you need to use continuous multi-part forms, use the
type which has both side edges glued together. Do not
use forms with more than three parts.
Make sure that the print gap is correctly set for the
thickness of paper that you are using. Setting the print
gap is described on page 63 of Chapter 4.
Page80
I
Parking paper
If you want to use single sheets, but do not want to
remove the fanfold paper, you can “park” the fanfold
paper.
●
Tear off the paper at a perforation, so that not more
than half a page protrudes above the paper delivery
selector (if necessary, put the printer in not-ready
mode and feed paper through by pressing the
=
keY until a Perforation iSjust visible above
the paper delivery selector).
●
Make sure that the printer is in ready mode and
that the release lever is forward. Press the [-]
key. The printer now automatically feeds the paper
backwards until it is no longer in contact with the
platen.
●
Push the release lever backwards. Now you can load
and print on single sheets.
When you want to resume using fanfold paper, you can
“unpark” it as described in the following section.
Unparking paper
To resume using fanfold paper, you can “unpark” the
fanfold paper as follows:
●
Remove all single sheets from the printer.
●
Pull the release lever forward.
●
Press the [-]
key. The printer feeds the parked
fanfold paper back into position, ready for printing.
Note:
Youcanalwaysunparkpaper,whetherthe printeris in “ready
mode”or “not-readymode”.
Page81
I
Using the tear-off function
You can remove finished fanfold output without disturbing the current position of the paper.
●
Make sure that the printer is in ready mode, hold
down the (-]
key and then hold down the [-]
key. Keep both keys held down. The printer starts to
feed the paper through the printer.
●
Release both keys. The printer automatically goes
into not-ready mode.
●
Tear off the paper, using the paper delivery selector’s tear-assist edge.
●
Press the [w]
key again. The printer winds the
paper back to its former position so that printing
can be resumed. The printer remains in ready
mode.
Page82
I
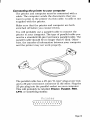
Serial-to-parallel interface converter
You can connect the printer to your computer via one of
your computer’s serial ports using the serial-to-parallel
converter (SPC-8K). To do this, you will also need an
additional serial converter cable.
To connect the printer to your computer using the
serial-to-parallel converter, proceed as follows (you will
also find it helpful to refer to the SPC-8K User’s Manual
and your MS-DOS or Windows User’s Guide).
Connecting the serial-to-parallel converter
Serial connector
Clear button ~“
Centronics connector
●
Turn off the printer and unplug the printer’s power
cable.
Page83
●
Plug the interface converter’s Centronics connector
into the socket on the side of the printer. Secure it
with the retaining clips.
●
Connect the interface connector’s 25-pin D-type
connector to one end of the serial converter cable.
●
Plug the other end of the serial converter cable into
one of your computer’s serial ports. The computer’s
serial ports are usually labelled COM1, COM2 etc.
COM1 is normally a 9-pin serial port and COM2 is
normally a 25-pin port.
COM2
. . . . . . . . . . . . .
\ . . . . . . . . . . . . /
●
Make sure that the serial-to-parallel converter is
resting on a stable, level surface, so that it will not
be prone to vibration or damage.
Note:
Page84
Consultyourdealerif you areunsureaboutthetypeof serial
convertercablethatyou need.
I
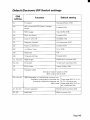
Setting the converter’s DIP switches
●
Set the DIP switches on the converter so that the
settings match the settings you intend to make on
your computer.
●
The DIP switches on the serial-to-parallel converter
correspond to the following settings. The equivalent
settings that you will need to make in MS-DOS’s
AUTOEXEC.BAT file, or in the Ports option in Windows’ Control Panel, are also listed. The converter’s
default settings are shown in gray.
I
Switch
t
1
Function
1
Data length
2
Parity
3
Protocol
7
Baud rate
8
Baud rate
I
Data length is the length in bits of the data unit (or byte)
that the computer transmits. Normally this is set to 8.
I Switch 1 i Data length
DOS/Windows setting
Parity is a means of checking for transmission errors.
I
Switch 2
Switch 5
OFF
OFF
Parity
DOS/Windows setting
Even
E
1
Page85
Protocol (or “handshaking”) is the communications convention used between the computer and printer to regulate the flow of data. DTR is the most commonly used
protocol.
I Switch3 1
I
OFF
I
Switch4
ON
I
I
Protocol
I
ETX/ACK
I
Baud rate is the rate in bits per second at which data is
sent to the printer. Typically 9600 or 19200 is used.
Switch 6 I Switch 7 ~Switch 8 Baud rate DOSIWindows setting
OFF
OFF
150 bps
150
OFF
ON
300 bps
300
ON
OFF
OFF
2400 bps
ON
OFF
ON
4800 bps
OFF
OFF
Page86
I
i
2400
4800
Setting up a serial connection
Make settings on your computer to correspond to the
settings you have made using the DIP switches.
On a Windows computer
●
Double-click the Control Panel icon in the Main window.
●
Double-click the Printers icon
●
Make sure that NX-2450 Rainbow/Colour is
selected in the InstaUed Printers list.
●
Click on Connect
●
Click on the serial port (COMn) to which the serialto-parallel converter is connected.
●
Click OK to return to the Printers window.
●
Click Close to return to the ControZPaneZwindow.
●
Double-click on Ports. The Ports dialog box appears.
●
Click on the name of the port to which the serial-toparallel converter is connected.
●
Click on Settings.
●
For each setting (Baud Rate, Data Bits, Parity, Stop
Bits and Flow Control (protocol)) select the appropriate setting from the pull-down menu (alternatively,
you can type in your selections directly).
●
Click OK to return to the Ports window.
●
Click Close to return to the ControZPanel window.
Page87
I
On an MS-DOS computer
If you are using an IBM PC or compatible running
MS-DOS, edit the AUTOEXEC.BAT file to include a line
that reads:
MODELPT1 :=COMn:
n stands for a number: 1, 2, 3 etc.
COMn must match the name of the serial port to which
the serial-to-parallel converter is connected. Usually it
will be COM2.
This line sends printer output to the COMn serial port.
Also add a line of the form
MODECOMn: baud,pari ty,data length,stopbits,p
to set up the COMn port to match the DIP switch settings on the serial-to-parallel converter. For example,
MODECOM2: 9600, N, 8, 1, p
will set up COM2 to run at 9600 baud, with no parity, a
data length of 8 bits, and 1 stop bit (an MS-DOS byteterminating convention). The ‘p’ jndicates that the
printer will continually try to re-transmit data, should
an error’ occur.
Refer to your MS-DOS User’s Guide if you need further
information on the MODE command.
Page88
Chapter 6
Troubleshooting
Your NX-2450 Rainbow/Colour printer should perform
without any problem most of the time. However, things
will go wrong from time to time. A list of common problems and corresponding suggestions for curing them is
given below.
A further section, Checking system softuxu-e settings,
suggests ways for you to check whether your system
software (MS-DOS or Windows) is correctly set up for
printing.
If the suggested remedies do not cure the problem, consult the store where you purchased your printer for
assistance.
Note:
Theprintercontainshighvoltages.Do nottry anyrepairoperationotherthanthosedescribedin thischapter.Otherwise,
you couldreceiveanelectricshockor causedamageto the
printer.Attemptingsuchan operationwill voidyourwarranty.
Page89
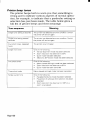
Common problems and solutions
Possible cause
Printer is not receiving
power
~Action
Check whether the power
cord is correctly connected.
1
If it is, try a different power
I cord.
Check whether the power
source is working by
unplugging the printer and
plugging in another device.
Action
Possible cause
1
~Make sure that the ribbon
The ribbon is jammed,
twisted or not set properly ~cartridge is correctly
between the print head and installed. Refer to preparing
the printer on page 9 of
the print head shield.
Chapter 2.
The print gap is not set
correctly.
Page90
Use the adjustment lever to
set the print gap. Move the
~lever to a lower (darker)
setting. See Setting the print
gap on page 63 of
I Chapter 4.
Possible cause
Action
The wrong emulation is
selected.
Check the emulation
selection (see Selecting
which emulation to use on
page 46 of Chapter 4), and
change it if necessary.
The wrong printer has been
selected by your
application program or
system software.
Check the printer selection
in your application or
system software. See the
following section, Checking
system software settings.
The computer system
software is not set up
properly for the printer or
for the type of interface
cable that you are using.
Check the system software
settings. See the following
section, Checking system
software settings.
The interface cable is
incorrectly connected, or
damaged.
Check that the printer
interface cable is correctly
connected. If it is, try a
different cable.
Possible cause
Action
Your application software
is overriding the control
panel font selection. This
does not apply to systems
running Windows.
Use the control panel to
inhibit font selection by
application software. See
the section Presenting
software font selection on
page 54 of Chapter 4.
I
Page91
Possible cause
I A~tion
The paper tray cover is not
properly closed.
Close the paper tray cover.
The release lever is in the
wrong position.
Make sure that the lever is
pushed back if you are
printing on single sheets,
or pulled forward if you are
using fanfold stationery.
Paper is jamming.
Remove all paper from the
printer. Reload paper.
The print gap is not set
correctly.
Check the print gap. If
necessary, use the
adjustment lever to set the
print gap. See Setting the
print gap on page 63 of
Chapter 4.
Possible cause
I Action
A monochrome ribbon
cartridge is installed.
Install a color ribbon
cartridge.
A printer that does not
support color has been
selected (either in Windows
or in your application
program).
Select a different printer
driver (see Setting up the
printer in Windows on
page 15 of Chapter 2, and
Printing out your documents
on page 27 of Chapter 3.
Page92
Possible cause
Electronic DIP Switch
settings prevent use of
color.
~
1Action
Check Electronic DIP
Switch setting A4 and B3.
Turn both settings to ON to
enable color printing (see
Making Electronic DIP
Switch settings on page 37
of Chapter 4).
Possible cause
Action
Paper is jamming.
Check the print gap. If
necessary, use the
adjustment lever to set the
print gap. See Setting the
print gap on page 63 of
Chapter 4.
The wrong line spacing or
leading has been selected
from your application
program.
Choose a different setting
in your application.
Auto line feed with carriage
return is selected.
Check Electronic DIP
Switch setting A5. Turn the
setting ON to turn off
automatic line feed (see
Making Electronic DIP
Switch settings on page 37
of Chapter 4).
Page93
I
Possible cause
Action
Auto line feed with carriage
return is not selected.
Check Electronic DIP
Switch setting A5, Turn the
setting to OFF to select
automatic line feed (see
Making Electronic DIP
Switch settings on page 37
of Chapter 4).
Paper is jamming.
Check the print gap. If
necessary, use the
adjustment lever to set the
print gap. See Setting the
print gap on page 63 of
Chapter 4.
Action
Adjust the auto load
position (see Setting the
auto load position on
page 60 of Chapter 4.)
1
Page94
Check Electronic DIP
Switch setting A5. Turn the
setting ON to turn off
automatic line feed (see
Making Electronic DIP
Switch settings on page 37
of Chapter 4).
Possible cause
Action
The wrong line spacing or
leading has been selected
from your application
program.
Choose a different setting
in your application.
~
I
Possible cause
1Action
The print gap is not set
correctly.
1Use the adjustment lever to
alter the print gap. See
Setting the print gap on
page 63 of Chapter 4.
The print head is damaged.
Return the printer to your
dealer for repair.
Page95
Possible cause
The print gap is not set
correctly.
1Action
Use the adjustment lever to
set the print gap. Move the
lever to a higher (lighter)
setting. See Setting the print
gap on page 63 of
Chapter 4.
Make sure that the ribbon
The ribbon is jammed,
cartridge is correctly
twisted or not set properly
between the print head and ! installed. Refer to Preparing
~the printer on page 9 of
the print head shield.
~Chapter 2.
...——
Print head shield is ‘Return the printer to your
dealer for repair.
damaged or missing.
Page96
I
Possible cause
Action
The printer’s air vents are
blocked or obstructed.
Switch off the printer and
allow it to cool down. Check
the air vents on the
underside of the printer to
see if they are clogged or
obstructed in any way.
Remove the obstruction or
clogging material if
possible.
If the problem persists,
return the printer to your
dealer for repair.
Possible cause
Action
The front cover is off.
Replace the front cover.
The printer is vibrating.
Move any unrelated objects
that are touching the
printer.
Make sure that the printer
is on a level, steady
surface.
Page97
Possible cause
~Action
I
The paper guides are
positioned incorrectly.
1Remove the paper. Adjust
the position of the paper
guides and reload the
paper.
The ribbon is jammed,
causing the print head to
jam.
Make sure that the ribbon
cartridge is correctly
installed. Refer to Preparing
the printer on page 9 of
Chapter 2.
The paper is jamming,
causing the print head to
jam.
Remove all paper from the
printer. Reload paper.
Check the print gap. If
necessary, use the
adjustment lever to set the
print gap. See Setting the
print gap on page 63 of
Chapter 4.
Inappropriate margin
settings have been selected
from your application
program.
Choose different margin
settings in your
application.
Page98
I
Possible cause
Action
The ribbon cartridge is
incorrectly installed,
causing the print head to
jam.
Make sure that the ribbon
cartridge is correctly
installed. Refer to Preparing
the printer on page 9 of
Chapter 2.
The paper is not loaded
properly, causing the print
head to jam.
Remove all paper from the
printer. Reload paper.
The print gap is not set
correctly.
“- Use the adjustment lever to
set the print gap. See
Setting the print gap on
page 63 of Chapter 4.
Static electricity caused by
interference from nearby
electrical devices or by a
low level of humidity is
affecting the printer’s
operation.
Make sure that the printer
is not too close to any
devices with electric motors
or raise the humidity level.
Inappropriate settings have
been selected from your
application program.
Choose different settings in
your application.
Page99
Possible cause
Action
The wrong emulation is
selected.
Check the emulation
selection (see Selecting
which emulation to use on
page 46 of Chapter 4), and
change it if necessary.
The wrong character table,
code page or international
character set is selected.
Check Electronic DIP
Switch settings D2, D3, D4
and D5 (see Making
Electronic DIP Switch
settings on page 37 of
Chapter 4).
Static electricity caused by
interference from nearby
electrical devices or by a
low level of humidity is
affecting the printer’s
operation.
Make sure that the printer
is not too close to any
devices with electric motors
or raise the humidity level.
Inappropriate settings have
been selected from your
application program.
Choose different settings in
your application.
There are wires missing
from the print head.
Return the printer to your
dealer for repair.
Page100
Possible cause
Action
The interface cable is
incorrectly connected or
damaged
Check that the printer
interface cable is correctly
connected. If it is, try a
different cable.
Static electricity caused by Make sure that the printer
interference from nearby
is not too close to any
devices with electric motors
electrical devices or by a
or raise the humidity level.
low level of humidity is
affecting the printer’s
operation.
I
Page101
Checking system software settings
In Windows
If you cannot print from your Windows application,
there are three things that you can check. You may also
wish to refer to the Microsoft Windows User’s Guide.
Firstly, check that the printer has been set as the
Default Printer.
Double-click the Control Panel icon in the Main window.
Double-click the Printers icon
Click on NX-2450 Rainbow/Colour in the list of
installed printers.
Make sure that Set As Default Printer is checked. If it
is not, click on the check box and try printing from
your application again.
Click on Close to return to the Control PaneZwindow.
Secondly, check that the printer is correctly selected in
your application.
●
Select Print from the application’s File menu. A dialog box appears listing available printers.
●
Make sure that NX-2450 Rainbow/Colour is highlighted. If it is not, click on it and try printing again.
Thirdly, check that the correct port is selected.
●
Double-click the Control Panel icon in the Main window.
●
Double-click the Printers icon
●
Click on NX-2450 Rainbow/Colour in the list of
installed printers.
●
Click Connect.
Page102
●
Make sure that your cable is connected to the port
highlighted in the port list. If you are using a parallel cable, you will probably be using LPT1. If you are
using the serial-to-parallel convertor, you will be
using COM 1 or COM2. Click on the appropriate port
name.
●
Click OK.
●
Click on Close to return to the Control Panel window.
If you still cannot print successfully, consult your software dealer for assistance.
In MS-DOS
If you cannot print a text file using the MS-DOS PRINT
command, check the AUTOEXEC.BAT file to see
whether it contains a statement like either of the following:
MODELPT1 :=COM1:
or
MODELPT1 :=COM2:
These statements indicate that the computer is setup to
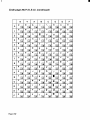
print to a printer via a serial cable, not a parallel cable.
So, if you are using a parallel cable, delete the line from
AUTOEXEC.BAT. Resave AUTOEXEC.BAT and restart
your computer. Now try printing again.
Conversely, if you are using a serial-to-parallel converter, make sure that one of these statements is
included in the AUTOEXEC. BAT file. Also make sure
that it refers to the correct serial port (COM1, COM2
etc.). See Setting up a serial connection on page 87 of
Chapter 5.
If you still cannot print, refer to the MS-DOS User’s
Guide or consult your software dealer.
If you can print from MS-DOS but cannot print from
your application, check to see which printer driver is
selected in the application. See Printing out your docuPage103
ments on page 27 of Chapter 3 and check the application’s manual for details of printer selection.
If you still cannot print, consult your software dealer.
Warning beeps
The printer beeps both to give you warnings that something is wrong and to indicate certain conditions that
are part of normal operation. A full list of printer beeps
is given on page 150 of the Appendix. The table below
shows the beep combinations that are associated with
printer problems.
Meaning
Beep combination
~
Sequence of four short
tones, twice
Single tone, two seconds
Single tone, continuous
Page104
I
I The printer is out of paper
I
1
The printer detects an error
condition. Turn the printer
off and on again.
Chapter 7
Softwarecommands
Introduction
The NX-2450 Rainbow/Colour has two emulation
modes: Standard/Epson mode and IBM mode.
In the Standard/Epson mode, the printer emulates the
Epson LQ-860/850, and can also recognize the graphics
commands of NEC 24-wire printers. In IBM mode, the
printer emulates the IBM Propnnter X24E. Some additional command codes, which are a superset of these
emulations, are also supported.
The emulation can be changed by changing Electronic
DIP Switch (EDS) setting Al. When Al is ON, the printer
is in Standard/Epson mode; when it is OFF, the printer
is in IBM mode (see SeZecting which emulation to use on
page 46 of Chapter 4).
In addition, when EDS switch A2 is ON, the printer can
automatically sense which emulation is required and
will change emulation as necessary.
This chapter describes the printer’s control commands.
Some commands are comm-onto both Standard and
IBM modes. All commands will grouped by function. The
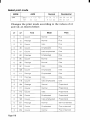
name of each command is followed by a table like the
one below:
Std.
Decimal
ASCII
MODE
<E SC>
“X”
<1>
27
120
1
Hexadecimal
IB
78
01
MODE:
Indicates the mode in which the command is
recognized.
Std.
Standard/Epson mode (EDS switch Al is ON)
IBM
IBM mode (EDS switch Al is OFF)
Page105
Both
Both Standard/Epson and IBM modes
ASCII:
Indicates the ASCII coding of the command.
Control characters are enclosed in angle
brackets: For example, <1> means character
code 1.
Decimal: Gives the command in decimal character
codes.
Hexadecimal: Gives the command in hexadecimal character codes.
Parameters for which values must be supplied are indicated by letters such as n, m or d.
Page106
Font control commands
Selectprint quality
‘]
ASCII
MODE I
Std .
<ESC>
“X”
I
‘ecimal
27
n
120
I
n
He)(de~imal
IB
78
n
Changes the print quality according to the value of n, as
shown below:
Printquality
n
o
Draft
1
Letter quality
Ignored if the FONT LOCK mode was selected during
power-up.
Selectprint quality
ASCII
MODE
IBM
<E SC>
“ [“
“d”
<1>
<0>
n
Decimal
27
1
91
100
On
Hexadecimal
5B
64
01 00
IB
n
Changes the print quality according to the value of n, as
shofi below:
Printquality
n
o
1
128
Unchanged
127
255
Draft
Letter quality
Ignored if the FONT LOCK mode was selected during
power-up.
Select L(2 font
]
MODE I
] Both
ASCII
] <ESC>
“k”
I
‘ecimai
] 27
n
107
n
I
Hexadecimal 1
I IB
6B
n
I
Selects an LQ font according to the value of n. In draft
mode, this command remains dormant and takes effect
later when LQ is selected. Ignored if the FONT LOCK
mode was selected during power-up.
I
nl
Font
I
Font
nl
o
Roman
3
Prestige
1
Sanserlf
4
Script
2
Courier
I
Select italiccharacters
ASCII
MODE I
Std.
I <ESC>
“4”
I
Decimal
I 27
52
I
Hexadecimal I
I IB
34
I
Causes subsequent characters (except IBM block
graphic characters) to be printed in italics.
Select upri~ht characters
MODE
Std.
Decimal
ASCII
<ESC> c’5“
27 53
Hexadecimal
IB 3’5
Cancels italic printing and causes subsequent characters to be printed upright.
Emphasized printing
Both
Decimal
AS(.X
MODE
<E SC>
“E”
27
69
Hexadecimal
IB
45
Causes subsequent characters to be emphasized by
adding extra thickness to horizontal strokes.
Page108
Cancelemphasized printing
ASCII
MODE
Both
<E SC>
“F”
Decimal
27
70
Hexadecimal
IB
46
Cancels emphasized printing.
Double-strike printing
ASCII
MODE
Both
<E SC>
27
“G”
Hexadecimal
Decimal
71
IB
47
Causes subsequent characters to be printed in doublestrike mode with a slight horizontal motion in between,
causing a thickening of vertical strokes.
For bold print, use of double-strike is recommended in
LQ mode, and combined use of emphasized and doublest-nkeis recommended in draft mode.
Canceldouble-strike printing
ASCII
MODE
Both
<E SC>
Decimal
27
“H”
72
Hexadecimal
IB
48
Cancels double-strike printing.
Underlining
ASCII
MODE
Both
<E SC>
“-”
n
Decimal
27 45 n
Hexadecimal
IB 2D n
Causes subsequent characters to be underlined when n
is 1, and cancels underlining when n is O. Block graphics characters and spaces skipped by horizontal tabulation are not underlined.
Page109
Overlining
MODE
IBM
<E SC>
“-”’
Hexadecimal
Decimal
ASCII
27 95 n
n
lB 5F n
Causes subsequent characters to be overlined when n is
1, and cancels overlining when n is O. Spaces skipped by
horizontal tabulation are not overlined.
Selectscore
Std.
<ESC>
“ (“
<O>
n2
<1>
“-”
nl
Hexadecimal
Decimal
ASCII
MODE
{3>
27 40 45 3 lB 28 2D 03
00 01 nl
o 1 nl
n2
n2
Start score according to the values of nl and n2, as
shown below.
Function
nl
n2
Function
1
Underlining
o
Cancel score
2
Strike-through
1
Single continuous
3
Overlining
2
Double continuous
5
Single broken line
6
Double broken line
Page110
hne
line
Selectornament character
MODE
Std.
ASCII
<E SC>
n
“q”
Hexadecimal
Decimal
27
n
113
IB
71
n
Selects an ornament character according to the value of
n, as shown below.
n
Character
o
Normal
1
Outline
2
Shadow
3
Shadow and outline
Superscript
ASCII
MODE
Both
<E SC)
“ S“
<O>
Hexadecimal
Decimal
27
83
0
IB
53
00
Causes subsequent characters to be printed as superscripts. Does not change the character pitch.
Subscript
MODE
Both
ASCII
<E SC>
“ S“
<1>
Hexadecimal
Decimal
27
83
1
IB
53
01
Causes subsequent characters to be printed as subscripts. Does not change the character pitch.
Cancelsuperscriptor subscript
MODE
Both
ASCII
<E SC>
“T”
Hexadecimal
Decimal
27
84
lB
54
Cancels printing superscripts or subscripts and returns
to normal printing.
Page 111
Selectcharactertable
MODE
ASCII
Decimal
Both
<E SC>
“:”
n
27
116
Std.
<FS >
“ I “
n
28
~3
Hexadecimal
n
lB 74 n
n
lC 49 n
Selects a character table according to the value of n as
shown below:
I ‘1
I
I
Character
table
,
I
2
IBM
character
I
set
Shifc download. character
area (Standard mode only)
Selectcharacterset #l
I
ASCII
MODE I
I Both
I <ESC>
“7”
I
Decimal
I 27
55
/
Hexadecimal I
I lB
37
Selects character set #1.
Selectcharacterset #2
ASCII
MODE
Both
<Z SC>
“ 6“
Selects character set #2.
Page 112
Hexadecimal
Decimal
27
54
lB
36
I
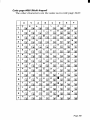
Selectinternational characterset
ASCII
MODE
Std.
<E SC)
“R”
n
Decimal
Hexadecimal
1B 52 r]
27 82 n
Selects an international character set according to the
value of n.
Character
set
n
Character
set
n
o
U.S.A
8
Japan
1
France
9
Norway
2
Germany
10
Denmark II
3
England
11
Spain II
4
Denmark I
12
Latin America
5
Sweden
13
Korea
6
Italy
14
Irish
7
Spain I
64
Legal
Any one of the first eight of these character sets (from
U.S.A. to Spain I) can be selected as the power-up
default using EDS switches D3 to D5.
International character set variations are shown on
page 156 of the Appendix.
Page 113
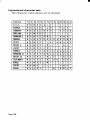
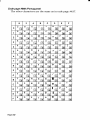
Select IBM code page
Both
Decimal
ASCII
MODE
<E SC>
<4>
<O>
“ [“
“T”
27
<o> <0>
nl
n2
91
84
Hexadecimal
lB
5B
54
400
04 00 00
O nl n2
00 nl n2
Changes the code page of the current IBM character set
according to the values of nl and n2, as shown below.
nl
Codepage
n2
1
181
#437U.S.A.
3
82
#850 Multi-Lingual
3
92
#860 Portuguese
3
93
#861 Icelandic
3
95
#863 Canadian French
3
97
#865 Nordic
One of these code pages can be selected as the power-up
default using EDS switches D3 to D5.
The various code pages are shown in the Appendix starting on page 157.
I
Enable printing of all charactercodes
ASCII
MODE
Decimal
Hexadecimal
Std.
<FS>
“\”
nl n2
28 92 nl n2 IC 5C nl n2
IBM
<E SC>
“ \ “
nl n2
27 92 nl n2 IB 5C nl n2
Enables printing of all characters in the IBM character
set, including those characters which are norrqally considered control codes. This command remains in effect
for the next n] + n2 x 256 characters, where nl and n2
are between O and 255. During this time no control
functions are executed. If a code with no assigned character is received, the printer prints a space.
Enable printing of all charactercodes on next character
ASCII
MODE
Decimal
Hexadecimal
5E n
Std.
<FS)
“A”
n
28 94 n
IC
IBM
<ESC>
“A”
n
27 94 n
IB 5E n
This command operates like the previous command,
Enable printing of all character codes, except that it
remains in effect for only one character.
Page 115
I
Character size and pitch commands
Picapitch
MODE
ASCII
Std.
<E SC>
IBM
<DC2 >
“P”
Decimal
Hexadecimal
27 80
IB 50
18
12
In Standard mode, changes from either elite or semicondensed to pica pitch (10 cpi) or from condensed elite
to condensed pica (17 cpi). In IBM mode, changes from
elite or condensed to pica (10 cpi).
Elite pitch
MODE
AS(X
Decimal
Hexadecimal
Std.
<Esc> -M”
27 77
IB 4D
IBM
<Esc)
27
IB
“ ;“
58
3A
In Standard mode, changes from either pica or semicondensed to elite pitch (12 cpi) or from condensed pica
to condensed elite (20 cpi). In IBM mode, changes from
pica or condensed to elite (12 cpi).
Semi-condensed pitch
MODE
Std.
ASCII
<E SC>
“ g“
Decimal
27 103
Hexadecimal
IB 67
Changes from either pica or elite to semi-condensed
pitch (15 cpi).
Condensed printing
MODE
ASCII
Decimal
15
<S1>
Hexadecimal
OF
Both
<ESC>
<S1>
27
15
IB
OF
In Standard mode, changes from pica to condensed pica
(17 cpi) or from elite to condensed elite (20 cpi). In IBM
mode, changes from pica to condensed pica.
Page 116
Cancelcondensed printing
ASCII
MODE
Both
Decimal
18
<DC2 >
Hexadecimal
12
In Standard mode, changes from condensed pica to normal pica or from condensed elite to normal elite. In IBM
mode, always changes to normal pica.
Proportional spacing
MODE
ASCII
Decimal
Hexadecimal
Std.
<E SC>
“p”
n
27 112 n
IB 70 n
IBM
<E SC>
“?”
n
27 80 n
IB 50 n
Causes subsequent characters to be proportionally
spaced when n is 1, and cancels it when n is O.
Select font and pitch
MODE
IBM
AS(X
<E SC>
“1“
n
Decimal
27 73 n
Hexadecimal
IB 49 n
Changes the print font and pitch according to the value
of n, as shown below:
Pitch
Font
.n
o
Draft
Pica
2
Letter Quality
Pica
3
Letter Quality
Proportional
8
Draft
Elite
10
Letter Quality
Elite
16
Draft
Pica condensed
18
Letter Quality
Pica condensed
Selectprint mode
Decimal
ASCII
MODE
<E SC>
IBM
‘4 : ‘t
<O>
nl
‘CI ,
<2>
27
91
73
O nl n2
n2
Hexadecimal
2
lB
5B
49
02
00 nl n2
Changes the print mode according to the values of n]
and n2, as shown below:
Mode
Font
Pitch
nl
n2
o
11
Courier
Normal
Pica
o
12
Prestige
Normal
Pica
o
18
Courier
Italic
Pica
o
46
Courier
Emphasized
Pica
o
57
Courier
Italic emphasized
Pica
o
60
Prestige
Emphasized
Pica
o
85
Courier
Normal
Elite
o
86
Prestige
Normal
Elite
o
92
Courier
Italic
Elite
o
108
,
Courier
Emphasized
Elite
o
111
Prestige
Emphasized
Ellte
o
112
Prestige
Italic
Elite
o
116
Courier
Italic emphasized
Ellte
o
164
Prestige
Normal
Proportional
o
171
Courier
Normal
Proportional
o
172
Courier
Italic
Proportional
o
184
Courier
Emphasized
Proportional
o
185
Courier
Italic emphasized
Proportional
o
221
Prestige
Normal
Semi-condensed
o
253
Courier
Emphasized
Pica condensed
o
254
Courier
Normal
Pica condensed
Pitch
Mode
Font
nl
n2
1
1
Prestige
Normal
Pica condensed
1
201
Prestige
Normal
Pica condensed
1
202
Prestige
Normal
Elite condensed
1
235
Courier
Normal
Elite
1
236
Courier
Normal
Semi-condensed
1
237
Courier
Normal
Pica condensed
1
238
Courier
Normal
Elite condensed
1
239
Prestige
Normal
Elite
1
240
Prestige
Normal
Semi-condensed
Expanded printing
ASCII
MODE
Both
<E SC>
“W”
n
Decimal
27
87
n
Hexadecimal
IB
57
n
Causes subsequent characters to be expanded to double
width when n is 1, and cancels it when n is O.
Expanded printing for one line
ASCII
MODE
< so>
Hexadecimal
Decimal
14
OE
Both
<E SC>
<SO>
27
14
IB
OE
Causes subsequent characters in the current line to be
expanded to double width. Characters return to normal
width after the next line feed (cLF>). The <DC4>, <~,
<FF>, and <ESC> “W” O commands also cancel
expanded printing.
Page 119
I
Cancelone-line expanded printing
Ascll
MODE
Both
Decimal
<DC4>
20
Hexadecimal
14
Cancels one-line expanded printing set with <SO> or
<ESC> <SO>.
Does not cancel expanded printing set with
<ESC> “W” 1.
Select characterwidth
ASCII
MODE
Std.
<ES>
n
“E”
Hexadecimal
Decimal
28
69
n
IC
45
n
Selects a character width according to the value of n as
shown below.
Character
width
n
o
Normal wide
1
Double -wide
2
Trip le wide
Selectmaster print mode
Std.
Decimal
ASCII
MODE
<E SC>
“ !“
n
27
33
n
Hexadecimal
IB 21 n
Selects a combined print mode according to the value of
n. The value of n is the sum of the values given below for
the desired characteristics.
Function
n value
128
Emphasized
8
Italic
64
Condensed
4
Expanded
32
Proportional
2
Double strike
16
Ellte
1
Underline
Page 120
Function
n value
Increasecharacterspacing
MODE
Std.
ASCII
<E SC>
<5P>
n
Decimal
27 32 n
Hexadecimal
1B 20 r]
Increases the space between characters by n dots, where
n is a number from O to 127. Used in micro-justification.
Print double-height characters
MODE
ASCII
<ESC>
“W”
<FS>
“v” <1>
<1>
Decimal
Hexadecimal
27 119 1
lB 77 01
28
lC 56 01
Std.
86 1
Prints subsequent characters double height without
moving the base line and without changing the line
spacing.
Return to normal height
MODE
ASCII
<ESC>
“W”
<O>
<FS>
“v” <0>
Decimal
Hexadecimal
27 119 0
lB 77 00
28 86 0
lC 56 00
Std.
Cancels double-height printing and prints subsequent
characters normal height.
Page 121
I
Selectcharacterheight, width and line spacing
Decimal
ASCII
MODE
IBM
<E SC>
(4)
<O>
‘4 [ “
“@”
<o>
<0>
n
m
Hexadecimal
IB
5B
40
400
04
00
00
Onm
00
27
91
64
m
n
Selects a combination of character height, width and
line spacing according to the values of n and m, as
shown below. Does not move the base line.
I
‘
I
n
Linespacing
I
I
Character
height
o
Unchanged
Unchanged
1
Unchanged
Single height
2
Unchanged
Double height
16
Single line
Unchanged
17
Single line
Single height
18
Single line
Double height
32
Double line
Unchanged
33
Double line
Single height
34
Double line
Double height
Irn
Page 122
I
I
Character
width
o
Unchanged
1
Single width (same as <ESC> “W”
2
Double width (same as <ESC> “W”
I
O)
1)
Vertical position commands
Set line spacing to 1/8 inch
MODE
Both
ASCII
<ESC>
“O”
Decimal
27
48
Hexadecimal
IB
30
Sets the distance the paper advances or reverses in subsequent line feeds to 1/8 inch.
Set line spacing to 1/6 inch
MODE
Std
ASCII
<E SC>
“2“
Decimal
27
50
Hexadecimal
IB
32
Sets the distance the paper advances or reverses in subsequent line feeds to 1/6 inch.
Set line spacing to n/360 inch
MODE
ASCII
Decimal
Hexadecimal
<ESC> “+” n
27
43
n
IB 2B n
<FS>
28
51
n
IC
Std.
“3”
n
33
n
Sets the distance the paper advances or reverses in subsequent line feeds to n/360 inch, where n is between O
and 255.
Page 123
Set base unit for line spacing
Mom
IBM
Decimal
ASCII
<E SC>
“ [“
“ \ “
<4>
<o>
<o>
<o>
n;
n2
27
91
92
400
o rll
rlz
Hexadecimal
:B
5B
04
00
5C
00
00
nl
n2
Sets the base unit for the line spacing commands,
<ESC> “3” and <ESC> “J”, as shown below:
Linespacingunit
nl
n2
o
180
1 / 180
o
216
1/216 inch
1
104
1/360 inch
inch
This command becomes effective only after <ESC> “3” or
<ESC> “J” is received. The default base unit is set to
1/216”.
Set line spacing
Both
Decimal
ASCII
MODE
<E SC>
“3”
n
27
51
n
Hexadecimal
IB
33
n
Sets the distance the paper advances or reverses in subsequent line feeds to n/180 inch (STD and IBM mode),
n/2 16 inch or n/360 inch (IBM mode only) according to
the preceding base unit.
The value of n is between O and 255. If n = O, in Standard mode the line-feed distance is set to O, but in IBM
mode the command is ignored.
Page 124
S
line spacing to n/60 inch or n/72 inch
MODE
Both
Decimal
ASCII
<E SC> “A”
n
27 65 n
Hexadecimal
IB 41 n
In Standard mode, sets the distance the paper advances
or reverses in subsequent line feeds to n/60 inch, where
n is between O and 255. If n = O, the line spacing is set to
o.
In IBM mode, this command defines the distance the
paper advances or reverses in subsequent line feeds to
n/72 inch, where n is between 1 and 85. The new line
spacing does not take effect until the next <ESC> “2”
command.
ExecutecESC> “A”
MODE
IBM
Decimal
ASCII
<E SC> “2“
27 50
Hexadecimal
IB
32
Sets the line spacing to the value defined by the last preceding <ESC> “A” command. Sets the line spacing to
1/6 inch if there is no preceding <ESC> “A” command.
Line feed
MODE
Both
Decimal
ASCII
<:F>
10
Hexadecimal
OA
Prints the current line and advances the paper to the
next line. The line spacing is set by one of the commands listed previously.
Page125
I
Reverseline feed
MODE
ASCII
Decimal
Hexadecimal
Std.
<ESC> <LF>
27 10
IB OA
IBM
<E SC> “ ] “
27 93
IB
5D
Prints the current line and moves the paper in the
reverse direction to the preceding line. Ignored when the
printer is in friction feed mode.
The line spacing is set by one of the commands listed
previously.
Select forward feed mode
MODE
Std.
ASCII
<FS> “F”
Decimal
28 70
Hexadecimal
IC
46
Cancels the reverse feed mode and selects forward feed
mode. This is the default setting at power-on.
Select reverse feed mode
MODE
Std.
ASCII
<FS>
“R”
Decimal
28 82
Hexadecimal
IC
52
Selects reverse feed mode. Reverses the direction of all
verticalmovements. Ignored when friction feed is used.
Perform one-time line feed
MODE
Both
ASCII
<E SC> “J”
n
Decimal
27 74 n
Hexadecimal
IB 4A n
Feeds the paper once by n times the defined base unit
(n/180 inches in Standard mode). The value of n is
between O and 255. If n = O, the line-feed distance is set
to O. Does not move the print position right or left. Does
not change the line-spacing setting.
Page126
Perform one n/180-inch reverse line feed
MODE
Std.
ASCII
<ESC> “ j “ n
Decimal
27 106 n
Hexadecimal
IB 6A n
Feeds the paper once by n/180 inches in the reverse
direction, where n is between O and 255. If n = O, the
line-feed distance is set to O. Does not move the print
position right or left. Does not change the line-spacing
setting.
Set page length ton lines
MODE
Both
ASCII
<E SC> “C”
n
Decimal
27 67 n
Hexadecimal
IB 43 n
Sets the page length to n lines at the current line spacing, where n is between 1 and 127.
Changing the line spacing later does not alter the physical page length. The current line becomes the first line of
a new page.
Set page length ton inches
MODE
Both’
ASCII
<E SC> “C”
<O> n
Decimal
27 67 0 n
Hexadecimal
IB 43 00 n
Sets the page length to n inches, where n is between 1
and 32 in Standard mode or between 1 and 64 in IBM
mode. The current line becomes the first line of a new
page.
Set top of page at current position
MODE
IBM
ASCII
<Esc>
“4”
Decimal
27 52
Hexadecimal
IB
34
Sets the current position as the top-of-page (top-of-form)
position.
Page127
I
Set bottom margin
MODE
Both
ASCII
<E SC> “N”
n
Decimal
27 78 n
Hexadecimal
IB 4E n
Sets the bottom margin to n lines, where n is between 1
and 127 in Standard mode or between 1 and 255 in IBM
mode. The bottom margin is reset when you change the
page length.
Cancelbottom margin
MODE
Both
ASCII
<E SC> “O”
Decimal
27 79
Hexadecimal
IB
4F
Cancels the bottom margin.
Form feed
MODE
Both
ASCII
<FF>
Decimal
12
Hexadecimal
Oc
Feeds the paper to the top of the next page according to
the current page length, and moves the print position to
the left margin. When friction feed is used, this command ejects the current page.
Set verticaltab stops
MODE
Both
ASCII
<E SC> “B” nl
nz
<o>
Decimal
Hexadecimal
27 66 nl
IB 42 nl
n2
‘72
.
0
.00
Cancels all current vertical tab stops and sets new vertical tab stops at lines n], n2, etc., where nl, n2, etc. are
numbers between 1 and 255: A maximum of 16 vertical
tab stops can be set. The tab stops must be specified in
ascending order; any violation of ascending order terminates the tab stop list. Standard termination is by the
<O> control code. The vertical tab stops are set in terms
of the current line spacing and do not move if the line
spacing is changed later.
Page128
Set verticaltab stops in channel
MODE
Std.
Decimal
ASCII
<E SC> “b”
nl
27 98 nO
nO
n2
<o>
n 1 n2
Hexadecimal
IB 62 nO
0 n 1 n2
00
Cancels all current vertical tab stops in channel nO,
(where nO is between O and 7) and sets new vertical tab
stops in this channel. (A channel is a set of vertical tab
stops selected with the <ESC> “/” command.) See the
<ESC> “B” command for parameters nl, n2, ... <0>.
Select verticaltab channel
MODE
Std.
Decimal
ASCII
<E SC> “ / “ nO
27 47 nO
Hexadecimal
IB 2F nO
Selects a set of vertical tab stops designated by a channel number (nO) from O to 7. The tab stops in each channel are set by <ESC> “b”.
Verticaltab
Both
Decimal
ASCII
MODE
<VT>
11
Hexadecimal
OB
Fee& the paper to the next vertical tab stop and moves
the print position to the left margin. Performs a line feed
if no vertical tabs are set, such as at power-up. Feeds to
the top of the next page if vertical tabs are set but the
current line is at or below the last vertical tab stop.
Page129
Horizontalpositioncommands
Set left margin
ASCII
klODE
Std.
<E SC> “1“
n
Decimal
27 108 n
Hexadecimal
IB 6C n
Sets the left margin at column n (where n is between O
and 255) at the current character pitch (pica pitch if
proportional spacing is selected). The left margin does
not move if the character pitch is changed later. The left
margin must be at least two columns to the left of the
right margin and within the limits given below:
Expanded pica
O < n < 38
O < n < 91
Expanded elite
O < n < 45
Semi-condensed
0 < n < 114
Expanded semi-condensed
O S n S 57
Condensed pica
O < n < 130
Expanded condensed pica
O < II < 64
Condensed elite
O < n < 152
Expanded condensed elite
O < n < 76
Pica
O < n<
Elite
76
Set right margin
ASCII
MODE ,
Std
<E SC> “Q”
n
Decimal
27 81 n
Hexadecimal
IB 51 n
Sets the right margin at column n in the current character pitch (pica pitch if proportional spacing is currently
selected). Column n becomes the last character position
in the line. The right margin does not move if the character pitch is changed later. The right margin must be
within the limits below:
Pica
4< n s 80
Expanded pica
2< n <40
Elite
5 s n s 96
Expanded elite
3< n <48
Semi-condensed
6 s n s 12(J
Expanded semi-condensed
3< n <60
Condensed pica
7< n < I 37
Expanded condensed pica
4< n <68
Condensed elite
8< n <160
Expanded condensed elite
4< n s 80
Page130
Set lee and right margins
IBM
<E SC> “X”
n]
Hexadecimal
Decimal
ASCII
MODE
27 88 nl n2 IB 58 nl n2
n2
Sets the left margin at column nl and the right margin
at column n2. See the preceding commands for margin
restrictions and other notes.
Carriagereturn
I
MODE I
I
Both
<CR>
ASCII
I
Decimal
I
I
Hexadecimal I
I
13
OD
Prints the current line and sets the print position to the
left margin. If EDS switch A5 is set to OFF, this command also performs a line feed.
Set automatic line feed
ASCII
MODE
IBM
<E SC> “5“
<1>
Decimal
27 53 1
Hexadecimal
IB
35 01
Causes the printer to perform both a carnage return
and line feed each time it receives a cCI+ code. This
command overrides EDS switch A5.
Cancelautomatic line feed
IBM
Decimal
ASCII
MODE
<E SC> “5“
<O>
27 53 0
Hexadecimal
IB 35 00
Causes the printer to perform only a carriage return
when it receives a cCW= code. This command takes priority over EDS switch A5.
Backspace
Both
Decimal
ASCII
MODE
<BS >
8
Hexadecimal
08
Moves the print position one column to the left. Ignored
if the print position is at the left margin. This command
can be used to overstrike or combine characters.
Page131
Set horizontal tab stops
MODE
Both
ASCII
<E SC> “D” nl
.n2
<0>
Decimal
27 68 nl
n2
.
0
Hexadecimal
IB
44 nl
n2
.00
Cancels all current horizontal tab stops and sets new
tab stops at columns nl, n2, etc. in the current character pitch (pica pitch if proportional spacing is currently
selected), where nl, n2, etc. are numbers between 1 and
255. The maximum number of horizontal tab stops
allowed is 32 in Standard mode and 28 in IBM mode.
The tab stops must be specified in ascending order; any
violation of ascending order terminates the tab stop list.
Standard termination is by the <O> control code. To
clear all tab stops, specify <ESC> “D” <O>.
Reset all tab stops
MODE
IBM
ASCII
<Esc>
“R”
Decimal
27 82
Hexadecimal
IB
52
Resets the horizontal tab stops to their power-up values
in which a tab stop is set every 8 columns starting at
column 9. Also clears all vertical tab stops.
Horizontal tab
MODE
Both
ASCII
<HT>
Decimal
9
Hexadecimal
09
Moves the print position to the next horizontal tab stop.
Ignored if there is no next horizontal tab stop on the
current line. Note that when underlining is selected,
spaces skipped by horizontal tabulation are not underlined.
Page132
Relativehorizontal tab
ASCII
MODE
Std.
27 92 nl n2 IB 5C nl n2
nl n2
<ESC> “\”
Hexadecimal
Decimel
Moves the print position right or left a specified distance. Ignored if the resulting position is beyond the
right or left margin. The formula for the distance and
direction are as follows:
If n2 is between O and 63, the print head moves right by
(n] + n2 x 256) dots.
If you want to move the print head to the left, nl and n2
are obtained by subtracting the value from 65536, and
dividing the re< into high and low bytes.
The unit of movement is fixed at 1/120 inch in draft
mode and 1/180 inch in LQ mode.
Relative horizontal tab in inches
I
MODE I
I IBM
ASCII
I <ESC> ‘ad,
nl 112
I
Decimal
127100
I
Hexadecimal
n, nl?lIB 64 nl n2
Sets the next print position to (n] + n2 x 256)/ 120
inches from the current position.
Ignored if this position is beyond the right margin.
The maximum tab position is 8 inches.
Absolute horizontal tab in inches
MODE
Std.
ASCII
<E SC> “$”
nl n2
Decimal
Hexadecimal
27 36 nl n2 IB 24 nl n2
Sets the next print position to (nl + n2 x 256)/60 inches
from the left margin on the current line. Ignored if this
position is beyond the right margin.
Page133
I
Graphicscommands
Print normal-density 8-bit graphics
ASCII
MODE
Both
<E SC> “K”
n2
ml
nl
m2
Decimal
27 75 nl
n2 ml m2
Hexadecimal
IB 4B nl
n2 ml m2
. .
.
Prints bit-image graphics at 60 dots per inch horizontally. The graphic image is 8 dots high and (r-d+ n2 x
256) dots wide. Maximum width is 8 inches (480 dots).
ml, M2, ... are the dot data, each a 1-byte value from O
to 255 representing 8 vertical dots, with the most significant bit at the top and the least significant bit at the
bottom. The number of data bytes must be nl + n2 x
256. Dots beyond the right margin are ignored. On completion of bit-image printing the printer returns automatically to character mode.
Print double-density 8-bit graphics
MODE
Both
ASCII
<E SC> “L”
n2
ml
n~
m2
Decimal
27 76 nl
n2 ml m2
...
Hexadecimal
IB 4C nl
n2 ml m2
...
Prints bit-image graphics at 120 dots per inch horizontally(maximum 960 dots wide). See the <ESC> “K” command for other information.
Print double-densit~ double-speed 8-bit graphics
ASCII
MODE
Both
<ESC> “Y”
n2
...
ml
nl
m2
Decimal
27 89 nl
n2 ml m2
Hexadecimal
IB 59 nl
n2 ml m2
Prints bit-image graphics at 120 dots per inch horizontally (maximum 960 dots wide), skipping every second
dot in the horizontal direction. See the <ESC> “K” command for other information.
Page134
I
Print quadruple-density 8-bit graphics
ASCII
MODE
Both
<ESC> “Z”
n2
...
ml
nl
m2
Decimal
27 90 nl
n2 m 1 m2
.,.
Hexadecimal
IB 5A nl
n2 ml m2
Prints bit-image graphics at 240 dots per inch horizontally (maximum 1920 dots wide), skipping every second
dot in the horizontal direction. See the cESC> “K” command for other information.
Print hex-density 24-bit graphics
ASCII
MODE
Std.
<FS>
n2
m3
“Z”
ml
nl
m2
Decimal
28 90 n]
n2 ml m2
m3 .
.
Hexadecimal
IC 5A nl
n2 ml m2
m3 .
Prints 24-bit dot graphics at 360 dots per inch horizontally. The graphics image is 24 dots high and rd + n2 x
256 dots wide. Maximum width is 8 inches (2880 dots).
In the data ml, ti, m3 ... each three bytes represent 24
vertical dots. In the leftmost position, the most significant bit of ml is the top dot; the least significant bit of
ml !is the eighth dot from the top; the most significant
bit of m2 is the ninth dot; the least significant bit of m2
is the sixteenth dot from the top; the most significant bit
‘of m3 is the seventeenth dot from the top; the least significant bit of m3 is the bottom dot. The rest of the data
is organized in the same way. The number of data bytes
must be 3 x (n] + n2 x 256). Dots beyond the right margin are ignored. On completion of dot graphics printing,
the printer returns automatically to character mode.
Page135
Selectgraphics mode
<E SC> “ * ,.
Std:
Decimal
ASCII
MODE
nl
m2
n2
27 42 nO
nl n2 ml
m2
nO
ml
Hexadecimal
IB 2A nO
nl n2 ml
m2
Selects one of eleven graphics modes depending on the
value of nOand prints bit-image graphics in this mode.
See the <ESC> “K” command (for 8-bit graphics) or the
<FS> “Z” command (for 24-bit graphics) for information
on nl, n2, ml, M2, etc.
Graphicsmode
nO
o
8-bit Normal-density
(60 dots per inch)
1
8-bit Double-density
(120 dots per inch)
2
8-bit Double-density, double-speed
(120 dots per inch)
3
8-bit Quadruple-density
(240dots per inch)
4
8-bit CRTgraphics, mode I
(80 dots per inch)
6
8-bit CRTgraphics, mode II
(90 dots per inch)
32
24-bit Normal-density
(60 dots per inch)
33
24-bit Double-density
(120 dots per inch)
38
24-bit CRTgraphics
(9Odots per inch)
39
24-bit Triple-density
(180 dots per inch)
40
24-bit Hex-density
(360 dots per inch)
Page136
I
Selectgraphics mode
ASCII
MODE
<~sc>
IBM
,71
ml
“ [“
“ ~,,
II 2
mO
m2 .
Decimal
Hexadecimal
27 91 103
IB
111
n2 m(?
ml m2
~1~
/m0
ml m2 .
5B 67
?71
Selects one of eight graphics modes depending on the
value of mO and prints bit-image graphics in this mode.
The graphics image is (nl + n2 x 256) – 1 dots wide. See
the <ESC> “K” command (for 8-bit graphics) or the <FS>
“Z” command (for 24-bit graphics) for information on
ml, m2, etc.
Graphicsmode
mO
o
8-bit Normal-density
(60 dots per inch)
I 8-bit Double-density
11
(120 dots per inch)
2
8-bit Double-density, double-speed
(120 dots per inch)
3
8-bit Quadrupledensity
(240 dots per inch)
I 24-bit Normal-density
(6Odots per inch)
9
24-bit Double-density
(120 dots per inch)
11
24-bit Triple-density
(180 dots per inch)
12
24-bit Hex-density
(360 dots per inch)
18
I
I
Convert graphics density
MODE
Std.
ASCII
<E SC> “ ? “ n m
Decimal
27 63 n m
Hexadecimal
IB 3F n m
Converts graphics defined by subsequent <ESC> “K”,
<ESC> “L”, <ESC> “Y” or <ESC> “Z” commands to a density mode defined by <ESC> “*”. n is “K”, “L”, “Y” or “2”,
indicating the mode to be converted. m is a code from
<O> to <4> or <6> indicating one of the modes of
<ESC> “*”.
Page137
Downloadcharactercommands
Define download characters
MODE
Std.
ASCII
<ESC> “&“ <O>
n2
mO
nl
ml
m2
d2
. ..
dl
dx
Decimal
Hexadecimal
27 38 0
lB
n 1 n 2 mo
ml m2 dl
d2 ... dx
nl n2 mO
ml m2 dl
d2. . dx
26 00
Defines one or more new characters and stores them in
RAM for later use. EDS switch A3 must be set to OFF;
otherwise RAM is used as an input buffer only, not for
storing downloaded characters, and this command is
ignored.
nl is the character code of the first character to be
defined and n2 is the character code of the last character to be defined. nl must be equal to or less than n2.
The data for each character starts with three bytes speci&ing proportional spacing attributes: the first byte, mO,
specifies the left of the character; the second byte, ml,
specifies the character width; the third byte, ti, specifies the right of the character.
These values must not exceed the following maximum
limits:
ml
mO+ ml + m2
9
12
LQ pica
31
36
LQ elite
27
30
LQ semi-condensed
19
24
LQ proportional
37
42
7
12
LQ super/subscript
19
36
LQ prop. super/subscript
37
42
Charactermode
Draft
Draft super/subscript
Page138
Next comes the dot data. Normal character height is 24
dots, so there must be 3 x ml bytes of dot data. If the
printer is in super/subscript mode, however, the character height is 16 dots, so there must be 2 x ml bytes of
dot data.
Each data byte represents eight vertical dots, with the
most significant bit representing the top dot, and the
least significant bit representing the bottom dot.
Select download characterset
MODE
Std.
ASCII
<E SC> “% “ <1>
Decimal
27 37 1
Hexadecimal
IB 25 01
Selects the download character set. Ignored when EDS
switch A3 is ON.
SelectROM characterset
MODE
Std.
ASCII
<ESC> “%”
<O>
Decimal
27 37 0
Hexadecimal
IB 25 00
Stops using the download character set and returns to
the built-in ROM character set. Ignored when EDS
switch A3 is ON.
Page139
Other printercommands
Selectprint color
ASCII
MODE
Both
<E SC> “r”
n
Decimal
27 114 n
Hexadecimal
IB 72 n
Selects the printing color according to the value of n as
shown below. Ignored if EDS switch A4 is OFF, EDS
switch B3 is OFF, or if a color ribbon is not installed.
n
Color
n
Color
o
Black
4
Yellow
1
Magenta
5
Orange
2
Cyan
6
Green
3
Violet
Set MSB to 1
ASCII
MODE
Std.
<ESC> ‘<>“
Decimal
27 62
Hexadecimal
IB 3E
Sets the most significant bit of each subsequent byte
received to 1, allowing users with a 7-bit interface to
access characters with ASCII codes greater than 127.
Set MSB to O
ASCII
MODE
Std.
<E SC> ,,=,,
Decimal
27 61
Hexadecimal
IB 3D
Sets the most significant bit of each subsequent byte
received to O.
Accept MSB as is
MODE
Std.
ASCII
<ESC> “j}”
Decimal
27 35
Hexadecimal
IB 23
Cancels the preceding commands and accepts the most
significant bit as it is when it is sent to the printer.
Page140
Delete last charactersent
MODE
Std.
ASCII
<DEL>
Decimal
127
Hexadecimal
7F
Deletes the last character received. Ignored if the last
character received has already been printed, or if the
last character received was part of a command.
Cancellast line
MODE
Both
ASCII
<CAN>
Decimal
24
Hexadecimal
18
Deletes the last line currently in the print buffer.
Set printer off-line
MODE
ASCII
Std.
<DC3>
IBM
<E SC> “Q”
“ $“
Decimal
Hexadecimal
19
13
27 81 36
IB
51 24
Sets the printer off-line (into not-ready mode). The
printer disregards all subsequent characters and commands except <DC 1>, which puts it back on-line (into
ready mode). The printer’s READY indicator will not go
off.
Set printer on-line
MODE
Both
ASCII
<3C 1>
Decimal
17
Hexadecimal
11
Puts the printer back on-line (into ready mode), allowing it to receive and process all subsequent characters
and commands. This command is ignored if the printer
was set off-line (into not-ready mode) by pressing the
keY on the control Panel.
Page141
Stop printing
MODE
IBM
Decimal
ASCII
<ESC> “ j “
27 106
Hexadecimal
IB 6A
Prints the entire contents of the input buffer, then sets
the printer off-line (into not-ready mode). The READY
indicator on the control panel will go off.
Bell
MODE
Both
Decimal
ASCII
<BEL>
7
Hexadecimal
07
Sounds a brief beep tone on the printer.
Bi-directionalprinting
MODE
Both
ASCII
<E SC> “U”
<O>
Decimal
27 85 0
Hexadecimal
IB
55 00
Causes subsequent printing to be performed in the normal bi-directional mode, which is faster than uni-directional printing.
Uni-directionalprinting
MODE
Both
ASCII
<E SC> “U”
<1>
Decimal
27 85 1
Hexadecimal
IB
55 01
Causes subsequent printing to be performed uni-directionally, ensuring maximum vertical alignment precision,
One-1ineuni-directionalprinting
MODE
Std.
ASCII
<E SC> “<”
Decimal
27 60
Hexadecimal
IB 3C
Immediately returns the print head to the left margin,
then prints the remainder of the line from left to right.
Normal bi-directional printing resumes on the next line.
Page142
Manual feed
Both
Decimal
ASCII
MODE
<ESC> <EM> <o>
27 25 0
Hexadecimal
IB 19 00
Selects manual sheet feeding even when the paper tray
is in use.
Auto feed
Both
Decimal
ASCII
MODE
<Esc>
27 25 4
<EM> <4>
Hexadecimal
lB
19 04
Selects automatic sheet feeding from the paper tray.
Ejectpaper
Both
Decimal
ASCII
MODE
<ESC> <EM> Z’RY’
27 25 82
Hexadecimal
IB 19 52
Ejects the current page.
Set print start position on paper tray feeding
Both
Decimal
ASCII
MODE
<Esc>
<EM> “T”
n
27 25 84 n
Hexadecimal
1B 19 54 n
Skips rt/6inches at the top of the page, where n is equal
to or greater than 1.
Resetprinter
ASCII
MODE
Decimal
Hexadecimal
Both
<ESC> “t?”
27 64
IB
Std.
<ES >
28 64
IC 40
“L?”
40
Re-initializes the printer. Clears the print buffer and
returns settings to their power-up values. Does not
clear the input buffer.
Page143
Set initial conditions
MODE
IBM
Decimal
ASCII
<~sc> “ [“ c’K,f
<3>
<‘2
> <0> <3> r,
27 91 75 3
00
3 n
Hexadecimal
lB 5B 4B 03
00 00 03 n
Re-initializes the printer to the initial conditions determined by the value of n.
The value of n is the sum of the values given below for
the desired characteristics.
Function
n value
Function
n value
Disable alarm
32
12-inch forms
4
Auto CR with LF
15
Slashed zero
2
Auto LF with CR
8
Character set #2
1
Page144
Appendix
Specifications
Printing system
Printing speed
Draft
Letter Quality
Serial Impact Dot-matrix
10 cpi
(Pica)
160 CpS
53 Cps
12 cpi
(Elite)
192 CpS
64 CpS
15 cpi (Semicondensed)
240 CpS
80 CpS
Print direction
Bi-directional, logic-seeking
Uni-directional, logic-seeking
(selectable)
Print head
Life
24 pins
100 million dots/pin
Line spacing
1/6, 1/8, n/60, n/72, n/180,
n/216, n/360 inches
Typeface
families
Draft, Roman, Sanserif, Courier,
Prestige, Script
Page145
Characters
ASCII
International
IBM special
IBM block graphic
IBM code page
Download
96
16 sets (*)
111
50
6 sets (**)
120
* USA, France, Germany, England, Denmark I,
Sweden, Italy, Spain I, Japan, Norway,
Denmark II, Spain II, Latin America, Korea,
Irish, Legal
** #437 (USA), #850 (Multi-Lingual),
#860 (Portuguese), #861 (Icelandic),
#863 (Canadian French), #865 (Nordic)
Number of columns
Pica (10 CPI)
Elite (12 CPI)
Semi-condensed (15 CPI)
Condensed pica (17 CPI)
Condensed elite (20 CPI)
Proportional
Character matrix
Pica
Elite
Semi-condensed
Condensed pica
Condensed elite
Proportional
Page146
Draft
24 X 9
24 X 9
16 X 7
24 X 9
24 X 9
80
96
120
137
160
Variable
LQ
24 X 31
24 X 27
16 X 21
24 X 16
24 X 16
24 x n
Bit image dot-matrix
8-pin normal (60 DPI)
8-pin double (120 DPI)
8-pin high-speed double (120 DPI)*
8-pin quadruple (240 DPI)*
8-pin CRT I (80 DPI)
8-pin CRT II (90 DPI)
24-pin normal (60 DPI)
24-pin double (120 DPI)
24-pin CRT III (90 DPI)
24-pin Triple (180 DPI)
24-pin Hex (360 DPI)*
8 X 480
8 X 960
8 X 960
8 X 1920
8 X 640
8 X 720
24 X 480
24 X 960
24 X 720
24 X 1440
24 X 2880
*. It is impossible to print adjacent dots in modes
marked with an asterisk (*).
Paper feed
Standard
Option
Friction feed with paper tray
Push tractor feed
Paper feed speed
2.9 inches/second maximum
Paper specifications
Cut sheet
Width
5.8” - 11.0” (148 -279.4 mm)
5.5” - 14.0” (139.7 -355.6 mm)
Length
Thickness
0.08-0.12 mm
Weight
16-24 lb, 60-90 g/m2, 52-77 kg
Fanfold (continuous)
Width
4.0” - 10.0” (101.6 -254.0 mm)
Minimum 5.5” (139.7 mm)
Length
Thickness
Single-ply paper 0.07-0.12 mm
Total for multi-part forms 0.25 mm
Weight
14-22 lb, 52-82 g/m2, 45-70 kg
Copies
Original + 2 copies
Page147
Maximum buffer size
Without Download
With Download
Emulations
Standard mode
IBM mode
Interface
Ribbon type
15.0 kB
512 bytes
Epson LQ-860/850, NEC 24-wire
graphics commands
IBM Proprinter X24E
Centronics parallel (standard)
RS-232C serial (option)
On-carnage, dedicated
(black only)
Monochrome
(black, magenta, cyan, violet,
Color
yellow, orange, green)
Ribbon life
Monochrome (.Y24WI
Color (Y24CL)
Dimensions and Weight
Width
Depth
Height
Weight
2.5 million characters (draft
pica)
0.4 million characters/color
(draft pica)
386 mm (15.2”)
275 mm (10.8”)
195 mm (7.67”)
6.4 kg (14.1 lb)
Power supply
120VAC, 220VAC, 230VAC, 240VAC,
50/60 Hz
(varies according to the country of
purchase)
Options
Push Tractor Unit (PT- 10Q)
Serial-Parallel Converter (SPC-8K)
Page148
Default Electronic DIP Switch settings
EDS
setting
Function
Default setting
Al
Emulation
Standard/Epson (ON)
A2
AEC (Automatic Emulation Change)
Mode
Enabled (ON)
A3
RAM usage
Input buffer (ON)
A4
Color and Zoom
Enabled (ON)
A5
Auto LF with CR
Disabled (ON)
B1
Graphics direction
Uni-directional (OFF)
B2
Paper-out detection
Enabled (ON)
B3
Ink Ribbon Type
Color (ON)
B4
Reserved
ON
B5
Tree-out printing
Enabled (ON)
cl, C2, C3
Page length
Letter (all 3 switches ON)
C4, C5
Print pitch
10 cpi (both switches ON)
DI
Print mode
D2
,
-
Letter Quality (ON)
Character table
Standard mode
IBM mode
D3, D4, D5
Graphics (ON)
Set #2 (ON)
IBM code page or International character set
Standard mode graphic character set
Standard mode italic character set
IBM mode
Code page #437 (U.S.A.)
U.S.A. character set
Code page #437 (U.S.A.)
(all 3 switches ON)
El, E2, E3
LQ font selection
Roman (all 3 switches ON)
E4, E5
Reserved
Both switches ON
Printer beep tones
The printer beeps both to warn you that something is
wrong and to indicate various aspects of normal operation, for example, to indicate that a particular setting or
selection has just been made. The table below gives a
full list of printer beeps and their meanings
Tone sequence
Meaning
Single tone lasting 2 seconds
The printer has detected an error condition. Switch
the printer off and on again.
Single tone lasting several
seconds
The printer has detected an error condition. Switch
the printer off and on again.
Four short tones, repeated
twice
The printer is out of paper
Single short tone
One of the following:
●
Vertical alignment mode has been selected
●
Zoom resolution has been set to 50~0
mode has been selected
●
Quiet
●
Electronic DIP Switch mode has been selected
Two short tones
One of the following:
●
Macro (saved settings) mode has been selected
●
Zoom resolution has been set to 67Y0
●
Quiet mode has been cancelled
Three short torfes
Macro (saved settings) mode has been cancelled
Single quarter tone
One of the following:
●
Hexadecimal dump mode has been selected
.
Prevention of software font selection has been
selected
●
Zoom resolution has been set to 10OYO(i.e.
zoom is canceled).
Page150
Interfacepin outs
Parallelinterface
Pin
Name
Function
1
STROBE
Goes low for 2 0.5vs when active
2
DATAO
High when active
3
DATA1
High when active
4
DATA2
High when active
High when active
DATA3
5
1
1
6
DATA4
High when active
17
I DATA5
I High when active
I
I DATA6
I High when active
I
9
DATA7
High when active
10
ACK
5ps to acknowledge receipt of data
I
11
I
BUSY
12
I
High when paper runs out. Can be
disabled with EDS setting.
PAPER
I
13
I
Printer sets line low when ready to
receive data.
I
High when printer is on-line
# I SELECT
.
Signal ground
+5V DC output from printer
+5V
18
1
1
19-30
Chassis ground (isolated from signal
ground)
CHASSIS
17
Twisted pair ground return
I GND
I
I
31
RESET
1—
I When this signal is set low, the printer
I is reset.
32
ERROR
II
I
33
I
I
Low when printer cannot continue due
to an error
1
EXT GND
External ground
Page151
Serialinterface
Name
Pin
I
I Function
I
Printer chassis ground
GND
1
I
I
Data from printer
TXD
2
I
I
1
1
Data to printer
3
4
RTS
Always low
5
CTS
LOWwhen the computer is ready to
transmit data
Printer ignores this signal
I 11
I RCH
Printer sets line low when ready to
receive data. Same signal as pin 20
I
I
20
Page152
I
DTR
I
Printer sets line low when ready to
receive data.
I
Character sets
The following tables show the Standard and IBM character sets. Also shown are the IBM code pages (international variations of IBM character set #2) and the
standard (Epson) mode international character sets
(international variations of the Epson Standard character set).
The decimal character code for each character is shown
in an inset at the bottom right of the character.
The hexadecimal character code for a character can be
found by reading the hexadecimal column and row
numbers, which are at the top and on the left of the
table. For example, the character “A” is in column 4 and
row 1, so its hexadecimal character code is 41. This is
equivalent to decimal 65 (4 x 16 + 1 = 65), which is the
decimal number shown in the inset.
Control codes are indicated by abbreviations in angle
brackets, e.g. <LF>.
Page153
Standardcharacterset#2
1.1
Page!54
—
—
.
Standardcharacterset #2 (continued)
Page155
Internationalcharactersets
The character codes shown are in decimal.
Page156
IBM characterset #2
Code page #437 (U.S.A.)
Page157
page #437 (U. S.A.) (continued)
Page 158
Code page #850 (Multi-lingual)
The other characters are the same as in code page #437.
,
,
i
I
1
I
1
1
1
+4-s4
c
::::
L
,,,
.
E? h
,,,:
—
o c l-iiil-iiim ml 11921[2081122411240J
..,
..,
JLJ
.:.:.;
,,:.:,
ti 85 f
*-1
1
WI
ml
1193112091122s1
1241
14!
d
F
,s%
8
2
9
A
6
A
!?3---1 1- —
6
3
‘—
,,
g -l~--lfi--l
i
B
—
%.-l
l-l--l
Ilt% 11841204
Flbi
‘d
@
!
l-iii i-iii hi
F
ml
J
121b 1232 IZq
Iii
o
1
(iii
““
I.
l-ii
I
-1
Fiil m ““ IIMI 1202
I
I
I
--l %--l,
Jim ““ 11871
““ 12031
–
--l
-1 -1 -J
1
3
m
lid
c
F
hi
A
Il!ia
f
m
1172111881
““ 12041
– 12’201Iml
B
l-iii
12521
1174 1190 1206 1222 123E 1254
■
‘
n
,
m
Iii
Z3
m
l%
Iii
Page 159
I
Code page #860 (Portuguese)
The other characters are the same as in code page #437.
I
8
_iJE
Page 160
Code page #861 (Icelandic)
The other characters are the same as in code page #437.
8
9
A
B
c
z
F
DIE
JL
a
m
T
-m
L
224
B
20922s
r
210
226
z
211
227
Lx
212
220
a
_-_@
-LizLIZ
!!Jz
lb
--lIi
-hi
J
+
e
-_@
--h
llz
-k
Page 161
Code page #863 (Canadian French)
The other characters are the same as in code page #437.
8
9
u
~
1
IL I
Page162
A
B
c
D
1761 1192
11291 Ilosl
11611 11771 I1931 I
E
F
I
Code page #865 (Nordic)
The other characters are the same as in code page #437.
Page163
I
Character set #1
The other characters are the same as in each version of
character set #2.
o
0
1
(w
Iii
(lEl)
l--i
l-ii
(UC?)
@
I--2
m)
I-3
IT
(ml)
In
1%
h
1
2
3
4
5
b
m
(’m
6
r-b
1%
(EEL)
7
I-i
l-x
(6s)
(CAN)
8
l-l
h
on)
(M)
9 ,~
~
* w
m
m
(UC)
riiI-T
(FF) (R)
c
IT
1%
(m)
D
IT
m
(s0)
E
m
1%
‘B
F
Page164
(w
(s1)
l-ii
l-ii
IBM special character set
These characters can be printed using the Enable
printing of all character codes and Enable printing of all
character codes on next character commands.
1 I I “, 1
I
I
1
M.,
!
I
I
I
LQI
I
Page165
Page166
Glossary
Adobe Type Manager
Software for Windows and Macintosh which allows you to print
PostScript fonts.
Adjustment lever
Lever which lets you adjust the
position of the print head for differing paper thicknesses.
AEC mode
See Automatic Emulation Change
mode.
Application
Software program, such as a
word-processor, from which you
can print out documents.
Auto line feed
Printer function in which the
printer automatically performs a
carnage return and line feed
whenever it receives a carriage
return control code.
Auto load position
Position of the print head after
paper is loaded, relative to the
physical top of the page.
AUTOEXEC.BAT
MS-DOS set-up file containing
statements which determine to
which port the printer output is
to be sent.
Page167
Automatic Emulation Printer mode in which the printer
automatically senses which emuChange mode
lation mode (Standard or IBM)
the computer requires, and
changes mode accordingly.
Bi-directional
printing
Mode in which the printer prints
graphics both from left to right
and from right to left.
Bit
Short for “binary digit”. The
smallest unit of information (“On”
or “Off’ – “1“ or “O”).
Bitmap fonts
Fonts that can only be printed at
a particular size. The fonts which
you can select from the printer’s
control panel are bitmap fonts.
Carriage return
An instruction from the printer
which tells the printer to move
the print position to the start of
the current line. See auto line
feed.
Centroniq5 connector The type of connector which
plugs into the printer’s interface
connector socket.
Character code
A number which stands for a let-
ter, digit or symbol. A computer
sends text to the printer in the
form of character codes.
Page168
1
Character set
A fixed set of characters which
can be printed. A character set
normally includes upper and
lower case letters, the digits O-9
punctuation symbols and various
other characters, for example
accented characters for foreign
languages or block graphic characters.
Character table
See character set.
Code page
A variant of the IBM character set
with characters for a particular
country or region, for example,
code page #860 - Portuguese.
Compatible
See IBM compatible.
Computer paper
See fanfold paper.
Control code
A code number which instructs
the computer to perform a particular operation. For example, the
computer sends the printer a
form feed control code (12) to
make it eject the current page.
Control panel
1) Panel on the printer that displays information about the
printer’s current working and
allows you to operate the
printer.
2) Windows utility which allows
you to make system settings,
such as printer selection and
port set-up.
Cut sheets
Single sheets of paper.
Default Printer
The printer which Windows applications automatically use.
Page169
Default setting
Feature setting adopted if no user
setting has been made (sometimes called “factory setting”).
DOS
See MS-DOS
Dot adjustment mode Mode in which you can realign
the print head in bi-directional
graphics mode.
Double-spacing
Printed text with a blank line
between each printed line.
Downloaded
character
User-defined character, created
on the computer. Sent to and
stored in the printer for later
printing.
Draft
Printing mode in which only the
Draft font is used. The printer
can print more quickly in Draft
mode than in Letter Quality
mode.
EDS settings
See Electronic DIP Switch settings.
Electronic DIP
Switch settings
Printer settings which take effect
when you switch on the printer.
You can make these settings
using the control panel.
Emulation
Imitation by one type of printer of
the functions of another type of
printer.
Epson LQ-860
Dot matrix printer which the
NX-2450 Rainbow/Colour can
emulate.
Epson mode
See Standard mode.
Extension cover
Part of the printer which holds
printed output.
Page170
I
Face-down printing
Output is delivered face-down in
sequential order. You can select
face-down printing by pushing
the paper delivery selector up and
back.
Face-up printing
Output is delivered face-up in
reverse order. You can select faceup printing by pulling the paper
delivery selector forward.
Factory settings
See Default settings
Fanfold paper
Sheets of paper joined by perforations. Fanfold paper has small
holes at the edges.
Fixed pitch font
See monospaced font.
Font
A set of characters of a particular
typeface, which you can select for
printing.
Font lock mode
Mode in which font selection can
only be made from the printer’s
control panel.
Form feed
Printer operation which ejects the
current page and feeds the next
sheet into position, ready for
printing.
Forward micro feed
Control panel operation which
feeds paper through the printer
in,small steps.
Graphics direction
The printer’s method of printing
graphics. See bi-directional and
uni-directional printing.
Handshaking
See protocol.
Page171
Hexadecimal dump
A printout of all character codes
and control codes as they are
received by the printer, along
with their hexadecimal (base 16)
values.
IBM mode
Mode in which the printer emulates an IBM Proprinter X24E.
IBM compatible
A personal computer that can
run the same system and applications software as an IBM PC.
IBM PC
Personal computer made by IBM
capable of running MS-DOS and
Windows system software. See
also IBM compatible.
IBM Proprinter X24E
Dot matrix printer which the
NX-2450 Rainbow/Colour printer
can emulate.
Icon
On-screen symbol in Windows or
Macintosh which represents a
program or document. You can
double-click on an icon to start
the program or open the document.
Interface
Physical link between the printer
and the computer.
International
character set
Variant of the Standard character
set containing characters for a
particular country or region.
Landscape
Landscape mode is when a document is printed on paper with the
longest sides of the paper at the
top and bottom.
Page172
Letter Quality
Printing mode in which the builtin fonts are used to produce
high-quality (suitable for correspondence) text output.
Line feed
& instruction from the computer
which tells the printer to advance
the paper by one line.
Long test
Repetitive printer test showing
every available font and pitch setting, all characters sets, current
vertical alignment and current
Electronic DIP switch settings.
Macintosh
Easy-to-use personal computer
which allows you to print using
TrueType and PostScript fonts (to
use PostScript fonts you must
have installed Adobe Type Manager). To use the printer with a
Macintosh, you need an additional interface cable.
Macro
Printer function which allows you
to save the font, pitch, zoom resolution, single-sheet auto load
position and fanfold auto load
position. Macro settings come
into effect each time the printer is
switched on.
Manual by-pass
Printer feature which allows you
to print on a single sheet of special paper (such as letter-head
paper) without removing the
paper already in the paper tray.
Micro feed
See forward micro feed and
reverse micro feed.
Page173
I
MODE statement
Statement in an MS-DOS
AUTOEXEC.BAT file that determines to which port the computer
should send printer output.
Monospaced font
Font in which all characters are
of the same width.
MS-DOS
The most common operating system software for the IBM PC and
compatible machines.
Multi-part form
Forms (such as invoices) consisting of several sheets, one on top
of another, enabling several copies to be made simultaneously.
NCR sets
“No Carbon Required” – multipart forms which use pressuresensitive chemicals to mark the
lower copies.
Not-ready mode
Printer mode in which you can
change printer settings using the
control panel. The printer cannot
print in not-ready mode.
Orientation
The rotation in which paper is
loaded. See landscape orientation
and portrait orientation.
Over-printing
Printing text on top of existing
text. This may be caused by an
incorrect auto line feed setting.
Paper delivery
selector
Printer part that lets you choose
whether print-outs are delivered
face-up or face-down.
Paper feed
Control panel operation which
allows you to feed paper through
the printer one line at a time.
Page174
Paper guides
Devices which hold single sheets
so that they are fed into the
printer correctly.
Paper out
Printer function which automatically detects when the paper has
run out and stops printing.
Paper tray
Part of the printer which holds
paper for feeding into the printer.
The tray can hold up to fifty-five
single sheets.
Parallel cable
Standard cable for connecting the
printer to a computer.
Parallel interface
An interface which transfers data
between the computer and the
printer 8 bits at a time.
Parity checking
A way of checking that information sent over a serial interface
has been received correctly.
Parking paper
Printer function that allows you
to print on single sheets without
removing fanfold paper.
Pitch
The number of characters in a
one-inch line of text.
Platen
Roller that guides paper through
the printer and provides a solid
surface against which the print
head can make an impression on
the paper.
Port
Socket in the back of a computer
through which a computer communicates with other devices,
such as the printer.
Page175
Portrait
Portrait mode is when a document is printed on paper with the
longest sides of the paper at the
sides.
PostScript font
Type of scalable font similar to
TrueType fonts. PostScript fonts
can be printed if you have
installed the Adobe ~pe Manager
program on your computer.
Print gap
The distance between the print
head and the platen. This distance can be adjusted to suit different thicknesses of paper.
Print head
Printer part that transfers the
image to the paper.
Print head shield
A thin metal plate between the
print head and the platen.
Print pitch
See pitch.
Printable area
The part of the page on which the
printer can print.
Printer driver
Computer file which enables system or application software to
print to a particular printer.
Proportionally spaced Font in which different characters can be of different widths.
font
Protocol
Method of regulating information
transfer between the computer
and the printer. Sometimes called
“handshaking”.
Push tractor unit
Optional accessory that allows
you to print on fanfold paper.
Page176
Quiet mode
Mode in which the printer prints
more quietly (and slightly more
slowly) .
Ready mode
Printer mode in which the printer
can receive and print data from
the computer.
Release lever
Lever that grips single sheets as
they are fed into the printer.
Reverse micro feed
Control panel operation which to
feeds paper backwards through
the printer in small steps.
Ribbon cartridge
Cartridge that contains the ribbonwhich the head uses to mark
the paper.
Scalable fonts
Fonts which you can print at any
size. TrueType fonts are scalable.
Serial interface
A computer interface which
transfers data one bit at a time.
Serial-to-parallel
interface converter
Optional accessory that allows
you to connect the printer to a
serial port on your computer.
Short test
Printer test in which seven lines
of characters are printed. If you
have fitted a color ribbon, each
line will be printed in a different
color.
Stack wire
Wire that pulls out to support
printed pages resting on the
extension cover.
Standard mode
Mode in which the printer emulates an Epson LQ-860 printer.
Page177
System software
Software that runs on your computer to control basic computer
functions (screen display, keyboard input, disk access and
printer output).
Tear-off function
Printer function which allows you
to remove fanfold output without
altering the current position of
the fanfold paper.
Thumb wheel
Printer wheel that allows you to
advance paper manually.
Tractor
Part of the push tractor unit
which grips the fanfold paper.
TrueType font
Type of scalable font which you
can install on your computer and
print on the printer (provided you
are using Windows 3.1 or later).
Typeface
The design style of a font. Common typefaces are Times and
Helvetica.
Uni-directional printing
Mode in which the printer prints
graphics from left to right only.
Vertical alignment
See dot adjustment mode.
Weight
The thickness of the lines which
make up a font’s characters.
Common weights are Medium,
Bold and Black.
Windows
System software for the IBM PC
which has an easy-to-use interface.
Zoom mode
Printer mode that allows you to
print documents scaled to 50?/0
or
670A.
Page178
Index
A
Adjustmentlever
AdobeType Manager
Auto load position
AUTOEXEC.BAT
6
53
60
17
Automaticemulation
change
2,40,46
Automaticline feed
enabling
41
Color
enabling use of
41,42
Color ribbon cartridge
enabling use of
42
Commands
character set
112
charactersize and pitch
116
downloadcharacter Z38
font control
107
graphics
134
horizontal position
130
other
140
verticalposition
123
B
Beep tones
Bi-directionalgraphics
Bitmapfonts
150
4f
51
c
Cable
leng~h of
13
parallel
47
selecting which type to
use
47
serial
47
Centronics parallel cable 13
Character pitch
51
setting
43,53
Character set
selecting
43“
Character set commands ]1,!2?
Character sets
153–165
international
44
Character size and pitch
commands
116
Choosing a place for the
printer
7
Code page
44
Computer port
13
Connecting the printer to your
computer
13,47
Control panel
5,25,34
Control panel keys
34
25,34
m
25,34
m
25,34
mm
Control panel lights
35
Font selection
26
Macro
26
Quiet mode
26
READY
24,26
Zoom
26
Currently selected font
26
D
Default Printer
setting printer as
Dot adjustment mode
27
6.5
Page 179
Double-spacing
unwanted
Download character
commands
138
E
Electronic DIP Switch settings
149
default settings
39
list of
37
making settings
Emulation
automatic switching
40,46
40,46
selecting
Epson emulation
40,46, 105
mode
5
Extension cover
F
57
Face-down printing
57
Face-up printing
55
Fanfold paper
76
loading
(91
parking
(90
printable area
79
printing on
81
unparking
50
Fixed space fonts
Font control commands 107
25,34
[~)
key
51
Font pitch
53
setting
26
Font selection
45
default
30
in MS-DOS
29,53
in Windows
using control panel
35
51
Font weight
Fonts
51
bitmap fonts
50
fixed space
introductionto
monospaced
Page180
49,53
Postscript
preventing selection by
applications software 54
proportionally-spaced 50
50
saris serif
41
50
50
62
savingselection
52
scalablefonts
50
serif
15,29,52
True~pe
59
Form feed
59
Forward micro feed
5
Front cover
9
how to open
G
134
Graphics commands
Graphics direction
setting
41
H
68
Hexadecimal dump
Horizontal position commands
130
I
IBM code page
IBM emulation mode
Installing the
ribbon cartridge
Interface connector
International
character sets
44
40,46
10
5
44
K
Keys
using
34
L
Letter Quality
default font selection
Letter Quality printing
Lights
Line feed
enabling automatic
4.5
43
35
41
Loading paper
Long test
19
67
M
Macintosh printer set-up 49
Macro feature
62
Macro indicator
26,35
Manual by-pass
57
Monospaced fonts
50
MS-DOS
AUTOEXEC.BAT file
27
checking settings
103
font selection
30
PRINT command
4(Y
printer driver
28
selection of
printer set-up
17,48
printing from applications
49
selecting printer in
27
serial connection
88
using control panel with
Multi-part forms
25
55
No paper
automatic detection of 42
Non-color printers
2(3
Not-Ready mode
24
0
Over-printing
unwanted
41
P
Page length
setting
Paper delive~ selector
Paper feed
Paper guides
EEEEilkeY
Paper loading
42
5
59
5
25,34
19
Paper out
automatic detection of 42
Paper size
42
setting
Paper tray
5
fitting
12
Parallel cable
length of
13
Parallel interface
pin outs
151
Parallel port
13
Parking paper
57,81
Pausing printing
57
Pin outs
151, 152
Pitch
51
saving selection
62
setting
43,53
Platen
6
PostScript fonts
49,53
Power switch
5
PRINT command
48
Print gap
63
setting
Print head
5
Print quality
43
setting
Printable area
56
Printer components
8
Printer driver
installing
15
selection of
28
Printer emulation
automatic switching
40
46
selecting
Printer emulation mode
40
setting
Printer location
7
Printing a text file in
MS-DOS
48
Proportionally-spaced
fonts
50
Protocol
86
Page181
I
Push tractor unit
installing
71
72
Q“
Quiet mode
Quiet mode indicator
26, ~;
R
READY indicator
k’Y
READY light
Ready mode
Release lever
Reverse micro feed
Ribbon cartridge
installing
m
24
25,34
26
24
5
60
5
10
s
Saving current settings
62
52
Scalable fonts
61
Scaled output
Selecting the printer
27
in MS-DOS
27
in Windows
87,88
Serial connection
Serial intetiace pin outs Z52
Serial-to-parallel converter
83
connecting
Serial-to-parallel interface
71,83
converter
setting DIP switches
85
50
Serif
Setting up with a
49
Macintosh
Setting up with
17,48
MS-DOS
Setting up with
15,47
Windows
67
Short test
5
Stack wire
Standard emulation mode ]0.5
40,46
Standard mode
Page 182
T
Tear-off function
Thumb wheel
Troubleshooting
TrueType fonts
installing
~eface
58,82
5
89
15,29,52
52
50
u
Uni-directional graphics
Unpacking the printer
Unparking
Using the control panel
41
8
81
25,34
v
Vertical alignment
adjustment
Vertical position
commands
65
123
w
51
Weight
Windows
102
checking settings
29
font selection
15
printer set-up
47
printer set-up in
53
selecting fonts in
selecting printer in
27
87
serial connation
using control panel with 25
Windows Default Printer
27
setting printer as
Windows printer driver
15
installing
z
Zoom indicator
Zoom mode
enabling use of
26,35
61
41
I
Customer service information
If you experience any technical difficulties with your
Star printer, please refer to Chapter 6- Troubleshooting
on page 89. This chapter describes easy methods to
diagnose and resolve some of the problems which you
may encounter.
For further technical support, you should first contact
your Authorized Star Dealer. If you require additional
support, Star Micronics offers a wide variety of technical
support services. Please use one of the telephone numbers listed below, depending on the country in which
your Star printer was purchased.
Star Micronics Technical Hotline:
1-908-572-3300
North America:
852-795-2335
Hong Kong:
61-2-748-4300
Australia:
64-9-570-1470
New Zealand:
Star Micronics FaxBack (Document Retrieval) System:
Requires access to a facsimile machine or board with receive
capability
1-908-572-4004
North America:
Star Micronics Bulletin Board Service:
Requires a computer modem
North America:
1-908-572-5010
44-494-461395
United Kingdom:
33-1-305807
France:
49-69-780929
Germany:
31-73-424485
Netherlands:
61-2-748-2960
Australia and New Zealand:
I
Customer response
Star Micronics Co., Ltd. invites your suggestions and comments on your printer and this manual. Please address your
correspondence to:
Worldwide Headquarters
STAR MICRONICS CO., LTD.
20-10 Nakayoshida
Shizuoka, Japan 422-91
Attn. Product Manager
North and South America Markets
STAR MICRONICS AMERICA, INC.
70- D Ethel Road West
Piscataway, NJ 08854
Attn. Product Manager
European Market
STAR MICRONICS DEUTSCHLAND GMBH
Westerbachstraj3e 59
D-60489 Frankfurt
F.R. of Germany
Attn. Product Manager
U.K. Market
STXR MICRONICS U.K., LTD
Star House
Peregrine Business Park
Gomm Road, High Wycombe
Bucks. HP13 7DL, U.K.
Attn. Product Manager
French Market
STAR MICRONICS FRANCE S.A.R.L.
25, rue Michael Faraday
F-78182 St.-Quentin en Yvelines Cedex
Attn. Product Manager
Asian Market
STAR MICRONICS ASIA LTD.
18/F Tower 2, Enterprise Square
9 Sheung Yuet Road, Kowloon Bay, HONG KONG
Attn. Product Manager
PRINTED IN JAPAN