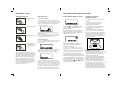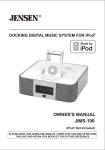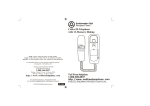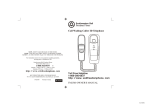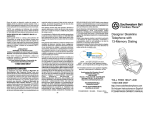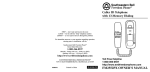
1
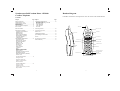
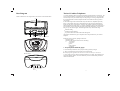
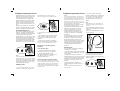
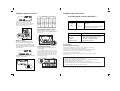
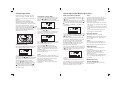
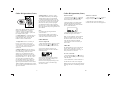
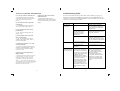
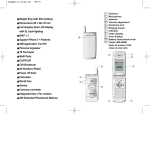
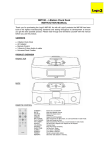
R
2.4GHz Clock Radio Cordless Telephone with
Call Waiting Caller ID
CALLS
DEL
TALK
FLASH
2 ABC
5 JKL
6 MNO
7 PQRS
8 TUV
9 WXYZ
#
0 OPER
REDIAL
For immediate answers to your questions regarding operation,
missing parts or installation, call:
3 DEF
1
4 GHI
CH
VOL/RING
ON
F
/OF
T
E N
STOP - DON'T TAKE ME BACK TO THE STORE.
LOOK - FOR THE TOLL-FREE "HELP" TELEPHONE NUMBER.
LISTEN - AS THE EXPERTS TALK YOU THROUGH THE PROBLEM.
RA
DI
O
MEM
E
R
R
Southwestern Bell Freedom Phone R
Retail Sales Help Line at
1-800-366-0937
Monday - Friday 8:30 a.m. - 9:00 p.m. EST
Saturday 8:30 a.m. - 12:30 p.m. EST
http: // www. swbfreedomphone. com
GH3060 OWNER'S MANUAL
Toll Free Helpline 1-800-366-0937
SOUTHWESTERN BELL FREEDOM PHONE
7475 N. GLEN HARBOR BLVD., GLENDALE, AZ 85307
GH3060
Printed in China
http://www.swbfreedomphone.com
IB-4640A
PLEASE READ IMPORTANT SAFETY INSTRUCTIONS BEFORE USE.
IMPORTANT SAFETY INSTRUCTIONS
Congratulations!
WHEN USING YOUR TELEPHONE EQUIPMENT, BASIC SAFETY
PRECAUTIONS SHOULD ALWAYS BE FOLLOWED TO REDUCE THE RISK
OF FIRE, ELECTRIC SHOCK AND INJURY TO PERSONS, INCLUDING THE
FOLLOWING:
You have purchased a 2.4GHz Clock Radio Cordless Telephone with Call Waiting Caller
ID that has been manufactured to the highest standards of
SOUTHWESTERN BELL FREEDOM PHONE R Retail Sales. Its"DIGICLEAR PLUS TM "
circuitry combines noise filtering with state of the art technology that reduces background
noise during your telephone conversations. Special compander circuitry compreses, then
expands, the transmitted signal to enhance clean, clear audio.
BEFORE INSTALLING AND OPERATING THIS TELEPHONE, IT IS VERY
IMPORTANT THAT YOU READ THIS OWNER`S MANUAL.
1.Do not use this product near water, for example, near a bathtub, wash bowl, kitchen
sink or laundry tub, in a wet basement or near a swimming pool.
2.Avoid using a telephone (other than a cordless type) during an electrical storm. There
may be a remote risk of electric shock from lightning.
3.Do not use the telephone to report a gas leak in the vicinity of the leak.
4.Use only the power cord and batteries indicated in this manual. Do not dispose of
batteries in a fire. They may explode. Check with local codes for possible special
disposal instructions.
5.CAUTION
RISK OF EXPLOSION IF BATTERY IS REPLACED BY AN INCORRECT TYPE.
DISPOSE OF USED BATTERIES ACCORDING TO THE INSTRUCTIONS.
SAVE THESE INSTRUCTIONS
1
2
Safety Instructions for Batteries
Handset Battery Caution
Handset Battery Pack
CAUTION:
CAUTION:
Use only a Southwestern Bell Freedom Phone R approved battery pack in the handset of your
GH3060 Cordless Telephone. To reduce the risk of fire or injury, always do the following
when replacing, discarding or charging batteries. When handling the batteries, be careful
not to short the battery with conducting materials such as rings, bracelets, and keys. The
battery or conducting material may overheat and cause burns.
a. Use only the following type and size batteries in the cordless phone:
Self-contained 3-cell Nickel-Metal-hydride rechargeable battery supply,
GP60 AAAH 3BMXZ 3.6V 600mAh or JB60AAANM3BMX 3.6V 600mAh
GPI International Ltd.
JB Energy (HK) Ltd.
b. Do not dispose of the battery pack in a fire. The cell may explode. Check with local
codes for possible special disposal instructions.
c. Do not attempt to open or mutilate the battery pack. The chemicals are dangerous and
may cause damage to the eyes or skin, and may be toxic if swallowed.
d. Follow the charging instructions outlined in this manual. (See page 10)
Save These Instructions
3
To Reduce the Risk of Fire or Injury to Persons, Read and Follow These Instructions.
1. Use only the following type and size batteries in the cordless phone:
Self-contained 3-cell Nickel-Metal-hydride rechargeable battery supply.
GP60 AAAH 3BMXZ 3.6V 600mAh or JB60AAANM3BMX 3.6V 600mAh
GPI Internationl Ltd.
JB Energy (HK) Ltd.
2. Use only the following type and size battery in the base unit: 9V (1604) Alkaline Battery.
3. Do not dispose of the battery(ies) in a fire. The cell may explode. Check with local codes
for possible special disposal instructions.
4. Do not open or mutilate the battery(ies). Released electrolyte is corrosive and may cause
damage to the eyes or skin. It may be toxic if swallowed.
5. Exercise care in handling batteries in order not to short the battery with conducting
material such as rings, bracelets, and keys. The battery or conductor may overheat and
cause burns.
6. Charge the battery(ies) provided with or identified for use with this product only in
accordance with the instructions and limitations specified in this manual.
7. Do not mix old and new batteries in this product (applies to products employing more
than one user replaceable second battery).
8. Do not mix batteries of different sizes or from different manufacturers in this product
(applies to products employing more than one user replaceable secondary battery).
9. Do not attempt to recharge the battery(ies) provided with or identified for use with this
product. The batteries may leak corrosive electrolyte or explode.
10. Do not attempt to rejuvenate the battery(ies) provided with or identified for use with this
product by heating them. Sudden release of the battery electrolyte may occur causing burns
or irritation to the eyes or skin.
11. When inserting batteries into this product, the proper polarity or direction must be
observed. Reverse insertion of batteries can cause charging, and that may result in leakage
or explosions. (Applies to product employing more than one separately replaceable primary
battery).
12. Remove the batteries from this product if the product will not be used for a long period
of time (several months or more) since during this time the battery could leak in the product.
13. Discard "dead" batteries as soon as possible since "dead" batteries are more likely to
leak in a product.
14. Do not store this product, or the batteries provided with or identified for use with this
product, in high temperature areas. Batteries that are stored in a freezer or refrigerator for
the purpose of extending shelf life should be protected from condensation during storage
and defrosting. Batteries should be stabilized at room temperature prior to use after cold
storage.
4
Southwestern Bell Freedom Phone GH3060
Cordless Telephone
Handset Diagram
Contents
HANDSET CONTROLS: The diagram below shows the controls of the GH3060 Handset.
Subject
Page Subject
Page
Safety Instructions......................................2
Handset Battery Pack.................................3
Handset Battery Caution............................4
Handset Diagram........................................6
Base Diagram.............................................7
Traits of Cordless Telephones....................8
Box Contents..............................................9
CALLER ID OPERATION.................................25
Receiving a Call
Receiving Call Waiting Caller ID
Reviewing Calls
Caller ID Redial
Caller ID Erase
VIP Calls
INSTALLATION........................................9
Common Questions.............................................29
Preliminary Preparation..............................9
Telephone Line Installation
Modular Outlet
Battery Backup
Desk or Table Installation
Handset Battery Charging
To Replace Batteries
Caller ID Setup
Troubleshooting Guide........................................30
TELEPHONE OPERATION.....................12
Tone/Pulse Switch
Digital Security System
40 Channel Operation
Making a Call
Receiving a Call
Headset Jack
Out of Range
Memory Feature
Call Timer
Flash
Temporary Tone Feature
Receiver Volume Control
Ringer Control
Speakerphone Volume Control
Page/Handset Locator
LED/LCD Indications (Handset)
To Reset Unit
ANTENNA
NEW CALL LED
Product Care........................................................33
Additional Information........................................33
EARPIECE
BELT CLIP
Speed Dialing Numbers Index............................ 33
Service.................................................................34
LCD DISPLAY
FCC Wants You to Know.....................................35
Limited Warranty.................................................37
CALLS BUTTON
CALLS
DEL
TALK
MEMORY BUTTON
DELETE BUTTON
TALK BUTTON
FLASH
MEM
FLASH BUTTON
HEADSET
JACK
1
2 ABC
3 DEF
4 GHI
5 JKL
6 MNO
8 TUV
9 WXYZ
7 PQRS
0 OPER
REDIAL
CH
#
VOL/RING
REDIAL BUTTON
KEYPAD
CHANNEL BUTTON
VOLUME/RINGER
BUTTON
R
MICROPHONE
ALARM OPERATION...........................21
Setting the clock
Setting the alarm time
Wake up to buzzer/radio
Snooze function
RADIO OPERATION............................22
To play the radio
Presetting station
Listen to preset memory stations
Sleep function
5
6
Traits of Cordless Telephones
Base Diagram
BASE CONTROLS: This diagram shows the controls of the GH3060 Base.
PAGE
PAGE
B. The usable range of the cordless handset away from the base is dependent upon many
factors. The telephone base is like a radio transmitter in that it transmits telephone line
signals via radio waves to the handset. Therefore, the location of the base is important in
order to maximize the usable range. For example, installing the base on the second floor, in
some locations, will provide longer range than a ground floor installation. Pick a location
that gives you the clearest signal. The following can adversely affect usable range:
ALARM
CHARGE
SNOOZE
SET
SET
1
SNOOZE
RA
DI
O
ON
SPEAKER
2
ALARM
SPEAKER
LCD DISPLAY
aluminum siding
insulation with foil backing
any metal construction which could shield radio signals.
Atmospheric conditions also play an important role in the performance of your cordless
telephone.
Interference can be caused by placing the base near:
fluorescent lights
appliances that generate electrical noise, including:
microwaves
televisions
VCR's
baby monitors
computers
F
/OF
FUNCTION
T
E N
E
A. Cordless telephones offer convenience and mobility during telephone conversations. The
use of cordless telephones is dependent upon the availability of DC power. Any disruption
of electrical power at your location will prevent the placing or receiving of telephone calls.
It is recommended that a cordless telephone should not be installed as the only phone at
your location.
C. Always keep the base antenna fully upright.
R
D. For maximum performance, always keep the battery pack fully charged.
RADIO ON/OFF ENTER FUNCTION DOWN UP
E. Plug your phone directly into an outlet, not an extension cord.
F.
F Do not plug other appliances into the outlet or control the outlet by a wall switch.
REAR VIEW
G. If you want to use more than one cordless telephone in your home, the telephones must
operate on different channels. Press the channel key to select a channel that provides the
clearest communication.
BACKLIGHT
BRIGHT / NORMAL / OFF
DC10V 650mA
+
T/P
RINGER
ON/OFF
USE ONLY WITH CLASS 2 POWER SOURCE
POWER JACK
BACKLIGHT TONE/ RINGER
BRIGHT /
PULSE ON/OFF
NORMAL /
OFF
7
8
Installation
Installation (Cont.)
Box Contents
Before installing your phone, check the shipping carton to be sure you have
the following:
Base Unit
Long Telephone Line Cord
Handset with Rechargeable Battery
Quick Installation Guide
DC Adaptor with Cord
Owner's Manual
Notes:
a. Keep the shipping carton and packaging, in case you need to transport your phone.
b. If there is visible damage, do not use this equipment. Contact your shipping agent
or return the telephone to the place of purchase.
1. Make sure DC adaptor is unplugged
Preliminary Preparation
from electrical outlet.
Telephone Line Installation
2. On the bottom of the base, press on
1. Never install telephone jack during a
the tab (toward the battery compartment
lightning storm.
door), and then lift the door away from
2. Never install telephone jack in wet
the unit.
locations unless the jack is specifically
3. Install one 9 volt battery.
designed for wet locations.
4. Replace battery compartment door.
3. Never touch uninsulated telephone wires
5. Install a replacement battery once a year
or terminals unless the telephone line has
to ensure proper operation of the power
been disconnected at the network interface.
failure protection feature. BATTERY LOW
4. Use caution when installing or
icon will turn on until a 9 Volt battery is
modifying telephone lines.
installed. Your unit is fully functional. Battery
is needed for power failure backup ONLY.
Modular Outlet
The GH3060 Cordless Telephone operates
from a standard 110/120 volt outlet. The
handset is powered by a rechargeable
battery pack. Batteries are charged
automatically when the handset is placed in
the cradle of the base unit.
Table/Desk Installation
Handset Battery Charging
A. Plug one end of the long telephone line
cord into the back of the unit and connect
the other end to a modular wall jack. Press
until locking lever clicks (Fig. 1).
The battery pack in the handset must be fully
charged for about 10-14 hours before using
the telephone. The Radio may be used prior
to the handset being fully charged. An
extension telephone will be required until the
handset is charged.
B. Connect the AM look antenna into the back
the unit (Fig.1). Place it on the desk or mount it
on the wall (Fig.2).
C. Connect the DC Adaptor into the back
of the unit. Plug the other end into a
standard 110/120 volt outlet (Fig. 1).
D. Place the handset into the base. The
handset will beep .
9
SPEAKER
ALARM
CHARGE
SET
SNOOZE
1
2
NOTE: BATTERY PACK MUST BE
CHARGED FOR 10-14 HOURS
BEFORE INITIAL OPERATION.
Fig. 1
BACKLIGHT
BRIGHT / NORMAL / OFF
DC10V 650mA
+
T/P
RINGER
ON/OFF
USE ONLY WITH CLASS 2 POWER SOURCE
DC adaptor
Line cord
Battery Backup
One 9 volt battery (not included) is required
to maintain clock and alarm time, and memory
settings during a power failure. If there is a
power failure and the battery is not installed,
clock and alarm time, and memory settings will
be lost.
HANDS ET IN
THE BAS E
FACE DOWN
Fig.2
AM antenna
After connecting the unit to DC power,
leave the handset in the base cradle for ten
to fourteen hours before using it for the
first time. The CHARGE LED on the base
will be lit when the handset is in the cradle.
Later, it will take less time for the battery
to recharge.
Note:
a. When the battery gets low, there will
be a low-battery beep from the handset
every 10 seconds . The handset will
display "BATTERY LOW" on the bottom
line.
b. If the battery becomes low while you are
using, you will be disconnected after about
1 minute. Terminate the call quickly and
put the handset in the base to recharge the
battery.
C. The battery will hold its charge for
several days out of the cradle, depending
on use.
10
Installation (Cont.)
Caller ID Setup/Telephone Operation
To Replace Batteries:
Caller ID Setup
1. Remove battery
cover.
To Set Handset Display Contrast
Tone/Pulse Switch
To Set Area Code
The GH3060 will operate on tone or rotary
systems.
Note: In order that the Caller ID Redial feature
works properly, you must set your local area code.
1. After installing the FULLY CHARGED handset
battery, the handset display will light and will
show "AREA CODE?"
1. Press the " *" or "# " button to adjust
the display contrast to the desired level
(lighter or darker).
2. Remove old battery.
2. Enter your 3-digit local area code using the
handset keypad.
3.After entering the third digit, press the "MEM"
button to confirm the displayed area code. The
unit will return to Date/Time Screen.
3. Install new battery.
Telephone Operation
2. Press the "MEM" button to confirm the
displayed contrast level. The time and date
will be automatically updated when the first
Caller ID call is received.
1. If your house is wired for rotary
service, move the Tone/Pulse (T/P)
switch to the Pulse position (P).
2. If your house is wired for Touch Tone
service, move the T/P switch to the
Tone position (T).
3. If you are not certain which type of
dialing service you have, set the switch to
Tone (T). On the handset, press the TALK
button and then any digit on the keypad. If
the dial tone persists, switch to Pulse (P).
To disconnect, press TALK again, or set the
handset in the cradle.
To Set Language
1. Press the "CH" button for a second in Date/Time
screen. The display will light and show "SET
LANGUAGE"
4. Close battery cover.
Charge 10-14
hours before first
use.
2.You can choose to see your LCD indications in
English, French or Spanish. Press the "▲*" or
"# ▼ " button to choose the desired language.
Note : To maximize your battery's life, we
recommend that you periodically fully drain
the battery and then recharge it. To do this,
unplug your phone line cord from your wall
phone jack. Press the "TALK" button and
allow the handset to remain on for 10 to 12
hours. Return the handset to the base and
allow to fully charge for 12 hours. If this
process is completed monthly, it will reduce
the memory buildup that occurs from
frequent partial charging.
3. Press the "MEM" key to confirm the display
language. The unit will begin to set the area code.
4. Set your local area code according to the above
steps ( To Set Area Code ). Once finished, the unit
will begin to set the remote access PIN code. Press
the "MEM" button to skip the setting (PIN code
not applicable in the GH3060 model). The unit
will begin to set the handset display contrast level.
11
Note:
1. The Caller ID setup procedure will not
begin until the handset has been fully
charged for 10-14 hours.
2. To set up your GH3060 again, press the
"CH" Button for a second in the Date/Time
screen.
3. Your GH3060 will always stay in setup mode
until you complete area code setup steps.
4. If you delay more than 20 seconds in
between any of the above steps, the unit will
revert to the beginning of the setup procedure.
5. To adjust the handset LCD display contrast
while in the standby mode, press the "FLASH"
button. Then press the " *" or "# " button
to set the desired contrast. Press "MEM" button
to confirm the contrast level.
BACKLIGHT
BRIGHT / NORMAL / OFF
DC10V 650mA
+
T/P
RINGER
ON/OFF
USE ONLY WITH CLASS 2 POWER SOURCE
Tone/Pulse Switch
Digital Security System
Your GH3060 Cordless Telephone is equipped
with a digital security coding system to
protect your base unit from being accessed
by other cordless telephones.
The code allows your base and handset to
recognize each other so that other cordless
phones will not make calls on your line.
If the DC adaptor is disconnected or a loss
of power occurs while the handset is away
from the base unit, the security code will be
lost and the phone will be inoperable. If
this occurs, reconnect the DC adaptor and
return the handset to the base unit so that the
security code is reset. The base will beep to
confirm that the security code has been reset.
12
Telephone Operation (Cont.)
When the handset is not in the base, only a
handset having the identical security code
and operating on the same channel can
access the base and use your phone line.
When the handset is in the base, no other
handset, even those having the identical
security code and operating on the same
channel, can access the base and use your
line.
Digital security coding will also eliminate
the "false" ringing associated with cordless
telephones not equipped with this feature.
Telephone Operation (Cont.)
The handset display will show TALK.
The base display will show LINE IN USE
DEL
CALL
S
TALK
ME
MEM
2 AB
1
TALK
F
C
O
6 MN
4 GH
FLASH
H
3 DE
DEL
CALLS
FLAS
M
7
5 JKL
I
YZ
9 WX
8 TUV
PQRS
#
0 OP
AL
ER
CH
VOL/R
ING
REDI
40 Channel Operation
Your cordless telephone has 40 operating
channels. The phone will automatically
search and select the clearest channel when
you pick up the handset and press the
"TALK" button. If you hear noise or other
interference during your conversation, you
can manually select a clearer channel by
pressing and releasing the channel control
on the handset to switch to another spare
channel. Your call will not be interrupted.
3. After hearing a dial tone, dial the desired
number.
4. If you misdial, simply press the "TALK"
button, wait for a couple of seconds, and
press the "TALK" button again for a new
dial tone.
5. After your conversation is completed,
press the "TALK" button once to disconnect
the line, or return the handset to the base.
Receiving a Call Through the
Handset
DEL
CALL
S
TALK
ME
FL
ASH
M
F
3 DE
2 AB
1
6 MN
4 GH
When the Phone Rings
1. IF THE HANDSET IS OUT OF THE
CRADLE, press any key on the handset.
C
O
5 JKL
I
9 WX
7 PQ
YZ
8 TUV
RS
#
0 OP
AL
ER
CH
VOL/R
ING
REDI
2. IF THE HANDSET IS IN THE
CRADLE, lift the handset. DO NOT press
the "TALK" button, as you will be
connected automatically.
Note:
You must be within maximum range to
change channel. If you come close to being
out of range, you may lose the call. If this
occurs, place the handset back into the base
for ten seconds to reset the security code
and then make the call again.
Receiving Call Through the Base
Press the "SPEAKER" button on the base unit.
You can speak through the microphone, without
lifting the handset or press the "TALK" Button
on the handset. H/S display will show "LINE
IN USE". Press the "SPEAKER" button again to
terminate a call.
Making a Call
1. Lift the handset and press the "TALK"
Button to be connected to the phone line.
13
5. To remove the belt clip from the
back of the handset, use your fingernails
Note:
to loosen one of the "arms" of the belt
If you experience difficulty with placing or
receiving calls, lost security code may be the clip. The other "arm" of the belt clip
cause of the problem. When this occurs, the
will automatically release from the
handset can no longer communicate with its
handset.
base. The loss of the code can occur any of
the following ways: the battery is drained and Note:
needs recharging; the DC adaptor is
-When the belt clip is connected to the
disconnected or a power loss has occurred;
handset, the handset can not charge on
or anything that causes electrical
the base.
interference, for example, multiple cordless
-You can purchase a headset through our
telephones, baby monitors, televisions,
help line at 1-800-366-0937, our secure
VCR's etc. Reset the security code by
website at
placing the handset on the base for 10
http://www.swbfreedomphone.com, or
seconds, removing it from the base, then
your local retailer.
replacing it on the base for an additional
10 seconds.
The unit will beep and you can now make
the call. If that does not work, make sure
DC adaptor is connected. If necesssary,
unplug the DC adaptor from the power
source. Disconnect the battery for 5 seconds
and then reconnect. Place the handset on the
base and then replug the DC adaptor (see
Troubleshooting). Let stand 2 minutes
before use.
Headset Jack
You can connect a headset (not included)
for hands-free conversations.
1. Insert the headset plug (must be 3/32 inch/
2.5mm type) into the headset jack on the side
of the handset.
2. Attach the belt clip to the back of the
handset. Make sure the "arms" of the belt clip
snap securely into the notches on the side of
the handset. You can now attach the handset/
belt clip to the desired location on your
clothing.
3. Adjust the headset microphone to a
comfortable position, placing it near your
mouth.
4. Press the "TALK" button to make or
receive a call.
Out of Range
If you experience static while using the
telephone, move closer to the base or
change the channel by pressing the "CH"
button on handset.
DEL
CALLS
TALK
H
FLAS
M
ME
3 DEF
2 ABC
1
6 MN
O
5 JKL
4 GHI
7
YZ
9 WX
8 TUV
S
PQR
#
R
0 OPE
L
REDIA
14
CH
ING
VOL/R
Telephone Operation (Cont.)
Memory Features
Your GH3060 is equipped with 10 memories
for programming your most frequently dialed
telephone numbers. You can store up to 16
digits in each of the memory locations 0
through 9, by following the steps outlined
below. A record of the numbers to be
speed-dialed may be kept on the speed
dialing numbers index on page 33.
To Program Frequently
Called Numbers
1. Press the "MEM" button on the handset,
and the display will show "MEM x", with "x"
representing the memory location that is
currently displayed.
Telephone Operation (Cont.)
Note : If you accidentally press a 17th digit,
an error tone will sound, and you must
reprogram the number.
- Press the "REDIAL" button to enter a
4-second pause into the dialing sequence.
A "P" will appear in the number sequence
to show where the pause has been inserted.
4. To delete a particular digit that has
already been entered, press the "DEL"
button. The last entered digit will be
deleted. To delete all of the digits, press the
"FLASH" button.
Scratchpad Memory
The GH3060 also functions as a scratchpad.
If you want to save a displayed telephone
number (up to 16 digits) into speed dial
memory.
1. Press the "MEM" button on the handset.
The display will show "LOCATION ? x",
with "x" representing the first empty
memory location.
2. Press the " *" or "# " button to select the
memory location where the telephone number
is to be deleted.
DEL
CALL
2. Press the " *" or "# " button to select the
memory location where the telephone number
is to be stored. You can choose from MEM 0MEM 9.
5. Press the "MEM" button to confirm the
entered telephone number. The display will
show "LOCATION ? x", with "x"
representing the current memory location.
15
S
TALK
ME
FLAS
H
M
3 DE
2 AB
1
F
C
6 MN
4 GH
O
5 JKL
I
9 WX
7 PQ
YZ
8 TUV
RS
#
0 OP
AL
ER
CH
VOL/R
ING
REDI
3. Press the "DEL" button to delete that
memory location. The display will show
"ERASE ?".
6. Press the "MEM" button again to
confirm that you want to save the telephone
number to that particular memory location
number. If you want to choose another
memory location number, press "* "or "# ",
or enter in the desired memory location,
using the handset keypad. The display will
show "MEM x STORED", with x
representing the memory location number.
Note : If a particular memory location is not
empty, the display will show the current
memory location and telephone number.
3. Enter the telephone number you wish to
store, using the handset keypad.
To Delete a Memory Location
1. Press the "MEM" button on the handset,
and the display will show "MEM x" with "x"
representing the memory location that is
currently displayed.
2. Press the "MEM" button again to
confirm that you want to save the
telephone number to that particular
memory location number. If you want to
choose another memory location number,
press " * ","# " or enter in the desired
memory location, using the handset
keypad. The display will show "MEM
x STORED",with "x" representing the
memory location number.
4. Press the "DEL" button again to confirm
that you want to delete this memory location,
and the memory location will be erased. If you
do not want to delete that memory location,
press any other key to cancel this procedure.
16
Telephone Operation (Cont.)
Telephone Operation (Cont.)
1. Press the "MEM" button on the handset.
To Dial a Number Stored
in Memory
WHEN THE TALK BUTTON
IS OFF:
2. Press the desired memory location
(0 through 9).
3. The number you programmed will be
automatically dialed.
1. Press the "MEM" button and the location
number on the handset, and the display will
show "MEM x" with "x"representing the
memory location that is currently displayed.
3. Press the "CALLS" button. The number will
scroll across the screen from left to right as it
is dialed.
DEL
CALL
S
TALK
ME
FLAS
3 DE
2 AB
1
4 GH
7
FLASH
O
5 JKL
I
9 WX
TALK
MEM
F
C
6 MN
DEL
CALLS
H
M
YZ
8 TUV
PQRS
#
0 OP
ER
VOL/R
CH
AL
ING
REDI
Temporary Tone Feature
Redial
2. Press the " *" or "# " button to select the
memory location where the telephone number
is to be redialed. You can choose from MEM 0
-MEM 9.
Your GH3060 remembers the last number (up to
32 digits ) dialed. This is a convenient feature
when trying to place a call to a phone number
that is not being answered or is continuously busy.
Call Timer
1. The LCD will display the call duration
timer 10 seconds after a call has begun.
In pulse dialing mode, you can access bank
facilities, telephone answering machines,
etc., by pressing the TONE ( *) key. This
will get you into the tone mode and will
allow you to input the required tone codes.
It will reset automatically to pulse dialing
after you end your call.
Do Not Press The Talk Button
1. Press the "REDIAL" button, and the
display will show the last telephone number
you previously dialed.
DEL
CALL
TALK
ME
2. After the call has
. ended, the call timer will
remain on the display for 5 seconds.
3. Press the "CALLS" button. The number
will scroll across the screen from left to
right as it is dialed.
S
F
CH
#
C
6 MN
4 GH
0 OPER
H
3 DE
2 AB
1
REDIAL
FLAS
M
7
O
5 JKL
I
9 WX
YZ
8 TUV
PQRS
#
0 OP
VOL/RING
AL
ER
CH
VOL/R
ING
REDI
2. If you want to edit this displayed telephone
number, you can choose the following
options:
a. To delete a particular digit that has
already been entered, press the "DEL"
button. The last entered digit will be
deleted.
b. To insert a digit at the end of the
telephone number, enter the desired
digit using the keypad.
c. To delete all of the digits, press the
"FLASH" button.
WHEN THE TALK BUTTON
IS ON:
17
Flash
Receiver Volume Control
You can use your cordless telephone with
special services such as Call Waiting or
Three Way Calling (Special subscription
from your local telephone company is
required). During a telephone conversation,
you may hear a tone or click, which indicates
that you are receiving another call. To speak
to the second caller and put the first call on
Hold, press the "FLASH" button. Press
"FLASH" again to return to the original call.
You may also press the "FLASH" key to
obtain a new dial tone.
Your GH3060 allows you to adjust the
handset volume to a more comfortable
listening level. Press "VOL/RING" button
to increase or decrease volume, while
handset is in the Talk On mode. The default
volume is set to level 1. The volume status
will show on the LCD.
18
Telephone Operation (Cont.)
Telephone Operation (Cont.)
-RINGER SWITCHBASE
ON
HANDSET
OFF
CRADLE
When The "VOL/RING" button is
pressed, the receiver volume will
increase to maximum (level 3) and then
back down and decrease to minimum
(level 1) in a repeated cycle.
ME
M
3 DE
1
REDIAL
CH
#
F
C
6 MN
4 GH
0 OPER
H
FLAS
2 AB
HANDSET
OFF
ON
ON
ON
ON
OFF
OFF
OFF
OFF
OFF
ON
OFF
ON
ON
OFF
ON
OFF
ON
ON
ON
OFF
OFF
OFF
OFF
OFF
OFF
ON
ON
OFF
Press the VOLUME control " "or" "
button on the base to adjust the speakerphone
volume level.
S
TALK
BASE
ON
O
5 JKL
I
9 WX
7 PQ
YZ
8 TUV
RS
#
VOL/RING
0 OP
AL
LCD/LED INDICATIONS (HANDSET)
LED
NEW
CALL
LED
STATUS
FLASHING
OFF
ER
CH
VOL/R
ING
LCD DISPLAY
BATTERY LOW
REDI
Ringer Control
RA
DI
O
ON
PAGING
TALK
LINE IN USE
F
/OF
FUNCTION
T
E N
E
ON
R
R
Power failure
protection/Battery Backup
Page/Handset Locator
You can send a page signal from the base
to the handset.
Press the "PAGE" button on the base once,
and the handset will beep 3 times. Press and
hold the "PAGE" button for 3 seconds, and
the handset will beep for about 60 seconds.
Press any button on the handset to stop the
handset from beeping.
PAGE
T/P
RINGER
ALARM
CHARGE
ON/OFF
USE ONLY WITH CLASS 2 POWER SOURCE
SET
SNOOZE
1
INDICATIONS
Handset battery power is low, and the
handset battery should be charged.
Base unit is paging handset.
Handset is connected to line.
Speakerphone active.
FUNCTION
T
E N
E
The handset and/or base unit will no longer
ring when a call comes in.
BACKLIGHT
BRIGHT / NORMAL / OFF
-All new Caller ID information has
already been reviewed.
F
/OF
RA
DI
O
If you do not want the handset and base
to ring , set the RINGER switch on the
back of the base unit to OFF and/or press
the " VOL/RING " button on handset for
2 seconds to toggle the ringer to off. The
LCD will show.
DC10V 650mA
+
INDICATIONS
-New Caller ID information is in
memory.
Speakerphone Volume Control
DEL
CALL
HANDSET
ON
CRADLE
-RING SOUND-
HANDSET
OFF
SPEAKER
2
If DC power failure occurs, or the power plug comes out of the wall,
your unit will shut down until the power is restored.
When the power is restored, clock and alarm time and memory settings
recorded before the power failure will be saved IF YOU HAVE
INSTALLED A 9 VOLT BATTERY.
If your unit is not operating properly when the power is restored, proceed
with a unit reset.
To Reset Unit
1. Unplug the DC adaptor from the power outlet.
2. Remove the 9 volt battery. Replace with a fresh 9 volt battery (see page 9).
3. Plug DC adaptor back into power outlet.
4. Set clock and alarm time, radio memory station (see page 21).
5. Remove the handset battery, wait 5 seconds, and then reinstall the handset battery.
You need to follow the Caller ID setup procedure.
IMPORTANT
During a power outage, your unit will NOT work, even if a 9 volt battery is installed.
19
20
Alarm Operation
Alarm Operation/Radio Operation
Once the unit is powered on, the clock
display will show 12:00AM . You can
utilize the clock and alarm time setting as
follows:
Before setting, you can select a
comfortable contrast and back light.
When the unit is in the standby mode,
press the ENTER button. The LCD of the
base will show CONTRAST, you can
or
select the desired level by pressing
button. Then press the ENTER button to
confirm. The LCD back light can be
adjusted by BACKLIGHT BRIGHT /
NORMAL / OFF switch.
RA
DI
O
ON
Wake Up To Buzzer/Radio
Note:
1. Press the FUNCTION button once, then
press the
or
button until the display
shows "ALARM TIME". Press ENTER
button; "ALARM1" will display on the LCD.
1. Press the FUNCTION button once, then
choose "ALARM MODE" by pressing
or
button.
2. Press the ENTER button; once "ALARM1"
will be displayed on the LCD. Press the
or
button to select one of the following:
"ALARM1" ,"ALARM2" , "ALARM1+2" ,
ALARM OFF".
If you select the "High VOL ON", the
volume of waking to radio will be louder
than normal. Press the "RADIO ON/
OFF" button can also stop the alarm
from "wake to radio".
If you are not in the mode of 'Alarm off'
and 'Alarm 1+2', the latest alarm setting
is effective.
If your setting is not completed in 20 sec,
it will timeout and resume the real clock
mode.
Press FUNCTION button to go back
to the upper level of the menu.
3. Press the ENTER button to confirm. If you
select "ALARM1/ALARM2", press the
or
button to select "WAKE BUZZER or
WAKE RADIO".
4. Press the ENTER button to confirm the
selection . If "WAKE BUZZER" is selected ,
the buzzer icon will be lit and the alarm
buzzer will sound at the set alarm time .
If "WAKE RADIO" is selected , the radio
icon will be lit and the radio will start
playing at the set alarm time.
5. If you select "WAKE RADIO","High VOL
ON"will display on the LCD. Press the
or
button to select "High VOL ON" or
"High VOL OFF".
Snooze Function
2. You can select "ALARM1" or "ALARM2"
by pressing
or
button.
3. Press the ENTER button to confirm your
selection. The LCD shows the last alarm
setting . The hour digits will flash.
F
/OF
FUNCTION
T
E N
E
Setting The Alarm Time
R
4. Press
or
button to select the correct
hour. Then press ENTER button to confirm;
the left minute digit will flash.
5. Press the
or
button to select
the correct value. Press ENTER button to
confirm; the right minute digit will flash.
Press
or
button to select the correct
value.
6. Press ENTER button again to complete
the alarm time setting.
Setting The Clock
1. Press the FUNCTION button once; the
base display will show"SET CLOCK".
RADIO
Note:
2. Press ENTER button; the hour digits
will flash. Press
or
button to
select the correct hour time. Press ENTER
button again to confirm the hour digits,
and the left minute digit will flash.
3. Press
or
button to select the
correct value. Press ENTER button; the
right minute digit will flash. Press
or
button to select the correct value.
Press ENTER button again to complete
the clock setting.
If your setting is not completed in 20 sec, it
will timeout and resume the real clock mode .
Press FUNCTION button can go back to
the upper layer of the menu.
The clock of the base is updated
automatically after receiving incoming
Caller ID.
21
6. Press the ENTER button to complete the
selection.
7. When the ALARM x comes on at the set
time, the BELL x icon will flash. Each alarm
period is 15minutes. Pressing ALARM x
button can stop the alarm and then BELL x
icon will not flash. (where x is 1 or 2).
When alarm comes on, press the
SNOOZE button, the alarm will stop and
come on after 9 minutes. Total snooze
time is 1 hour .
NOTE:
If both alarms (alarm1 and alarm2) are
set within 9 minutes of each other, the
last alarm will override the previous one.
IMPORTANT!!
1. Radio does not operate during DC
power failure.
2. Radio is muted when the phone is in
ringing and conversation status.
3.The icon 'ST 'will be lit, if Stereo
station is selected.
4. If your setting is not completed in 20
sec, it will timeout and resume the real
clock mode.
Radio Operation
To Play The Radio
1. Press the RADIO ON/OFF button to
turn on the radio.
22
Radio Operation
Radio Operation
2. Press the FUNCTION button, the
display will show "FM".
3.You can select "FM" or "AM" band by
pressing the or button, then press the
ENTER button to confirm.
4. Press the or button to select a station
which you want to save.
5. Press and hold the SET button about one
second. "PROG" icon will flash on the LCD
display.
MHZ
FM
SLEEP FUNCTION
PROG
3. You can select "FM" or "AM" band by
pressing the or
button, then press
the ENTER button to confirm.
AM
FM
4. Tune to the desired station by pressing
the
or
button. Each time you press
the button , the frequency will change
by one step.
5. You can also use automatic tuning .
Keep the
or
button pressed until
the frequency starts to change rapidly,
then release the button and it will stop
at the next strong station.
6. When listening to the radio, you can
adjust the volume
or
to select a
suitable listening level.
7. To turn off the radio, press the RADIO
ON/OFF button.
AM
MHZ
6. While the PROG is blinking, press the
or
button to choose a desired memory
location. You can choose from CH1 to CH10 .
7. Press the ENTER button to confirm.
The station now broadcasting will be
stored in the preset memory.
8.By repeating the above steps 3 to 7 ,
you can store other stations in the memory .
KHZ
LISTEN TO PRESET MEMORY STATIONS
1. Press the RADIO ON/OFF button to turn on the radio.
2. Press the FUNCTION button to select "AM" "FM" , then press the ENTER
button to confirm.
3. Press the SET button once, the latest location will be kept. You can select the
desired memory by pressing or button.
4. To turn off the radio, simply press the RADIO ON/OFF button.
If you want the radio turned off after a desired playing time. You can follow the below
steps.
1. During Radio play, or in the standby mode, press the SET button. The LCD will show
"SLEEP 15".
2. Press or button repeatedly to select the desired playing time . The display
sequence is 15 minutes
30 minutes
60 minutes
90 minutes
SLEEP OFF.
3. Press ENTER button to confirm, "sleep" icon will turn on.
NOTE:
During sleep mode, the wake up to buzzer/radio function still works .
NOTE:
Up to 10AM and 10FM stations can be
stored into preset memories.
KHZ
Presetting Station
1. Press the RADIO ON/OFF button to
turn on the radio.
2.Press the FUNCTION button. The
display will show "FM".
23
24
Caller ID Operation (Cont.)
Caller ID Operation
Receiving a Call
1. After the first ring, the caller`s name and
telephone number will be displayed on the
handset screen.
IMPORTANT:
You must subscribe to Call Waiting and Call
Waiting Caller ID service from your local
telephone company in order to receive Call
Waiting Caller ID information
To Store a Caller ID Record to Speed
Dial Memory
Note:
You can store a Caller ID record from the
handset to Speed Dial Memory.
Reviewing Calls
1. When the handset display shows the
current time/day, press the "
*" or "#
" button to select the Caller ID record
you want to store to Speed Dial Memory
Reviewing New Call Records
The Caller ID information (up to 64 callers )
will be stored in the handset display in the order
received. If the received call information is the
same as any of the new calls, the unit will
display the "RPT" icon to indicate a repeat call.
If the unit receives more than 64 calls, the
oldest Caller ID information will be erased.
The New Call LED will flash until you review
all your new calls.
Note:
If you answer your incoming call before the
second ring, the unit will not display the call
information.
1. When the display shows the current date/
time, press the " * " or " #
" button on the
handset to display the information for the last
new call received.
Note:
You can review up to 64 New Caller ID calls
from the handset.
2. Continue pressing " * " or " # " button
to review all new call records in the order the
calls were received.
When a name received exceeds 12 characters,
the first 12 characters will be shown with " "
showing on the right hand side. Press the
" # " button to view the remaining
characters.
3. After the final call has been displayed,
press the " *" or "# " button again. The
New Call LED will stop blinking and the
LCD will show "END NEW CALL"
Receiving Call Waiting Caller ID
when you are on an existing phone call, your
GH3060 will display incoming Call Waiting
Caller ID information.
Note:
If you do not review all new calls, the Time/
Date screen will display after 20 seconds
and the new call counter will show the total
number of new calls received ( including
those you just reviewed ).
Base will only show incoming call and does not
have Review function.
1. You will hear a beep and the telephone will
be muted momentarily while the display show
the second caller Caller ID information.
2. When you access the Call Waiting, the Caller
ID information will disappear and the
Time/Day screen will be display.
25
2. Press the "MEM" button on the handset
3. The display will show "LOCATION? x",
with "x" representing the first empty
memory location.
4. Press the "MEM" button again to
confirm that you want to save the
telephone number to that particular
memory location number. If you want to
choose another memory location number,
press " *" or "# " or enter in the
desired memory location, using the
handset keypad. The display will show
"MEM x STORED".
Reviewing All Call Recor ds
1. After you have reviewed all of the new calls
(see page 25), press the " *" or "# " button
on the handset. The displays will show the calls
stored in memory.
You can review up to 64 Caller ID calls from
the handset.
2. Once in the Caller ID review mode, press
the " *" or "# " button. The LCD display
will show the calls stored in memory.
3. Continue to press " *" button to display
all records in the order they were received
from the oldest to the newest, or "# "
button from the newest to the oldest.
4. After the last call record has been reviewed,
the LCD will show "--END--"
Caller ID Redial
THE LOCAL AREA CODE MUST BE
PROGRAMMED IN ORDER TO FULLY
UTILIZE THE REDIAL FEATURE (SEE
PAGE 11). The GH3060 allows you to redial
a phone number stored in the Caller ID
memory.
1. When the display shows the current time/
day, press the " *" or "# " button on the
handset to select the Caller ID record that
you want to dial.
Note:
- You can review and redial up to 64 Caller
ID calls from the handset.
2. Press and release the "CALLS" button
on the handset. The number will scroll
across the screen from left to right as it is
dialed.
Note:
- If you review the Caller ID call from the
handset, then you will need to redial the call
from the handset (by pressing the "CALLS"
button).
26
Caller ID Operation (Cont.)
4. 10 digits with a 1: Since the 1 prefix
will be added automatically when dialing a
10 digit number, simply press the handset
"CALLS" button ONCE to make your call.
If your area code requires that you add 1 and
your area code, even if the call is within the
same area code, then you must reprogram
your GH3060 to another 3-digit "fictitious"
area code. The "1" prefix will be added before
the 10 digit number and your long distance call
will be dialed.
DEL
CALL
DEL
CALLS
TALK
FLASH
FLAS
H
M
3 DE
2 AB
1
TALK
MEM
S
ME
F
C
6 MN
4 GH
O
5 JKL
I
9 WX
7 PQ
YZ
8 TUV
RS
#
0 OP
AL
ER
CH
VOL/R
Caller ID Operation (Cont.)
ING
REDI
With current Telecom redialing situations,
there are 4 redial options: (1) 7 digits
without a 1 prefix; (2) 7 digits with a 1
prefix; (3) 10 digits without a 1 prefix; and
(4) 10 digits with a 1 prefix.
Note:
Use caution when pressing the handset
"CALLS" button.
Press and release rapidly; if the handset
"CALLS" button is held down too long, the
"VIP CALL" feature will be activated.
1. 7 digits without a 1 : Assuming that you
have programmed your correct area code,
redial your local call by pressing the
handset "CALLS" button ONCE.
Caller ID Erase
To Erase a Single Call
2. 7 digits with a 1 : If it is necessary to
Insert a 1 prefix before your local call,
assuming that you have programmed your
correct area code, simply press the handset
"CALLS" button TWICE WITHIN 2
SECONDS.
1. When the handset display shows the current
time/day, press the " *" or "# " button to
select the Caller ID record you want to erase.
2. Press "DEL" button to erase the call
displayed, the display will show "ERASE?"
on the bottom line.
3. 10 digits without a 1: In some areas of
the country, the area code must be included,
even when dialing a local call. In this
situation, set your GH3060 area code to
another 3 digit "fictitious" area code. (We
recommend using an area code not currently
being used in the U.S., i.e. 100, etc.). Once
your area code is programmed as above,
your GH3060 will show all "10 digits" for
every incoming call. To redial a local 10
digit call, press the handset "CALLS" button
TWICE WITHIN 2 SECONDS in succession.
The "1" prefix is then omitted and the local 10
digit call is redialed.
To Erase All Calls
1. You must press the " *" or "# " button
to review all of the new Caller ID records
received before you can erase all calls.
To Remove a VIP Call:
2. While the display is in standby mode,
press and hold the "DEL" button for 2
seconds. The display will show "ERASE
ALL?" on the bottom line.
2. Press and hold "CALLS" button for 2
seconds until the "VIP" icon has disppeared.
1. Press the handset " *" or "# " button to
display the call you have marked "VIP".
3. Press the "ERASE" button again, all
VIEWED messages will be erased.
Note: 1. In this condition, all the Caller ID
records are erased. If there are records
that have not been reviewed, the "Erase All
Calls" function cannot be performed.
2. VIP calls will not be erased when you
erase all calls.
VIP Calls
The GH3060 allows you to create VIP call
records. When a VIP call is received, 4
beeps will be heard (after the first ring), to
alert you that this is a VIP call.
To Create a VIP Call:
4. Press "DEL" button again, the Caller ID
record will be erased and the display will
show the next call message.
Note: If the current displayed message is the
last message to come in, then the display
will show "--END--".
27
1. Press the handset " *" or "# " button to
select the caller ID which you want to assign
a VIP indication.
2. Press and hold the "CALLS" button for 2
seconds until the "VIP" icon is displayed.
Note: Four beeps will also be heard when the
incoming VIP call is a Call Waiting Caller ID
call.
26
28
Answers to Commonly Asked Questions
Troubleshooting Guide
Q. I can't get a dial tone. What do I do?
A. Your phone may have lost its digital
security code and needs to be reset. Refer
to the "To Reset" unit procedure on
page 20
If you have followed the instructions in this manual, and have difficulty operating your
Southwestern Bell Freedom Phone R Cordless Telephone, locate the PROBLEM in the left
column below. Check the corresponding POSSIBLE CAUSE and CORRECTIVE ACTION
columns to locate and remedy the problem.
Q. How many calls can be stored in
Caller ID memory?
A. The telephone number, name (if
available), and time/day of up to 64 calls
will be stored in memory on the handset
display.
Q. How often do I need to replace the
9 volt battery?
PROBLEM
The unit will
not operate.
A. You should replace the 9 volt battery
once a year or after a power outage.
Q. Can my unit be left on for a long
period of time?
CORRECTIVE ACTION
Recheck all plug connections.
Also, check the DC adaptor for
proper connection to wall outlet
and phone base.
POSSIBLE CAUSE
Improper installation.
A. Yes. Your unit is designed to be on
24 hours a day.
The digital security
code has been lost due
to a power loss while
the handset was away
from the base.
Reset the digital security code by
returning the handset to the base.
A new code is then set.
Q. My DC Adaptor feels warm to the
touch. Is this normal?
The battery is not charged.
Charge the battery for about
10-14 hours before initial use or
when the battery low beep sounds
every 10 seconds from the handset.
See the above mentioned
possible causes.
See the above mentioned
corrective actions.
The handset is being
used too far away
from base.
Move the handset closer to the
base.
You may have lost the
security code. The handset
can no longer communicate
with its base. The loss of the
code can occur if the battery
is drained and needs
recharging, the DC adaptor
is disconnected, a power loss
has occurred, or there is
electrical interference form
other cordless phones, baby
monitors, microwaves, etc.
Even a momentary power
interruption could erase your
cordless phone's security
code.
1. Return the handset to the base
unit for 5-10 seconds to reset
code. If that doesn't work:
2. Check to make sure the DC
adaptor is connected.
3. Unplug DC adaptor from
power source; disconnect handset battery for 5 seconds, then
reconnect. Place handset back
on base, then replug in the DC
adaptor
A. Yes. It is characteristic of your DC
Adaptor to feel slightly warm. There is
no need to be alarmed.
No dial tone.
Q. Will my unit operate in a very cold
or hot environment?
A. Your unit is designed to perform most
efficiently at room temperature. However,
it can be used in environments ranging
from 50 F to 120 F.
Difficulty placing
or receiving calls.
Q. Why are some of the digits on the
display missing?
A. Information in the Transmission can not
to be decoded by your unit, so it cannot
be displayed. If the error affects only a
single digit, the display will sometimes
show a "_" in the area of the digit effected.
Your telephone is able to recover all available
information, making it possible for you to
determine who the call is from.
29
30
Troubleshooting Guide (Cont.)
Troubleshooting Guide (Cont.)
PROBLEM
POSSIBLE CAUSE
CORRECTIVE ACTION
Can't make
outgoing calls.
Tone/Pulse switch is not
set correctly.
Set the Tone/Pulse switch to proper
position for your type of service.
The digital security code
has been lost.
Reset the security code by returning
the handset to the base.
The base and handset
battery contacts are not in
contact with each other.
Make certain the battery contacts in
the handset and base make contact
when handset rests in the base.
Battery pack is
not recharging.
Battery pack needs to be
replaced.
Replace the battery pack at least
Once a year
Noise or
interference
is being heard
during your
conversation.
Current channel is not
the clearest choice.
Press the channel button to switch
from one channel to another. This
will allow you to choose the
clearest of 40 channels.
During a
conversation,
a loud static
noise is heard.
The handset is being
used too far away from
the base.
Move the handset closer to
the base station.
The incoming
call's signal is
intermittent
or fades.
The battery is not
charged.
Recharge the battery.
The handset is being used
too far away from the
base.
Move the handset closer to the
base.
31
PROBLEM
POSSIBLE CAUSE
CORRECTIVE ACTION
Your telephone
rings but the
GH3060 doesn't
show any Caller ID
records.
The telephone line is not
connected properly to the
unit.
Connect the telephone line into
the back of the unit. Check with
your local telephone company to
be sure Caller ID service is being
provided on your telephone line.
Also, if you pick up the phone
before the first complete ring, the
caller information will not be
completely received.
You cannot redial a
call record.
Your local area code is not If the display does not indicate 7
digits for local incoming calls,
programmed.
reprogram the local area code.
Verify the number displayed
during redial. Data received was
possibly corrupted during the
transmission through the
telephone lines. Dial the
telephone number manually on
your telephone.
The number displayed is
incorrect.
.
You can't receive
call waiting
messages.
This service is not
available.
You must subscribe to Caller ID,
Call Waiting, as well as Call
Waiting Caller ID service from
your local phone company. The
phone must be off-hook to hear
the call waiting Caller ID alert
signal.
The display screen
is dim or blank.
The display contrast is set
at too low level.
Press the handset "FLASH" and then
the " *" or "# " button to adjust the
handset contrast level.
32
Service
Product Care
A. Avoid putting cordless phones near
heating appliances and devices that
generate electrical noise (motors,
fluorescent lamps, etc.).
E. Retain the original packaging in case you
need to ship the phone at a later date.
Additional Information
B. Avoid rough treatment of the phone
by placing the handset gently into the
base when hanging up. Avoid dropping
the handset.
C. Clean your cordless telephone only
with a soft cloth slightly dampened with
water or mild hand soap. Do not use
any type of solvent or abrasive cleaner.
Before cleaning, always unplug the
phone from the wall outlet.
D. Your cordless phone is not designed
to be water resistant. Do not use the
handset in the rain, in the pool or in the
shower. Do not install your base unit
outdoors, or near a sink, bathtub or shower.
Do not expose to direct sunlight.
A. Connecting this telephone to a coin
operated telephone or party line is
prohibited by law.
B. If it is determined that your
telephone is malfunctioning, the FCC
requires that it be disconnected from
the modular outlet until the problem
has been corrected.
For immediate answers to all your
questions regarding the operation of
your Southwestern Bell Freedom
Phone, call the Consumer Hotline, toll
free at (800) 366-0937.
R
NUMBER
FOR IN WARRANTY SERVICE:
Package your complete unit (including all adaptors, line cords, and other accessories) and
ship the unit postage prepaid* and insured (for your protection) to:
SOUTHWESTERN BELL FREEDOM PHONE
DEPT.: Warranty Repair
7475 N. Glen Harbor Blvd., Glendale, AZ 85307
R
Be sure to include your return address, proof of purchase, a daytime phone number, $9.50
for postage and handling*, and a brief explanation of your difficulties.
*NOTE: California residents need only provide proof of purchase and should call
1-800-366-0937 for shipping instructions.
FOR OUT OF WARRANTY SERVICE:
You may call our toll-free Help Line for the price of a replacement before returning your
unit. Please follow all instructions for In-Warranty service (above) to return your unit, and
mark the package: DEPT.: Out of Warranty.
If you have called and know the cost of your replacement, please include this information
with your unit for prompt service.
Speed Dialing Numbers Index
LOCATION
According to FCC regulations, this equipment, which has been certified and registered by
the FCC, may only be repaired by authorized persons. If repairs or adjustments are made by
an unauthorized person, the FCC certification may be voided. Should you encounter any
problems, please call the Southwestern Bell Freedom Phone R toll-free Customer Help Line
for assistance: 1-800-366-0937, Monday - Friday 8:30 am - 9:00 pm, and Saturday
8:30 am - 12:30 pm. You can also visit our website at http://www.swbfreedomphone.com.
LOCATION
0
5
1
6
2
7
3
8
4
9
33
NUMBER
QUESTIONS?
STOP...DON'T TAKE ME BACK TO THE STORE.
LOOK...FOR THE TOLL-FREE "HELP" TELEPHONE NUMBER.
LISTEN...AS THE EXPERTS TALK YOU THROUGH THE PROBLEM.
For immediate answers to your questions regarding operation, missing parts or installation,
call the
SOUTHWESTERN BELL FREEDOM PHONE
R
HELP LINE AT:
1-800-366-0937
http://www.swbfreedomphone.com
34
FCC Wants You to Know
FCC Wants You to Know
This equipment complies with Part 68 of the FCC rules and the requirements adopted by the
ACTA. On the bottom of the bottom of this equipment is a label that contains, among other
information, a product in the format US:AAAEQ##TXXXX. If requested, this number must be
provided to the telephone company. the FCC Registration Number and Ringer Equivalence
Number (REN) for this equipment. You must, upon request, provide this information to your
telephone company. The REN is useful to determine the number of devices that may be connect to
a telephone line. Excessive RENs on a telephone line may result in the devices not ringing in
response to an incoming call. In most but not all areas, the sum of RENs should not exceed five
(5.0). To be certain of the number of devices the may be connect to a line, as determined by the
RENs, contact the local telephone company. [For product approved After July 23, 2001, the REN
for this product is part of the product identifier that has the format US:AAAEQ##TXXXX. The
digits represented by ## are the REN without a decimal point (e.g., 03 is a REN of 0.3). For earlier
products, the REN is separately shown on the label.] To determine the maximum REN for your
calling area.
If your telephone equipment causes harm to the telephone network, the telephone company may
discontinue your service temporarily. If possible, they will notify you in advance. But if advance
notice isn't practical, you will be notified as soon as possible. You will be informed of your right to
File a complaint with the FCC.
Your telephone company may make changes in its facilities, equipment, operation or procedures
that could affect the proper functioning of your equipment. If they do, you will be notified in
advance to give you an opportunity to maintain uninterrupted telephone service. If you experience
trouble with this telephone equipment disconnect from the network until the problem has been
corrected or until you are sure that the equipment is not malfunctioning.
An applicable certification jacks Universal Service Order Codes (USOC) for the equipment is
provided (i.e., RJ11C) in the packaging with each piece of approved terminal equipment.
A plug and jack used to connect this equipment to the premises wiring and telephone network
must comply with the applicable FCC Part 68 rules and requirements adopted by the ACTA. A
compliant telephone cord and modular plug is provided with this product. It is designed to be
connected to a compatible modular jack that is also compliant. See installation instructions for
details.
NOTICE: If your home has specially wired alarm equipment connected to the telephone line,
ensure the installation of this [equipment ID] does not disable your alarm equipment. If you
have questions about what will disable alarm equipment, consult your telephone company or a
qualified Installer.
NOTICE: According to telephone company reports, AC electrical surges, typically resulting
from lightning strikes, are very destructive to telephone equipment connected to AC power s
ources. To minimize damage from these types of surges, a surge arrestor is recommended.
This equipment may not be used on coin service provided by the telephone company. Connection
to party lines is subject to state tariffs.
Warning: Changes or modifications to this unit not expressly approved by the party responsible
for compliance could void the user's authority to operate the equipment.
NOTE: This equipment has been tested and found to comply with the limits for a Class B digital
device, pursuant to Part 15 of the FCC Rules. These limits are designed to provide reasonable
protection against harmful interference in a residential installation. This equipment generates, uses
and can radiate radio frequently energy and, if not installed and used in accordance with the
instructions, may cause harmful interference to radio communications. However, there is no
guarantee that interference will not occur in a particular installation. If this equipment does cause
harmful interference to radio or television reception, which can be determined by turning the
equipment off and on, the user is encouraged to try to correct the interference by one or more of the
following measures:
Increase the separation between the equipment and receiver.
Connect the equipment into and outlet on a circuit different from that to which the receiver is
connected.
Consult the dealer or an experienced radio TV technician for help.
35
36
Limited Warranty
This Southwestern Bell Freedom Phone R is warranted to the original purchaser to be free
from defects in materials and workmanship under normal installation, use, and service for a
period of one(1) year from the date of purchase as shown on the purchaser's receipt.
The obligation of Southwestern Bell Freedom Phone R Retail Sales under this warranty
shall be limited to repair or replacement (at our option) during the warranty period of any
part which proves defective in material or workmanship under normal installation, use, and
service, provided the product is returned to Southwestern Bell Freedom Phone R Retail
Sales (address below) TRANSPORTATION CHARGES PREPAID (California residents call
1-800-366-0937 for shipping instructions). Products returned to us or to an Authorized
Service Center must be accompanied by a copy of the purchase receipt.
In the absence of such purchase receipt, the warranty period shall be one (1) year from the
date of manufacture. To obtain service under this warranty, return the defective product to
the service center nearest you together with your sales slip and $9.50 for postage and
handling (California residents need only provide proof of purchase). You may also have
other warranty rights which vary from state to state.
This warranty shall be invalid if the product is damaged as a result of defacement, misuse,
abuse, neglect, accident, destruction, or alteration of the serial number, improper electrical
voltages or currents, repair alteration or maintenance by any person or party other than our
own service facility or an authorized Service Center, or any use violative of instructions
furnished by us.
This warranty is also rendered invalid if this product is removed from the country in which
it was purchased, if it is used in a country in which it is not registered for use, and/or if it is
used in a country for which it was not designed. Due to variations in telephone systems and
communications laws, this product may be illegal for use in some countries. Southwestern
Bell Freedom Phone R Retail Sales assumes no responsibility for damages or penalties
incurred resulting from the use of this product in a manner or location other than that from
which it is intended.
This one-year limited warranty is in lieu of all other expressed warranties, obligations, or
liabilities. ANY IMPLIED WARRANTIES, OBLIGATIONS, OR LIABILITIES,
INCLUDING BUT NOT LIMITED TO THE IMPLIED WARRANTIES OF
MERCHANTABILITY AND FITNESS FOR A PARTICULAR PURPOSE, SHALL BE
LIMITED IN DURATION TO THE ONE-YEAR DURATION OF THIS WRITTEN
LIMITED WARRANTY. SOME STATES DO NOT ALLOW LIMITATIONS ON HOW
LONG AN IMPLIED WARRANTY LASTS, SO THE ABOVE LIMITATIONS MAY
NOT APPLY TO YOU.
IN NO EVENT SHALL WE BE LIABLE FOR ANY SPECIAL, INCIDENTAL OR
CONSEQUENTIAL DAMAGES FOR BREACH OF THIS OR ANY OTHER
WARRANTY, EXPRESSED OR IMPLIED, WHATSOEVER.
Some states do not allow the exclusion or limitation of special, incidental, or consequential
damages, so the above limitation or exclusion may not apply to you. This warranty gives
you specific legal rights, and you may also have other rights which vary from state to state.
R
SOUTHWESTERN BELL FREEDOM PHONE
7475 NORTH GLEN HARBOR BLVD., GLENDALE, AZ 85307
37