1
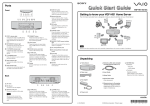
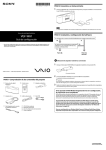
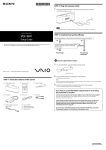
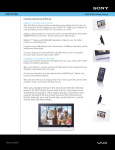
Ports Back (POWER) button Press to turn on the power when in power off or standby mode. Press to enter standby mode while power is turned on. Light sensor Detects ambient light around the unit. Hint /ENTER button Press to select options and enter. While the browse screen or a screen other than the Options screen is displayed, adjust the volume by pressing . BACK button Press to quit setting and return to the previous screen. OPTIONS button Press to display the setting screen of the current feature. HOME button Press to return to the Home screen. If you set [ System settings] - [Auto power on/off ] to [On] in the setting screen of this unit, the power will automatically turn on or enter the standby mode according to the surrounding ambient brightness. For details, see “Settings Menu” on the Operating Instructions supplied with this unit. VGF-CP1 Series Getting to know your VGF-CP1 Digital Photo Frame This unit is a Digital Photo Frame for displaying photos with Internet access. In addition to displaying photos, you can also enjoy music and information by creating various frames. For details, see “Creating a Frame” on the Operating Instructions supplied with this unit. Note For home wireless network connection, you will need a subscription to an Internet service provider and a wireless LAN router. Picasa Web Albums, etc. Home server Memory Stick media, etc. Home server Note Keep sharp objects away from the sensor. WLAN ON/OFF switch Press to switch ON/OFF the wireless LAN. (USB) connector Connects a digital still camera or USB memory device. Registered RSS information, etc. Note A USB hub should not be connected. Bottom You can display the following: Photos stored on memory cards such as Memory Sticks. Memory Stick slot Accesses Memory Stick, Memory Stick PRO, Memory Stick Duo or Memory Stick PRO Duo media data. SD memory card slot Photos stored on your computer or home server through your wireless home network. Photos stored on a Web photo organizer. In order to use, some network and server settings need to be configured. A slide show of your favorite photos, with photo effects and music. Photos stored on your home server supporting the Remote Home Access function - even if you are away from home. Accesses SD/SDHC memory card data. CF (CompactFlash) slot Accesses CompactFlash data. Media access indicator Lights up in orange when accessing memory card data. © 2008 Sony Corporation / Printed in Japan 4-127-382-11 (1) 6V DC IN port Connects to the AC adapter, which in turn connects to a power outlet. Speakers Outputs sound when playing back music. There is another speaker on the opposite side. Unpacking Digital Photo Frame AC adapter Power cord Remote control Stand Installation CD (U.K. model only) Operating Instructions Quick Start Guide (this document) VGF-CP1 Quick Reference Guide Connecting 1 Turning OFF Attach the threaded portion of the stand to the threaded hole at the bottom left corner of the back of the unit. 3 Connect the power cord to the AC adapter, then connect the power cord plug to a wall outlet. To set to standby mode “Standby Mode” reduces power consumption by deactivating the screen. If you set [ System settings] - [Auto power on/off ] to [On] in the setting screen of this unit, the power will automatically turn on or enter standby mode according to a surrounding ambient brightness. For details, see “Settings Menu” on the Operating Instructions supplied with this unit. 1 Press (POWER) on the remote control pointing at the remote control sensor of this unit. The STANDBY indicator lights up in orange and turns to standby mode. Hint To wall outlet 2 To turn off the power Connect the AC adapter plug to the unit. AC adapter This unit can also be set to standby mode by pressing (POWER) on the back of this unit. The power turns on and the start-up screen appears. Setting up the remote control 1 Remove the insulation sheet from the remote control. The steps below show how to turn off the power to remove the AC adapter, etc. 1 Press (POWER) on the back of this unit. The STANDBY indicator lights up in orange and standby mode is set. 2 Press and hold (POWER) on the back of this unit. The New Info indicator blinks and turns off when the power turns off. Note You cannot turn off the power by the remote control. A ferrite core is supplied with the U.K. model only. Press and hold (POWER) only when in standby mode. If you turn the power off from a mode other than standby mode, stored data may be lost. Ports Turning ON For the customers purchasing the U.K. model After connecting the power cord for the first time, the screen detailing the required user registration appears. Please fill out the required contents and proceed to the following procedure. Front WLAN (wireless LAN) indicator Lights up when the wireless LAN turns on. STANDBY indicator Lights up in standby mode. New Info indicator 1 Make sure the stand, power and remote control are ready for use by following the steps in “Connecting” (this page). This unit turns on after connecting the power cord. Hint Press (POWER) to turn the power on when in standby mode. Blinks when receiving new information. Also can be turned on as a light. Remote control sensor Receives a signal from the remote control.