1
S100/150 colour Tchibo / UK / A31008-M1575-L131-1-7619 / cover front.fm / 01.07.2005
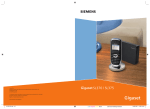
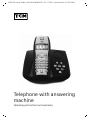
Telephone with answering
machine
Operating instructions and warranty
S100/150 colour Tchibo / UK / A31008-M1575-L131-1-7619 / covers_I-II.fm / 01.07.2005
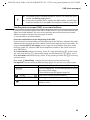
Brief overview of the handset
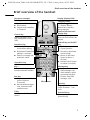
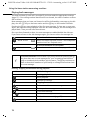
Brief overview of the handset
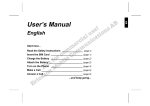
Reception strength
Display (display field)
Talk key
◆ Accept a call
◆ Dial number
◆ Switch from handsfree
to "handset"
Charging status
× flat Ú full
× flashes: Battery
almost flat or battery
being charged
Current functions and
display keys
The display keys give you
access to the functions displayed.
Control key
Opens the menu, directory, Navigation in entry
field
Handsfree key
◆ Switch from "handset"
to handsfree talking
◆ Illuminated: Handsfree
talking is activated
◆ Flashes: incoming call,
automatic redial
Ð
Ù
INT 1
20.05.04
•
09:45
§§§§§§§SMS§§§§§§
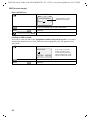
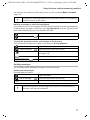
Open directory
Key 1
Select answering
machine/network mailbox
Star key
◆ Ringer tones on/off
(press for about
2 seconds)
◆ Switch between uppercase, lowercase and
number mode
R key
Enter pause (hold key
down)
End call key and On/Off
key
◆ End call
◆ Cancel function
◆ One menu level back
(press briefly)
◆ Return to idle state
(press for about 1
second)
◆ Handset on/off (press
for about 2 seconds)
Message key
◆ Access to the lists of
SMS messages, network mailbox, caller/
answering machine
◆ Flashes: new SMS,
message, calls
Microphone
Hash key
Keypad protection on/off
(press for about 1 second)
Speed dial key
Open speed dial list
(press briefly)
1
S100/150 colour Tchibo / UK / A31008-M1575-L131-1-7619 / S_150_AMIVZ.fm / 01.07.2005
Contents
Contents
Brief overview of the handset . . . . . . . . . . . . . . . . . 1
Safety precautions . . . . . . . . . . . . . . . . . . . . . . . . . . 6
Preparing the telephone . . . . . . . . . . . . . . . . . . . . . . 7
Installing the base station . . . . . . . . . . . . . . . . . . . . . . . . . . . . . . . . . . . . . . . . . . . . . . . 7
Connecting the base station . . . . . . . . . . . . . . . . . . . . . . . . . . . . . . . . . . . . . . . . . . . . . 8
Operating the handset . . . . . . . . . . . . . . . . . . . . . . . . . . . . . . . . . . . . . . . . . . . . . . . . . . 9
Attaching the belt clip . . . . . . . . . . . . . . . . . . . . . . . . . . . . . . . . . . . . . . . . . . . . . . . . . 11
Activating/deactivating the handset . . . . . . . . . . . . . . . . . . . . . . . . . . . . . . . . . . . . . . 11
Activating/deactivating keypad protection . . . . . . . . . . . . . . . . . . . . . . . . . . . . . . . . . 11
Using the telephone and menus . . . . . . . . . . . . . . 12
Keys . . . . . . . . . . . . . . . . . . . . . . . . . . . . . . . . . . . . . . . . . . . . . . . . . . . . . . . . . . . . . . .
Correcting entries . . . . . . . . . . . . . . . . . . . . . . . . . . . . . . . . . . . . . . . . . . . . . . . . . . . . .
Idle state . . . . . . . . . . . . . . . . . . . . . . . . . . . . . . . . . . . . . . . . . . . . . . . . . . . . . . . . . . . .
Graphic main menu . . . . . . . . . . . . . . . . . . . . . . . . . . . . . . . . . . . . . . . . . . . . . . . . . . .
Example for menu operation: "Set volume for handsfree talking" . . . . . . . . . . . . . . .
12
13
14
14
14
Date and time functions . . . . . . . . . . . . . . . . . . . . . 15
Setting the date and the time . . . . . . . . . . . . . . . . . . . . . . . . . . . . . . . . . . . . . . . . . . .
Setting the alarm clock . . . . . . . . . . . . . . . . . . . . . . . . . . . . . . . . . . . . . . . . . . . . . . . .
Setting appointments . . . . . . . . . . . . . . . . . . . . . . . . . . . . . . . . . . . . . . . . . . . . . . . . .
Displaying and deleting missed appointments and anniversaries . . . . . . . . . . . . . . .
15
15
17
18
Making calls . . . . . . . . . . . . . . . . . . . . . . . . . . . . . . . 19
Making and ending external calls . . . . . . . . . . . . . . . . . . . . . . . . . . . . . . . . . . . . . . . .
Answering a call . . . . . . . . . . . . . . . . . . . . . . . . . . . . . . . . . . . . . . . . . . . . . . . . . . . . . .
Calling line identification . . . . . . . . . . . . . . . . . . . . . . . . . . . . . . . . . . . . . . . . . . . . . . .
Handsfree talking . . . . . . . . . . . . . . . . . . . . . . . . . . . . . . . . . . . . . . . . . . . . . . . . . . . . .
Activating/deactivating listening in (at the base station) . . . . . . . . . . . . . . . . . . . . . .
Muting the handset . . . . . . . . . . . . . . . . . . . . . . . . . . . . . . . . . . . . . . . . . . . . . . . . . . .
19
19
20
21
22
22
Network mailbox features . . . . . . . . . . . . . . . . . . . 23
Function set for the next call . . . . . . . . . . . . . . . . . . . . . . . . . . . . . . . . . . . . . . . . . . . .
Functions set for all following calls . . . . . . . . . . . . . . . . . . . . . . . . . . . . . . . . . . . . . . .
Functions during a call . . . . . . . . . . . . . . . . . . . . . . . . . . . . . . . . . . . . . . . . . . . . . . . . .
Function set after a call . . . . . . . . . . . . . . . . . . . . . . . . . . . . . . . . . . . . . . . . . . . . . . . .
2
23
23
25
25
S100/150 colour Tchibo / UK / A31008-M1575-L131-1-7619 / S_150_AMIVZ.fm / 01.07.2005
Contents
Using the directory and other lists . . . . . . . . . . . . 26
Directory and speed dial list . . . . . . . . . . . . . . . . . . . . . . . . . . . . . . . . . . . . . . . . . . . .
Redialling list . . . . . . . . . . . . . . . . . . . . . . . . . . . . . . . . . . . . . . . . . . . . . . . . . . . . . . . .
Email directory . . . . . . . . . . . . . . . . . . . . . . . . . . . . . . . . . . . . . . . . . . . . . . . . . . . . . . .
Displaying available memory . . . . . . . . . . . . . . . . . . . . . . . . . . . . . . . . . . . . . . . . . . .
Displaying lists via the message key . . . . . . . . . . . . . . . . . . . . . . . . . . . . . . . . . . . . . .
Caller list and message list . . . . . . . . . . . . . . . . . . . . . . . . . . . . . . . . . . . . . . . . . . . . .
26
32
34
36
36
37
Making cost-effective calls . . . . . . . . . . . . . . . . . . 41
Linking a call-by-call number and a telephone number . . . . . . . . . . . . . . . . . . . . . . . 41
Automatic network provider selection (Preselection) . . . . . . . . . . . . . . . . . . . . . . . . . 41
SMS (text messages) . . . . . . . . . . . . . . . . . . . . . . . 44
General . . . . . . . . . . . . . . . . . . . . . . . . . . . . . . . . . . . . . . . . . . . . . . . . . . . . . . . . . . . .
Prerequisites for sending and receiving text messages (SMS) . . . . . . . . . . . . . . . . . .
Sending and receiving text messages . . . . . . . . . . . . . . . . . . . . . . . . . . . . . . . . . . . . .
Sending text messages (SMS) and outgoing list . . . . . . . . . . . . . . . . . . . . . . . . . . . . .
Sending text messages (SMS) to an email address . . . . . . . . . . . . . . . . . . . . . . . . . . .
Receiving text messages (SMS) and incoming list . . . . . . . . . . . . . . . . . . . . . . . . . . .
Using several SMS mailboxes . . . . . . . . . . . . . . . . . . . . . . . . . . . . . . . . . . . . . . . . . . .
Using new ring tones for the handset . . . . . . . . . . . . . . . . . . . . . . . . . . . . . . . . . . . . .
Text messages (SMS) on PABX systems . . . . . . . . . . . . . . . . . . . . . . . . . . . . . . . . . . . .
Errors when sending and receiving text messages (SMS) . . . . . . . . . . . . . . . . . . . . .
44
45
45
47
49
53
57
61
62
62
Using the base station answering machine . . . . 64
Operating the answering machine via the base station . . . . . . . . . . . . . . . . . . . . . . .
Operating the answering machine via the handset . . . . . . . . . . . . . . . . . . . . . . . . . .
Playing back messages . . . . . . . . . . . . . . . . . . . . . . . . . . . . . . . . . . . . . . . . . . . . . . . .
Recording infotexts . . . . . . . . . . . . . . . . . . . . . . . . . . . . . . . . . . . . . . . . . . . . . . . . . . .
Operating the answering machine by voice command . . . . . . . . . . . . . . . . . . . . . . .
Operating the answering machine away from home (remote operation) . . . . . . . . .
64
65
70
72
74
75
Setting the base station answering machine . . . 77
Ring delay and charge saving function for remote operation . . . . . . . . . . . . . . . . . .
Setting the message length and recording quality . . . . . . . . . . . . . . . . . . . . . . . . . . .
Listening in . . . . . . . . . . . . . . . . . . . . . . . . . . . . . . . . . . . . . . . . . . . . . . . . . . . . . . . . .
Resetting the answering machine for fast access . . . . . . . . . . . . . . . . . . . . . . . . . . . .
77
78
78
79
Using the network mailbox . . . . . . . . . . . . . . . . . . 80
Setting the network mailbox for speed dialling . . . . . . . . . . . . . . . . . . . . . . . . . . . . . 80
Checking the network mailbox . . . . . . . . . . . . . . . . . . . . . . . . . . . . . . . . . . . . . . . . . . 80
3
S100/150 colour Tchibo / UK / A31008-M1575-L131-1-7619 / S_150_AMIVZ.fm / 01.07.2005
Contents
Registering and de-registering handsets . . . . . . . 81
Automatic registration . . . . . . . . . . . . . . . . . . . . . . . . . . . . . . . . . . . . . . . . . . . . . . . . .
Manual registration . . . . . . . . . . . . . . . . . . . . . . . . . . . . . . . . . . . . . . . . . . . . . . . . . . .
Manual registration of handsets from other manufacturers . . . . . . . . . . . . . . . . . . . .
De-registering handsets . . . . . . . . . . . . . . . . . . . . . . . . . . . . . . . . . . . . . . . . . . . . . . . .
Looking for handsets ("Paging") . . . . . . . . . . . . . . . . . . . . . . . . . . . . . . . . . . . . . . . . . .
Switching base stations . . . . . . . . . . . . . . . . . . . . . . . . . . . . . . . . . . . . . . . . . . . . . . . .
81
81
82
82
83
83
Operating several handsets . . . . . . . . . . . . . . . . . . 84
Making internal calls . . . . . . . . . . . . . . . . . . . . . . . . . . . . . . . . . . . . . . . . . . . . . . . . . .
Changing the name of the handset . . . . . . . . . . . . . . . . . . . . . . . . . . . . . . . . . . . . . . .
Changing a handset's internal number . . . . . . . . . . . . . . . . . . . . . . . . . . . . . . . . . . . .
Internal enquiry calls . . . . . . . . . . . . . . . . . . . . . . . . . . . . . . . . . . . . . . . . . . . . . . . . . .
Accepting or rejecting a waiting call . . . . . . . . . . . . . . . . . . . . . . . . . . . . . . . . . . . . . .
Listening in on an external call . . . . . . . . . . . . . . . . . . . . . . . . . . . . . . . . . . . . . . . . . .
Using direct inward dialling . . . . . . . . . . . . . . . . . . . . . . . . . . . . . . . . . . . . . . . . . . . .
Using a handset as a room monitor . . . . . . . . . . . . . . . . . . . . . . . . . . . . . . . . . . . . . . .
Setting the Walk and Talk mode . . . . . . . . . . . . . . . . . . . . . . . . . . . . . . . . . . . . . . . . .
84
84
85
86
86
87
88
89
92
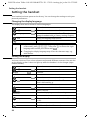
Setting the handset . . . . . . . . . . . . . . . . . . . . . . . . . 94
Changing the display language . . . . . . . . . . . . . . . . . . . . . . . . . . . . . . . . . . . . . . . . . . 94
Setting the display . . . . . . . . . . . . . . . . . . . . . . . . . . . . . . . . . . . . . . . . . . . . . . . . . . . . 94
Logo display . . . . . . . . . . . . . . . . . . . . . . . . . . . . . . . . . . . . . . . . . . . . . . . . . . . . . . . . . 95
Activating/deactivating Auto talk . . . . . . . . . . . . . . . . . . . . . . . . . . . . . . . . . . . . . . . . . 95
Changing the handsfree speaking volume . . . . . . . . . . . . . . . . . . . . . . . . . . . . . . . . . 95
Changing ringer melodies . . . . . . . . . . . . . . . . . . . . . . . . . . . . . . . . . . . . . . . . . . . . . . 96
Activating/deactivating advisory tones . . . . . . . . . . . . . . . . . . . . . . . . . . . . . . . . . . . . 99
Resetting a handset to the factory setting . . . . . . . . . . . . . . . . . . . . . . . . . . . . . . . . . 100
Setting the base station . . . . . . . . . . . . . . . . . . . . 101
Protecting your telephone from unauthorised access . . . . . . . . . . . . . . . . . . . . . . . . 101
Emergency numbers . . . . . . . . . . . . . . . . . . . . . . . . . . . . . . . . . . . . . . . . . . . . . . . . . 102
Changing the loudspeaker volume of the base station . . . . . . . . . . . . . . . . . . . . . . 103
Changing the base station ringer tones . . . . . . . . . . . . . . . . . . . . . . . . . . . . . . . . . . 104
Activating/deactivating the base station key beep . . . . . . . . . . . . . . . . . . . . . . . . . . 104
Changing the base station name . . . . . . . . . . . . . . . . . . . . . . . . . . . . . . . . . . . . . . . . 105
Repeater support . . . . . . . . . . . . . . . . . . . . . . . . . . . . . . . . . . . . . . . . . . . . . . . . . . . . 105
Resetting the base station to the factory setting . . . . . . . . . . . . . . . . . . . . . . . . . . . . 105
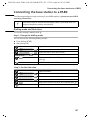
Connecting the base station to a PABX . . . . . . . . 107
Dialling mode and flash time . . . . . . . . . . . . . . . . . . . . . . . . . . . . . . . . . . . . . . . . . . . 107
Saving the prefix (APL) . . . . . . . . . . . . . . . . . . . . . . . . . . . . . . . . . . . . . . . . . . . . . . . . 108
Setting pauses . . . . . . . . . . . . . . . . . . . . . . . . . . . . . . . . . . . . . . . . . . . . . . . . . . . . . . 108
Switching temporarily to tone dialling (DTMF) . . . . . . . . . . . . . . . . . . . . . . . . . . . . . 109
4
S100/150 colour Tchibo / UK / A31008-M1575-L131-1-7619 / S_150_AMIVZ.fm / 01.07.2005
Contents
Appendix . . . . . . . . . . . . . . . . . . . . . . . . . . . . . . . . 110
Care . . . . . . . . . . . . . . . . . . . . . . . . . . . . . . . . . . . . . . . . . . . . . . . . . . . . . . . . . . . . . .
Contact with liquid . . . . . . . . . . . . . . . . . . . . . . . . . . . . . . . . . . . . . . . . . . . . . . . . . .
Questions and answers . . . . . . . . . . . . . . . . . . . . . . . . . . . . . . . . . . . . . . . . . . . . . . .
Authorisation . . . . . . . . . . . . . . . . . . . . . . . . . . . . . . . . . . . . . . . . . . . . . . . . . . . . . . .
Technical data . . . . . . . . . . . . . . . . . . . . . . . . . . . . . . . . . . . . . . . . . . . . . . . . . . . . . .
Answering machine remote operation . . . . . . . . . . . . . . . . . . . . . . . . . . . . . . . . . . .
Character map . . . . . . . . . . . . . . . . . . . . . . . . . . . . . . . . . . . . . . . . . . . . . . . . . . . . . .
Predictive text entry . . . . . . . . . . . . . . . . . . . . . . . . . . . . . . . . . . . . . . . . . . . . . . . . .
110
110
110
111
113
114
114
116
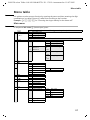
Menu table . . . . . . . . . . . . . . . . . . . . . . . . . . . . . . 117
Main menu . . . . . . . . . . . . . . . . . . . . . . . . . . . . . . . . . . . . . . . . . . . . . . . . . . . . . . . . 117
Directory key and speed dialling list key . . . . . . . . . . . . . . . . . . . . . . . . . . . . . . . . . . 119
Caller list/message list . . . . . . . . . . . . . . . . . . . . . . . . . . . . . . . . . . . . . . . . . . . . . . . . 119
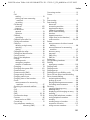
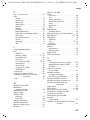
Index . . . . . . . . . . . . . . . . . . . . . . . . . . . . . . . . . . . 120
5
S100/150 colour Tchibo / UK / A31008-M1575-L131-1-7619 / starting.fm / 01.07.2005
Safety precautions
Safety precautions
$
!
Only use the power supply unit supplied, as indicated on the underside of the
base station.
Only use approved rechargeable batteries (page 113) of the same type!
I. e. no other type of rechargeable batteries or non-rechargeable batteries
because otherwise health risks and personal injuries cannot be excluded.
‹
Œ
Insert rechargeable batteries in accordance with the polarity symbols and use
the battery type recommended in these operating instructions (the symbols
can be found on the handset battery compartment).
Medical equipment can be affected by the use of the telephone. Observe the
conditions of your environment (e. g. doctor's practice).
The handset can cause an unpleasant humming sound in hearing aids.
Do not install the base station in bathrooms or showers (page 110). The handsets and base station are not splashproof.
Do not use the telephone while driving (Walk and Talk function).
Telephones must be switched off at all times while in an aircraft (Walk and Talk
function). Prevent accidental activation.
Do not use the telephone in environments where there is a risk of explosions
(e. g. paint shops).
ƒ
Ensure that the operating instructions are included when passing on your
base station and handset to a third party.
Dispose of batteries and telephone in an environmentally friendly manner.
i
6
Not all functions described in these operating instructions are available in
all countries.
S100/150 colour Tchibo / UK / A31008-M1575-L131-1-7619 / starting.fm / 01.07.2005
Preparing the telephone
Preparing the telephone
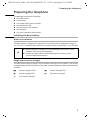
The package contains the following:
◆ one base station,
◆ one handset,
◆ one power supply unit and cable,
◆ one telephone cord,
◆ one belt clip for the handset,
◆ two batteries,
◆ one set of operating instructions.
Installing the base station
Notes on installation
The base station is designed for operation in dry rooms with a temperature range of
+5 °C to +45 °C. Install the base station in a central location in the home, e. g. in the hall.
W
◆ Never expose the telephone to the following: heat sources, direct
sunlight, other electrical equipment.
◆ Protect your base station and handset against moisture, dust,
corrosive liquids and vapours.
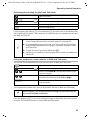
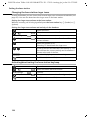
Range and reception strength
The base station range is approx. 300 m outdoors and up to 50 m indoors. The receive
strength display shows the quality of the radio contact between the base station and the
handset:
Ð
Ñ
|
receive strength 100%
receive strength 50%
i
Ò
receive strength 75%
low receive strength
no reception (flashes)
7
S100/150 colour Tchibo / UK / A31008-M1575-L131-1-7619 / starting.fm / 01.07.2005
Preparing the telephone
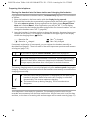
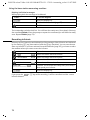
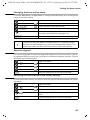
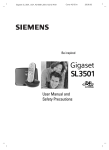
Connecting the base station
Telephone
socket
Cable duct
1.
Telephone plug
with telephone
cable
Underneath of
base station
(magnified)
1.
◆ Insert the small plug on the telephone cable into the jack (clicks into place),
◆ place cable in the cable duct,
◆ insert telephone jack into the telephone socket.
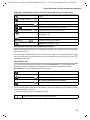
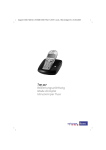
Socket
Cable duct
2.
Power supply unit
(230V) with
mains cable
Underneath of
base station
(magnified)
2.
◆ Insert the small plug on the mains cable into the jack,
◆ place cable in the cable duct,
◆ insert power supply unit into mains socket.
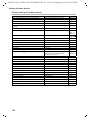
Telephone jack assignment:
i
3
2
1
1
2
3
4
5
6
free
free
a
b
free
free
◆ The power supply unit must be plugged in at all times for the
telephone to work.
◆ If you buy another telephone cable, ensure that the telephone leads
have 3-4 assignment.
8
4
5
6
S100/150 colour Tchibo / UK / A31008-M1575-L131-1-7619 / starting.fm / 01.07.2005
Preparing the telephone
Operating the handset
Remove the protective plastic film
The display is protected by a plastic film.
Remove the protective plastic film!
Insert the batteries
◆ Insert the batteries ensuring correct polarity – see figure on left.
◆ Place the cover about 3 mm down lower and then push upwards until it clicks into
place,
◆ To open, press the grooved area on the cover and slide back.
W
Only use the chargeable batteries recommended on page 113! Never use
ordinary (non-rechargeable) batteries or a different type of rechargeable
batteries because this may lead to serious health risks or personal injuries.
For example the battery casing may be destroyed (dangerous). The telephone itself may not work properly or be damaged.
9
S100/150 colour Tchibo / UK / A31008-M1575-L131-1-7619 / starting.fm / 01.07.2005
Preparing the telephone
Placing the handset into the base station and charging the batteries
If you place the handset on the base station, it automatically registers. This can be done
as follows:
1. Place the handset in the base station with the display facing upward.
2. Wait until the handset has automatically registered with the base station (page 81):
This takes about a minute. During registration the display shows Regstr.Procedure and it flashes Base 1. After registration you will see "INT 1" in the display,
which means that the handset has been assigned the first internal number. You can
change the handset name "INT 1" (page 84).
3. Leave the handset in the base station to charge the batteries, because they are not
charged at the factory. The charging is indicated in the upper right of the display
where the charging status Ù flashes:
×
Batteries flat
Ø Batteries 1/3 charged
Ù
Batt. 2/3 charged
Ú Batt. fully charged
If automatic registration is interrupted, you can register the handset manually as
described from page 81. There is a table of the most important questions and answers
to help you (page 110).
i
If you want to register further handsets, please turn to page 81.
W
For initial charging we recommend a continous, uninterrupted charging
period of seven hours, whatever charge level is indicated! The battery
charge capacity decreases after a few years for technical reasons.
The battery charging status is correctly displayed only after uninterrupted charging/discharging. Therefore you should not remove the batteries unnecessarily or terminate the
charging process early.
◆ Once the initial charging operation is completed you can replace your
i
handset in the base station after each call. Charging is controlled
electronically. This ensures optimum charging.
◆ The batteries heat up during charging. This is normal and not
dangerous.
Note:
Your telephone is now ready for operation. The answering machine with the prerecorded announcement has also been switched on. All you have to do is set the date
and time, so the time of incoming calls and messages can be noted correctly (page 15).
10
S100/150 colour Tchibo / UK / A31008-M1575-L131-1-7619 / starting.fm / 01.07.2005
Preparing the telephone
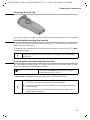
Attaching the belt clip
Push the belt clip onto the back of the handset until the side protrusions click into place.
Activating/deactivating the handset
To activate the handset hold down the end call key a. You will hear a confirmation
beep (rising tone sequence).
To deactivate the handset while in the idle state hold down the end call key a again
(confirmation beep).
i
Placing the handset in the base station or charging unit automatically
activates it.
Activating/deactivating keypad protection
You can disable the handset keys, e. g. when carrying it in your pocket or bag. This protects the keypad against inadvertent activation.
Hold down the hash key (confirmation beep).
The display shows the icon Ø.
To deactivate hold down the hash key R again (confirmation beep).
◆ The keypad protection is automatically deactivated when you receive
a call. After the call it is automatically activated again.
i
◆ Emergency numbers cannot be dialled if the keypad protection has
been activated.
◆ The keypad protection is still indicated if you have loaded a logo as
display graphic (page 61).
11
S100/150 colour Tchibo / UK / A31008-M1575-L131-1-7619 / guidance.fm / 01.07.2005
Using the telephone and menus
Using the telephone and menus
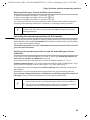
Keys
Control key
The control key with four direction arrows and associated icons is the central operating
element. Pressing the various icons (up, down, right or left) opens a different function.
The side you have to press is shown by a black triangle in the operating instructions,
e.g.: v key for right = open menu. Navigating in the graphic main menu (see page 14)
is always displayed with the down key s.
Example:
Control key
Functions of the control key.
t
s
In idle state
In lists and menus
In an entry field
Open directory
Scroll up
Scroll down
Move the cursor one line up
Move the cursor one line
down
Move the cursor to the right
Open graphic main menu
Confirm selected entry
(as OK )
Open
handset
list
Scroll
one menu level back Move the cursor to the left
u
(cancel)
Use the control key to navigate through the icons that appear in the graphic main menu
(page 14).
v
i
12
You can often use the control key to carry out functions assigned to the
right display key.
S100/150 colour Tchibo / UK / A31008-M1575-L131-1-7619 / guidance.fm / 01.07.2005
Using the telephone and menus
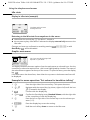
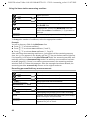
Display keys
The display keys are the horizontal buttons directly below the display. Their functions
depend on the operating situation. The current function is shown directly above the
button in the display.
Example:
•
§§§§§§§SMS§§§§§
Display keys
The various displays have the following meaning:
Display
icon
Þ
OK
à
C
Ý
ä
If you press the key
Redial key: Opens the list of the last 10 telephone numbers.
OK key: Confirm menu function or entry.
Menu key: In idle state opens the main menu.
While telephoning, opens context sensitive menu.
Delete key: Deletes input character by character from right to left.
Escape key: One menu level back (cancel).
Open email directory.
Correcting entries
After a correct entry you will hear a confirmation beep (rising tone sequence), after an
incorrect entry an error beep (falling tone sequence). You can repeat the entry.
If you have entered the wrong character in a text, you can correct it as follows:
Delete characters to the left of the cursor with fC
To correct a telephone number or text, move the cursor to the right of the incorrect character or number with the control key. Then press the display key fC . This deletes the
character. Now enter the correct character.
Inserting characters to the left of the cursor
If you have left out a character, use the control key to move the cursor to where you
want to insert the character and then enter it.
Overwriting characters to the right of the cursor
When entering Cost per Unit: the number of digits is fixed and there is a default entry
in the field. Use the control key to move the cursor to the left of the wrong digit and
then overwrite it.
13
S100/150 colour Tchibo / UK / A31008-M1575-L131-1-7619 / guidance.fm / 01.07.2005
Using the telephone and menus
Idle state
Display in idle state (example)
Ð
×
Ù
INT 1
20.05.04
09:45
•
The date and time have
already been set
SMS
Returning to the idle state from anywhere in the menu:
◆ Hold down the end call key a for about 1 second or
◆ do not press any key: After about 2 minutes the display automatically returns to the
idle state.
Changes you have not confirmed or saved by pressing OK , Yes, Save, Send or with
Save Entry OK will be discarded.
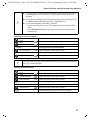
Graphic main menu
è
ç
SMS
î
ê
é
ë
1
The icons actually displayed will
depend on your base.
Ît
x §§§§§§§§§OK§§§§§§§§
The display shows all the menu options from the main menu as coloured icons. Use the
control key to select the required icon - this is now highlighted by a border. The name of
the selected menu appears at the top of the screen. To open the menu, press the display
key OK .
If the main menu has three lines, then either the top two or the bottom two lines will
be displayed.
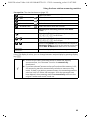
Example for menu operation: "Set volume for handsfree talking"
1. v
2. s
ê
3. OK
Press the right side of the control key. This opens the menu.
Navigate with the control key (up, down, right or left) until the icon
ê is framed in the display.
Confirm with the display key.
4. v or OK
Confirm the first display entry, Handset Volume, with the right side
of the control key or with the display key.
5. r
Press the left or right side of the control key to set the volume you
want (1–5).
6. [RRRRRRRRRRRRRRRRRRRRRR]
Save
Press the display key to save the setting.
7. a
Hold the end call key down to return to the idle state.
14
S100/150 colour Tchibo / UK / A31008-M1575-L131-1-7619 / TimeCalendar.FM / 01.07.2005
Date and time functions
Date and time functions
Setting the date and the time
You need to set the date and time so that they can be displayed correctly when calls /
messages are received.
You can set the clock mode to either 12 hour (factory setting) or 24 hour (am = 1st part
of the day; pm = 2nd part of the day).
[______________________________________________]
OK
ç
[______________________________________________]
OK
Date/Time
Open the menu.
Select the menu item and confirm.
Select the menu item and confirm.
Enter the date:
In the Date: line, enter day/month/year.
Enter the time:
Scroll to the Time: line and enter the hours/minutes.
Select the display mode:
Scroll to the Time Mode: line if you want to choose
between 12 hour and 24 hour mode.
[RRRRRRRRRRRRRRRRRRRRRR]
Save
Press the display key to save the entry.
With 12-hour mode you can scroll to Time: and then use the display key am/pm to switch
between am and pm.
Setting the alarm clock
You can use your handset as an alarm clock.
Prerequisite: You have set the date and time (page 15).
15
S100/150 colour Tchibo / UK / A31008-M1575-L131-1-7619 / TimeCalendar.FM / 01.07.2005
Date and time functions
Activating and setting the alarm clock
If you want to use your handset as an alarm clock, you have to set the alarm time,
choose a melody and activate the alarm clock.
[______________________________________________]
OK
ç
[______________________________________________]
OK
Alarm Clock
Open the menu.
Select the menu item and confirm.
Select the menu item and confirm.
The current setting is displayed.
Switching the alarm clock on:
In the Room M.: line select On.
Enter the time for alarm call:
Scroll to the Time: line and enter the hours/minutes,
e.g. QM15 for "7.15 am".
[RRRRRRRRRRRRRRRRRRRRRR]
am/pm
When in 12 hour mode, press the display key if you
want to switch between am and pm.
[RRRRRRRRRRRRRRRRRRRRRR]
Save
Press the display key to save the entry.
Hold down (return to idle). You will see the icon ¼.
◆ The alarm clock will ring only if the handset is in the idle state. The
i
alarm clock will not ring if the room monitor function is activated, a
call is being made or during automatic redialling.
◆ How to change the volume and melody is explained on page 96.
Switching the alarm clock off
The alarm clock is set to a particular time, but you do not want it to ring.
[______________________________________________]
OK
ç
[______________________________________________]
OK
Alarm Clock
Open the menu.
Select the menu item and confirm.
Select the menu item and confirm.
In the Room M.: line select Off.
[RRRRRRRRRRRRRRRRRRRRRR]
Save
Press the display key to save the setting.
Hold down (return to idle).
Deactivating the alarm call
An alarm call with deactivated ringer melody is signalled on the handset and the display
shows Alarm Clock. Press the display key Silence or any key to turn off the alarm call.
The alarm call will ring for 30 seconds if it is not answered sooner.
16
S100/150 colour Tchibo / UK / A31008-M1575-L131-1-7619 / TimeCalendar.FM / 01.07.2005
Date and time functions
Setting appointments
You can have your handset remind you of up to five appointments. To do this you have
to save the times.
Activating and setting appointments
[______________________________________________]
OK
ç
[______________________________________________]
OK
Set Appoints.
OK
[______________________________________________]
Appoint. 2
Open the menu.
Select the menu item and confirm.
Confirm.
Select the appointment (1 - 5) and confirm.
Activating the appointment:
In the Room M.: line select On.
Enter the date:
Scroll to the Date: line and enter the day/month.
Example: For 20.05 enter 2QQ5.
Enter the time:
Scroll to the Time: line and enter the hours/minutes.
Example: For 9:05 am enter QOQ5.
If in 12h mode (page 15): you can switch between
am and pm
[RRRRRRRRRRRRRRRRRRRRRR]
am/pm
Specifying the appointment:
[RRRRRRRRRRRRRRRRRRRRRR]
Edit
Scroll to the Notes: line and press the display key.
Enter a name (max. 16 characters) (for entering letters and characters see page 114) and confirm.
OK
Press the display key to save the entry.
[RRRRRRRRRRRRRRRRRRRRRR]
Save
Hold down (return to idle). You will see the icon ¼.
◆ If you do not enter a name, the display will then show
"Appointment…".
i
◆ How to change the volume and melody is explained from page 96.
◆ An appointment will be displayed only if the handset is in the idle
state. It will not be displayed if the room monitor function is activated,
a call is being made or during automatic redialling.
17
S100/150 colour Tchibo / UK / A31008-M1575-L131-1-7619 / TimeCalendar.FM / 01.07.2005
Date and time functions
Cancelling an appointment
OK
[______________________________________________]
ç
[______________________________________________]
OK
Set Appoints.
[______________________________________________]
OK
Appoint. 2
Open the menu.
Select the menu item and confirm.
Confirm.
Select the appointment (1 - 5) and confirm.
Select setting Off.
Press the display key to save the setting.
[RRRRRRRRRRRRRRRRRRRRRR]
Save
Switching off or answering an appointment alarm
An appointment is signalled with the selected ringer melody (page 97) and in the display you will see for example Appoint. 2. Once it has been signalled you can switch it
off or answer with an SMS. The appointment call will ring for 30 seconds if it is not
answered sooner.
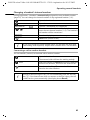
Displaying and deleting missed appointments and anniversaries
If you do not accept an appointment or anniversary alarm when it rings (page 32), it will
be saved in a list.
[______________________________________________]
OK
ç
OK
[______________________________________________]
Missed Dates
Open the menu.
Select the menu item and confirm.
Select the menu item and confirm. The list of
appointments/anniversaries will open.
Select appointment/anniversary.
This will display information about the appointment/
anniversary. A missed appointment is marked with
¼, a missed anniversary with ‚.
[RRRRRRRRRRRRRRRRRRRRRR]
Delete
Press the display key.
... then
Hold down (return to idle).
◆ If there is a new appointment/anniversary in the list, the display
i
18
shows Appoint. You can also use this display key to open the list of
appointments/anniversaries. Once you have looked at all the new
appointments, Appoint will disappear from the display.
◆ If the list is empty, you can close it with Go Back.
S100/150 colour Tchibo / UK / A31008-M1575-L131-1-7619 / telephony.fm / 01.07.2005
Making calls
Making calls
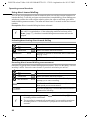
Making and ending external calls
External calls are calls into the public telephone network.
Enter the telephone number and press the talk key.
The telephone number is dialled.
Ending a call:
Press the end call key.
i
◆ You can also first press the talk key c (you will hear the dial tone)
and then enter the telephone number.
◆ You can cancel the dialling operation with the end call key a.
Dialling pause
You can insert a pause between the dialling code and the telephone number. Hold down
the key S for about 2 seconds. Then enter the telephone number.
i
How to call another handset is explained on page 84.
Answering a call
Your handset rings, the call is shown in the display and the handsfree key d flashes.
Press the talk key c, the display key Accept or the handsfree key d to accept the call.
If the handset is in the base station/charging unit and the function Auto Answer is activated (page 95), you only have to take the handset from the base station/charging unit
to answer the call.
i
If the ringer tone disturbs you, press the display key Silence. You can
accept the call as long as it is shown in the display.
19
S100/150 colour Tchibo / UK / A31008-M1575-L131-1-7619 / telephony.fm / 01.07.2005
Making calls
Calling line identification
The caller's number or name will be shown.
Prerequisites:
1. You have asked your network provider to have the caller's telephone number (CLIP)
or name (CNIP) shown on your display.
2. The caller has asked his or her network provider to have the telephone number
shown (CLI).
3. Your network provider supports CLIP, CLI and CNIP.
CLI
CLIP
CNIP
Calling Line Identification = transmission of the caller's telephone number
Calling Line Identification Presentation = display of the caller's telephone
number
Calling Name Identification Presentation = display of the caller's name
Display with CLIP/CLI
The caller's telephone will be shown in the display. If you have saved an entry in your
directory for this number, then the directory entry will be shown instead of the number,
e. g. "Anna".
Å
1234567890
Accept
Silence
Bell icon
telephone number
or "Anna"
The display will show External if no telephone number is transmitted.
The display will show Withheld if the caller has suppressed transmission of the number
(page 23) or Unavailable if it has not been ordered.
Display with CNIP
If you have CNIP, you will also see the name (place) registered with your network provider for this telephone number.
Anna Smith, London
Name and place
1234567890
Telephone number
Accept
Silence
The display will show External if no telephone number is transmitted.
The display will show Withheld if the caller has suppressed transmission of the number
(page 23) or Unavailable if it has not been ordered.
i
20
Calling line identification may be a chargeable function. Please contact
your network provider for more information.
S100/150 colour Tchibo / UK / A31008-M1575-L131-1-7619 / telephony.fm / 01.07.2005
Making calls
Handsfree talking
Activating/deactivating handsfree talking
Activating while dialling:
Enter the telephone number and press the handsfree
key (instead of the talk key c).
Activating during a call:
Press the handsfree key.
Deactivating handsfree talking:
Press the talk key
As soon as you end handsfree talking, you switch to "handset operation" for the rest of
the call.
i
◆ If you want to put the handset back in the base station during a call,
keep the handsfree key d pressed while you do so.
◆ Before you use the handsfree function, you should inform your caller
about your intention.
Changing the volume during handsfree talking
You are making a call and handsfree talking d is activated.
Press the handsfree key again.
Raise or lower the volume.
[RRRRRRRRRRRRRRRRRRRRRR]
Save
Press the display key to save the setting.
21
S100/150 colour Tchibo / UK / A31008-M1575-L131-1-7619 / telephony.fm / 01.07.2005
Making calls
Activating/deactivating listening in (at the base station)
You can switch on the base station loudspeaker so that other people in the room can
hear what your external caller on the telephone is saying.
Prerequisite: You are making a call (handsfree talking).
Open the menu.
[______________________________________________]
OK
Open Listen. On
Select the menu item and confirm.
Ending the call deactivates the function.
i
◆ Before you use this function, you should inform your caller about your
intention.
◆ You can adjust the volume directly on the base station with the keys
ð and ñ (page 64).
Muting the handset
You can deactivate your microphone during external calls in order to talk confidentially
to another person in the room, for example. The external caller cannot hear your conversation during this time (waiting melody). You cannot hear your caller either.
Open the handset list. The call is "parked" (waiting
melody).
Reactivating the microphone:
Ý
22
Press the display key.
S100/150 colour Tchibo / UK / A31008-M1575-L131-1-7619 / SAG_TNet_LM.fm / 01.07.2005
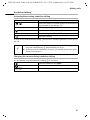
Network mailbox features
Network mailbox features
Network mailbox features are functions made available by your network provider. You
can only use these features if you have ordered them from your network provider.
Please contact the provider to find out which functions can be activated free of charge
and which are chargeable.
i
If you have any problems with these features please contact your
network provider.
Function set for the next call
Before the following procedure press the keys:
v (open menu); s î [. Once the procedure is completed, a code will be sent
which you can then see in the handset display.
Suppressing the telephone
number for the next call
(CLIR):
Withhold No. [
~ (enter the telephone number); c
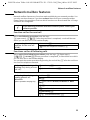
Functions set for all following calls
Before each of the following procedures press the keys: v (Open menu);
s î [; s All Calls [ Once a procedure is completed, a code will be sent which
you can then see in the handset display.
You can quit the current procedure by pressing the end call key a after the confirmation from the telephone network.
Activating/deactivating call
s Call Waiting [
waiting (only during an exter- r (activate/deactivate); Send
nal call):
Activating/deactivating and
setting general call
diversion:
(Menu operation see page 23)
Call Divert [
All [
r (select variant All Calls, No Answer or When
Busy)
s Edit
~ (enter the telephone number)
© Save Entry [
s r (activate/deactivate); Send
23
S100/150 colour Tchibo / UK / A31008-M1575-L131-1-7619 / SAG_TNet_LM.fm / 01.07.2005
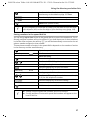
Network mailbox features
Activating/deactivating and
setting selective call
diversion:
(Menu operation see page 23)
Call Divert [
s Selective [
Settings [
r (select variant); s Edit
~ (enter the telephone number)
© Save Entry [
s r (activate/deactivate); Send
Entering the telephone
number for selective call
diversion:
(Menu operation see page 23)
Call Divert [
s Selective [
s Number List [
~ (enter the list position); s Edit
~ (enter the telephone number)
© Save Entry [; Send
24
S100/150 colour Tchibo / UK / A31008-M1575-L131-1-7619 / SAG_TNet_LM.fm / 01.07.2005
Network mailbox features
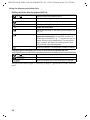
Functions during a call
Activating callback:
You hear the busy tone: v (open menu)
s Ringback [; a
Initiating an enquiry call:
Ext.Call, ~ (enter the number of the user)
Ending an enquiry call:
v (open menu)
s End Active Call [
Toggling:
q (Toggling between two callers)
Ending toggling:
v (open menu)
s End Active Call [
Accepting a waiting call:
Accept
Rejecting a waiting call:
v (open menu)
s Reject Call Wait [
Function set after a call
Before the procedure press the keys: v (open menu); s î [.
Cancelling callback:
s Ringback Off [;
25
S100/150 colour Tchibo / UK / A31008-M1575-L131-1-7619 / Directories.fm / 01.07.2005
Using the directory and other lists
Using the directory and other lists
Directory and speed dial list
The directory and speed dial list can store up to 200 telephone numbers depending on
the length of the entries, the number of entries in the speed dial list and the email directory (page 34).
The directory makes dialling numbers much easier. Open the directory with the s key.
For each directory entry you can add an anniversary and mark the entry as "VIP".
The speed dial list is a special directory you can use to store especially important numbers, e.g. private telephone numbers, prefixes of network providers (so-called "call-bycall numbers") etc. Open the speed dial list with the C key.
You can create a directory, email directory and speed dial list individually for your handset. If you want to make the lists or individual entries available to other handsets, you
can send them to the handset(s) (page 31).
Apart from the storing of entries, the operating of speed dial lists is identical to that for
the directory.
◆ Entering names can be made easier with EATONI predictive text entry
(page 116, factory setting deactivated).
i
◆ Please see the character map (page 114) on how to enter text
correctly.
◆ You can enter up to 32 digits for a number and 16 letters for a name.
◆ When entering a number you can use à , s Insert Pause OK or
press the S key for about 2 seconds to add the appropriate pause.
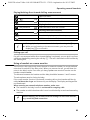
Saving telephone numbers in the directory
Open the directory.
OK
[______________________________________________]
New Entry
Confirm.
Write the entry
Enter the telephone number.
Scroll to the next line and enter the name.
either ...
à
[______________________________________________]
OK
Save Entry
or ...
26
Saving the telephone number:
Press the display key to open the menu.
Confirm. The entry is saved.
Entering an anniversary before saving:
S100/150 colour Tchibo / UK / A31008-M1575-L131-1-7619 / Directories.fm / 01.07.2005
Using the directory and other lists
Scroll to the line Annivers.: if you want to enter an
anniversary, as described on page 32. Then:
Press the display key to save the entry.
RRRRRRRRRRRRRRRRRRRRRRRR
Save
... then
Hold down (return to idle).
i
If your telephone is connected to a PABX, you may have to enter the external call prefix (APL) as the first digit of your directory entry (page 108).
Saving numbers in the speed dial list
You can assign up to nine entries in the speed dial list to one of the numbers 0, 2 to 9.
Already assigned numbers will not be offered. If you hold down one of these numbers
in the idle state and press the talk key c you will be immediately connected to the telephone number assigned to that number.
The maximum number of entries in the speed dial list depends on the number of entries
in the directory and the email directory.
Open the speed dial list.
[______________________________________________]
OK
New Entry
Confirm.
Write the entry
Enter the telephone number.
Scroll to the PublicKey: line and enter the name.
either ...
Saving the telephone number:
à
Press the display key to open the menu.
[______________________________________________]
OK
Save Entry
or ...
Confirm. The entry is saved.
Saving a speed dial number:
Scroll to the Enter key: line and select a number (0,
2–9) for this telephone number.
Press the display key to save the setting.
RRRRRRRRRRRRRRRRRRRRRRRR
Save
... then
Hold down (return to idle).
i
◆ Already assigned speed dial numbers will not be offered.
◆ Sorting sequence: Entries with speed dial numbers will appear at the
head of the list.
27
S100/150 colour Tchibo / UK / A31008-M1575-L131-1-7619 / Directories.fm / 01.07.2005
Using the directory and other lists
Dialling with the directory/speed dial list
or
either ...
Open the directory/speed dial list.
Scroll to the entry:
Select the entry.
Press the talk key The telephone number is dialled.
or ...
Enter the first letter:
Enter the first letter of the name you are looking for,
e.g. "N".
You can also enter the next letter(s): The line directly
above the display keys (entry field) contains "N".
Enter the second letter, e.g. "i". You will now see the
name closest to this combination. The entry field
now contains "Ni". Keep on entering letters (max.
10) until the right name appears.
Press the talk key. The telephone number is dialled.
Displaying and changing an entry in the directory/speed dial list
or
Open the directory/speed dial list.
RRRRRRRRRRRRRRRRRRRRRRRRR
View
Select the entry and press the display key.
[RRRRRRRRRRRRRRRRRRRRRR
]
Edit
Press the display key to start making the changes.
Proceed as described on page 26 (directory) or page 27 (speed dial list) under "Write the
entry".
28
S100/150 colour Tchibo / UK / A31008-M1575-L131-1-7619 / Directories.fm / 01.07.2005
Using the directory and other lists
Copying and changing a directory entry
To avoid having to enter two very similar entries twice, you can make and edit a copy.
Open the directory.
Select the entry and open the menu.
[______________________________________________]
OK
Copy and Edit
Select the menu item and confirm.
Change the telephone number.
If necessary, scroll to the next line and edit the name.
either ...
Saving the changes:
à
Press the display key to open the menu.
OK
[______________________________________________]
Save Entry
or ...
Confirm. The entry is saved.
Editing the anniversary before saving:
[RRRRRRRRRRRRRRRRRRRRRR]
Edit
Scroll to the Annivers.: line and press the display
key.
Change and confirm the anniversary (see page 32).
OK
Press the display key to save the entry.
[RRRRRRRRRRRRRRRRRRRRRR]
Save
... then
If you do not change the number, you will be warned
that the number already exists. Press the display key
to confirm the prompt.
[RRRRRRRRRR]
Yes
Press key (return to idle).
i
The VIP settings and voice patterns are not copied.
Marking an directory entry as VIP
You can mark the directory entries for callers who are particularly important as VIP (Very
Important Person) using Æ . You can assign a particular ringer melody to a VIP number
so you can tell from the tone who is phoning. The VIP melody starts after the first ringer
tone. Prerequisite: The incoming call number has been transmitted (page 20).
Open the directory.
Select the entry and open the menu.
[______________________________________________]
OK
VIP Entry
Select the menu item and confirm.
In the VIP: line activate the function.
Scroll down a line. The current melody rings and its
number is shown at the end of the line. Select a melody (1–10) (page 96).
[RRRRRRRRRRRRRRRRRRRRRR]
Save
Press the display key to save the setting.
Hold down (return to idle).
29
S100/150 colour Tchibo / UK / A31008-M1575-L131-1-7619 / Directories.fm / 01.07.2005
Using the directory and other lists
Deleting a single entry or directory/speed dial list
Open the directory/speed dial list.
or
Select the entry and open the menu.
either ...
Deleting a single entry:
OK
[______________________________________________]
Delete Entry
or ...
Select the menu item and confirm.
Deleting an entire directory/speed dial list:
[______________________________________________]
OK
Delete Calls List
Select the menu item and confirm.
Press the display key to confirm the prompt.
[RRRRRRRRRRR]
Yes
Hold down (return to idle).
Copying a telephone number to the directory
If a telephone number is shown in the display (CLIP), you can copy it to your directory.
This can be done while dialling from the redialling list, from the caller list/message list
or during a call.
Open the menu.
OK
[______________________________________________]
Copy to Directory
Select the menu item and confirm.
If you do not have CNIP, scroll to the name line and
enter the name.
either ...
à
Storing an entry
Press the display key to open the menu.
[______________________________________________]
OK
Save Entry
or ...
Confirm. The entry is saved.
Entering an anniversary
Scroll to the line Annivers.: if you want to enter an
anniversary, as described on page 32.
[RRRRRRRRRRRRRRRRRRRRRR]
Save
Then:
Press the display key to save the entry.
... then
Hold down (return to idle).
i
30
If you have both CLIP and CNIP (page 20), the name (max 16 characters)
will also be transmitted.
S100/150 colour Tchibo / UK / A31008-M1575-L131-1-7619 / Directories.fm / 01.07.2005
Using the directory and other lists
Copying telephone number from the directory
If you are prompted to enter an external number while using your telephone, you can
do so using your handset directory.
Prerequisite: The entry field for external telephone numbers is displayed.
either ...
à
Press the display key to open the menu.
OK
[______________________________________________]
Directory
Select the menu item and confirm.
OK
Select the entry and confirm.
or ...
Open the directory.
OK
Select the entry and confirm.
The telephone number in the entry is copied to the entry field.
Copying an entry or entire list to a handset
You can copy individual entries or the entire list to a different handset registered at the
same base station. This saves you having to make the same entry twice. The VIP settings, voice patterns and speed dial numbers are not copied.
or
Open the directory/speed dial list.
Select the entry and open the menu.
either ...
[______________________________________________]
OK
Copy Entry
or ...
[______________________________________________]
OK
Copy List
Sending a single entry:
Select the menu item and confirm.
Sending a complete list:
Select the menu item and confirm.
... then
OK
Enter and confirm the number of the receiving handset. This starts the copy procedure.
After a single entry has been copied, you will be asked if you want to copy another one.
As long as you confirm this with the display key Yes, you can select more entries, then
terminate copying with the display key No.
Successful transfer is indicated by a message and confirmation beep on the receiving
handset. Existing entries on the receiving handset are not affected.
Entries with identical numbers or names are not overwritten. Thus the number of stored
entries can differ from the number of transmitted entries.
Transmission is interrupted if the telephone rings and you answer the call or if the memory of the receiving handset is full. The last entry transmitted is shown in the display.
31
S100/150 colour Tchibo / UK / A31008-M1575-L131-1-7619 / Directories.fm / 01.07.2005
Using the directory and other lists
Saving an anniversary for a telephone number
You can save anniversaries, e.g. a birthday, in the directory so that you can be reminded
about them (anniversary alarm). You have to enter a time so that the anniversary can
be signalled with a ringer melody.
Prerequisite: You have opened a directory entry (page 26).
Scroll to the Annivers.: line and press the display
key.
[RRRRRRRRRRRRRRRRRRRRRR]
Edit
In the Date: line, enter day/month (4-digit).
Scroll to the Time: line and enter hour/minute
(4-digit) for the anniversaryalarm call.
Scroll to the Prompt: line and select an indicator for
the alarm (melody 1 to 10 or "visual").
Confirm. The telephone entry is displayed again.
Save the entry as described on page 26.
OK
You can delete an anniversary by pressing in the field for the anniversary the display
keys Edit, after display change Delete and after a further display change Save.
Anniversary alarm
You will be reminded of an anniversary by the selected ringer melody sounding on the
handset. The display will show the directory entry with ‚ ‚ ‚.
either ...
Cancelling an anniversary alarm:
Press the display key.
[RRRRRRRRRRRRRRRRRRRRRR]
Silence
or ...
Answering with an SMS:
Press the display key. You will now be in the SMS
menu.
[RRRRRRRRRRRRRRRRRRRRRR]
SMS
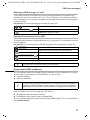
Redialling list
The redialling list shows the last ten numbers dialled. If the directory contains the
names for these numbers, both the names and numbers will be displayed. You can use
the redialling list to phone the number again.
Manual redialling
Þ
Open the redialling list.
Select the entry and press the talk key.
The telephone number is dialled.
◆ To add to or change the number, press à ,
i
OK .
Display Number
◆ If a name is displayed, you can use the display key View to show the
corresponding number.
◆ You can copy numbers from the redialling list to the directory
(page 30).
32
S100/150 colour Tchibo / UK / A31008-M1575-L131-1-7619 / Directories.fm / 01.07.2005
Using the directory and other lists
Automatic redialling
This function automatically redials the number every 20 seconds. The handsfree key
flashes and the loudspeaker is on. If the other person answers the call, press the talk key
c. If there is no answer, the call is terminated after about 30 seconds. The function
switches itself off after 10 unsuccessful attempts.
Prerequisite: The person you called is not available.
Press the end call key.
Þ
Open the redialling list.
The unavailable person you called is selected.
Open the menu.
OK
[______________________________________________]
Automatic Redial
Confirm.
To cancel automatic redial, press the display key Off or any other key.
i
Automatic redialling is deactivated if you make another call. You have to
reactivate it afterwards.
Deleting single numbers or entire redailling list
Þ
Open the redialling list.
Select the entry and open the menu.
either ...
[______________________________________________]
OK
Delete Entry
Deleting a single entry:
Select the menu item and confirm.
Hold down (return to idle).
or ...
OK
[______________________________________________]
Delete Calls List
Deleting an entire redialling list:
Select the menu item and confirm.
33
S100/150 colour Tchibo / UK / A31008-M1575-L131-1-7619 / Directories.fm / 01.07.2005
Using the directory and other lists
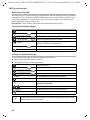
Email directory
Use the email directory to store the email addresses you need for sending SMS texts, for
example. You can store a maximum of 200 entries in the directory, email directory and
speed dial list.
Saving a new email address
Step 1: Open the email directory:
Open the directory.
[______________________________________________]
OK
Deleting
Select the menu item and confirm.
Step 2: Write the entry:
[______________________________________________]
OK
New Entry
Confirm.
Enter the address (for entering letters and characters
see page 114).
During the entry...
à
Press the display key to open the menu.
either ...
OK
[______________________________________________]
Insert '.'
or ...
[______________________________________________]
OK
Insert '@'
or ...
à
Select the menu item and confirm.
Enter @:
Select the menu item and confirm.
Switching predictive text entry on/off (page 116):
Press the display key to open the menu.
[______________________________________________]
OK
Predictive Text
... then
à
Enter stop:
OK
[______________________________________________]
Save Entry
Select the menu item and confirm.
Saving the email address
Press the display key to open the menu.
Confirm. The entry is saved.
Hold down (return to idle).
34
S100/150 colour Tchibo / UK / A31008-M1575-L131-1-7619 / Directories.fm / 01.07.2005
Using the directory and other lists
Opening a email directory, reading and changing an address
Prerequisite: You have opened the email directory (page 34).
[RRRRRRRRRRRRRRRRRRRRRRR]
View
Select the entry and press the display key. The
number is displayed.
Changing an entry:
RRRRRRRRRRRRRRRRRRRRRRRR
Edit
Press the display key.
Change the address.
à
Press the display key to open the menu.
OK
[______________________________________________]
Save Entry
Confirm. The entry is saved.
Hold down (return to idle).
Deleting or copying an email address
Prerequisite: You have opened the email directory.
Select the entry and open the menu.
either ...
[______________________________________________]
OK
Delete Entry
or ...
[______________________________________________]
OK
Copy and Edit
Deleting the email address:
Select the menu item and confirm.
Copying an email address:
Select the menu item and confirm.
Change the address if necessary.
à
Press the display key to open the menu.
OK
[______________________________________________]
Save Entry
Confirm. The entry is saved.
... then
Hold down (return to idle).
Deleting an entire email directory
Prerequisite: You have opened the email directory.
Select any entry and open the menu.
[______________________________________________]
OK
Delete List
Select the menu item and confirm.
Hold down (return to idle).
35
S100/150 colour Tchibo / UK / A31008-M1575-L131-1-7619 / Directories.fm / 01.07.2005
Using the directory and other lists
Displaying available memory
The memory is shared by the directory, the speed dial list (page 26) and the email directory (page 34). The available memory of all lists is displayed.
Open the directory.
Select any entry and open the menu.
[______________________________________________]
Available Memory OK
Select the menu item and confirm.
Hold down (return to idle).
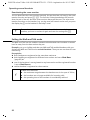
Displaying lists via the message key
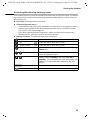
You can use the message key f to open the following lists:
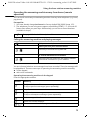
1. SMS list (if several mailboxes have been set up, these are listed),
2. Message list or mailbox 1, mailbox 2, mailbox 3 (page 65),
3. Messages on the network mailbox (if your telephone company supports this function and it has been defined for fast access, page 80),
4. Caller list.
As soon as a new entry (SMS, message on the integrated answering machine and/or
calls) appears in one or more lists, the f key flashes and you hear a signal tone. If you
press the flashing f key but leave the menu before opening any of the lists, the f key
will continue to flash.
If you press the flashing f key and open one of the lists, the key will not flash after you
leave the list even if other lists still contain new entries. If there is at least one new
entry, you can reset the f key to "flashing", i.e. to re-activate it. Then other members
of your family or colleagues, for example, will know that there are new messages waiting for them.
If you press the f key, you will see the following lists:
◆ If only one of the lists has new entries, the first new entry of this list will be displayed; if it is an entry in a personal mailbox, the corresponding list will be displayed.
◆ If several lists have new entries, they will be displayed.
◆ If none of the lists has any new messages, all the lists are displayed.
◆ If calls are saved in the network mailbox, you will receive a message to that effect
depending on the settings made (see the network mailbox operating instructions).
Activating/deactivating "flashing" message key
Prerequisite: There is still at least one new entry in one of the lists.
Open the caller list.
OK
[______________________________________________]
Mark as new
Select the menu item and confirm.
Hold down (return to idle).
The key will continue to flash until it is pressed again and a list or list entry is opened.
36
S100/150 colour Tchibo / UK / A31008-M1575-L131-1-7619 / Directories.fm / 01.07.2005
Using the directory and other lists
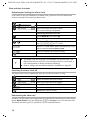
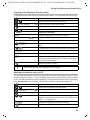
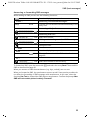
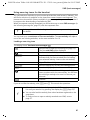
Caller list and message list
The numbers of the last 30 calls are saved in the caller list. If the list is full and there is
a new entry, the oldest one will be deleted.
Prerequisite: The incoming call number has been transmitted (page 20).
Depending on the setting either All Calls (factory setting) or only Missed Calls will be
saved ("Set caller list", page 38).
Depending on this setting, several calls from the same number will be included in the
caller list as follows:
◆ Repeatedly if All Calls has been selected,
◆ once, and only the last call received, if Missed Calls has been selected.
The caller list ("Calls List:") is shown in the display for example as follows:
Calls List: 01+02
Number of new entries in the list
Number of old, read entries in the list
Use the message list on the handset to play back messages. The date and time of each
call will be displayed, and also the caller's number if this has been transmitted.
Once you have listened to them, the new messages in the message list are added behind
the old ones.
The message list (Ans M.:) is shown in the display for example as follows:
Ans M.: 01+02
Number of new entries/messages in the list
Number of old, heard entries/messages in the list
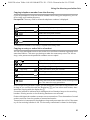
Example list entry:
List type: Missed Calls or All Calls
____ Missed Calls___
New Call
01+02
1234567890
12.07.04
09:45
Delete
Call
First call /message of a total of two calls /two messages
Telephone number or name
Date and time
This entry provides information about the status of the call /message:
New Call
The call is new in the list
Old Call
The call is old in the list.
Answ.
The call has been answered
(only for setting All Calls, page 38).
AM answ.
The answering machine has picked up the call, but the caller did not
leave a message (only for setting "all calls", page 38).
New Msg.
The call is new in the list.
Old Msg.
The call is old in the list, it has already been played back.
37
S100/150 colour Tchibo / UK / A31008-M1575-L131-1-7619 / Directories.fm / 01.07.2005
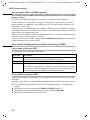
Using the directory and other lists
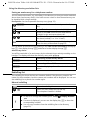
Setting the caller list
Press the message key.
OK
[______________________________________________]
Calls List: 01+02
Select the menu item and confirm.
Open the menu.
[______________________________________________]
OK
Calls Settings
either ...
Select the menu item and confirm. The current selection is marked with ‰.
Only calls you missed:
[______________________________________________]
OK
Missed Calls
or ...
Confirm.
All calls:
[______________________________________________]
OK
All Calls
Select the menu item and confirm.
Hold down (return to idle).
i
◆ The currently set list type is shown at the top of the display.
◆ Changing the list type does not affect the entries already in the list.
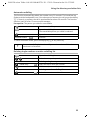
Opening the caller list/message list
New calls (caller list) or new messages (answering machine) are indicated by the flashing f key and a confirmation beep.
Press.
either ...
Opening the caller list:
[______________________________________________]
OK
Calls List:
Select the menu item and confirm.
The last received entry is displayed.
Select the entry.
or ...
Opening the message list:
OK
[______________________________________________]
Ans M.: 01+02
Select the menu item and confirm. The entry for the
first new message is displayed. The loudspeaker
switches on by itself. Replay starts.
Skip to the next or last message. The message entry
is displayed. Replay starts.
i
38
You can delete an entry or a message by pressing the Delete key.
S100/150 colour Tchibo / UK / A31008-M1575-L131-1-7619 / Directories.fm / 01.07.2005
Using the directory and other lists
Calling back a caller
Prerequisite: The incoming call number has been transmitted (page 20).
Open the caller list/message list. Then:
Select the entry.
either ...
Press the display key.
[RRRRRRRRRRRRRRRRRRRRRR]
Call
or ...
Press talk key 1 x (caller list) or 2 x (message list).
This starts the callback. The telephone number is copied to the redialling list.
Displaying an entry in the caller list and copying it to the directory
You can copy the caller's number to the directory.
Open the caller list/message list and select the entry. Then:
Open the menu.
[______________________________________________]
OK
Copy to Directory
Confirm.
Scroll to the Name line and enter the name (for
entering letters and characters see page 114).
If you have CNIP, the first 16 characters of the name
will be displayed.
à
Press the display key to open the menu.
[______________________________________________]
OK
Save Entry
Confirm. The entry is saved.
Hold down (return to idle).
i
When copying numbers from the message list, the replay will be interrupted as soon as you press à . It will be continued after the number
has been stored in the directory.
39
S100/150 colour Tchibo / UK / A31008-M1575-L131-1-7619 / Directories.fm / 01.07.2005
Using the directory and other lists
Deleting the caller list
Open the caller list (page 38). Then:
Open the menu.
[______________________________________________]
OK
Delete Calls List
Select the menu item and confirm. Important: All
old and new entries will be deleted.
Hold down (return to idle).
If you want to delete old messages from the message list, turn to page 71.
Deleting an entry from the caller/message list
Open the caller list/message list and select the entry (page 38). Then:
[RRRRRRRRRRRRRRRRRRRRRR]
Delete
Press the display key.
Hold down (return to idle).
40
S100/150 colour Tchibo / UK / A31008-M1575-L131-1-7619 / charges.fm / 01.07.2005
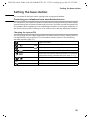
Making cost-effective calls
Making cost-effective calls
Use a telephone company that offers particularly low charges (Call-by-Call). You can use
the network access list to store call-by-call numbers.
Entries in the network access list can be used just like directory entries,
open the list with the C key. Read from page 26 on how to save, edit or
delete entries.
i
Linking a call-by-call number and a telephone number
You can use this function to put a network provider's prefix in front of the telephone
number ("linking").
Open the network access list.
à
Select entry and press the display key.
[______________________________________________]
OK
Display Number
either ...
Confirm.
Enter the telephone number:
Enter the telephone number.
or ...
Select the telephone number from the directory:
OK
Open the directory, select the required entry and
confirm.
... then
Press the talk key. The telephone number is dialled.
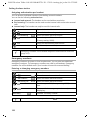
Automatic network provider selection (Preselection)
You can choose a call-by-call number that will be automatically put in front of the
telephone number dialled (preselection number). You can define the telephone numbers to be dialled with this preselection number via two different lists.
◆ List with preselection Here you can define the dialling codes or the first digits of
dialling codes for which the preselection number is to be used. If you add "08" to this
list, all telephone numbers starting with 08 will be dialled with the preselection
number.
◆ List without preselection Here you can define the "exceptions to the rule". The
"rule" is the list with preselection. If you add "08" to the list with preselection, and
"081" to the list without preselection, only telephone numbers starting with 080,
082, ..., 089 will be dialled automatically with the preselection number. The preselection number will not be used for telephone numbers 081xxxxx.
41
S100/150 colour Tchibo / UK / A31008-M1575-L131-1-7619 / charges.fm / 01.07.2005
Making cost-effective calls
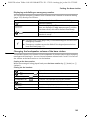
Saving the preselection number
First save the preferred preselection number in the preselection list.
[______________________________________________]
OK
í
OK
[______________________________________________]
Preselection
[______________________________________________]
OK
Preselect. No.
à
[______________________________________________]
OK
Save Entry
Open the menu.
Select the menu item and confirm.
Select the menu item and confirm.
Confirm.
Enter or edit the preselection number and press the
display key.
Confirm. The entry is saved.
Hold down (return to idle).
Saving/changing entries in the preselection lists
Each of the lists can hold up to 11 entries:
◆ 5 entries with up to 6 digits and
◆ 6 entries with up to 2 digits.
Depending on the country you live in, digits may be added to entries in the list "with
preselection", for example so that all domestic calls or calls to mobile phones are automatically linked with the call-by-call number you have saved.
OK
[______________________________________________]
í
[______________________________________________]
OK
Preselection
Open the menu.
Select the menu item and confirm.
Select the menu item and confirm.
either ...
[______________________________________________]
OK
With Preselect
Select the menu item and confirm.
or ...
OK
[______________________________________________]
Without Presel.
Select the menu item and confirm.
... then
[RRRRRRRRRRRRRRRRRRRRRR]
Edit
à
[______________________________________________]
OK
Save Entry
Select entry and press the display key.
Enter or edit the initial digits of the telephone
number and press the display key.
Confirm. The entry is saved.
Hold down (return to idle).
42
S100/150 colour Tchibo / UK / A31008-M1575-L131-1-7619 / charges.fm / 01.07.2005
Making cost-effective calls
Dialling with and without preselection (automatic call-by-call number)
The telephone numbers you dial are automatically checked by your telephone. When
you press the talk or handsfree key, the first digits of the dialled number are compared
with both lists:
◆ If they do not match any entry in either of the lists or match an entry in the list "without preselection", no call-by-call number will be used. This is the case even if the
first digits of the telephone number also match an entry in the list "with preselection".
◆ If the first digits match only an entry in the list "with preselection", the call-by-call
number will be used.
Temporary suppression of preselection
Press the talk key
Open the menu.
[______________________________________________]
OK
Aut Preselct off
Select the menu item and confirm.
43
S100/150 colour Tchibo / UK / A31008-M1575-L131-1-7619 / sms_neutral_Bobo.fm / 01.07.2005
SMS (text messages)
SMS (text messages)
You can use your handset to send and receive text messages, so-called SMS (Short Message Service). You can write, edit, read, delete or forward text messages from any registered handset. If several handsets are in operation, only one handset can use the SMS
function at a time.
i
Bear in mind that when the SMS function is activated the first ringer
tone is suppressed (page 98).
General
Text messages are exchanged via SMS centres operated by service providers. The telephone numbers of the SMS centres that you want to use to send or receive text messages have to be entered in your telephone. Altogether you can enter five SMS centres.
SMS centres may already be included as part of the factory setting. You can change the
SMS centre telephone numbers.
i
If your telephone is connected to a PABX, you may have to insert a prefix
to the telephone number (page 108) (this depends on the PABX you use).
You can receive text messages from any of the registered SMS centres. This assumes
that you are registered with the SMS centre in question to receive text messages.
Sending text messages to email addresses
If you want to send an SMS to email addresses, you have to make additional settings on
your telephone for the send centre (page 46). Ask your service provider whether it supports "SMS to Email" and what settings this requires.
Memory
The number of text messages that can be saved by the base station depends on the size
of the SMS messages stored. The memory is also used for the incoming and outgoing
lists. If the memory is full, you will be prompted to delete text messages.
44
S100/150 colour Tchibo / UK / A31008-M1575-L131-1-7619 / sms_neutral_Bobo.fm / 01.07.2005
SMS (text messages)
Prerequisites for sending and receiving text messages (SMS)
◆ Telephone number transmission (page 20) must be activated. Check with your tele-
phone company that this function has in fact been activated for your telephone connection. If not, you will have to apply for its activation.
◆ Before you can receive text messages you have to have registered with your service
provider.
Please contact your telephone company about
◆ the charges for sending and receiving text messages,
◆ which mobile network operators you can send text messages to and from which
ones you can receive text messages,
◆ which functions your SMS service provides,
◆ in which form you are registered with any preset SMS centres; automatically by
sending an SMS or via a special registration procedure.
Sending and receiving text messages
In order to send and receive text messages you have to enter the telephone numbers of
the SMS centre operated by your service provider. The telephone numbers may already
be entered as part of the factory setting.
Activating/deactivating the Send SMS and Receive SMS functions
In the factory setting the Send SMS and Receive SMS functions are already activated.
Open the menu.
Initiate the setting.
either ...
OK
or ...
OK
Deactivating "Send/receive SMS":
Enter and confirm.
Activating "Send/receive SMS":
Enter and confirm.
Deactivating the function does not affect the settings you have made for sending and
receiving SMS messages (SMS centre telephone numbers, personal mailboxes etc.), or
the entries saved in the incoming and outgoing lists. They automatically apply when
you reactivate the function.
If you deactivate the function you cannot receive any more SMS messages nor can your
telephone send any. The first ringer tone will be reactivated (page 98).
45
S100/150 colour Tchibo / UK / A31008-M1575-L131-1-7619 / sms_neutral_Bobo.fm / 01.07.2005
SMS (text messages)
Entering the telephone number for an SMS centre, changing the
send centre
You can enter or change the telephone number of an SMS centre. You can change an
already stored SMS centre telephone number by overwriting it.
Please contact your service provider about its offerings and particularities before making a new entry or deleting the factory settings.
If your service provider supports the sending of text messages to email addresses, you
can enter a telephone number for the SMS to EMail service. This telephone number will
then be offered when you want to send an SMS to an email address.
[______________________________________________]
OK
è
OK
[______________________________________________]
Settings
[______________________________________________]
OK
Service Centres
[______________________________________________]
OK
Service Centr.3
Open the menu.
Confirm.
Select the menu item and confirm.
Confirm.
Select the menu item and confirm, e.g. Service
Centr.3.
____ Service Centr.3____
Active send: ÎYes g
SMS:
no.
E-Mail:
no.
”
Save
If necessary, select in the Active send: line Yes to
activate Service Centr.3 as the send centre. The previously selected send centre will be deactivated automatically.
RRRRRRRRRRRRRRRRRRRRRRRR
Edit
à
Scroll to the SMS: line and press the display key.
Enter the telephone number of the SMS centre and
open the menu.
[______________________________________________]
OK
Save Entry
[RRRRRRRRRRRRRRRRRRRRRR]
Edit
à
Confirm.
Scroll to the E-Mail: line and press the display key.
Enter the telephone number of the email service and
open the menu.
[______________________________________________]
OK
Save Entry
Confirm.
[RRRRRRRRRRRRRRRRRRRRRR]
Save
Press the display key to save the entry.
Hold down (return to idle).
i
46
Please contact your service provider for information about entering the
service telephone numbers for using personal mailboxes (assuming your
service provider supports this function).
S100/150 colour Tchibo / UK / A31008-M1575-L131-1-7619 / sms_neutral_Bobo.fm / 01.07.2005
SMS (text messages)
Sending text messages (SMS) and outgoing list
If you receive a call while you are writing an SMS, the SMS will automatically be saved
in the outgoing list. You can accept the call and finish the SMS later (page 51).
Text messages that could not be sent are assigned an error status (page 62) and are
saved in the incoming list.
SMS messages are saved automatically only where transmission is interrupted.
If you want to save an SMS you have to do so before sending it.
Your telephone line will be engaged while the SMS message is being sent to the SMS
send centre. All handsets will display Sending message!.
i
Please bear in mind that some service providers charge for a terminated
connection to the SMS centre.
Writing SMS messages
An individual SMS may not exceed 160 characters. If your text is longer, it will automatically be sent as a linked SMS. Up to four SMS messages each with 153 characters can
be linked. In other words you can write up to 612 characters. But remember that linking
will increase the charges.
Please bear in mind that service providers cannot relay an SMS text with Greek or
Cyrillic characters. Therefore, if you have set your display language to Russian or Greek,
you will have to change the language before writing the SMS.
To do this, once you have opened the entry field for the SMS text, press the display
key ©. Then in the menu, select the entry Select Language and confirm the selection
with [. Now choose as entry language one that uses Latin characters (e.g. Deutsch
or English). Confirm the selection with [ and then briefly press the end call key a
twice to return to the entry field. The setting for the entry language applies only to the
SMS you are writing. You can write an SMS message as follows:
[______________________________________________]
OK
è
Open the menu.
Confirm.
OK
[______________________________________________]
Mailbox 1
If several mailboxes have been activated (page 58),
select the mailbox and confirm, e.g. Mailbox 1.
OK
If necessary, enter the mailbox PIN and confirm.
[______________________________________________]
OK
Write Message
Confirm. This opens the entry field.
Enter the text (for entering letters and characters see
page 114).
EATONI predictive text entry activated.
The counter shows how many more characters you can write. It
470(2)_____Ç_____Abc
counts from 612 characters downwards (maximum number of
characters permitted with linking).
tomorrow with
Uppercase, lowercase and number mode
The bracketed number shows you the SMS you are in (with linked
W ¨
SMS messages). Example: You are now in the second SMS.
47
S100/150 colour Tchibo / UK / A31008-M1575-L131-1-7619 / sms_neutral_Bobo.fm / 01.07.2005
SMS (text messages)
Predictive text entry
While writing a text you may find the EATONI (page 116) predictive text entry function
useful. The icon Ç shows you whether EATONI is active (factory setting: on). You can
deactivate EATONI using à , s Predictive Text OK at any time.
◆ Please see the character map (page 114) on how to enter text
correctly.
◆ Use 1 to insert blanks, press P to switch between uppercase,
i
lowercase and number mode (page 114).
◆ If you want to correct an entry, please read page 13.
◆ An advisory message will inform you if you receive an incomplete SMS
(e.g. because your telephone memory is full).
Saving SMS messages
Prerequisite: You have written an SMS message (page 47) and the entry field is open.
à
Press the display key to open the menu.
[______________________________________________]
OK
Save Entry
Select the menu item and confirm. You can then
send the SMS (see page 48).
The SMS will be saved in the outgoing list. You can open it again later on when you are
ready to send it (page 51).
Sending an SMS without saving it
Prerequisite: You have written an SMS message (page 47) and the entry field is open.
à
Press the display key to open the menu.
[______________________________________________]
OK
Send
Confirm.
OK
[______________________________________________]
SMS
Confirm.
either ...
Enter the number you want to send the SMS to (with
dialling code).
Send SMS to
1234567890
W
or ...
¨
Copying telephone number from the directory:
Open the directory.
OK
Select the entry and confirm. The telephone number
appears in the display.
... then
à
[______________________________________________]
OK
Send
48
Press the display key to open the menu.
Confirm.
S100/150 colour Tchibo / UK / A31008-M1575-L131-1-7619 / sms_neutral_Bobo.fm / 01.07.2005
SMS (text messages)
◆ The number you are sending the SMS to, even if it is a local call, must
i
include the dialling code (prefix).
◆ If you want to send an SMS to a particular SMS mailbox, you will have
to add the mailbox ID to the end of the telephone number (page 59).
Sending text messages (SMS) to an email address
If your service provider supports the SMS to E-Mail function, you can also send text messages to an email address. Ask your service provider about the format for the email
address it needs to transmit text messages as emails.
To send an SMS to an email address:
Enter the email address at the beginning of the SMS
Enter the receiver's email address at the beginning of the SMS text. Separate the email
address and the message text with a blank or colon (this depends on your provider). As
long as the text field is still empty you can copy the email address from your email
directory (page 34). Send the SMS to the telephone number of the E-mail service of
your SMS centre.
With deactivated predictive text entry, enter "@" using the hash key R (press twice),
the colon with the key Q (press eight times) and the blank with 1 (press once).
With activated predictive text entry, enter "@" by pressing the hash key R once long
and once short.
With à , s Save Entry OK you can save what you have written so far.
Prerequisite: You are writing an SMS message (page 47) and the entry field is open.
either ...
Copying the address from the email directory:
Œ
Press the display key. This will be displayed as long as
the entry field is empty.
The email directory will appear (page 34).
OK
[______________________________________________]
Anna@...
or ...
Select and confirm the email address.
Entering the email address manually:
Enter the complete email address and then either a
blank or colon.
49
S100/150 colour Tchibo / UK / A31008-M1575-L131-1-7619 / sms_neutral_Bobo.fm / 01.07.2005
SMS (text messages)
Enter the SMS text
Enter the SMS text.
580(1)_____Ç_____Abc
[email protected]
m
Hi Peter
à
Email address, blank,
SMS text (example)
Press the display key to open the menu.
[______________________________________________]
OK
Send
OK
[______________________________________________]
E-Mail:
Confirm.
Select the menu item and confirm.
Sending an SMS as email
You have to send the SMS to the telephone number of the email service. If you have
entered the email service of your SMS send centre (page 46), this will appear in the
entry field.
If you need to enter the number of the email service.
Send e-mail to:
W
à
[______________________________________________]
OK
Send
50
¨
If the send centre telephone number of the
e-mail service has been
entered (page 46), it will
appear in the entry field.
Press the display key to open the menu.
Confirm.
S100/150 colour Tchibo / UK / A31008-M1575-L131-1-7619 / sms_neutral_Bobo.fm / 01.07.2005
SMS (text messages)
Open the outgoing list
The outgoing list shows:
◆ SMS messages you saved before sending them (page 48),
◆ SMS messages that could not be sent because an incoming call interrupted you
while you were writing it.
These SMS messages will remain saved until you delete them.
[______________________________________________]
OK
è
Open the menu.
Confirm.
OK
[______________________________________________]
Mailbox 2
If several mailboxes have been activated (page 58),
select the mailbox and confirm, e.g. Mailbox 2.
OK
If necessary, enter the PIN and confirm.
OK
[______________________________________________]
Outgoing
Select the menu item and confirm.
_____Outgoing____
Saved
01/02
Msg from unknown
12.03.04
09:45
Delete
Read
Total number of the
saved SMS
Serial number of the
displayed SMS
Use q to scroll through the list.
i
If the SMS memory is full, you will be prompted to delete text messages.
Reading and deleting SMS messages in the outgoing list
Prerequisite: You have opened the outgoing list (page 51).
Select the SMS.
either ...
RRRRRRRRRRRRRRRRRRRRRRRR
Read
or ...
[RRRRRRRRRRRRRRRRRRRRRR]
Delete
Reading SMS messages:
Press the display key. Use s to display the rest of the
SMS.
Deleting SMS messages:
Press the display key.
Deleting the entire outgoing list
This function deletes all the SMS messages in the outgoing list.
Prerequisite: You have opened the outgoing list (page 51).
Open the menu.
[______________________________________________]
OK
Delete Calls List
[RRRRRRRRRR]
Yes
Confirm.
Press the display key to confirm the prompt.
Hold down (return to idle).
51
S100/150 colour Tchibo / UK / A31008-M1575-L131-1-7619 / sms_neutral_Bobo.fm / 01.07.2005
SMS (text messages)
Sending or editing SMS messages in the outgoing list
Prerequisite: You have opened an SMS message in the outgoing list (page 51).
The menu will appear.
either ...
[______________________________________________]
OK
Write Message
or ...
OK
[______________________________________________]
Use Text
Writing and sending a new SMS message:
Confirm. The entry field appears (page 47).
Editing and sending a saved SMS message:
Select the menu item and confirm. The entry field
opens with the content of the saved SMS.
Then you can send the SMS as described on page 48.
Inserting templates or email addresses in an SMS
You can insert a template (standard text) or an emoticon in your SMS text. Your telephone provides:
◆ 3 template texts: I am late, Let's meet , Congratulations ,
◆ 8 emoticons: Happy :-), Sad :-(, Wink ;-), Serious :-|,
Sarcastic :->, Laughing :-D, Surprised :-o, Crying :'-(.
You can also insert an email address that has been saved in your email directory
(page 34). Template text, emoticons and email addresses are inserted at the cursor position.
Prerequisite: You are writing an SMS message (page 47) and the entry field is open.
à
Press the display key to open the menu.
either ...
[______________________________________________]
OK
Insert Template
Select the menu item and confirm.
OK
[______________________________________________]
Let's meet
Select the template and confirm, e.g. Let's meet
or ...
Inserting an emoticon:
[______________________________________________]
OK
Insert Smiley
Select the menu item and confirm.
[______________________________________________]
OK
Laughing :-D
Select the emoticon and confirm.
or ...
52
Inserting the template:
Inserting an email address:
[______________________________________________]
OK
Insert e-mail Adr.
Select the menu item and confirm. The email directory will appear.
[______________________________________________]
OK
Anna@...
Select the address and confirm.
S100/150 colour Tchibo / UK / A31008-M1575-L131-1-7619 / sms_neutral_Bobo.fm / 01.07.2005
SMS (text messages)
Receiving text messages (SMS) and incoming list
New SMS messages are signalled by the message "You have new messages Û",
flashing message key f on all handsets and a confirmation beep. The date and time
(as transmitted by the SMS centre) are shown for each SMS received.
The new (not yet read) SMS messages appear in the incoming list before the old ones.
Both the new and the old SMS messages are sorted by the time of arrival: oldest new
SMS, ... , newest SMS, the oldest old SMS, ..., newest old SMS.
Linked SMS messages are shown as one SMS (in so far as your service provider supports
SMS linking). If an incoming linked SMS is too long or incomplete, it will be broken up
into individual SMS messages and saved in the incoming list.
Opening the incoming list
The incoming list shows:
◆ All SMS messages received,
◆ SMS messages that could not be sent despite repeated attempts. The SMS messages
are saved with an error status (page 62).
The SMS list may appear as follows
Number of new entries in the list
SMS: 01+05
Number of old, read entries in the list
Name of the general or personal mailbox
Open the list with the message key
Prerequisite: There is at least one new SMS in the list.
Press the message key.
[______________________________________________]
OK
SMS:01+05
If necessary select the mailbox and enter the mailbox
PIN (page 58). The incoming list appears with the
first new SMS displayed.
______SMS ____
New
01/02
1234567890
12.07.04
09:45
Delete
Read
Total number of SMS messages
Serial number of the
displayed SMS
If the SMS memory is full, you will see a message. Confirm it with OK and delete SMS
messages you no longer need from the incoming and outgoing lists.
53
S100/150 colour Tchibo / UK / A31008-M1575-L131-1-7619 / sms_neutral_Bobo.fm / 01.07.2005
SMS (text messages)
Open the list via the menu
[______________________________________________]
OK
è
[______________________________________________]
OK
Mailbox
Open the menu.
Confirm.
Confirm.
If several mailboxes have been activated (page 58),
select the mailbox and confirm.
OK
If necessary, enter the mailbox PIN and confirm.
[______________________________________________]
OK
Incoming 01+05
Select the menu item and confirm.
Reading and deleting SMS messages in the incoming list
Prerequisite: You have opened the incoming list (page 53).
Select the SMS.
either ...
[RRRRRRRRRRRRRRRRRRRRRR]
Read
or ...
[RRRRRRRRRRRRRRRRRRRRRR
Delete ]
Reading the SMS message:
Press the display key. Use s to display the rest of the
SMS.
Deleting individual SMS messages:
Press the display key. This shows the next SMS message.
Hold down (return to idle).
When you open a new SMS, it is given the status Old.
Deleting the entire incoming list
This function deletes all new and old SMS messages in the incoming list.
Prerequisite: You have opened the incoming list (page 53).
Open the menu.
OK
[______________________________________________]
Delete Calls List
[RRRRRRRRRR]
Yes
Select the menu item and confirm.
Press the display key to confirm the prompt.
Hold down (return to idle).
54
S100/150 colour Tchibo / UK / A31008-M1575-L131-1-7619 / sms_neutral_Bobo.fm / 01.07.2005
SMS (text messages)
Answering or forwarding SMS messages
While reading an SMS you can use the following functions:
à
Press the display key to open the menu.
either ...
[______________________________________________]
OK
Reply
or ...
[______________________________________________]
OK
Answer: Yes
or ...
OK
[______________________________________________]
Answer: No
or ...
[______________________________________________]
OK
Use Text
Answering received SMS messages:
Confirm. You can answer the SMS immediately in the
entry field.
Answering with "yes":
Select the menu item and confirm.
Answering with "no":
Select and confirm..
Editing and returning a received SMS message:
Select the menu item and confirm.
Change the text.
... then
à
Press the display key to open the menu.
[______________________________________________]
OK
Send
Then confirm and send the SMS as described on
page 48.
or ...
[______________________________________________]
OK
Save Entry
Select and confirm to save the entry.
To forward an SMS, open the menu with © and select the entry Send. Then send the
SMS as described on page 48.
When you answer an SMS the attachments (e.g. logo, melody) are not sent.
When you forward an SMS, the attachments are sent as well. Some service providers do
not allow the forwarding of SMS messages with attachments. In this case, select the
function Use Text to forward the SMS without attachments. Confirm the prompt New
SMS will not contain picture/ melody. Proceed?.
55
S100/150 colour Tchibo / UK / A31008-M1575-L131-1-7619 / sms_neutral_Bobo.fm / 01.07.2005
SMS (text messages)
Copying a telephone number from the SMS text to the directory
Your telephone "recognises" telephone numbers in any SMS messages you receive. It
shows the number by highlighting them (maximum 32 digits). If the SMS text contains
several numbers, the first one will be highlighted. When you scroll through the SMS text
with s, the next number will be highlighted automatically etc.
Prerequisite: You have opened the incoming list and selected an SMS.
Press the display key.
[RRRRRRRRRRRRRRRRRRRRRR]
Read
Hi Sabine, here is my new
number
1234567890
W
à
¨
The number is highlighted with a black background.
Press the display key to open the menu.
[______________________________________________]
OK
Copy to Directory
Select the menu item and confirm.
Scroll to the Name line and enter the name (max. 16
characters) (for entering letters and characters see
page 114).
à
Press the display key to open the menu.
[______________________________________________]
OK
Save Entry
Confirm. The entry is saved.
Hold down (return to idle).
i
If you want to use the telephone number for sending SMS messages as
well, it has to be saved in the directory with its dialling code (prefix).
Copying the telephone number of an SMS sender to the directory
You can copy the number to the directory.
Prerequisite: You have opened the incoming list and selected an SMS.
Press the display key to open the menu.
[______________________________________________]
OK
Copy to Directory
Select the menu item and confirm.
Scroll to the Name line and enter the name (max. 16
characters) (for entering letters and characters see
page 114).
à
Press the display key to open the menu.
[______________________________________________]
OK
Save Entry
Confirm. The entry is saved.
Hold down (return to idle).
◆ If you want to use the telephone number of the SMS receiver for
i
56
sending SMS messages as well, it has to be saved in the directory with
its dialling code (prefix).
◆ You can set up a special SMS directory within the ordinary directory by
inserting a star (*) in front of the names of these entries.
S100/150 colour Tchibo / UK / A31008-M1575-L131-1-7619 / sms_neutral_Bobo.fm / 01.07.2005
SMS (text messages)
Marking an SMS message as "new"
If you want to put an "old" SMS that you have already read back to the head of the
incoming list, you have to mark it as "new". Then the f key on the handset will flash.
Other members of your family or colleagues, for example, will then know that they have
received an SMS
Prerequisite: You have opened the incoming list (page 53).
Select the SMS and open the menu.
[______________________________________________]
OK
Mark as New
Confirm.
Hold down (return to idle).
Opening the attachment of an SMS
The attachment is shown in angled brackets (e.g. <ring tone>). For installation information see page 61.
Prerequisite: You have opened an old SMS message in the incoming list (page 53).
[RRRRRRRRRRRRRRRRRRRRRR]
Read
Select the SMS and press the display key.
Move the cursor to where the attachment is.
à
Press the display key to open the menu.
[______________________________________________]
OK
View Content
Select the menu item and confirm.
Hold down (return to idle).
i
An SMS can contain more than one attachment.
Using several SMS mailboxes
You can add up to three user-related "private" mailboxes to your telephone so that up to
three people can have their own SMS mailbox. You can choose:
◆ 1 general mailbox,
◆ 3 private mailboxes.
i
You can only use personal mailboxes if your service provider supports the
sending of SMS messages to them. Please consult your service provider
about how to set up SMS centre numbers for using personal mailboxes.
Open the SMS list with the message key. You will see:
◆ All mailboxes that have been activated,
◆ All mailboxes that contain at least one new SMS.
Access to private mailboxes can be protected with a PIN (4 digit). This is not possible for
the general mailbox.
57
S100/150 colour Tchibo / UK / A31008-M1575-L131-1-7619 / sms_neutral_Bobo.fm / 01.07.2005
SMS (text messages)
Setting up a personal mailbox
To use several mailboxes, you have to activate each one and assign a "Mailbox ID", a kind
of extension number.
If an SMS centre receives an SMS for your telephone number (without mailbox ID), the
SMS will be sent to your general mailbox.
If you have activated only the general mailbox, all incoming SMS messages will be
directed to it, even if the SMS was sent with a mailbox ID.
If you want to protect your mailbox, you can assign a PIN that has to be entered before
opening the mailbox.
The general mailbox cannot be protected with a PIN. In the factory setting only the general mailbox has been activated. Its mailbox ID is "0". The general mailbox cannot be
deactivated.
[______________________________________________]
OK
è
Open the menu.
Confirm.
[______________________________________________]
OK
Settings
Select the menu item and confirm.
[______________________________________________]
OK
SMS Mailboxes
Select the menu item and confirm. Activated mailboxes are marked with ‰.
[______________________________________________]
OK
Mailbox 2
Select and confirm, e.g. Mailbox 2.
Activation:
ID:
Protection:
PIN
Offg
1
Off
0000
Save
Activating/deactivating mailboxes
Activate the mailbox.
Scroll to the ID: line and select a number (ID) for your
private mailbox (0 - 9). Already assigned numbers
cannot be selected.
Scroll to the Protection: line if you want to activate
PIN protection.
Scroll to the line PIN: and assign the PIN (4 digit).
[RRRRRRRRRRRRRRRRRRRRRR
]
Save
or ...
Depending on the operating situation: Press the display key to save the entry.
OK
i
If you are operating several SMS-enabled devices (base stations) on one
telephone line, each SMS mailbox ID must be unique. In this case, you will
also have to change the default ID of the general mailbox.
How to change the PIN is explained on page 59. If you forget your PIN you can reset it
by resetting the base station to the factory setting. This will delete all SMS messages
in all mailboxes.
58
S100/150 colour Tchibo / UK / A31008-M1575-L131-1-7619 / sms_neutral_Bobo.fm / 01.07.2005
SMS (text messages)
If you deactivate a mailbox (by selecting in line Call Director: Off), all the SMS messages sent to this mailbox will be lost. The SMS messages saved for this mailbox will be
deleted.
If you deactivate PIN protection, the PIN will be reset to 0000.
Sending an SMS to a personal mailbox
Before an SMS can reach your personal mailbox, the sender must know your ID and add
it to the end of your telephone number. Send your SMS partner an SMS. He or she will
automatically receive your SMS telephone number with the current ID. They can then
save it in their directory.
◆ If the sender adds an invalid ID or if the mailbox has been deactivated,
i
the SMS cannot be delivered.
◆ If the sender omits the ID, the SMS will be sent to your general
mailbox.
Changing the name, PIN and ID of a mailbox
You can change the PIN by overwriting the current setting. You cannot change the name
of the general mailbox.
[______________________________________________]
OK
è
Open the menu.
Confirm.
[______________________________________________]
OK
Settings
Select the menu item and confirm.
OK
[______________________________________________]
SMS Mailboxes
Select the menu item and confirm. All activated mailboxes are marked with ‰.
either ...
Changing the mailbox name:
[RRRRRRRRRRRRRRRRRRRRRRR]
Edit
Select the mailbox and press the display key.
[RRRRRRRRRRRRRRRRRRRRRRR]
Save
Enter the new name and press the display key to save
the entry.
or ...
Changing the mailbox ID and PIN:
[______________________________________________]
OK
Mailbox 2
Select and confirm, e.g. Mailbox 2.
OK
If necessary, enter the mailbox PIN and confirm.
Scroll to the ID: line if you want to select a new ID.
Scroll to the Protection: line if you want to activate
or deactivate PIN protection.
Scroll to the line PIN: (you will see the current PIN) if
you want to overwrite it with a new PIN (4 digit).
[RRRRRRRRRRRRRRRRRRRRRR]
Save
Press the display key to save the entry.
Hold down (return to idle).
i
The general mailbox cannot be protected with a PIN.
59
S100/150 colour Tchibo / UK / A31008-M1575-L131-1-7619 / sms_neutral_Bobo.fm / 01.07.2005
SMS (text messages)
Notification via SMS
You have to go out, but are expecting an important call or a message from your answering machine. You can have any SMS-enabled device send a notification via SMS, e.g. to
your mobile telephone. To do this you have to save the number to be called in your
home telephone (factory setting: off).
Prerequisite: The incoming call number has been transmitted (CLIP).
Saving notification number
[______________________________________________]
OK
è
Open the menu.
Confirm.
OK
[______________________________________________]
Settings
Select the menu item and confirm.
[______________________________________________]
OK
Notify Number
Select the menu item and confirm.
à
Enter the telephone number (e.g. of your mobile
phone) and press the display key.
[______________________________________________]
OK
Save Entry
Confirm. The entry is saved.
Hold down (return to idle).
Setting the notification type
You can select what type of calls you will be notified about:
◆ Missed calls from the caller list and/or
◆ messages from the answering machine.
[______________________________________________]
OK
è
Open the menu.
Confirm.
[______________________________________________]
OK
Settings
Select the menu item and confirm.
OK
[______________________________________________]
Notify Type
Select the menu item and confirm.
either ...
Activating/deactivating missed calls:
In the Missed Calls: line select On or Off.
or ...
Activating/deactivating messages from the
answering machine:
Scroll to Ans Machine: and select On or Off.
[RRRRRRRRRRRRRRRRRRRRRR]
Save
Press the display key to save the setting.
Hold down (return to idle).
i
60
If you have set Greek or Russian as the handset display language, the notification will be sent in English.
S100/150 colour Tchibo / UK / A31008-M1575-L131-1-7619 / sms_neutral_Bobo.fm / 01.07.2005
SMS (text messages)
Using new ring tones for the handset
You can load other melodies on your handset provided the used format is "iMelody". You
will find a selection of melodies on the Internet at www.siemens.com/ringtones. The
Internet sites show which files are available in your country. Ask your service provider if
he supports the downloading of melodies by SMS.
When you request a melody download you will receive one or more SMS messages (in
the incoming message list, page 53) with the requested files.
i
A charge is incurred for loading data. Please contact your service provider
for details.
You can load up to a maximum of five new melodies. The new melody will replace
one of the ten existing melodies, at the most melodies 6 to 10.
Loading a new ring tone
The display shows You have new messages Û.
Press the key to open the incoming list (page 53).
The first new SMS will be displayed.
Scroll to another SMS if you want.
Press the display key. A title or icon on the display
indicates that you have received files for loading
your selected melody. Listen to the new melody.
[RRRRRRRRRRRRRRRRRRRRRR]
Read
If you like the melody:
[RRRRRRRRRRRRRRRRRRRRRR]
Install
Press the display key to start the loading process.
[RRRRRRRRRR]
Yes
Press the display key to load the new melody.
Choose the number of the old ringer melody you
want to replace with the new melody. You will hear
the old ringer melody to be sure it is the one you
selected.
Confirm.
OK
If you do not like the melody, after Install press No. This cancels the operation.
◆ After it has loaded, the melody stays in the SMS incoming messages
list until you remove it by pressing the display key Delete (page 54).
i
◆ You can also load the melody from other handsets registered on the
same base.
◆ To find out how to open a melody attached to an SMS, turn to
page 57.
61
S100/150 colour Tchibo / UK / A31008-M1575-L131-1-7619 / sms_neutral_Bobo.fm / 01.07.2005
SMS (text messages)
Text messages (SMS) on PABX systems
You can only receive an SMS if the calling number identification is sent to the PABX
extension (CLIP).
The CLIP of the SMS centre telephone number is evaluated in the telephone.
If your telephone is connected to a PABX, you may have to insert a prefix to the telephone number (this depends on the PABX you use). The prefix can be saved on your
base station (page 108).
If in doubt, test your PABX system by sending an SMS to your own telephone number
after adding the prefix to the SMS centre telephone number. If the SMS does not arrive,
send another one without the prefix.
When you send an SMS, it may be transmitted without your extension number. In this
case, the receiver cannot answer it directly.
You can send and receive SMS messages on an ISDN PABX system only via the MSN
number assigned to your base station.
Errors when sending and receiving text messages (SMS)
Errors when sending an SMS
The following error codes may be displayed:
Error code
Description
E0
Permanent suppression of the telephone number is activated (CLIR).
It has not been activated by your telephone company.
Error while transmitting the SMS.
Error while connecting to the SMS centre.
If the SMS centre telephone number is missing or if it has been saved
incorrectly, no SMS messages can be sent or received. Check that you
have correctly saved the SMS centre telephone number.
FE
FD
Errors when receiving an SMS
A message will appear in the display if your telephone cannot receive any more SMS
messages.
You may not be able to receive any SMS messages under the following circumstances:
◆ The calling line identification (CLIP) has not been activated for your telephone
number,
◆ Call redirect has been activated with When: All Calls (page 23),
◆ Call redirect for the network mailbox has been activated (All Calls)
◆ Memory (incoming and outgoing list) is full
62
S100/150 colour Tchibo / UK / A31008-M1575-L131-1-7619 / sms_neutral_Bobo.fm / 01.07.2005
SMS (text messages)
How to respond to error messages
Error message
Possible cause
SMS messages cannot be sent. The "calling line identification"
(CLIP) function has not been
activated.
SMS transmission was interrupted (e.g. by a call).
No number or the wrong
number has been entered for
the SMS centre activated as the
send centre.
The SMS you receive is incom- The telephone memory is full.
plete.
The provider has not transmitted the rest of the SMS yet.
You no longer receive any SMS You have changed your mailmessages.
box ID.
You do not receive any SMS
messages.
The message is played back.
You have not activated your
mailbox.
The "Display telephone
number" function has not been
activated.
The end device is stored in your
SMS provider's database as not
enabled for fixed line SMS messages, i.e. you are no longer
registered there.
You receive SMS messages dur- If your SMS network provider's
ing the day only.
database does not know that
your end device supports the
fixed line SMS function, it tries
to relay messages only during
the day.
Remedy
Have your telephone company
activate this function.
Send the SMS again.
Enter the telephone number.
Delete old SMS messages
(page 54).
Tell your SMS partners the new
ID or restore the old ID
(page 59).
Activate your mailbox
(page 59).
Have your network provider
activate this function (chargeable).
Have the device registered for
receiving SMS messages
(again).
Have the device registered for
receiving SMS messages
(again) so that it is correctly
recorded in the database.
63
S100/150 colour Tchibo / UK / A31008-M1575-L131-1-7619 / answering_m.fm / 01.07.2005
Using the base station answering machine
Using the base station answering machine
The base station contains an answering machine which records calls when it is switched
on (factory setting). You can operate it:
◆ via the base station,
◆ via the handset (voice control also possible),
◆ via remote operation (voice control also possible).
The date and time of each call is recorded if you have made the appropriate settings
(page 15).
You can include up to three mailboxes in the answering machine. This allows several
users to each have their "own" answering machine. The announcement is always used
for all mailboxes.
Apart from the integrated answering machine, you can use an answering machine supplied by your network provider.
Message
Infotexts
Text that a caller leaves on the answering machine.
"Audible notes" that you can record on the answering machine for members of your family or for colleagues, for example.
Announcement mode Recording or advisory announcement.
Recording mode
The caller hears a standard or personal announcement and can then
leave a message.
Announce only mode The caller hears your announcement but cannot leave a message.
Standard announcePreset announcement (Standard text).
ment
Personal announceAn announcement you record on the answering machine.
ment
Operating the answering machine via the base station
You can use the base station keys to operate the answering machine when it is idle.
Meaning of the keys: A mailbox is activated
Changing the volume while replaying messages:
ð = quieter; ñ = louder.
Skips to the beginning of the message (press once) or to the
previous message (press twice).
Replay/Stop key: Replays messages from the answering
machine or stops playback.
Skips to the next message (press once) or to the next but one
(press twice ).
On/Off button: Turns the answering machine on or off.
Flashes as long as there is at least one new message.
Deletes the current message.
Register/Paging key: Key for registering handsets and for the
"paging" function (page 83).
64
S100/150 colour Tchibo / UK / A31008-M1575-L131-1-7619 / answering_m.fm / 01.07.2005
Using the base station answering machine
Meaning of the keys: Several mailboxes are activated
To listen to messages on mailbox 1, press the ò key.
To listen to messages on mailbox 2, press the ó key.
To listen to messages on mailbox 3 , press the ô key.
You cannot operate the answering machine from the base station while somebody is
operating the answering machine via a handset or a message is being recorded
i
If the on/off key continues to flash after you have switched the answering
machine off, then there is still at least one new message that has not
been played back.
Operating the answering machine via the handset
If you receive an acoustic prompt or message while operating the answering machine
via the handset, the handset loudspeaker is switched on automatically. Use the talk key
c to switch off handsfree talking.
The answering machine uses the standard announcement stored until you record
your own announcement.
Switching the answering machine on and off and adding up to three
mailboxes
If you want to use several mailboxes, you have to switch the answering machine on
and enter the number of mailboxes to be used.
An announcement tells the caller who has which mailbox number (1, 2 or 3).
Example announcement: "This is the answering machine of Mr and Mrs Smith. If you
want to leave a message for Rosy Smith, press 1, for John Smith press 2."
The caller then enters the appropriate mailbox number before leaving a message on
that mailbox.
Remember to record the appropriate announcement on your answering machine.
If you want to change the number of mailboxes, you will be prompted to delete all
messages. Then you will be prompted to record a new announcement.
i
◆ If the caller enters an invalid mailbox number or the selected mailbox
has not been set up, incoming messages will be stored in mailbox 1.
◆ You can only record one announcement on the answering machine
regardless of how many mailboxes have been activated.
65
S100/150 colour Tchibo / UK / A31008-M1575-L131-1-7619 / answering_m.fm / 01.07.2005
Using the base station answering machine
[______________________________________________]
OK
æ
[______________________________________________]
OK
Ans Machine
Open the menu.
Select the menu item and confirm.
Select the menu item and confirm.
You can switch the answering machine on or off in
the On/Off: line.
If appropriate, scroll to the Mailboxes: line and
select the number of mailboxes (1–3) you want to
activate.
[RRRRRRRRRRRRRRRRRRRRRR]
Save
Press the display key to save the setting.
To change the number of mailboxes, select the appropriate number.
Example:
You are in the entry field of the Mailboxes: line
◆ Press r "1" to activate mailbox 1,
◆ Press r "2" to activate two mailboxes (1 and 2),
◆ Press r "3" to activate three mailboxes (1, 2 and 3).
After switching the answering machine on, you will be told the remaining memory
time, the × icon appears in the display and the ö key on the base station lights up.
If the memory is full when in the Ans. & Record mode, the answering machine automatically switches to Announce Only mode if an advisory announcement has been
recorded (page 66). If there is no advisory announcement, the answering machine
switches itself off. Delete old messages. After the messages have been deleted, the
answering machine automatically returns to the original mode set.
Recording personal/advisory announcements
[______________________________________________]
OK
æ
OK
[______________________________________________]
Announcements
either ...
[______________________________________________]
OK
Rec Announce
or ...
[______________________________________________]
OK
Rec Anc Only
Select the menu item and confirm.
Select the menu item and confirm.
Record personal announcement:
Confirm.
Record advisory announcement:
Select the menu item and confirm.
... then
The display will prompt you to start recording:
OK
Confirm. You will hear the ready tone (short beep).
Now record your announcement.
[RRRRRRRRRRRRRRRRRRRRRR]
End
66
Open the menu.
Press the display key. The recorded announcement is
repeated for you to check.
S100/150 colour Tchibo / UK / A31008-M1575-L131-1-7619 / answering_m.fm / 01.07.2005
Using the base station answering machine
◆ The recording is automatically terminated if you exceed the maximum
recording time of 170 seconds or if you pause for more than two
seconds.
◆ During the recording you can cancel the announcement using the a
or Ý key and start again with the OK display key.
◆ If you have cancelled a recording, and the
– Answer and Record is active, the standard announcement will be
used,
– if the Announce only setting is active, the answering machine is
switched off.
i
Listening to announcements
[______________________________________________]
OK
æ
[______________________________________________]
OK
Announcements
either ...
Select the menu item and confirm.
Select the menu item and confirm.
Check personal announcement:
OK
[______________________________________________]
Play Announce
or ...
Select the menu item and confirm.
Check advisory announcement:
[______________________________________________]
OK
Play Anc Only
i
Open the menu.
Select the menu item and confirm.
While you are listening to the announcements, you can press the display
key New to rerecord them.
Deleting announcements
OK
[______________________________________________]
æ
Open the menu.
Select the menu item and confirm.
[______________________________________________]
OK
Announcements
Select the menu item and confirm.
[______________________________________________]
OK
Del Announce
Select the menu item and confirm.
Press the display key to confirm the prompt.
[RRRRRRRRRR]
Yes
or ...
[______________________________________________]
OK
Del Anc Only
[RRRRRRRRRR]
Yes
Select the menu item and confirm.
Press the display key to confirm the prompt.
67
S100/150 colour Tchibo / UK / A31008-M1575-L131-1-7619 / answering_m.fm / 01.07.2005
Using the base station answering machine
Select the announcement mode
You can choose between the Ans. & Record and Announce Only mode (if you have
recorded them, page 66). For an explanation of the terms see page 64.
You can also use the Ans Mode Time function with either mode.
Your telephone has one stored standard announcement for the recording mode. The
answering machine uses this standard announcement until you record your own
announcement or if you delete it again.
OK
[______________________________________________]
æ
Open the menu.
Select the menu item and confirm.
[______________________________________________]
OK
Announcements
Select the menu item and confirm.
[______________________________________________]
OK
Set Ans. Mode
Select the menu item and confirm.
either ...
OK
[______________________________________________]
Ans. & Record
or ...
[______________________________________________]
OK
Announce Only
With message recording:
Confirm (‰ = on).
Without message recording:
Select the menu item and confirm ( ‰ = on). The
announcement you selected is available even after
the answering machine has been switched off.
Hold down (return to idle).
Alternate between recording and announce only setting
This function alternates between record and announce only modes.
Example: You have set the record mode. Now select a period in which the answering
machine is to switch from record to announce only mode, e.g. from 6 pm to 8 am. The
record mode set is then automatically activated in the period from 8.01 am to 5.59 pm.
68
S100/150 colour Tchibo / UK / A31008-M1575-L131-1-7619 / answering_m.fm / 01.07.2005
Using the base station answering machine
Prerequisite: The time has been set (page 15).
[______________________________________________]
OK
æ
Open the menu.
Select the menu item and confirm.
[______________________________________________]
OK
Announcements
Select the menu item and confirm.
[______________________________________________]
OK
Set Ans. Mode
Select the menu item and confirm.
[______________________________________________]
OK
Ans Mode Time
Select the menu item and confirm.
Entering and activating time for "Ans Mode
Time":
Enter in the From: line the starting time, e.g.
Q N Q Q for 8.00 am.
Enter in the Until: line the end time, e.g.
1 M Q Q for 5.00 pm.
Scroll to the On/Off: line and activate the switch to
Announce Only (in so far as the answer and record
mode Ans. & Record has been set or vice versa).
[RRRRRRRRRRRRRRRRRRRRRR]
Save
Press the display key to save the entry.
If the 12h display is active, you can change between am/pm display by pressing display
key am/pm.
◆ As soon as you select a different mode or delete the advisory
i
announcement, the "alternate" function is automatically
deactivated.
◆ If you have selected "answer and record" mode and the memory is full,
the answering machine automatically switches to announce only
mode. If there is no advisory announcement, the answering machine
switches itself off. Delete old messages. After the messages have
been deleted, the answering machine automatically returns to the
original "answer and record" mode set.
69
S100/150 colour Tchibo / UK / A31008-M1575-L131-1-7619 / answering_m.fm / 01.07.2005
Using the base station answering machine
Playing back messages
The date and time of each call is recorded if you have made the appropriate settings
(page 15). If the calling number identification is activated, the caller's number or name
will be shown.
New messages that you have not listened to will be indicated by a message on the display, also the ö key on the base station and the f key on the handset will flash.
Pressing the f key starts playback of the first new message. If there are no new messages, the old ones will be replayed. After the last new message, the old messages are
played back. Then you will hear the end tone.
Once you have listened to them, the new messages are added behind the old ones.
If you want to listen to the old messages again, you have to select the message list.
Open the caller list/message list.
[______________________________________________]
OK
Ans M.: 01+02
or ...
If several mailboxes are activated:
[______________________________________________]
OK
Mailbox 2
i
Select the menu item and confirm. The loudspeaker
switches itself on. Playback starts.
Select the menu item and confirm, e.g. mailbox 2.
If several mailboxes are activated: If you notice that after pressing the f
key that there are no new messages on "your" answering machine but
only on somebody else's mailbox, quit the menu. The f key continues to
flash so that other members of your family or colleagues know that there
is a new message.
Pausing, skipping forward/back during playback
either ...
1. Via the keypad:
Pausing playback:
Pause playback.
Confirm to continue.
Skipping forward/back:
To the start of the current message.
2x
To the previous message.
To the next message.
2x
or ...
To the next message but one.
2. Via voice command (page 74):
Hold down.
70
S100/150 colour Tchibo / UK / A31008-M1575-L131-1-7619 / answering_m.fm / 01.07.2005
Using the base station answering machine
You will hear the ready tone (short beep). Now say the command Back or Forward
(page 74).
i
If playback is interrupted (pause) for more than a minute, the answering
machine returns to idle status.
Marking a message as "new" during playback
If you want to put an "old" message you have already listened to back to the beginning
of the list again, you have to mark it as "new" during playback, then the ö key on the
base station and the f key on the handset will flash.
Open the menu.
OK
[______________________________________________]
Mark as New
Select the menu item and confirm.
Copying the telephone number of a message to the directory
You can transfer a telephone number to the directory. During playback :
Open the menu.
OK
[______________________________________________]
Copy to Directory
Select the menu item and confirm.
Enter the name (for entering letters and characters
see page 114).
à
Press the display key to open the menu.
[______________________________________________]
OK
Save Entry
Confirm. The entry is saved.
Deleting messages
You can delete either individual messages or all old messages.
Deleting all old messages
During playback or pause:
Open the menu.
[______________________________________________]
OK
Del All Old Msgs
[RRRRRRRRRR]
Yes
i
Select the menu item and confirm.
Press the display key to confirm the prompt.
You have to listen to new messages for at least 3 seconds before they
become "old" and can be deleted.
71
S100/150 colour Tchibo / UK / A31008-M1575-L131-1-7619 / answering_m.fm / 01.07.2005
Using the base station answering machine
Deleting individual messages
While playing back the message to be deleted:
either ...
[RRRRRRRRRRRRRRRRRRRRRRR]
Delete
or ...
1. Via the keypad:
Press the display key.
2. Via voice command (page 74):
Hold down.
The loudspeaker switches itself on. You will hear the ready tone (short beep). Now say
the command Delete. After the prompt to repeat the command you will hear the ready
tone. Repeat Delete (page 74).
Recording infotexts
Infotexts can be listened to and deleted just like messages. New infotexts are indicated
by the flashing ö key (base station) and the f key (handset). You can record more
than one infotext. If you have activated several mailboxes (page 65), you have to select
the mailbox where you want to save the infotext.
[______________________________________________]
OK
æ
[______________________________________________]
OK
Record Memo
Open the menu.
Select the menu item and confirm.
Select the menu item and confirm.
If several mailboxes are activated:
[______________________________________________]
OK
Mailbox 2
Select the mailbox and confirm.
[______________________________________________]
OK
press "OK"
Confirm. You will hear the ready tone (short beep).
Now speak your infotext.
[RRRRRRRRRRRRRRRRRRRRRRR]
End
Press the display key.
If you press the Ý or a key while recording, it will be cancelled and the current
infotext deleted.
72
S100/150 colour Tchibo / UK / A31008-M1575-L131-1-7619 / answering_m.fm / 01.07.2005
Using the base station answering machine
Copying a telephone number from the message list to the directory
Press.
OK
[______________________________________________]
Ans M.: 01+02
Select the menu item and confirm.
If several mailboxes are activated:
[______________________________________________]
OK
Mailbox 2
Select the mailbox and confirm.
Select the entry and open the menu.
[______________________________________________]
OK
Copy to Directory
Select the menu item and confirm.
Enter the name (for entering letters and characters
see page 114).
à
Press the display key to open the menu.
OK
[______________________________________________]
Save Entry
Confirm. The entry is saved.
Hold down (return to idle).
Picking up a call from the answering machine
While the answering machine is recording a message, you can pick up the call by pressing the talk key c.
The recording is terminated and you can talk to the caller. If the recording lasted longer
than 2 seconds, the call will be shown as a new message. Once you end the call, the ö
and f keys will flash.
Recording a call
You can use the answering machine to record an external call. The recording time
depends on what recording quality (page 78) is set and the available memory.
Prerequisite: You are conducting an external call.
Open the menu.
either ...
To start recording:
[______________________________________________]
OK
Two Way Record
Select the menu item and confirm.
If several mailboxes are activated:
OK
[______________________________________________]
Mailbox 2
Select the menu item and confirm.
The recording will be indicated by an advisory text on the display and it will be included
as a new message in the list.
To end the recording, press the display key End.
i
Tell the caller that the call is being recorded.
73
S100/150 colour Tchibo / UK / A31008-M1575-L131-1-7619 / answering_m.fm / 01.07.2005
Using the base station answering machine
Operating the answering machine by voice command
You can use voice commands to control message playback. Four different users can save
their voice patterns of the commands Delete, Continue and Go Back for voice
recognition. The user has to say all three voice patterns in the specified order.
Recording voice commands
Record your voice pattern in quiet surroundings.
OK
[______________________________________________]
æ
[______________________________________________]
OK
Voice Prompts
[______________________________________________]
OK
Record Command
OK
[______________________________________________]
User 2
Open the menu.
Select the menu item and confirm.
Select the menu item and confirm.
Confirm.
Select the user and confirm.
Confirm.
OK
The loudspeaker switches itself on. After the prompt to say the first command you will
hear the ready tone (short tone). Now say the command Delete. After the prompt to
repeat the command you will hear the ready tone again. Repeat Delete.
You will then be prompted to say the second command Forward. Proceed as with the
command Delete. Thirdly say the command Back.
i
If the memory is full, no more voice patterns can be recorded.
Changing a user name
[______________________________________________]
OK
æ
[______________________________________________]
OK
Voice Prompts
OK
[______________________________________________]
Record Command
[______________________________________________]
User 2
[RRRRRRRRRRRRRRRRRRRRRR
]
Edit
[RRRRRRRRRRRRRRRRRRRRRR]
Save
Open the menu.
Select the menu item and confirm.
Select the menu item and confirm.
Confirm.
Select the user.
Press the display key.
Enter the name and press the display key.
Switching voice control on/off
Prerequisite: You have recorded voice patterns.
[______________________________________________]
OK
æ
74
Open the menu
Select the menu item and confirm.
[______________________________________________]
OK
Voice Cntl.
Select the menu item and confirm.
OK
[______________________________________________]
Ans Machine
Select the menu item and confirm ( ‰ = on).
S100/150 colour Tchibo / UK / A31008-M1575-L131-1-7619 / answering_m.fm / 01.07.2005
Using the base station answering machine
Operating the answering machine away from home (remote
operation)
You can check or activate your answering machine from any other telephone (e.g. hotel,
pay phone).
Prerequisite:
1. You have already changed at home the factory default PIN (0000) (page 101).
2. The telephone you are using must support tone dialling (DTMF), i. e. you hear different tones when you press keys. Alternatively you can use a tone transmitter
(available in shops).
i
See page 110 for a brief description of how to use remote operation.
Calling the answering machine and playing messages
Dial your own telephone number.
While you hear your announcement:
9
Press key 9 and enter the system PIN.
If several mailboxes are activated:
;
Press the hash key and enter the mailbox number.
You will be connected to "your" mailbox.
You are informed whether new messages have been recorded. Then the messages will
be played back. There are two ways of operating the answering machine remotely:
◆ via the keypad,
◆ with voice commands.
Operating the answering machine via the keypad
Enter the appropriate number.
Number
Meaning
A
To skip to the start of the current message.
To skip to previous messages (press repeatedly).
B
3
Stop. Press once more to continue.
:
0
;I
Mark message as "new".
To skip to the next message.
To skip to subsequent messages (press repeatedly).
Delete the current message.
To access a certain mailbox, e.g. to mailbox 3.
75
S100/150 colour Tchibo / UK / A31008-M1575-L131-1-7619 / answering_m.fm / 01.07.2005
Using the base station answering machine
Operating the answering machine via voice commands
Before each voice command press the number 9 and speak the command after you
hear the ready tone. When deleting a message, you will be prompted to repeat the command. Then repeat "DELETE" (without pressing the number 9 first).
Prerequisite: You have already activated voice command (page 74).
Activating the answering machine remotely
If you forget to activate your answering machine, you can switch it on remotely. Phone
your number from a mobile telephone or a telephone with tone dialling and let your
phone ring for about a minute. You will hear: "Please enter PIN".
Prerequisite: The system PIN must not be 0000 (page 101).
Enter the system PIN.
If several mailboxes are activated:
Also enter the mailbox number.
Your answering machine is now activated. You will hear how much memory is left. If
several mailboxes have been activated, you will be prompted for the number of the mailbox you want to listen to. Then the messages will be played back.
i
76
The answering machine can not be switched off remotely.
S100/150 colour Tchibo / UK / A31008-M1575-L131-1-7619 / answering_m.fm / 01.07.2005
Setting the base station answering machine
Setting the base station answering machine
The answering machine has already been preset for you at the factory. You can however
make individual settings using the handset.
Ring delay and charge saving function for remote operation
You can also decide when the answering machine should be activated. You can choose:
0 sec., after 10 sec., 20 sec. (factory setting) or 30 sec.. Instead of a fixed ring delay
you can select the charge saving function Auto.
The answering machine switches itself on automatically
◆ after 10 seconds if there are new messages;
◆ after 20 seconds if there are no new messages.
After about 15 seconds you know during the remote operation that there are no new
messages (otherwise the answering machine would have already been activated). If you
hang up now, the call will not cost you anything.
Please note:
◆ Only ringer melodies 1–3 correspond to the ringer tones during a call.
◆ During all ringer tones the first ringer tone is suppressed. You can
deactivate the suppression of the first ringer tone (page 98).
i
[______________________________________________]
OK
æ
[______________________________________________]
OK
Ring Delay
Open the menu
Select the menu item and confirm.
Select the menu item and confirm.
Select ring delay (0 sec., 10 sec., 20 sec., 30 sec.,
Auto).
[RRRRRRRRRRRRRRRRRRRRRR]
Save
Press the display key to save the setting.
77
S100/150 colour Tchibo / UK / A31008-M1575-L131-1-7619 / answering_m.fm / 01.07.2005
Setting the base station answering machine
Setting the message length and recording quality
You can set the maximum recording time for a message and its quality. The total recording time of your answering machine depends on the quality set.
With setting High Quality the total recording time is up to 9 minutes, with Long Play
up to 15 minutes.
[______________________________________________]
OK
æ
OK
[______________________________________________]
Message Set
[______________________________________________]
OK
Message Length
Open the menu.
Select the menu item and confirm.
Select the menu item and confirm.
Confirm.
either ...
Select recording length (30, 60, 120 seconds or Maximum).
or ...
[______________________________________________]
OK
Record Quality
Select the menu item and confirm.
Select Long Play or High Quality.
... then
Press the display key to save the setting.
[RRRRRRRRRRRRRRRRRRRRRR]
Save
Listening in
While a message is being recorded you can listen in via the loudspeaker of any handset
or on the loudspeaker of the base station (factory setting).
[______________________________________________]
OK
æ
OK
[______________________________________________]
Call Screening
either ...
Open the menu.
Select the menu item and confirm.
Select the menu item and confirm.
Switching on the handset loudspeaker:
[______________________________________________]
OK
Handset
or ...
Confirm (‰ = on).
Switching on the base station loudspeaker:
[______________________________________________]
OK
Base
Select the menu item and confirm ( ‰ = on).
Hold down (return to idle).
◆ During the recording the handsfree key d is illuminated. You can pick
i
78
up the call by pressing the talk key c, the display key Accept or the
handsfree key d.
◆ You can use the end call key a to switch off the Call Screening
function on the handset during the conversation.
S100/150 colour Tchibo / UK / A31008-M1575-L131-1-7619 / answering_m.fm / 01.07.2005
Setting the base station answering machine
Resetting the answering machine for fast access
The (integrated) answering machine has already been preset for fast access at the factory. If you have set fast access for the network mailbox (see page 80), you can restore
the factory setting.
Open the menu.
OK
[______________________________________________]
æ
Select the menu item and confirm.
[______________________________________________]
OK
Answer Machine
Select the menu item and confirm.
[______________________________________________]
OK
Set Key 1
Confirm.
Hold down (return to idle).
Once you have selected the network mailbox or the answering machine, simply hold
down the key 1. You will be connected directly.
If several mailboxes have been activated , press the 1 key and then the number of
the mailbox you want to open.
i
The fast access setting applies for all registered handsets.
79
S100/150 colour Tchibo / UK / A31008-M1575-L131-1-7619 / SAG_T-NetBox.fm / 01.07.2005
Using the network mailbox
Using the network mailbox
The network mailbox is the answering machine on the network of your network service
provider. You can only use this mailbox if you have ordered it from your network provider.
Setting the network mailbox for speed dialling
With speed dialling you can hold down the 1 key to immediately dial the
network-mailbox or access the integrated answering machine.
The telephone has speed dialling for the (integrated) answering machine already as a
factory setting. You can use the network mailbox instead. Contact your network provider for more information about this.
Setting the telephone number for the network mailbox and defining the mailbox
for speed dialling.
[______________________________________________]
OK
æ
Open the menu.
Select the menu item and confirm.
[______________________________________________]
OK
Set Key 1
Confirm.
[______________________________________________]
OK
Network Mailb.
Confirm (‰ = on).
à
[______________________________________________]
OK
Save Entry
Enter the telephone number of the network mailbox
and press the display key.
Confirm. The entry is saved.
Hold down (return to idle).
The setting applies for all registered handsets. How to reset speed dialling on the telephone to the answering machine is described on page 79.
Calling the network mailbox
Hold down the 1 key. You are directly connected to the network mailbox. If you then
press the handsfree key d, you can hear the mailbox announcement loudly and it will
be easier to operate the mailbox.
Checking the network mailbox
You will receive a call from the network mailbox when a message arrives for you. The
display will show the number if you have requested this service. If you accept the call,
the new message will be played back. If you do not accept the call, the number of the
network -mailbox will be entered in the list of missed calls and the message key will flash
(see page 36).
80
S100/150 colour Tchibo / UK / A31008-M1575-L131-1-7619 / registration.fm / 01.07.2005
Registering and de-registering handsets
Registering and de-registering handsets
You can register up to six handsets on your base station.
The handset which is not yet registered on this base station is registered automatically.
Handsets from other manufacturers must be registered manually.
Automatic registration
To "introduce" your handset, place it in the base station with the display facing
upward. The registration process takes about a minute. During registration the display
shows Regstr.Procedure and it flashes Base 1. The next unassigned internal
number 1 is automatically assigned to the handset. After successful registration, the
display shows this internal number, e.g. "INT 1". This means that the handset has been
assigned the first internal number.
◆ Automatic registration is only possible if the base station you want to
i
register the handset at is not being used for a call.
◆ You can assign a different internal number (page 85) or name
(page 84) to a registered handset.
Manual registration
The handset must be registered manually if you have restored the factory settings.
You must initiate registration of the handset on the handset and base station included
in delivery.
1. At the handset
OK
[______________________________________________]
ì
Open the menu.
Select the menu item and confirm.
[______________________________________________]
OK
Register H/Set
Select the menu item and confirm.
[______________________________________________]
OK
Base 1
Select the base station (1–4) and confirm,
e.g. Base 1.
OK
Enter the base station system PIN (factory setting:
0000) and confirm.
After entering the system PIN, Base 1 flashes in the display, for example.
81
S100/150 colour Tchibo / UK / A31008-M1575-L131-1-7619 / registration.fm / 01.07.2005
Registering and de-registering handsets
2. At the base station
Press the Register/Paging key on the base station
(page 64) , until you hear a signal tone (about 3 seconds). This starts the registration procedure.
The base station search is terminated after 60 seconds. If registration is not completed
in this period, repeat the process.
After successful registration, the handset is assigned the next available number, as
described in the chapter "Automatic registration" (page 81).
Manual registration of handsets from other manufacturers
1. At the handset
Start handset registration as described in its operating instructions.
2. At the base station
Press the Register/Paging key on the base station
(page 64) , until you hear a signal tone (about 3 seconds). This starts the registration procedure.
During registration, the next unassigned internal number (1–6) is automatically
assigned to the handset. If all 6 are assigned, number 6 will be overwritten if this handset is in the idle state.
De-registering handsets
De-registering the handset included in delivery:
Open the handset list.
________ Internal
______1
Call All
INT 1
Anna
<
The handset you are using
is marked with <.
Select the handset to be de-registered (your handset
is marked with <) and open the menu.
[RRRRRRRRRR
Yes ]
[______________________________________________]
De-reg. H/Set No. OK
Select the menu item and confirm.
OK
Enter the system PIN (factory setting: 0000) and confirm.
Press the display key to confirm the prompt.
To de-register any handsets from other manufacturers, please read the operating
instructions for the handset in question.
82
S100/150 colour Tchibo / UK / A31008-M1575-L131-1-7619 / registration.fm / 01.07.2005
Registering and de-registering handsets
Looking for handsets ("Paging")
If you cannot find your handset, you can use the base station to locate it. The Registration/Paging key is to the right of the handset recess on the base station (page 64).
Press the Registration/Paging key on the base station
for 1 second. All the handsets will ring at the same
time ("Paging").
End paging:
Press the Registration/Paging key on the base station
for 1 second or press the talk key c.
Switching base stations
If your handset is registered at several base stations, the following settings will be possible:
◆ Set to a certain base station, e. g. base station at home or at the office.
◆ Set to the base station with the best reception Best Base. The handset
automatically switches to the base station with the best reception.
[______________________________________________]
OK
ì
Open the menu.
Select the menu item and confirm.
OK
[______________________________________________]
Select Base
Select the menu item and confirm.
OK
Select one of the registered base stations or Best
Base and confirm.
83
S100/150 colour Tchibo / UK / A31008-M1575-L131-1-7619 / registration.fm / 01.07.2005
Operating several handsets
Operating several handsets
Making internal calls
Internal calls are calls to other handsets registered to the same base station. They are
free of charge.
Calling a particular or all handsets simultaneously
Open the handset list.
Your own handset is marked with "<".
either ...
Calling a particular handset:
Select the handset and press the talk key.
or ...
Calling all handsets ("joint call"):
Press the star key. All the handsets are called.
... then
Ending a call:
Press the end call key.
i
◆ If you want to call a particular handset you can also open the list and
then enter the number of that handset, e.g. u 2.
◆ If you receive a call during an internal or joint call, the joint call is not
interrupted.
Changing the name of the handset
The names "INT 1", "INT 2" etc. are assigned automatically. However, you can change
these names, e.g. to "Anna" etc. (10 characters maximum). The changed name is shown
in every handset list.
Open the handset list.
84
[RRRRRRRRRRRRRRRRRRRRRR]
Edit
Select the handset and press the display key.
[RRRRRRRRRRRRRRRRRRRRRR]
Save
Enter the name and press the display key (for
entering letters and characters see page 114).
S100/150 colour Tchibo / UK / A31008-M1575-L131-1-7619 / registration.fm / 01.07.2005
Operating several handsets
Changing a handset's internal number
During registration, a handset is automatically assigned the next available number
(page 81). You can change the internal number of any registered handset (1–6).
Open the handset list
Open the menu.
OK
[______________________________________________]
Edit H/Set No.
Confirm. The handset list is displayed.
The current number flashes. Select the handset and
enter the new internal number (1–6). The handset's
old number will be overwritten.
RRRRRRRRRRRRRRRRRRRRRRRR
Save
Press the display key to save the entry.
Hold down (return to idle).
i
If you try to assign the same number twice, you will hear the error tone
(descending tone sequence). Repeat with a number that is still available.
Connecting a call to another handset
You can transfer (connect) an external call to another handset.
Open the handset list.
The external caller will hear the waiting melody.
OK
Select the handset or Call All and confirm. When the
internal user answers, announce the external call.
Press the end call key. The external call is then transferred to the other handset.
i
Instead of announcing the call, you can immediately press the end call
key a. If the internal user does not answer or the line is busy, the call
comes back to you automatically (the display shows Recall).
85
S100/150 colour Tchibo / UK / A31008-M1575-L131-1-7619 / registration.fm / 01.07.2005
Operating several handsets
Internal enquiry calls
While you are conducting a call with an external user, you can call an internal user to
conduct an enquiry call. You are automatically reconnected to the external user when
you end the enquiry call.
Open the handset list.
The external caller will hear the waiting melody.
OK
Select the handset and confirm.
Ending an enquiry call:
[RRRRRRRRRRRRRRRRRRRRRRR]
End
Press the display key. You are re-connected to the
waiting caller.
Accepting or rejecting a waiting call
You hear the call waiting tone (short beep) if you receive an external call while conducting an internal call. If call number identification is activated, the caller's number or
name will be shown.
either ...
[RRRRRRRRRRRRRRRRRRRRRRR]
Accept
or ...
[RRRRRRRRRRRRRRRRRRRRRR]
Reject
i
86
Terminating the internal and accepting the
external call:
Press the display key. The internal call is ended. You
are connected to the external caller.
Rejecting the external call:
Press the display key. The call waiting tone is
switched off. You remain connected to the internal
caller.
If you reject the waiting call tone on your handset, it will still be heard on
the other registered handsets.
S100/150 colour Tchibo / UK / A31008-M1575-L131-1-7619 / registration.fm / 01.07.2005
Operating several handsets
Listening in on an external call
You are conducting an external call. An internal user can listen in on this call and speak
to the other users. This is indicated by a signal tone heard by all those participating in
the call.
Prerequisite: The Listening In function has been activated (factory setting: off).
Activating/deactivating internal listening in
Open the menu.
OK
[______________________________________________]
í
Select the menu item and confirm.
[______________________________________________]
OK
Add. Features
Select the menu item and confirm.
[______________________________________________]
OK
Listening In
Select the menu item and confirm.
[_______]
OK
Enter the system PIN (page 101) and confirm
(‰ = on).
Hold down (return to idle).
Internal istening in
Your handset display shows In use. You want to join in the external call.
Press the talk key You can now talk to the other callers. They will hear a signal tone.
Exiting a call:
Press the end call key (signal tone).
i
If the first internal caller presses the end call key a, a signal tone will be
heard. The connection between the handset that listened in and the
external caller is still open.
87
S100/150 colour Tchibo / UK / A31008-M1575-L131-1-7619 / registration.fm / 01.07.2005
Operating several handsets
Using direct inward dialling
You can set your telephone so that an external caller can call the internal number of a
handset directly. To do this you have to activate direct inward dialling. After dialling your
telephone number the caller will be asked to select the caller or will hear your direct
inward dialling announcement. The caller will then have 5 seconds to dial the internal
number.
Prerequisite: Direct inward dialling has been activated.
If the internal user does not answer, the answering machine will pick up
the call if it is switched on. If the answering machine has been set to
0 sec. (page 77), the direct inward dialling announcement will not be
played.
i
Activating/deactivating direct inward dialling
[______________________________________________]
OK
í
OK
[______________________________________________]
Call Director
[______________________________________________]
OK
Call Director
Open the menu.
Select the menu item and confirm.
Select the menu item and confirm.
Confirm to activate or deactivate direct inward dialling (‰ = on).
Hold down (return to idle).
Recording direct inward dialling announcement
Example of a typical direct inward dialling announcement: "Dial 1for Mr. Miller, 2 for the
secretary's office. Press the >star< button if you don't mind who you talk to".
[______________________________________________]
OK
í
Open the menu.
Select the menu item and confirm.
[______________________________________________]
OK
Call Director
Select the menu item and confirm.
OK
[______________________________________________]
Rec Announce
Select the menu item and confirm. The display will
prompt you to start recording.
OK
[RRRRRRRRRRRRRRRRRRRRRRR]
End
Confirm. You will hear the ready tone (short beep).
Now speak your announcement.
Press the display key. The recorded announcement is
repeated for checking.
◆ If during the recording you press Ý or the end call key a, the
i
88
recording will be terminated.
◆ The recording is automatically terminated if you exceed the maximum
recording time of 170 seconds or if you pause for more than two
seconds.
S100/150 colour Tchibo / UK / A31008-M1575-L131-1-7619 / registration.fm / 01.07.2005
Operating several handsets
Playing/deleting direct inward dialling announcement
OK
[______________________________________________]
í
[______________________________________________]
OK
Call Director
either ...
Open the menu.
Select the menu item and confirm.
Select the menu item and confirm.
Playing back the announcement:
[______________________________________________]
OK
Play Announce
or ...
Select the menu item and confirm.
Deleting the announcement:
OK
[______________________________________________]
Del Announce
Select the menu item and confirm.
Press the display key to confirm the prompt.
[RRRRRRRRRR]
Yes
Hold down (return to idle).
i
◆ During playback you can activate the loudspeaker using the d key.
◆ While you are listening to the announcement, you can press the
display key New to re-record it.
Picking up a call
If a call is not accepted while direct inward dialling is activated, you can pick it up from
a different handset by pressing the talk key c. The call is indicated on this handset by
the flashing LED.
Using a handset as a room monitor
This function calls a previously stored internal or external number if a certain defined
noise level is reached (if the baby cries). When you answer the call, you will hear the
noise in the baby's room. Even after you hang up the room monitor function on the
handset remains active.
The distance between the handset and the baby should be between 1 and 2 metres.
The microphone must be facing the baby.
If the room monitor function is activated, incoming calls on that handset will be signalled without the ringer and shown only on the display. The display and keypad are
not illuminated.
When entering an external telephone number, make sure:
◆ The handset in the baby's room is not barred for outgoing calls.
◆ The number to which the alarm calls is sent is not blocked by an activated answering
machine.
W
Before leaving, you should check the settings for the room monitor,
e.g. sensitivity and connection.
89
S100/150 colour Tchibo / UK / A31008-M1575-L131-1-7619 / registration.fm / 01.07.2005
Operating several handsets
◆ If you use an external number for the room monitor call, remember to
inform the owner of the telephone.
◆ The alarm call to an external number is cut after about 90 seconds,
i
an alarm call to an internal number (handset) is unlimited.
◆ The active room monitor function considerably reduces the operating
time of the handset. You can leave the handset in the baby's room in
the charging unit so as to avoid flat batteries.
◆ The room monitor function can also be used in Walk and Talk mode.
Activating the room monitor and entering the number to be called for the
first time
Step 1: Open the entry field for the room monitor:
[______________________________________________]
OK
é
[______________________________________________]
OK
Room Monitor
Open the menu.
Select the menu item and confirm.
Confirm. The entry field appears.
Step 2: Activate room monitor:
In the Room M.: line select On.
Step 3: Enter the telephone number:
RRRRRRRRRRRRRRRRRRRRRRRR
Edit
either ...
Scroll to the Call to: line and press the display key.
The entry field for the telephone number appears.
Entering an internal telephone number:
Press the display key.
[RRRRRRRRR]
INT
OK
or ...
Select the handset and confirm.
Entering an external telephone number:
Enter the telephone number.
à
[______________________________________________]
OK
Save Entry
Press the display key to open the menu.
Confirm. The entry is saved.
Step 4: Set the noise level sensitivity:
You can scroll to the Level: line if you want to set the
sensitivity for the noise level (Low or High).
[RRRRRRRRRRRRRRRRRRRRRR]
Save
90
Press the display key. The room monitor function is
now activated.
S100/150 colour Tchibo / UK / A31008-M1575-L131-1-7619 / registration.fm / 01.07.2005
Operating several handsets
If the room monitor is activated, you can use v (open menu) to go straight to the room
monitor setting.
◆ If you want to copy the external telephone number from the directory,
while in the entry field for the telephone number press the bottom of
the control key s (open directory), use s to select an entry and
confirm it with OK .
◆ If you enter an external telephone number, only the last 4 digits will
be shown in the display.
i
Changing an external telephone number
Prerequisite: You are in the entry field for the room monitor (Step 1, page 90).
Û
RRRRRRRRRRRRRRRRRRRRRRRR
Edit
Scroll to the Call to: line and press the display key.
Delete the number.
either ...
Entering an external telephone number:
Enter the new telephone number.
à
Press the display key to open the menu.
[______________________________________________]
OK
Save Entry
or ...
Confirm. The entry is saved.
Entering an internal telephone number:
Press the display key.
[RRRRRRRR]
INT
OK
Select the handset and confirm.
Continue from Step 4 as described on page 90.
Changing an internal telephone number
Prerequisite: You are in the entry field for the room monitor (Step 1, page 90).
RRRRRRRRRRRRRRRRRRRRRRRR
Edit
Scroll to the Call to: line and press the display key.
[RRRRRRRRR]
Yes
Press the display key to confirm the prompt.
[RRRRRRRRRRRRRRRRRRRRRR]
Edit
Press the display key. The entry field for the telephone number appears.
either ...
Entering an internal telephone number:
Press the display key.
[RRRRRRR
INT]
OK
or ...
Select the handset and confirm.
Entering an external telephone number:
Enter the telephone number.
à
[______________________________________________]
OK
Save Entry
Press the display key to open the menu.
Confirm. The entry is saved.
Continue from Step 4 as described on page 90.
91
S100/150 colour Tchibo / UK / A31008-M1575-L131-1-7619 / registration.fm / 01.07.2005
Operating several handsets
Deactivating the room monitor
You can deactivate the room monitor remotely. Accept the alarm call sent by the room
monitor function and enter O R. The function is deactivated about 90 seconds
after the end of the call. No more room monitor alarms will be sent. The other room
monitor functions on the handset (e.g. no ring tone) will remain active until you press
the display key Off on the handset in the baby's room.
i
To re-activate the room monitor function with the same telephone
number, you have to activate it again and save the setting with Save.
Setting the Walk and Talk mode
The Walk and Talk function enables communication between two handsets no matter
how far away from the base station they are.
Example: you go on holiday and take two Walk and Talk enabled handsets with you.
Activate the Walk and Talk function on both handsets. Then you can use them for communicating.
Prerequisite:
◆ Both handsets are registered at the same base station or
◆ both handling are registered at different base stations and set to Best Base
(page 83) or
◆ one of the handsets is not registered at any base station and the registered handset
is set to Best Base or
◆ neither handset is registered at a base station.
i
92
In Walk and Talk mode
◆ the maximum range between the handsets out in the open is 300 m,
◆ the handsets are no longer available for incoming calls,
◆ the operating time of the handsets is considerably reduced.
S100/150 colour Tchibo / UK / A31008-M1575-L131-1-7619 / registration.fm / 01.07.2005
Operating several handsets
Activating/deactivating the Walk and Talk mode
OK
[______________________________________________]
é
[______________________________________________]
OK
Walk and Talk
Open the menu.
Select the menu item and confirm.
Select the menu item and confirm.
Deactivating Walk and Talk mode:
Press the display key.
[RRRRRRRRRR]
Off
If you now press the talk key c or handsfree key d, the call is sent to all handsets that
are in Walk and Talk mode. The connection is made with the first handset that accepts
the Walk and Talk call.
◆ The ring and signal tones can be set just like when your handset has
contact with the base station at home (page 95 and page 97).
◆ "Activating/deactivating the ringer tone" (page 98) and "Activating/
i
deactivating keypad protection" (page 11) are both possible in Walk
and Talk mode.
◆ To open the menu, press the display key ©.
◆ Switching your handset off and on again does not affect the Walk and
Talk mode.
Using the handset as a room monitor in Walk and Talk mode
You can still use the handset as a room monitor while in Walk and Talk mode.
[RRRRRRRRRRRRR]
à
Open the menu.
OK
[______________________________________________]
Room Monitor
Select the menu item and confirm.
Scroll to the Room M.: line and activate the room
monitor function.
You can scroll to the Level: line if you want to set the
sensitivity for the noise level (Low or High).
[RRRRRRRRRRRRRRRRRRRRR
]
Save
Press the display key. The room monitor function is
now activated.
The room monitor alarm call is sent to all handsets that are in Walk and Talk mode.
W
Before leaving, you should check the settings for the room monitor,
e.g. sensitivity and connection.
Press the display key Off on the room monitor handset to deactivate the room monitor
function. The handset returns to normal Walk and Talk mode.
93
S100/150 colour Tchibo / UK / A31008-M1575-L131-1-7619 / settings_bs_hs.fm / 01.07.2005
Setting the handset
Setting the handset
Your handset has been preset at the factory. You can change the settings to suit your
personal preferences.
Changing the display language
The display texts can be shown in various languages.
[______________________________________________]
OK
ì
Open the menu.
Select the menu item and confirm.
OK
[______________________________________________]
Language
Select the menu item and confirm. The active language is marked with ‰ (factory setting: English).
OK
Select the language and confirm.
Hold down (return to idle).
◆ If you accidentally choose the wrong language (one you do not
understand), press v M I. Then press s to choose the right
language and confirm your choice with OK .
◆ Changing the display language may affect the character map, e.g.
with Russian.
i
Setting the display
You have a choice of four colour schemes and several different contrasts. You can also
set the display so that it does not light up while the handset is in the charger (night
mode activated).
OK
[______________________________________________]
ì
[______________________________________________]
OK
Display
Open the menu.
Select the menu item and confirm.
Confirm.
either ...
[______________________________________________]
OK
Colour Scheme
Select the menu item and confirm.
OK
Select colour scheme and confirm. The current selection is indicated by ‰ .
or ...
[______________________________________________]
OK
Contrast
Select the menu item and confirm.
Select contrast.
[RRRRRRRRRRRRRRRRRRRRRR]
Save
Press the display key to save the setting.
or ...
[______________________________________________]
OK
Night Mode
Select and confirm to turn the function off or on (‰
= On).
... then
Hold down (back to idle status).
94
S100/150 colour Tchibo / UK / A31008-M1575-L131-1-7619 / settings_bs_hs.fm / 01.07.2005
Setting the handset
Logo display
You can display a logo instead of the 'idle status display'. You have a choice of 4 logos.
OK
[______________________________________________]
ì
Open the menu.
Select the menu item and confirm.
[______________________________________________]
OK
Display
Confirm.
[______________________________________________]
OK
Screen Picture
Confirm.
Screen picture on/off
[______________________________________________]
Go to the Picture: line and select a picture.
[RRRRRRRRRRRRRRR]
Show OK
Preview picture and accept.
[RRRRRRRRRRRRRRRRRRRRR
]
Save
Press the display key to save your settings.
Hold down (back to idle status).
Activating/deactivating Auto talk
If you have activated this function, you can remove the handset from the charging unit/
base station to answer a call without having to press the talk key c to accept it (factory
setting: on).
[______________________________________________]
OK
ì
[______________________________________________]
OK
Auto Answer
Open the menu.
Select the menu item and confirm.
Confirm to activate or deactivate the function
(‰ = on).
Hold down (return to idle).
Changing the handsfree speaking volume
You can change the handsfree speaking volume to one of five levels, the loudspeaker
volume to one of three levels – even during an external call.
OK
[______________________________________________]
ê
[______________________________________________]
OK
Handset Volume
Open the menu.
Select the menu item and confirm.
Confirm. You will hear the current handsfree speaking volume.
Set the required level (1–5) in the entry field.
Scroll one line down and set the handset volume
(1–3).
[RRRRRRRRRRRRRRRRRRRRR
]
Save
Press the display key to save the setting.
Hold down (return to idle).
95
S100/150 colour Tchibo / UK / A31008-M1575-L131-1-7619 / settings_bs_hs.fm / 01.07.2005
Setting the handset
Melody quality
You have the option of activating an echo effect for the long ringer melodies (4-10).
[______________________________________________]
OK
ê
OK
[______________________________________________]
Ringer Echo
Open the menu.
Select the menu item and confirm.
Confirm (‰ = on).
Hold down (return to idle).
Changing ringer melodies
You can choose from a number of options:
◆ Six volumes:
– Five volumes (1–5; e.g. volume 2 = ˆ),
– "Crescendo" ring (6; increasing volume of each ring = ‰).
◆ Ten melodies (1–10; melodies 1–3 are the "classic ringer melodies")
Settings for external calls and time control
You can set the volume and melody to suit what is being signalled. You can also set the
time control for the volume of a call (e.g. quieter during the night).
[______________________________________________]
OK
ê
[______________________________________________]
OK
Ringer Settings
Open the menu.
Select the menu item and confirm.
Select the menu item and confirm.
Setting the melody and volume:
OK
[______________________________________________]
Ext. Calls
Confirm. You will hear the current volume.
Select the required volume in the entry field.
Scroll to the next line and select the melody (1–10).
You will hear the current melody and the number
displayed at the end of the line shows the current
setting.
If necessary activate time control:
[RRRRRRRRRRRRRRRRRRRRRR]
Time C.
Press the display key.
Time ctrl:
From:
Until:
Ö
”
fOng
20:00
08:00
‡
Save
Status On or Off
Period for On
Ringer volume
In the Time ctrl: line select On.
Scroll to the From: line and enter the start of the
period (4 digits).
Scroll to the Until: line and enter the end of the
period (4 digits).
96
S100/150 colour Tchibo / UK / A31008-M1575-L131-1-7619 / settings_bs_hs.fm / 01.07.2005
Setting the handset
Scroll to the next line and set the ringer volume for
this period.
[RRRRRRRRRRRRRRRRRRRRR
]
Save
Press the display key to save the time control.
[RRRRRRRRRRRRRRRRRRRRR
]
Save
Press the display key to save the setting.
... then
Hold down (return to idle).
Individual settings for internal calls, alarm call and appointments
You can set the ringer tone for internal calls, alarm calls and appointments to suit your
personal preferences. You can also make the ringer tone the same for all these functions.
OK
[______________________________________________]
ê
[______________________________________________]
OK
Ringer Settings
either ...
[______________________________________________]
OK
Internal Calls
or ...
[______________________________________________]
OK
Appointments
or ...
[______________________________________________]
OK
Alarm
or ...
[______________________________________________]
OK
All
Open the menu.
Select the menu item and confirm.
Select the menu item and confirm.
For internal calls:
Select the menu item and confirm.
For appointments set (page 17):
Select the menu item and confirm.
For a set alarm call (page 15):
Select the menu item and confirm.
To set all functions the same:
Select the menu item and confirm.
... then
Set the required volume (1–6) in the entry field.
Scroll to the next line and select the ringer melody.
You will hear the current melody and the number
displayed at the end of the line shows the current
setting. Select a melody (1–10).
[RRRRRRRRRRRRRRRRRRRRR
]
Save
Press the display key to save the setting.
[RRRRRRRRRR]
Yes
When setting All also press the display key to confirm
the prompt.
... then
Hold down (return to idle).
97
S100/150 colour Tchibo / UK / A31008-M1575-L131-1-7619 / settings_bs_hs.fm / 01.07.2005
Setting the handset
Activating/deactivating the ringer tone
All handsets ring when there is an incoming external call. Before taking a call or while
the telephone is in the idle state you can deactivate the ringer tone on your handset permanently or for the current call.
Permanently deactivating the ringer tone:
Press the star key until you can no longer hear the
ringer tone. It is now permanently deactivated. You
will see the iconÚ in the display.
Re-activating the ringer tone:
Hold down star key.
To deactivate the ringer tone in in the idle state, press the key until you see the Ú icon.
You cannot reactivate it during an external call.
i
To deactivate the ringer tone for the current call, press the display
key Silence.
Activating/deactivating the attention tone
When you deactivate the ringer tone you can activate an attention tone. Then an incoming call is signalled by a short tone ("beep") instead of the ringer tone.
Hold down the star key and within 3 seconds:
[RRRRRRRRRRRRRRRRRRRRRRR]
Beep on
Press the display key. Calls will now be signalled by a
short attention tone. In the display you will see º.
Deactivating the attention tone:
Hold down the star key. The ringer tone will be reactivated.
Activating/deactivating suppression of the first ringer tone
The first ringer tone of an incoming text message (SMS) is suppressed so that it does not
disturb you. You can change the setting so that the first ringer tone is heard.
Open the menu.
Press key.
either ...
You want to hear the first ringer tone:
Press the key.
or ...
You want to suppress the first ringer tone:
Press the key.
OK
i
98
Confirm.
If you answer a call immediately on the first ringer tone and this tone was
triggered by an SMS, then the SMS will be lost.
S100/150 colour Tchibo / UK / A31008-M1575-L131-1-7619 / settings_bs_hs.fm / 01.07.2005
Setting the handset
Activating/deactivating advisory tones
Your handset points out various activities and states with an acoustic signal. The following advisory tones can be activated and deactivated independently of each other (factory setting: on).
◆ Key beep: Each keystroke is confirmed
◆ Acknowledgement tones:
– Confirmation beep (rising tone sequence): at the end of an entry/setting, when
replacing the handset in the base station and when there is an SMS or a new
entry in the caller list/message list
– Error beep (descending tone sequence): when you make an incorrect entry
– Menu end tone: when you scroll to the end of a menu
◆ Battery low beep: The batteries have to be recharged.
[______________________________________________]
OK
ê
[______________________________________________]
OK
Advisory Tones
Open the menu.
Select the menu item and confirm.
Select the menu item and confirm.
You can activate/deactivate the key beep in the Key
Tones: line.
Scroll to the Confirm.: line to activate/deactivate the
acknowledgement tones.
Scroll to the line Battery: and select On, Off or
together. This activates/deactivates the battery low
beep or it is only heard while talking on the telephone.
[RRRRRRRRRRRRRRRRRRRRR
]
Save
Press the display key to save the setting.
Hold down (return to idle).
99
S100/150 colour Tchibo / UK / A31008-M1575-L131-1-7619 / settings_bs_hs.fm / 01.07.2005
Setting the handset
Resetting a handset to the factory setting
You can undo any settings and changes you make. Entries in the directory, caller list,
email directory and the speed dialling list, the registration of the handset at the base station and also any logos and melodies you have loaded will not be affected. You can terminate reset with a.
OK
[______________________________________________]
ì
[______________________________________________]
OK
Reset Handset
[RRRRRRRRRR]
Yes
Open the menu.
Select the menu item and confirm.
Select the menu item and confirm.
Press the display key to confirm the prompt.
Hold down (return to idle).
Factory setting of the handset
Base station selection
Handset volume
Volume for handsfree talking
Ringer volume
Time control for ringer tone
Ringer melody
Contrast
Logo
Night mode
Auto talk
Battery low/ keystroke/confirmation beep
Display language
Character map
Alarm clock/appointment
"Best base"
1
3
5
deactivated
1
5
deactivated
deactivated
activated
activated
country specific
standard
deactivated
Appointment name
Redialling list
Room monitor/room monitor sensitivity
deleted
empty
deactivated/high
100
page 83
page 95
page 95
page 96
page 96
page 96
page 94
page 95
page 94
page 95
page 99
page 94
page 16/
page 17
page 17
page 32
page 90
S100/150 colour Tchibo / UK / A31008-M1575-L131-1-7619 / settings_bs_hs.fm / 01.07.2005
Setting the base station
Setting the base station
You can make all the base station settings with a registered handset.
Protecting your telephone from unauthorised access
You can protect your telephone from unauthorised access by protecting the base station
system settings with a system PIN that only you know. You have to enter the system PIN,
for example, when registering or de-registering a handset, re-setting the telephone to
the factory setting, when listening in on an internal call or barring telephone numbers.
Changing the system PIN
You can change the set 4-digit system PIN of the base station (factory setting 0000) to
a 4-digit PIN that only you know. This also makes remote control of the answering
machine possible (page 75).
[______________________________________________]
OK
í
Open the menu.
Select the menu item and confirm.
OK
[______________________________________________]
System PIN
Select the menu item and confirm.
OK
Enter the current system PIN and confirm.
OK
Enter the new system PIN and confirm. For security
reasons the entry is shown with four stars (****).
Scroll to the next line and repeat the new system PIN.
[RRRRRRR]
OK
Confirm.
Hold down (return to idle).
101
S100/150 colour Tchibo / UK / A31008-M1575-L131-1-7619 / settings_bs_hs.fm / 01.07.2005
Setting the base station
Assigning authorisation per handset
You can prevent individual handsets from dialling external numbers.
You can set the following authorisations:
◆ Internal and external: The handset can be used without restriction.
◆ Ext incoming: The handset can be used to make internal calls and receive external
calls.
◆ Internal only: The handset can only be used for internal calls.
Open the handset list.
Select the handset and open the menu.
[______________________________________________]
OK
HS Call Barring
Select the menu item and confirm.
OK
Enter the system PIN and confirm.
(Factory setting: 0000).
OK
Select the authorisation and confirm.
Hold down (return to idle).
i
Emergency numbers can be dialled despite the authorisation restriction
(page 102).
Emergency numbers
Emergency numbers are preset to local requirements. You can also save additional
emergency numbers. The emergency numbers are valid for all handsets. Emergency
numbers can still be dialled even if your handset is barred for external dialling.
Entering or changing emergency numbers
[______________________________________________]
OK
í
102
Select the menu item and confirm.
[______________________________________________]
OK
Add. Features
Select the menu item and confirm.
OK
[______________________________________________]
Add. Emerg. No
Select the menu item and confirm.
OK
Enter the system PIN (factory setting: 0000) and confirm.
à
Enter or edit the emergency number and press the
display key.
[______________________________________________]
OK
Save Entry
i
Open the menu.
Confirm. The entry is saved.
You can delete an emergency number with
C
.
S100/150 colour Tchibo / UK / A31008-M1575-L131-1-7619 / settings_bs_hs.fm / 01.07.2005
Setting the base station
Displaying and dialling an emergency number
You can dial an emergency number from a handset that is barred for external dialling
(page 102) directly or as follows.
The handset is barred for external dialling:
Press the talk key.
[RRRRRRRRRRRRRRRRRRRRRR]
EmerCall
Press the display key. The available emergency numbers are displayed. If only one emergency number
has been saved, this will be dialled immediately.
OK
Select the emergency number and confirm. The connection is set up.
◆ If a prefix (APL) is set (page 108), it is automatically put in front of the
i
emergency numbers.
◆ Emergency numbers cannot be dialled if the keypad protection has
been activated (page 11).
Changing the loudspeaker volume of the base station
The speaker volume is the volume of the loudspeaker of the base station when replaying
messages and listening in. You can choose between volume levels 1 and 5. You can set
the volume at the base station or via the handset.
Setting at the base station:
While the message is being played back press the base station key ñ (louder) or ð
(quieter).
Setting via the handset:
OK
[______________________________________________]
í
Open the menu.
Select the menu item and confirm.
[______________________________________________]
OK
Audio Settings
Confirm.
[______________________________________________]
OK
Loudspeaker Vol
Confirm. You will hear the current volume.
Set the required volume (1–6) in the entry field.
[RRRRRRRRRRRRRRRRRRRRR
]
Save
Press the display key to save the setting.
Hold down (return to idle).
103
S100/150 colour Tchibo / UK / A31008-M1575-L131-1-7619 / settings_bs_hs.fm / 01.07.2005
Setting the base station
Changing the base station ringer tones
As with the handset you can choose from several ringer tone volumes and melodies (see
page 96). You can also deactivate the ringer tone on the base station.
Setting the ringer tone volume at the base station:
While an incoming call is being signalled press the base station key ñ (louder) or ð
(quieter).
Setting the ringer tone volume and melody via the handset:
[______________________________________________]
OK
í
[______________________________________________]
OK
Audio Settings
OK
[______________________________________________]
Ringer Settings
Open the menu.
Select the menu item and confirm.
Confirm.
Select the menu item and confirm. You will hear the
current volume.
Select the volume (0–6).
Selecting "0" deactivates the ringer tone.
Scroll to the next line and select the melody (1–10).
You will hear the current melody and its number is
shown at the end of the line.
[RRRRRRRRRRRRRRRRRRRRRR]
Save
Press the display key to save the setting.
Hold down (return to idle).
Activating/deactivating the base station key beep
[______________________________________________]
OK
í
OK
[______________________________________________]
Audio Settings
[______________________________________________]
OK
Key Tones
Open the menu.
Select the menu item and confirm.
Confirm.
Select the menu item and confirm ( ‰ = on).
Hold down (return to idle).
104
S100/150 colour Tchibo / UK / A31008-M1575-L131-1-7619 / settings_bs_hs.fm / 01.07.2005
Setting the base station
Changing the base station name
The name "Base station 1" to "Base station 4" is assigned automatically. You can change the
name of your base station.
Open the menu.
OK
[______________________________________________]
Settings
Select the menu item and confirm.
[______________________________________________]
OK
Select Base
Select the menu item and confirm.
[RRRRRRRRRRRRRRRRRRRRRRR]
Edit
Select the base station and press the display key.
Enter the new name (max. 16 characters) (for entering letters and characters see page 114).
Press the display key to save the setting.
[RRRRRRRRRRRRRRRRRRRRR
]
Save
The name of the base station is handset specific, i.e. the base station
receives the name assigned to it from the corresponding handset. The
same base station can have different names on different handsets.
i
Repeater support
You can use a repeater to boost the range and reception of your base station; it has to
be registered. Before you can use it, you have to activate the repeater function. This will
terminate any calls being made.
OK
[______________________________________________]
í
Open the menu.
Select the menu item and confirm.
[______________________________________________]
OK
Add. Features
Select the menu item and confirm.
[______________________________________________]
OK
Repeater Mode
Select the menu item and confirm.
Press the display key to confirm the prompt.
[RRRRRRRRRR]
Yes
Resetting the base station to the factory setting
If you reset the base station, this will not affect the system PIN and handsets will remain
registered.
[______________________________________________]
OK
í
[RRRRRRRRRR]
Yes
Open the menu.
Select the menu item and confirm.
OK
[______________________________________________]
Base Reset
Select the menu item and confirm.
OK
Enter the system PIN (factory setting: 0000) and confirm.
Press the display key to confirm the prompt.
105
S100/150 colour Tchibo / UK / A31008-M1575-L131-1-7619 / settings_bs_hs.fm / 01.07.2005
Setting the base station
Factory setting of the base station
Name of the handsets
Authorisation restriction of the handsets
Listening in
Network provider selection (preselection)
Own emergency numbers
Telephone number of the SMS centre/email
services
Send centre
SMS incoming and outgoing list
"INT 1" to "INT 6"
Internal and external (none)
deactivated
country specific default setting
deleted
country specific default setting
page 84
page 102
page 87
page 41
page 102
page 46
019001504 ("Anny Way")
empty
SMS message/message number
deactivated/deleted
List type
Prefix (APL)
Pause after prefix
Pause after R key
Pause after line seizure
Flash time
Dialling mode
Speed dialling 1
all calls (CLL)
none
3s
1600 ms
3s
100 ms
DTMF
Network mailbox without a telephone number or Integrated
answering machine
page 44
page 53
and
page 47
page 60/
page 60
page 38
page 108
page 109
page 108
page 108
page 107
page 107
page 80/
page 79
Answering machine functions:
Answering machine
Messages on the answering machine
Ringer volume
Ringer melody
Loudspeaker volume
Key beep at the base station
Number of activated mailboxes
Announcement
Personal/advisory announcement
Voice command
Message length, recording quality
Ring delay
Direct inward dialling
Listening in
106
activated
deleted
5
1
2
activated
one
Standard announcement
deleted
deactivated
120 s/standard
after 20 s
off
activated
page 65
page 71
page 104
page 104
page 103
page 104
page 65
page 68
page 66
page 74
page 78
page 77
page 88
page 78
S100/150 colour Tchibo / UK / A31008-M1575-L131-1-7619 / pabx.fm / 01.07.2005
Connecting the base station to a PABX
Connecting the base station to a PABX
The following settings are only necessary if your PABX requires it, please see your PABX
operating instructions.
i
You cannot send or receive text messages (SMS) if your PABX does not
support telephone number transmission.
Dialling mode and flash time
The current setting is marked with ‰
Step 1: Change the dialling mode
You can choose the following dialling modes:
◆ Tone dialling (DTMF),
◆ Dial pulsing (DP).
[______________________________________________]
OK
í
OK
[______________________________________________]
Add. Features
[______________________________________________]
OK
Dialling Mode
OK
Open the menu.
Select the menu item and confirm.
Select the menu item and confirm.
Confirm.
Select and confirm the dialling mode (marked
with ‰).
Hold down (return to idle).
Step 2: Set the flash time
OK
[______________________________________________]
í
Open the menu.
Select the menu item and confirm.
[______________________________________________]
OK
Add. Features
Select the menu item and confirm.
[______________________________________________]
OK
Recall
Select the menu item and confirm.
OK
Select and confirm the flash time (marked with ‰).
Hold down (return to idle).
107
S100/150 colour Tchibo / UK / A31008-M1575-L131-1-7619 / pabx.fm / 01.07.2005
Connecting the base station to a PABX
Saving the prefix (APL)
Prerequisite: Your PABX requires a prefix, e. g. "0", before the telephone numbers for
external calls.
OK
[______________________________________________]
í
Open the menu.
Select the menu item and confirm.
[______________________________________________]
OK
Add. Features
Select the menu item and confirm.
[______________________________________________]
OK
Access Code
Select the menu item and confirm.
à
OK
[______________________________________________]
Save Entry
Enter or change the prefix (up to 3 digits) and press
the display key.
Confirm. The entry is saved.
Hold down (return to idle).
The following applies if a prefix is saved:
◆ For emergency numbers, SMS service centre numbers and dialling from the caller
list or message list the prefix is automatically inserted.
◆ For telephone numbers from the directory or network access list, you have to add
the prefix yourself.
◆ If you use the telephone number from the directory when sending an SMS, you have
to delete the prefix.
◆ You can delete a prefix using X. To insert a pause, press à , s Insert Pause
OK or à , s Insert Recall OK .
Setting pauses
Pause after line seizure
You can use this function to set the length of the pause that is automatically inserted
between pressing the talk key c and transmitting the telephone number (factory setting: 3 seconds).
Open the menu.
Press key.
OK
108
Enter the pause length (1 = 1 second; 2 = 3 seconds;
3 = 7 seconds; 4 = 2.5 seconds) and confirm.
S100/150 colour Tchibo / UK / A31008-M1575-L131-1-7619 / pabx.fm / 01.07.2005
Connecting the base station to a PABX
Pause after R key
You can change the length of the pause if your PABX requires this (see your PABX operating instructions; factory setting: 1600 ms).
Open the menu.
Press key.
OK
Enter the pause length (1 = 800 ms; 2 = 1600 ms;
3 = 3200 ms) and confirm.
Changing the dialling pause (Pause after prefix)
Prerequisite:
You have saved a prefix (page 108). Factory setting: 3 seconds.
Open the menu.
Press key.
OK
Enter the pause length (1 = 1 second; 2 = 2 seconds;
3 = 3 seconds; 4 = 6 seconds) and confirm.
Switching temporarily to tone dialling (DTMF)
If your PABX still operates with dial pulsing (DP) but tone dialling (DTMF) is required (e.g.
to check the network mailbox), you must switch to tone dialling during the call.
Prerequisite: You are conducting a call.
Open the menu.
[______________________________________________]
OK
Tone Dialing
Select the menu item and confirm. Tone dialling is
active for this call.
109
S100/150 colour Tchibo / UK / A31008-M1575-L131-1-7619 / appendix.fm / 01.07.2005
Appendix
Appendix
Care
Wipe the base and the handset with a damp cloth (use no solvent) or an antistatic cloth.
Never use a dry cloth as this can cause static discharge!
Contact with liquid !
If the handset should come into contact with liquid, on no account switch the device
on. Remove all batteries immediately.
Allow the liquid to drip out of the device, and then dab all parts of the device dry.
Keep the handset with the batteries removed in a warm, dry place for at least 72 hours.
In many cases, you will then be able to use it again.
Questions and answers
If any questions occur to you while you are using your device, our customer advisor will
be more than happy to help you. You will find the most frequently asked questions and
answers below.
What has happened if ... Possible cause
... the display is blank?
… the handset fails to respond
to a key press?
... "Base x" flashes in display?
... Base Search flashes in the
display?
... an Internet address appears
in the display?
… (if several handsets are
used) the handset in the base
station does not charge?
... the handset or the base station does not ring?
... I cannot hear any ringer/
dialling tone?
... the units/call charges are
not displayed?
110
Possible solution
Hold down the end call key a
for about 2 seconds.
Charge or replace the batteries
(page 10).
The keypad protection is actiHold down the hash key R
vated.
for about 2 seconds
(page 11).
The handset is outside the base Move the handset closer to
station range.
base station.
The base station is not activated. Check the mains connector at
the base station (page 8).
The handset is set to Best Base, Move the handset closer to
but there is no base station acti- base station.
vated or in range.
Check the mains connector at
the base station (page 8).
The automatic registration of
Register your handset manuyour handset has been interally (page 81).
rupted.
A handset cannot be charged
Use an additional charging
while a telephone call is being
unit.
made.
The ringer tone is switched off. Activate the ringer tone of the
handset (page 95) or the base
station.
Call diversion has been set to All Switch off call diversion
Calls.
(page 23).
You have changed the telephone Ensure, when purchasing a
cord on your telephone.
new cord, that it has the correct pin assignment (page 8).
There are no metering pulses.
Ask your network provider to
transmit the metering pulses.
Handset is not switched on.
The batteries are flat.
S100/150 colour Tchibo / UK / A31008-M1575-L131-1-7619 / appendix.fm / 01.07.2005
Appendix
What has happened if ... Possible cause
... the other person cannot
hear me?
... the incoming call number is
not displayed although CLIP is
set?
... the error beep is heard
while making an entry (rising
tone sequence)?
Possible solution
You have pressed the u (INT)
key. This "mutes" the handset.
The calling line identification is
not enabled.
Re-activate the microphone
(page 22).
The caller should permit call
line identification (CLI) by his
or her telephone company.
The action has failed or the input Repeat the procedure; read the
is incorrect.
display message and, if necessary, refer to the operating
instructions.
Your PABX system is set to dial
Switch the PABX system to tone
pulsing.
dialling (page 109).
The date/time are not set.
Set the date/time (page 15).
… I cannot listen to the network mailbox?
... an answering machine
message does not have a time
stamp?
... the answering machine
The system PIN entered is incorsays ”PIN is incorrect” during rect or still set to 0000.
remote operation?
... the answering machine
Its memory is full.
does not record any messages
or has automatically switched
to announce only mode?
Re-enter the system PIN or set a
PIN other than 0000
(page 101).
Delete old messages.
Play back and delete new messages.
Authorisation
Your telephone is intended for operation in your country, as depicted on the underside
of the base station. Country-specific features have been taken into account.
The CE mark certifies conformity of the device with the essential requirements of the
R&TTE directive.
Excerpt from the original declaration
"We declare that the above mentioned product is manufactured according to our Full Quality Assurance System certified by CETECOM ICT Services GmbH in compliance with ANNEX V of the R&TTE
Directive 99/05/EC. The presumption of conformity with the essential requirements regarding
Council Directive 99/5/EC is ensured"
Senior Approvals Manager
The Declaration of Conformity (DoC) has been signed. In case of need a copy of the original DoC can be made available via the company hotline.
111
S100/150 colour Tchibo / UK / A31008-M1575-L131-1-7619 / appendix.fm / 01.07.2005
Appendix
EG-Konformitätserklärung
EU-Declaration of Conformity
Déclaration de conformité CE
Hiermit erklären wir, dass das nachfolgend bezeichnete Gerät den einschlägigen EG-Richtlinien
(insbesondere den unten benannten) entspricht und die Serie entsprechend gefertigt wird.
We herewith confirm that the appliance as detailed below complies with the governing EU-directives (in particular with those
directives mentioned below) and bulk production will be manufactured accordingly.
Nous déclarons que l’appareil ci-dessous est conforme aux directives CE applicables (en particulier celles citées ci-dessous)
et que la série est fabriquée en conséquence.
TCHIBO-Artikelbezeichnung:
TCHIBO article description:
Nom d’article TCHIBO :
TCHIBO-Artikelnummer:
TCHIBO article number:
Référence d’article TCHIBO :
Telefon
Telephone
226 729 (D), 226 730 (A),
226 731 (GB)
Type:
Baureihe:
Model:
Série :
Technische Daten:
Technical data:
Caractéristiques techniques :
Sonstige Angaben:
Further details:
Autres informations :
Einschlägige EG-Richtlinien / Governing EU-directives / Directives CE concernées :
O Elektromagnetische Verträglichkeit (EMV)
O Niederspannungs-Richtlinien
Electromagnetic compatibility (EMC)
Compatibilité électromagnétique (CEM)
Low-voltage standards
Directives basse tension
73/23/EEC, amended 93/68/EEC
89/336/EEC
O Medizinprodukte (Klasse 1)
O Sicherheit von Spielzeug
Safety standards of toys
Sécurité des jouets
Medical device directive (Class 1)
Dispositifs médicaux (classe 1)
88/378/EEC, amended 93/68/EEC
93/42/EEC
Endgeräterichtlinie
O
Radio and Telecommunication Terminal Equipment
Directive sur les terminaux
R&TTE 1999/5/EC
Harmonisierte EN-Fach- und Grundnorm / Harmonised EN-Standards and general standards /
Norme spécialisée et de base harmonisée EN :
Der Artikel entspricht folgenden, zur Erlangung des CE-Zeichens erforderlichen Normen:
The article complies with the standards as mentioned below which are necessary to obtain the CE-symbol:
L’article est conforme aux normes suivantes nécessaires à l’obtention du label CE :
Fixed Parts (Basis): EN60950, 99/519/EC, EN50360, EN301489-1/6, EN301406
Mobile Parts (Mobilteile):
EN60950, 99/519/EC, EN50360, EN301489-1/6, EN301406, TBR10 Acoustic shock
Diese Konformitätserklärung wurde nach Prüfung durch eine zuständige Stelle ausgestellt.
This Letter of Conformity has been issued based on entire inspection by a responsible institute.
La présente déclaration de conformité a été établie après examen par un service compétent.
Ausstellungsdatum
Produktionsbetrieb:
Date of issue
Date d’établissement
Producing company:
(Name, First name, Company stamp)
Établissement de production : (nom, prénom, cachet de la société)
25.05.05
Tchibo Gmbh, Überseering 18, D-22297 Hamburg
Stellung im Betrieb / Position / Position dans l’entreprise :
Unterschrift / Signature / Signature
Rechtsverbindliche Unterschrift des Inverkehrbringers
Legally binding signature of distributing company
Signature du distributeur
112
(Name, Vorname, Firmenstempel)
S100/150 colour Tchibo / UK / A31008-M1575-L131-1-7619 / appendix.fm / 01.07.2005
Appendix
Technical data
Recommended batteries
Nickel-metal-hydride (NiMH)
◆ GP Batteries: GP85AAA85
The handset's operating times/charging time
Capacity
(mAh)
Standby time
(hours)
Talktime
(hours)
Charging time
(hours)
700
about 160 (6 days)
about 13
about 7
The above operating and charging times apply only for the recommended batteries.
Power consumption
◆ In standby mode (without charging): approx. 2.2 Watt.
◆ In standby mode (during charging): approx. 4.6 Watt.
◆ In conversation (without charging): approx. 2.5 Watt.
General technical data
Feature
Value
DECT standard
GAP standard
No. of channels
Radio frequency range
Duplex method
Channel grid
Bit rate
Modulation
Language coding
Transmission power
Range
Power supply/Base station
Environmental conditions for operation
supported
supported
60 duplex channels
1880 – 1900 MHz
Time multiplex, 10 ms frame length
1728 kHz
1152 kbit/s
GFSK
32 kbit/s
10 mW, average power per channel
up to 300 m outdoors, up to 50 m indoors
230 V ~/ 50 Hz
+5 °C to +45 °C;
20% to 75% relative humidity
DTMF (tone dialling)/DP (dial pulsing)
100 ms
Dialling modes
Flash time
113
S100/150 colour Tchibo / UK / A31008-M1575-L131-1-7619 / appendix.fm / 01.07.2005
Appendix
Answering machine remote operation
The functions of the keys for operating the answering machine remotely are the same
for all telephones, handsets and tone transmitters. The ”credit card” shows you how to
perform remote operations on an external telephone (e.g. from a pay phone, from a
hotel etc.) and the meaning of the keys.
Initiating remote operation:
Dial your own telephone number.
You will hear your own
answering machine.
+
Press key and enter the
system PIN. Operating
the answering
machine via number
keys
Switching the answering
machine on: Let the telephone
ring for about 1 minute.
A
Previous
D
G
:
new
B
3
Stop/
Cont.
Next
F
E
H
9
0
;
Voice command
delete
Change
mailbox
Enter the system PIN.
The answering
machine switches
itself on.
Character map
Standard font
Press the relevant key repeatedly or hold it down:
1x
114
2x 3x
â
c
f
i
l
o
r
v
y
?
a
d
g
j
m
p
t
w
.
1
b
e
h
k
n
q
u
x
,
Abc-->
abc
abc-->
123
#
@
Blank
*
\
4 x 5 x 6 x 7 x 8 x 9 x 10 x 11 x 12 x 13 x 14 x
£
2
3
4
5
6
s
8
z
!
/
&
$
ä
ë
ï
¥
á
é
í
¤
à
è
ì
â
ê
î
ã
ç
ö
7
ü
9
0
(
§
ñ
ß
ú
ÿ
+
)
ó
ò
ô
õ
ù
ý
<
û
æ
:
=
ø
¿
>
å
¡
%
”
‘
;
_
S100/150 colour Tchibo / UK / A31008-M1575-L131-1-7619 / appendix.fm / 01.07.2005
Appendix
Entering text (without predictive text entry)
There are a number of options for entering a text:
◆ You can move the cursor with u v t s.
◆ Delete characters (to the left of the cursor) with fC .
◆ Characters are inserted to the left of the cursor (page 13).
◆ To change from upper case (the first letter is automatically written in upper case, all
others in lower case) to lower case, press P before entering the letter. Pressing
P again switches from lower case to numbers. Pressing it once more switches
from numbers to upper case.
◆ For directory entries, the first letter of the names is automatically written in upper
case, all the others in lower case.
◆ If you hold a key down, the characters assigned to that key will be shown in the bottom line of the display and highlighted one after the other. When you release the
key the highlighted character is inserted in the entry field.
The display will tell you whether you are in uppercase, lower case or number mode:
– for directory entries, there will be an "A" or "a" in the bottom line of the display.
– When writing an SMS you will see "Abc", "abc" or "123" in the top right corner of
the display.
Sequence of directory entries
1. Blank (shown here with s)
2. Digits (0 to 9)
3. Letters (alphabetical)
4. Remaining characters
To avoid the alphabetical sequence of the entries in the directory, enter a blank before
the name. This entry then goes to the first position (example: "sKarla"). You can also
number the entries (e.g. "1Sue", "2Karla", "3Albert").
115
S100/150 colour Tchibo / UK / A31008-M1575-L131-1-7619 / appendix.fm / 01.07.2005
Appendix
Predictive text entry
EATONI predictive text entry is useful when writing the following texts:
◆ SMS,
◆ Names in directory,
◆ Names in the speed dial list,
◆ Names in email directory.
Each key between Q and O is assigned to several letters and numbers that are all
shown in a selection line directly above the softkeys (underneath the text field) as soon
as you press a key. While you are entering letters, the next most probable letter you will
need is highlighted in gray. It is at the head of the selection list and is inserted in the
text field.
470(2)_____Ç_____Abc
Hello, Peter, cant come
today. I am sta
ywxz
”
¨
EATONI predictive text entry
activated.
SMS text
Selection line
If this letter is the one you want, confirm it by pressing the next key. If the letter suggested by EATONI is not the one you want press the hash key R until the right letter
is highlighted in grey in the presentation line and thus inserted in the text field.
P
R
Hold down the star key for about 2 seconds. This changes the mode from
abc to Abc, from Abc to 123 and from 123 to abc (applies to the next character you enter).
Jumps in the selection line to the next letter (highlighted in grey).
Switching predictive text entry on/off
The predictive text entry can be switched on or off for each function separately. If for
example you have switched EATONI off for directory entries, it is still active for writing
an SMS.
Prerequisite: You are in a text entry field (SMS, Name in directory, speed dial list or
email directory).
Open the menu.
OK
[______________________________________________]
Predictive Text
Select the menu item and confirm ( ‰ = on).
Press the end call key briefly to return to the text
field. Now enter the text.
116
S100/150 colour Tchibo / UK / A31008-M1575-L131-1-7619 / menuetree.fm / 01.07.2005
Menu table
Menu table
It is quicker to select a menu function by opening the menu and then entering the digit
combinations (so-called "shortcut") rather than scrolling to the function.
Example: v 5 2 4 for "Choosing the ringer melody for the alarm call".
Main menu
In telephone idle state v (menu open) press:
1
è
or ...
1
è
You have activated an SMS mailbox (general or private) without a PIN
1-1 Write Message
1-2 Incoming 00+00
1-3 Outgoing
You have activated an SMS mailbox with a PIN or 2 to 4 mailboxes
1-1 Mailbox
1-1-1 Write Message
1-1-2 Incoming 00+00
1-1-3 Outgoing
1 - 2 Mailbox 1
to
Mailbox 2
1-4 Mailbox 3
2
î
3
é
4
ç
5
ê
2-1
2-2
2-3
2-4
Automatic Recall
Network Mailbox
Withhold No.
All Calls
2-5
Ringback Off
3-1
3-2
Room Monitor
Walk and Talk
4-1
4-2
4-3
4-4
Set Appoints.
Alarm Clock
Missed Dates
Date/Time
5-1
5-2
Handset Volume
Ringer Settings
5-3
5-4
Advisory Tones
Ringer Echo
1-2-1
to
1-4-1
1-2-2
to
1-4-2
1-2-3
to
1-4-3
Write Message
2-4-1
2-4-3
Call Divert
Call Waiting
5-2-1
5-2-2
5-2-3
5-2-4
5-2-5
Ext. Calls
Internal Calls
Appointments
Alarm
All
Incoming 00+00
Outgoing
117
S100/150 colour Tchibo / UK / A31008-M1575-L131-1-7619 / menuetree.fm / 01.07.2005
Menu table
7
ì
7-1
Display
7-1-1
Screen Picture
7-1-2
Colour Scheme
7-1-2-1
7-1-2-...
7-1-2-4
7-2
7-3
7-4
7-5
8
118
í
Auto Answer
Language
Register H/Set
Select Base
7-6
Reset Handset
8-1
Audio Settings
8-2
8-3
8-4
System PIN
Base Reset
Add. Features
Colour Scheme
1
[to]
Colour Scheme
4
7-1-3
7-1-4
Contrast
Night Mode
(Liste)
7-5-1
7-5-…
7-5-4
7-5-5
Base 1
[to]
Base 4
Best Base
8-1-1
8-1-2
8-1-3
Loudspeaker Vol
Ringer Settings
Key Tones
8-4-1
Dialling Mode
8-4-1-1
8-4-1-2
8-4-2
Recall
8-4-2-1 80 ms
8-4-2-… [to]
8-4-2-8 800 ms
8-4-3
8-4-4
8-4-5
8-4-6
Repeater Mode
Access Code
Add. Emerg. No
Listening In
8-5
Preselection
8-5-1
8-5-2
8-5-3
Preselect. No.
With Preselect
Without Presel.
8-6
Call Director
8-6-1
8-6-2
8-6-3
8-6-4
Call Director
Rec Announce
Play Announce
Del Announce
Tone
Pulse
S100/150 colour Tchibo / UK / A31008-M1575-L131-1-7619 / menuetree.fm / 01.07.2005
Menu table
9
æ
9-1
Set Key 1
9-2
9-3
Ans Machine
Call Screening
9-4
9-5
Record Memo
Announcements
9-6
Message Set
9-7
9-8
Ring Delay
Voice Prompts
9-1-1
Network Mailb.
9-1-2
Answer Machine
9-3-1
9-3-2
Handset
Base
9-5-1
9-5-2
9-5-3
9-5-4
9-5-5
9-5-6
9-5-7
Rec Announce
Play Announce
Del Announce
Rec Anc Only
Play Anc Only
Del Anc Only
Set Ans. Mode
9-6-1
9-6-2
Message Length
Record Quality
9-8-1
Record Command 9-8-1-1 User 1
9-8-1-… [to]
9-8-1-4 User 4
9-8-2
Commands
9-5-7-1
9-5-7-2
9-5-7-3
Ans. & Record
Announce Only
Ans Mode Time
9-6-2-1
9-6-2-2
Long Play
High Quality
Directory key and speed dialling list key
Press directory key s or speed dialling list key C, with s select the entry and press
v to open the list. The following menu functions are available:
Display Number
Edit Entry
Delete Entry
VIP Entry
Copy and Edit
Copy Entry
Delete List
Copy List
Available Memory
Applies only for the directory (s)
Applies only for the directory (s)
Caller list/message list
Press the f key. Then the following lists are available:
SMS: 00-00
Ans M.: 00+00
Mailbox: 00+**
Calls List: 00+00
Mark as new
or
Mailbox 1 00+00
Mailbox 2 00+00
Mailbox 3 00+00
119
S100/150 colour Tchibo / UK / A31008-M1575-L131-1-7619 / S_150_AMSIX.fm / 01.07.2005
Index
Index
A
Access protection . . . . . . . . . . . . . . 101
Acknowledgement tones . . . . . . . . . . 99
Activating
alarm clock . . . . . . . . . . . . . . . . . . 16
answering machine . . . . . . . . . . . . 65
answering machine remotely . . . . . 76
appointment . . . . . . . . . . . . . . . . . 17
direct inward dialling . . . . . . . . . . . 88
handset . . . . . . . . . . . . . . . . . . . . . 11
keypad protection . . . . . . . . . . . . . 11
room monitoring . . . . . . . . . . . . . . 90
voice command . . . . . . . . . . . . . . . 74
Walk and Talk . . . . . . . . . . . . . . . . . 93
Additional features . . 87, 102, 105, 107,
108
Advisory tones . . . . . . . . . . . . . . . . . 99
Alarm call . . . . . . . . . . . . . . . . . . . . . 16
Alarm clock
activating/deactivating . . . . . . . . . . 16
setting . . . . . . . . . . . . . . . . . . . . . . 15
Anniversary
ignore . . . . . . . . . . . . . . . . . . . . . . 18
Anniversary alarm . . . . . . . . . . . . . . . 32
Announcement
check/delete for answering
machine . . . . . . . . . . . . . . . . . . . 67
for direct inward dialling playback . . 88
recording . . . . . . . . . . . . . . . . . . . . 66
recording for direct inward dialling . 88
select mode . . . . . . . . . . . . . . . . . . 68
Answering machine
announcement . . . . . . . . . . . . . . . 67
announcement mode . . . . . . . . . . . 68
call recording . . . . . . . . . . . . . . . . . 73
charge saving function . . . . . . . . . . 77
deleting messages . . . . . . . . . . . . . 71
message length, recording quality . 78
on/off (base station). . . . . . . . . . . . 64
picking up a call . . . . . . . . . . . . . . . 73
recording infotext . . . . . . . . . . . . . 72
remote operation . . . . . . . . . . . . . . 75
set . . . . . . . . . . . . . . . . . . . . . . . . . 77
set key 1 . . . . . . . . . . . . . . . . . . . . 79
setting ring delay . . . . . . . . . . . . . . 77
skipping forward/back . . . . . . . . . . 71
120
skippping forward/back . . . . . . . . . . 64
switching (handset) on and off . . . . 65
voice command . . . . . . . . . . . . . . . 74
Answering machine see also Network
mailbox
APL see Prefix
Appointment
activating/setting . . . . . . . . . . . . . . 17
deactivating . . . . . . . . . . . . . . . . . . 18
ignore . . . . . . . . . . . . . . . . . . . . . . 18
specifying . . . . . . . . . . . . . . . . . . . . 17
Attention tone . . . . . . . . . . . . . . . . . . 98
Authorisation (handset) . . . . . . . . . . 102
Auto talk . . . . . . . . . . . . . . . . . . . . . . 95
Automatic preselection . . . . . . . . . . . . 41
Automatic redialling . . . . . . . . . . . . . . 33
list . . . . . . . . . . . . . . . . . . . . . . . . . 32
B
Barring
external call . . . . . . . . . . . . . . . . . 102
handset . . . . . . . . . . . . . . . . . . . . 102
internal calls . . . . . . . . . . . . . . . . . 102
Base station
changing the base station
name . . . . . . . . . . . . . . . . . 104, 105
connecting . . . . . . . . . . . . . . . . . . . . 8
connecting to PABX . . . . . . . . . . . . 107
listening in . . . . . . . . . . . . . . . . . . . 22
operating . . . . . . . . . . . . . . . . . . . . . 7
resetting to the factory setting. . . . 105
switching . . . . . . . . . . . . . . . . . . . . 83
volume . . . . . . . . . . . . . . . . . . . . . . 64
Batteries
charging . . . . . . . . . . . . . . . . . . . . . 10
display . . . . . . . . . . . . . . . . . . . . . . 10
inserting . . . . . . . . . . . . . . . . . . . . . . 9
recommended . . . . . . . . . . . . . . . 113
Battery low beep . . . . . . . . . . . . . . . . 99
Beep
confirmation. . . . . . . . . . . . . . . 13, 99
error . . . . . . . . . . . . . . . . . . . . . . . . 13
error beep . . . . . . . . . . . . . . . . . . . 99
Belt clip . . . . . . . . . . . . . . . . . . . . . . . 11
S100/150 colour Tchibo / UK / A31008-M1575-L131-1-7619 / S_150_AMSIX.fm / 01.07.2005
Index
C
Call
ending . . . . . . . . . . . . . . . . . . . . . 19
picking up from answering
machine . . . . . . . . . . . . . . . . . . . 73
recording . . . . . . . . . . . . . . . . . . . 73
Call barring
external. . . . . . . . . . . . . . . . . . . . 102
internal . . . . . . . . . . . . . . . . . . . . 102
Call diversion
general . . . . . . . . . . . . . . . . . . . . . 23
selective . . . . . . . . . . . . . . . . . . . . 24
Callback . . . . . . . . . . . . . . . . . . . . . . 25
cancelling . . . . . . . . . . . . . . . . . . . 25
Callback from caller list . . . . . . . . . . . 39
Call-by-call numbers . . . . . . . . . . . . . 26
Caller list . . . . . . . . . . . . . . . . . . . . . 36
deleting a single entry . . . . . . . . . . 40
opening . . . . . . . . . . . . . . . . . . . . 38
setting . . . . . . . . . . . . . . . . . . . . . 38
Calling back a caller. . . . . . . . . . . . . . 39
Calling line identification . . . . . . . . . . 20
Cancel (action) . . . . . . . . . . . . . . . . . 13
Care of the telephone . . . . . . . . . . . 110
Change
dialling mode . . . . . . . . . . . . . . . 107
emergency number . . . . . . . . . . . 102
number of mailboxes . . . . . . . . . . . 66
Changing . . . . . . . . . . . . . . . . . . . . . 74
Changing the system PIN . . . . . . . . . 101
Character map . . . . . . . . . . . . . . . . 114
Character map (SMS) . . . . . . . . . . . . 47
Charge saving function . . . . . . . . . . . 77
Charging status icon . . . . . . . . . . . . . 10
Charging time of the handset . . . . . 113
Check
announcement for answering
machine . . . . . . . . . . . . . . . . . . . 67
Checking the network mailbox. . . . . . 80
CLI . . . . . . . . . . . . . . . . . . . . . . . . . . 20
CLIP . . . . . . . . . . . . . . . . . . . . . . . . . 20
CLIR . . . . . . . . . . . . . . . . . . . . . . . . . 23
CNIP . . . . . . . . . . . . . . . . . . . . . . 20, 30
Confirmation beep . . . . . . . . . . . 13, 99
Connect . . . . . . . . . . . . . . . . . . . . . . 85
base station to PABX . . . . . . . . . . 107
Control key . . . . . . . . . . . . . . . . . . . . 12
Copy telephone number to
directory (SMS) . . . . . . . 56
Correcting entries . . . . . . . . . . . . . . . 13
Cursor . . . . . . . . . . . . . . . . . . . . . . . . 12
D
Date setting . . . . . . . . . . . . . . . . . . . . 15
Deactivating
alarm call . . . . . . . . . . . . . . . . . . . . 16
answering machine . . . . . . . . . . . . 65
appointment alarm . . . . . . . . . . . . . 18
callback (cancelling) . . . . . . . . . . . . 25
direct inward dialling . . . . . . . . . . . 88
handset . . . . . . . . . . . . . . . . . . . . . 11
keypad protection . . . . . . . . . . . . . . 11
ringer tone (at the handset) . . . . . . 98
room monitor . . . . . . . . . . . . . . 90, 93
Delete
announcement for direct inward
dialling . . . . . . . . . . . . . . . . . . . . 88
announcements for answering
machine. . . . . . . . . . . . . . . . . . . . 67
directory entry . . . . . . . . . . . . . . . . 30
message. . . . . . . . . . . . . . . . . . . . . 71
SMS entry . . . . . . . . . . . . . . . . . . . 51
SMS list . . . . . . . . . . . . . . . . . . 51, 54
Delete key . . . . . . . . . . . . . . . . . . . . . 13
De-registering handsets . . . . . . . . . . . 82
Dialling
emergency number . . . . . . . . . . . 103
Dialling code . . . . . . . . . . . . . . . . . . . 49
Dialling mode . . . . . . . . . . . . . . . . . 107
Dialling pause . . . . . . . . . . . . . . 19, 109
Dialling prefix see Dialling code
Direct call see Direct inward dialling
Direct inward dialling . . . . . . . . . . . . . 88
activating/deactivating . . . . . . . . . . 88
picking up a call . . . . . . . . . . . . . . . 89
playing/deleting announcement . . . 88
recording announcement . . . . . . . . 88
Directory . . . . . . . . . . . . . . . . . . . . 1, 26
copying/changing entry . . . . . . . . . 29
deleting entry. . . . . . . . . . . . . . . . . 30
displaying and changing an entry . . 28
opening . . . . . . . . . . . . . . . . . . . . . 12
saving SMS telephone number . . . . 55
saving telephone number . . . . . . . . 26
sending . . . . . . . . . . . . . . . . . . . . . 31
sending entry to handset . . . . . . . . 31
sequence of entries . . . . . . . . . . . 115
using to enter numbers . . . . . . . . . . 31
121
S100/150 colour Tchibo / UK / A31008-M1575-L131-1-7619 / S_150_AMSIX.fm / 01.07.2005
Index
Display
12/24 h mode . . . . . . . . . . . . . . . . 15
changing the language. . . . . . . . . . 94
colour scheme . . . . . . . . . . . . . . . . 94
contrast . . . . . . . . . . . . . . . . . . . . . 94
emergency number . . . . . . . . . . . 103
in idle state . . . . . . . . . . . . . . . . . . 14
keys . . . . . . . . . . . . . . . . . . . . . . . . 13
memory . . . . . . . . . . . . . . . . . . . . 36
name (CNIP) . . . . . . . . . . . . . . . . . 20
network mailbox message . . . . . . . 80
night mode . . . . . . . . . . . . . . . . . . 94
setting . . . . . . . . . . . . . . . . . . . . . . 94
suppressing (CLIR) . . . . . . . . . . . . . 23
telephone number (CLI/CLIP) . . . . . 20
DP (Dial pulsing) . . . . . . . . . . . . . . . 107
E
EATONI see Predictive text entry
Email address see SMS
Email directory . . . . . . . . . . . . . . . . . 34
Email service (telephone number) . . . 46
Emergency number . . . . . . . . . . . . . 102
Emoticon see SMS
End call key . . . . . . . . . . . . . . . . . . 1, 19
Enquiry call . . . . . . . . . . . . . . . . . . . . 25
Enquiry call (internal) . . . . . . . . . . . . 86
Enter
appointment . . . . . . . . . . . . . . . . . 17
Entry (directory)
deleting . . . . . . . . . . . . . . . . . . . . . 30
displaying and changing . . . . . . . . . 28
finding and dialling . . . . . . . . . . . . 28
Entry (menu) select . . . . . . . . . . . . . . 12
Entry (preselection)
saving and editing . . . . . . . . . . . . . 42
Entry language (SMS) . . . . . . . . . . . . 47
Error . . . . . . . . . . . . . . . . . . . . . . . . . 99
Error beep . . . . . . . . . . . . . . . . . . 13, 99
Error message see SMS
Escape key . . . . . . . . . . . . . . . . . . . . 13
F
Factory setting
base station . . . . . . . . . . . . . . . . . 105
handset . . . . . . . . . . . . . . . . . . . . 100
Fast access
assign key 1 . . . . . . . . . . . . . . . . . . . 1
Features network mailbox features . . . 23
122
Flash time . . . . . . . . . . . . . . . . . . . . 107
Forwarding . . . . . . . . . . . . . . . . . . . . 55
G
General call diversion . . . . . . . . . . . . . 23
H
Handset . . . . . . . . . . . . . . . . . . . . . . . . 1
activating/deactivating . . . . . . . . . . 11
authorisation . . . . . . . . . . . . . . . . 102
belt clip . . . . . . . . . . . . . . . . . . . . . 11
direct dialling . . . . . . . . . . . . . . . . . 88
list . . . . . . . . . . . . . . . . . . . . . . . . . 12
muting . . . . . . . . . . . . . . . . . . . . . . 22
name . . . . . . . . . . . . . . . . . . . . . . . 84
operating . . . . . . . . . . . . . . . . . . . . . 9
operating time/charging time . . . . 113
registering at another base
station . . . . . . . . . . . . . . . . . . . . . 83
registration . . . . . . . . . . . . . . . . . . . 81
resetting to the factory setting. . . . 100
switching to a different base
station . . . . . . . . . . . . . . . . . . . . . 83
switching to best reception . . . . . . . 83
using as room monitor . . . . . . . . . . 89
Handset operation . . . . . . . . . . . . . . . 21
Handset volume . . . . . . . . . . . . . . . . . 95
Handsfree speaking volume . . . . . . . . 95
Handsfree talking . . . . . . . . . . . . . . . . 21
key . . . . . . . . . . . . . . . . . . . . . . . . . . 1
Hash key . . . . . . . . . . . . . . . . . . . . 1, 11
Hearing aids. . . . . . . . . . . . . . . . . . . . . 6
I
Icon
for new messages . . . . . . . . . . . 70, 71
Idle state (display) . . . . . . . . . . . . . . . 14
Incoming list (SMS) . . . . . . . . 47, 53, 61
opening . . . . . . . . . . . . . . . . . . . . . 54
Incorrect entry (correct) . . . . . . . . . . . 13
Internal
calls . . . . . . . . . . . . . . . . . . . . . . . . 84
enquiries . . . . . . . . . . . . . . . . . . . . 86
listening in . . . . . . . . . . . . . . . . . . . 87
J
Joint call . . . . . . . . . . . . . . . . . . . . . . 84
S100/150 colour Tchibo / UK / A31008-M1575-L131-1-7619 / S_150_AMSIX.fm / 01.07.2005
Index
K
Key 1 (fast access) . . . . . . . . . . . . . 1, 79
Keys
cancel . . . . . . . . . . . . . . . . . . . . . . 13
control key . . . . . . . . . . . . . . . . . . 12
delete key . . . . . . . . . . . . . . . . . . . 13
display keys . . . . . . . . . . . . . . . . . . 13
end call . . . . . . . . . . . . . . . . . . . . . 19
escape . . . . . . . . . . . . . . . . . . . . . 13
key beep . . . . . . . . . . . . . . . . . . . . 99
keypad protection . . . . . . . . . . . . . 11
keystroke (confirmation beep) . . . . 99
menu key . . . . . . . . . . . . . . . . . . . 13
of the base station . . . . . . . . . . . . . 65
OK key . . . . . . . . . . . . . . . . . . . . . 13
redial key . . . . . . . . . . . . . . . . . . . . 13
talk . . . . . . . . . . . . . . . . . . . . . . . . 19
L
Language see Display
List
caller list . . . . . . . . . . . . . . . . . . . . 36
deleting (SMS) . . . . . . . . . . . . . 51, 54
email directory . . . . . . . . . . . . . . . 34
handsets . . . . . . . . . . . . . . . . . . . . 12
incoming list (SMS) . . . . . . . . . 53, 61
message list. . . . . . . . . . . . . . . . . . 37
missed calls . . . . . . . . . . . . . . . . . . 37
outgoing list (SMS) . . . . . . . . . . . . 48
redialling list . . . . . . . . . . . . . . . . . 33
Listening in . . . . . . . . . . . . . . . . . . . . 87
Listening in (base station) . . . . . . . . . 22
Listening in while a call is being
recorded . . . . . . . . . . . . 78
Logo. . . . . . . . . . . . . . . . . . . . . . . . . 95
M
Mailbox ID see SMS
Mailboxes
change number . . . . . . . . . . . . . . . 66
Mailboxes see SMS
Mains cable . . . . . . . . . . . . . . . . . . . . 8
Making calls
external. . . . . . . . . . . . . . . . . . . . . 19
internally . . . . . . . . . . . . . . . . . . . . 84
Manual redialling . . . . . . . . . . . . . . . 32
Medical equipment . . . . . . . . . . . . . . . 6
Melody (ringer tone) . . . . . . . . . . . . . 96
Memory . . . . . . . . . . . . . . . . . . . . . . 36
Memory see SMS
Menu
end tone . . . . . . . . . . . . . . . . . . . . 99
key. . . . . . . . . . . . . . . . . . . . . . . . . 13
menu operation . . . . . . . . . . . . . . . 12
one menu level back . . . . . . . . . . . . 13
open . . . . . . . . . . . . . . . . . . . . . . . 12
operation . . . . . . . . . . . . . . . . . . . . 14
table . . . . . . . . . . . . . . . . . . . . . . 117
Message key . . . . . . . . . . . . . . . . . . . . 1
opening the list . . . . . . . . . . . . . . . 53
Message length, recording quality . . . 78
Message list . . . . . . . . . . . . . . . . . 37, 38
Messages . . . . . . . . . . . . . . . . . . . . . 64
deleting . . . . . . . . . . . . . . . . . . . . . 71
icon . . . . . . . . . . . . . . . . . . . . . 70, 71
playing . . . . . . . . . . . . . . . . . . . . . . 70
Microphone . . . . . . . . . . . . . . . . . . . . . 1
Missed
anniversary . . . . . . . . . . . . . . . . . . 18
appointment . . . . . . . . . . . . . . . . . 18
Missed calls . . . . . . . . . . . . . . . . . . . . 37
Muting (handset) . . . . . . . . . . . . . . . . 22
N
Name
changing for the base station . . . . 105
displaying the caller's (CNIP) . . . . . . 20
handset . . . . . . . . . . . . . . . . . . . . . 84
Network access list
save number . . . . . . . . . . . . . . . . . 41
Network mailbox
checking messages . . . . . . . . . . . . . 80
setting for speed dialling . . . . . . . . . 80
Network mailbox features . . . . . . . . . 23
Network provider (number list) . . . . . . 26
Network provider selection,
automatic . . . . . . . . . . . . 41
Night mode . . . . . . . . . . . . . . . . . . . . 94
Noise level . . . . . . . . . . . . . . . . . . 90, 93
Notes (spoken) see Infotext . . . . . . . . 64
Notification number see SMS
Notification see SMS
Notification type see SMS
Number
withholding . . . . . . . . . . . . . . . . . . 23
Number see also Telephone number
or Entry . . . . . . . . . . . . . 26
123
S100/150 colour Tchibo / UK / A31008-M1575-L131-1-7619 / S_150_AMSIX.fm / 01.07.2005
Index
O
OK key . . . . . . . . . . . . . . . . . . . . . . . 13
On/off key . . . . . . . . . . . . . . . . . . . . . . 1
Open
directory . . . . . . . . . . . . . . . . . . . . 12
menu . . . . . . . . . . . . . . . . . . . . . . 12
Open an attachment see SMS
Operating (preparing the telephone) . . 7
Operating time
in Walk and Talk mode . . . . . . . . . . 92
of the handset . . . . . . . . . . . . . . . 113
of the room monitor. . . . . . . . . . . . 90
Outgoing list (SMS) . . . . . . . . 47, 48, 51
P
PABX. . . . . . . . . . . . . . . . . . . . . . . . 107
changing the dialling mode . . . . . 107
pause after prefix . . . . . . . . . . . . . 109
saving the prefix . . . . . . . . . . . . . 108
setting the dialling mode . . . . . . . 107
setting the flash time . . . . . . . . . . 107
switching to tone dialling . . . . . . . 109
Package contents . . . . . . . . . . . . . . . . 7
Paging . . . . . . . . . . . . . . . . . . . . . . . 83
Paging key . . . . . . . . . . . . . . . . . 64, 83
Pause
after prefix. . . . . . . . . . . . . . . . . . 109
after R key . . . . . . . . . . . . . . . . . . 109
changing after line seizure . . . . . . 108
Phoning
external . . . . . . . . . . . . . . . . . . . . . 19
internally . . . . . . . . . . . . . . . . . . . . 84
PIN
SMS PIN . . . . . . . . . . . . . . . . . . . . . 58
system PIN . . . . . . . . . . . . . . . . . . 101
Playing
announcement for direct inward
dialling . . . . . . . . . . . . . . . . . . . . 88
messages (answering machine) . . . 70
Power supply unit . . . . . . . . . . . . . . 6, 8
Predictive text entry . . . . . . 48, 49, 116
Prefix
for PABX . . . . . . . . . . . . . . . . . . . 108
pause . . . . . . . . . . . . . . . . . . . . . 109
Prefix see Dialling code
Preparing the
handset . . . . . . . . . . . . . . . . . . . . . . 9
telephone . . . . . . . . . . . . . . . . . . . . 7
Preselection . . . . . . . . . . . . . . . . . . . 41
124
suppressing . . . . . . . . . . . . . . . . . . 43
Protecting telephone from
unauthorised access . . . 101
Protection
keypad protection . . . . . . . . . . . . . . 11
Protective plastic film . . . . . . . . . . . . . . 9
Provider . . . . . . . . . . . . . . . . . . . . . . . 44
Q
Questions and answers. . . . . . . . . . . 110
R
R key . . . . . . . . . . . . . . . . . . . . . . . . . . 1
pause after . . . . . . . . . . . . . . . . . . 109
Range . . . . . . . . . . . . . . . . . . . . . . . . . 7
Receiving SMS . . . . . . . . . . . . . . . . . . 53
Reception strength . . . . . . . . . . . . . . . . 7
Record
announcement for direct inward
dialling . . . . . . . . . . . . . . . . . . . . . 88
voice command . . . . . . . . . . . . . . . 74
Recording . . . . . . . . . . . . . . . . . . . . . 64
announcements for answering
machine . . . . . . . . . . . . . . . . . . . . 66
infotext . . . . . . . . . . . . . . . . . . . . . 72
personal announcement . . . . . . . . . 64
record call. . . . . . . . . . . . . . . . . . . . 73
Recording call (answering machine) . . 73
Redial
automatic . . . . . . . . . . . . . . . . . . . . 33
deleting list . . . . . . . . . . . . . . . . . . 33
key . . . . . . . . . . . . . . . . . . . . . . . . . 13
manual . . . . . . . . . . . . . . . . . . . . . . 32
Register key . . . . . . . . . . . . . . . . . . . . 64
Registering handsets . . . . . . . . . . . . . 81
Remote operation
activating . . . . . . . . . . . . . . . . . . . . 76
answering machine . . . . . . . . . 75, 114
Repeater . . . . . . . . . . . . . . . . . . . . . 105
Reset see Factory setting
Ring delay . . . . . . . . . . . . . . . . . . . . . 77
Ring tone see SMS
Ringer tone . . . . . . . . . . . . . . . . . . . . 96
activating/deactivating . . . . . . . . . . 98
setting the melody . . . . . . . . . . . . . 96
setting the volume . . . . . . . . . . . . . 96
suppress . . . . . . . . . . . . . . . . . . . . . 44
time control for volume . . . . . . . . . . 96
Room monitor
S100/150 colour Tchibo / UK / A31008-M1575-L131-1-7619 / S_150_AMSIX.fm / 01.07.2005
Index
deactivating . . . . . . . . . . . . . . 90, 93
setting noise level . . . . . . . . . . 90, 93
Room monitoring . . . . . . . . . . . . . . . 89
activating . . . . . . . . . . . . . . . . . . . 90
S
Safety precautions . . . . . . . . . . . . . . . 6
Save
directory entry . . . . . . . . . . . . . . . . 26
emergency number . . . . . . . . . . . 102
SMS . . . . . . . . . . . . . . . . . . . . . . . 48
speed dial list entry . . . . . . . . . . . . 27
Select (menu entry) . . . . . . . . . . . . . 12
Selective call diversion . . . . . . . . . . . 24
Send
directory (entry) to handset . . . . . . 31
SMS . . . . . . . . . . . . . . . . . . . . 48, 52
Sequence in directory . . . . . . . . . . . 115
Service provider . . . . . . . . . . . . . . . . 44
Set
alarm clock . . . . . . . . . . . . . . . 15, 97
answering machine . . . . . . . . . . . . 77
appointment . . . . . . . . . . . . . . 17, 97
date . . . . . . . . . . . . . . . . . . . . . . . 15
display language . . . . . . . . . . . . . . 94
flash time . . . . . . . . . . . . . . . . . . 107
handset volume . . . . . . . . . . . . . . . 95
loudspeaker volume . . . . . . . . . . . . 95
ring delay . . . . . . . . . . . . . . . . . . . 77
ringer melody . . . . . . . . . . . . . . . . 96
ringer volume . . . . . . . . . . . . . . . . 96
time . . . . . . . . . . . . . . . . . . . . . . . 15
time control. . . . . . . . . . . . . . . . . . 96
Short Message Service see SMS
Shortcut . . . . . . . . . . . . . . . . . . . . . 117
Signal tone . . . . . . . . . . . . . . . . . . . . 82
Signal tone see Advisory tones . . . . . 99
Skip forward . . . . . . . . . . . . . . . . 64, 71
Skipping back . . . . . . . . . . . . . . . 64, 71
SMS . . . . . . . . . . . . . . . . . . . . . . . . . 44
activating/deactivating function . . . 45
activating/deactivating mailbox . . . 58
answering . . . . . . . . . . . . . . . . . . . 55
assigning a PIN . . . . . . . . . . . . . . . 58
changing the mailbox . . . . . . . . . . 59
character map . . . . . . . . . . . . . . . . 47
copying telephone number to
directory . . . . . . . . . . . . . . . . . . . 56
copying the email address . . . . . . . 52
deleting the list . . . . . . . . . . . . 51, 54
editing/returning . . . . . . . . . . . . . . 55
emoticon
entering the email address . . . . . . . 49
entry language . . . . . . . . . . . . . . . . 47
error when receiving/sending . . . . . 62
forwarding . . . . . . . . . . . . . . . . . . . 55
loading ring tone . . . . . . . . . . . . . . 61
mailbox ID . . . . . . . . . . . . . . . . 58, 59
mailboxes. . . . . . . . . . . . . . . . . . . . 57
marking as new . . . . . . . . . . . . . . . 57
memory . . . . . . . . . . . . . . . . . . . . . 44
notification number . . . . . . . . . . . . 60
notification type . . . . . . . . . . . . . . . 60
notification via SMS . . . . . . . . . . . . 60
on PABX systems . . . . . . . . . . . . . . 62
opening attachment . . . . . . . . . . . . 57
predictive text entry . . . . . . . . . . . . 48
reading/deleting . . . . . . . . . . . . . . . 51
receiving . . . . . . . . . . . . . . . . . . . . 53
response to error messages . . . . . . . 63
save telephone number . . . . . . . . . 55
saving . . . . . . . . . . . . . . . . . . . . . . 48
send centre . . . . . . . . . . . . . . . . . . 46
sending . . . . . . . . . . . . . . . . . . . . . 48
sending as email . . . . . . . . . . . . 44, 49
sending to a personal mailbox . . . . . 59
sending/editing . . . . . . . . . . . . . . . 52
sending/receiving . . . . . . . . . . . . . . 45
SMS centre . . . . . . . . . . . . . . . . . . . 44
suppress ringer tone . . . . . . . . . . . . 44
template . . . . . . . . . . . . . . . . . . . . 52
writing . . . . . . . . . . . . . . . . . . . . . . 47
SMS centre . . . . . . . . . . . . . . . . . . . . 44
changing the telephone number . . . 46
Speed dial key . . . . . . . . . . . . . . . . 1, 26
Speed dial list . . . . . . . . . . . . . . . . . . 26
changing single entry . . . . . . . . . . . 28
deleting a single entry . . . . . . . . . . 30
saving number . . . . . . . . . . . . . . . . 27
Speed dialling . . . . . . . . . . . . . . . . . . 80
network mailbox. . . . . . . . . . . . . . . 80
Standard announcement (answering
machine) . . . . . . . . . . . . 64
Star key . . . . . . . . . . . . . . . . . . . . . 1, 98
Suppression
first ringer tone . . . . . . . . . . . . . . . 44
preselection . . . . . . . . . . . . . . . . . . 43
Switching off see Deactivating . . . . . . 16
System settings . . . . . . . . . . . . . . . . 101
125
S100/150 colour Tchibo / UK / A31008-M1575-L131-1-7619 / S_150_AMSIX.fm / 01.07.2005
Index
T
Talk key . . . . . . . . . . . . . . . . . . . . . 1, 19
Technical data . . . . . . . . . . . . . . . . . 113
Telephone cable . . . . . . . . . . . . . . . . . 8
Telephone jack . . . . . . . . . . . . . . . . . . 8
Telephone number
copying from SMS to directory . . . . 55
copying from the directory . . . . . . . 31
displaying the caller's (CLIP) . . . . . . 20
entry with directory . . . . . . . . . . . . 31
saving (directory) . . . . . . . . . . . . . . 26
Telephone number transmission . . . . 23
Telephoning
answering a call . . . . . . . . . 19, 20, 21
Template see SMS
Text field (empty) see SMS
Text message see SMS . . . . . . . . . . . . 44
Time control (ringer volume) . . . . . . . 96
Time functions . . . . . . . . . . . . . . . . . 15
Time setting . . . . . . . . . . . . . . . . . . . 15
Toggling . . . . . . . . . . . . . . . . . . . . . . 25
Tone dialling . . . . . . . . . . . . . . . . . . 109
V
Voice command . . . . . . . . . . . . . . . .
Volume
base station . . . . . . . . . . . . . . . . . .
handset volume . . . . . . . . . . . . . . .
loudspeaker . . . . . . . . . . . . . . . . . .
ringer tone . . . . . . . . . . . . . . . . . .
74
64
95
95
96
W
Waiting call
accepting/rejecting . . . . . . . . . . . . . 25
activating/deactivating . . . . . . . . . . 23
external call . . . . . . . . . . . . . . . . . . 23
internal call . . . . . . . . . . . . . . . . . . 86
Waiting melody . . . . . . . . . . . . . . . . . 22
Walk and Talk . . . . . . . . . . . . . . . 92, 93
Warning tone see Advisory tones . . . . 99
Writing an SMS . . . . . . . . . . . . . . . . . 47
126
S100/150 colour Tchibo / UK / A31008-M1575-L131-1-7619 / garantie.fm / 01.07.2005
Guarantee
We give three years guarantee from date of purchase.
This article was produced using the latest manufacturing
methods and has undergone thorough quality control inspection. We guarantee that the appliance is in perfect condition.
If a problem occurs during the guarantee period, please
consult our sales outlet or the sales agency. Our friendly staff
will be glad to help you.
Damage due to improper use, wear parts and consumables are
not covered by the guarantee.
If you would like additional product information or if you
have any questions about service procedures, please
call our TCM Customer Care Line. Please find the
telephone number for the hotline listed below. In case of
any queries, please have the article number handy. You
will find it on the product or at the end of this manual.
Great Britain:(0044) - (0)800 - 0850 507 (freephone)
Monday – Friday, 8.30 a.m. to 5.30 p.m.
E-Mail: [email protected]
Article number: 226 731
127
S100/150 colour Tchibo / UK / A31008-M1575-L131-1-7619 / cover back.fm / 01.07.2005
A 3 1 0 0 8 - M1 5 7 5 - L 1 3 1 - 1 - 7 6 1 9