1
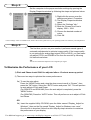
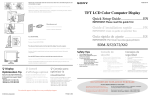
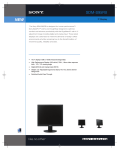
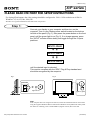
4-088-537-31(1)
X/P series
PLEASE READ ME FIRST FOR SETUP INSTRUCTIONS
For Optimal Performance the video settings should be configured to 1280 × 1024 resolution at 60 Hz for
Windows® 95, 98, NT, Me, 2000, XP.
Windows is a registered trademark of the Microsoft® Corporation.
Step 1:
Connect your display to your computer and then turn on the
computer. Turn on your Display power switch located on the bottom
left side of the panel (Fig. 1), then press the power button on the front
panel until the green light is on (Fig. 2). If no image appears, press
the “INPUT” selector button slowly and toggle through the 3 inputs
positions:
INPUT1: DVI-D
m
M
INPUT1: HD15
m
M
INPUT2: HD15
until the desired input is selected.
This monitor complies with the “DDC” Plug & Play standard and
should be recognized by the computer.
Fig. 1
Fig. 2
MAIN POWER
Lights in red
Lights in green
Note
If the computer does not recognize the monitor, install the information file for this monitor
using the supplied Windows Monitor Information/Windows Utility/Macintosh Utility Disk.
For details on installing, refer to the ReadMe E (English version) file on the disk.
Sony Corporation © 2002 Printed in Thailand
(Continued)
Step 2:
Set the computer to the proper resolution settings by opening the
Display Properties window by following the steps and pictures below:
1
2
3
5
4
1) Right-click the mouse over the
desktop and select : Properties.
2) The Display Properties window
opens.
3) Select the “Settings” tab.*
4) Slide the “Screen Area” bar to
display 1280 × 1024.
5) Choose the desired number of
colors.
6) Click OK.
6
* If the “Settings” tub is not available in NT, 2000 or XP versions, please refer to your operating system User manual or your IS department.
Step 3:
The first time you turn on your monitor, it performs several types of
automatic adjustments to optimize image quality. If the image quality
is not optimum for analog input signal (VGA or HD15), you can manually adjust PITCH and PHASE to fine tune the monitor by following
the instructions below:
Tip
You do not need manual adjustment for a digital input signal.
To Maximize the Performance of your LCD
1) Pitch and Phase should ONLY be adjusted after a 15 minute warm-up period.
2) There are two ways to optimize the screen performance.
2a) To use the auto adjust:
Press the “MENU” button and using the down arrow to scroll to “Screen”, then
press the “OK” button. Select the “AUTO” button and press “OK”. This will perform
an auto adjust of Pitch and Phase.
(For SDM-X72 and SDM-X82) Once the auto adjust is completed, press the
“MENU” button.
(For SDM-P82) Press the “AUTO” button. This will perform an auto adjust of Pitch
and Phase.
OR
2b) Insert the supplied Utility CD-ROM, open the folder named “/Display_Adjust for
Windows”, then run the file named “Display_Adjust for Windows verx.x.exe”.
Once the file is launched, follow the short step-by-step instruction to maximize
the performance of your display.
For additional support, go to www.sony.com/displays/support or call 866-357-7669 (SONY)