1
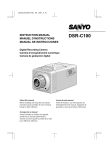
WWWSNOMCOM %.',)3( $%5 43#( 5SERÖ'UIDE "EDIENUNGSANLEITUNG ÖÖÖ3(/24Ö6%23)/.Ö ÖÖÖ+52:6%23)/. User Guide short version Bedienungsanleitung kurzversion Version 1.31 © 2007 snom technology AG All rights reserved. Alle Rechte vorbehalten. For questions regarding the product, please contact your snom Value Added Reseller (VAR). Bei Fragen bezüglich des Produkts kontaktieren Sie bitte Ihren snom Fachhändler. Also visit us at www.snom.com Besuchen Sie uns auf www.snom.com english Welcome Thank you for purchasing the . This user guide describes how to install, configure, and use the , enabling you to make SIP calls. About this User Manual This user guide consists of a number of sections to guide you through the process of installing, configuring, and setting up your phone for first use. These sections are best read from beginning to end. The remaining sections of this user guide serve as a reference guide for all features of the . In this manual we have used the following abbreviations: DHCP IP LAN NAT SIP STUN URL NET – Dynamic Host Configuration Protocol – Internet Protocol – Local-Area Network – Network Address Translation – Session Initiation Protocol – Simple Traversal of UDP through NAT – Uniform Resource Locator – Network For more information see the glossary on our website. On the website you can also find additional information about the such as troubleshooting, frequently asked questions and support contact information. www.snom.com © snom technology AG 2007 • 3 english Have your serial number and MAC address ready when contacting support. You find the numbers on the bottom of the gateway. For inquiries concerning your network connection contact your network administrator. For the EU: The telephone’s conformity with EU directives is confirmed by the CE symbol. We hereby declare that the snom m3 and the snom m3 handset are in compliance with the essential requirements and other relevant provisions of Directive 1999/5/EC. This device complies with Part 15 of the FCC Rules. Operation is subject to the following two conditions: (1) this device may not cause harmful interference, and (2) this device must accept any interference received, including interference that may cause undesired operation. NOTE: This equipment has been tested and found to comply with the limits for a Class B digital device, pursuant to Part 15 of the FCC Rules. These limits are designed to provide reasonable protection against harmful interference in a residential installation. This equipment generates, uses and can radiate radio frequency energy and, if not installed and used in accordance with the instructions, may cause harmful interference to radio communications. However, there is no guarantee that interference will not occur in a particular installation. If this equipment does cause harmful interference to radio or television reception, which can be determined by turning the equipment off and on, the user is encouraged to try to correct the interference by one or more of the following measures: • Reorient or relocate the receiving antenna. • Increase the separation between the equipment and receiver. • Connect the equipment into an outlet on a circuit different from that to which the receiver is connected. • Consult the dealer or an experienced radio/TV technician for help. Modifications not expressly approved could void the user’s authority to operate the equipment. Privacy of communications may not be ensured when using this equipment. This handset meets the FCC standard for Hearing Aid Compatibility. Important safety information Do not install the handset, handset charger, AC/DC adapter, gateway, power cord, and network cord outdoors. NOT FOR OUTDOOR USE! Charge the battery or handset only in combination with snom m3 DECT Handset Desktop Charger and the SALOM SSW-1444 adapter that comes with the product. Plug the SALOM SSW-1444 AC/DC adapter in a wall outlet socket near the equipment for easy access/removal of the AC/DC adapter. Use only power adapter Sino American model A31230A/G/B or SALOM SSW-1187US which comes with the product to connect with snom m3 Gateway. Important battery information This product uses rechargeable Lithium-Ion batteries 3.7V, 650mAh. Only 4 • © snom technology AG 2007 Charging and discharging Your device is powered by a rechargeable battery. The full performance of a new battery is achieved only after two or three complete charge and discharge cycles. The battery can be charged and discharged hundreds of times, but it will eventually wear out. Use only snom technology AG approved batteries. If left unused, a fully charged battery will lose its charge over time. If the battery is completely discharged, it may take a few minutes before the charging indicator appears on the display. Use the battery only for its intended purpose. Never use any charger or battery that is damaged. Do not short-circuit the battery. Short-circuiting the terminals may damage the battery or the connecting object. Leaving the battery in hot or cold places will reduce the capacity and lifetime of the battery. Charge batteries within an ambient temperature range of 0° C to 40° C (32° F to 104° F). A device with a hot or cold battery may not work temporarily, even when the battery is fully charged. Avoid overcharging, repeated overcharging can lead to deterioration in battery performance. Never attempt reverse charging, charging with polarity reversed can cause a reversal in battery polarity causing gas pressure inside the battery to rise, which can activate the safety vent, lead to leakage. Storage temperature and humidity (short-term): Store batteries in a dry location with low humidity, no corrosive gases, and at a temperature range of -20° C to 45° C (-4° F to 113° F). Long-term storage: Store at a temperature ranges between +10° C and +30° C (50° F to 86° F). Sensitive Electronic Environment Any radio-based equipment can potentially cause interference with other equipment and can be interfered from other equipment. This also applies for DECT equipment. However due to the very low transmission power level the chances for interference are very small. Research proves that operational DECT phones normally don’t influence electronic equipment however some precautions must be taken into account for sensitive electronic equipment e.g. sensitive laboratory equipment. When DECT phones operate in straight nearness of sensitive electronic equipment incidental influence can appear. You are advised not to place the DECT phone on or close (less than 10 cm) to this kind of equipment, even in standby mode. Additional safety information Small children: Your device and its enhancements may contain small parts. Keep them out of the reach of small children. Operating environment: Remember to follow any special regulations in force in any area, and always © snom technology AG 2007 • 5 english use batteries with “snom” brand and P/N: 60020438 or 60020438 that come with the handset or dedicated spare batteries recommended by snom technology AG. Do not use any other type, since this may present a risk of leakage, fire, explosion or other hazardous situation. For battery replacement or removal please remove the battery cover of the handset. Never disassemble, customize or short-circuit batteries. Do not place battery in fire or heat the battery. Charge battery only within the snom m3 handset together with snom m3 Charger and the SALOM SSW-1444 adapter that comes with the product. english switch off your device when its use is prohibited or when it may cause interference or danger. Use the device only in its normal operating positions. Do not place credit cards or other magnetic storage media near the device, because information stored on them may be erased. Medical devices Operation of any radio transmitting equipment, may interfere with the functionality of inadequately protected medical devices. Consult a physician or the manufacturer of the medical device to determine if they are adequately shielded from external RF energy or if you have anyquestions. Switch off your device in health care facilities when any regulations posted in these areas instruct you to do so. Hospitals or health care facilities may be using equipment that could be sensitive to external RF energy. Implanted medical devices Manufacturers of medical devices recommend that a minimum separation of 15.3 centimeters (6 inches) should be maintained between a wireless device and an implanted medical device, such as a pacemaker or implanted cardioverter defibrillator, to avoid potential interference with the medical device. Persons who have such devices should: Always keep the wireless device more than 15.3 centimeters (6 inches) from the medical device when the wireless device is turned on. • Not carry the wireless device in a breast pocket. • Hold the wireless device to the ear opposite the medical device to minimize the potential for interference. • Turn the wireless device off immediately if there is any reason to suspect that interference is taking place. • Read and follow the directions from the manufacturer of their implanted medical device. If you have any questions about using your wireless device with an implanted medical device, consult your health care provider. Potentially explosive environments Switch off your device when in any area with a potentially explosive atmosphere and obey all signs and instructions. Sparks in such areas could cause an explosion or fire resulting in bodily injury or even death. Switch off the device at refuelling points such as near gas pumps at service stations. Observe restrictions on the use of radio equipment in fuel depots, storage, and distribution areas; chemical plants; or where blasting operations are in progress. Areas with a potentially explosive atmosphere are often but not always clearly marked. They include below deck on boats, chemical transfer or storage facilities, vehicles using liquefied petroleum gas, and areas where the air contains chemicals or particles such as grain, dust, or metal powders. Product disposal information For countries in the European Union: The symbol depicted here has been affixed to your product in order to inform you that electrical and electronic products should not be disposed of as municipal waste. Electrical and electronic products 6 • © snom technology AG 2007 For countries outside the European Union: Disposal of electrical and electronic products in countries outside the European Union should be done in line with the local regulations. Please contact the local authorities for further information. Battery disposal information: Defect or exhausted batteries should never be disposed of as municipal waste. Return old batteries to the battery supplier, a licensed battery dealer or a designated collection facility. Do not incinerate batteries. It is recommended that the customer install an AC surge arrester in the AC outlet to which this device is connected. This is to avoid damage to the equipment caused by local strikes of lightening and other electrical surges. SELV (Safety Extra Low Voltage) Compliance Safety status of Input/Output connections comply to SELV requirements. Warning: To avoid electric shock, do not connect safety extra-low voltage (SELV) circuits to telephone-network voltage (TNV) circuits. LAN ports contain SELV circuits, and PSTN ports contain TNV circuits. Some LAN and PSTN ports both use RJ-45 (8P8C) connectors. Use caution when connecting cables. snom technology AG reserves the right to revise this document and make changes at any time and without the obligation to notify any person and/or entity of such revisions and/or changes. Product specifications contained in this document are subject to change without notice. © snom technology AG 2007 • 7 english including the cables, plugs and accessories should be disposed of separately in order to allow proper treatment, recovery and recycling. These products should be taken to a designated facility where the best available treatment, recovery and recycling techniques are available. Separate disposal has significant advantages: valuable materials can be re-used and it prevents the dispersion of unwanted substances into the municipal waste stream. This contributes to the protection of human health and the environment. Please be informed that a fine may be imposed for illegal disposal of electrical and electronic products via the general municipal waste stream. In order to facilitate separate disposal and environmentally sound recycling, arrangements have been made for local collection and recycling. In case your electrical and electronic products need to be disposed of please refer to your supplier or the contractual agreements that your company has made upon acquisition of these products. english At a G l a n c e Handset – front view earpiece Color display green phone key used to initiate calls on the active line or to accept calls Navigational keys used to navigate through menus and services Star key used in the name editor to capitalize letters, type numbers and enter a star symbol 8 • OK key used to enter the main menu and select and confirm options Soft keys used for various functions red phone key used to hang up or to leave a menu and to turn the handset on or off R key used to enter special characters Microphone © snom technology AG 2007 english Handset – side view Belt Clip Volume UP Volume Down Speakerphone activation and deactivation key Headset Jack Connector 2.5 mm © snom technology AG 2007 • 9 english Handset Charger – front view Handset charger Handset Charger – rear view Power Supply Connector On Handset Charger 10 • © snom technology AG 2007 Connection Status IndiCators 1) Handset Name Battery Status and charging indicator Time and Date Call Log for incoming, outgoing and missed calls (activated with soft key) Options for redial and active calls (activated with soft key) OK Key Indicator signifies that the OK key is active 1) black / black – out of range of the gateway yellow / black – within range of the gateway, but not ready for SIP calls yellow / yellow – within range of the gateway and ready for SIP calls on primary line Main menu Intercom for communication between two handsets Contacts Settings Call Log for incoming, outgoing and missed calls Messages © snom technology AG 2007 • 11 english Idle mode english Gateway – rear view Power Connection RESET DC 9-20V NET Net Connection port Reset Button for Ethernet cable for activating configuration changes and enabling handset registration Gateway – frontview netWORK Indicator Network indicator is flashing during boot. It indicates that the gateway has received an IP address Registered Indicator indicates that the gateway is registered (at least one line) CALL Indicator is flashing during firmware update. Constant light indicates call in progress Power Indicator 12 • © snom technology AG 2007 english I n s ta l l i n g t h e Phone This section guides you through the process of installing your . Prerequisities In order to take full advantage of the features of the , you need to have the following in place: • Connection to a network •SIP-User account information Furthermore, before you start the installation process, make sure that you have the following close to the gateway: • Wired Ethernet connection • Power outlet for the gateway NOTE : The gateway can either be placed on a tabletop or mounted on the wall. If longer cables are required, you can use ordinary cable extensions. The handset has an indoor signal range of up to 50 meters (150 feet) from the gateway, and you must place your handset charger within the signal range. Concrete and metal objects might affect the signal range. © snom technology AG 2007 • 13 english Installing the gateway and registering the handset How to install the gateway 1)To prepare the gateway for SIP telephony, connect the Ethernet cable to the NET port on the gateway and then to a LAN port on your network. Gateway RESET DC 9-20V NET network/ switch 2) Connect the power adapter to the gateway and to an active power outlet (preferably a continuous power outlet without a switch to interrupt its power) Gateway RESET DC 9-20V 14 • NET © snom technology AG 2007 english How to install and register the handset 1)Open the battery cover. 2)Insert the battery in the handset, making sure that contacts of battery are correct. ContActs of battery © snom technology AG 2007 • 15 english 3) Connect the power adapter to the charger and the other end to an active power outlet (preferably a continuous outlet without a switch to interrupt its power). 16 • © snom technology AG 2007 NOTE : After registration of the first handset, there is a 5-minute period during which you can register additional handsets. If you want to register additional handsets after the 5-minute period has expired, press the Reset button on the back of the gateway to start a new 5-minute registration period. © snom technology AG 2007 • 17 english 4) Place the handset in the charger, and charge the battery. We recommend that you charge the batteries fully before first use. This takes approximately 10 hours. When you place the handset in the charger, the handset automatically registers with the gateway. english GETTING ST A RTED Using the Menus and Typing Text and Numbers The has 5 menus all of which you access from the Main menu. How to enter the Main menu 1)In Idle mode, press the OK key. The Main menu opens. Typing text and numbers When you are in a number editor or text editor use the Erase soft key to erase text that is already in the editor, or to erase text that you have just typed. The Options soft key in text mode only provides you with the following two options: Insert symbol and Input mode. How to insert a symbol 1)In a text editor, press the Options soft key, choose Insert symbol, and then press the OK key. 2) Use the navigation keys to choose a symbol, and then press the OK key. The symbol is inserted in the text. 18 • © snom technology AG 2007 When you are in a text editor, the upper right corner of the display shows which text input mode is currently active. You can change the input mode of the text editor at any time during editing. 1)In a text editor, press the Options soft key, choose Input mode, and then press the OK key. 2) Choose the preferred input mode, and then press the OK key. The following options are available: Option What it does ABC Types upper case letters. Abc Types first letter in a sentence in upper case and remaining letters in lower case. abc Types lower case letters. 123 Types numbers only. You can also change the case of letters on the fly or type a number in the middle of a text. Press the Star key once to change the case, press the Star key twice to type numbers. How to lock and unlock the keypad If you are carrying the handset around, you can lock the keypad so that you do not use it accidentally. © snom technology AG 2007 • 19 english How to change the text format english 1)In Idle mode, press the Star key, and then press the Lock soft key. 2)To unlock, press the Star key, and then press the Unlock soft key. NOTE : The keypad unlocks automatically when you answer an incoming call or when you make an emergency call. Configuring the The following sections describe how to configure and set up your for first use. You have to configure your phone before it is ready for first use. You will need the account information that you received from your SIP Service Provider to complete the configuration of your . How to configure using a webbrowser 1)Open a browser on your PC, go to the IP address of the gateway (Press the volume up key to get the IP address) 2) Log in to the menu. default settings: username: admin password: admin 3)In the menu, choose Identity 1 ... 8 4) Fill in the SIP user data: 20 • © snom technology AG 2007 Press the Save button. You will be redirected to the main page. Choose the Identity 1...8 again and press Reboot button to apply the settings. Please wait for the reboot of the Gateway. After a few seconds, both status indicators in the upper left corner of the display will turn yellow, indicating that you have successfully configured your . How to configure the handset You can configure your set. using the using the hand- 1)In Idle mode, press the OK key, choose Settings, and then press the OK key. © snom technology AG 2007 • 21 english · Server is local: Choose Yes or No · Display name (optional): Caller ID that the called party sees · Account: Usually the phone number you received from your service provider · Password: the password you received from your SIP Provider · Account name: Name of the account used in call groups ·Registrar: IP or DNS address of the SIP Server ·Outbound Proxy: IP or DNS address of the Outbound Proxy english 2) Choose VoIP settings, and then press the OK key. 3) When prompted for a PIN code, type the default PIN code 0000, and then press the OK key. 3) Choose Accounts. You then enter the data for the SIP account. 1) Choose the appropriate SIP account and fill in the user data. 2)If you have more than one SIP account, then you need to enter the account settings for each account. 3) Choose the listed parameters one by one, press the OK key. •Display name (optional) – Caller ID that the called party sees •User name – usually the phone number you received from your service provider •Authentication Name – usually the same as User name •Password – the password you received from your SIP provider •Account name – name of the account used in Call Groups •Registrar – IP or DNS address of the SIP server •Outbound Proxy – IP or DNS address of the Outbound Proxy 4) After each change, press the OK key and then the Yes soft key when prompted to save changes. 22 • © snom technology AG 2007 How to change the PIN code Make sure to change the PIN code after first login to prevent unauthorized access to your VoIP settings. 1)In Idle mode, press the OK key, choose Settings, and then press the OK key. 2) Choose VoIP settings, and then press the OK key. 3) When prompted for a PIN code, enter the default PIN code 0000, and then press the OK key. 4) Choose Change PIN code and then press the OK key. 5)Enter a new PIN code, and then press the OK key. 6) Press the Yes soft key when prompted to save the PIN code. 7) For future reference, write down your new PIN code here: NOTE : The handset PIN code and the online configuration password are independent of each other. Changing the handset PIN code will not affect the online configuration password. © snom technology AG 2007 • 23 english 5) Press the Reset button on the rear of the gateway when you have completed all changes. english How to change access code The access code is used for calculating encryption keys during the intitial pairing of handsets to the gateway. To ensure privacy, the access code must be changed. Handset and gateway access codes must be the same. When registering a new handset, ensure that its access code is modified to the same value as the access code of the gateway. 1)Enter Settings, System settings. 2) When prompted for a PIN code, type the PIN code (default: 0000), and then press the OK. 3) Choose Access Code. 4) Press OK. 5) Press Gateway. 6) Type in the new access code. Press OK and press Yes to save. 1)Enter Settings, System settings. 2) When prompted for a PIN code, type the PIN code (default: 0000), and then press the OK. 3) Choose Access Code. 4) Press OK. 5) Press Handset. 6) Type in the new access code. Press OK and press Yes to save. 24 • © snom technology AG 2007 Before you start using your phone, we strongly recommend that you set handset language, country selection, time zone, and routing of emergency numbers to ensure that your functions properly. How to set the handset language The individual handset language setting determines in which language the text on the display is presented. 1) In the Main menu, choose Settings, and then press the OK key. 2) Choose System settings. When prompted for a PIN code, type the PIN code (default: 0000), and then press the OK, and then choose Language. Press the OK key. 3) Choose the preferred language, and then press the OK key. How to change the time zone Setting the time zone properly ensures that the time displayed in the Idle mode screen corresponds to the time zone you are in. 1)In the Main menu, choose Settings, and then press the OK key. 2) Choose System settings. When prompted © snom technology AG 2007 • 25 english Basic Settings english for a PIN code, type the PIN code (default: 0000). Choose Time and date. Press the OK key. 3) Choose Time zone, press the OK key, and then select the appropriate time zone. Press the OK key. You should also verify that the time format and the daylight saving settings are correct. Date and time are automatically synchronized with a time server on the Internet to ensure that the time and date displayed on the is always correct. How to set the primary line for outgoing calls You must set a primary line for each handset. This line is used for outgoing calls when you press the Green phone key. You can choose from eight SIP accounts. 1)In the Main menu, choose Settings, and then press the OK key. 2) Choose Telephony settings, press the OK key, and then choose VoIP line. Press the OK key. 3) When prompted for a PIN code, type the PIN code (default: 0000), and then press the OK. 4) Choose the account for the primary line, and then press the OK key. 26 • © snom technology AG 2007 If you have more than one handset, you must specify from which account or accounts you want each handset to receive calls. To do this you use Call Groups. 1)In the Main menu, choose Settings, and then press the OK key. 2) Choose Telephony settings, press the OK key, then choose Call Groups and then enter your PIN Code (the default PIN code is 0000). Press the OK key. All account names for the VoIP accounts you subscribe to are listed. Clear any accounts for which you do not want the current handset to receive calls, and then press the OK key. Updating the Firmware To ensure that your has the latest features installed, we recommend that you update the firmware once you have configured and set up the phone. How to update the firmware When new software is available the display reads, “New firmware available”. © snom technology AG 2007 • 27 english How to set Call Groups english 1) Press the OK key. The Firmware update menu appears. 2)To update to the latest version, choose the update listed on the Simple tab, press the OK key, and then press the Yes soft key when prompted wether you want to update the system. If you press the View soft key before you start the installation, you can find out about the software version number and the date and time it was released. 3) Select (if available) language and press OK. The update time varies depending on the size of the update and the speed of your Internet connection. During the update process the following steps are listed in the display: •Getting gateway •Updating gateway •Getting handset •Updating handset Once a step is complete, a green checkmark appears next to the step. When the entire update has been successfully completed, the display reads “Upgraded to <version number>”. NOTE : While the update is in progress you cannot receive incoming calls or make calls, including emergency calls, on the . Also note that we recommend that you do not reset the gateway during the installation process. 28 • © snom technology AG 2007 english M A KING A ND A NS W ERING C A LLS The following sections describe how to make calls with the . When you make and receive Internet calls, the following icons are displayed: •Calling •Ongoing call How to make a call In Idle mode, type the number you want to dial and then press the Green phone key How to end a call Press the Red phone key or place the handset in the charger. How to make a call using contacts 1)In the Main menu, choose Contacts, and then press the OK key. © snom technology AG 2007 • 29 english 2) Choose the contact you want to call and then press the Green phone key. The default number is dialed. If you want to call a contact and use another number than the default number, do the following: 1)In the Main menu, choose Contacts and then press the OK key. 2) Choose the contact you want to call and then press the OK key. 3) Choose a number from the list and then press the Green phone key.How to make a call using the call log 1)In Idle mode, press the Call log soft key or choose Call log from the Main menu and then press the OK key. 2) Choose the number you want to call and then press the Green phone key. How to make a call using redial 1) Press the Options soft key, choose Redial and then press the OK key. The most recently dialed number is displayed. 2) Press the Green phone key to call the number. 30 • © snom technology AG 2007 Enter the emergency number and then press the Green phone key. You cannot make emergency calls in the following situations: •Firmware update is in progress •Handset batteries are drained •Power failure •Handset is out of range of the gatewa How to answer a call Pick up the handset and then press the Green phone key. You can also set the to auto answer so that when you pick up the handset from the charger, you have automatically answered the call. Callwaiting – Hold/Unhold To switch between calls, you have to press the hold key. The call you had is put on hold. To retrieve the call press the Options key, then select Retrieve Call and press the OK key or just press the Red Phone key. © snom technology AG 2007 • 31 english How to make an emergency call english Multiple Call handling To make another call you have to put the first party on hold, and then just dial the number of the second party as you would normally dial a number. By pressing the Options key you then can •Swap the calls, •Initiate a 3-way conference, •Or transfer the two active calls (join those two, see transferring calls for more details). Attended Transfer If you receive a call, which you need to transfer to a third party, put the first caller on hold (see How to switch between two calls). Then dial the number of the party you want to connect the first caller. If the third party wants to talk to the first caller, press the Options key select Transfer and press OK. The two parties get connected and the returns to idle mode. 32 • © snom technology AG 2007 When receiving a call and you want to transfer the call unattended to a third party press the Hold key then the Options key, then select Transfer and press the OK key. Enter the third party extension number and press the OK key. The call is transferred to the third party extension. You will find the detailed User Guide on the Internet at www.snom.com. © snom technology AG 2007 • 33 english Unattended Transfer