1
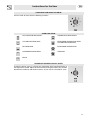
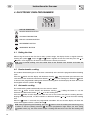
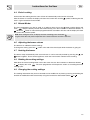
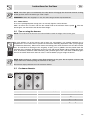
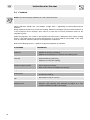
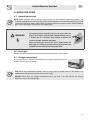
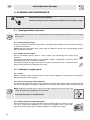
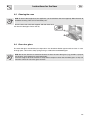
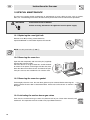
Table of Contents
1. IMPORTANT SAFETY INSTRUCTIONS ................................................................................. 4
2. BEFORE USING YOUR RANGE FOR THE FIRST TIME ....................................................... 6
3. DESCRIPTION OF CONTROLS ........................................................................................... 10
4. ELECTRONIC PROGRAMMER ............................................................................................ 12
5. USE OF THE COOKTOP ...................................................................................................... 14
6. USE OF THE OVEN .............................................................................................................. 17
7. AVAILABLE ACCESSORIES ................................................................................................ 18
8. COOKING HINTS .................................................................................................................. 19
9. CLEANING AND MAINTENANCE ......................................................................................... 24
10. EXTRAORDINARY MAINTENANCE ................................................................................... 26
WARNING: If the instructions contained in this manual are not followed
precisely, a fire or explosion may result causing property damage, personal
injury or loss of life.
- Do not store or use gasoline or other flammable vapors and liquids near this
or any other appliance.
WHAT TO DO IF YOU SMELL GAS
• Do not try to light any appliance.
• Do not touch any electrical switch.
• Do not use any phone in your building.
• Immediately call your gas supplier from a neighbor's phone. Follow the gas
supplier's instructions.
• lf you cannot reach your gas supplier, call the Fire Department.
- Installation and service must be performed by a qualified installer, service
agency or the gas supplier.
NOTE: THIS APPLIANCE MUST BE INSTALLED SOLELY AND EXCLUSIVELY BY A QUALIFIED
TECHNICIAN. ANY TECHNICAL PROCEDURES MUST BE CARRIED OUT BY AN AUTHORIZED
TECHNICIAN.
INSTRUCTIONS FOR THE USER: these instructions contain user advice, a description of the controls
and the correct procedures for cleaning and maintenance of the appliance.
3
Important Safety Instruction
1. IMPORTANT SAFETY INSTRUCTIONS
READ AND SAVE THESE INSTRUCTIONS – Your safety and the safety of others are very important.
We have provided many important safety messages throughout this manual and on the appliance.
Read all the instructions before using the appliance and always obey all safety messages.
RECOGNIZE SAFETY INFORMATION
This is the safety alert symbol. This symbol alerts you to potential hazards that can result in severe
personal injury or loss of life.
UNDERSTAND SIGNAL WORDS
A signal word – DANGER, WARNING, or CAUTION – is used with the safety alert symbol. DANGER
denotes the most serious hazards. It means you could lose your life or be seriously injured if you do not
immediately follow the instructions. WARNING means you could lose your life or be seriously injured if
the instructions are not followed. CAUTION indicates a potentially hazardous situation which, if not
avoided, could result in minor to moderate injury.
WARNING
-
This appliance is intended for household use only.
-
Use this appliance only for its intended purpose. The manufacturer cannot be
held liable for damage caused by improper use of this range.
-
This appliance complies with current safety regulations. Improper use of this
range can result in personal injury and property damage.
-
Read all the instructions before installing or using the range for the first time.
-
Keep these operating instructions in a safe place and pass them on to any future
user.
The safety messages will inform you of potential hazards, on how to avoid the risk of injury and what can
occur if the instructions are not followed.
IMPORTANT: Observe all governing codes and ordinances. Refer to the Installation Manual for
instructions on installing the appliance.
WARNING: For your safety, the instructions contained in this manual must be followed to minimize the
risk of fire or explosion and to prevent property damage, personal injury or loss of life.
Do not store or use gasoline or other flammable vapors, liquids or materials near this or any other
appliance.
WHAT TO DO IF YOU SMELL GAS
4
Important Safety Instruction
•
Do not attempt to turn on any appliances.
•
Do not touch any electrical switches.
•
Do not use any phone in your building.
•
Immediately call your gas supplier from a neighbor's phone. Follow the gas supplier's instructions.
•
lf you cannot reach your gas supplier, call the Fire Department.
Installation and service must be performed by a qualified installer, service agency or gas supplier.
NOTE: This range is manufactured for use with natural gas. To convert the appliance to LP/Propane
gas, see the instructions in the Gas Conversion Kit provided in the literature package.
The proper gas supply connection must be available. See "Gas supply requirements”.
5
Important Safety Instruction
2. BEFORE USING YOUR RANGE FOR THE FIRST TIME
WARNING
RANGE TIPPING HAZARD
-
All ranges can tip
-
Bodily injury can result
-
Install the anti-tip device shipped with the range
-
See installation instructions
FAILURE TO FOLLOW THESE INSTRUCTIONS CAN RESULT IN LOSS OF
LIFE OR SERIOUS BURNS TO CHILDREN AND ADULTS.
NOTE: This range is NOT designed for installation in manufactured (mobile) homes or in recreational
vehicles (RVs).
DO NOT install this range outdoors.
To reduce the risk of fire, electrical shock, personal injury, or property
WARNING
damage when using the rangetop, follow basic safety precautions,
including the following:
-
Proper installation is your responsibility. Make sure your appliance is properly installed and grounded
by a qualified installer.
-
-
NEVER USE YOUR APPLIANCE AS A SPACE HEATER OR THO WARM THE ROOM.
DO NOT LEAVE CHILDREN UNATTENDED: Children should not be left alone or unattended in the
area where the appliance is being used. Never allow children to sit or stand on any part of the
appliance.
-
Do not store items of interest to children in the area where the appliance is in use. If children are
allowed to use the appliance, they must be closely supervised by an adult.
-
WEAR PROPER APPAREL: loose-fitting or hanging garments should never be worn while using the
appliance.
-
For safety reasons and to avoid damage to your appliance, never sit, stand or lean on the oven door.
-
FLAMMABLE MATERIALS SHOULD NEVER BE STORED IN AN OVEN OR NEAR THE SURFACE
BURNERS.
-
GREASE IS FLAMMABLE: Allow hot grease to cool before attempting to handle it. Do not permit
deposits of grease to accumulate.
-
DO NOT USE WATER ON GREASE FIRES: Turn the appliance off and smother the fire with baking
soda or use a dry chemical or a foam-type extinguisher.
-
USE ONLY DRY POTHOLDERS: Moist or damp potholders on hot surfaces may cause burns from
steam. Do not allow potholders to touch hot surface burners. Do not use towels or other bulky cloth in
place of potholders.
6
Important Safety Instruction
-
Never allow garments, potholders or other flammable materials to come into direct or indirect contact
with burners until they have completely cooled.
-
DO NOT TOUCH SURFACE BURNERS OR THE INSIDE OF APPLIANCE: Burners may be hot
even though they are dark in color. The oven cavity can be hot enough to cause burns. During and
after use, do not touch areas near burners or the inside of the oven until they have had sufficient time
to cool. Do not allow garments or any flammable material to come into contact with hot surfaces. If
personal clothing or hair catches on fire, drop to the floor immediately and roll to extinguish the
flames.
-
PLACE THE OVEN RACKS IN THE DESIRED POSITION WHILE THE OVEN IS COOL. If a rack
must be removed while the oven is hot, do not allow the potholders to come in contact with the broiler
burner.
-
USE CAUTION WHEN OPENING THE OVEN DOOR: Allow hot air or steam to escape before
removing or placing foods in the oven.
-
Do not leave the packing materials around the home. Sort the various items of waste and take them
to the nearest specialized waste collection facility.
-
Do not obstruct oven vents or openings for air intake.
-
ELECTRICAL GROUNDING IS REQUIRED. It is the end user’s responsibility:
a) To contact a qualified electrician.
b) To ensure that the electrical system is adequate and in compliance with the National Electrical Code
ANSI / NFPA 70 Electrical Code – latest edition – Or the CANADIAN ELECTRICAL CODE, C22.11 –
1982 and C22.2 No. 01982 – or latest edition – and all local codes and ordinances.
-
Always check that the controls are in the "zero" (off) position when the range is not in use.
-
Use only pots or pans with a perfectly smooth, flat bottom on the range surface burners. NEVER
USE THE RANGETOP AS A WORK SURFACE.
CAUTION: If a crack is detected in the ceramic rangetop, immediately disconnect the range from the
electrical power supply and contact the nearest service center.
7
Important Safety Instruction
-
Do not attempt to repair or replace any part of this appliance unless specifically recommended in this
manual. All other servicing should be done by a qualified technician.
-
Never use any part of the range or oven for storage. Flammable materials can ignite and plastic
items may melt or burst into flame.
-
Do not hang articles from any part of the appliance or place anything against the oven. Some fabrics
are extremely flammable and could ignite.
-
DO NOT USE ALUMINUM FOIL TO LINE ANY PART OF THE OVEN OR RANGETOP. Use of a foil
liner can result in an electrical shock or fire hazard or obstruct the flow of heat and air. Foil is an
excellent heat insulator and heat can be trapped under it. This can interfere with cooking and can
damage the enamel of the oven.
-
Never leave the range unattended when using high heat settings. Boilover can cause smoke and
spattered grease can ignite.
IMPORTANT: After a spill or boil-over, turn off the burner and clean around it. After cleaning, check
that the burner functions properly.
-
Not all types of glass, thermally resistant glass-ceramic, ceramic, earthenware, or other glazed
cookware are suitable for range use. This type of cookware can break with sudden temperature
changes. Use only on low or medium heat settings in accordance with the instructions supplied by
the manufacturer.
-
DO NOT HEAT UNOPENED FOOD CONTAINERS: A buildup of pressure can cause the containers
to burst.
-
DO NOT USE FLAMMABLE PRODUCTS TO CLEAN THE RANGE.
-
Do not clean, rub, damage or remove the oven door gasket. It is essential for a good, tight seal
during baking and when the self-clean cycle is engaged. Replace the oven door gasket if it becomes
damaged or encrusted with food residue.
-
Be sure all range surface burner controls are turned off and that the rangetop is cool before using
any type of cleaning product. The chemical elements in these products could, in the presence of
heat, ignite or cause corrosion of metal parts.
-
ONLY QUALIFIED SERVICE PERSONNEL SHOULD PERFORM REPAIRS. Service personnel must
disconnect the power supply before servicing this unit.
SAVE THESE INSTRUCTIONS
NOTE: The California Safe Drinking Water and Toxic Enforcement Act requires the Governor of
California to publish a list of substances known to the State of California to cause cancer, birth defects
or other reproductive harm, and requires businesses to warn customers of potential exposure to such
substances.
WARNING: This product contains a chemical known by the State of California to cause cancer, birth
defects or other reproductive harm.
This appliance can cause low-level exposure to some of the substances listed, including benzene,
formaldehyde, carbon monoxide, toluene, and soot.
8
Important Safety Instruction
WARNING
RANGE TIPPING HAZARD
-
All ranges can tip
-
Bodily injury can result
-
Install the anti-tip device shipped with the range
-
See installation instructions
FAILURE TO FOLLOW THESE INSTRUCTIONS CAN RESULT IN LOSS OF
LIFE OR SERIOUS BURNS TO CHILDREN AND ADULTS.
MAKE SURE THAT YOUR PRO RANGE IS PROPERLY SECURED AND THE ANTI-TIP DEVICE IS
CORRECTLY INSTALLED. REFER TO THE INSTRUCTIONS INSIDE THE INSTALLATION MANUAL.
-
Remove all packing materials and temporary labels from the oven and rangetop.
-
Record the Model and Serial number on Page 2 of this booklet. The Model and Serial numbers are
on the Range ID plate, which is visibly located in the storage compartment. THE ID PLATE MUST
NOT BE REMOVED.
-
BEFORE BAKING OR BROILING FOR THE FIRST TIME, turn on the oven and broiler to burn off
any dirt, oil or grease remaining from the manufacturing process. Turn the oven on to 450°F (230°C)
for 20 to 30 minutes, then turn on the broiler for the same amount of time. You may want to turn on
the ventilator above your range for the same amount of time.
9
Instructions for the user
3. DESCRIPTION OF THE RANGE CONTROLS
All the range selectors and controls are located on the front panel.
FRONT CONTROL PANEL
Electronic
oven
programmer
Oven
thermostat
control knob
Oven
function
selector knob
Rear left
burner
control knob
Front left
burner
control knob
Rear center
inner burner
control knob
Rear center
outer burner
control knob
Rear right
inner burner
control knob
Front center
burner
control knob
Front right
burner
control knob
NOTE: Before using the oven, check that the electronic oven programmer displays the symbol
See paragraph “4. Electronic oven programmer”.
OVEN THERMOSTAT CONTROL KNOB
The cooking temperature is set by turning the knob clockwise to any desired
temperature ranging from 120° to 500° F. The indicator light illuminates to
indicate that the oven is warming up. The indicator light goes out when the
desired temperature has been reached. Regular flashing means that the oven
temperature is being constantly maintained as programmed.
10
.
Instructions for the User
OVEN FUNCTION SELECTOR KNOB
Turn this knob to select from the following functions:
OVEN FUNCTIONS
NO FUNCTION SELECTED
CONVECTION WITH BROIL
TOP AND BOTTOM HEAT
EUROPEAN CONVECTION WITH
TOP AND BOTTOM HEAT
BOTTOM HEAT
EUROPEAN CONVECTION
ROTISSERIE WITH BROIL
DEFROST
BROIL
RANGETOP BURNER CONTROL KNOB
To light the burner, press in and turn the appropriate knob counterclockwise to
the large flame symbol. Adjust the flame size by turning the knob to any position
between the maximum and minimum marks. To turn off, turn the knob to "zero".
11
Instructions for the user
4. ELECTRONIC OVEN PROGRAMMER
LIST OF FUNCTIONS
MINUTE-MINDER BUTTON
COOKING TIME BUTTON
END OF COOKING BUTTON
DECREMENT BUTTON
INCREMENT BUTTON
4.1 Setting the time
When using the oven for the first time or after a power outage, the display flashes at regular intervals,
showing the symbol
. Press the
and
buttons together and at the same time press the
or
buttons: each fingerpress will increase or decrease the time by one minute.
NOTE: Prior to timed cooking, turn the control knob to the desired oven function and select the
temperature.
4.2 Semiautomatic cooking
This mode of timed cooking turns off the oven automatically at the end of the programmed timed cooking
cycle.
Press the
button and the display will illuminate showing
; keep the button pressed and at the
same time use the increment or decrement buttons
or
to set the cooking time. When the
button
is released, the programmed cooking time will start counting down and the display will show the current
time together with the symbols A and .
4.3 Automatic cooking
This timed cooking mode automatically turns the oven on and off.
Press the
button and the display will illuminate showing
; holding the button in, use the
increment and decrement buttons
or
to set the cooking time.
Press the
button and the display will show the sum of the current time plus the cooking duration::
keeping the button pressed, use the increment or decrement buttons
or
to set the end of cooking
time.
When the
button is released, the programmed countdown will start and the display will show the
current time together with the symbols A and .
NOTE: After programming timed cooking, press the
button to view the cooking time remaining; press
the button to view the cooking end time
. The oven programmer’s logic keeps you from setting
incompatible values (e.g. the timer will not accept a cooking end time that is less than the cooking start
time).
12
Instructions for the User
4.4 End of cooking
At the end of the cooking time the oven will turn off automatically and a buzzer will sound.
After the buzzer is hushed, the display will show the current time and the
symbol, indicating that the
oven is again restored to manual mode.
4.5 Minute Minder
The oven programmer can also be used as an ordinary timer. Press the
button and the display will
show
; keep the button pressed and simultaneously press the increment or decrement buttons or
. When the
button is released the programmed timer countdown will start and the display will show
the current time and the symbol.
NOTE: After setting the timer, to display the time remaining press the button .
Using the timer does not prevent operation of the oven before the end of the set time.
4.6 Adjusting the buzzer volume
The buzzer has 3 different volume settings.
To change the setting, press the
button at the end of the timed cycle while the buzzer is going off.
4.7 Hushing the buzzer
The buzzer stops automatically after seven minutes. It can be manually hushed by pressing the
buttons together. To turn off the appliance, return the oven function selector to the 0 setting.
and
4.8 Deleting the cooking settings
Hold down the end of cooking button and at the same time use the increment or decrement buttons
or
to display the value
. The oven programmer will interpret the action as cancelling the timed
cooking cycle.
4.9 Changing the cooking settings
The cooking information that you have entered can be modified at any time by pressing and holding the
function for modification while concurrently using the increment or decrement buttons
or .
13
Instructions for the user
5. USING THE RANGETOP
FIRE HAZARD
-
Do not allow the burner flame to extend beyond the
edge of the pan.
-
Turn off all controls when not cooking.
WARNING
NOTE: Check that the burner rings, burner caps and grates are correctly positioned.
Before lighting the rangetop burners check that the burner rings are correctly in place with their
respective burner caps, making sure that the holes A in the burner ring are aligned with the spark
electrodes and thermocouples. For the dual burner, place the burner caps G and F on the burner ring D,
ensuring that they fit snugly. The burner ring must then be placed on and fitted into the drip tray B (taking
care to use the pin C as a guide). The supplied drip tray B is for use with woks. The special pan stand H
is for use with woks.
5.1 Ignition safety device
Each burner knob has a marking corresponding to the burner it controls (the example at the left shows
the front left burner).
The appliance is equipped with a spark electrode ignition.
-
Just press in and turn the knob counterclockwise to the minimum flame symbol
turns on.
until the burner
-
Keep the knob pressed in for about 2 seconds to keep the flame lit and to activate the safety device.
-
After turning the burner on, it is recommended that the knob be left in the minimum flame position for
approximately 20 seconds before adjusting it to the desired flame intensity.
The flame may go out when the knob is released. In this case, repeat the operation, but keep the knob
pressed in for a longer period of time.
14
Instructions for the User
NOTE: If the flame goes out accidentally, the safety device will engage after about 20 seconds, shutting
off the gas flow, even if the burner gas valve is open.
REMEMBER: When the rangetop is in use, the entire range surface may become hot.
5.1.1 Power failure
In case of a prolonged power outage you can manually light the surface burners.
Hold a lit match near a burner and turn the control knob to the minimum flame symbol
burner lights, turn the knob to the desired flame height.
. After the
5.2 Tips on using the burners
NOTE: Do not obstruct the flow of heat and ventilation around the edges of the burner grate.
For more efficient use of the burners and to lower gas consumption, use covered cookware that is
proportional in size to the burner to prevent the flame from extending beyond the sides (see paragraph
“5.3 Cookware diameter"). When water reaches the boiling point, lower the flame so that it does not boil
over. To avoid burns or damage to the rangetop, all pots, pans or griddles must be placed within the
perimeter of the rangetop. All cookware must have a flat and smooth bottom. When cooking with grease
or oil, be extremely careful to avoid overheating and a potential grease fire. If the flame accidentally goes
out turn the control knob to off and wait at least 1 minute before trying to re-light the burner.
NOTE: Before turning on a burner, place filled cookware on the grate. Do not operate a burner with
empty cookware or without placing the cookware on the grate.
Do not leave empty cookware on a hot surface or burner.
5.3 Cookware diameter
BURNERS
Ø min. and max. (cm)
1 Auxiliary
12 - 14
Ø min. - max. (inch)
4¾-7
5
2 Semi-fast
16 - 24
6 /16” - 9 ½
3 Fast
18 - 26
7 1/8” - 10 1/4”
4 Ultra fast
20 - 26
7 7/8” - 10 1/4”
15
Instructions for the user
5.4 Cookware
NOTE: Do not leave empty cookware on a hot surface or burner.
Ideally, cookware should have a flat bottom, straight sides, a tight-fitting lid and medium-to-heavy
thickness.
Rough cookware finishes may scratch the rangetop. Aluminum and copper may be used in cookware as
a core material or base. However, when used as a base they can leave permanent marks on the
rangetop or grates.
Cookware properties are a factor in how quickly and evenly heat is distributed, which affects cooking
results. A non-stick finish has the same characteristics as its base material. For example, a non- stick
finish on aluminum cookware will take on the properties of aluminum.
Refer to the following chart as a guide to the physical properties of cookware.
COOKWARE
Aluminum
Cast iron
Ceramic or glass-ceramic
Copper
Earthenware
Porcelain enameled steel or cast
iron
Stainless steel
PROPERTIES
•
Heats quickly and evenly
•
Suitable for all types of cooking
•
Medium or heavy thickness is best for most cooking tasks.
•
Heats slowly and evenly
•
Good for browning and frying
•
Maintains heat for slow cooking.
•
Follow the manufacturer’s instructions
•
Heats slowly but unevenly
•
Best results with low to medium heat settings.
•
Heats very quickly and evenly
•
Follow the manufacturer’s instructions
•
Use low heat settings
•
See stainless steel or cast iron
•
Heats quickly but unevenly
•
Stainless steel cookware with aluminum or copper as a core
material or bottom provides even heating.
16
Instructions for the User
6. USING THE OVEN
6.1 General Instructions
NOTE: Before using the oven for the first time, pre-heat it to the maximum temperature (500°F), and
operate long enough to burn away any oily residue remaining from the manufacturing process that could
give the food a bad taste. After a power failure, the display will flash at regular intervals, showing 0:00. To
adjust, refer to paragraph “4. Electronic oven programmer”.
BURN HAZARD
To prevent burns caused by steam in the oven, open the
WARNING
door in two stages: partially open (approximately 5 cm or
2 inches) for 4- 5 seconds, long enough to permit the
steam to escape, and then fully open.
When accessing the food in the oven, always leave the
door open the shortest possible time to prevent the oven
temperature from falling and ruining the food.
6.2 Oven light
It illuminates when the oven function selector knob is turned to any oven function.
6.3 Storage compartment
The storage drawer is located at the bottom of the range, underneath the oven.
To open, pull the top of the drawer.
NOTE: Never store flammable materials, such as rags, paper or similar items, in this drawer. It is
intended for the storage of metal accessories for the range.
CAUTION: Never open the storage compartment when the oven is on and still hot: the internal
temperature may be exceedingly high.
17
Instructions for the user
7. AVAILABLE ACCESSORIES
The oven features 4 rack supports for arranging oven trays and racks at different
heights.
Oven rack: for cooking food on oven trays, small cakes, roasts or food
requiring light broiling.
Oven pan: used to catch drippings from foods placed on the rack above and
for baking cakes, pizza and desserts.
Special pan stand: used for the wok.
18
Instructions for the User
8. COOKING HINTS
WARNING
BURN HAZARD
Keep the oven door closed during cooking.
NOTE: Do not line the bottom of the oven with aluminum or tin foil or place pans or oven trays on this surface as
this may damage the enamel oven lining. If you wish to use waxed paper in the oven, position it so that it does
not interfere with the circulation of hot air inside the oven.
In fan-assisted mode, the oven should be preheated to 90-100°F above the recommended cooking temperature.
This considerably shortens the cooking time, reduces power consumption and provides more even cooking.
8.1 Conventional cooking
OVEN FUNCTION SELECTOR KNOB
OVEN THERMOSTAT CONTROL KNOB FROM 120° TO 500°F
In conventional cooking, heat circulates from bottom to top; this is ideal for cooking food on a single rack.
Preheat the oven to the desired temperature and put the food in the oven only after the thermostat
indicator light has gone out. Very fatty meats may be put in when the oven is still cold. Frozen meat can
be placed directly in the oven without waiting for it to thaw. However, set the temperature about 70°F
lower and allow 25% more time for cooking.
NOTE: Use pans with deep sides to prevent oil/grease from splattering and soiling the
walls of the oven.
19
Instructions for the user
8.2 Convection cooking
OVEN FUNCTION SELECTOR KNOB
OVEN THERMOSTAT CONTROL KNOB FROM 120° TO 500°F
Covention can be used to cook food simultaneously on several rack positions, even when different types
of food (fish, meat etc.) are being prepared, without mixing tastes and aromas. Air circulation in the oven
ensures uniform distribution of heat. Pre-heating is not necessary.
NOTE: Simultaneous cooking of multiple foods is possible as long as the cooking temperature required
for the different foods is the same.
8.3 Broiler
OVEN FUNCTION SELECTOR KNOB
OVEN THERMOSTAT CONTROL KNOB AT MAXIMUM AND
OVEN DOOR CLOSED
Browns food rapidly. It is recommended to place the broiling pan in the highest rack.
For short cooking times for small quantities, place the rack on the third runner from the bottom. For
longer cooking times and for broiling, put the rack on the lowest runner depending on the size of the
food.
NOTE: Keep the oven door closed during cooking.
20
Instructions for the User
8.4 Convection broil
OVEN FUNCTION SELECTOR KNOB
OVEN THERMOSTAT CONTROL KNOB AT MAXIMUM AND
OVEN DOOR CLOSED
Convection provides uniform distribution of heat and greater heat penetration. Food will be lightly
browned on the outside and tender inside.
NOTE: Keep the oven door closed during broiling. Broiling time must not exceed 60 minutes.
8.5 Defrosting
OVEN FUNCTION SELECTOR KNOB
OVEN THERMOSTAT CONTROL KNOB ON 0
The flow of air generated by the fan ensures rapid defrosting.
The air circulating inside the oven is at room temperature.
NOTE: The advantage of defrosting at room temperature is that it does not alter the taste or appearance
of the food.
21
Instructions for the user
8.6 Recommended cooking chart
Cooking times, especially of meat, can vary according to the thickness and quality of the food as well as
personal taste.
CONVENTIONAL COOKING
FIRST COURSES
LASAGNA
OVEN-BAKED PASTA
MEAT
ROAST VEAL
ROAST BEEF
ROAST PORK
CHICKEN
DUCK
GOOSE - TURKEY
RABBIT
LEG OF LAMB
FISH
PIZZA
DESSERTS
SMALL PASTRIES
BUNDT CAKE
TARTS
FRUIT CAKE
CRUMB CAKE
APPLE CAKE
RICE CAKE
(*) = PREHEATED OVEN
22
RACK
POSITION
TEMPERATURE
(°F)
TIME IN
MINUTES (*)
2-3
2-3
390 - 410
410 - 450
50 - 60
40
2
2
1-2
1-2
2
2
2
2
350 - 390
410 - 470
350 - 400
350 - 400
350 - 400
300 - 350
350 - 400
350 - 400
1
338 - 392
1-2
430 - 470
15 - 20 /LB.
15 - 20 /LB.
100 - 110
80 - 90
110 - 130
45 - 60
100 - 120
40 - 50
ACCORDING TO THE
SIZE OF THE FISH
20 - 25
1-2
1-2
1
1-2
1-2
1
1
340 - 400
340
360 - 400
340 - 400
320
400
360
15 - 20
60 - 70
30 - 40
20 - 30
60
60
60 - 70
Instructions for the User
BROIL
RACK
POSITION
PORK CHOPS
FILLET OF PORK
FILLET OF BEEF
LIVER
VEAL CHOPS
HALF CHICKEN
SAUSAGES
MEATBALLS
FILLET OF FISH
TOAST
TIME IN
MINUTES (*)
FIRST SIDE
SECOND SIDE
5-7
7-9
5-9
9 - 11
9 - 11
9 - 11
2-3
2-3
5-7
7-9
9 - 11
9 - 14
5-6
7-9
5-6
7-9
3-4
5-6
2-3
2-4
4
3
3
4
4
3
3
3
3
3
CONVECTION COOKING
RACK
POSITION
TEMPERATURE
(°F)
TIME IN
MINUTES (*)
FIRST COURSES
LASAGNA
OVEN-BAKED PASTA
MEAT
ROAST VEAL
ROAST PORK
ROAST BEEF
FILLET OF BEEF
ROAST LAMB
ROAST BEEF
ROAST CHICKEN
ROAST DUCK
ROAST TURKEY BREAST
ROAST RABBIT
ROAST HARE
ROAST PIGEON
2
2
370 - 400
370 - 400
40 - 50
25 - 30
1-2
1-2
1-2
1-2
1-2
1-2
1-2
1-2
1-2
1-2
1-2
1-2
300 - 340
300 - 320
320 - 340
320 - 360
270 - 300
340 - 360
340
340 - 360
320 - 340
320 - 340
320 - 340
280 - 340
FISH
2-3
302 - 338
PIZZA
BREAD
TOAST
DESSERTS
BUNDT CAKE
FRUIT CAKE - FRUIT FLAN
TARTS
SMALL PASTRIES
RICE CAKE
APPLE CAKE
CRUMB CAKE "TORTA
PARADISO"
2-3
2-3
1-2
410 - 450
370 - 400
430 - 470
65 - 90
70 - 100
65 - 90
35 - 45
100 - 130
40 - 45
70 - 80
100 - 120
90
80 - 100
30 - 50
15 - 25
ACCORDING TO THE
SIZE OF THE FISH
15 - 20
40
7
2-3
2-3
2-3
2-3
2-3
2-3
2-3
300 - 340
340 - 380
320 - 340
340 - 360
340
360
320
35 - 45
65 - 40
20 - 25
20
50 - 60
60
60
(*) = PREHEATED OVEN
23
Instructions for the user
9. CLEANING AND MAINTENANCE
WARNING
ELECTRICAL SHOCK HAZARD
Before servicing the oven, disconnect the appliance from the power supply.
9.1 Cleaning stainless steel parts
NOTE: To maintain stainless steel in good condition it should be regularly cleaned after use. Let steel
parts cool first.
9.1.1 Routine Daily Cleaning
To clean and preserve stainless steel surfaces, use only specific products that do not contain abrasives
or chlorine-based acids.
How to use: pour the product onto a damp cloth and wipe the surface, then rinse thoroughly and dry
with a soft cloth or deerskin.
9.1.2 Food stains or residues
Do not use metallic scouring pads or sharp scrapers: they will damage the surface of the
appliance.
Use standard non-abrasive products and a wooden or plastic scraping tool if necessary. Rinse
thoroughly and dry with a soft cloth or deerskin.
Do not allow residues of sugary foods (such as jam) to set inside the oven. If allowed to set for
too long, they will pit the enamel lining of the oven.
9.2 Cleaning of rangetop parts
9.2.1 Grates
Remove the grates. Clean with warm water and non-abrasive detergent, removing any crusty build-up.
Replace the grates on the rangetop.
9.2.2 Burner caps, burner rings and grates
The burner caps and burner rings can be removed for easier cleaning. Wash them in hot water and with
non-abrasive detergent, ensuring that all deposits are removed, and put them aside for complete drying.
NOTE: Replace the burner caps on the burner rings, making sure that the slots A are
perfectly aligned with the projections on the burners.
Never wash these parts in the dishwasher.
9.2.3 Spark electrodes and thermocouples
For best performance, the spark electrode and the thermocouple must always be kept
very clean. Check them frequently and if necessary wipe down with a damp cloth.
Remove any burnt residue with a wooden toothpick or a straight pin or needle.
24
Instructions for the User
9.3 Cleaning the oven
NOTE: To ensure the longevity of your appliance, you should clean the oven regularly. Allow the oven to
cool before cleaning. Take out all removable parts.
Clean the oven rack and rack supports with hot water and
non-abrasive detergent. Rinse and dry.
9.4 Oven door glass
The oven door glass should always be kept clean. Use absorbent kitchen paper towels to clean. In case
of tough spots, clean with a damp sponge using a standard household detergent.
NOTE: Do not use abrasive or corrosive cleaners to clean the oven door glass (e.g. powders, spray-on
oven cleaners, stain removers or steel wool pads).
Do not use rough or abrasive materials or sharp metal scrapers to clean the oven door glass as they can
scratch the surface or cause the glass to break.
25
Instructions for the user
10.SPECIAL MAINTENANCE
The oven may require special maintenance or replacement of parts subject to wear such as gaskets,
bulbs, etc. The following instructions describe how to perform these minor maintenance operations.
WARNING
ELECTRICAL SHOCK HAZARD
Before servicing, disconnect the appliance from the power supply.
10.1 Replacing the oven light bulb
Remove cover A by twisting counterclockwise,
replace bulb B with a similar bulb. Replace the cover A.
NOTE: Use only oven bulbs (T 600°F).
10.2 Removing the oven door
Open the door completely and insert the pins (supplied)
into the slots from the inside.
Close the door to an angle of about 45° and lift the door
to remove it. To replace, fit the hinges into the slots, then
lower the door until it comes to rest and extract the pins.
If the pins are lost, two screwdrivers can also be used.
10.3 Removing the oven door gasket
To thoroughly clean the oven, the oven door gasket may be removed. Before removing the
gasket, remove the oven door as described above. Lift the tabs at the corners as shown in
the figure.
10.4 Lubricating the surface burner gas valves
Over time, the surface burner gas stems may become stiff or jam. Clean them internally and
relubricate. This operation must be carried out by a qualified technician.
26