1
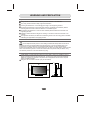
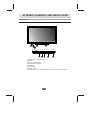
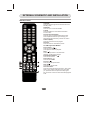
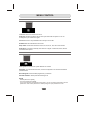
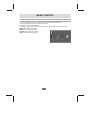
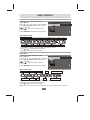
CONTENTS
CONTENTS ........................................................................................................... 1
WARNING AND PRECAUTION ......................................................................... 2-4
FUNCTIONS AND FEATURES ............................................................................. 5
EXTERNAL SCHEMATIC AND INSTALLATION .............................................. 6-10
Front Panel .................................................................................................... 6
Back Panel .....................................................................................................7
Remote Control ........................................................................................ 8-10
MENU CONTROL .......................................................................................... 11-15
Menu Operation ..........................................................................11
Picture .......................................................................................................... 11
PC .................................................................................................................12
Sound ...........................................................................................................12
Installation ....................................................................................................13
Setup ............................................................................................................13
Time ..............................................................................................................14
Advanced ......................................................................................................14
USB Menu ....................................................................................................15
USB CONTROL ............................................................................................. 16-17
Video Menu ...................................................................................................16
Music Menu ..................................................................................................16
Photo Menu ..................................................................................................17
Text Menu .....................................................................................................17
TROUBLESHOOTING .........................................................................................18
SPECIFICATIONS ...............................................................................................19
-1-
WARNING AND PRECAUTION
Read all of the instructions before operating the set. Keep these instructions well for later use.
Warning
Only use attachments/accessories specified or provided by the manufacturer (such as the
exclusive supply adapter, battery etc).
Please refer the information on exterior back enclosure for electrical and safety information
before installing or operating the apparatus.
To reduce the risk of fire or electric shock, do not expose this apparatus to rain or moisture.
The ventilation should not be impeded by covering the ventilation openings with items, such
as newspaper, table-cloths, curtains, etc.
The apparatus shall not be exposed to dripping or splashing and that no objects filled with
liquids, such as vases, shall be placed on the apparatus.
For the terminals marked with symbol of " " may be of sufficient magnitude to constitute a
risk of electric shock. The external wiring connected to the terminals requires installation by
an instructed person or the used of ready-made leads or cords.
To prevent injury, this apparatus must be securely attached to the floor/wall in accordance with
the installation instructions.
Danger of explosion if battery is incorrectly replaced. Replace only with the same or
equivalent type.
The battery (battery or batteries or battery pack) shall not be exposed to excessive heat such
as sunshine, fire or the like.
Excessive sound pressure from earphones and headphones can cause hearing loss.
Listening to music at high volume levels and for extended durations can damage one's hearing.
In order to reduce the risk of damage to hearing, one should lower the volume to a safe,
comfortable level, and reduce the amount of time listening at high levels.
The mains plug is used as disconnect device, the disconnect device shall remain readily
operable.
When not in use and during movement, please take care of the power cordset, e.g. tie up the
power cordset with cable tie or something like that. It shall be free from sharp edges and the
like that can cause abrasion of the power cordset. When put into use again, please make sure
the power cordset being not damaged, If any damages found, please look for the service
person to replace the power cordset specified by the manufacturer or have the same
characteristics as the original one.
Explanation of symbol, marking, signal lamp or similar means indicate that apparatus is
completely disconnected from the mains.
Attention should be drawn to environmental aspects of battery disposal.
No naked flame sources, such as lighted candles, should be placed on the apparatus.
To prevent the spread of fire, keep candles or other open flames away from this
product at all times.
Each USB terminal shall be loaded with 500mA under normal operation.
-2-
WARNING AND PRECAUTION
Important Information for Australia
Using cabinets or stands recommended by the manufacturer of the television.
Only using furniture that can safely support the television.
Ensuring the television is not overhanging the edge of the supporting furniture.
Not placing the television on tall furniture(for example, cupboards or bookcases) without
anchoring both the furniture and the television to a suitable support.
Not standing the television on cloth or other materials placed between the television and
supporting furniture.
Educating children about the dangers of climbing on furniture to reach the television or its
controls.
The apparatus should be provided with a restraining device such as a fixing point to facilitate
restraining the apparatus from toppling forward.
WEEE Directive
Correct Disposal of this product. This marking indicates that this product should not be
disposed with other household wastes throughout the EU. To prevent possible harm to the
environment or human health from uncontrolled waste disposal, recycle it responsibly to
promote the sustainable reuse of material resources. To return your used device, please use the
return and collection systems or contact the retailer where the product was purchased. They
can take this product for environmental safe recycling.
Positioning The TV Set
Install Display on solid horizontal surface such as a table or desk. For ventilation, leave a
space of at least 10cm free all around the set. To prevent any fault and unsafe situations,
please do not place any objects on top of the set. This apparatus can be used in tropical
and/or moderate climates.
Fixing the rear of enclosure to wall. (only for AU market)
10CM
10CM
10CM
10CM
-3-
WARNING AND PRECAUTION
Operating Environment
Do not install this equipment in a confined space such as a bookcase or similar unit.
Do not use the set near damp, and cold areas, protect the set from overheating.
Keep away from direct sunlight.
Do not use the set near dust place.
Do not attach candle to accessible opening area, to avoid flammable foreign material from
entering the TV.
Precautions For Using Remote Control
Use the remote control by pointing it towards the remote sensor. The items between the
remote control and the remote sensor will interfere the normal operation.
Do not make remote control vibrate violently. Also, do not splash liquid on the
remote control, also do not put the remote control in high humidity place.
Do not place remote control under direct sunlight which will cause deformation
of the unit by heat.
When the remote sensor is under direct sunlight or strong lighting, the remote
control will do not work. If so please change the lighting or TV's position, or
operate the remote control closer to the remote sensor.
Precautions For Using Battery
Improper using of the battery will cause leakage. So please do as the following methods
and use carefully.
1. Please note the batteries' polarity, to avoid short circuit.
2. When the battery's voltage is insufficient which affect the use range, you should replace
new battery. Remove the batteries from the remote control unit if you do not intend to use it for a
long time.
3. Do not use different types of batteries( for example, Manganese and Alkaline batteries)
together.
4. Do not put the battery into fire, and charge or decompose the battery.
5 .Please dispose batteries abide by relevant environmental protection regulation.
Installation Of Remote Control Battery
Place two AAA size batteries in the remote controls battery compartment, making sure to
match the polar-ity markings inside the compartment.
Note: Pictures are only for reference. Actual items may differ.
1 Open.
2 Make sure the
polarity is correct.
-4-
3 Close.
FUNCTIONS AND FEATURES
Brief Introduction:
Thanks for your purchase of our digital high-definition LED television! This product with diverse
functions is designed to fulfill the optimum requirements from commercial, industrial and
household uses. LED television possesses the display function of both TV and PC. It features
advanced picture performance, smaller in size and lighter in weight, meanwhile, consumes less
power and makes no radiation. The new generation LED provides you with comfortable, safe
and environmental protection feeling. Some description could be little different base on different
model.
Basic Function
1. Auto and manual tuning.
2. AV and COMPONENT inputs are available.
3. Full-function infrared remote control.
4. Sleep timer and program recall shortcut.
5. Narrow design of ultra-thin ultra-light.
6. Various input source modes( ATV / AV / COMPONENT / PC / HDMI / USB1 / USB2).
PC Monitor Functions
1. Auto resizing & centering, perfect geometric graphic.
2. Supports PC sound source input.
3. Supports 800x600, 1024x768, 1360x768, PC formats, refresh rate is 60Hz.
Features
1. Embedded digital color gain control circuit, provides better brightness and reality.
2. Embedded 3D comb filter.
3. Black/white Level Stretch Circuit.
4. High class LCD screen features, high brightness, high contrast and wide viewing angle,
responding fast.
5. Component input supports 1080P high definition signal formats.
6. Support HDMI input.
7. This TV can be used as a high-performance PC monitor for it has a VGA interface.
Computer sound source can also be supported to realize the multimedia function.
8. Low power consumption in standby mode to save energy.
9. Latest high integrated digital processor chip.
-5-
EXTERNAL SCHEMATIC AND INSTALLATION
Front Panel
Note: The graphics are for representation only.
1
2
2
7
6
5
4
3
1.Power Indicator / Remote Sensor
2.Speakers
3.Program Up/Down Button
4.Volume Up/Down Button
5.Menu Button
6.Source Button
7.Standby Button
(Functions as OK button when main menu or source menu shows on the TV.)
-6-
EXTERNAL SCHEMATIC AND INSTALLATION
Back Panel
Note: The graphics are for representation only.
USB1
5V 500mA
USB2
5V 500mA
19
19
8
1
1
PC IN
2
PC
AUDIO IN
3
ANTENNA
IN
4
S/PDIF
5
LEFT
RIGHT
AUDIO IN
6
Pb
HDMI2
HDMI IN
7
Pr
HDMI3
COMPONENT
Y/VIDEO
HDMI1
IN
1. HDMI1\HDMI2\HDMI3: Connect HDMI input signal from signal source such as DVD.
2. PC IN: Connect a PC via a VGA cable.
3. PC AUDIO IN: Audio input for PC and Audio input for HDMI when the signal is DVI timing.
4. ANTENNA IN: Connect a coaxial cable to receive signal from the antenna or cable.
5. S/PDIF: Use a 75 ohm coaxial cable to connect your TV to a compatible audio receiver. You
can use the S/PDIF interface as digital audio output,in order to achieve better sound quality.
6. AUDIO IN: Connect AUDIO input signal from signal source such as DVD.
7. COMPONENT(Y/VIDEO Pb Pr IN): Connect COMPONENT signal from signal source
such as DVD. VIDEO share the same port with Y port.
8. EARPHONE: Audio output, speakers will be muted when earphone is plugged in and the
headphone is selected; speaker will be not muted when an audio output plug
is inserted and line output in the menu is selected. The output audio signal is
needed when TV connects to other audio instruments, such as an audio
amplifier. You can use the EARPHONE interface as anolog audio output in
order to achieve better sound quality.
9. USB1\USB2: USB port.
-7-
EXTERNAL SCHEMATIC AND INSTALLATION
Remote Control
1.POWER( )
Press to turn the TV on or standby.
1
2
4
3
5
2.Mute( )
Press to mute or restore the volume.
3.Picture Mode(P.M.)
Press to select the desired picture mode.
6
4.Sound Mode(S.M.)
Press to select the desired sound mode.
5.Zoom
Press to the desired picture format.
7
8
6.Number buttons
Press to set the TV channel directly.
9
10
7.Return Button
Press to return to the previously viewed channel.
12
11
13
15
14
16
17
18
8.QUICK
No use.
9.Menu
Press to enter or exit from the TV menu.
10.Source
Press to select the input source mode.
11.Up/Down/Left/Right( / / / )
Press to select or adjust the desired item on the
TV menu.
12.OK button
Press to confirm and execute the selection.
13.Exit
Press to exit from any menu.
14.Information (INFO.)
Press to display the current information including
screen format, source, etc.
15.3D
This TV is not a 3D TV.The 3D button on the
remote will not work and is not to be used.
16.Volume Up/Down(V+/V-)
Press to adjust the volume.
17.Program Up/Down(PR+/PR-)
Press to select previous/next channel.
18.NICAM (Option)
Press to select desired sound output(Mono,Stereo
or NICAM)depending on the broadcasting channel.
-8-
EXTERNAL SCHEMATIC AND INSTALLATION
Remote Control
19
20
21
23
22
24
25
26
19.SLEEP
Press to set the length of time to switch the TV to
standby mode.
20.Subtitle
Press to open or close the subtitle.
21.EPG
Press to display the current EPG information
in DTV mode.
22.Favorite Channel(FAV.)
Press to view your assigned favorite channels.
Press Up/Down buttons to cycle through your
assigned favorite channels, press OK to confirm.
23.Record(REC)
Press to record the current program.
24.Freeze
Press to freeze or unfreeze the picture.
25. USB Play Control Buttons
Play & Pause (
)
Press to pause playback,
press again to continue playback.
Stop (
)
Press the stop button to exit full-screen
playback, access to the preview.
Fast Backward Button(
)
Press to fast reverse.
Fast Forward (
)
Press to fast forward.
Previous (
)
Press to play the previous file.
Next (
)
Press to play the next file.
26.Color buttons
Press to execute the prompt function in DTV mode.
Note: In DTV mode, PVR done at any time after
you press this button to eject the PVR program
list, the list can choose to watch recorded programs
PVR.
-9-
EXTERNAL SCHEMATIC AND INSTALLATION
Remote Control
27.TEXT Buttons(Option)
Press to enter the teletext menu.
INDEX
Press this button to display index page.
CANCEL
Press this button to return to TV
program temporarily while searching for
a Teletext page. When the search is
done, the page number will be displayed
on the upper left of the screen.
Press again to return to the Teletext page.
HOLD
Press to hold the teletext page on screen
without update and changes. Press again to
release the hold state. When not in teletext
mode, press this button to freeze the picture
display.
Note: In non-teletext mode and non-USB
mode, the button is "FREEZE".
SIZE
Enlarge the teletext display: Press this
button once to enlarge upper half of the
screen. Press this button again to
enlarge lower half of the screen. Press
this button again to resume to normal
screen size.
27
REVEAL
Press this button to display concealed
information, such as solutions to riddles
or puzzles. Press again to remove the
information from the display.
MIX
Press this button to superimpose the
teletext over the TV program.
Press again to return to normal teletext
mode.
SUB-PAGE
Press this button to enter or exit
subpage mode (if subpage is available).
Press Red / Green buttons to select the
desired subpage.
-10-
MENU CONTROL
Menu Operation
Press
Press
Press
Press
Press
"MENU" key to enter the main menu .
the[ ] / [ ] key to select a menu.
the[ ] / [ ] key to select a item.
"OK" key to enter the item.
"MENU" key to exit the item.
PICTURE
Picture Mode
Color Temperature
Display Mode
DNR
Backlight
PC
27
PICTURE
Picture Mode: Contain "Normal", "Soft", "Personal", "Bright" four modes .
Contrast: Adjusts the difference between the light and dark areas of the picture. To get
better picture value, Contrast should be adjusted to the proper value.
Brightness: Adjusts the brightness of the picture, and usually is adjusted together
with Contrast.
Color: Adjusts the richness of colour. This function is not available in PC mode.
Sharpness: Adjusts the sharpness of the picture. This function is not available in PC mode.
Tint: Adjust the tint of the picture. Only can be done under the NTSC system.
Color Temperature: Contain "Neutral","Warm", "Cool" three modes.
Display Mode: Contain "16:9", "4:3", "Auto", "Panorama", "Just Scan ", "Caption ","Movie" seven
modes.(Some options are not visible at some sources).
DNR: Contain "High", "Off", "Low", "Middle" four modes .
Backlight: Contain "Low", "Middle", "High" three modes .
-11-
MENU CONTROL
PC
Auto Adjust
H.Position
V.Position
Frequency
Phase
PICTURE
Auto Adjust: Adjust PC size and position.
H.Position: Adjust the H.Position of the television.
V.Position: Adjust the V.Position of the television.
Frequency: Adjust the updating frequency of the picture.
Phase: Adjust the phase of the picture.
SOUND
Sound Mode
Balance
AVL
Surround
SPDIF Mode
SOUND
Sound Mode: Contain "Standard", "Music", "Film", "News" and "Personal".
Balance: Control the sound balance between the right and left loudspeaker (earphone).
AVL: This function may be set as On or Off.
Surround: Contain On and Off.
SPDIF Mode: Options include PCM and AUTO.
-12-
MENU CONTROL
INSTALLATION
Auto Search
DTV Manual Search
ATV Manual Search
Programme Edit
Signal Information
INSTALLATION
Auto Search: Search and save all programs at current source by automatically.
DTV Manual Search: Search and save the digital programs at AIR source by manually.
ATV Manual Search: Search and save the analog programs at current source by
manually.
Programme Edit: Edit the programs. You can skip the programs or add the programs in
the favorite list.
Signal Information: Showing the information of current DTV channel.
SETUP
OSD Language
TTX Language
PVR File System
Sticker Demo
User Reset
SETUP
OSD Language: Select you desired OSD language.
TTX Language: Select you desired teletext language.
PVR File System: Personal Video Record setting. If you want to use this function, you
must receive a digital program and plug a USB disk.
Sticker Demo: Functional demo switch.
User Reset: Set to the factory default mode.
-13-
MENU CONTROL
TIME
Time Zone
Auto Sync
Clock
SummerTime
Sleep Timer
Auto Sleep
TIME
TIME
Time Zone: Select the desired Time Zone.
Auto Sync: Contain On,Off.Can set TV time synchronize with the system or not. It is
working when you receive DTV signal.
Clock: Set the time. Only available when Auto Sync is set to Off.
Summer Time: Choose between On and Off.
Sleep Timer: Set the auto Off time to Off,10, 20, 30, 60, 90, 120, 180 or 240 minutes.
Auto Sleep: TV set auto to standby when there is no signal. Contain Off, 4Hours, 6Hours
and 8Hours four options.
ADVANCED
Lock System
Set Password
Block Program
Parental Control
ADVANCED
Lock system: Switch the lock system between On and Off.
Password: To enter the lock sub-menu, set the Lock System to On and enter the default
password:0000.
Block Program: Set the blocked programmers you desired.
Parental Guidance: Set the parental controlling level.
NOTE:
- Default password is [0000].
- The Super password is [8899].
In the event whereby new password is forgotten, you can use Super Password as the old
password to reset a new password. Or directly using the super password to enter.
-14-
MENU CONTROL
USB Menu
You can view video, music, photo and text files from your USB storage devices.
1.Connect USB storage device to USB input terminal.
2.Press the source to select the USB.
3.Press [ ] / [ ] to select the types of media modes: VIDEO, MUSIC, PHOTO and TEXT.
VIDEO:Play videos from USB.
MUSIC:Play music from USB.
PHOTO:View photos from USB.
TEXT:View text files from USB.
USB 2.0
VIDEO
-15-
MUSIC
PHOTO
TEXT
USB CONTROL
Video Menu
1.Press [ ] / [ ] to select VIDEO. Press
[ OK ] to enter.
2.Press [ ] / [ ] or [ ] / [ ] to select the desired
folder and press [ OK ] to open the folder, press
[ ] to start playing.
3.Press [ ] to stop movie playing and return
to video list.
4.Press "RETURN" to the previous menu screens.
C: \Video
VIDEO
MUSIC
PHOTO
[0] Delete
TEXT
[RETURN] Return
.flv
1/1
Video Control Bar
Pause
Fast Forward Next
Play Mode List
A
Fast Reverse
Previous
Selection Play
Zoom In Move
A/B
-
Stop Repeat Play Current Information Zoom Out
- Press [ INFO ] to display Video Control Bar while playing the video.
- Press [ ] / [ ] to select the desired settings.
- Press [ ] to exit from Video Control Bar.
Music Menu
1.Press [ ] / [ ] to select MUSIC. Press
[ OK ] to enter.
2.Press [ ] / [ ] or [ ] / [ ] to select the desired
folder and press [ OK ] to open the folder, press
[
] to start playing.
3.Press [ ] to stop music playing and return
to music list.
4.Press "RETURN" to the previous menu screens.
C: \Music
VIDEO
MUSIC
PHOTO
TEXT
[0] Delete [RETURN] Return
.mp3
1/1
Music Control Bar
Pause
Fast Forward Next Play Mode
List
Current Information
A
Fast Reverse
Previous
Stop
Mute
Search Time Set
- Press [ INFO ] to display Music Control Bar while playing the music.
- Press [ ] / [ ] to select the desired settings.
- Press [ ] to exit from music Control Bar.
Note:For lyric function to work, the music and lyric files must be named in the same.
-16-
USB CONTROL
Photo Menu
1.Press [ ] / [ ] to select PHOTO. Press
[ OK ] to enter.
2.Press [ ] / [ ] or [ ] / [ ] to select the desired
folder and press [ OK ] to open the folder, press
[
] to start playing.
3.Press [ ] to stop picture playing and return
to picture list.
4.Press "RETURN" to the previous menu screens.
C: \Photo
MUSIC
VIDEO
PHOTO
TEXT
[0] Delete [RETURN] Return
.bmp
1/1
Photo Control Bar
Pause
Play Mode
Next
Clockwise
90 Degrees
List
A
Stop
Previous
Zoom In Zoom Out
90
90
Background Music
Current
Information
+
-
Counterclockwise
90 Degrees
Move
- Press [ INFO ] to display Photo Control Bar during photo slide show.
- Press [ ] / [ ] to select the desired settings.
- Press [ ] to exit from photo Control Bar.
Text Menu
1.Press [ ] / [ ] to select TEXT. Press [ OK ]
to enter.
2.Press [ ] / [ ] or [ ] / [ ] to select the desired
folder and press [ OK ] to open the folder, press
[
] to start playing.
3.Press [ ] to stop text playing and return to
text list.
4.Press "RETURN" to the previous menu screens.
C: \Text
VIDEO
MUSIC
PHOTO
TEXT
[0] Delete [RETURN] Return
.txt
1/1
Text Control Bar
Fast Reverse
Previous
Fast Forward
Next
Stop
List
Background Music Current Information
- Press [ INFO ] to display Text Control Bar while reading the text.
- Press [ ] / [ ] to select the desired settings.
- Press [ ] to exit from Info bar.
Note:The txt document supports up to 1000 pages. It supports *.txt files.(English character)
-17-
TROUBLESHOOTING
Before calling a service technician, review following information for possible causes and solutions for the problem
you are experiencing.
NO PICTURE, NO SOUND
SNOWY DOTS AND INTERFERENCE
1. Check if the fuse or circuit breaker is working.
2. Plug another electrical device into the outlet to
make sure it is working or turned on.
3. Power plug is bad contact with the outlet.
4. Check the signal source.
If the antenna is located in the fringe area of a
television signal where the signal is weak, the
picture may be marred by dots. When the signal
is extremely weak, it may be necessary to install
a special antenna to improve the reception.
1. Adjust the position and orientation of the
indoor/outdoor antenna.
2. Check the connection of antenna.
3. Fine tune the channel.
4. Try another channel. Broadcasting failure may
happen.
NO COLOR
1. Change the color system.
2. Adjust the saturation.
3. Try another channel. Black-white program may
be received.
IGNITION
REMOTE CONTROL DOES NOT WORK
Black spots or horizontal streaks appear, or the
picture flutters or drifts. This is usually caused by
interference from car ignition system, neon lamps,
electric drills, or other electrical appliance.
1. Change the batteries.
2. Batteries are not installed correctly.
3. Main power is not connected.
NO PICTURE, NORMAL SOUND
GHOST
1. Adjust the brightness and contrast.
2. Broadcasting failure may happen.
Ghosts are caused by the television signal
following two paths. One is the direct path, the
other is reflected from tall buildings, hills, or other
objects. Changing the direction or position of the
antenna may improve the reception.
NORMAL PICTURE, NO SOUND
1. Press the volume up button to increase volume.
2. Volume is set to mute, press MUTE to restore
sound.
3. Change the sound system.
4. Broadcasting failure may happen.
RADIO FREQUENCY INTERFERENCE
UNORDERLY RIPPLES ON THE PICTURE
This interference produces moving ripples or
diagonal streaks, and in some case, loss of
contrast in the picture. Find out and remove the
radio interference source.
It is usually caused by local interference, such as
cars, daylight lamps and hair driers. Adjust the
antenna to minimize the interference.
Note:
If the problem persists after solutions, please
contact your local support centre.
BLANK SCREEN IN PC MODE
Perhaps the TV can not recognize the resolution set
by the PC. Suggest to change to the best resolution
or other standard resolutions of Windows system.
Set refresh rate to be 60Hz.
-18-
SPECIFICATIONS
Screen size - diagonal:
81cm
1366X768
Screen resolution:
Audio output power (L+R):
6W + 6W
Working voltage:
100-240V~50/60Hz
Rated power consumption:
65W
740.4 X 489.4 X 190mm
Dimensions (W x H x D):
5.3Kg
Net weight:
Environment(only for Tropical climates zone):
o
o
Working temperature: 5 C~45 C
Working humidity: 20%~80%
o
o
Storage temperature: -15C~50
C
Storage humidity: 10%~90%
Environment(only for Moderate climates zone):
o
o
Working temperature: 5 C~35 C
Working humidity: 20%~80%
o
o
Storage temperature: -15C~45
C
Storage humidity: 10%~90%
Channel Coverage: 43.25~869.25MHz full range of RF input
System:
TV:PAL / SECAM-BG / DK, PAL-I, NTSC-M
AV:PAL, NTSC, SECAM
Preset programs: ATV: 100
Status displaying method: On screen display
Function adjustment indicator: Menu display
Language of OSD: Multiple options
RF aerial input: 75 ohm unbalanced
AV video input: 75 ohm, 1.0Vp-p, RCA
AV audio input: 10k ohm, 0.5Vrms
-19-