1
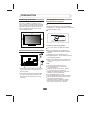
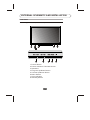
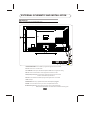
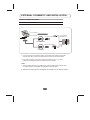
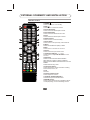
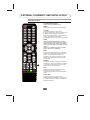
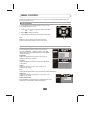
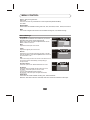
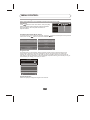
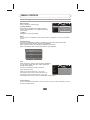
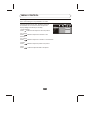
Instruction Manual
42E66A
CONTENT
CONTENT ........................................................................................................1
WARNINGS AND PRECAUTIONS ...............................................................2-3
INTRODUCTION, FUNCTIONS AND FEATURES ...........................................4
PREPARATION ................................................................................................5
Positioning The TV Set .............................................................................5
Antenna And Power Connections .............................................................5
Inserting Batteries In The Remote Control Handset .................................5
EXTERNAL SCHEMATIC AND INSTALLATION ......................................... 6-11
Front Panel ............................................................................................... 6
Back Panel ................................................................................................7
Antenna/Cable Connection .......................................................................8
Remote Control ....................................................................................9-11
PERSONAL VIDEO RECORDING(PVR)......................................12-13
EPG(Electronic Program Guide)................................................................14-15
MENU CONTROL .....................................................................................16-21
Basic Operation ......................................................................................16
Picture Settings ......................................................................................16
Sound Settings .......................................................................................17
Channel Settings ....................................................................................18
Setup Settings ........................................................................................19
Advanced Settings ..................................................................................20
PC Settings .............................................................................................21
TROUBLESHOOTING ...................................................................................22
SPECIFICATIONS .........................................................................................23
-1-
WARNINGS AND PRECAUTIONS
Read all the instructions before operating the set. Keep these instructions well for future
reference.
Warning
Only use attachments/accessories specified or provided by the manufacturer (such as the
exclusive supply adapter, battery etc).
Please refer the information on the exterior back of the appliance for electrical and safety
information before installing or operating the apparatus.
To prevent the risk of fire or electric shock, do not expose this apparatus to rain or moisture.
The ventilation should not be impeded by covering the ventilation openings with items such
as newspaper, table-cloths, curtains, etc.
The apparatus shall not be exposed to dripping or splashing and that objects filled with liquids,
such as vases, must not be placed on top of the apparatus.
For the terminals marked with symbol of “
” may be of sufficient magnitude to constitute a
risk of electric shock. The external wiring connected to the terminals requires installation by
an instructed person or using ready-made leads or cords.
To prevent injury, this apparatus must be securely attached to the floor/wall in accordance with
the installation instructions.
There is a danger of explosion if the battery is incorrectly replaced. Replace the battery
only with the same or equivalent type.
The battery (battery or batteries or battery pack) shall not be exposed to excessive heat such
as sunshine, fire or the like.
Excessive sound pressure from earphones and headphones can cause hearing loss.
Listening to music at high volume levels for extended durations can damage one’s hearing.
In order to reduce the risk of damage to hearing, one should lower the volume to a safe,
comfortable level, and reduce the amount of time listening at high levels.
The mains cable is used as a disconnect device, the disconnect device shall remain readily
operable.
When the TV is not in use or during movement,please take care of the power cord, e.g. tie
up the power cord with a cable tie and the like. It shall be free from sharp edges that can
cause abrasion of the power cord. When the TV is put into use again, please make sure the
power cord has not been damaged. If any damages found, please contact the service centre
to replace the power cord specified by the manufacturer.
Explanation of symbol, marking, signal lamp or similar means indicate that apparatus is
completely disconnected from the mains.
Attention should be drawn to environmental aspects of battery disposal.
Naked flame sources, such as lighted candles, should not be placed on the apparatus.
To prevent the spread of fire, keep candles or other open flames away from this
product at all times.
Each USB terminal shall be loaded with 500mA under normal operation.
-2-
WARNINGS AND PRECAUTIONS
IMPORTANT INFORMATION FOR AUSTRALIA
Use cabinets or stands recommended by the manufacturer of the television.
Only use furniture that can safely support the television.
Ensure the television is not overhanging the edge of the supporting furniture.
Do not place the television on tall furnitures(for example, cupboards or bookcases) without
anchoring both the furniture and the television to a suitable support.
Do not place the television on cloth or other materials placed between the television and
supporting furniture.
Educate children about the dangers of climbing onto the furniture to reach the television or
its controls.
The apparatus should be provided with a restraining device such as a fixing point to facilitate
restraining the apparatus from toppling forward.
WEEE Directive
Correctly dispose this product. This symbol indicates that this product should not be
disposed with other household wastes throughout the EU. To prevent possible harm to the
environment or human health from uncontrolled waste disposal, recycle it responsibly to
promote the sustainable reuse of material resources. To return your used device, please use the
return and collection systems or contact the retailer where the product was purchased. They
can take this product for environmental safe recycling.
OPERATING ENVIRONMENT
Do not install this equipment in a confined space such as a bookcase or a similar unit.
Do not use the set near damp, and cold areas. Protect the set from overheating.
Keep away from direct sunlight.
Do not use the set near dusty places.
Do not attach candle to accessible area of the set to avoid flammable foreign material from
entering the TV.
-3-
INTRODUCTION, FUNCTIONS AND FEATURES
BRIEF INTRODUCTION:
Thanks for your purchase of our digital high-definition LED television! This product with
diverse functions is designed to fulfill the optimum requirements from commercial, industrial
and household uses. LED television possesses the display function of both TV and PC. It
features in advanced picture performance, smaller in size and lighter in weight. Meanwhile,
it consumes less power and makes no radiation. The new generation LED provides you with
a comfortable, safe and Eco-friendly feeling. Descriptions could be different with different
models.
BASIC FUNCTION
1. Auto and manual tuning.
2. AV and YPBPR inputs are available.
3. Full-function infrared remote control.
4. Sleep timer and program recall shortcut.
5. Ultra-thin & ultra-light.
6. A wealth of receptions: TV, AV, YPBPR, PC, HDMI and USB.
7. Digital Still Function.
8. Personal video recorder(PVR) with time-shifting.
PC MONITOR FUNCTIONS
1. Auto resizing & centering with perfect geometric graphic.
2. Supports PC sound source input.
3. Supports 640x480,800x600,1024x768,1280x1024, PC formats, refresh rate is 60Hz.
FEATURES
1. Embedded digital color gain control circuit that provides better brightness and reality.
2. Embedded 5-line comb filter.
3. Black & white level stretch circuit.
4. High class LED screen features in high brightness, high contrast, wide viewing angles and
fast response.
5. Component input supports 1080P high definition signal formats.
6. Support HDMI input.
7. This TV can be used as a high-performance PC monitor as it has a VGA interface.
Computer sound source can also be supported to realize the multimedia function.
8. Low power consumption in standby mode to save energy.
9. Latest highly integrated digital processor chip.
-4-
PREPARATION
Inserting Batteries In The
Remote Control Handset
Positioning The TV Set
Install Display on a solid horizontal surface such
as a table or a desk.For ventilation, leave a
space of at least 10cm free from all around the
set. To prevent any fault and unsafe situations,
please do not place any objects on top of the
set. This apparatus can be used in tropical
and/or moderate climates.
Remove the battery cover.
Insert two AAA Alkaline or equivalent batteries,
following the +/- marking in the battery compartment.
Replace the battery cover.
10CM
10CM
10CM
Precautions when using batteries
Do not use old and new batteries together.
Do not use different types of batteries (for
example, Manganese and Alkaline batteries)
together.
Antenna And Power Connections
Note that there are chargeable and nonchargeable batteries. Do not attempt to charge
non-chargeable batteries.
Remove the batteries from the remote control
unit if you do not intend to use the unit for a
long time.
Note:
Do not drop the remote control unit.
Do not subject the remote control unit
to physical shocks.
Keep the remote control unit dry. Wetting
it may cause the unit to malfunction.
Replace the batteries with new ones when
operation of the unit deteriorates.
Do not dispose batteries in a fire.
Do not disassemble or overheat the batteries.
Please dispose the batteries properly under
environmental considerations.
The battery (battery or batteries or battery
pack) shall not be exposed to excessive
heat such as sunshine, fire, or the like.
1.Connect the antenna cable into the antenna
input terminal at the rear panel and wall
antenna socket.
2.Connect the power plug into the wall outlet.
(The type of power plug provided may be
different from the above picture for some
countries.)
-5-
EXTERNAL SCHEMATIC AND INSTALLATION
Front Panel
Note: The graphics are for representation only.
3
3
2
4
5
6
7
1.Power Button
2.Power Indicator / Remote Sensor
3.Speakers
4.Program Up/Down Button
5.Volume Up/Down Button
6.Menu Button
7.Source Button
8.Standby Button
-6-
1
8
EXTERNAL SCHEMATIC AND INSTALLATION
Back Panel
Note: The graphics are for representation only.
400MM
10
5
6
USB1
USB
HDMI3
5V 500mA
VIDEO
AV IN
RIGHT
LEFT
Pr
Pb
YPbPr IN
Y
400MM
PC IN
1
2
3
RF IN
4
HDMI1
HDMI IN
PC
AUDIO IN
9
1. HDMI1\HDMI2\HDMI3:Connect HDMI input signal from signal source such as DVD.
2. PC IN: Connect a PC via a VGA cable.
3. PC AUDIO IN: Audio input for PC and audio input for HDMI when the signal is DVI timing.
4. RF IN: Connect a coaxial cable to receive signal from the antenna or cable.
5. YPBPR(Component input): Connect YPBPR signal from signal source such as DVD.
Share the same AUDIO input with AV IN.
6. AV IN: Connect AUDIO and VIDEO input signal from signal source such as DVD.
7. USB: USB port.
8. EARPHONE: Audio output, speakers will be muted the earphone is plugged in.
9. S/PDIF: Use an AV cable to connect your TV to a compatible audio receiver.
10.Wall Mounting Holes:The four holes can be used to fix your wall mounting plate.
Please unscrew first and then use the M6 screw to install the mounting plate.
-7-
7
8
HDMI2
S/PDIF
1
EXTERNAL SCHEMATIC AND INSTALLATION
Antenna /Cable Connection
There are two kinds of antennas in use.
VHF TV ANTENNA
TWO KINDS OF ANTENNA
UHF TV ANTENNA
No need to install adapter
To TV VHF/UHF
ANTENNA jack
(Note 1)
U/V MIXER
COAXIAL ANTENNA
Need to install adapter
VHF/UHF
(75
)
(Note 2)
FLAT CABLE
1. Connect the plug of the antenna cable or CATV cable to the cable (not provided
with this unit), then connect to the antenna input of this unit for best reception.
2. If the antenna cable in your home is other than the above two, or you have
problems in installing the antenna, please contact your dealer.
Notes:
1. Current outdoor antenna or TV cable usually uses 75 OHM coaxial antenna cable.
For better reception, we suggest using this kind of antenna cable.
2. Flat cable or indoor antenna is old designed, the reception may not be good enough.
-8-
EXTERNAL SCHEMATIC AND INSTALLATION
Remote Control
1.POWER( )
Press to turn the TV on or standby.
1
4
3
5
2.Mute( )
Press to mute or restore the volume.
3.Picture Mode(P.M.)
Press to select the desired picture mode.
6
4.Sound Mode(S.M.)
Press to select the desired sound mode.
5.Zoom
Press to select the desired picture format.
7
8
6.Number buttons
Press to set the TV channel directly.
9
10
7.Return Button
Press to return to the previously viewed channel.
2
12
8.QUICK
Press to show INFO bar quickly in USB.
9.Menu
Press to enter or exit from the TV menu.
10.Source
Press to select the input source mode.
11
13
15
14
16
17
18
11.Up/Down/Left/Right( / / / )
Press to select or adjust the desired item on the
TV menu.
12.OK button
Press to confirm and execute the selection.
When there is no menu on screen, press this
button to show available channel list in DTV or ATV.
13.Exit
Press to exit from any menu.
14.Information (INFO.)
Press to display the current information including
screen format, source, etc.
15.3D
Not used.
16.Volume Up/Down(V+/V-)
Press to adjust the volume.
17.Program Up/Down(PR /PR )
Press to select previous/next channel.
18.NICAM (Option)
Press to select desired sound output(Mono,Stereo
or SAP)depending on the broadcasting channel.
-9-
EXTERNAL SCHEMATIC AND INSTALLATION
Remote Control
19.SLEEP
Press to set the length of time to switch the TV to
standby mode.
20.Subtitle
Press to open or close the subtitle.
21.EPG
Press to display the current EPG information
in DTV mode.
22.Favorite Channel(FAV.)
Press to view your assigned favorite channels.
Press Up/Down buttons to cycle through your
assigned favorite channels, press OK to confirm.
23.Record(REC)
Press to record the current program.
24.Freeze
Press to freeze or unfreeze the picture.
19
20
21
23
22
24
25. USB Play Control Buttons
Play & Pause (
)
Press to pause playback,
press again to continue playback.
Stop (
)
Press the stop button to exit full-screen
playback, access to the preview.
Fast Backward Button(
)
Press to fast reverse.
Fast Forward (
)
Press to fast forward.
Previous (
)
Press to play the previous file.
Next (
)
Press to play the next file.
26.Colour buttons
These four colour keys are for relative fast teletext
function in the bottom of teletext page .
25
26
-10-
EXTERNAL SCHEMATIC AND INSTALLATION
Remote Control
27.TEXT Buttons(Option)
Press to enter the teletext menu.
INDEX
Press this button to display index page.
CANCEL
Press this button to return to TV
program temporarily while searching for
a Teletext page. When the search is
done, the page number will be displayed
on the upper left of the screen.
Press again to return to the Teletext page.
HOLD
Press to hold the teletext page on screen
without update and changes. Press again to
release the hold state. When not in teletext
mode, press this button to freeze the picture
display.
Note: In non-teletext mode and non-USB
mode , the button is "FREEZE".
SIZE
Enlarge the teletext display: Press this
button once to enlarge upper half of the
screen. Press this button again to
enlarge lower half of the screen. Press
this button again to resume to normal
screen size.
27
REVEAL
Press this button to display concealed
information, such as solutions to riddles
or puzzles. Press again to remove the
information from the display.
MIX
Press this button to superimpose the
teletext over the TV program.
Press again to return to normal teletext
mode.
SUB-PAGE
Press this button to enter or exit
subpage mode (if subpage is available).
Press Red / Green buttons to select the
desired subpage.
-11-
PERSONAL VIDEO RECORDING(PVR)
IMPORTANT NOTE:
For any type of recording with this television, you must have plugged a USB device into the
appropriate USB port at the back of the television to record on.
1.Please insert the external high-speed storage devices that have been formatted in FAT 16, FAT 32
OR NTFS file system. (See USB Instruction Manual).
2.Select the TV program and channel you wish to record.
3.Press [REC. ] button to enter PVR mode and start recording. PVR control bar on the screen is shown
as below.You can select the appropriate settings required. While recording, press this button to hide or
show the control bar.
4. When the hard disk PVR function has not been able to realize, please attempt to format the hard disk
through the television.
Play
Fast Reverse
Fast Forward
Previous
5.If you wish to stop the recording, select and press [
Next
Pause
Stop
] icon and the recording will stop.
Instant one-touch recording
In DTV mode and with a USB device properly plugged in, press the REC. button on the
remote control to activate the PVR function for instant recording of the channel you are
watching. Once you are in PVR mode, use the arrow keys at the bottom of the screen
when watching the recording.
Time-shift recording
Use the same one-touch recording method as described above for time-shifting a program you
are currently watching. Time-shifting is the recording of television programs to a storage medium
(your USB device) for viewing at a later, more convenient time. Use it to record a program when
your viewing is interrupted or delayed.
Timer recording
There are two ways to set the timer to record a television program.
-12-
PERSONAL VIDEO RECORDING(PVR)
If you know the programming details:
1. In DTV mode and with a USB device properly plugged in, go to the channel that will broadcast
the program you want to record.
2. Press the EPG button on your remote control to bring up the EPG interface. The channel you
are watching will be highlighted on the screen that appears.
3. Press the RED button on the remote control, then enter the program details on the recorder
menu by pressing / to select an item and / to change the setting. For example, if the
program starts at 8:30pm on the same day, enter: 30 in the space for MINUTES, 20 in the
space for HOURS (a 24 hour clock applies), and then the relevant date. Use the same method
for entering the finish time.
4. Choose the appropriate recording mode: once, every day or weekly.
5. Press OK to confirm your selection. A schedule of all your recordings (the reminder list) will
appear. See page 15 for more on the schedule.
6. Press the power ( ) button to switch the TV to stand-by. It will record your selection automatically.
If you are browsing the EPG:
1. In DTV mode and with a USB device properly plugged in, press the EPG button on your
remote control to bring up the EPG interface. Then follow steps 1¨C6 under EPG on page 14.
2. When you have found a program you want to set to record, press the RED button on the
remote control. Then follow steps 3¨C6 described above.
Note: (A) During the record mode, you cannot change channels or select another function.
(B) If the signal is interrupted or removed while in recording,the recording will stop until the
signal is established again. This may cause you to lose program content.
(C) Please do not turn the TV OFF during recording. This will make the TV exit the PVR and
turn to standby.
(D) The file recorded can only be used in this TV, any copy communication is strictly prohibited.
-13-
EPG (Electronic Program Guide)
EPG stands for Electronic Program Guide. It is supplied by the program providers and
offers information about the programs to be broadcast. You can access it in digital mode by
pressing the EPG button on the remote control.
PROGRAMME GUIDE
1.Press the EPG button to bring up the EPG interface (right).
The second bar from the top will display the current date and time.
On the list below, the channel you are currently watching will be
highlighted.
2.Before you can view any EPG information, you have to 'activate'
every channel for which you want to view program information.
To do this, use the / buttons to select a channel, then press
[ OK ] to confirm.
3.To check the programs to be broadcast on a future date, scroll up
with the button to the date field. Use the button to select the
date and press [ OK ] to confirm.
4.Press the button to scroll up to the top bar in the display, then
press the button to select Time. The top bar will now display
Channel in the top right corner and the second bar will display one
of your available channels.
5.Go to the channel and use the / buttons to select the channel
for which you want to view information. After a brief moment, the
program information will appear.
6.Use the
/
buttons to scroll through the time slots.
7.To exit the EPG menu, press the RETURN button.
-14-
TIME
29 Nov 01:14
Home
King & 1(C/K)(S)
World
Dream Homes(S)
Jade
When Easterly Showers F..
Pearl
Zhang ZiYi a Conservatio
Recorder
INFO
Schedule
Remind
INDEX
OK
PROGRAMME GUIDE
CH
29 Nov
11 Home
01:00-02:30
King & I(C/K)(S)
02:30-02:52
Money Talks(S)
03:08-03:15
Sports Bulletin(S)
03:15-03:40
Late News(S)
Recorder
OK
INFO
Schedule
Remind
INDEX
EPG (Electronic Program Guide)
Recorder
Press the RED button to display the recorder menu (right) to
see detailed information about the different ways of recording
television programs onto a USB device.
RECORDER
1 SDTV
Start Time
00 Minute
23 Hour
Jan Month
Info
Press the GREEN button to show information about the
selected program.
01 Date
End Time
30 Minute
23 Hour
Schedule
Press the YELLOW button to display the Reminder List. Press
/ to select a reminder and press the RED button to delete a
reminder.
Jan Month
01 Date
Mode AUTO
OK
Remind
Press the BLUE button to display a reminder menu.
Press / to select an item and / to change the setting.
Press OK to add a program to the reminder list. An updated
reminder list will be shown.
BACK
Reminder Setting
1 SDTV
55 Minute
22 Hour
Jan Month
01 Date
Once Mode
OK
Note:
Please be cautious to use the "SCHEDULE" & "REMIND" function. Because the time
function of this TV set is not a real-time clock.
-15-
BACK
MENU CONTROL
This section explains the menus of your TV. Each menu is outlined and detailed to help you
get the most from your TV.
Basic Operation
1. Press MENU on the remote control or on the TV key
panel to display the main menu.
2. Press
/
and
/
to highlight the desired menu/item.
3. Press
/
to change the setting.
4. Press MENU to save setting and go back to last menu.
Note:
Buttons on the key panel have the same functions
as the corresponding buttons on the remote control.
Picture Settings
Picture Mode
Adjusts the picture mode: Standard, Mild, Personal,
Dynamic. "Brightness", "Contrast", "Color", "Tint" and
"Sharpness" can only be adjusted when "Picture Mode
"
is set to "Personal".
Brightness
Adjusts the brightness of the picture, and usually is
adjusted together with Contrast.
PICTURE
Picture Mode
Standard
Brightness
50
Contrast
Tint
50
50
50
Sharpness
50
Color
Color Temperature
PICTURE
Contrast
Adjusts the difference between the light and dark areas
of the picture.
Display Mode
DNR
16:9
LOW
Colour
Adjusts the richness of colour. This function is not
available in PC mode.
Tint
Adjusts the tint of the picture. Only can be done under NTSC system.
Sharpness
Adjusts the sharpness of the picture. This function is not
available in PC mode.
Color Temperature
Color Temperature
Colour Temperature
Press OK button to enter the Colour temperature sub menu.
Select from: Cool, Medium, Warm and Personal.
-16-
Personal
Red
55
Green
50
Blue
20
MENU CONTROL
Medium: Keep the original white
Warm: Red
Personal: The user may customize the colour temperature.(Red/Green/Blue).
Cool: Blue.
Display Mode
Seven modes are available including Just Scan, Auto, Panoramic, Zoom1, Zoom2,16:9 and 4:3.
DNR
Four modes of digital noise reduction are available including Off, Low, Middle and High.
Sound Settings
Sound Mode
Equipped with five kinds of voice modes for your choice:
Standard, Music, Movie, Sports and Personal.
"Bass" and "Treble" can only be adjusted when "Sound
Mode" is set to "Personal".
Bass
Adjusts the lowest part of the sound.
SOUND
Standard
Sound Mode
Bass
0
Treble
0
Balance
0
AVL
Off
Surround Sound
Off
AD Switch
Treble
Adjusts the highest part of the sound.
SOUND
Balance
Adjusts how much audio (loudness) gets sent to the left
and right speakers. Only can be adjusted when "Surround
Sound" is set to " Off ".
SPDIF Mode
Auto
AVL
This function may be set as On or Off. Auto Volume Level
can set the volume automatically corresponding to
the input audio.
AD Switch
Surround Sound
Press this option to set "Surround Sound" On or Off.
AD Switch
AD Volume
On
20
AD Switch
Press OK button to access the AD Switch sub menu.
AD Switch Press this option to set On or Off.
(only for digital televisions in DTV mode. )
AD Volume Press this option to adjust AD Volume.
SPDIF Mode
There are three modes available including Auto, PCM and DOLBY.
DOLBY is alternative under DTV and USB, while other sources are default to PCM output.
-17-
MENU CONTROL
Channel Settings
Note: These settings are only available in ATV, DTV and DTV+ATV mode.
Auto Search
Press / buttons to select Auto Search, then press [OK]
button to start auto search. ATV auto search comes after
DTV auto search. User can press menu button to
skip auto search.
CHANNEL
Auto Search
DTV Manual Search
ATV Manual Search
Programme Edit
Signal Information
DTV Manual Search/ATV Manual Search
If you want to tune your TV channels manually, press the / buttons to select (DTV or ATV) manual
search, then use the / buttons to select the available channels.
DTV Manual Search
ATV Manual Search
UHF CH 21
Storage To 1
System I
Current CH 1
Serach
Fine - Tune
NO SIGNAL
Bad
Frequency Unregistered
Normal
Good
MENU
Save
Menu
Programme Edit
This setting lets you edit channels. Select a channel and then use the coloured buttons on the
remote control. Press the 'red' button to delete the channel, the 'green' button to rename ATV
channel, the 'yellow' button (only in ATV mode) to move it (change its position in the list) and the
'blue' button to skip the channel (so it will automatically skip when scanning the channels). Once you
have selected your setting, press [ OK ] to confirm.
Program Edit
11 Home
DTV
16 World
DTV
Delete
OK
Rename
Move
Skip
FAV
Menu
Signal Information
Show the quality and signal strength of the channel.
-18-
MENU CONTROL
Setup Settings
OSD Language
Select you desired OSD language.
SETUP
OSD Language
* Hearing impaired
Hearing Impaired
This function is prepared for the hearing impaired
people. When the status is on, subtitles will show up
on the screen.
Country
English
Off
Sweden
PVR File System
TIME
Charset
GBK
* Country
Change your local country setting.
Notes:
This function is only available in some certain models. It is based on your local TV broadcast
service.
PVR File System
To check your USB Disk and make it compatible for the PVR file system of this model.
Select "Check PVR File System" to check your USB Disk.
Select "Format" to make your USB Disk compatible for this model.
Select "Free Record Limit" to set the record limit for your USB Disk.
Select Disk
C:
Check PVR File System
Start
USB Disk
Format
Time Shift Size
Speed
Free Record Limit
6Hr.
Menu
Time
Press OK button to enter the Time sub menu. Depending
on your need to select: Time Zone, Clock, Sleep Timer
and Auto Sleep settings.
Time Zone: Showing the country's time zone.
TIME
Time Zone
Clock
Clock: Set the TV clock.
Sleep Timer
Sleep Timer: Set the sleep timer. The TV will
automatically enter standby mode when time is up.
Beijing GMT+8
01/Jan 13:08
Off
On
Auto Sleep
Auto Sleep: Set the Auto Sleep on/off. The TV will
automatically enter standby mode 15 minutes after no signal input.
Charset (Option)
There are multiple charsets (GBK / CP1250 / CP1251 / CP1254 / MAC / UNICODE) for you to
choose for subtitle display.
-19-
MENU CONTROL
Advanced Settings
Press / buttons to select Advanced menu, then press [OK]
button to enter. Input password to enter, default password is
"0000" .
ADVANCED
Set Password
Parental Control
Please enter password
4
Off
SW. Update(USB)
Clear
Free Record Limit Cancel
6Hr.
Set Password
To set your own password, first enter the old password, and then enter your new password twice,
following the prompts as illustrated below.
Please enter old password
Please enter new password
Confirm new password
Clear
Free Record Limit Cancel
6Hr.
Parental Control
You can set up parental control function to choose the classifications suitable for your children.
Choose from the following categories:
1. "P": Content is suitable for preschoolers under age 5.
2. "C": Content is suitable for children age 6-7.
3. "G": For general exhibition. All ages may watch.
4. "PG": Parental guidance is recommended for young viewers.
5. "M": Recommended for mature audience.
6. "MA15+": Not suitable for people under age 15.
7. "AV15+": Not suitable for people under age 15.The programmes contain violence content.
8. "R18+": Not suitable for people under age 18.
Summer Time
During daylight saving time (DST), please change your selection to On.
SW. Update(USB)
Update the firmware of this model.
1. Rename the latest firmware to "MERGE.bin".
2. Save the "MERGE.bin" to the root directory of your USB Device.
3. Plug in your USB Device, then enter the item of "SW.Update(USB)" to update.
**Note**
Please be cautious to use this function.
SW update is only available on ATV / DTV mode.
In the progress of updating,please don't switch off the power as this may cause the TV
set to failure.
Please contact the after sales department for further assistance.
-20-
MENU CONTROL
PC Settings
Note: These settings are only available in PC mode.
When you connect VGA cable to the jacks of PC and
select the signal source as "PC", the screen menu will
be activated. You can use the function to adjust the
display settings automatically or manually.
PC
Auto Adjust
H. Position
1.AUTO ADJUST
Press "
" buttons to auto adjust PC size and position.
50
Phase
50
Size
50
2.H. Position
Press "
" buttons to adjust the H-Position of the
television.
3.V. Position
Press "
" buttons to adjust the V-Position of the television.
4.Phase
Press "
" buttons to adjust the phase of the picture.
5.Size
Press "
" buttons to adjust the size of the picture.
-21-
50
V. Position
TROUBLESHOOTING
NO PICTURE, NO SOUND
SNOWY DOTS AND INTERFERENCE
1. If the antenna is located in the fringe area of a
television signal where the signal is weak, the
picture may be marred by dots. When the signal
is extremely weak, it may be necessary to install
a special antenna to improve the reception.
2. Adjust the position and orientation of the indoor/
outdoor antenna.
3. Check the connection of antenna.
4. Fine-tune the channel.
5. Try another channel. Broadcasting failure may
happen.
1. Check if the fuse or circuit breaker is working.
2. Plug another electrical device into the outlet to
make sure the outlet is working or turned on.
3. Check if the power plug is in poor contact with
the outlet.
4. Check the signal source.
NO COLOUR
1. Change the colour system.
2. Adjust the saturation.
3. Try another channel.Black & white program may
be received.
REMOTE CONTROL DOES NOT WORK
1. Change the batteries.
2. Batteries are not installed correctly.
3. Main power is not connected.
BLACK SPOTS OR HORIZONTAL STREAKS
Black spots or horizontal streaks appear, or in some
cases, the picture flutters or drifts. This is usually
caused by interference from car ignition system,
neon lamps, electric drills, or other electrical
appliances.
GHOSTS
Ghosts are caused by the television signal
following two paths. One is the direct path, the
other is reflected from tall buildings, hills, or other
objects. Changing the direction or position of the
antenna may improve the reception.
NO PICTURE, NORMAL SOUND
1. Adjust the brightness and contrast.
2. Broadcasting failure may happen.
NORMAL PICTURE, NO SOUND
1. Press the volume up button to increase volume.
2. Volume is set to mute, press MUTE to restore
sound.
3. Change the sound system.
4. Broadcasting failure may happen.
DISORDER RIPPLES ON THE PICTURE
It is usually caused by local interference, such as
cars, daylight lamps and hair driers. Adjust the
antenna to minimize the interference.
BLANK SCREEN IN PC MODE
Perhaps the TV can not recognize the resolution set
by the PC. Change to the best resolution
or other standard resolutions of Windows system.
Set refresh rate to 60Hz.
-22-
RADIO FREQUENCY INTERFERENCE
This interference produces moving ripples or
diagonal streaks, and in some case, loss of
contrast in the picture. Find out and remove the
radio interference source.
SPECIFICATIONS
Screen size - diagonal:
107cm
1920 X 1080
Screen resolution:
Audio output power (L+R):
8W + 8W
Working voltage:
100-240V~50/60Hz
Rated power consumption:
120W
Dimensions (W x D x H):
971 X 220 X 632.7mm
Net weight:
16.3Kg
Environment(only for Tropical climates zone):
o
o
Working temperature: 5 C~45 C
Working humidity: 20%~80%
o
o
Storage temperature: -15C~50
C
Storage humidity: 10%~90%
Environment(only for Moderate climates zone):
o
o
Working temperature: 5 C~35 C
Working humidity: 20%~80%
o
o
Storage temperature: -15C~45
C
Storage humidity: 10%~90%
System:
DTV: DVB-T
TV: PAL, BG, D/K, I
AV: PAL, SECAM, NTSC
Preset programs: ATV: 99,
DTV:400
Status displaying method: On screen display
Function adjustment indicator: Menu display
Language of OSD: Multiple options
RF aerial input: 75 ohm unbalanced
AV video input: 75 ohm, 1.0Vp-p, RCA
AV audio input: 10k ohm, 0.5Vrms
-23-