1
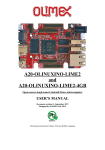
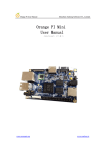
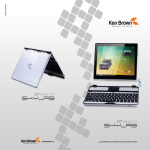
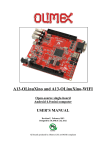
User Manual
1
CONTENTS
Section
Page
Introduction
3
Section 1: Getting Started
4-5
Section 2: Understanding Your Device
6-9
Section 3: Settings
10-17
Section 4: Wireless Connectivity
18-19
Section 5: Web Browsing
20-21
Section 6: Pictures, Music and Video
22-25
Section 7: Camera and Email
26-28
Section 8: USB and Micro SD
29-30
Section 9: About SKYPAD Alpha2
Section 10: Health and Safety Information
2
31
32-34
Introduction
THANK YOU FOR PURCHASING THE SKYPAD ALPHA 2 INTERNET
TABLET BY SKYTEX TECHNOLOGY. WE HOPE YOU ENJOY YOUR
NEW DEVICE.
PLEASE READ THIS MANUAL BEFORE OPERATING YOUR TABLET,
AND KEEP IT FOR FUTURE REFERENCE.
PLEASE BE ADVISED THAT MANY SERVICES AND APPLICATIONS
OFFERED THROUGH THIS DEVICE ARE PROVIDED BY VARIOUS
OPERATING SYSTEMS, SOFTWARE AND APPLICATIONS
DEVELOPERS. IF YOU USE, LINK TO OR DOWNLOAD SUCH A
SERVICE, OR AN APPLICATION, CHAT ROOM, FORUMS,
MARKETPLACE OR SOCIAL NETWORK FROM THIS DEVICE, YOU
SHOULD CAREFULLY REVIEW THE TERMS OF SUCH SERVICE OR
APPLICATION. PERSONAL INFORMATION YOU SUBMIT MAY BE
READ, COLLECTED, OR USED BY THE SERVICE OR APPLICATION
PROVIDER AND/OR OTHER USERS OF THOSE FORUMS. PLEASE
CAREFULLY REVIEW ANY AND ALL TERMS AND CONDITIONS
APPLICABLE TO THOSE APPLICATIONS AND SERVICES,
INCLUDING THOSE RELATED TO ANY LOCATION BASED SERVICES
FOR ANY PARTICULAR PRIVACY POLICIES, RISKS OR WAIVERS.
3
SECTION 1: Getting Started
Device controls and ports
1. Volume +
8. DC IN
2. Volume -
9. Micro SD card reader
3. Power
10. Speaker
4. Microphone
11. Touch Key - Back
5. 3.5mm Audio Jack
12. Touch Key - Home
6. mini-HDMI 1.4 port
13. Touch Key - Menu
7. mini-USB OTG port
Turning Your Device On
Press and hold the power button, the system will enter the
4
startup process, as follows:
. Boot Logo startup
. Unlock Screen (place your finger on the image of the lock and
drag it up to the green dot)
Turning Your Device Off
Press and hold the power button, a pop-up menu of options will
appear. Touch “Power off” and then “OK”.
5
Section 2: Understanding your Device
Features
. 7-inch 800*480 LCD Display
. Capacitive touch screen with 5-Points of touch recognition
. Android OS 2.3
. Connections: Wi-Fi 802.11 b/g/n
. 0.3Mega pixel forward-facing
. HD Video Player (up to 1080P or stereoscopic 3D)
. ARM Cortex-A8 1.2GHz
. Mail-400 MP GPU, 3D graphics engine
. AXP209 Power management system
. Battery Capacity 3000mAh
. Power input AC 110-240V, DC 5V, 2A
Home screen
The home screen is the starting point for using your device. You
can Place shortcuts, widgets and other items here to customize
your device to your needs. The default desktop features a
status/notifications bar, quick search bar, and shortcut menu.
6
. Widgets: Applications that run on the Home screen
. Shortcuts: Shortcuts to commonly used applications
. Status/Notifications bar: Displays network signal strength,
battery life, time, and system notifications
. Quick search box: Quick search the web by typing search terms
Navigating Your Device
Use command keys (home, back, menu) and the touch screen to
navigate.
Volume keys: changes the volume outputting through the
speakers or headphones.
Power key: Long press for power on/off, short press to enter or
leave hibernation.
Menu button: Displays the menu options for current operation.
Home button: Back to the home screen
Back: Return to last interface.
7
Finger Gestures
. Tap items to select or launch them.
. Tap a menu item to select it.
. Tap an application’s icon to launch the application.
. Pinch/expand to zoom in or out in the web browser and apps
with pinch-to-zoom support.
. Touch and hold a widget on the home screen to move or delete
it.
. Touch and hold on an empty area to display a pop-up menu of
options (add widgets, shortcuts and folders, or change
wallpaper).
Notification panel
. The notification panel shows information about connections,
downloads, updates, etc.
Applications Tray
To open your applications tray, tap the corresponding icon on
your shortcut menu:
8
The app tray displays all of the applications that have been
installed to the device. Stock applications include a web
browser, clock, camera, calculator, market (1 Mobile), gallery
and more.
9
Section 3: Settings
This section explains Settings for customizing your device.
System Settings
Click the main menu interface in the "settings" icon; you can
open the system settings interface, as shown below:
Accessing settings
. From the Home screen, press the Menu key → Settings.
. From the Home screen, touch Applications → Settings.
Wireless and networks
. Control your device’s wireless connections.
. Wi-Fi settings interface as shown below:
10
. Your device supports Wi-Fi b/g/n. Use Wi-Fi settings to manage
your device’s Wi-Fi connections.
. Turning Wi-Fi On and Off. When you turn the Wi-Fi service on,
your device automatically searches for available, in-range
wireless Access Points.
Managing Wireless Access Points
. Tap Wi-Fi settings to choose the access point you wish to
connect to
. Tap the name of the access point of choice and enter the
password/network key (if required)
Sound and display
Set the volume level for music, videos and apps
.
From
the
Home
screen,
press
key→Settings→Volume
. Touch and drag the sliders to set
. or press the Volume +/- keys of the device to set
11
the
Menu
Date and time settings
To set the date and time for your device, go to Settings → Date
& time settings:
. You can choose to automatically use the Network Time.
. You can also manually set the date, select the time zone, and
set the time, time format, and date format.
For example:
Select +: to increase the unit by 1,
Select -: to decrease the unit by 1.
You can also choose the number by entering the input mode.
Manually enter the desired number, then select done. Like so:
12
Screen brightness
To adjust screen brightness go to Settings → Display, scroll down
section, select "Brightness", move the slider to the desired
position and tap “OK”:
Standby
The screen can be set to automatically timeout when the tablet
is idle over a set period of time. To set the screen timeout time,
go to Settings → Display, then choose the length of time the
tablet idles before the screen times out:
Note: While playing video, the screen timeout is disabled.
13
HDMI
The SKYPAD Alpha 2 supports HDMI 1.4 through a mini-HDMI
port.
. Plug a mini-HDMI-to-HDMI cable to an HD capable television or
monitor
Downloading and Installing Applications
First we must allow the device to accept downloads from
“unknown sources”. (Note: Android considers all 3 rd party app
markets as “unknown sources”, including 1Mobile)
. Go to Settings → Applications as shown below:
Tap “Unknown Sources”, and then tap “OK”, as shown below:
14
The official Android market is not supported by this device at
this time. The default App market for the Alpha 2 is the 1Mobile
Market. It is a 3rd party app store that offers thousands of free
Android Applications.
To download apps from 1Mobile, go to App Tray → 1Mobile
Market.
. Browse or search for your desired apps and games
. Tap the application you would like to download
. Tap download
. A notification will appear, letting you know your app is being
downloaded
. Pull down the notifications bar to see the progress of your
download
. Once the download is finished, tap it
15
. Tap install. Once the installation is finished you can choose to
open the app or press “done” to go back to the previous screen
. Downloaded apps will appear in your App tray
Side-loading Applications
Side-loading an application is an alternative to directly
downloading an app onto the device. You can do this via PC and
Micro SD card.
. Copy the APK onto your Micro SD card.
In the main menu, select the “app installer” icon:
16
. The system will start a scan to find all of the available APKs
from your Micro SD card.
. Select all the available APKs you wish to install.
To force close or uninstall applications
. Go to Settings → Application → Manage Applications, select
the appropriate application to view the program information,
force stop, or uninstall the program.
17
Section 4: Wireless Connectivity
The Skypad Alpha 2 includes features that allow it to connect to
the internet and to other devices
Note: Your device’s internal wireless antenna is located along
the bottom back of the device. Do not block the antenna; doing
so may affect signal quality and may cause the device to operate
at a higher power level than is necessary.
Wi-Fi
. Wi-Fi is a wireless networking technology that provides access
to local area network. Use your device’s Wi-Fi feature to:
. Access the internet for browsing, or to send and receive email.
. Access your corporate network.
. Use hotspots provided by hotels or airports while traveling.
Wi-Fi communication requires access to an existing Wireless
Access Point. WAP can be open or secured. Your device supports
the 802.11b/g/n Wi-Fi protocol.
Scanning and Connecting to a Wi-Fi Network
. When Wi-Fi is turned on, your device will search for and display
available wireless networks.
18
. When the scan is complete, touch a wireless network to
connect, if the network is open, your device will automatically
connect, if the network is secured, enter the password to
connect.
19
Section 5: Web Browsing
Your device is equipped with a full HTML Browser, which allows
you to view webpages.
. While connected to a network, open the Web browser by
tapping the Globe icon on the shortcut menu and enter a URL.
Or
. Quick-search the web by using the search bar on the top of the
home screen.
Entering a URL
. Launch the browser.
. Touch the URL field at the top of the screen, and then enter the
URL using the virtual QWERTY keyboard.
. As you enter characters, potential matches display. Continue
entering characters, or touch a match to complete the URL.
. Touch Go to load the page.
20
Browser Menu
. Add Bookmark: Create a bookmark for the current page.
. Find on page: Search for content on the current page
. Select text: Allows you to select and copy text from the website
currently displayed
. Page info: Displays information about the website
. Share page: Email the site to friends, family or colleagues
. Downloads: View and manage recent downloads.
. Settings: options for adjusting your browser settings
21
Section 6: Pictures, Music and Videos
Viewing Pictures
. From the App tray, select the Gallery app
. Tap a category, then tap a picture to view it.
Setting a Picture as Wallpaper
. From the App tray, select the Gallery app
. Touch a category, and then touch a picture to select it.
. Press Menu key→more→set as→Wallpaper.
22
Music
. From your App Tray, tap the Music app. Music files transferred
to or downloaded on your tablet or micro SD card will
automatically sync with the app.
. Music files transferred or installed to your tablet with
automatically sync with the app.
. You can choose how your songs are arranged by tapping the
section next to the headphone icon. A pop-up menu will appear:
23
. You can search for specific music files on your tablet by tapping
the magnifying glass icon in the upper right corner of the app.
. To play music, simply tap a song.
. Once your playlist has started, you can exit out of the app by
pressing the “home” or “back” buttons. Music will continue to
play in the background. To stop music playback, go back to the
music app and press the pause (II) button.
Video
. Tap the video player or gallery app in your app tray. Select the
movie folder to view movies downloaded to your device:
24
. Select the video file you wish to playback. Once the video has
started, you may select "Play", "stop", "Volume +", "Volume -",
"fast forward", "rewind", "progress bar" and control keys to
control playback progress.
© copyright Blender Foundation | www.sintel.org
Online video
You can stream video via the web browser or 3 rd party video
streaming applications. Some videos may require Adobe® Flash®
Player to stream properly. Flash® Player and many of the
popular streaming video applications are available through the
1Mobile market.
25
Section 7: Applications and Widgets
Camera
Use your device’s built-in camera to take pictures and record
video.
. Open the camera app by tapping on the camera icon on your
shortcut menu
. Using the display as a viewfinder, compose your picture by
aiming the lens at the subject.
. To take a picture, tap the aperture button (highlighted below):
. After taking a picture, open the gallery app to view it. While
viewing the picture, the following options will be available:
. Tap delete to erase the photo.
. Tap share to send the picture via email.
. Tap menu for more options
. Tap “set as” to assign the picture as the device's wallpaper.
26
Email
Send and receive email using an existing email account.
. From the apps tray, tap the Email icon to enter the e-mail
client. The first entry will ask to configure the account
information. As shown below:
. In the Password field enter your valid password: ********,
then tap “Next"
. If required, select the account type. If you are unsure of your
account type, please contact your email provider for more info:
27
. If the settings are correct, you will enter the following
interface:
. After you set your account options, you can set the account
name and the name you wish to appear on outgoing messages:
28
Section 8: USB and Micro SD
Transferring files to/from PC via USB
. Connect your tablet to your PC via the included USB cable.
Once the connection has been made, a USB symbol will appear
in your notifications bar
. Touch the symbol and drag it downwards to open your
notifications.
. Tap “USB connected” and select “Turn on USB storage” to
complete the connection. Your tablet will be recognized as an
external USB device. You can now drag-and-drop files and
folders between your tablet and PC.
OTG use
. Use approved OTG adapter cable (sold separately) and an
external USB device.
. Supports plug and play USB mouse and keyboard equipment,
29
and external USB flash drives
Memory Card
Your device supports removable micro SDTM or micro SDHCTM
memory cards, for storage of music, pictures, videos, and other
files.
Inserting and removing a Memory card:
. With the gold contacts facing down, carefully slide the memory
card into the slot, pushing gently until it clicks into place (it must
be pushed in far enough to lock-in, which may require the use of
your fingernail)
. Gently press in on the memory card, so that it pops out from
the slot. Carefully remove the card from the slot.
External SD card
. Go to settings→ storage
. From here you can view total space and available space on the
inserted memory card.
. Touch Unmount SD card to prepare the memory card for safe
removal or formatting.
. Touch Format SD card to erase the memory card and prepare it
for use with your device.
Note: In order for the music and gallery apps to sync with music,
pictures and videos on your micro SD card, you must tap “Scan
SD card”
30
Section 9: About Alpha2
View information about your pad, including status, legal
information, hardware and software versions, and a tutorial.
. Go to settings→About device.
. Touch Items to view details.
Android version: Display the Android version of your pad.
Model number: Display your device’s model number.
Kernel version: Display the kernel version of your pad.
Build number: Display your pad’s build number.
31
Section 10: Health and Safety Information
This product is a highly sensitive electronic device, do not
disassemble.
* Avoid strong impact or drops.
* Avoid using this product under the following conditions: high
and low temperature, excessive moisture, dust, magnetic fields
strong and long-term exposure to sunlight.
* Please use a slightly damp cotton cloth to gently wipe the
product shell. Water is sufficient for this purpose, please do not
use chemical cleaning solutions.
* This device should not be splashed by or immersed in water or
other liquids. Please keep away from the pool, sink, bath, or
other potentially damaging situations.
* Avoid using headphones at high volumes and for prolonged
periods of time as it may cause permanent hearing damage.
* In order to avoid a hazardous situation, please do not cross the
street, operate a motor vehicle or ride a bicycle while using
headphones.
* Please follow the relevant local environmental regulations to
properly dispose of or recycle obsolete electronic devices and
accessories.
* If you have any questions about this product, please contact
your local dealer or engage directly with the company's
32
customer service center.
* In cases where data is lost or the product is damaged from
negligence or misuse, SKYTEX assumes no responsibility. Please
follow the user manual for standard operating procedures, and
keep your data backed-up.
* SKYTEX is not liable for injuries caused by negligence or
misuse of the tablet. Please use the device responsibly.
Note: Instructions in this manual are based on default settings,
and may vary depending on the software version on your
device, and any changes to the device’s settings. Unless stated
otherwise, instructions in this User Manual start with the device
unlocked, at the home screen. All screen images in this manual
are simulated. Actual displays may vary, depending on the
software version of your device and any changes to the device’s
settings.
* The battery in the SKYPAD Alpha 2 is not intended to be
replaced by the consumer. If you believe the battery is damaged
or needs to be replaced, take the pad to a service center for
inspection and replacement.
* Do not let the tablet or battery come in contact with liquids.
Liquids can get into the tablet’s circuits, leading to corrosion.
* Do not place your battery in or near a heat source. Excessive
33
heat can damage the tablet and/or the heat source, such as a
microwave oven, hair dryer, iron, or radiator.
* Do not dispose of the tablet or the battery in a fire. The tablet
or the battery may explode when overheated.
* Avoid dropping the tablet; it can potentially cause damage to
the pad. If you suspect damage to the pad or battery, take it to a
service center for inspection.
* Never use any charger or battery that is damaged in any way,
use only SKYTEX-approved batteries, and recharge your battery
only with SKYTEX-approved chargers which are specifically
designed for your tablet.
* Use of a Non-SKYTEX–approved battery or charger may
present a risk of fire, explosion, leakage, or other hazard.
SKYTEX’s warranty does not cover damage to the pad caused by
non-SKYTEX-approved battery and/or chargers.
For Troubleshooting, accessories and information on current
products please visit www.skytex.com
For technical support, email [email protected] or call 1-888SKYTEX-9.
34