1
SEWING MACHINE
IMPORTANT THREADING
INSTRUCTIONS
This machine features a special
Easy Threading System. Even if you
have sewn before, take the time to
learn how to properly thread the
machine, and you will avoid
serious sewing problems in the
future.
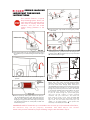
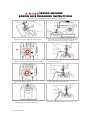
1. Raise presser foot lever. This separates the tension discs in
the machine that you will be feeding the thread through in
step 5.
4. Using two hands, snap thread into thread guide post A,
as illustrated.
5. Holding thread secure at A, pass the thread under guide B
and through the slot, guide thread down threading channel
to tension system C. Pull thread firmly up to top of channel
D, and then back down again.
A
2. Turn handwheel toward you to raise needle to highest
position.
3. Remove spool cap. Place spool of thread on spool pin,
with Thread Retaining Slit to right. Slide spool cap onto
spool pin until it touches spool to prevent thread from
tangling. For large spools of thread, larger end of spool
cap should touch spool. For small spools, smaller end
should touch spool.
B
6. Before threading needle, test for proper threading as
follows: Pull a few inches of thread through theading
channel. Lower presser foot to engage tension discs,
pull a few more inches through. There should be a
noticeable difference between the thread tension when the
presser foot is down and when it is up. If the thread pulls
through easily when the presser foot is down, the machine
is not properly threaded and sewing problems will result.
Re-thread the machine and test again.
To pass the thread through the spiral thread guide,
start from the left, making a circular clockwise
movement with your hand twice. The thread will
slide inside the center of the spiral (illustration A).
Pass the thread through the last thread guide from
right to left and turn hand wheel toward you until
needle is in its highest position. Lower presser foot.
Thread eye of the needle.(illustration B).
IMPORTANT NOTE: If thread balls up in the bobbin case or knots up on the underside of the fabric,
t h e m a c h i n e m a y n o t b e p r o p e r l y t h r e a d e d . D O N OT a d j u s t t h e t h r e a d
tension until you have checked for proper threading using the test described in step 6.