1
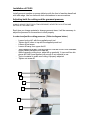
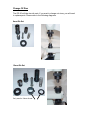
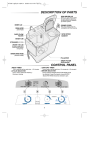
Model PG-20
Manual Grommet Machine
Operating Manual
(800) 624-2408 (530) 626-9386 Fax (530) 626-5144
6686 Merchandise Way Diamond Springs, Ca 95619
www.sineqco.com
INTRODUCTION
MANUAL MACHINE MODEL PG-20 FOR PLACING APPLICATIONS BY HAND
The function of this machine is the placement of applications or to punch holes (interior
diameter of tube grommet 8mm or 12mm) in materials that need these applications.
Specially recommended for placing grommets and washers in: awnings, curtains, advertising
signs, etc.
THIS MACHINE WILL PUNCH THE MATERIAL WHILE SIMULTANEOUSLY SETTING THE GROMMET.
WARNINGS!
We hope you will take notice of these warnings and we would like to thank you for the
purchase of this machine.
User unawareness of the machine leads on many occasions to elementary doubts about its
operation.
Please read this instruction manual carefully for your guidance, in order to make the most of
your machine.
Always use extreme caution when operating machine. Keep hands free of cutting surfaces.
SINCLAIR EQUIPMENT DECLINES ALL RESPONSABILITY ON THE INCORRECT USE
OF THIS INSTRUCTION MANUAL.
Grommet
Grommet Measurements Washer Measurements
8mm Plastic Grommet
A: 8mm
B: 15mm
C: 8mm
No washer is used for
8mm grommet.
12mm Plastic Grommet
A: 12mm
B: 26mm
C: 8.3mm
A: 15mm
B: 24mm
Installation of PG-20
Install grommet machine on secure table top with the front of machine base flush
with table edge. Use four bolts with lock nuts/washers to secure machine.
Adjusting both the cutting and the grommet pressure.
ALWAYS ADJUST FIRST THE CUTTING PRESSURE, NEVER TRY DO CUTTING AND
SETTING AT THE SAME TIME.
Each time you change material or change grommet sizes, it will be necessary to
adjust the pressure for the machine to work properly.
In order to adjust the cutting pressure: ( Refer to diagram below )
-
Loosen lock nut #1 with the supplied punch tool.
Tighten die #2 close to top with the supplied punch tool.
Loosen #5 set screw
Loosen #6 away from upper die #3
-
While frequently pulling lever, adjust #6 up gradually ¼ turns until two die
pieces #3 & #4 come together just enough to cut material in use.
Test cut material to make sure cutting is properly adjusted.
Tighten set screw #5
-
AVOID DAMAGES ON THE DIES. IF THE DIES COME TOO CLOSE AND YOU TRY TO SET A GROMMET,
YOU WILL BREAKE THE EDGE OF THE LOWER ONE.
1
2
3
4
5
6
In order to adjust the grommet pressure.
-
-
Insert grommet on die #3 as shown in figure 1 below. Make sure bottom of
grommet is up above bottom of top die. No washer is needed for 8mm
grommets. For 12mm grommets, insert washer on die #4 as shown in
figure 2.
Do a test grommet with the material you are using,
Slowly loosen #2 die to tighten grommet fit. Use ¼ turns or less at a time.
Try to spin grommet in material. If grommet is loose, continue to bring die
#2 down until grommet is secure in material and won’t spin.
When grommet tension is correct, tighten tension nut #1
FIG 1
FIG 2
Grommet
Washer
Change Of Dies
The PG-20 will take two die sets. If you want to change out sizes, you will need
to replace parts. Please refer to the following diagrams.
8mm Die Set
12mm Die Set
Only used in 12mm die set.
Parts Schematic
Schematic #
Part #
Description
30
31
32
33
34
36
37
38
39
40
41
42
43
44
45
46
48
49
50
51
52
58
PGR2030
PGR2031
PGR2032
PGR2033
PGR2034
PGR2036
PGR2037
PGR2038
PGR2039
PGR2040
PGR2041
PGR2042
PGR2043
PGR2044
PGR2045
PGR2046
PGR2048
PGR2049
PGR2050
PGR2051
PGR2052
PGR2058
Machine Head
Die Holder Pin
Driving Stem
Driving Stem Guide Wheel Pin
Driving Stem Guide Wheel
Eccentric Part
Connecting Rod
Connecting Rod Pin
Adjusting Nut For Top Die
Screw For Fixing Lever
Lever Pin
Draw Back Spring
Driving Stem Control Part
Driving Stem Control Pin
Pin For Top Set Spindle
Lever
Die Holder For Machine
Top Die
Bottom Die
Top Set Spindle
Top Set Spindle Spring
Screw For Fixing Die Holder
NOTES