1
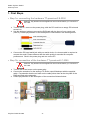
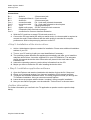
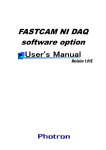
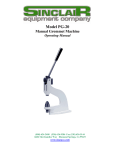
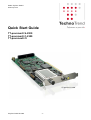
Sales: CityCom GmbH
www.tt-pc.com
Quick Start Guide
TT-premium® S-2300
TT-premium® C-2300
TT-premium® CI
TT-premium C-2300
CityCom GmbH © 2009
-1-
Sales: CityCom GmbH
www.tt-pc.com
1. First Steps
• Step 1a: connecting the hardware TT-premium® S-2300
Attention: Pay attention that all appliances are turned off before you connect the
PCI-card.
1. Turn off the PC, move out the power plug, stick the PCI-card into an empty PCI-slot and
screw it on.
2. Use the delivered cables to connect the DVB-card with the input of your sound card
(Line-In). Please pay attention to the description of connections in the drawing below.
3. Connect the PCI-card aerial jack with your aerial device. A relevant cable is required to
connect the aerial. Please observe that the cable quality is essential for reception
performance. Stick in the power plug and turn on the PC.
• Step 1b: connection of the hardware TT-premium® C-2300
Attention: Pay attention that all appliances are turned off before you connect the
PCI-card.
1. Turn off the PCand move out the power plug.
2. Connect the extension for the analoge TV-Audio output/Videoinput with the supplied
cable. Pay attention that the red mark on the cable points down at the slot plate of the
DVB-card and at the extension.
3. Please pay attention to the description of the connection followed below.
CityCom GmbH © 2009
-2-
Sales: CityCom GmbH
www.tt-pc.com
Connections:
Bu 1
Bu 2
Bu 3
Con 1
Con 2
Bu 4
Bu 5
Bu 6
Con 3
Audio-In
3,5mm stereo jack
Composite-Video-In Cinch connector
Audio-Out
3,5mm stereo jack
connection cable
Pin 1 (red mark) directed downwards
connection cable
Pin 1 (red mark) directed to the slot plate
TV-In
cable-/antenna input
digital audio output S/P-DIF electrical cinch-connector
Composite Video-Out cinch-connector
connection for Common-Interface-Extension
4. Stick the PCI-card into an empty PCI-slot and screw it on.
5. Connect the PCI-card aerial jack with your aerial device. A relevant cable is required to
connect the aerial. Please observe that the cable quality is essential for reception
performance. Stick in the power plug and turn on the PC.
• Step 2: Installation of the device driver
>> Advice: Administrator-rights are needed for installation. Please note additional installation
advices of your PC.
1. Turn on your PC and log in with your user identification if necessary.
2. The operating system identifies the appliance automatically and asks you to install the
adequate device driver. Insert the supplied CD in your CD ROM drive. The adequate
device drivers and the device driver information are placed in the main index of the
installation-CD.
3. Instruct the operating system to use the driver information from the CD.
4. Maybe you have to restart the PC after installing the device driver.
• Step 3: Installation application software
1. Open the Explorer and start the Installation with double click on the file “Setup.exe“
2. Chose your purchased product if you have an installation-CD for several products.
3. Thereupon the software installation starts. The setup program will lead you through the
TV-Software installation. Here you can select several options.
4. Leave the set up program with the button “complete“ after successful installation.
5. Now you can start the program over the selection “TechnoTrend” in the start menu
• further information
For further information you can find in the TV-application a question mark to open the helpdialog.
CityCom GmbH © 2009
-3-
Sales: CityCom GmbH
www.tt-pc.com
2. Connection of Common Interfaces (optionally)
• Step 1: connecting the hardware
Attention: Pay attention that all appliances are turned off before you connect the
PCI-card.
1. Turn off the PC and move out the power plug.
2. Build the Common Interface into an empty 3.5” slot. Connect the DVB-card and the CI
with the supplied cable. Pay attention to the marks of the connectors of the cable, to
avoid a twisting of the cable.
3. On the front side of the CI-extension you can find an infrared sensor for the remote
control. Please pay attention that the jumper for the remote control is set at the backside
of the CI-Extension. If you already have or use an infrared receiver and remote control
with your DVB-card, than you have to remove the jumper.
4. Stick the CAM with Smartcard into the CI.
5. Stick in the power plug and turn on the PC.
• Step 2: Installation
>> Advice: Please avoid to remove the CAM out of the Common Interface during a
utilization. The application can breake down.
093200028/3708
1. As soon as the CI was recognized a new symbol should appear in the Toolbar of the TVapplication.
2. To change the CI setup you have to push the CI button.
Technical changes and mistakes reserved!
CityCom GmbH © 2009
-4-