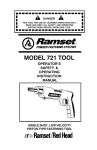
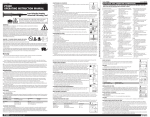
1
LIMITED WARRANTY (ONE YEAR)
ON SIMPSON BRAND TOOLS
One Year
Limited
Warranty
Read This Manual
BEFORE Operating This Tool
Simpson warrants their tool operated under normal uses in
the United States and Canada, that Simpson will repair replace
or adjust any of these tools or their component parts found
to be defective in materials or workmanship within one year
from the date of purchase.
All we require is that you properly operate and maintain the tool as described
herein and that you return the tool for warranty repairs to Simpson.
To the extent allowed by law:
1. Any implied warranty of merchantability or fitness is limited to the
one-year duration of this written warranty.
2. Simpson shall not have any responsibility for loss of use of these
tools, loss of time, inconvenience, commercial loss or incidental or
consequential damages.
Return Tools To:
Northwest USA
Simpson Strong-Tie Co.
5151 S. Airport Way
Stockton, CA 95206
(209) 234-7775
Southwest USA
Simpson Strong-Tie Co.
260 N. Palm Street
Brea, CA 92821
(714) 871-8373
Northeast USA
Simpson Strong-Tie Co.
2600 International Street
Columbus, OH 43228
(614) 876-8060
Southeast USA
Simpson Strong-Tie Co.
1720 Couch Drive
McKinney, TX 75069
(972) 542-0326
Eastern Canada
Simpson Strong-Tie Co.
5 Kenview Boulevard
Brampton, Canada L6T 5G5
(905) 458-5538
Western Canada
Simpson Strong-Tie Co.
11476 Kingston Street
Maple Ridge, B.C. Canada V2X-0Y5
(604) 465-0296
Form T-SAS-PTM27HD04 4/04
© Copyright 2004 SIMPSON STRONG-TIE COMPANY INC.
This warranty gives you specific legal rights and you also may have other
rights, which may vary, from state to state.
© Copyright 2004 SIMPSON STRONG-TIE COMPANY INC.
Some states do not allow limitations on how long an implied warranty lasts
or the exclusion or limitation of incidental or consequential damages, so the
above limitations may not apply to you.
OPERATOR'S MANUAL
Model
PTM-27
PTM-27HD
4120 Dublin Blvd., Suite 400, Dublin, CA. 94568 • www.simpsonanchors.com
Serious Injury Or Death May Result If This Tool Is Not Used In
Accordance To This Instructions!
HOW TO AVOID SERIOUS INJURY OR DEATH:
1. ALWAYS - make certain the base material consists of thick
concrete or structural steel.
2. ALWAYS - observe these safety precautions and those
appearing throughout this manual.
3. ALWAYS - wear eye, ear and head protection.
1. NEVER
2. NEVER
3. NEVER
4. NEVER
5. NEVER
6. NEVER
- attempt to bypass or circumvent any of the
safety features of this tool.
- attempt to fasten into soft, thin, brittle or
very hard material.
- attempt to fasten into a spalled, cracked
or uneven surface.
- attempt to fasten less than (3) inches from
the edge of concrete.
- attempt to fasten less than one-half (1/2) inch
from the edge of steel.
- place your hand over the muzzle end of the tool
with a powder load in the chamber.
REMEMBER: SAFETY FIRST!
WARNING - Excess dirt or debris on the breech faces may cause the tool to
accidentally discharge causing serious injury or death. Clean this tool daily
before using as follows.
A. Barrel Assembly
1. Nosepiece - must be cleaned and inspected daily
making certain the inside is clean and free of debris
and damage.
2. Barrel - make certain the breech face and chamber are
clean and free of dirt and carbon deposits. Use only
the lubricant supplied or a similar non-flammable
substance. Use lubrication sparingly as excessive
amounts will cause a more rapid build-up of powder
residue and dirt.
3. Piston - should be brushed clean daily and checked
for damage or excessive wear.
B. Firing Mechanism
© Copyright 2004 SIMPSON STRONG-TIE COMPANY INC.
Do Not Attempt To Use This Powder Actuated Tool Without First
Reading And Understanding The Information Contained In This
Manual! You Must Then Be Trained And Certified By An
Authorized Simpson Strong-Tie Representative.
CLEANING AND MAINTENANCE
© Copyright 2004 SIMPSON STRONG-TIE COMPANY INC.
READ THIS BEFORE USING!
! Read This First ! Read This First ! Read This First ! Read This First ! Read This First ! Read This First !
! Read This First ! Read This First ! Read This First ! Read This First ! Read This First ! Read This First !
! Read This First ! Read This First ! Read This First ! Read This First !
1. Breech faces should be wiped clean with a cloth and
the lubricant supplied. Check carefully around the
firing pin opening for dirt or carbon build-up.
2. Cleaning of all parts in the firing mechanism should
be conducted by an authorized Simpson Strong-Tie
repair station, twice annually or every 5,000 fastenings
whichever comes first.
WARNING - Remember, never proceed with cleaning and maintenance until
you are certain the tool is not loaded. If the tool does not function properly,
tag it "WARNING - DO NOT USE" and return it as soon as possible to an
authorized Simpson Strong-Tie repair station or to the factory.
-18-
! Read This First ! Read This First ! Read This First ! Read This First !
TABLE OF CONTENTS
DISASSEMBLING THE TOOL
WARNING - Make sure tool is unloaded before disassembly.
General Information ………………………………………………………… 3-4
WARNINGS …………………………………………………………………… 5
Your Responsibility …………………………………………………………… 6
General Operating Procedures ………………………………………………… 7
Handling the Tool and Powder Loads ………………………………………… 8
Parts Breakdown …………………………………………………………… 9-10
How to Load and Fire the Tool …………………………………………… 11-12
1. Loosen the reset pin cap by turning
it counter-clockwise and remove.
Remove the reset pin spring and reset
pin from the tool while holding the barrel
in place with your other hand.
2. Remove the barrel assembly by sliding
forward out of the receiver.
Making Safe Fastenings…………………………………………………… 13-14
Selecting Fasteners and Loads …………………………………………… 15-16
Changing the Piston ………………………………………………………… 17
Cleaning and Maintenance …………………………………………………… 18
Tool Warranty ……………………………………………………… Back Cover
4. Slide the piston forward and remove
from the barrel.
© Copyright 2004 SIMPSON STRONG-TIE COMPANY INC.
3. Remove the nose piece from the barrel.
Inspect the piston buffer for damage.
© Copyright 2004 SIMPSON STRONG-TIE COMPANY INC.
INTRODUCTION
The Simpson Strong-Tie PTM-27 and PTM-27HD tools are low velocity or
indirect-acting tools. Do not attempt to operate this or any other tool before
obtaining proper training and operator certification.
READ THIS MANUAL CAREFULLY!
It will help you operate the tool with the greatest SAFETY and efficiency by
providing you with an understanding of the safety features, operating principles
and limitations of the tool and its use. Simpson Strong-Tie disclaims any
responsibility for incidents resulting from the disregard of these instructions
and warnings.
These tools use .22 or .27 caliber loads to drive .300 headed fasteners or
1/4 inch threaded studs, ranging from 1/2 to 3 inches in length.
6. Inspect all parts for excessive wear or
5. Remove the firing modular by turning the
damage and replace all parts necessary.
cap counterclockwise and remove. The
Use only genuine Simpson Strong-Tie
firing modular should be cleaned daily
replacement parts. To reassemble
after use and lightly lubricated. To
reverse steps 1 thru 5.
reassemble, insert the modular as shown
aligning the two long rods with the
holes inside the receiver.
-17-
Each tool kit contains the following items vital to the safe operation and storage
of the tool: lockable carrying case, brushes for cleaning, instruction and safety
manual, tools for maintenance, safety goggles, ear protection, chart of fasteners
designed for these tools.
-2-
IMPORTANT SAFETY INFORMATION
SELECTING FASTENERS AND LOADS
This manual describes the proper use of the PTM-27 and PTM-27HD and
the safe operating procedures for them; however, THINKING IS YOUR
RESPONSIBILITY. You must understand ALL operating principles, safety
features and fastening limitations of these tools, to use them without risk
of serious injury or death to yourself or bystanders.
2. POWER LOAD SELECTION
REMEMBER: Do not operate this tool until you study and understand this
manual completely and become trained and certified to operate it by an
authorized Simpson Strong-Tie instructor.
For PTM-27 and PTM-27HD / .27 caliber strip loads
1.
The PTM-27 and PTM-27HD are designed to use 4 levels of powder loads,
each identified by a number and color as follows:
Simpson Strong-Tie Part #
Power Level
Color
P27SL2
P27SL3
P27SL4
P27SL5
2
3
4
5
BROWN
GREEN
YELLOW
RED
OPERATING PRINCIPLE
There are two types of Powder Actuated Tools:
This type tool uses the expanding gases of the power load to
directly force the fastener down the barrel and into the work.
CAUTION: The PTM-27 and PTM-27HD are capable of fastening into concrete
and/or steel. The fastener enters the work surface with an extreme amount of
energy. Make certain not to misdirect the energy.
-3-
© Copyright 2004 SIMPSON STRONG-TIE COMPANY INC.
This type tool uses the expanding gases of the power load to push
a captive piston which in turn forces the fastener into the work.
The PTM-27 and PTM-27HD are indirect acting tools.
© Copyright 2004 SIMPSON STRONG-TIE COMPANY INC.
.27 CALIBER STRIP LOAD - BRASS CARTRIDGE
2.
When making a test fastening start with the lightest load first going up one
level at a time until the proper level is attained.
3.
WARNING - Do Not Overpower, doing so many cause the fastener to break
and ricochet or pass completely through material and escape.
4.
Do not attempt to force a load into the chamber of a tool.
Failure to observe these or any other warnings in this manual may result in
serious injury or death.
Simpson Strong-Tie power loads are
color-coded for safety and identification
purposes. Power level should be noted
before selecting and/or using load.
In addition each box of power loads is
labeled with an indicator dial denoting
the energy level on a scale from 1
(lowest) to 12 (highest). Power loads
numbered 1 through 6 have a brass
case, and those numbered 7 through 12
have a nickel case finish.
-16-
P27SL4
.27
100/YELLOW
POWER LEVEL
6.8 X 11MM
BRASS NICKEL
POWER LEVEL
CAL.
SELECTING FASTENERS AND LOADS
-15-
BASE MATERIAL SUITABILITY
Before fastening into any material, give it the center punch test. Using the
fastener as a punch, and a hammer, strike a solid blow to the actual material
you wish to fasten into. If the point of the fastener is blunted the material is too
hard and is unsuitable. If the material cracks or shatters it is too brittle and is
unsuitable. If the fastener sinks into the material with the hammer blow, the
material is too soft and is unsuitable.
WARNING
✓
✓
© Copyright 2004 SIMPSON STRONG-TIE COMPANY INC.
✓
© Copyright 2004 SIMPSON STRONG-TIE COMPANY INC.
1. FASTENER SELECTION
1. The PTM-27 and PTM-27HD are designed to set three types of
fasteners, drive pins, threaded studs and special assemblies such
as drive pins with pre-assembled washers, conduit clips and
ceiling clips.
2. All Simpson Strong-Tie fasteners are manufactured from high
carbon steel, especially heat treated to allow ductility yet hard
enough to penetrate concrete or structural steel.
3. Drive pins vary in length from 1/2" to 3" shank length and are
.300 inch, 5/16" or 8mm-head diameter. The PTM-27 and
PTM-27HD have a capacity of 3 inches. Drive pins are used to
directly fasten suitable work materials to a suitable base material.
4. Threaded studs vary in overall length from 3/4" to 2-1/2" with
many combinations of thread length or shank length. Threads are
1/4-20 NC. Threaded studs are generally driven directly into the
base material with the work material attached subsequently with
a nut and washer.
5. Drive pins assembled with washers generally vary in length from
1" to 3" and are assembled with washers from 3/4" diameter to
1-1/2" diameter. Conduit clips are generally available in 1/2" TW,
3/4" TW and 1" TW with either a 1" or 1-1/4" drive pin assembled.
Ceiling clips are assembled with 1" or 1-1/4" drive pins and
although generally used for hanging suspended ceilings they can
be used for a variety of hanging applications.
6. Fastener penetration into concrete should be roughly 6 to 8 times
the shank diameter; higher for low psi concrete and lower for high
psi concrete, for maximum holding power.
7. When fastening into steel with a drive pin add the thickness of the
work material to the thickness of the steel plus 1/4" for the point to
fully penetrate. For threaded studs select one that has a shank
length to penetrate the steel 1/4 inch and sufficient thread length
for the work material plus a washer and nut.
8. Always use the spall guard where space allows as it helps hold the
tool perpendicular to the work surface as well as offering additional
safety to the use of the tool.
IMPORTANT SAFETY INFORMATION
If the material is too hard the fastener can ricochet and possibly escape,
striking you or bystanders and cause serious injury or death.
If the material is too soft the fastener can pass completely through and
strike someone on the other side causing serious injury or death.
REMEMBER - If you can hammer a fastener into the base material do not
attempt to drive it with any powder-actuated tool.
SAFETY STARTS WITH YOU!
Your safety and the safety of those around you should always be kept the
foremost thought in the mind of every powder actuated tool operator. Consider
that the least powerful load used in powder actuated stud drivers produce
approximately 10 times the power of a .22 caliber long rifle cartridge. Respect
this power as you would your chain saw, your lawn mower, and your rifle.
Keep safety in mind and safety will mind you.
Reliable training is necessary if you want to be a good chemist, engineer,
architect, machinist or carpenter. The only absolutely reliable training for powder
actuated tool operator lies in his or her ability to absorb and abide by the
instruction and safety precautions for each and every tool operated.
For absolute reliable training, rely on yourself.
Think of safety first!
-4-
MAKING SAFE FASTENINGS
WARNING
3. Thickness of base material is perhaps the most important consideration
for good safe fastenings. In concrete the thickness must be 3 times the
shank penetration, in other words, for 1" of shank the concrete must be
at least 3" thick. In steel thickness must be equal to or greater than the
diameter of the shank.
STUDY AND UNDERSTAND THESE RULES BEFORE OPERATING THESE TOOLS.
Before Loading and Firing
1. Never operate the tool without checking to see if the barrel is free of
obstructions and that the tool is clean and in good working condition.
2. Never attempt to alter, modify or manufacture parts for use in your
Simpson Strong-Tie tool, this can cause malfunctions and result in unsafe
functioning of the tool. Use only genuine Simpson Strong-Tie parts,
fasteners and power loads at all times.
3. Operators and bystanders must wear eye; ear and head protection at all
times. Serious injury or death can occur if these safety items are not used.
4. REMEMBER: use common sense and good judgement. Use this tool for its
intended purpose only. Know the material you are fastening into making
certain it is compatible with the powder actuated tool.
D. DO NOT USE THESE TOOLS FOR FASTENING INTO:
1. Vertical mortar joints.
2. Bricks
3. Hollow block or tile
4. Glazed tile
5. Glass
6. Hardened or tool grade steel
7. Cast iron
8. Welded areas or torch cuts
9. Spring Steel
10. Natural rock
-5-
© Copyright 2004 SIMPSON STRONG-TIE COMPANY INC.
1. ALWAYS open the tool before handling it to be certain it is unloaded.
2. ALWAYS insert the fastener first. Make sure you never double load
the fasteners.
3. NEVER load or fire the tool in an explosive atmosphere or when
flammables are nearly.
4. NEVER allow bystanders to gather around you when using the tool.
5. ALWAYS check to be sure that the tool is clean. Excessive dirt or debris
can cause accidental firing or misfiring of the tool.
6. NEVER use improper power loads or fasteners in the tool, as the may
be unsafe or damage the tool.
7. NEVER guess - before fastening into any unknown base material,
particularly in walls, perform the center punch test described in this
manual.
8. NEVER GUESS - once you determine that the base material is suitable,
make a test fastening with a brown (P27SL2) strip load. If the brown
does not set the fastener try green (P27SL3), yellow (P27SL4), red
(P27SL5) until the proper power is determined.
© Copyright 2004 SIMPSON STRONG-TIE COMPANY INC.
Prepare for Loading
E. REMEMBER: If you are unsure of the base material being suitable, perform
the center punch test described on page 13; failure to do so may cause
serious injury or death.
-14-
MAKING SAFE FASTENINGS
YOUR RESPONSIBILTY
There is no substitute for good common sense; however, knowing and
understanding the following basic rules will help ensure safe use of
Simpson Strong-Tie tools.
A. TRAINING
1. Remember you must obtain certification of training from an authorized
Simpson Strong-Tie instructor. If such training is not available where
you purchased the tool, call or write Simpson Strong-Tie before
attempting to operate the tool for information on the nearest
authorized instructor. Remember obtaining this instruction is
YOUR RESPONSIBILITY.
2. Read this manual completely and understand its contents fully before
attempting to operate the tool. If there is anything in this manual that
you do not fully understand, ask your instructor or call Simpson
Strong-Tie for information. Remember reading and understanding
this manual is YOUR RESPONSIBILITY.
A. CENTER PUNCH TESTING: Before making a fastening always test the base
material and the work piece. Using a long Simpson Strong-Tie fastener, a
hammer AND SAFETY GLASSES, place the point of fastener against the
surface to be tested and strike the head with an average hammer blow.
DO NOT FASTEN THROUGH OR INTO A MATERIAL IF:
1. The fastener point is blunted - this material is too hard.
2. The material cracks or shatters - this material is too brittle.
B. APPLICATIONS FOR THE PTM-27 and PTM-27HD: Both these tools are
capable of making a wide range of fastenings; however each has a general
purpose for which it was designed.
1. PTM-27 - a heavy-duty tool for the professional who requires
the high-speed production of a 10 shot strip load tool.
2. PTM-27HD - the same heavy-duty tool but for the professional who
fastens daily but prefers the versatility and economy of a single
shot tool.
© Copyright 2004 SIMPSON STRONG-TIE COMPANY INC.
REMEMBER: Use for a base material only a substance that shows an
impression when tested by the center punch method, but that does NOT blunt
the point of the fastener, does NOT crack or shatter, and does NOT receive the
fastener easily with an average hammer blow.
© Copyright 2004 SIMPSON STRONG-TIE COMPANY INC.
DO NOT FASTEN INTO A BASE IF:
1. The fastener sinks easily into the surface with an average blow - this
material is too soft - fastener may penetrate causing serious injury
or death.
B. LIMITATIONS
1. Just as no instruction book of any kind can forewarn a learner against
all possible situations or emergencies that may arise, neither can
Simpson Strong-Tie instructors or printed instructions detail all possible
conditions or circumstances surrounding the use of this tool or its
supporting products. Recognizing these circumstances and reacting
in a safe manner is YOUR RESPONSIBILITY.
2. Simpson Strong-Tie disclaims any responsibility for injury or death,
which may result from any disregard of this manual or the verbal
instruction of the authorized Simpson Strong-Tie instructor. Following
the rules of safe operation given to you here and verbally is
YOUR RESPONSIBILITY.
SAFETY STARTS WITH YOU!!!
OBTAIN AUTHORIZED TRAINING
C. MINIMUM SPACING AND BASE MATERIAL THICKNESS
1. Edge spacing when fastening in concrete must be at least 3" and in
steel at least 1". Fastening too close to the edge may cause the
fastener to break out and ricochet.
2. Spacing between fasteners is equally important in concrete.
Maintain a 4" spacing for 1/4" fasteners, and 6" for 3/8" fasteners.
In steel maintain a 1-1/2" spacing for both diameter fasteners.
-13-
-6-
5. Depress the tool firmly against
the work surface using both
hands. Make certain you hold the
tool perpendicular to the work.
The tool is now in the firing
position, if you have followed
ALL safety precautions, pull
the trigger.
WARNING
6. After making the fastening, lift
the tool off the work surface and
pull the nose piece sharply
forward, or flip the tool open
with a snap of the wrist. This
action resets the piston and
prepares it for the next load.
© Copyright 2004 SIMPSON STRONG-TIE COMPANY INC.
7. To remove the spent strip loads,
grasp the strip firmly and pull
upwards in a smooth motion.
© Copyright 2004 SIMPSON STRONG-TIE COMPANY INC.
GENERAL OPERATING PROCEDURES OF THE PTM-27 AND PTM-27HD
1. Always point the tool away from yourself and all bystanders.
2. Never place your hand over the front (muzzle) end of the tool.
3. An accidental discharge will seriously injure your hand.
4. Always hold the tool perpendicular to the work surface making certain
that NO debris is present on the surface.
5. Never set a fastener too close to another set fastener, as this can
cause a ricochet.
6. Never fasten less than 3" from the edge of concrete, or less than 1/2"
from the edge of steel.
7. Never fasten into rough, spalled, cracked or uneven concrete. Fasten
at least 3" from the outer edge of a spalled area.
8. Never fasten into material which is too hard such as hardened steel, welds,
cast steel, marble, spring steel, natural rock, etc. This could cause the
fastener to shatter and escape and result in serious injury or death.
9. Never fasten into material which is too brittle such as glass, glazed
brick, glazed tile, slate, etc. This could cause the material to shatter
and result in serious injury or death.
10. Never fasten into material, which is too soft such as wood, plaster,
drywall composition board, plywood, etc. This could cause the fastener
to pass through and escape resulting in serious injury or death.
11. Never fasten into a concrete base material less than 3 times the shank
penetration of the fastener. Never fasten into a steel base material
less than the shank diameter of the fastening being used. Fastening
into any base material, which is too thin, may allow the fastener to
pass through and escape resulting in serious injury or death.
12. Never attempt to fasten through a disc, use only pre-assembled
fasteners and disc (PDPW-series) when a disc is required.
13. Never fasten through an existing hole in any material as the fastener
could hit the edge of the hole and ricochet.
14. If you decide not to make a fastening after having loaded the tool,
remove both the power load and fastener from the tool before
returning it to its case.
WARNING
Never place your hand over the nose piece of the tool unless inserting a
fastener and only then with the tool fully open and the chamber empty!
FAILURE TO OBSERVE ANY OF THESE WARNINGS MAY RESULT
IN SERIOUS INJURY OR DEATH TO YOURSELF OR A BYSTANDER.
-7-
-12-
HOW TO LOAD AND FIRE THE TOOL
WARNING
A. HANDLING THE PTM-27 AND PTM-27HD AND POWDER LOADS
• NEVER leave a loaded tool unattended. Once the tool is loaded make the
fastenings or unload the tool.
• NEVER carry powder loads in the same pocket or container with fasteners
or any other hard objects.
• NEVER use powder actuated loads in firearms. They are more powerful
than normal small arms ammunition.
• NEVER carry a loaded tool from job to job.
• ALWAYS Properly brace yourself when working on scaffolding or ladders
• ALWAYS wear eye, ear and head protection.
• NEVER use the tool for anything other than its intended purpose.
1. Grasp the nose piece and pull
sharply forward until you feel a
definite stop. This resets the
piston and sets the strip advance
lever into the correct location.
DO NOT place your hand over
the nose piece when operating
the tool !
4. Partially close the tool by pulling
the nosepiece rearward into the
detent (carry) position.
WARNING - Never place your
hand over the nose piece while
closing.
-11-
© Copyright 2004 SIMPSON STRONG-TIE COMPANY INC.
3. Select the proper powder load
and insert it into the chamber.
Always start with the lightest
load (P22AC1). WARNING Always keep the tool pointed
downward and away from
yourself and any bystanders.
© Copyright 2004 SIMPSON STRONG-TIE COMPANY INC.
2. Insert the fastener into the nose
piece of tool, head or threaded
stud end first. Push fastener until
the pointed end is even with the
face of the nose piece.
B. OPERATING PROBLEMS
• If the powder load does not fire after pulling the trigger, hold tool firmly
against the work surface for at least 30 seconds. Carefully remove tool
from work surface, making sure to point it away from yourself and any
bystanders. Remove load and dispose of it in a can of water. Unfired loads
must never be thrown in trash containers or carelessly discarded in any way.
• NEVER attempt to force or pry an unfired powder load from the breech plug
with a sharp or pointed object, as this may cause an accidental discharge.
• NEVER attempt to disassemble a jammed tool containing a live powder
load. Tag the tool "DO NOT USE" and store it safely in a locked case. Call
your Simpson Strong-Tie representative for tool repair.
• If at any time during the operation of the tool you feel it is not working
properly, STOP using it and call your Simpson Strong-Tie distributor.
C. OPERATING PROBLEMS
• If unnecessary bystanders are in the area tell them to leave, warn all others
that you are using a powder actuated tool.
• Check the work surface to be sure it is clear of any debris. Clear away any
debris so that the tool sits flush on the work surface.
• Check work area for explosive or flammable materials. If any are found
remove before operating tool.
• Check the breech faces of the tool to be sure there is no dirt, grit or
foreign objects present.
• Check the barrel to make sure you don't double load it, and that
it is clear of any obstruction.
BEFORE loading the tool operate it a few times on a solid surface making
certain all parts move freely and that the firing pin clicks when the tool is fully
depressed and the trigger is pulled. "Dry firing" will not damage the tool.
-8-
TOOL ASSEMBLY BREAKDOWN
PTM-27 and PTM-27HD
Strip, Feeding Module
Fastening Module
Firing Module
PTM-01102
PTM-FM1
PTM-SF1
PTM-01112
PTM-01335
PTM-01107
© Copyright 2004 SIMPSON STRONG-TIE COMPANY INC.
© Copyright 2004 SIMPSON STRONG-TIE COMPANY INC.
PTM-01114
PTM-01106
PTM-01122
NOTE: For tools with serial number
ending with “A” use PTM-03122
PTM-01106WC
for PTM-27W
PTM-01108
NOTE: For tools with serial number
ending with “A” use PTM-03108
PARTS LIST OF PTM-27
PTM-SF1
Feeding Module
Serviced or replaced as
an entire module.
PTM-FM1
Firing Module
Serviced or replaced as
an entire module.
-9-
PTM-FP1
Fastening Module Includes the following:
PTM-01102
PTM-01106
PTM-01107
PTM-01108
PTM-01112
PTM-01114
PTM-01122
PTM-01135
Barrel
Nose Piece
Piston Reset Pin
Reset Pin Cap
Piston with Ring
Piston Buffer
Reset Pin Spring
FM Retaining Screw
PARTS LIST OF PTM-27HD
PTM-01112HA
PTM-01106HA
PTM-01114HA
PTM-01102HA
-10-
PTM-SG1HA
(Optional)