1
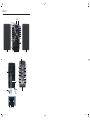
HOME TECH
Micro Stereo System
6
KH 2311
CY
Micro Stereo System
Operating instructions
KOMPERNASS GMBH
BURGSTRASSE 21 · D - 44867 BOCHUM
www.kompernass.com
ID-Nr.: KH2311-02/10-V3
CV_KH2311_DT49401_LB6.indd 1-3
30.03.2010 9:33:11 Uhr
KH 2311
1
2
j
h
g
f
d
s
a
p
3
4
5
6
7
8
9
o
i
0
u
k
zt re wq
k
M
N
m
5#
B
5@
V
C
X
Y
L
K
J
H
5!
D
l
n
F
G
y
b
CV_KH2311_DT49401_LB6.indd 4-6
v
c
x
30.03.2010 9:33:12 Uhr
CONTENT
PAGE
Intended Usage
2
Contents
2
Technical Data
2
Safety instructions
2
Positioning the device
3
The operating components
4
Inserting the batteries
4
Becoming acquainted with the remote control
4
Connecting the components
4
Switching the device on and off
5
Setting the time
5
Selecting mode of operation
5
Setting the sound volume levels
5
Setting the sound quality
5
Using headphones
5
Operating the radio
5
Operating the CD player
6
MP3/WMA functions
7
Playback of USB memory devices
8
Operating the cassette player/recorder
8
Line In operation
9
Setting the alarm wake time
9
Snooze function
10
Sleep function
10
Cleaning and care
10
Troubleshooting
10
Disposal
10
Notes regarding CE conformity
10
Importer
10
Warranty & Service
11
Read the operating instructions carefully before using the device for the first time and preserve this booklet for later reference.
Pass this manual on to whoever might acquire the device at a future date.
This documentation is copyright protected. Any duplication and/or reproduction wholly or partially including reproduction of
the illustrations, also in a modified form, is only permitted with written authorisation from the manufacturer.
-1-
Intended Usage
Weight
Main device:
Per speaker:
Operating temperature:
Storage temperature :
Protection class:
This Micro system is intended exclusively for the playback of
audio CDs, MP3/WMA CDs, CD-R, CD-RW, USB storage
mediums, audio cassettes and for the playback of radio programmes. Additionally, the Micro system is suitable for the recording of audio cassettes. The Micro system is not intended
for use in commercial or industrial environments. No liability/
warranty will be accepted for damage resulting from improper
use of the device or from unauthorised modification!
Subject to technical changes.
Safety instructions
Contents
1
2
2
1
1
• These operating instructions are the basis for any handling
of the device and must be kept in the immediate vicinity of
the device.
• This device is not intended for use by individuals (including
children) with restricted physical, physiological or intellectual abilities or deficiencies in experience and/or knowledge unless they are supervised by a person responsible
for their safety or receive from this person instruction on
how the device is to be used. Children must be supervised
to ensure that they do not play with the device.
• Check the device and all parts for visible damages. The
safety concept can work only if the device is in a faultless
condition.
Micro system
Speakers
Speaker cables
Remote control (incl. 3 V battery, CR-2032)
Operating manual
Technical Data
Rated voltage:
Power consumption:
In standby
in operation
Music output:
230 V~, 50 Hz
1.55 Watt
max. 26.5 Watt
2 x 2 Watt RMS
•
•
•
Radio frequency range: MW (AM): 526.5 -1606.5 kHz
VHF (FM): 87.5 -108 MHz
The technical details of the device allow for an adjustable
frequency range outside of the receivable MW (AM) 526.51606.5 kHz, and/or FM (USW) 87.5 - 108 MHz frequency
ranges. In some countries, different national regulations may
apply to the assigned radio frequency ranges. Please note
that information received outside of the assigned radio frequency ranges may not be exploited, passed on to third parties or otherwise misused.
•
•
•
USB port
Readable storage mediums: USB1.1 and 2.0 up to
a capacity of 32GB
CD player:
Playback formats:
Laser class 1
CD, CD-R, CD-RW, MP3/WMA
CDs
Cassette:
Standard cassette
(C-90 or shorter)
4.75 cm/sec.
Tape speed:
Headphones output:
Maximum
output voltage:
137 mV
Remote Control
Battery:
1 x 3 V Type CR 2032
approx. 2 kg
690 g approx.
5° - 40°C
-20° - 60°C
II /
Risk of explosion!
Do not throw batteries into a fire.
Do not recharge the batteries.
Never open batteries, never solder or weld batteries.
The risk of explosions and injuries exists!
Regularly check the condition of the batteries.
Leaking batteries can cause damage to the remote control
or to the device.
If you do not intend to use the device for an extended
period of time, remove the batteries.
If batteries have leaked put on protective gloves and clean
the battery compartment with a dry cloth.
Risk of electrical shocks.
• Connect the device to an electrical wall socket with a mains
voltage of 230 V ~ /50 Hz.
• Do not operate the device if the connection cord or the
power plug is damaged.
• The connection cord or device should be immediately repaired or exchanged by the customer service department
if they fail to function faultlessly.
• Never submerse the device in water. Wipe it only with
a slightly damp cloth.
• Do not expose the device to rain and never use it in a humid
or wet environment.
• Make sure that the power cord does not become wet during operation.
• You must not open the device housing or attempt to repair
the device yourself. There is invisible radiation inside the
device (Class 1 Laser) Furthermore should you do so, the
safety concept of the device may be compromised and the
warranty becomes void.
• Do not place objects containing fluids, e.g. flower vases,
on or near the device.
3.5mm Jackplug
Measurements (W x H x D):
Main device:
15.4 x 22.2 x 20.4 cm
Per speaker:
13.7 x 21.9 x 12.5 cm
-2-
Notice regarding disconnection from mainspower
Danger of eye injuries!
• This device is fitted with a "Class 1 Laser". Never look
directly into an open CD compartment The invisible laser
beam can damage your eyes.
To completely disconnect the device from mains power, the
plug must be removed from the power socket. For this purpose
the device must be set up so that constant, unimpeded access
to the mains power plug is guaranteed thus allowing for a
quick withdrawal of the mains plug in an emergency situation.
To eliminate the risk of fire the mains plug must be disconnected from the power source in the event that the device is not
going to be used for an extended period of time, for example,
during holidays.
CAUTION!
Information on surge voltage (EFT / rapid electrical
transition process) and Electrostatic discharge:
In the case of a malfunction due to rapid electrical transition
(surge voltage) or electrostatic discharge the product must
be reset (it may be necessary to disconnect the power source
and then reconnect it) to restore normal operation.
• Always take hold of the power cable by the plug. Do not
pull on the cable itself and never touch the power cable
with wet hands, this could result in either a short circuit or
you receiving an electric shock. Do not place the device,
furniture or anything else on the power cable and ensure
that it does not become clamped. Never make a knot in
the power cable and do not bind it together with other
cables. Place the power cable in a position where it cannot
be trodden on. A damaged power cable can cause a fire
or an electrical shock. Check the power cable from time
to time. Should it become damaged, contact your nearest
authorized customer service centre or dealer to have it
replaced.
• The power plug must always be easily accessible, so that
in the event of an emergency the device can be quickly
disconnected from the mains power supply.
Note: A case of electrostatic discharge occurs if you
walk with plastic-soled shoes over a carpet that also contains
elements of plastic. Through the friction of the shoe soles on
the carpet a charge is created in the body which discharges
itself as soon as you touch an electricity conducting object,
such as for example a door knob or the bodywork of a motor
vehicle. Thereby it is sufficient to approach the conductor to
within only a few cm. Direct contact is not required to effect a
discharge. The charge can also unload itself over an electrical arc. A discharge is thus also possible through plastic housing components.
Note: This device is equipped with non-slip rubber feet.
As upper surfaces can comprise of various materials and are
treated with various cleaning materials, it cannot be completely excluded that some of these materials contain components
that could attack and soften the rubber feet. If possible place
an anti-slip material under the feet of the device.
Risk of fire!
• Do not use the device near hot surfaces.
• Do not place the device in locations that are subject to
direct sunlight. If you do, it may overheat and become irreparably damaged.
• In order to ensure sufficient ventilation place the device in
a location that has at least 10 cm clearance between it
and the wall.
• Never leave the device unattended while it is being used.
• Never cover the ventilation slots of the device while it is on.
Avoid placing this device in locations that provide insufficient ventilation or hot locations and do not place the device in direct sunlight or under strong artificial light sources.
• Do not place open fire sources, such as candles, on the
device.
• When a storm and/or thunderstorm with the risk of lightening threatens disconnect the device from the mains power.
Observe copyright laws
When recording on CDs, USB memory mediums or from a
radio transmission obeserve the copyright laws of the country
in which the device is be used.
Positioning the device
> Remove the Micro system and accessories from the packing.
> Remove the transportation safety device from the CD compartment and all adhesive tapes/foils from the device.
> Place the Micro system on an even, level surface. Place
the micro system in such a position that the CD tray cover
can open fully.
> Place the speakers to the right and left of the Micro system.
Risk of personal injury!
• Keep the power cord and device away from children.
Children frequently underestimate the dangers of electrical
devices.
• Provide a stable location for the device.
• Do not operate the device if it has sustained a fall or is
damaged. Arrange for the device to be checked and/or
repaired by qualified technicians.
• Keep batteries well away from children. Children can put
batteries into their mouths and swallow them. If a battery is
swallowed medical assistance must be sought immediately.
-3-
The operating components
Inserting the batteries
On the device
q CD compartment
w OPEN/CLOSE
The remote control requires a 3 V battery type CR2032,
which has been preinstalled at the factory. To protect against
premature discharging the poles have been isolated with a
plastic strip, which you can simply pull out before initial operation. The remote control is then ready for operation.
e
r
t
y
u
i
o
a
s
d
f
g
h
j
k
l
1(
2)
2!
2@
2#
2$
2%
2^
2&
2*
2(
3)
3!
3@
3#
3$
3%
3^
- Pressure point, CD compartment open /close
Display
Infrared sensor for the remote control signals
LED STEREO
- VHF stereo reception indicator
/PLAY/PAUSE/BAND - Playback start/stop
radio band switching
- End playback
STOP/FM MO/ST.
VHF mono/stereo switching
SNOOZE
- Switch on snooze function
TUNING
- Radio station tuning
Cassette compartment cover
- Stop cassette playback
- End cassette playback
- Open cassette compartment
- Cassette wind forward
- Cassette wind backwards
- Start cassette playback
- Start cassette recording
- Headphones socket
VOL +
- Volume increase
VOL —
- Volume decrease
USB IN
- USB port
PROG/CLOCK-ADJ.
- CD programme saving/
setting the time of day
FUNCTION
- Select mode of operation
LED STANDBY
- Operation indicator
STANDBY
- On / Standby button
SKIP/SEARCH
- Title skip/Search backwards
PLAY MODE
- Repeat function/Random
playback
SKIP/SEARCH
- Title skip/Search forward
Speaker
Mains power switch
Power cord
LEFT speaker connection +
LEFT speaker connection —
RIGHT speaker connection —
RIGHT speaker connection +
FM (VHF) dipole antenna
LINE IN-Socket
- Connection of external audio
sources
If the device no longer reacts reliably on the remote control
signal, the battery is depleted. Change the battery with a new
one of the same type.
> For this open the battery compartment on the rear side of
the remote control. Press the battery holder's locking device to the side and pull the holder out (see illustration).
> Remove the batteries and replace them with new ones of
the same type. With this make sure that you observe the
correct polarity as depicted on the battery holder.
> Slide the battery holder back into the remote control until it
locks into place.
Becoming acquainted with the remote control
Point the remote control towards the device when you activate
its buttons. The remote control functions at a distance of approx. 5m from the device and at an angle of at least 60°.
For transmission of the signal there must be no objects placed
between the device and the remote control.
Connecting the components
Loudspeakers
> Connect the speaker wires of the right speaker to the right
speaker terminals:
• connect the grey lead of the speaker wire to the + terminal.
• connect the black lead of the speaker wire to the — terminal.
> Connect the speaker wires of the left speaker to the left
speaker terminals:
• connect the grey lead of the speaker wire to the + terminal.
• connect the black lead of the speaker wire to the — terminal.
On the remote control:
3& STANDBY/ON
- On / Standby button
3* /PLAY/PAUSE/BAND - CD playback start/stop
- radio band switching
- CD playback end
VHF mono/stereo switching
SKIP/SEARCH
- Title skip/Search forward
SKIP/SEARCH
- Title skip/Search backward
FOLDER
- to the next MP3/WMA folder
FOLDER
- to the previous MP3/WMA folder
AL. SET/OFF - Alarm 2 set/deactivate
AL. SET/OFF - Alarm 1 set/deactivate
VOLUME +
- Volume increase
VOLUME —
- Volume decrease
Battery compartment (rear panel)
MUTE
- Switching sound to mute
EQ
- Activate sound settings
SLEEP
- Setting the sleep function
PLAY MODE
- Repeat function/Random
playback
FUNCTION
- Selecting mode of operation
3( STOP/FM MONO/ST.
4)
4!
4@
4#
4$
4%
4^
4&
4*
4(
5)
5!
5@
5#
Power supply
> Connect the plug of the power cable to a properly installed
power socket supplying 230 V ~/50 Hz.
-4-
Switching the device on and off
> For this press repeatedly the FUNCTION button on the
device or on the remote control until the desired operation
mode is shown in the display.
To supply the device with mains power, place the power switch
on the rear panel of the Micro system to the "ON" position. The
LED STANDBY lights up.
Setting the sound volume levels
> To switch the device on press the STANDBY button on
the device or the STANDBY/ON button on the remote
control. The Micro system is now operational and the blue
background illumination lights up in the display.
> To put the device back into the standby mode press the
STANDBY button on the device once more or the
STANDBY/ON button on the remote control.
> The device consumes power in the standby mode. To
disconnect the device from mains power move the power
switch on the rear panel of the Micro system to the "OFF"
position.
> To increase the volume press or hold the VOL + button on
the device and/or VOLUME + on the remote control until
the desired volume is reached.
> To decrease the volume press or hold the VOL - button on
the device and/or VOLUME - on the remote control until
the desired volume is reached.
> To switch the sound to mute, press the button MUTE on
the remote control.
> To switch the sound back on press the MUTE button
once more or one of the buttons VOL + or VOL -.
Setting the sound quality
Setting the time
The Micro system is equipped with several sound settings
(CLASSIC, ROCK, POP, JAZZ), which you can access according to the currently playing music.
You can only adjust the clock in standby mode. The programming for the time is not retained if the device is disconnected
from the power network or switched off with the power switch.
If, during the setting, approx. 10 seconds elapses without a
button being activated the device changes to the standby
mode and the settings must be carried out again.
> For this press repeatedly the EQ button on the remote control until the desired sound setting is shown in the display.
With the initial pressing of the EQ button the current setting
(PASS) is shown. PASS stands for "Passive" (neutral).
> Press and hold the PROG/CLOCK-ADJ. button on the
device until the notice 24H appears in the display.
> Press the button SKIP/SEARCH or SKIP/SEARCH
on the device and/or on the remote control to set the time
to 24 hour or 12 hour display.
> Press the PROG/CLOCK-ADJ. button to save the setting.
The hour indicator blinks in the display.
> Press the button SKIP/SEARCH or SKIP/SEARCH to
set the hour.
> Press the PROG/CLOCK-ADJ. button to save the setting.
> Press the button SKIP/SEARCH or SKIP/SEARCH to
set the minutes.
> Press the PROG/CLOCK-ADJ. button to save the setting.
The time of day is now set and activated.
Using headphones
You can connect headphones to the Micro system with a 3.5mm
jackplug (not supplied). The headphones socket is located on
the front of the Micro system. When you have connected the
headphones, the loudspeakers are disconnected and you will
only hear sound via the headphones.
Attention! Listening to music with headphones for
long periods and at high sound volume levels can
lead to hearing damage!
Selecting mode of operation
Operating the radio
You can select from the following modes:
This device receives radio stations on the frequency bands, Ultra short wave (USW or engl. FM) and Medium wave (MW
or engl. AM).
• CD
• USB
> In order to receive a good VHF reception with the Micro
system unwind the dipole antenna on the rear panel of the
device completely.
> Should FM radio reception be inadequate, change the
position of the wire antenna. Secure the dipole antenna, if
necessary, with sticky tape.
> The device has a built in ferrite antenna for reception of
MW stations. When the MW reception is insufficient turn
the device in a more favourable direction.
> Switch the Micro system on with the STANDBY button
on the device or with the STANDBY/ON button on the
remote control.
• RAD
• LINE
• TAPE
- Playback of audio CDs or MP3/WMA CDs
- Playback of MP3/WMA files on a USB
data carrier
- Playback of radio stations
- Playback of audio sources through the LINE
IN connection.
- Playback of audio cassettes
-5-
Playback stop/resume
> During playback press the /PLAY/PAUSE/BAND
button on the device and/or on the remote control to stop
playback. With stopped CD playback the number of the
currently playing title and the pause symbol blink in the
display.
> To resume playback press the /PLAY/PAUSE/BAND
button once more.
> To activate the radio function keep pressing the FUNCTION
button on the device and/or on the remote control until
appears in the display.
> Select with the button/PLAY/PAUSE/BAND the
desired frequency band FM or AM.
> With the help of the TUNING controller set the radio station. Turn the controller in a clockwise direction to select
stations with a higher broadcast frequency than the one
currently shown in the display.
> Turn the TUNING controller in a counter clockwise direction to select stations with a lower broadcast frequency
than the one currently shown in the display.
> If the device receives VHF transmissions in stereo the LED
STEREO lights up on the device.
> Should the stereo reception become noisy press the
STOP/FM MO/ST. button on the device and/or the
STOP/FM MONO/ST. button on the remote control
to switch to mono reception. The LED Stereo goes out and
S-OFF appears briefly in the display.
> Press the button STOP/FM MO/ST. on the device and/
or the button STOP/FM MONO/ST. on the remote control again to switch back to stereo reception. S-ON appears
briefly in the display.
Next/previous title
> To playback the next title of a CD press the button SKIP/
SEARCH on the device and/or on the remote control.
> To playback the previous title of a CD press twice briefly
in succession the SKIP/SEARCH button on the device
and/or on the remote control.
Search forward and backward
You can activate a search to look for specific passages within
a title. During the search no sound will play.
> For this, during playback, hold down the button
SKIP/SEARCH (Search forward) and/or the button
SKIP/SEARCH (Search backwards) until the desired
location in the title is reached.
Stopping playback
> Press the STOP/FM MO/ST. button on the device and/
or STOP/FM MONO/ST. on the remote control.
Operating the CD player
The device plays audio CDs (CD-A) and MP3/WMA CDs.
Both pressed and blank discs burnt on the computer of the
format CD-R and CD-RW are supported. Because of the many
different kinds of blank discs, computer types, operating systems,
burning software and burning processes we are not able to
guarantee that every "burnt" disc will playback faultlessly.
Removing the CD
> To open the CD compartment press carefully on the spot
marked " OPEN/CLOSE" on the CD compartment lid.
The lid will open.
> Remove the CD.
> To close the CD compartment push the lid down, by hand,
and allow it to lock into place by carefully pressing on the
spot marked " OPEN/CLOSE".
Inserting a CD
> Switch the Micro system on with the STANDBY button
on the device or with the STANDBY/ON button on the
remote control.
> To activate the CD function keep pressing the FUNCTION
button on the device and/or on the remote control until the
notice "CD" appears in the display.
> To open the CD compartment press carefully on the spot
marked " OPEN/CLOSE" on the CD compartment lid. The
lid will open.
> Place the CD with the marked side up pointing towards the
arbor of the CD disc in the CD tray.
> Press the CD lightly downwards until it locks firmly onto the
arbor.
> To close the CD compartment push the lid down, by hand,
and allow it to lock into place by carefully pressing on the
spot marked " OPEN/CLOSE".
The device will now read the CD. Subsequently the number of
the CD title appears in the display. Playback of the CD starts
automatically and in the display is shown the number of the
currently playing title, the playback symbol as well as "CD".
Switching on the repeat function
With the repeat function you can repeat play individual titles
or all the titles of a CD.
> To repeat an individual title press, before or during playback, the PLAY MODE button on the device and/or on the
remote control.
The prompt
appears in the display.
> To repeat all titles of a CD press twice the button PLAY
MODE on the device and/or on the remote control.
The notice
ALL appears in the display.
> To end repeat playback keep pressing the button PLAY
MODE on the device and/or on the remote control until
the notices
ALL and RAND go out.
Playing back titles in random order
> Press three times the button PLAY MODE on the device
and/or on the remote control. The notice "RAND" appears
in the display. The titles on the CD will be played back
from now on in random order.
> Press the button PLAY MODE on the device and/or on the
remote control again in order to switch off the function.
-6-
Programme playing order
You can programme an order in which the titles of a CD
are to be played. 32 programme slots are available for this
purpose. Programming is only possible when playback is
stopped.
Playback of the CD starts automatically and in the display
appears the playback symbol . Alternating with the title
number the display shows the number of the folder from
which is currently being played (i.e. F01 as the 1st. folder in
alphabetical order).
> Press the button PROG/CLOCK-ADJ. on the device.
In the display appears the notice "PROG" and the programme slot 1 (P - 0 1) of the title which is to be played first
with the programmed playback.
If the MP3/WMA CD contains several folders proceed as
follows:
> To select a folder before the start of playback press,
repeatedly, the button FOLDER or FOLDER on the
remote control.
> Press the button /PLAY/PAUSE/BAND on the device and/or on the remote control to start playback with
the files in this folder. After the files from this folder have
played back the device switches to the next alphabetical
folder.
> To select another folder during playback press repeatedly
the button FOLDER or FOLDER on the remote control.
> Select with the buttons SKIP/SEARCH and/or SKIP/SEARCH the desired title for the indicated programme slot. In place of the programme position indicator
the display now shows the CD titles available for selection.
> To save the selected title press the button PROG/CLOCK-ADJ.
on the device.
> To programme further titles, repeat the previously described
steps. When all programme slots are occupied FUL will be
shown in the display.
Playback stop/resume
> During playback press the /PLAY/PAUSE/BAND
button on the device and/or on the remote control to stop
playback. With stopped CD playback the number of the
currently playing title and the pause symbol blink in the
display.
> To resume playback press the /PLAY/PAUSE/BAND
button once more.
Starting the programmed title list.
> When you have programmed all desired titles you start
playback by pressing the button /PLAY/PAUSE/
BAND on the device and/or on the remote control.
> If you press the button STOP/FM MO/ST. on the device
and/or STOP/FM MONO/ST. on the remote control
you will end playback, however, the device remains in
programme mode.
> If you press the button STOP/FM MO/ST. on the device
and/or STOP/FM MONO/ST. on the remote control
twice you delete the programme and the device exits the
programme mode.
The programmed title sequence is deleted when you open
the CD compartment, switch to another mode of operation or
switch off the Micro system. The notice "PROG" is erased in
the display.
Stopping playback
> Press the button STOP/FM MO/ST. on the device or the
button STOP/FM MONO/ST. on the remote control.
Next/previous title
> To playback the next MP3/WMA title on the CD press
the button SKIP/SEARCH on the device and/or on the
remote control.
> To playback the previous MP3/WMA title from a CD
press twice briefly in succession the SKIP/SEARCH button on the device and/or on the remote control.
MP3/WMA functions
Search forward and backward
You can activate a search to look for specific passages within
an MP3/WMA title.
"MP3" denotes a process and/or format developed by the
Fraunhofer Institute for the compression of audio data. In the
MP3 format compressed music pieces are only a fraction of
their original size, which, for example, on CD-Rs/CD-RWs
allows for storage of a considerably greater volume of music
than on commercially available audio CDs, on which audio
data is stored in the CDA format. Indeed the audio quality is
scarcely reduced by the process.
> For this, during playback, hold down the button
SKIP/SEARCH (Search forward) and/or the button
SKIP/SEARCH (Search backwards) until the desired
location in the title is reached.
Programming an MP3/WMA title sequence
You can programme the sequence in which the titles of an
MP3/WMA CD are to be played back. 99 programme slots
are available for this purpose. This is only possible when the
play function has been stopped
"WMA" is a process and/or format developed by Microsoft®
for the compression of audio data. The compression process
is largely comparable to the MP3 process.
MP3/WMA title playback
> Place a CD with MP3/WMA files into the CD compartment. The device will now read the CD. In the display appears the notice "MP3" and/or "WMA" and, alternating,
the number of the available folder and the number of the
disc title.
> Press the button PROG/CLOCK-ADJ. on the device.
In the display appears the notice "PROG" and the programme slot 1 (P - 0 1) of the title which is to be played first
with the programmed playback.
> Select with the buttons SKIP/SEARCH and/or SKIP/SEARCH the desired folder for the indicated programme slot.
-7-
Playback of USB memory devices
> To save the selected folder press the button PROG/
CLOCK-ADJ..
> Select with the buttons SKIP/SEARCH and/or SKIP/SEARCH the desired title for the indicated programme slot.
> To save the selected title press the button PROG/CLOCK-ADJ..
> To programme further titles, repeat the previously described
steps. When all programme slots are occupied FUL will be
shown in the display.
The Micro system is equipped with a USB port. You can use
this interface to play MP3 and WMA files.
> Connect the USB memory medium to the USB port.
> Switch the Micro system on with the STANDBY button
on the device or with the STANDBY/ON button on the
remote control.
> Press repeatedly the button FUNCTION until the notice
"USB" appears in the display.
The device now reads the medium. After which the display
shows the number of available folders and the number of
the included titles. Playback starts automatically and in the
display is shown the title number and the file format of the currently playing title (MP3 or WMA).
Starting the programmed title list.
> When you have programmed all desired titles you start
playback by pressing the button /PLAY/PAUSE/
BAND on the device and/or on the remote control.
> If you press the button STOP/FM MO/ST. on the device
and/or STOP/FM MONO/ST. on the remote control you
will end playback, however, the device remains in programme mode.
> If you press the button STOP/FM MO/ST. on the device
and/or STOP/FM MONO/ST. on the remote control
twice you delete the programme and the device exits the
programme mode.
The programmed title sequence is deleted when you open
the CD compartment, switch to another mode of operation or
switch off the Micro system. The notice "PROG" is erased in
the display.
Further operations are identical to the playback of MP3/
WMA CDs.
> Before you disconnect the memory medium from the USB
port stop playback with the button STOP/FM MO/ST.
on the device and/or STOP/FM MONO/ST. on the remote control.
Note:
Because of the many different formats, specifications and
manufacturers of flash memory mediums we can not guarantee that every memory medium can be played. It is not possible to playback hard discs connected to the USB port.
Switching on the MP3/WMA repeat function
With the repeat function you can repeat playback individual
MP3/WMA titles, the contents of a folder or all the titles on
an MP3/WMA CD.
Operating the cassette player/recorder
> To repeat an individual MP3/WMA title press, before or
during playback, the PLAY MODE button on the device
and/or on the remote control.
The prompt
appears in the display.
Inserting a cassette
> To open the cassette compartment, press the key .
.
The cassette compartment opens automatically.
> Place the cassette with the tape opening down into the
holder in the cassette compartment lid. The tape should be
taut and without loops. Close the cassette compartment by
hand.
> To activate the cassette recorder press repeatedly the
button FUNCTION on the device and/or on the remote
control until "TAPE" and the time of day appears in the
display.
> To repeat all titles in a folder on the MP3/WMA CD press
twice the button PLAY MODE on the device and/or on the
remote control.
In the display the notice
FOLD appears.
> To repeat all titles of an MP3/WMA CD press the button
PLAY MODE three times.
The notice
ALL appears in the display.
Starting cassette playback
> Press the cassette key .
> To end repeat playback keep pressing the button PLAY
MODE on the device and/or on the remote control until
the notices
ALL and RAND go out.
Cassette playback stop/resume
> Press, during playback, the cassette key .
> To continue playback press the cassette key again.
Playing back MP3/WMA titles in random order
> Press four times the button PLAY MODE on the device
and/or on the remote control. The notice "RAND" appears
in the display. The titles on the MP3/WMA CD will be
played back from now on in random order.
> Press the button PLAY MODE on the device and/or on the
remote control again in order to switch off the function.
Stop cassette playback
> Press the cassette key
.
If the device reaches the end of the tape when recording or
when playing back, the tape is stopped automatically.
-8-
Setting the alarm wake time
Winding the cassette forward and backward
Note: Only use the wind function when the tape is
stopped otherwise the tape could be damaged.
With the Micro system you can be awakened by a radio
programme, from the sound of a CD, a USB memory medium
or with a signal tone. For this you can programme two wake
times.
> Press the cassette key to wind the tape forwards.
> Press the cassette key to wind the tape backwards.
> Press the key
to stop winding.
Note: If you want to be woken by a CD or a USB memory medium insert/plug in beforehand the corresponding medium. If no medium is inserted/ plugged in the Micro system
automatically wakes with a signal tone. You can only set the
wake time in standby mode.
Cassette recording
You have the potential of recording onto a cassette radio programmes, CDs, MP3/WMA files from USB memory mediums
or the audio signal of a device connected to the LINE IN
socket.
> Press and hold the button AL. SET/OFF or on the
remote control until the notice
appears in
and/or
the display and the hour indicator blinks.
> Press the button SKIP/SEARCH or SKIP/SEARCH
on the device and/or on the remote control to set the hour.
> Press the button AL. SET/OFF or to save the setting.
> Press the button SKIP/SEARCH or SKIP/SEARCH
on the device and/or on the remote control to set the minutes.
> Press the button AL. SET/OFF or to save the setting.
The operation mode
blinks in the display.
> Press the button SKIP/SEARCH or SKIP/SEARCH
on the device and/or on the remote control to set the desired mode of operation (RADIO, CD, USB or BUZZER).
> Press the button AL. SET/OFF or to save the setting.
The alarm volume blinks in the display.
> Press the button SKIP/SEARCH or SKIP/SEARCH
on the device and/or on the remote control to set the desired alarm volume.
> Press the button AL. SET/OFF or to save the setting.
The time of day is shown again in the display. The notice
is an indication that the wake function is
and/or
activated.
> If you want to deactivate the wake function press, briefly,
the button AL. SET/OFF or . The notice
and/or
goes out.
> If you want to activate the wake function again with the
previously set parameters press, briefly, the button AL. SET/
OFF or . The notice
and/or
appears again in
the display.
> Tune to the desired station and/or place the desired CD
into the CD tray. Connect an MP3 player, for example, to
the LINE IN socket or plug in the USB memory medium.
> Start playback of the corresponding audio source.
> When you want to start the recording press the cassette
key . The keylocks at the same time.
> When you want to stop recording press the cassette key
.
Observe copyright laws!
When recording cassettes from CDs, USB memory mediums
or copying radio transmissions be aware of the copyright
regulations of the country, in which the device is to be used.
Line In operation
You can playback audio signals from other devices, for example an MP3 player, via the Micro system.
> Connect the audio output of, for example, the MP3 player
via a 3.5 mm jackplug lead (not supplied) to the LINE IN
socket on the Micro system.
> Switch the Micro system on with the STANDBY button
on the device or with the STANDBY/ON button on the
remote control.
> Press repeatedly the button FUNCTION on the device
and/or on the remote control until the notice LINE appears
in the display.
> Begin playback of the connected device.
-9-
Snooze function
Troubleshooting
> Press the button SNOOZE on the device as soon as the
radio, CD, USB or the signal tone sounds. The alarm stops
and switches back on after approx. 9 minutes.
> The alarm automatically switches off after 30 minutes if
you do not press any buttons. Likewise, the snooze function switches off after 30 minutes.
> To switch the wake function off until the next day press,
whilst the alarm is sounding, the button
AL. SET/OFF or . The notice
remains
and/or
in the display.
No or poor radio reception
> When the MW reception is insufficient check to see if the
device is optimally aimed and/or with insufficient VHF reception whether the VHF dipole antenna is unwound and
optimally aimed.
> With noisy VHF stereo reception switch to mono with
the button STOP/FM MO/ST. on the device and/or
STOP/FM MONO/ST. on the remote control.
Sleep function
You can preset a time, after which the micro system will switch
off. You can set a switch-off time between 90 and 10 minutes.
Disposal
NORMAL
> For this, when the Micro system is switched on, press repeatedly the button SLEEP on the remote control until the
desired remaining period is shown in the display.
> When the desired remaining period is set wait a few seconds. The notice "SLEEP" appears in the display.
Do not dispose of the device in your normal
domestic waste. This product is subject to the
European directive 2002/96/EC.
• Have the Micro system or parts of it disposed of by a professional disposal company of by your communal disposal
facility.
• Observe the currently applicable regulations. In case of
doubt contact your disposal facility.
The sleep function is now activated and the Micro system will
switch itself off after the set time.
Cleaning and care
Batteries/rechargeable batteries
• Used batteries/rechargeable batteries may not be disposed of in household waste.
• Batteries can contain poisons which are damaging to the
environment. Therefore, dispose of the batteries/rechargeable batteries in accordance with statutory regulations.
• Every consumer is legally obliged to surrender batteries/
rechargeable batteries to a community collection centre in
their district or to a dealer. The purpose of this obligation is
to ensure that batteries are disposed of in a non-polluting
manner.
• Only dispose of batteries when they are fully discharged.
Dispose of all packaging materials in an environmentally friendly manner.
Risk of potentially fatal electrical shock:
• Never open the device housing. There are no user-serviceable components inside.
• Never submerse the device or its components in water or
other fluids!
• Do not allow any liquids to penetrate the housing.
Cleaning the housing:
> Remove the power plug from the power socket beforehand.
> Clean the housing surface with a slightly damp cloth
Never use petrol, solvents or detergents that can damage
plastics!
Cleaning the sound heads
• At regular intervals remove dust and cassette deposits
from the sound heads. Contamination on the sound heads
impairs sound quality, both when recording and on playback.
• To clean the sound heads use a commercial head cleaning
cassette.
Cleaning the CD-Laser
• Clean the laser at regular intervals.
• To clean the laser use a commercial cleaning CD.
The device is not providing any sound
> Is the plug of the power cable inserted firmly into the
power socket?
> Have you switched the device on with the power switch?
> Is there a plug inserted into the headphone output? This
will switch off the speaker.
Notes regarding CE conformity
This device complies regarding conformity to the basic requirements and other relevent regulations of the EMV directive
2004/108/EC, the low voltage directive 2006/95/EC as
well as the Eco-design directive 2009/125/EC (Provision
1275/2008 supplement II, Nr. 1).
The complete original declaration of conformity can be
obtained from the importer.
Importer
KOMPERNASS GMBH
BURGSTRASSE 21
44867 BOCHUM, GERMANY
www.kompernass.com
- 10 -
Warranty & Service
The warranty for this appliance is for 3 years from the date
of purchase. The appliance has been manufactured with care
and meticulously examined before delivery. Please retain
your receipt as proof of purchase. In the event of a warranty
claim, please make contact by telephone with our Service
Department. Only in this way can a post-free despatch for
your goods be assured.
The warranty covers only claims for material and maufacturing defects, but not for transport damage, for wearing parts
or for damage to fragile components, e.g. buttons or batteries. This product is for private use only and is not intended for
commercial use. The warranty is void in the case of abusive
and improper handling, use of force and internal tampering
not carried out by our authorized service branch. Your statutory rights are not restricted in any way by this warranty.
The warranty period will not be extended by repairs made
under warranty. This applies also to replaced and repaired
parts. Any damage and defects extant on purchase must be
reported immediately after unpacking the appliance, at the
latest, two days after the purchase date. Repairs made after
the expiration of the warranty period are subject to payment.
DES UK LTD
Tel.: 0871 5000 700 (£ 0.10 / minute)
e-mail: [email protected]
Kompernass Service Ireland
Tel:1850 930 412 (0,082 EUR/Min.)
Standard call rates apply. Mobile operators may vary.
e-mail: [email protected]
- 11 -
Buch_49401_LB6.indb 12
30.03.2010 17:26:46 Uhr