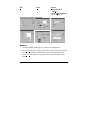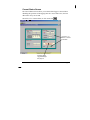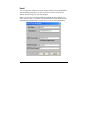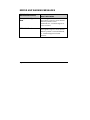
1
Instruction Manual In-Transit FlashLink Data Logger In-Transit FlashLink Software Table of Contents INTRODUCTION ..........................................................................................1 In-Transit FlashLink Software Features .....................................................2 Data Logger Features..................................................................................3 SETUP ............................................................................................................4 Minimum PC Requirements........................................................................4 Connecting to Your Computer ....................................................................4 Software Installation...................................................................................5 Instructions for Win 98/95/3.1 ....................................................................5 Instructions for Windows 2000, XP and NT ...............................................7 Port Settings................................................................................................8 Windows 98/95 .........................................................................................10 Windows 3.1 .............................................................................................10 Windows NT .............................................................................................11 Windows XP .............................................................................................12 OPERATING INSTRUCTIONS ..................................................................13 Starting the Data Logger...........................................................................13 Main Screen Description ..........................................................................13 Customize Screen .....................................................................................15 Auto Backup .............................................................................................16 Download Data .........................................................................................17 Shadow Logging.......................................................................................17 Time Zone Map ........................................................................................18 Data Tag Information ............................................................................... 19 Downloading ............................................................................................ 20 Graphs and Reports.................................................................................. 24 Graphs ...................................................................................................... 24 Reports ..................................................................................................... 26 Current Status Screen............................................................................... 27 Email........................................................................................................ 28 LED INDICATORS .................................................................................... 29 ERROR AND WARNING MESSAGES..................................................... 30 Current Status Logger Messages.............................................................. 33 TROUBLESHOOTING............................................................................... 34 APPENDICES Product Specifications ................................................................................. 35 In-Transit FlashLink Data Logger Models Available .............................. 36 Hardware Compatibility........................................................................... 37 Additional Connection Options ............................................................... 38 Warranty .................................................................................................. 39 Limitation of Liability.............................................................................. 39 Contacting DeltaTRAK, Inc. ................................................................... 40 Post Trip Calibration and Technical Support ........................................... 40 Customer Service ..................................................................................... 40 Website..................................................................................................... 40 INTRODUCTION The In-Transit FlashLink Data Logger is a single use instrument designed with a unique, patented communications feature via the PC’s parallel port, which allows an extremely fast data download (typically 760 data points per second). The 25-pin cable (included) connects FlashLink to your computer’s parallel (printer) port. . (A Serial Port Adapter is available for computers that do not have a parallel port) The PC time and date is used to track data history to the last data point collected. The software will automatically tabulate and graph the collected data. • You will need both the FlashLink Data Logger and In-Transit FlashLink Software properly installed and configured for use. Refer to page 5“Software Installation” and follow the instructions to install the In-Transit FlashLink Software onto your PC. The software can also be downloaded from http://www.deltatrak.com/contribute/software_new.shtml Page 1 In-Transit FlashLink Software Features • Single Windows-based user-friendly program for downloading, graphing, and reporting. • Patented design downloads 3800 data points in 5 seconds on average. • Capable of communicating through either Parallel or Serial Ports. • Patented shadow logging design. (See page 17). • Embedded independent email engine, eliminating the need for additional email software such as Microsoft Outlook. • Automatic file naming, point-and-click interface, single-point connection to a PC and other easy-to-use features allow even non-technical users to download data quickly. • The program allows easily customization with your company name and logo, time zone, temperature scale, and other operational preferences. • Data can be saved as a text delimited file for insertion into any spreadsheet or database program. • Status monitoring screen checks data logger activity status without disturbing operation except if the log interval is less than 20 seconds. • FlashLink Data Loggers are Year 2000 compatible. Page 2 Data Logger Features • Non-volatile data memory – data can be recovered after power loss. • Standard 25-pin connector for downloading data to the PC; communicates with PC through parallel printer port. (Optional Serial Port Adapter Available) • Green and red LEDs indicate whether the data logger is in active mode or alarm mode. • Internal temperature sensor or external probe option • Patented utility packaging for hanging, probe storage, and PC access • Shock resistant ABS plastic case construction • CE mark certified by TÜV Page 3 SETUP Minimum PC Requirements IBM (or compatible) 486 with 4 megabytes of memory. The In-Transit FlashLink Software runs on all versions of Windows (3.1, 95, 98, 2000, ME, XP and NT). It will also run on Windows LAN servers if the “client computers” use Windows 3.1, 95, or 98. Some brands of laptop computers may not be compatible with the In-Transit FlashLink Software. See page 36 of this manual for a list of compatible laptop computer models or call DeltaTRAK Customer Service for the latest information. . The optional Serial Port Adapter will make most computers compatible. Connecting to Your Computer The recommended connection method is to use a standard 25-pin PC data cable, serial or parallel, with male on one end and female on the other. Remove the printer cable from the PC. Connect male end of the data cable to the back of the computer. The female end can be connected to the printer or to the data logger as needed. The data logger can be connected directly to the PC’s parallel (printer) port on a laptop or desktop computer, but mounting hardware on the PC may get in the way of making a reliable connection. IMPORTANT: Do not turn on your computer or reboot with a data logger connected to your PC as it may cause loss of data. Page 4 Software Installation Instructions for Win 98/95/3.1 1. Check the date and time setup in your computer. It is extremely important to have the correct information in your computer before installing the program disk or downloading the data to the PC. 2. IF you have downloaded the software from www.DeltaTRAK.com, double click the FLITFULLx_x.exe icon; (x_x indicates the version #) click “Yes” to continue. Go to step 4. 3. If you have the Installation CD, insert the In-Transit FlashLink Software Installation CD into your CDROM drive. (If the program does not open automatically, follow the instructions below.) Windows 95/98 Windows 3.1 a. Go to Start. a. Go to File Manager. b. Choose Run. c. Type D:\Disk1\Setup.exe (if the CD drive is D:\) d. Press Enter. 4. The computer will start loading the program. Read the Welcome message, then click on Next to continue. 5. User Information Screen: The registered owner of the computer may already appear in the fields, or you may type in your name and company name. Click on Next to accept the settings and continue. Page 5 6. Choose Destination Location: C:\Flash is automatically entered as the default directory. To change the destination, click on Browse. Select the directory you want, then click on Next to accept the settings and continue. 7. Select Program Folder: The “In-Transit FlashLink Software” folder is automatically entered as the default program folder. You can also select an existing folder from the list. Click on Next to accept the settings and continue. 8. Start Copying Files: The settings that you just entered are displayed. Click on Back to make changes. Click on Next to accept the settings and continue. If installing from diskette, continue to next step, else go to Step 9. 9. Two program versions are included. Email (EFlit.exe) and non-Email (Flit.exe). 10. The icon for the Email and non Email versions are automatically created. To place an icon onto your Desktop, press and hold CTRL, then click on the icon (EFlit or Flit) and drag it out of the Flash window. 11. Windows 3.1 systems may show the message “Cannot load OLE2.DLL”, click OK and continue. 12. Reboot the PC. Page 6 Instructions for Windows 2000, XP and NT To install FlashLink Program Manager Software on Windows 2000, XP and NT: *Network Users: See your LAN Administrator. 1. Restart the computer and log on as the Administrator. (You cannot install the software in of these Windows NT based systems without having Administrator access). 2. IF you have downloaded the software from www.DeltaTRAK.com, double click the FLITFULLx_x.exe icon; (x_x indicates the version #) click “Yes” to continue. Go to step 8. 3. If you have the Installation CD, insert the In-Transit FlashLink Software Installation CD into your CDROM drive. (If the program does not open automatically, follow the instructions below.) 4. Go to Start 5. Choose Run 6. Type D:\Disk1\setup.exe (if the CD Drive is D:\) 7. Press Enter 8. The computer will start loading the program. Read the welcome message and click on Next to continue. If you have an error when trying to access the FlashLink logger, insure that you have administrator privileges before installing the software. If the problem persists, check the port settings for your computer. Page 7 Port Settings The parallel port drive will try to allocate the parallel port with FlashLink automatically with the first run of the FlashLink software under the following conditions: Standard port address assignment a) One parallel port configuration LPT1 address: 0x378 b) More than one parallel port configuration LPT1 address: 0x3BC LPT2 address: 0x378 LPT3 address: 0x278 In all non-standard cases the user has to specify explicitly the LPT address of the parallel port used with the FlashLink. This can be done using the Customize Screen Æ Port Setup. (See next page for illustration.) Page 8 1) First click “Customize” for the “Customize” setup screen 3) Click here to select the LPT and Base Address OR 4) Click here to use the optional Serial Port Adapter 2) Then click “SetPort” for “Port Settings” screen. Page 9 Windows 98/95 To check your port settings in Windows 98/95/3.1, do the following: 1. Press start button, go to setting then control panel. 2. Double click on system icon. 3. Click on device manager tab. 4. Click on ports. 5. Double click on port you wish to use for FlashLink and write down port number. 6. Click on resources tab. 7. Write down first number of the first input/output range line. Should be something like 3BC. This is your base address. Then start your FlashLink Software and select from the top menu “Customize”. Then click the “Set Port” button. You will see the port-setting value that FlashLink Software is using in the “Base Address” field. Put the port-setting value that you wrote down from the above instructions into the “Base Address” field. Windows 3.1 Uses Standard port configuration. Page 10 Windows NT To check your port settings in Windows NT, do the following: 1. Go to “Start”. 2. Choose “Programs”. 3. Choose “Administrative Tools”. 4. Choose “Window NT Diagnostic”. 5. Select the “Resources Tab”. 6. Select the “I/O port” button. This will display the port settings for LPT1 where the FlashLink can be accessed. They should look something like 03BC, write this down. Then start your FlashLink Software and select from the top menu “Customize”. Then click the “Set Port” button. You will see the port-setting value that FlashLink Software is using in the “Base Address” field. Put the port-setting value that you wrote down from the above instructions into the “Base Address” field. Page 11 Windows XP To check your port settings in Windows XP, do the following: 1. Go to “Start”. 2. Choose “Control Panel”. 3. Choose “Administrative Tools”. 4. Choose “Computer Management” 5. Double click “Device Manager” in the left quadrant. 6. Double click “Ports (COM & LPT)” icon in the right quadrant. 7. Double click “Printer Port (LPT1)” icon in the right quadrant. 8. Click the “Resources” tab. This will display the port settings for LPT1 where the FlashLink can be accessed. They should look something like “0378-037F”, write down “0378”. Then start your FlashLink Software and select from the top menu “Customize”. Then click the “Set Port” button. You will see the port-setting value that FlashLink Software is using in the “Base Address” field. Put the port-setting value that you wrote down from the above instructions into the “Base Address” field. Page 12 OPERATING INSTRUCTIONS Starting the Data Logger The data logger must be started by the shipper by inserting a ballpoint pen or other small blunt object into the start switch hole on the front of the data logger. The green LED will flash rapidly three times to indicate it started. If the green LED does not flash, press the start switch again. If the data logger still does not activate after three tries, contact your distributor or DeltaTRAK, Inc., for technical assistance. Main Screen Description With the In-Transit FlashLink Software you can download data, open existing data files on the computer, manipulate data presentation, create graphs, and print reports. All functions are customizable and accessible from the main screen. Double click on the FlashLink icon “EFLIT” or “Flit” to start the program. Menu Click to open Setup Window Click to open an existing data file on the computer. Click to download data from a data logger Click to close pop-up window and either open an existing data file or download data from data logger The Help Line provides prompts when the cursor is placed over an object. Page 13 Menu Bar File Open Data File: Open an existing (previously saved) data file on the computer. Download Data: Download data from a data logger to the PC. Proceed to page 15. View Current Status: Check the status of the data logger. Proceed to page 26. Customize Select to set your preferences for company name, logo, on-line help, temperature scale, and graph and reporting defaults. Proceed to page 14 for complete information on the Customize Screen. NOTE: This can only be accessed from the Main Menu. Email Data File: Proceed to page 27. Icon Bar Open a previously saved data file on the computer View current status of data logger Email data Page 14 Download data from the data logger Software version Customize Screen You can customize how the software works and the look of your data. The information can be updated or changed later, if desired. (Click “Customize” on the menu bar to open the window shown below.) Enter your company name Enter the file name for your logo (it must be in .bmp format). Your logo will appear on the printed reports, if desired. Click to select or deselect actions. The selections may be changed at any time after starting the program. Click here to search and select from available .bmp files. Click here to select the temperature scale. Click here to change the port setting for the printer. Page 15 Auto Backup Data files are automatically saved when they are downloaded. The directory is named Databack, and is automatically created in the program’s “Flash” directory with your first download. If the custom option “Always ask for backup file name” is checked (to check: click “Customize” on the top menu bar), you may use whatever naming convention you wish (Up to 8 characters). You will be prompted to name each file as it is saved. Choosing Cancel at this point will still save the file, however, it will be saved using the automatic naming convention described below. If the custom option “Always ask for backup file name” is not checked, the data files will be named automatically using the data logger’s serial number. A numbered extension is added each time that particular data logger is downloaded. Therefore, downloading data logger number 00000403 three times will give you file names of 00000403, 00000403.001, and 00000403.002. The software will give you another chance to save the data in case you have changed computers, deleted files, etc. When the screen asks, “Data has been already saved! Continue Auto Backup anyway?” you can click OK to save the data again or Cancel to proceed without resaving. Page 16 Download Data Downloading can be done several ways. Connect the data logger to the data cable and do one of the following. • Click on the Data Logger illustrated on the Main Screen, or • Select File, Download Data, or • Click the icon. You will be guided through the time zone selection and data tag screens. Note: If the custom option “Always show help info before download” is checked, the screen will display helpful information about connecting your computer. Click Next when your connection is complete. Shadow Logging Shadow Logging is a failsafe background program in the FlashLink Data Logger that collects data at a 30 minute interval. It is active when in Manual Start Waiting mode. It will record 80 days of data. When the logger is manually started it reverts to the programmed conditions and shadow data is erased from the memory. Page 17 Time Zone Map Time zone information is based on Greenwich Mean Time (GMT), also known as Coordinated Universal Time. The field will accept decimals for those areas with fractional time zones. 1. Choose either “Shipper” or “Receiver” classification for the time zone of your data, graphs, printouts, etc. 2. Select or enter the time zone; the “Data Time Zones” field will accept decimals for those areas with fractional time zones. 3. Click Next. Use the pull down menu to select your Data Zones. The value may also be typed in. OR Move the reference line over your geographic area and click to set your data zone’s “distance” from the GMT reference line. Page 18 Data Tag Information 1. Enter the data tag information. It can be edited later, if desired. 2. Click Next to start the download. Note: The Receiver field must be filled in before downloading will start unless the “One Click Download” option is selected in the “Customize” screen. Using the One Click Download option will skip both the Time Zone Map and the Data Tag screens and go directly to the Data screen. Page 19 Downloading The data will immediately download. Menu Bar See page 19. Icon Bar See page 21. Click on the Data Info or Statistics tabs to access the other pages of the Information Panel. Data Grid – Use the scroll bar to move up or down through the downloaded data. Select Options, Statistics Range, then click on desired beginning and ending sequence numbers, or enter the sequence numbers in the FROM and TO boxes. Page 20 Menu Bar File Open Open an existing data file on the computer. Save… View Download Data Download another FlashLink Data Logger. Update the backup file of the displayed data. Note: You can only update or modify after downloading the Data Tag information. The Data Info and Statistics cannot be modified. Graph Data Save As Locate the lowest value in the selected statistical range. Save the backup file under a new name or location. Show downloaded data in a graph. Maximum Locate the highest value in the selected statistical range. Minimum Save as Text Current Status Save all downloaded data and information as an ASCII text file. View the status of a data logger without interrupting the data logging process. Save as Delimited Options Statistics Range Select and change the statistical range in the Statistics Information Panel. Type the Sequence # in the “From” and “To” boxes, or click on two data points in the table. Note: Statistics calculation affects only the data points within the statistical range! Creates a text delimited file for opening into an Excel or Access program. (Continued) Page 21 File Delete The file currently open will be permanently removed from your hard drive. Email Proceed to page 27. Close Close the current screen. Printer SetUp Open the printer setup screen. Print, Selection Print a selected range of data points. Print, Report Page Print the Data Summary Report Page. Exit Terminate and leave the In-Transit FlashLink Software program. Page 22 View Options Icon Bar Same as File, Save Same as View, Maximum Same as File, Print, Print Selection Same as View, Minimum Same as View, Graph Data Email data Open a previously saved data file on the computer View current status of data logger Download data from the data logger Software version Page 23 Graphs and Reports Graphs 1. After downloading a data logger or opening an existing data file, report and graph windows appear. * If no graph appears, select View, Graph Data or click on the icon. Use the arrow keys to move the sequence marker. Information about the individual data points will be displayed in the Help Line if Options, Show Sequence Marker is turned on. Page 24 Menu Bar Edit Copy as Full Color MetaFile 16 Bit Color Clipboard File. Most Colors, Largest Size File. Copy as Color MetaFile 256 Color Clipboard File. Fewer Colors, Medium Size File. (Recommended) Copy as BW MetaFile Black & White Clipboard File. Smallest Size Copy as Bitmap Copies image from display. Quality, Size and Colors Dependent on Display Driver. Zoom Zoom In Click and drag your mouse over the area you want to zoom in on. You can continue zooming in to see details. Restore Return to the original full graph view. Select 8 HR Period View the graph in 8 hour segments. Options, Axes, Axes Select the font(s). Axes, Grid Select colors for the graph, turn gridlines off or on, select gridline colors. Axes, Scale Use Manual Scaling to limit the time scale of the graph and turn rounding on or off. Axes, Ticks Adjust the tick marks in the graph. Lines+Text, Lines Select data indicator line styles and colors. Text Enter Axis labels, title and select font. Font Color Select font color. Page 25 Edit Zoom Options, Hide Sequence Marker 9 Show Sequence Marker Shown on page 23. Customizing a Graph’s Appearance: Reports 1. After downloading a data logger or opening an existing data file. 2. Select File, Print Report Page to print the data and the information found on the Data Tag, Data Info, and Statistics panels on the Download Screen. 3. Select File, Print Selection if you want to select a specific range of data points. Page 26 Current Status Screen The Current Status Screen allows you to check a data logger’s status without disturbing the operation. If the logging interval is 20 seconds or less, the time data will be off by one second. Select File, View Current Status, or click on the icon . Asterisks (***) indicate a feature is disabled. For Setup Status Logger Messages see page 32 Page 27 Email You can send a file attached to an email message without leaving the FlashLink Program Manager program if you have access to the internet. You can also attach a data file using your own email program. Before you can email a file from within the FlashLink Program Manager you will be asked to enter in your Mail Account Information. If you do not have this information you should contact your Internet provider or your IT department. Page 28 LED INDICATORS LED ACTIVITY WHAT IT MEANS 3 green flashes: Data logger activated 1 green flash every 12 seconds: Logging 1 red flash every 12 seconds: Alarm limits exceeded, logging continues No flashing Manual Start waiting or logging completed Page 29 ERROR AND WARNING MESSAGES ERROR AND WARNING MESSAGES Corrupted Configuration Data EEPROM Failure! Page 30 WHAT THEY MEAN The data logger will not communicate. This might be a sign of a serious internal hardware problem. Contact DeltaTRAK, Inc., Technical Support for further assistance. The data logger will not communicate. This might be a sign of a serious internal hardware problem. Contact DeltaTRAK, Inc. Technical Support for further assistance. ERROR AND WARNING MESSAGES FlashLink Not Accessible! WHAT THEY MEAN This message appears when there is no connection between PC and the data logger. Check for good contact between the data logger, cable, and computer. Use only a 25-pin “male-female” extension cable Check the parallel port settings on your computer. Note: Only the following parallel port settings are recognized. Search order isBasic configuration 0000 = 0378-037F Basic configuration 0001 = 03BC-03BF Basic configuration 0002 = 0278-027F If you continue receiving this message, contact DeltaTRAK, Inc. Technical Support for further assistance. No Available Data! This message appears when you try to download the data logger and logging hasn’t started or no data points are recorded. This also occurs if the data logger is waiting for manual start. Page 31 ERROR AND WARNING MESSAGES Process not Completed! Page 32 WHAT THEY MEAN This message follows critical errors to let you know the download was not completed. Current Status Logger Messages MESSAGE Logging Interruption! Manual Start Waiting! Startup Failure! *Shadow Logging Finished! *See page 15 Manual Start Waiting! *Shadow Logging… Data Downloaded, Logging Stopped Data Complete! Logging Finished! Logging… Logging Failure! WHAT THEY MEAN Logging unexpectedly stopped. Data may not be present. Push Manual Start switch to begin logging. Invalid program conditions. Check PC clock setting and download. Manual Start not activated. Only *Shadow Data may be present. Only *Shadow Data is present. Data is available. Logger has discontinued logging data. The programmed conditions are complete. Data is available for downloading. The programmed conditions are in process. Download PC, Time or Time Zone may be incorrect. Number of samples does not match current time. Page 33 TROUBLESHOOTING 1) Software Installation Problems a) Make sure the FlashLink Data Logger is not connected to the PC. b) Close all applications and shut down the PC completely. Restart the computer* and install the software again. c) If you are still experiencing problems installing the software contact DeltaTRAK Inc., Technical Support for assistance. 2) FlashLink Communication Problems a) Always start the In-Transit FlashLink Software before connecting the FlashLink Data Logger. b) Verify that the FlashLink Data Logger and the data cable, or the FlashLink Data Logger and PC parallel port (i.e. if directly connected) are firmly connected. Click on the Current Status icon to check the connection. c) Replace the data cable that connects the FlashLink Data Logger to the PC parallel port. Click on the Current Status icon to check the connection. d) Disconnect the FlashLink Data Logger and restart the PC*. Start the InTransit FlashLink Software, reconnect the FlashLink Data Logger and click on Current Status icon. e) If you are still experiencing problems establishing communication contact DeltaTRAK Inc., Technical Support for assistance. * If problems persist, push “Ctrl + Alt + Delete” keys at the same time once and “End Task” on all programs in list except “systray” and “explorer” then retry. Page 34 APPENDICES Product Specifications Instrument Operating Range: Ext. Probe Cable: Temperature Resolution: Logged Data Capacity: Two LED indicators: Battery Type / Life: Enclosure: Shock Resistance: Certification: -40°F~150°F (-40C°~66°C) -112°F~230°F (-80°C~110°C) 0.1°F or °C 3,800 data points 12 second flashing red for alarm / green for logging 18 months with typical use ABS plastic case construction Drop from 3 feet to hard surface TÜV – CE Mark Probes/ Sensors Internal Sensor Range: External Probe Range: Ext. Probe Stabilization: Temp. Accuracy: -40°F~150°F (-40C°~66°C) -112°F~230°F (-80C°~110°C) Low Range 15 seconds in moving fluid, for a step change of temperature of 50°F / 25°C + 1°F (.5°C) at 32°F~150°F (0°C~66°C) + 2°F (1°C over entire range Software Data Download Time: 5 seconds typical for 3,800 data points Page 35 In-Transit FlashLink Data Logger Models Available Model # 20011 Description 05-Day In-Transit Temperature Logger 20012 15-Day In-Transit Temperature Logger 20013 45-Day In-Transit Temperature Logger 20014 75-Day In-Transit Temperature Logger 20041 05-Day In-Transit External Temperature Blunt Probe -80°C 20042 15-Day In-Transit External Temperature Blunt Probe -80°C 20043 45-Day In-Transit External Temperature Blunt Probe -80°C Page 36 Hardware Compatibility The following laptop computers have been tested for compatibility with the FlashLink Data Logger and In-Transit FlashLink Software: Chicony NP Series IBM ThinkPad Compaq Armada Series NEC Versa Series CTX EZ Book Toshiba Satellite Series Hewlett Packard Omnibook Sony VAIO Series Contact DeltaTRAK for the latest compatibility information Page 37 Additional Connection Options • Add a PC card with a dual parallel port. o SIIG Inc. Model 101828 allows the FlashLink Data Logger to function simultaneously with your printer. • Add a data switch with a 25 pin parallel port to manually switch between the FlashLink Data Logger and the printer. o Belkin Components, Precision Instruments • Add a Port Buffer to increase data logger download speed, compensate for a weak printer port, low battery, or low quality cable. o • Add a Data switch with port buffer to get functionality of both the data switch and port buffer combined. o • DeltaTRAK Add the Serial Port Adapter model # 20218 o Page 38 DeltaTRAK DeltaTRAK Warranty DeltaTRAK instruments have a limited warranty period of 1 year against defects in materials and workmanship from the date of purchase. Accessory items and sensors have a limited warranty of 3 months. DeltaTRAK, Inc. shall, at its option, either repair or replace hardware products that prove to be defective, if a notice to that effect is received within the warranty period. DeltaTRAK, Inc. makes no other warranties or representations of any kind whatsoever, expressed or implied, except that of title, and all implied warranties including any warranty of merchantability and fitness for a particular purpose are hereby disclaimed. Limitation of Liability The remedies of purchases set forth herein are exclusive and the total liability of DeltaTRAK, Inc. with respect to this order, whether based on contract, warranty, negligence, indemnification, strict liability or otherwise, shall not exceed the purchase price of the product upon which liability is based. In no event shall DeltaTRAK, Inc. be liable for consequential, incidental, or special damages. Page 39 Contacting DeltaTRAK, Inc. Post Trip Calibration and Technical Support DeltaTRAK Technologies 9260 Isaac Street, Suite D Santee, CA 92071 Phone: (619) 596-4830 Toll Free: (800) 390-0804 Fax: (619) 596-4829 Email: [email protected] Customer Service DeltaTRAK, Inc. P.O. Box 398 Pleasanton, CA 94566 Phone: (925) 249-2250 Toll Free: (800) 962-6776 Fax: (925) 249-2251 Email: [email protected] Website http://www.deltatrak.com FlashLink and DeltaTRAK are registered trademarks 2004 DeltaTRAK, Inc. All rights reserved. Page 40 Version : April 09, 2004