1
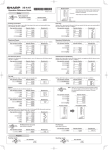
XE-A102 Quick Start Guide
English
The following describes how to get your cash register ready to operate. Follow these steps when you use the cash register for the first time.
1
Initializing the Cash
Register
To ensure the cash register operates
properly, initialize it using the following
procedure:
1. With the power cable unplugged,
insert one of the supplied mode
keys into the mode switch and turn
it to the REG position.
REG
OFF
VOID
2
Installing Batteries
Install batteries for back-up of sales data
and programmed contents.
3
Installing a Paper
Roll
1. Place a paper roll in the paper roll
cradle so that the paper unrolls from
the bottom.
REG
OFF
VOID
Before Starting Entries
Turn the mode switch to the REG
postition.
X/Flash
Z/PGM
REG
VOID
Setting the Time
X/Flash
Z/PGM
Enter the time in 4 digits (“hhmm” format) using the 24 hour
#/
SBTL
2. Open the battery cover next to the
paper roll cradle.
2. Insert the paper straight into the
paper inlet, and press the f key.
The inserted end comes out at the
printing area.
system. Press the
key once to program the next item
or twice to exit the programming mode.
Example:
#/
#/
SBTL
SBTL
Enter a clerk code (1-4) and press .
(Once the clerk code entered, re-entry
of the clerk code is not needed until
the clerk is changed.)
CLK#
Time (2:30 p.m.)
1
Setting the Date
CLK#
Clerk code
Enter the date in 6 digits using the month-day-year
#/
SBTL
format. Press the
key once to program the next item
or twice to exit the programmig mode.
#/
#/
Example:
SBTL
SBTL
3. Insert three new “AA” batteries.
(Batteries are not supplied with the
cash register.)
The buzzer will sound three times.
3. Now the cash register has been
initialized. The register display will
show “0.00” with “ ” .
Date (March 15, 2006)
3. (For journal printing) Insert the top
end of the paper into the slit in the
take-up spool shaft and wind the
paper two or three turns. Then place
the take-up spool on the bearing.
View from rear
4. When the batteries are properly installed,
“ ” on the display will disappear.
Close the battery cover.
IMPORTANT
Improper use of batteries may damage
the cash register. Please take the
following precautions.
Specify a tax rate (%) for calculation of tax on each
taxable subtotal using the following sequence:
9
➝
➝
@/TM
#/
SBTL
➝ Tax number (1-4)* ➝
@/TM
➝R
(For receipt printing, step 3 should be
omitted.)
Price and dept.
7
3
#/
SBTL
Price and dept.
Amount tendered
R: Tax rate (0.0000% to 99.9999%)x10000
(Enter the rate in 6 digits. Leading zeros may be
omitted.)
Q: Minimum taxable amount (0.01 to 99.99)x100
(Smallest amount for which tax must be collected. )
*Up to 4 types of tax are programmable.
Reading and Resetting
Example:
position and press
@/TM
Initial settings
Departments 1-4: Taxable 1
Departments 5-8: Non-taxable
X Reports (reading)
Turn the mode switch to the X/Flash
.
Z Reports (reading and resetling)
@/TM
Tax rate (7.0000%)
Min. taxable
amount ($0.11)
NOTE
Your cash register is pre-programmed so that you can
use it with minimum set-up. To change the settings, see
the instruction manual.
Please read the instruction manual for
other battery handling precautions.
Clerk code
1
➝Q➝
Tax 1
4. Attach the printer cover.
5
CLK#
Setting Tax Rates (%)
#/
SBTL
•Be sure that the positive (+) and negative
(-) poles of each battery are oriented
properly.
•Never mix batteries of different types.
•Never mix old batteries and new ones.
For further information, please read the instruction manual.
Registration Example
(When the Customer Pays by Cash)
View from rear
1 paper roll
2 mode keys
2 drawer lock keys
1 instruction manual (English)
1 instruction manual (Spanish)
1 Quick Start Guide
1 ink roller (pre-installed)
1 take-up spool
1 mounting bracket
Now, you are ready!
OFF
IMPORTANT
This operation must be performed
without batteries loaded.
The following are supplied with your
cash register.
5
Turn the mode switch to the Z/PGM postition.
1. Push the printer cover forward and
detach it.
X/Flash
Z/PGM
2. Insert the plug of the power cable
into the AC outlet.
4
Basic Programming
In the Z/PGM mode, press
.(In this
case, grand total resetting is not performed.)
Flash Reports (displayed but not
printed)
In the X/Flash mode:
Press dept. key for dept. sales reports
Press
for sales total reports
#/
SBTL
Press
CH
Printed in China/Impreso en China
for cash-in-drawer reports
O(TCADH2488RCZZ) 1
Guía para instalación rápida de la XE-A102
Español
A continuación se explica cómo poner la caja registradora lista para su uso. Siga estos pasos cuando utilice la caja registradora por primera vez.
1
Inicialización de la
caja registradora
Para asegurar que su caja registradora
funcione adecuadamente debe inicializarla
empleando el siguiente procedimiento:
2
Instalación de las
pilas
3
Instale las pilas para evitar que los datos de
ventas y ajustes programados sean borrados.
1. Eche hacia delante la tapa de la
impresora y sáquela.
Instalación del rollo
de papel
1. En el compartimiento del rollo de
papel, coloque el rollo de papel de tal
forma que el papel se desenrrolle
desde abajo.
OFF
VOID
REG
OFF
VOID
Gire el interruptor del modo a la
posición “REG”.
Ajuste de la hora
VOID
Registre la hora en 4 dígitos (formato “hhmm”) usando el
sistema de las 24 horas. Luego pulse una sola vez la tecla
para continuar con la siguiente programación o pulse
dos veces para salir del modo de programación.
#/
#/
Ejemplo:
#/
SBTL
2. Abra el compartimiento de las pilas situada
cerca del soporte del rollo de papel.
2. Introducir el enchufe en el
tomacorriente.
IMPORTANTE
Esta operación debe realizarse
sin instalar las pilas.
2. Meta el papel recto en la ranura de
entrada y pulse la tecla f.
El extremo metido correrrá hasta la
zona de impresión.
SBTL
SBTL
Hora (2:30 p.m.)
Ajuste de la fecha
#/
SBTL
SBTL
3. Meta tres pilas nuevas AA. (Las pilas
no vienen junto con la caja
registradora.)
1 rollo de papel
2 llaves del mode
2 llaves de cierre del cajón
1 manual de instrucciones (Inglés)
1 manual de instrucciones (Español)
1 Guía para instalación rápida
1 rodillo de la tinta (instalado
previamente)
1 carrete de toma de papel
1 soporte de montaje
Ajuste de la tasa de impuestos ([%])
Especifique una tasa de impuesto ([%]) para el cálculo
del impuesto de cada subtotal imponible empleando la
siguiente secuencia:
9
➝
#/
SBTL
➝R➝
Vista posterior
Para mayor información, por favor lea el manual de instrucciones.
➝Q➝
@/TM
Impuesto 1
4. Vuelva a colocar la tapa de la
impresora.
(Para la impresión del recibo, se omitirá
el paso 3.)
Mínima cantidad
imponible ($0.11)
NOTA
Su caja registradora está pre-programada para que
pueda utilizarla con una mínima configuración. Para
cambiar los ajustes, vea el manual de instrucciones.
Ajustes prestablecidos:
Secciones 1 - 4: Imponible 1.
Secciones 5 - 8: No imponible
Ejemplos de registros
(Cuando el cliente paga en efectivo)
5
Código del
empleado
1
Precio y sección
7
3
#/
SBTL
Precio y sección
Lectura y reposición de las ventas
Informes X (Lectura)
Gire el interruptor del modo a la posición
“X/Flash” y pulse la tecla
.
Informes Z (Lectura y reposición)
En el modo Z/PGM, pulse la tecla
.
En este caso, no se realiza el reajuste
del total global (GT).
@/TM
Tasa de impuesto
(7.0000%)
Código del empleado
Cantidad recibida
Ejemplo:
#/
SBTL
CLK#
@/TM
R: Tasa de impuesto (0.0000% a 99.9999%) x 10000
(Registre la tasa en 6 dígitos. Se pueden omitir los
ceros iniciales.)
Q: Mínima cantidad imponible (0.01 a 99.99) x 100
(Es la menor cantidad para la que deben recaudarse
los impuestos.)
*Se pueden programar hasta 4 tipos de impuestos.
4. Cuando las pilas están colocadas
correctamente, el símbolo “ ”
desaparecerá de la pantalla. Cierre el
compartimiento de las pilas.
IMPORTANTE
El uso inapropiado de las pilas puede
dañar la caja registradora. Tome las
siguientes precauciones:
• Asegúrese de que los polos positivo (+)
y negativo (-) de cada pila estén
orientadas correctamente.
• Nunca utilice pilas de diferente tipo al
mismo tiempo.
• Nunca utilice las pilas nuevas con pilas
gastadas al mismo tiempo.
➝ No. del impuesto (1 – 4)* ➝
@/TM
CLK#
CLK#
Fecha (Marzo 15, 2006)
3. (Para la impresión del registro diario)
Meta el extremo superior del papel
en la ranura del eje del carrete y
bobine el papel dos o tres vueltas.
Luego coloque el carrete de toma en
el cojinete.
El timbre sonará tres veces.
SBTL
X/Flash
Z/PGM
Registre el código del empleado, 1 a 4,
y pulse la tecla .
(Una vez que se registra el código del
empleado inicial, no es necesario
volver a registrarlo hasta que se
cambie de empleado).
1
Registre la fecha en 6 dígitos usando el formato mesdía-año. Luego pulse una sola vez la tecla
para
continuar con la siguiente programación o pulse dos
veces para salir del modo de programación.
#/
#/
Ejemplo:
Vista posterior
Los siguientes elementos estan
incluídos junto con su caja
registradora.
Antes de empezar los registros
X/Flash
Z/PGM
OFF
X/Flash
Z/PGM
3. Ahora la caja registradora ha sido
inicializada. En la pantalla de la caja
registradora aparecerá “0.00” con el
símbolo “ ” .
5
Gire el interruptor del modo a la posición “Z/PGM”.
¡Yá está preparado!
REG
1. Coloque una de las llaves provistas
del modo en el interruptor del modo
y gire a la posición “REG” con el
cable del enchufe desconectado.
REG
4
Programación básica
Informes instantáneos
En el modo X/Flash:
Pulse la tecla de sección para los
informes de ventas por sección.
Pulse la tecla
para los informes del
total de ventas.
Pulse la tecla CH para los informes del
efectivo en el cajón.
Printed in China/Impreso en China
#/
SBTL
O(TCADH2488RCZZ) 1