1
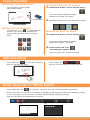
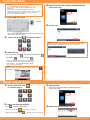
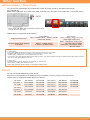
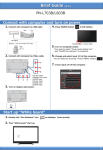
Brief Guide
ver1.1
PN-L703A/L603A
Turn on power and launch “Whiteboard”
1. Press the POWER button.
3. Launch “Whiteboard”.
[Notice]
If main power is turned off,
please turn on this.
At previous #1 if you press the POWER button
“Whiteboard” is launched automatically.
[Notice]
Even if you touch the launch button
“Whiteboard”, you can launch.
,
in bottom and touch
POWER button / Power LED
2. Prepare “Touch pen”.
Inserting the battery.
[Notice] Default setting
・Function button 1:Right mouse click
・Function button 2:PageDown
・Function button 3:PageUp
*When the function button is pressed, the battery indicator
illuminates. If the battery indicator does not illuminate,
please check if the battery is depleted.
Draw character on “White board”
You can draw character by touching display
(White board area) with pen.
2.
“Square menu” like following image appears.
3.
Touch “Pen1” icon.
[ Notice]
・You can draw by 4 people at same time.
・You can use max. 100 sheets.
*If you use pensoftware by external PC,
you can use max. 1000 sheets.
*If file is heavy, reading time / moving sheet takes a lot time.
4. Set on the setting menu like following image.
Bundled pen
●Change size and color of pen
1. Touch the indicator (menu icon) .
・Please select the kind of pen
(Standard pen/Brush pen
/Marker/Figure pen), Color
(Black/Red/Blue/Green/Yellow
/White), Size(1~5).
・When you finish setting, please touch “Close” icon.
5. You can create size and color which you want .
・Touch “Custom” icon
,
Then you can set size and color.
1
Erase character
●Erase by bundled eraser
・You can erase by moving softly
with bundled eraser.
●Change the size of eraser
1. Double click “Eraser” icon on “Square menu”.
・If you have already selected “eraser”,
please touch “Eraser” icon again.
Bundled eraser
2. Select the size and touch from following 4 images.
●Erase by bundled pen
・Touch “Eraser” icon
on “Square menu”,
and then you can erase by touching (like
moving softly) the area which you want to
erase.
●Erase all item on sheet
1. Double click “Eraser” icon on “Square menu”.
・If you have already selected “eraser”,
please touch “Eraser” icon again.
2. Touch “Sheet clear” icon
,
then dialog box appears.
・Once you touch “Yes”, all item is cleared.
Add new sheet
・Touch “Add” icon
on “Tool bar” in bottom,
then you can add new sheet.
・Touch ”Page” icon
,
then you can move sheet, previous and next.
Show sheet list of “White board”.
・Touch “Sheet list” icon
on “Tool bar” in bottom, then you can see thumbnail each sheet.
・If you touch once, you can see up to 8 sheets’ thumbnails at the bottom of screen like following (a) image.
If you touch again, you can see max. 48 sheets’ thumbnails like following (b) image
and you can move to the sheet where you touch.
(a)
(b)
2
Save the data
[ Notice]
・You can not save the data into display.
If you want to save the data, please prepare USB
flash drive.
・If you want to use USB flash drive with security,
please use a drive with hardware security. You can not use
a drive with software security since security software
can not be installed into display.
4. Select the file save location (USB flash drive)
and touch “OK”.
1. Insert USB flash drive.
USB I/F
5. Touch “OK”.
*If you insert USB flash drive to USB I/F of bottom side,
You can not save the data.
2.
Touch “Save” icon
on “Square menu”.
[Notice]
When you want to change file name, software key board appear
by touching file name space and then you can change it
3. Select the save method.
・Save as a new file:
・Save PDF:
・Save to the same file:
・Save image:
*”Save as a new file” and “Save to the same file”,
it save as SWSX format and you can build again.
*”Save image”, it save as BMP/JPEG/PNG format
so you can not build again.
[Notice]
Format of “Save as image” is set by “sheet” tab on setting
of “Tool bar” in bottom
Open saved data
1. Touch “Open file” icon
3. Read the file.
on “Square menu”.
・Select the saved location (USB flash drive)
and touch “OK”.
2. Select file opening method.
・New
: Create a new sheet
・Open as a new file
4. Select the file and touch “OK”.
: Open data as a new file
・Add to the current sheet
: Add data to the current sheet
3
Eject a USB flash drive
1. Touch “Eject USB Media” from launcher menu.
2. Select a USB flash drive.
Select a USB flash drive which
you want to eject, and touch “Stop”.
Turn off power
1. Press POWER button
in left bottom.
The display will go whiteboard standby mode.
2. Hold down POWER button
[Notice]
If you want to turn off main power, please turn off main power
after you check whiteboard has
shout down
(after you can see Orange lit).
in left bottom
until the exit screen appears.
Whiteboard will shutdown.
[Notice]
Status of Power LED
・Green lit
・Orange lit
・Orange flashing
・Green flashing
:
:
:
:
Power on
Power off (Standby mode)
Power off (Whiteboard standby mode)
Input signal standby mode
Launcher menu structure
①
②
③
④
⑤
⑥
⑦
⑧
⑥ Clear Data
Erase data that was used on the monitor.
⑦ Setting
Show the WHITEBOAD mode settings screen.
⑧ Eject USB Media
Appears when a USB flash drive is inserted .
Use when you want to remove the USB flash drive.
① Whiteboard
Use Whiteboard mode of Pen Software.
② Open File
You can browse PDF and Microsoft Office files, view images,
and play audio/video.
③ Remote Meeting
Use Touch Display Link to hold teleconferences.
④ Attended Users
Use the host function of Touch Display Link.
⑤ Touch Pen
Show touch pen information.
*If you use function of ③ and ④ with Touch Display Link
software, please refer to manual of Touch Display Link.
Square menu structure
・Pen1~3:Draw lines.
・Eraser:Erase hand-drawn lines.
・Select :Select an object.
You can move/enlarge/rotate
/delete/copy.
・Redo :Redo the immediately preceding
canceled operation.
・View :Enlarge the view of the whiteboard,
change the display position and pages.
・Undo :Cancel the immediately preceding
operation.
・Drawing Object:Draw a figure or line/arrow.
・Paste:Pastes a copied object.
・Open:Open a file.
・Text :Enter text by software key board.
・Insert image:
:Insert an image file.
:Insert Screen capture.
・Save:Save file.
・All function:Displays all functions in list view.
・Print:Print file. You can select current sheet or all.
Tool bar structure (in bottom)
①
①
②
③
④
②
③
④
⑤
⑥ ⑦
“Pin” button: Touch to switch between the pin / do not pin settings.
Sheet list : Shows the sheets as thumbnails.
Settings
: Displays the pen software settings screen.
Search box : You can search for text and handwritten characters
in the box.
⑤ Sheet navigation buttons:Touch the sheet navigation button
to change the displayed sheet.
⑧
⑨
⑥ Page No. of the current sheet:
⑦ Launch button : Open launcher menu.
⑧ Add sheet button:When the last sheet is displayed,
press to add a sheet at the end.
⑨ Quit : The software is exited.
4
Other function
●Quick start
・This display have quick start function which you can start within around 5 seconds
from pressing the POWER button.
Please set “Whiteboard standby mode” in advance by referring to follows.
■Preparation in advance
■Quick start, and “whiteboard standby mode” again
1) Insert POWER code to socket and turn on main power. 1) Press the POWER button by remote controller or
POWER button when it is “whiteboard standby mode”
(Power LED : Orange flashing), then white board can
start within around 5 seconds
2) Press the POWER button by remote controller
or POWER button.
Power LED are changed to “Green lit”,
and White board will start after around 2 minutes.
3) Press the POWER button by remote controller
or POWER button.
Power LED are changed to “Orange flashing”,
the display will go “whiteboard standby mode”.
Remote controller
POWER button / Power LED
2) Press the POWER button by remote controller
or POWER button.
Power LED are changed to “Orange flashing”,
the display will go “whiteboard standby mode”.
So in next time white board can start within
around 5 seconds again.
Remote controller
POWER button / Power LED
[ Caution ]
■ In case of turning off main power or ejecting POWER code
If you want to turn off main power or eject POWER code, please operate after checking that you hold down POWER button in left
bottom until the exit screen appears and you can see Orange lit.
1) Hold down POWER button in left bottom
until the exit screen appears.
2) Check you can see Orange lit in Power LED.
3) Turn off main power and then eject POWER code.
Remote controller
POWER button / Power LED
* Even if other video signal is inputted, please check you can see Orange lit in Power LED and operate same way as above
5
Other function
●Presentation / Play movie
・You can have a presentation by bundled file viewer and play movie by bundled media player
w/o external PC.
・When insert USB flash drive with some data, and then you can open from “Open File” of launcher menu.
USB I/F
*If you insert USB flash drive to USB I/F of bottom side,
You can not save the data.
・ Please refer to supported file as follows.
Supported file format
Presentation
PDF / POWER POINT / WORD / EXCEL
*these are Viewer
Recommended data capacity
and detail
Approx. 1 MB/5 pages
in case of POWER POINT
Play movie
.wmv /.mpeg /.mpg /.avi /.asf
/.wm/.mpa/.mpe/.m1v
WMV : Resolution under 720P,
Bit rate under 10Mbps
MOV/MP4 : Resolution 720P,
Bit rate 1Mbps
[ Notice]
>> Presentation
・If you have POWER POINT file with movie, there may be case that you can not play.
・It supports Office 2007 format, but there may be case that you can not read.
・ If file is heavy, reading time / moving sheet takes a lot time.
・If you want to save presentation data with character you drew, you need to capture and copy to White board by each page and save.
You can not save plural pages at one time.
>> Play movie
・If these are above format, there may be case that you can not play.
・If file is heavy, reading time takes a lot time.
・If file is high resolution file like 1080p, it may happen dropping frame.
●Print
・You can not install additional printer driver.
Since some universal driver of SHARP printer is installed, you can print by using this driver.
・ Please refer to supported SHARP printer as follows.
DX-C401
DX-C401 J
MX-C300P
MX-C300PE
MX-2610N
MX-2614N
MX-4141N
MX-5110N
MX-B402P
MX-M264N
MX-M465N
MX-M503N
DX-C400
MX-C300PL
MX-2640N
MX-5111N
MX-M264U
MX-M503U
DX-C311
MX-C300W
MX-3110N
MX-5140N
MX-M283N
MX-M565N
DX-C311 J
MX-C300WE
MX-3111U
MX-5141N
MX-M314N
DX-C310
MX-C310
MX-3114N
MX-B380P
MX-M314U
DX-C381
MX-C311
MX-3140N
MX-B381
MX-M354N
6