1
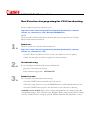
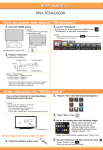
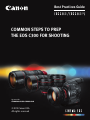
Best Practices Guide
COMMON STEPS TO PREP
THE EOS C300 FOR SHOOTING
For more info:
cinemaeos.usa.canon.com
© 2012 Canon USA
All rights reserved
EOS C300 controls referenced in this guide:
Left side view
Power switch
Select dial
SET button
ND Filter “+” button
ND Filter “-” button
Control dial
Status button
Custom Picture button
Custom White Balance button
Cooling intake vents
Rear view
Eye-level
viewfinder
Rear LCD panel
Function button
Start-Stop button
Joystick / SET button
Card slot A and release switch
Card slot B and release switch
Slot Select
button
Menu button
SD card slot
(on right side)
Battery door and latch
EOS C300 Best Practices Guide
Best Practices for preparing the C300 for shooting
For the complete instruction book, please go to:
http://usa.canon.com/cusa/professional/products/professional_cameras/
cinema_eos_cameras/eos_c300 - BrochuresAndManuals
NOTE:
The instruction book should be taken as the final authority on the operation of the C300.
Please read the instruction manual.
1.
Firmware:
Check to see that the camera has the latest firmware:
http://usa.canon.com/cusa/professional/products/professional_cameras/
cinema_eos_cameras/eos_c300
• Look for ‘Drivers and Software’ (if the section is not visible, there are no updates)
• Follow the instruction on website to update the camera’s firmware
2.
Troubleshooting:
If you need help in troubleshooting an issue with the C300
(page 162 of the instruction manual)
Canon Customer support line: 1-855-246-3367
3.
Status Screens:
You can quickly check the C300 various settings:
• Press the STATUS button on the left side of the camera
• Push the joystick up/down, or turn the SELECT Dial to scroll through the Status screens
• Press the STATUS button again to clear the Status screen, and return to shooting
Available screens include: Basic camera settings, Assign Button status, Audio settings, Recording Media settings, Video Terminal status, Metadata, Battery status, Custom Picture settings
(if active), and Wi-Fi remote settings (if optional WFT-E6A Wireless File Transmitter is active)
EOS C300 Best Practices Guide
4.
3
Cooling System:
There are cooling holes on both the left and right sides of the camera body (fresh air intake), as
well as at the top (warm air exhaust). It is vital that these be open at all times, and not blocked with tape or
covered by various accessories fitted to the camera. Operators must be aware of the location of these cooling vents, and insure that the cooling system is not blocked in any way.
5.
Powering the camera:
Canon recommends that Canon batteries be used to power the camera
The BP-955 battery pack comes with the camera. Typical operation/recording time for the
BP-955 battery is 115 minutes
Additional Canon brand batteries which are compatible with the EOS C300 and C300 PL:
• BP-950G, BP-970G, BP-975
(With the BP970G and BP-975 batteries, the battery door will not close) The battery door is removable
(note that this will make the camera more vulnerable to dust, moisture and so on):
1. Slide down the BATT OPEN switch and open the battery compartment cover
2. Push down on the latch at the bottom of the battery compartment
3. Gently pull out the battery compartment door.
6.
Checking battery power:
a). A button on the battery can be pressed, and LEDs on the battery will indicate its
approximate state of charge
b). Approximate percentage of charge and remaining battery run time can be displayed
in the camera’s viewfinder, and on its LCD monitor (please note that these are not
precise numbers, and depending on conditions may not be entirely accurate).
Press the DISPLAY button to turn on-screen displays on or off; the main Power Switch must be
in CAMERA position.
EOS C300 Best Practices Guide
7.
4
Reset the camera:
For setting up for a new shoot, do a full reset on the camera. This clears any previous settings,
and returns the camera to a known, factory-default state. This is especially important if the camera has been rented, and you’re not certain of all settings from its most recent use.
For the following days, as long as no one has touched the camera a full reset is not necessary.
MENU >
Be sure to select OK to complete the process.
8.
9.
Setting Date, Time and Language:
It is very important to set the date and time correctly. Setting Date and Time is done via the
OTHER FUNCTIONS Menu. You can freely change date format, (dd/mm/yy, etc.), and set
Time Zone to match your location.
Check the sensor:
NOTE: The camcorder’s CMOS sensor is a delicate piece of precision engineering. Direct
exposure of the sensor to ion rays or other types of cosmic radiation may affect it and may rarely
appear as bright colored dots on the screen. This is the nature of CMOS image sensors and does
not represent a malfunction. Adjusting the black balance may solve the problem.
The effects of the damages may be more noticeable when the camcorder is subject to high temperatures, when a high ISO speed or gain level is used and when slow shutter speeds are used.
To check the sensor:
Put body cap on (no lens), connect monitor, slowly increase the ISO or Gain. If there are noticeable pixels, then do a black balance. If this does not work, contact Canon support (1-855-2463367)
ISO/Gain settings: (page 61 of the instruction manual)
1. Repeatedly press the FUNCTION button (rear of camera) until ISO or GAIN appears
2. Turn the SELECT DIAL (larger of two left-side dials) to select desired ISO or GAIN value
Black balance: (page 46 of the instruction manual)
MENU >
1. Remove the lens, and attach a body cap
2. Select OK, and then press SET
3. When the confirmation message appears on-screen, press SET
EOS C300 Best Practices Guide
10.
5
Setting up the LCD and EVF:
The camera can be operated with or without the Canon-supplied LCD monitor connected.
Caution about the EVF: Allowing direct sun or to strong light sources into the electronic viewfinder may cause damage to internal components. When you are not using the viewfinder, make
sure to attach the viewfinder cap or other covering to the viewfinder
There are several operator overlays available, for EVF use:
• Peaking, Zebra Pattern, On-screen crop marks, etc.
With the LCD panel, you get the addition display options of
• Waveform, Vetorscope, Edge Monitor display
Video scopes — LCD monitor only: (page 88 of the instruction manual)
MENU >
Onscreen Markers and Zebra patterns: (page 71 of the instruction manual)
MENU >
11.
Setting up the outputs:
The C300 has HD-SDI, HDMI outputs as well as sync out.
The HD-SDI output can be turned off, be sure to check this in the menu system
under VIDEO SETUP
(page 127 of the instruction manual)
12.
Setting the ISO or Gain:
Sensor sensitivity can be set for GAIN or ISO — whichever a camera operator feels
more comfortable using.
• ISO range is 320 ~ 20,000
(ISO can be set in either 1⁄3-stop increments, or full-stop increments).
• Gain range is -6dB ~ 30dB (in 3dB increments), or fine 0.5dB increments at 0dB~24dB
Dynamic Range for the EOS C300 is always 12 stops (with Canon Log active); at ISO 850 and
above, the range over & under 18% gray is virtually even. ISO 850 is equal to 2.5dB.
EOS C300 Best Practices Guide
6
Setting ISO or Gain (continued):
To select ISO or Gain as your preferred method of controlling sensor sensitivity:
MENU >
To actually set or change ISO or Gain:
1. Press the FUNCTION button (on rear of camera) repeatedly, until ISO or Gain is highlighted on camera’s
viewfinder/LCD monitor display
2. Turn SELECT Dial (larger of two dials on left side of camera), until desired setting appears on-screen
(page 61 of the instruction manual)
13.
Setting the Resolution, Bit Rate, and Frame Rate:
The EOS C300 can record in various bit rates and resolutions. Resolution and frame rates are
set separately in the camera’s menu. The highest quality is 50Mbps at 1920x1080 resolution.
MENU >
The C300 is capable of numerous frame rates, including 23.976P, 29.97P, and 59.94i (when
shooting at Full HD 1920x1080). There’s also a separate, true 24.00P — more about that below.
To select a conventional video fps rate:
MENU >
Commonly, 23.976P is referred to as 24P, but is a technically accurate description
14.
Warning — 23.98 fps vs. 24.00 fps
EOS C300 cameras allow users to choose two frame rates that at first glance appear to be “24P”.
For conventional digital video recording at “24P”, users normally want to actually be shooting
at 23.976 fps. To accomplish this, proceed as indicated directly above (MENU > Other Functions > Frame Rate), and choose 23.98P.
However, for video recording which must be precisely tied to existing 24.00 fps film footage,
there’s a completely separate fps setting:
MENU >
It cannot be over-emphasized — the 24.00P setting is NOT for general-purpose video
recording. DO NOT set 24.00P unless you deliberately intend to match video files
with existing film footage which was shot at 24 fps in a film camera, or unless postproduction staff have specifically instructed camera operators to use this setting
instead of 23.976P. EOS C300 Best Practices Guide
15.
7
Interval recording, and Slow/Fast frame rates
The C300 is also capable of interval recording, as well as slow and fast frame rates: • Interval Recording: intervals from 1 sec.~10 minutes
(page 93 of the instruction manual)
• Slow and Fast Recording (sound is not recorded in this mode):
fps rates from 1~30 fps (at Full HD 1920x1080); 1~ 60 fps at 1280x720
(page 95 of the instruction manual)
Setting Interval Recording:
MENU >
Select the desired interval, and then the desired number of frames, and press SET
Activating Interval Recording:
MENU >
Select INTERVAL REC, and press SET (“INT STANDBY” flashes at top of screen)
Press START/STOP button to begin recording; Press again to stop recording
Slow/Fast Recording — setting frame rate:
MENU >
Select desired fps rate, and press SET
Activating Slow/Fast Recording:
MENU >
Select SLOW & FAST MOTION, and press SET
Press START/STOP button to begin recording; Press again to stop recording
16.
Shutter Control:
Shutter timing on the EOS C300 can be set to any of the following methods:
• Shutter Angle (range 360°~11.25°)
• Shutter Speed (range 1⁄24 ~ 1⁄2000 second, at 23.98 fps; slow speed varies depending on fps)
• Slow Shutter (range 1⁄3 ~ 1⁄30 sec. (range varies, depending on fps rate)
• Clear Scan (range 23.98 Hz ~ 250.78 Hz, depending on fps rate)
MENU >
(page 58 of the instruction manual)
EOS C300 Best Practices Guide
8
Shutter Control (continued):
To set or change the actual shutter speed, angle, etc —
1. Press FUNCTION button (rear of camera) repeatedly, until shutter value is highlighted in viewfinder
or on LCD monitor display
2. Rotate SELECT Dial (larger dial on left side of camera) until desired value appears on display
3. Press SET.
17.
Canon Log shooting
The EOS C300 and C300PL can record video files using “Canon Log” Gamma. This intentionally reduces contrast, darkens exposure slightly, but significantly expands dynamic range and
available detail in bright highlights and dark shadows. It is a setting that is intended to be used by
camera operators who expect their files will be color graded during the editing process, using a LUT.
A point of possible confusion about Canon Log is that it can be set two ways, in two different
places on the camera:
• As option C8 within the Custom Pictures menu
Press Custom Pictures button on left side of camera; select option C8 — CINEMA
• As part of the Cinema Locked setting
MENU >
When option C8—CINEMA is selected, within Custom Pictures menu, many other aspects of
picture quality can be further adjusted if the camera operator sees fit. Knee, Toe, master R,G,B,
sharpness, skin detail, Black Gamma and more are among the possible choices.
When CINEMA LOCKED is selected from the Camera Set-up menu, it’s different — this setting
is to literally lock-out any other Custom Picture controls, apply Canon Log to reduce contrast and
increase dynamic range, and set the camera for high-end cinema recording. Any previous image
settings that may have been in effect are ignored if Cinema Locked is applied.
CINEMA LOCKED is a very quick and effective way for high-end cine operators to pre-set the
camera for most types of on-set recording, where color grading of files in post is anticipated.
18.
Viewing the LCD monitor with Canon Log active
The viewfinder and LCD monitor image when Canon Log Gamma is used will appear very flat
and somewhat dark. The EOS C300 offers View Assist, to approximate how the scene would
appear with a normal gamma applied.
MENU >
• View Assist cannot be adjusted or changed to simulate different “looks”
• View Assist applies only to what’s seen in the EOS C300’s viewfinder, or the Canon-supplied
LCD monitor. The correction applied with View Assist is not output via the SDI or HDMI output ports.
(page 109 of the instruction manual)
EOS C300 Best Practices Guide
19.
9
Setting up Time Code:
The EOS C300 uses SMPTE standard Time code.
• Preset options include Rec Run, and Free Run.
• The Regen option reads any recorded time code on the selected memory card, and will continue from the last recorded time code. (Time Code only runs while recording when Regen
is active, so consecutively recorded clips will have continuous time code.)
MENU >
(page 73 of the instruction manual)
20.
Built- in ND Filters:
The EOS C300 has three available, built-in ND filters. The camera can be operated with a clear
filter in place, or with any one of the following in the optical path (it’s not possible to combine or
“stack” the in-camera glass ND filters):
• ND 1 (2-stop light reduction / 4x; ND 0.6)
• ND 2 (4-stop light reduction / 16x; ND 1.2)
• ND 3 (6-stop light reduction / 64x; ND 1.8)
Built-in ND filters are activated via the + and - buttons on the left side of the camera body.
(page 63 of the instruction manual)
21.
22.
Manually Operating the ND filters in case of a malfunction:
On the right side of the camera, near the base, is a small cover held in place by a screw. This can
be removed, and a small Phillips head screwdriver inserted and rotated to manually move the ND
filter mechanism to move a filter if the built-in motor mechanism ever fails on location.
(page 172 of the instruction manual)
White and Black Balance:
White balance options in-camera are:
• Pre-set — Daylight (5400 K) or Tungsten (3200 K)
• Color Temperature (user-set between 2,000 K and 15,000K)
• Custom WB (Two available settings, A and B; assumes white or neutral gray test target)
Press the FUNCTION button (rear of camera) to highlight the WB icon in viewfinder or on LCD monitor;
turn SELECT Dial on left side of camera to select desired WB type; press SET to lock-in your choice.
To set Color Temperature:
• Press the Custom WB button (left side of camera) — with Color Temperature selected, the default color
temperature will be highlihgted
• Push joystick up/down or turn SELECT Dial (left side of camera) to desired temperature; press SET.
EOS C300 Best Practices Guide
22.
10
To take a Custom WB reading:
• Aim camera at white or neutral gray test object. Be sure it fills entire picture area.
• Press CustomWB button on left side of camera; “A” or “B” icon will blink rapidly — hold camera so
test object fills screen until icon stops blinking. When blinking stops, procedure is completed. Setting will be
retained, even if camera is shut off.
(page 66 of the instruction manual)
Black balance
See item 9 on page 3 of this document.
(page 46 of the instruction manual)
23.
Audio Recording:
If the C300 is operated without the LCD panel assembly, then the only audio input is a mini jack
on the camera — this is good for scratch audio. The LCD panel assembly has 2 XLR terminals
that can be used for high quality audio recording.
(page 80 of the instruction manual)
24.
Taking still photos:
The EOS C300 has two methods of capturing still images and saving them to the SD card
(still images are not saved to either of the two CF card slots):
• Camera mode: Press a button and record a separate, still-image file during recording
(there is no interruption of video recording)
1. Set any of the assignable buttons to “PHOTO”
2. Press that button to take a still-image shot; image will be taken at same resolution as video recording
• Media mode: (Main switch set to “MEDIA”) Play back video file, pause playback, and
press assignable button set to PHOTO to capture a frame-grab and save it to SD card
(page 139 of the instruction manual)
25.
Color Bars:
The C300 can display the following types of Color Bars (page 87 of the instruction manual):
• SMPTE standard-definition color bars
• EBU color bars
• ARIB multi-format HDTV color bars
Setting color bars is a two-step process —
1. Select the type of color bar: MENU >
2. Activate your choice: MENU >
EOS C300 Best Practices Guide
26.
27.
11
Audio reference signals:
A 1 kHz audio reference signal can be output with the color bars on the EOS C300. Levels can
be user-set at -12 dB, -18 dB, and -20 dB. To activate an audio reference signal...
MENU >
Setting up assignable Buttons:
There are 15 assignable buttons on the C300. Each assignable button on the camera is numbered, making them easy to identify. These can be assigned to various functions to make it easier
to operate the camera.
MENU >
(page 99 of the instruction manual)
28.
3D shooting:
The EOS C300 has a function to invert the recorded image horizontally and/or vertically.
It is available in the Custom Functions menu:
MENU >
> Scan Reverse Rec
(page 110 of the instruction manual)
29.
Setting up CF cards for recording:
The EOS C300 and C300 PL require UDMA-compatible Type 1 CF cards, with a capacity of
at least 512 MB. UDMA-compliance or “card speed” alone is not a guarantee that a card will
function properly in the camera. Canon Inc. has subjected various popular cards to a series of
rigorous tests to verify reliable operation in the EOS C300. This list should be checked by any
prospective camera operator:
http://usa.canon.com/cusa/professional/products/professional_cameras/cinema_eos_cameras/eos_c300 - Specifications
The C300 has 2 CF card slots for recording: CF-A and CF-B. The Recording Method options
for using the two CF card slots are:
• Relay Recording
If two cards are installed, the camera records to one card first — and instantly switches to
the second when the first card is full.
• Double Slot Recording
With two cards installed, the camera records simultaneously to both cards, creating an immediate back-up copy in-camera as you record. Note: Double-slot recording is not possible with
slow & fast motion recording, or with Relay Recording
MENU >
(page 41 of the instruction manual)
EOS C300 Best Practices Guide
12
Recording to a single card slot:
To select one CF card slot for active recording, press the Slot Select button on the left side of
the camera. The card access LED lamp adjacent to slot A or B will glow green to indicate which
is active, and a triangle icon will appear next to “A” or “B” on the smaller rear LCD info panel.
• It’s not possible to switch between slots A and B during recording
• If both CF card slots contain a CF card, and the card door to the selected slot is opened during recording, the camera immediately switches to the other CF card slot
Initializing (formatting) cards before use:
Both CF cards A and B, and (if installed) the SD card can be initialized in-camera. Canon recommends a card be initialized prior to each use. Of course, be certain that any data previously
recorded on the card is safely copied elsewhere before initializing a card.
MENU >
> Select CF-A, CF-B, or SD Card
• A CF card can be initialized while the other card is recording
• Initialization is not possible with a card that is actively recording
• You can immediately move to the Initialize Media sub-menu by assigning Initialize Media
to an assignable button
(page 43 of the instruction manual)
Maximum recording Time:
(approximate figures, based on continuous recording at Full HD 1920x1080)
50 Mbps
35 Mbps
25 Mbps
30.
16GB CF card
64GB CF card
40 min.
55 min.
80 min.
160 min.
225 min.
310 min.
Disposal of recorded data on CF cards:
When you delete data on the recording media, only the File allocation table is altered and stored
data is not physically erased. If video files you’re recording are confidential in nature, be sure
that once data is safely copied to other media, that it is fully deleted from memory cards:
• Format (initialize) the card, (using the [Complete] initialization option for the card
(page 43 of the instruction manual).
• Fill the card up with unimportant recordings, and then initialize it again. This makes recovering
the original recordings very difficult.
EOS C300 Best Practices Guide
31.
13
Saving camera settings to SDHC card:
EOS C300 camera settings can be saved onto an SD memory card, and then applied to other
C300 cameras — allowing for easier, and identical set up of multiple cameras.
MENU >
• Menu: saves menu settings to the SD card
• Menu + CP: Saves menu settings plus any Custom Picture settings to SD card
• Be sure to highlight and select OK, and then press the SET button
(page 111 of the instruction manual)
32.
Mounting the camera:
From the factory the C300 ships with both a 3⁄8" and 1⁄4 -20" threaded screw holes for rigs and
tripods. If you remove the 4 small screws, the plate can be changed to one that only has a 1/4"
threaded screw hole and an alignment hole.
NOTE: Canon recommends that with heavy lenses, that the front of the lens be supported to reduce the strain
on the lens mount. This support is available from various third party manufacturers.
33.
On Set and Near Set backup and footage check:
Canon has a program called XF Utilities that can be used to scrub through the footage, add metadata and make backups of the original cards. There are also plug-ins for Apple FCP 7 and Avid
Media Composer on this disk (Adobe Premier does not need any plug-in).
The XF Utilities is included with the C300. It will shortly be available for download from the
Canon USA website:
http://usa.canon.com/cusa/professional/products/professional_cameras/
cinema_eos_cameras/eos_c300
• IMPORTANT: Copy the complete contents of the CF cards when backing up the cards.
Some NLE software programs require the associated files on the CF cards to properly ingest
the footage.
Please consult the owner’s manual for more detailed instructions.
###