1
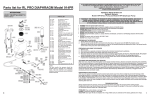
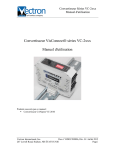
Projector Instructions For SharpNV4
Step One:
The Sharp NV4 should contain 2 basic cords. Make sure all the cords are in the bag.
Cord #1:
Cord #1: Plugs
into the projector
and the wall.
Input 1 = RGB1
Cord #2: The second cord
plugs into the laptop and to
the projector (RGB1= port 1).
Cord #2
Plug to
Projector
Step Two:
Turn on the projector on first and then the laptop.
Page 1
Step Three:
Projector should come show on the screen (imaging). The “input selection” button on
the projects will help you choose RGB1, RGB2, or video. You will generally choose
RGB1 for PowerPoint presentations. RGB2 is for Blackboard. Video is for a movie.
“ON”
“Black Screen”
“Input Select”
RGB1=port 1
PowerPoint
Step Four:
If the projector is not projecting an image from the laptop, please re-start the
computer. Then the projector will be able to find the image.
Step Five:
If the projector is still not projecting an image, then you must hold two keys at the
same time the projector will also find the image. These two keys are:
Fn and F3 (Please hold these keys down together). You may have to hit these
particular keys 3 different times until you get the projected image on your desktop and
screen or wall. Sometimes the Projector buttons maybe an F4 rather than an F3. Please
take note of the pictures on the next page.
Page 2
“F3”
“Fn”
Step Six:
If you are still having problems call Marti at x5289, Lowell at x7679, Sue at x5189.
Page 3