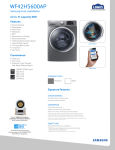
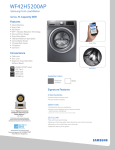
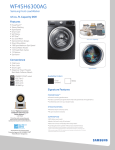
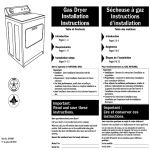
1
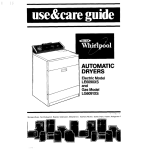
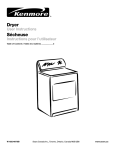
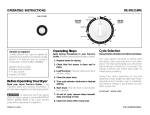
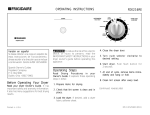
m
VARIABLE
SIGNAL
CONTROL
I
i
OPERATING STATUS
KEYS
I
UNT SCREEN
r_
SAFETYDOOR
SWITCH
_
MODEL NO. PLATE
_]_
ERFORMANCE
GUIDE
LABEL
!
[!
J
If you need SERVICE or PARTS for your Kenmore dryer:
Be ready to give your Sears Service Department the model number, serial number and date of
purchase. Write in below. The plate Im with model and serial numbers is located behind the
ELECTRIC
MODEL 64781
dryerdoor.
MODEL NO.
IM
SERIAL NO.
I
DATE OF PURCHASE
I
GAS
MODEL 74781
How to dry a load of laundry
b_
_Put
Clean lint scre_
laundry
bef'rre
) Set Hea! Temp Control lgl
each load.
into dryer and shut the door.
Set Cycle Selector
Push
the Start Control [] to start
your dryer.
Set End_of-Cycle Signal Control il.
(_
Remove load when dry.
Control II
I|
I!
I
mouw
m
WUP
IlUl
INi,
m
m imiim
I
m-li_
R
if.A1', lll_
ImlI
Iff_
lII)I
Ill Cycle Selector Control
I1 End-of-Cycle Signal Control
Use this control to select the proper drying method for the type of
items in the load. The control can be set for automatic or timed
drying, touch up or air. You can turn the control at any time to
make drying time longer or shorter or you can turn the control to
an OFF position to shut the dryer off.
Use this control to select the loudness of the signal that buzzes to
tell you the drying cycle is over. It can be adjusted to OFF or up
to LOUD. The dryer should be unloaded as soon as the cycle is
over to get the best wrinkle free results. Always use the signal
when drying noqron fabrics.
OPERATING STATUS KEYS
Color coordinated keys indicate in which portion of the cycle the
dryer is operating.
During Wrinkle Guard I the buzzer will sound every 5 minutes
unless the control is off.
Igl Heat Temp Control
Use this conl_folto start the dryer. Be sure the door is closed.
Use this control to select drying temperature to match fabrics in
the load. The control can be adjusted from LOW for delicate fabrics to HIGH for sturdy work clothes.
Openingthe door stopsthe dryer.Itwill notstartagainuntilyou
close the door and pushthe STARTcontrol. Be surethe Cycle
SelectorControlis ona drysetting.
It is important to choose the right temperaturefor the type of fabrics being dried. A wrong setting could damage some fabrics.
The Heat Temp Control will not work when the dryer is set in the
AIR cycle.
Part No. 3392334
Il! Start Control
Ill CYCLE
SELECTOR
CONTROL
AUTO DRY I Cycle
TOUCH-UP
Use this cycle for most loads, it gives the best drying in the shortest time.
Drying time varies according to type of fabric, size of load and dryness
setting.
Use this cycle to "smooth" synthetic and permanent press clothes that are
clean but wrinkled from being crowded in a closet or suitcase. This setting
provides about 15 minutes of heated tumbling followed by a 10-minute
(approx.) cooldown.
• Put just a few garments into the dryer.
Dryness is determined by thermostats that react to the amount of moisture
in the air exhausted from the dryer. When the dryness selected is reached,
the dryer goes into cooldown for 10 minutes (approx.) then a buzzer
sounds. If you do not unload the dryer, it goes into Wrinkle Guard I
automatically.
• Set the Cycle Selector Control to the (:t:)which is good for most fabrics.
You can set the control for MORE DRY if clothes are still damp at the
end of the cycle or LESS DRY for clothes that are too dry or are to be
ironed.
• Set the Heat Temp Control to the type of fabric in the load.
• Push the StartControl.
AIR DRY Cycle
Use this cycle to get up to 30 minutes of drying time in room temperature
air. Use this setting for items that will not tolerate beat, such as plastics,
foam rubber, etc. and for airing and flutfang items such as pillows.
Cycle
• Set the Cycle Selector Control to TOUCH-UP.
• Set the Heat Temp Control to the type of fabric in the load.
• Push the StartControl.
• Remove clothes immediately when tumbling stops.
TIMED DRY Cycle
Use this cycle to get up to 70 minutes of heated drying time. The heating
cycle is followed by a 10-minute (approx.) cooldown.
• Set the Cycle Selector Control to the amount of time you want in the
TIMED DRY Cycle.
• Set the Heat Temp Control to the type of fabric in the load.
• Push the Start Control.
• Do not use heat to dry these items.
• Set the Cycle Selector Control for the number of minutes you want in the
AIR DRY Cycle.
• Push the Start Control.
SOFT-HEAT ®
Wrinkle Guard I
In the AUTOMATIC and TIMED DRY Cycles, clothes are dried at the
selected temperature until the last few minutes of the cycle when the dryer
switches to low heat. This helps prevent overdrying.
Wrinkle Guard I helps keep your permanent press items wrinkle free when
you cannot unload the dryer promptly at the end of the Automatic Cycle.
If you do not open the door at the end of the Automatic Cycle, Wrinkle
Guard I will tumble the clothes without heat for 30 minutes unless you
open the dryer door sooner. During Wrinkle Guard I the End-of-Cycle
Signal will sound'after every 5 minutes unless the control is off.
Lint Alert
Clean the lint screen before each load. If you do not, your dryer may not
operate properly. If enough lint accumulates to clog the lint screen, a continuous whistle tone will sound. Turnoff the dryer, remove the lint screen,
clean and replace it. When the dryer is restarted the sound will stop.
Cooldown
Approximately ten minutes before the end of the AUTOMATIC and
TIMED DRY Cycles, clothes are tumbled without heat to help reduce
wrinkles and make clothes more comfortable to handle.
FEATURES
E1 Lint Screen
Ik_ Model No. Plate
Keep the lint screen clean. A lint-clogged screen will slow down the flow
of air. This makes drying time longer and wastes energy. Clean the lint
screen before each load as follows:
1. With dryer off, remove the screen by pulling straight up.
2. Roll the dry lint off the screen. Do not wet the screen or lint; wet lint is
hard to remove.
3. Replace the cleaned lint screen.
Shows model and serial numbers. Have these ready if you ever call for
service.
Do not use your dryer while the lint screen is removed.
It could cause overheating and possible damage to fabrics and dryer
parts or create a fire hazard. Lint screen must be pushed firmly into
place.
I
I
Located inside the dryer door. Gives information on what to do if dryer
does not perform normally.
•El Easy Loader Door
Fire Hazard.
III
l_ Performance Guide Label
I
NOTE: A whistle tone will remind you when the lint screen needs
cleaning.
NOTE: If lint screen gets clogged by detergent or fabric softener build-up,
remove and clean it with a nylon brush, hot water and liquid detergent.
Dry and replace screen.
Drop down door is located to reduce stooping. It can also serve as a shelf
for folding clothes. The large opening makes it easy to load and unload and
to see inside dryer. Clothes in dryer are easy to reach.
NOTE: If dryer drum is stained, clean it with a damp cloth and mild
detergent.
For more detailed drying times, roles for safe operation, fabric care,
maintenance and installation information, refer to the LAUNDRY
GUIDE and INSTALLATION INSTRUCTIONS you received with
yourdryer.
i
i_ Safety Door Switch
For safety, the switch shuts off dryei when door is opened. Dryer will not
start until door is closed and START is pushed. Be sure the Cycle Selector
Control is on a dry setting.
Part No. 3392334
Printed
in U.S.A.
i