1
INSTRUCTION
ASSEMBLY
SHEET
OF CAR-TOP
MODEL300.7271
PA S
UST
I
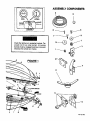
DESCRIPTION
IMPORTANT
PART NO.
WA
1
Hardshell Bottom
N/A
1
Master Parts Bag
04870
1
M&=_J?,BJ_L_=_
O487O
Garnlock with Keys
03807
(R)
2
Lock Bracket
00841
(M)
2
Lock Locator
03808
(S)
2
Snap Latch
03347
(P)
2
Support Assembly
03810
(O)
2
Foam Gasket
01315
(A)
1
Instruction Sheet
04857
1
Small Parts Bag
04864
1
Large Flat Washer
00070
(G)
8
1/4"Flatwasher
00017
(Hi
2
Small Flat Washer
03668
(B)
4
1/4" x 20 Plastic Insert Nut
00115
(J) 10
1/4" :( 20 x 5/8" Screw
04103
(E)
6
1/4"x 20 Universal Drive Screw
03948
(F)
4
01010
(D)
4
#10-24 Plastic Insert Nut
00764
(I)
4
PRE-ASSEMBLEO ON CARRIER AT FACTORY.
(L)
PARTS AVAILABLE
Save this instrUctionsheet
sheet for
for tuture reference
when ordering replacement
laeement parts, Refer to
I
Model 300,72"Z_1. Replacement parts
are
available through.Sears Parts Department.
Depa_
(800) 366-7278
MFG. By KAF_
3737 NORll-L ACO_
ASSEMBLING
No more than 100 pounds of evenly distributed weight should
Do not travel with an empty carder at speeds over 40 MPH. Keep
a minimum of 50 Ibs. in the carrier at higher speeds to ayold
undesirablewind effects. It is recommended to remove carrier,
from vehicle when not in use.
All Carrier hardware and straps must be firmly attached. When
traveling, periodically check all hardware and straps to assure'it'
is fastened securely. Each time the carder is installed che_:l_:
hardware and straps for sign of corrosionor excessive wear.
When using carrier the front and rear back latches must i_e
closed, and the two locks must be locked and the keys
removed. Then locking carrier be sure latches on upper.
hardshell are engaging brackets on lower hardshell beam
turning key, Top hardshlHI will not pull up from lower
hard.shell when carrier Is properly locked,
The carrier is water resistant, not waterproof. Always protect
centents accordingly.
Do NOT place valuable or fragile items in the carrier. Sudden
stops may cause contents to shift, possible damaging "valual_e
or fragile items, The carder is not designed to be accident or
theft proof,The manufacturer and retailer cannot be held 1
responsible for damage to or theft of carder's eontsnts,
_ninla In m
03396
- MUST READ BEFORE
ever be transported In the carrier.
#10-24 x 5/8" Screw
Hinge
(18 CU. FTi)
Before assembling and installingthe canJer please carefully r_d.
the guidelinesfor Installationand use of the carder below. Proper
assembly and installation of the carrier Is the customers'
responsibility.The mar_ufa(;turer'swarranty is limited to the repair
or replacement of a defective €an'let. Damage to the vehicle, 'tl_
carrier'scontents, or to any person or property Is excluded,
QUAN,
Hardshell Top (18 cu. ft.)
CARRIER
IN _
Ill
_
la maaaOllql II
_
Jl _
O
d_ilml
Jig' an_i
- INSTALLATION OPTIONS -
I.
•
I
|
I
If you intend to attach the Carrier to a vehk;le by using, ,
mounting hooks, boa the mounting hooks and 7228 strop:.' J
kit are purchased separately. See Application Chart on store' I
i
displayfor specificvehiclefltment,
•
• If you intend to attach
I
factory installed or aftermarket roofrack, you must purchbse. II
the U-Bolt Kit #7215 separately. See application Chart .on
;
store display for specific vehicle fitment. Roof racks must
'=
|
•
have a capacity ot at least 150 Ibs. Consult your owner's
manual for capacity
I
2
L . .........
AVENUE
Im _
FRANKLIN PARK, iLLiNOIS 60131
the Carrier to a vehicle
_. , __......
1-_30-Y..A_RITE
i
with a ,
__.. __.. _...J
PART NO. 041_1o*7
MARCH, 2000
i|
i
|
•
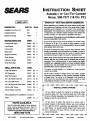
ASSEMBLY COMPONE_S
i
A
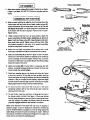
FIGURE 3
m
I
I
Check that, latches are engaging brackets. Top
should not lift up when pulled. All locking
devicesmust be engaged (and keys removed)
whenever the vehicle is in motion.
|1
R
i
i
FIGURE 1
G
J
E
FACING INWARD
D
FRONT
J
i
B
B
, TOP ASSEMBLY
TOOLS REQUIRED
I
1. Attachfoam,wea_'_r'sld_ng (A) to insideof Carriertop;as shown
in figure 1 and detail DO NOT CUTT R_ _Jt In one piese and trim
I ASSEMBUNG TOP TO BoTroM I
While someone_
the top,ar_n the slot in the hinges(L) sn the
Carrier bottomwith bheCarriertop and attachmedium screws(E),
medum ffatweshem (H) and large plastic insert nuts (J). Do not
mUyt_hten at this time. Turn carde_[_side down andpos_on top
to _ bottom _
the same spacing in front and rear of carder
FIGURE:
CUTAWAY OF
HARDSHELL TOP
S
\
T_htan screws.
.
While someone holds the top in an open position, attach the
support esserr_blies(O) (Note proper Ix_ltioning as shown In
figure 1) with _ 2 large screws(F), 4 largeflatwashem(G) and 2
large plas_cin_ nuts (J). 1-_jhlanscrewsuntil snug,Note: White
round plastic protectorsin the center of the supportassemblies
shouldbe rasinginwardas sbownin _gum 1.
4, Attach front and back snap latches (P) to bottom with 4 small
INSTALLED IN
LOCKED POSITION
screws(D), small_tweshers (B) and smallplasticinsertnuts(I).
5. Install lock assemblies (R) as shown in f'_ure 2. Note: The locks
need to be in _ "locked"positionfor assembly to the carrier top
and for assembly of the lock Iocatom. Remove key to prevent
movement of lock hook. Lock locator(S) tabs shouldbe pointing
towardthe inside of the carrier,
6. Attach lock brackets(M) to Carder bottomon passengerside with
medium s_rews_E)and large plasticinsertnuts (J). Use lowerslots
in lockbrackets.Do not fully tighten.
7. Check lock assemblyalignmentby closingand locking the Carder
to check for correct fit, If they align and lock properly, open the
Carrierand tightenthe hinge (L) hardwareand _ lock brecht (M)
hardware. If they do not a_n and lock properly,adjustbothhinges
and Io_k hardware untilthey alignand lock.Once they are properly
aF_ned,tightenboth the hingesand lockbrai::ket
hardware.
8, To close Carrier,
make sure the locks are in the open
REAR
(horizontal) pos'Rionwith the key removed and pull Carrier top
downward from both ends
g. To lock Can'lar, insertkey, pull down on flange and turn key to
the locked position (vertical). See figure 3. Place snap latches
intotop flange depressionsand pushfront of snap latches down
until they engage. For safety, the Carrier locks (R) must be
properly engaged whenever the vehicle is in motion.
Note: Some distortionof the plastic top may occur/n shipping or
improperstorage./t may be ne_ssary to reshape _e hardshell top
over_e ham_hellbotlomby pre._'ing
inon thetopflange
agalnst
the
botom flangeall around_ Cartier and Ioddng _e Carffer, Wi_ 48
hours_ top and bottomwill reshape and fittogs#let more readily. The
Cartiercan be used during _ m_aping period.
PASSENGER
_
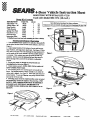
4-Door Vehicle Instruction
Sheet
MOUNTING WITH STRAP KIT # 7228
Used with Model 300.7271
(18 cu.ft.)
Strap Kit Contents
D_,SCRIPTION
PART NO.
QUAN
Gray Straps. 42"
00286
4
(A)
I R_lac_acnt Save
this lmtmction sheetScm
for _nm:
reference. 800-366-7278
partsareavailablethrough
PortoDepartment,
*Black Sla'aps - 48"
04865
2
(B)
Suap Bracket
04866
4
(C)
_g_el
*slide Bracket
04867
2
(D)
Sponge Foot Pad*
00264
16
(E)
Gzay Boh Covers
02985
8
(F)
Hardware Bag
04872
1
Instruction Sheet
04868
I
(w) Reflects parts nat used with mounting _ 4-Door vehicles
M0untintr InstruetloM
rot 4 Door Sedans
I. Turn assembled carrier upside down and place foot pads (E)
on the tai.*ed section of the inverted carrier bottom _ shown in
Fisure L
2. Attach strap braekeu (C) to bottom of comer with screws,
Large washers, and large plastic insert nuts. See Figure 2. Place
Gray bolt covers ('F) over bolts att_ohiag the strap brackets (C),
cm the imidc of the carrier bottom to prevent po_ible damage
to contents. Note: plasdc insert nuts are meant to hold very
aooarely,
S_ews cmmOt be tightened by hand, they must be
driven through with a screwdriver and pliers or adju._table
w_ench.
3. Route gray straps (A) through the strap brackets and
mortaring hook as shown on Figure 3,
4. Center career on roof. NOTE: HffPE C£EANAI_4
ROOF UNDER FOOT PADS,
Figure 2
OF
5. Put mountin E hooks over external gutter or beneath door
frame, Pull bottom portion of loops towards you to center the
carrier and to dghte_
See Figure 4. When tight, pull strap end
toward carrier. To prevent flapping, wrap straps around buckle
area and tie off loose ends.
6. Mounting straps should be redghteued after carrier is loaded
and periodically
check-ed for tightne= when IQraveling. FOR
SAFETY,
THE C.4RJUER LOCES MUST BE PROPER£ Y
ENOAOED
AND THE FRONT ,4HD RF-.4g BLACK
L_I TCHP_9 CLOSED IVHENEVJ_R THE Y_HIC£E IS IN
MOTION,
-.--tmeml_
\
(A)
LIMITED WARRANTY
The warranty is limited to (1) year from the date of purchase. Manufacturer's warranty obligation is exclusively
limited to the replacement or repair, at Manufacturer's sole discretion, of any Car-Top Carder (the "Carrier")
that the Manufacturer finds to be defective in material or workmanship, if the Pumhasar believes the Carder to
be defective, Purchaser must return the Carrier within the (1) year warranty period, with receipt ot the original
sale, to the place of purchase.
Manufacturer.will
have no warranty obligation for normal wear and tear of a Carrier or if you fail to properly
attach the Carrier to the roof of your vehicle. No warranty is given if the Carrier is subjected to abuse, misuse,
negllger_e, accidents or alterations.
The warrqnty printed above Is the only express warranty by Manufacturer applicable to this purchase.
The implied warranties
of merchantability
year from the (late uf purchase.
and fitness for a particular purpose arc also limited to (1)
It is understood
and agreed that manufacturer's
contract, .in tort, under any warranty, in negligence,
or otherwise, shall not exceed the return
amount of the purchase price paid by purchaser and under no circumstances
liable for special,
Indirect, or consequential
liability, whether in
of the
shall manufaeturcr
be
damages.
(Some states do not allow limitations on how long an implied warranty wil! last or the exclusion or limitation of
ineidantal or consequential damages, so the above limitations or exclusions may not apply to you.)
LOST KEYS
Most Sears Auto Centers have lock accessory
and mounting
hardware.
If just replacement
with the four digit number stamped
kits available containing
or additional
two locks,
keys are needed,
two keys,
call 1-800-527-7483
on the lock. Two keys will be mailed to you for $5.00.
Allow two weeks for delivery.
DON'T LET DIRT DAMAGE YOUR VEHICl E!
Dirt and dust scratch paint! To prevent damage to your vehicle's finish, it is
strongly recommended that your Carrier be removed when not in use. If
prolonged use is anticipated, or dusty conditions exist, Carrier must be removed
to clean surfaces that come in contact with the Carrier.
STORAGE
To avoid distortion when storing, c/ose and/arch. Do not store items on top of carrier.
MFG.BYKARRrTE
_¢/_?
M'_m_,=.,,-_=_
_ =tl=,,,,=
.....................
TOTRL P. O5