1
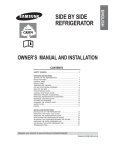
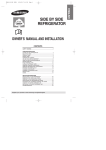
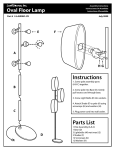
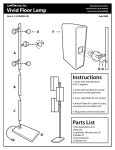
RS
Write the model and serial number here:
Model #
Serial #
Find these numbers on a label of the
refrigerator cabinet at the left hand-side wall.
OWNER’S MANUAL AND INSTALLATION
Before operating the appliance, please read this manual carefully
and retain for future reference.
CONTENTS
SAFETY WARNING SIGNS
........................................................... 2
OPERATING INSTRUCTIONS ..................................................... 4
PREPARING THE APPLIANC FOR USE ............................................ 4
FEATURES ................................................................................................ 4
THE CONTROL PANEL ............................................................................ 5
DIGITAL PANEL ........................................................................................ 5
THE CONTROL PANEL ............................................................................ 6
TEMPERATURE CONTROL .................................................................... 6
OVERVIEW OF YOUR FREEZER/REFRIGERATOR ....................... 7
MAKING ICE ............................................................................................ 7
FOOD STORAGE GUIDE ........................................................................ 8
REMOVING ACCESSORIES FROM THE FREEZER ...................... 10
REMOVING ACCESSORIES FROM THE REFRIGERATOR .......... 10
CLEANING THE ACCESSORIES ......................................................... 11
REPLACING THE LIGHTBULBS .......................................................... 11
INSTALLATION INSTRUCTIONS .............................................
12
INSTALLATION OF THE REFRIGERATOR ........................................... 12
ADJUSTING THE CLEARANCE BETWEEN THE DOORS ............ 14
TROUBLESHOOTING ........................................................................... 15
DA68-01171A REV(0.2)
ENGLISH
SIDE BY SIDE
REFRIGERATOR
SAFETY WARNINGS
• Before operating the appliance, please read this manual thoroughly and retain it for your reference.
• Because these following operating instructions cover various models, the characteris tics of your refrigerator may
differ slightly from those described in this manual
WARNING • The appliance is not intended for use by children or infirm persons without adult supervision.
• Children should be supervised to ensure that they do not play with the appliance.
• R600a or R134a is used as a refrigerant. Check the compressor label on the rear of the appli
• The refrigerant used in the refrigerator/freezer and the gases in the insulation material require special disposal
procedures. Ensure that none of the pipes on the back of the appliance are damaged prior to disposal.
CAUTION/WARNING SYMBOLS USED
OTHER SYMBOLS USED
Represents something you must NOT
WARNING
Represents something you must NOT
disassemble.
Represents something you must NOT
touch.
Indicates that a danger of
death aor serious injury exists.
Represents something you must follow.
CAUTION
Indicates that you must disconnect the
power plug from the socket.
Represents a ground is needed to prevent electric shock.
It is recommended that this symbol be
handled by service man.
Indicates that a risk of
personal injury or material
damage exists.
WARNING
Do not plug several appliances into the same multiple
power board.
• This could cause overheating and the risk of fire.
Make sure that the power plug is not squashed or damaged by the back of the refrigerator .
• A damaged power plug may overheat and cause fire.
Do not bend the power cord excessively or placeheavey articles on it .
• This constitutes a fire hazard. If the power cord is
damaged, have it replaced immediately by the
manufacturer or its service agent.
Do not directly spray water inside or outside the refrigerator.
• There is a risk of fire or electric shock.
Do not spray inflamable gas near the refrigerator.
• There is a risk of explosion or fire.
Do not insert the power plug with wet hands.
• You may receive an electric shock.
Do not put a container filled with water on the
refrigerator.
• If spilled, there is a risk of fire or electric shock.
Do not install the refrigerator in a damp place or a
place where it may come in contact with water.
• Deteriorated insulation of electrical parts may cause an
electric shock or fire.
Do not store volatile or flammable substances in the
refrigerator.
• The storage of benzene, thinner, alcohol, ether, LP gas
and other such products may cause explosions.
Do not disassemble or repair the refrigerator by yourself.
• You run the risk of causing a fire, malfunctions and/or
personal injury.
Pull the power plug out of the socket before changing
the interior light of the refrigerator.
• Otherwise, there is a risk of electric shock.
If you wish to dispose of the refrigerator / freezer throw
it away after first removing the doors and seals.
• Do so in a way, that is not possible for a child to remain
trapped inside.
The refrigerator must be grounded.
• You must ground the refrigerator to prevent any power leak
ages or electric shocks caused by current leakage from the
refrigerator.
Never use gas pipes, telephone lines or other potential
lightening rods as ground.
• Improper use of the ground plug can result in electric
shock.
WARNING
• Keep ventilation openings in the appliance enclosure or
mounting structure clear of obstruction.
• Do not use mechanical devices or any other means to
accelerate the defrosting process, other than those recommended by the manufacturer.
• Do not damage the refrigerant circuit.
• Do not use electrical appliances inside the
refrigerator/freezer, unless they are of a type recommended by the manufacturer.
2
WARNING
CAUTIONS
Do not overfill the refrigerator with food.
• If food falls out when you open the doors, there is a
risk of personal injury and or material damage.
The refrigerant used in the refrigerator/freezer and the gases in the
insulation material require special disposal procedures. Ensure
that none of the pipes on the back of the appliance are damaged
prior to disposal.
Do not put bottles or glass containers in the freezer.
• When the contents freeze, the glass may break and
cause personal injury.
If the power plug socket is loose, do not insert the
power plug.
• There is a risk of electric shock or fire.
Do not disconnect the power cord by pulling on its
lead.
• Damage to the cord may cause a short-circuit, fire and
or electric shock.
Do not use a wet or damp cloth when cleaning the
plug. Remove any foreign matter or dust from the
power plug pins.
• Otherwise there is a risk of fire.
• If the refrigerator is disconnected from the power
supply, you should wait for at least five minutes
before plugging it back.
• If the power cord is damaged, it must be replaced by
the manufacturer, a certified service agent or qualified
service personnel.
If the refrigerator is not to be used for a long period
of time, pull out the power plug.
• Deterioration in the insulation may cause fire.
Do not store articles on top of the appliance.
• When you open or close the door, the articles may fall
and cause personal injury and or material damage.
The appliance is not intended for use by young children or infirm persons without supervision.
Young children should be supervised to ensure that
they do not play with the appliance.
Do not store medicine, scientific materials and temperature-sensitive products in the refrigerator.
• Check product labels to make sure that refrigeration is
not prohibited.
Do not place the equipment directly under the sunlight.
Do not let children hang on the doors.
The appliance must be positioned so that the plug
is accessible after installation
If you detect abnormal sounds, smzells or smoke,
pull out the power plug immediately and contact
your nearest SAMSUNG Electronics service center.
If the power cord is damaged it must be replaced
by manufacturer, a certified service agent or qualified service personnel.
Do not place your hands in the area under neath the
appliance.
• Any sharp edge may cause personal injury.
This appliance contains a small amount of
isobutane refrigerant (R600a), a natural gas
with high environmental compatibility that is,
however, also combustible. When transporting and
installing the appliance, care should be taken to ensure that
no parts of the refrigerating circuit are damaged.
Do not touch the inside walls of the freezer or products stored in the freezer with wet hands.
• It may cause frostbite.
Do not use a wet or damp cloth when cleaning the
plug. Remove any foreign matter from the power
plug pins.
• There is a risk of burning and fire.
Refrigerant squirting out of the pipes could ignite or cause
an eye injury. If a leak is detected, avoid any naked flames
or potential sources of ignition and air the room in which
the appliance is standing for several minutes.
• In order to avoid the creation of a flammable gas-air mixture if
a leak in the refrigerating circuit occurs, the size of the room in
which the appliance may be sited depends on the amount of
refrigerant used. The room must be 1m3 in size for every 8 g of
R600a refrigerant inside the appliance. The amount of refrigerant in your particular appliance is shown on the identification
plate inside the appliance.
• Never start up an appliance showing any signs of damage. If
in doubt, consult your dealer.
If you wish to move the freezer/refrigerator, hold it
by the handles on its back and bottom .
• If the appliance is disconnected from the power supply, you should wait for at least five minutes before
plugging it back in.
If the freezer/refrigerator will not be used for a long
period of time, pull out the power plug.
• Any deterioration in the insulation may cause fire.
3
SAFETY WARNING SIGNS
SAFETY WARNINGS
PREPARING THE APPLIANCE FOR USE
Once you have performed the following steps, your freezer/refrigerator should be fully operational. If not, check the power supply and electricity source. If you have any doubts or problems, contact your nearest SAMSUNG service center.
Place the shelves and containers
which were removed for transport in
their appropriate positions (refer to
pages
8 to 9).
Set the temperature control to the
coldest temperature and wait for one
hour. The freezer/refrigerator should
now be slightly chilled and the motor
should run smoothly producing a soft
humming noise.
Clean the freezer/refrigerator and
accessories to remove any dust that
may have accumulated during packing
and shipping (refer to page 9).
Once the freezer/refrigerator temperature is sufficiently cool, you can begin
storing food inside.
Please be advised that it takes a few
hours after starting the freezer/refrigerator to reach the appropriate temperature.
When the refrigerator is plugged in,
the interior light should illuminate
every time the refrigerator door is
opened.
FEATURES
Multi-Flow System
• Cool air circulates through multiple vents on each shelf level.
This provides even distribution of cooling inside of freezer/refrigerator and keeps food fresher for
longer.
High humidity for fresher food
• You can keep food, fruit and vegetables fresh for longer because your refrigerator supplies highly
humidified cold air.
Door alarm
• When the refrigerator door is left open for more than two minutes, a musical alarm is automatically
triggered. This feature helps you save electricity and preserve stored foods.
4
Power Freezer
Speeds up the freezing process in freezer.
Power Cool
Speeds up the cooling process in fridge
Freezer Temp
To set the freezer temperature, press the
button repeatedly to change the set
temperature in sequence between -14ºC
and -25ºC
Fridge Temp
To set the fridge temperature, press the
button repeatedly to change the set
temperature in sequence between 1 ºC
and 7 ºC
DIGITAL PANEL
Freezer Temp : Indicates the current freezer temperature.
Fridge Temp : Indicates the current fridge temperature.
Power Freeze
• This light is on when you press the Power Freezer button.
Press the button to make the freezer reach the set temperature guickly.
• Press the button again to cancel the Power Freezer mode.
Power Cool • This light is on when you press the Power Cool button.
Press the button to make the fridge reach the set temperature guickly.
• Press the button again to cancel the Power Cool mode.
5
OPERATING INSTRUCTIONS
THE CONTROL PANEL
THE CONTROL PANEL
FRE. TEMP. BUTTON
To set the freezer temperature, push the
button repeatedly to select a level
between 1 level (cold) to 9 level (colder).
•
REF. TEMP. BUTTON
To set the refrigerator temperature, push
the button repeatedly to select a level
between 1 level (cold) to 9 level (colder).
The higher level you set, the lower temperature inside the unit.
NOTE
TEMPERATURE CONTROL
Freezer
Control levels table
• The freezer temperature can be set to a level between
Reference
1 level (cold) to 9 level (colder).
• Push the FRE. TEMP. button repeatedly until the
desired level is reached.
-.At each level, the LED lamps will turn on or off as
shown on the table.
cold
normal
colder
LED
Condition
(on)
(off)
(blink)
level
Refrigerator
• The refrigerator temperature can be set to a level
1
2
3
4
5
6
7
9
❋ At level 2,4,6,8 the LED which is marked with
(
) will light up fully (
) after blinking for 5
seconds.
between 1 level (cold) to 9 level (colder).
• Push the REF. TEMP. button repeatedly until the
desired level is reached.
-.At each level, the LED lamps will turn on or off as
shown on the table.
• For your convenience, your freezer/refrigerator controls have been preset at the factory. The
NOTE
8
freezer/refrigerator control should both be set to NORMAL (level 5) when you first install your
freezer/refrigdfator.
6
OVERVIEW OF YOUR FREEZER / REFRIGERATOR
FREEZER / REFRIGERATOR
Light
Light
Dairy compartment
Food Guard
Egg tray
Food Guard
Fresh center (option)
Ice tray
Fresh fruit & salad drawer
(upper)
Drawer
Fresh salad drawer
(lower)
Bottle guard
Leg cover
MAKING ICE
Pull out the ice tray.
Place it under the freezer
shelf or on the freezer shelf.
Pour water into the tray
until it reaches the water
level indicator on the tray.
To separate individual ice
cubes, pull out the ice tray
and hold the ice tray by its
ends, then twist it gently.
7
OPERATING INSTRUCTIONS
Shelf
Shelf
FOOD STORAGE GUIDE
8
4
11
5
1
9
2
3
6
3
7
10
FOOD STORAGE GUIDE TO FREEZER
Food Guard
For storing small packages of frozen food.
Tempered glass shelf
For storing all types of frozen food.
Meat and dry goods storage compartment
For storing meat and dry goods. Stored food should be wrapped securely using
foil or other suitable wrapping materials.
Tempered glass shelf
• Can be used safely because it will not break if it falls.
Fresh center (option)
• Preserve the taste of food and prolongs its freshness. Use the fresh center to
store cheese, meat, snacks, fish or any food to be used quickly.
8
FOOD STORAGE GUIDE
Fresh fruit & salad drawer (Upper)
• Stores fruit.
• This compartment preserves freshness for a long period of time by maintaining
the moisture in the food.
❈ To create more storage space, simply remove the drawer.
Fresh salad drawer (Lower)
• Stores vegetable.
• This compartment is airtight and maintains the moisture content and fresh-
ness of the food for a long time as itmes stored inside are not directly affected by the cooing system of the unit.
Dairy compartment
Food Guard
• Stores such as milk and yoghurt in small packages.
Bottle guard
• Stores a variety of bottles, cans and cartons.
Egg tray
• Stores eggs in the egg tray and then place the tray on the tempered glass shelf.
•
Food stored under ambient temperatures of 5 oC or lower can be frozen.
NOTE
9
OPERATING INSTRUCTIONS
• Stores fatty foods, like butter and cheese.
REMOVING ACCESSORIES FROM THE FREEZER
Ice tray and cube
• Remove the ice tray by pulling
it towards you.
Tempered glass shelf
• Pull the shelf out as far as
it goes. Then lift it up and
remove it.
Food Guard
Leg cover
• Hold the guard in both
• Open the freezer and refriger-
hands and then lift it up.
ator doors, remove the three
screws and detach the leg
cover.
• To reassemble the leg cover, replace it in its
original position and tighten the three screws.
Drawers
• Remove the compartment
by pulling it out and lifting it
up slightly.
•
•
Warning
•
❈ Only remove the leg cover when absolutely
necessary.
Do not use excessive force when removing the accessories, otherwise, it may cause personal injury.
Do not place top side shelf of freezer in any other location, it may get dropped, damaged and cause
personal injury.
Before removing accessories from the freezer and refrigerator always move stored food to other space
first.
REMOVING ACCESSORIES FROM THE REFRIGERATOR
Fresh fruit & salad drawer
and lower shelf
• Remove the compartment
by holding the handle,
pulling the compartment
towards you and lifting it up slightly.
• Remove the lower shelf by pulling it towards
you.
• Keep the sequence (first, remove fresh fruit
salad draw after then remove lower shelf)
• Lower shelf can be damaged if you do not
keep the sequence.
Tempered glass shelf
• Pull the shelf out as far as it
will go. Then lift it up and
remove it.
Bottle guards and food
guard
• Hold the shelf in both hands
and remove it by lifting it up.
10
CLEANING THE ACCESSORIES
Inside
• Clean the accessories using a mild
detergent. Then wipe with a dry cloth.
• After washing the accessories, make
sure that they are dry before using them
again.
Rear
• Use a vacuum cleaner to
remove dust once or twice
a year.
Exterior
• The doors and door handles should be
cleaned with a mild detergent and cloth.
Dry them with a clean cloth.
• The exterior should be polished once or
twice a year.
• When cleaning the appliance or if the appliance will not be used for a long time, allways turn the power
off, leave the doors open and keep the appliance dry.
Do not clean it by spraying it directly with water.
Warning •
• Do not clean it with benzene, thinner or car detergent.
REPLACING THE LIGHTBULBS
WARNING
Before replacing the lightbulbs light, unplug the appliance from the power supply.
If you experience difficulty when you attempt to replace the lightbulbs contact your
nearest samsung service center.
LIGHTBULBS
Remove the lamp cover.
Use the screw driver to remove the screws
securing the lamp cover.
NOTE
After replacing the bulb, reassemble the
cover with a screw.
The rated wattage of lightbulbs are marked on the lamp cover and lightbulbs.
11
OPERATING INSTRUCTIONS
Rubber door seals
• If the rubber door seals
are dirty, the door will not
close properly and the
refrigerator and freezer
will be unable to function
efficiently.
Clean them with a mild detergent and damp cloth.
Then wipe them with a dry cloth.
INSTALLATION OF THE REFRIGERATOR
Checking the dimensions of your entrance door
Checking the dimensions of your entrance door to determine whether the refrigerator can pass through it.
* Dimensions of the appliance
Dimensions (mm)
Remark
Width
850
Dept
724
with door
Height
1722
with hinge
Allow a clearance of 1 cm to the right, left and rear side when installing the appliance; as this will help
to reduce power consumption.
Allow sufficient space to install
the appliance on a flat surface.
• If your appliance is not level, the
internal cooling system may not
work properly
Clean your freezer/refrigerator.
• Wipe the inside and outside of
your freezer/refrigerator with a
dry cloth.
Store food in the freezer/refrigerator.
• Wait for at least two or three hours after
plugging your appliance in before storing
food and other items inside.
12
INSTALLATION OF THE REFRIGERATOR
LEVELLING
When you adjust the level of the freezer/refrigerator, set the front legs slightly higher than the rear legs, so
that you can open and close the door more easily.
First disassemble the leg cover and then adjust the level of the freezer/refrigerator.
If your freezer/refrigerator tilts
to the left, turn the left adjusting leg.
If your freezer/refrigerator tilts to
the right, turn the right adjusting leg.
EARTHING THE APPLIANCE
WARNING
If you are using a power plug that is not already earthed.
• Connect one end of the earthing wire (yellow/green or
green) to the earth screw and the other end to a steel or
copper pipe, such as a water pipe.
Earthing
wire
Copper
pipe
Earth screw
13
INSTALLATION INSTRUCTIONS
The appliance must be earthed before use.
You must earth the freezer/refrigerator to prevent any power leakage or electric shock caused
by current leakage from the appliance.
• Never use gas pipes, telephone lines or other potential lightning rods as earths.
ADJUSTING THE CLEARANCE BETWEEN THE DOORS
Adjusting the small step difference between doors.
If the door of freezer is higher than that of the
refrigerator.
If the door of freezer is lower than that of the
refrigerator.
Adjustment part
Adjustment part
Please open the doors and adjust the doors as follows:
1) Release the nut (①) on the lower hinge until the upper end of the bolt (➁).
When you release the nut(①), use enclosed hex wrench (➂) to turn the bolt(➁) a little counterNOTE clockwise to make the nut(①) loose with your fingers.
➂ WRENCH
➂ WRENCH
➀ NUT
➀ NUT
➁ BOLT
➁ BOLT
2) Please adjust the height difference between the doors turning the bolt (➁) turn clockwise(
clockwise (
).
When you turn clockwise (
) or counter
), the door goes up.
NOTE
➂ WRENCH
➂ WRENCH
➁ BOLT
➁ BOLT
3) After adjusting the doors, turn the nut (①) turn clockwise(
en the bolt again with wrench (➂) to fix the nut(①).
) until the lower end of the bolt, then tight➂ WRENCH
➂ WRENCH
➀ NUT
➀ NUT
➁ BOLT
➁ BOLT
If you do not fix the nut (①)firmly, the bolt (➁) may be released.
NOTE
14
TROUBLESHOOTING
INSTALLATION INSTRUCTIONS
The freezer/refrigerator does not work at all or it The front corners and sides of the freezer /
does not chill sufficiently
refrigerator are hot.
• Check that the power plug is properly connected. • Heat pipes are installed in the front corners of
the refrigerator to prevent condensation.
• Check that the power plug fuse has not blown.
• Is the temperature control set to the proper tem- • Condensation can result from leaveing the unit’s
door open for too long or storing unwrapped food
perature?
with a high water content when outside tempera• Is the freezer/refrigerator in direct sunlight or
ture and humidity levels are high.
located near a heat source?
• Is the back of the freezer/refrigerator too close to
You can hear water babbling in the refrigerator
the wall?
• The babbling is caused by the refrigerant circulatThe food in the refrigerator is frozen
• Is the temperature control set to the proper tem- ing in the unit.
perature?
There is a bad smell in the freezer/refrigerator
• You did not wrap food with a strong smell proper• Is the temperature in the room too low?
ly, or you have left something in the refrigerator
• Did you put food with a high water content near
for too long.
the coldest part of the refrigerator.
• Always wrap food with a strong smell so that it is
airtight. Always throw away food that has gone
You can hear unusual noise or sounds
off.
• Check that the floor is level and stable.
• Is the back of the appliance too near to the wall? Frost forms on the wall of the freezer
• Has anything dropped behind or under the appli- • Is the air inlet/outlet blocked?
ance?
• Always allow sufficient space between the food
• Is the noise from the compressor in the appliitems for air to circulate efficiently.
ance?
• Is the door closed properly?
• A “ticking” sound may be heard from inside the
appliance, but this is normal. It is caused when
the various accessories contract or expand.
15
Ambient Room Temperature Limits
This appliance is designed to operate at the ambient temperatures specified by its temperature
class marked on the rating plate.
Temperature
Class
Extended Temperate
Symbol
Ambient Temperature
Maximum
Minimum
SN
32°C (90°F)
10°C (50°F)
Temperate
N
32°C (90°F)
16°C (61°F)
Subtropical
ST
38°C (100°F)
18°C (64°F)
T
43°C (109°F)
18°C (64°F)
Tropical
NOTE: The internal temperature may be affected by such factors as the location of the appliance,
ambient temperature and the frequency with which you open the doors.
Adjust the temperature as required to compensate for these factors.