1
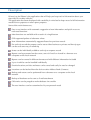
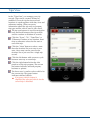
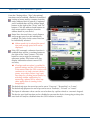
User’s Guide
Drivers Log for iPhone
Table of content
Description
Trips View
3
4
Trips View - User Selectable Options
Expenses View
5
6
Expenses View - User Selectable Options
Statistics View
Reports View
Settings View
7
8
9
10
Trips Settings View
11
Trip settings - Calibrate GPS
12
Expenses Settings View
13
Expenses settings - Payment methods
14
Expenses settings - Quick selections groups
15
Statistics Settings View
16
Reports Settings View
17
Vehicles Settings View
18
General Settings View
19
Maintenance View
20
Backup/restore View
21
Purge View
Input Methods
22
23
Text input
24
Numeric input
25
Date and time input
26
Quick selections groups input
Appendix - Troubleshooting
Appendix - Report Format
© 2011 RandiRundi
27
28
29
2 (29)
ver. 1.4-a
Description
Drivers Log for iPhone is the application that will help you keep track of information about your
trips with car or other vehicles.
The application has been developed with useability in mind and to keep record of all information
needed for tax purposes or other report purposes.
Some of the main features are,
Easy to use interface with automatic suggestion of new information and quick access to
most used functions
Most functions are available with a touch of a single button
GPS supported update of odometer values
New information automatically suggested based on previous records
For each trip record the purpose can be set to either business or private and the trip type
can be set to one way or round trip
Notes can be individually added to each trip or expense record
Reports can be presented on the screen, sent via E-mail or viewed in a browser on a
computer on the local network
Reports can be created in different formats and with different information included
Up to 4 vehicles can be handled individually
Favorite locations, articles and notes can be saved and easily be used or changed
Locations can be fetched from the device native Address Book (Contacts)
Backup and restore can be performed from a browser on a computer on the local
network
Backup of database can be sent as E-mail attachment
Old entries can be purged to make database size smaller
The user interface can be customized to fit your personal needs
© 2011 RandiRundi
3 (29)
ver. 1.4-a
Trips View
In the ”Trips View” you manage your trip
records. Trips can be created, deleted or
modified. For each trip the start and end
locations is saved together with date, time and
odometer reading. Other necessary
information about the trip such as purpose,
trip type and the vehicle used is also saved.
The top row buttons is used for navigation
back and forth between the trip records
and for creation or deletion of records.
Click the ”From”, ”To”, ”Date/Time” or
”Odometer” buttons to set location, date/
time or odometer values for the start or
end of the trip.
Click the ”Note” button to select a note
from the favorites list or to enter a new
note. New notes can be saved to the
favorites list or just used for a single trip
record.
Click the left button with arrows to cycle
between one way or round trip.
Click the right button below the info
panel to set the trip purpose. The text on
the button indicates selected purpose,
business or private.
The lower row is used to select vehicle for
the current trip. The green button
indicates selected vehicle.
➡ If no green vehicle button is
displayed the selected vehicle for the
current trip is disabled.
© 2011 RandiRundi
4 (29)
ver. 1.4-a
Trips View - User Selectable Options
From the ”Settings View - Trips” the optional
functions can be enabled, disabled or modified.
Lookup of name and/or company from the
native Address Book (Contacts) is optional
and if enabled there will be address book
buttons to the right of the ”From” and ”To”
buttons. Click the address book buttons to
fetch name and/or company from the
address book in your device.
Status lines for travel time, travel distance
and average speed can be individually
enabled. The color for the status lines can
be individually selected.
➡ When round trip is selected the travel
time and average speed will not be
displayed.
If the GPS automatic odometer function is
enabled there will be a start/stop button to
the right of the ”Note” button. Click this
button to start or stop the automatic
odometer update. This button will also
display information about current GPS
accuracy.
➡ If background execution is enabled in
general settings and the GPS function is
in the started state the GPS receiver will
continue to run, and consume device
power, even when Drivers Log is put
into sleep (by clicking home button, by
selecting another application, by
answering a phone call or when any
other application is running in the
foreground).
The default trip type for new trips can be set to ”One way”, ”Round trip” or ”Latest”.
The default trip purpose for new trips can be set to ”Business”, ”Private” or ”Latest”.
The input of odometer values can be set to be done by a picker wheel or a numeric keypad.
The device auto lock function can be disabled to prevent the device from going to sleep (the
auto lock will only be disabled when the GPS function is started).
© 2011 RandiRundi
5 (29)
ver. 1.4-a
Expenses View
In the ”Expenses View” you manage your
expense records. For each record, location,
date and time, odometer, article, quantity,
amount and a note can be saved.
The top row buttons is used for navigation
back and forth between the expense
records and for creation or deletion of
records.
Click the ”Location”, ”Date/Time” or
”Odometer” buttons to set location, date/
time or odometer for the current expense.
Click the ”Article” button to select an
article from the favorite list or to enter a
new article. New articles can be used
without saving to the favorite list as well
as be saved as a new favorite.
Click the ”Group” button to get a picker
wheel where one of the predefined
articles can be selected.
Click the ”Quantity” button to enter
amount.
Click the ”Amount” button to enter
amount.
Click the ”Note” button to select a note
from the favorites list or to enter a new
note. New notes can be saved to the
favorites list or just used for a single
expense record.
Click one of the quick selections buttons
to get a keypad with your personally
selected predefined articles.
The lower row is used to select vehicle for
the current expense. The green button indicates selected vehicle.
➡ If no green vehicle button is displayed the selected vehicle for the current expense record
is disabled.
© 2011 RandiRundi
6 (29)
ver. 1.4-a
Expenses View - User Selectable Options
From the ”Settings View - Expenses” the optional
functions can be enabled, disabled or modified.
Lookup of name and/or company from the
native Address Book (Contacts) is optional
and if enabled there will be an address
book button to the right of the ”Location”
button. Click the address book button to
fetch name and/or company from the
address book in your device.
When the current article is one of the
predefined articles from the fuel group the
”Group” button will change to a fuel meter
button where you can select whether the fill
up was partial or full.
Status lines for unit price and fuel
consumption can be individually enabled.
The color of the status lines can also be
individually selected as well as the unit for
fuel consumption.
➡ Fuel consumption will only be
displayed if the fuel consumption can
be calculated (there must be a previous
fill-up with full tank and the current
record must also be full).
➡ For fuel consumption calculation to
work the article must be set to one of
the predefined fuel articles from the
fuel group.
Payment methods for expenses can be set
when this option is enabled. Six user
selectable payment methods can be defined.
The quick selection articles presented when
pressing a quick selections groups button is user defined.
Input method for odometer, quantity and amount can each be set to either picker wheel or
keypad.
Statistics View
The ”Statistics View” displays basic statistics for
trips or expenses. The period for statistics can be
month, year, custom time period or just a fixed
number of the latest records.
For trips the start and end odometer for the
selected period and the total distance is
listed. Also the the distribution of business,
private or unregistered trips is displayed. If
there are trip records with odometer or date
values missing there will also be
information of this listed.
For expenses fuel consumption (as a graph),
maintenance costs, payment distribution or
the top expenses can be displayed.
Click the ”Fuel” button to select display of
fuel consumption and to cycle between
liquid and gas fuel.
Click the ”Maintenance” button to display
the maintenance cost statistics.
Click the ”Payment” button to display the
distribution of used payment methods.
Click the ”Top 7” button to show the top
expenses.
Click the lower left corner of the fuel
consumption diagram
to cycle through the different fuel
consumption units.
© 2011 RandiRundi
8 (29)
ver. 1.4-a
Reports View
From the “Reports View” you initiate the
different reports and select how to display or
distribute them.
Click the top row buttons to select report
via web, via E-mail or for display directly
on your device.
For each report type a new view will be
presented with further options for the
selected report type.
Click the buttons in the info display to
select period for the report.
Click the blue arrows to change the
custom defined periods. When you
change the custom period that period will
also be selected as the report period.
Select report for trips or expenses with the
buttons below the info display.
Click the ”All vehicles” button to toggle
between report for all vehicles or for a
single vehicle.
➡ Only vehicles enabled in the
”Vehicles Settings View” can be
selected for reports.
Select ”All vehicles” to get a report for all
enabled vehicles
© 2011 RandiRundi
9 (29)
ver. 1.4-a
Settings View
The settings view is the entry point to all the
user selectable options. Due to the high
amount of options most settings are reached
in subviews reached by pressing one of the
blue buttons to the right.
Click the ”Odometer unit” button to cycle
between the available units. The text on
the button shows the currently selected
unit. Available units are miles (mi) or
kilometer (km).
Click the ”Volume unit” button to select
the default volume unit for fuel. The text
on the button shows the currently selected
unit. Available units are US gallon, UK
gallon or liter.
Click one of the right blue buttons to
display the settings view for the specific
function. The available settings views are
Trips
Expenses
Statistics
Reports
Vehicles
General
Click the blue ”Maintenance” button to
display the maintenance subview where
backup/restore and purge functionality is
available.
© 2011 RandiRundi
10 (29)
ver. 1.4-a
Trips Settings View
In the trip settings view you select your display
options and enabled features for the ”Trips
View”.
Click the ”Info display color” button to
cycle through the available colors. The
button color and text indicates the current
choice.
Click the ”Default trip type” button to select
which trip type should be set for new trips.
The following choices are available,
Latest
One way
Round trip
Click the ”Default trip purpose” button to
select which trip purpose should be set for
new trips. The following choices are
available,
Latest
Business
Private
Click the right ”Address Book” button to
enable or disable access to the device
native Address Book.
Click the mid ”Address Book” button to
select what information to fetch from the
Address Book. The following choices are
available,
Name
Company
Name, company
Company, name
Click the right ”GPS” button to enable or disable GPS supported odometer updates.
Click the mid ”GPS” button to open the view for GPS calibration.
Click the ”Disable Auto Lock” button to disable the auto lock timer that makes the display to
fade after a predefined period (defined in the device general settings). When the button is
green the ”Disable Auto Lock” is active and the screen will not get into sleep mode.
➡ Note! If GPS is disabled the auto lock will work according to the device general settings
Click the ”Odometer input” to toggle the input method for odometer. The icon on the button
indicates current method and the available choices are picker wheel and keypad.
Click the ”Status lines” button to open the settings for the status lines in the info panel.
© 2011 RandiRundi
11 (29)
ver. 1.4-a
Trip settings - Calibrate GPS
In most vehicles the odometer is controlled from the engine or from the wheels rotation. For
different reasons there might be differences in what is presented by the vehicles odometer and
what is presented by the Drivers Log application.
For many people the wanted behaviour is that the Drivers Log report should contain the same
numbers that would have been reported if a manually controlled log with values from the vehicles
odometer had been kept. For this reason it is possible to set a compensation factor for each
vehicle which will adjust the GPS distance values before they are used in the trip records.
To find the compensation factor the following procedure can be used.
1. In ”Trips Settings View” - Make sure GPS is enabled and that Auto Lock is disabled.
2. In ”Trips View” create a new trip and enter the vehicles odometer reading in the odometer
from field. Also verify the correct vehicle is selected.
3. Start the GPS tracking and wait for the GPS accuracy information bars to reach at least four
bars (green color).
4. Drive to the destination (the longer the trip the better calibration).
5. Stop the GPS tracking.
6. Open the GPS calibration view from the ”Trips Settings View”.
7. The values for odometer readings and the selected vehicle is prefilled with the values from the
currently selected trip.
8. If the ”From odometer”, ”To odometer - GPS” and selected vehicle is correct you should now
change the ”To odometer - Vehicle” field to contain the odometer reading from your vehicle.
9. Exit the GPS calibration view as the calibration now is finished.
© 2011 RandiRundi
12 (29)
ver. 1.4-a
Expenses Settings View
In the expenses settings view you select your
display options and enabled features for the
”Expenses View”.
Click the ”Info display color” button to
cycle through the available colors. The
button color and text indicates the current
choice.
Click the right ”Address Book” button to
enable or disable access to the device
native Address Book.
Click the mid ”Address Book” button to
select what information to fetch from the
Address Book. The following choices are
available,
Name
Company
Name, company
Company, name
Click the ”Use payment method” button to
enable the use of payment methods.
➡ By disabling payment methods only the
possibility to save payment methods for
a expense record is disabled. Already
stored payment methods will still be
saved with the expense record.
Click the ”Odometer input” to toggle the
input method for odometer. The icon on the
button indicates current method and the
available choices are picker wheel and
keypad.
Click the ”Quantity input” to toggle the input
method for quantity. The icon on the button indicates current method and the available
choices are picker wheel and keypad.
Click the ”Amount input” to toggle the input method for amount. The icon on the button
indicates current method and the available choices are picker wheel and keypad.
➡ When the keypad is displayed in the ”Expenses View” this input method will be used for
all input of odometer, quantity or amount even if picker view has been defined as input
method.
Click the ”Payment methods” button to get into the settings view for payment methods.
Click the ”Quick selections groups” button to get into the settings view for quick selections
groups.
Click the ”Status lines” button to get into the settings view for expenses status lines.
© 2011 RandiRundi
13 (29)
ver. 1.4-a
Expenses settings - Payment methods
The payment methods settings controls which
payment methods is to be available in the
”Expenses View” quick selection keypad when
payment methods is enabled. This setting also
controls the name for each payment method.
Select the default payment method for new
expense records by clicking the button. The
text on the button indicates current
selection. The value can be ”None”,
”Latest” or one of the enabled payment
methods.
Enable a payment method in the quick
selection keypad by clicking the right
button. Green indicates the payment
method is enabled.
Set the name of the payment methods by
clicking the mid button. The text on the
button shows current setting.
➡ Payment method name can only be
changed when the actual payment
method is enabled.
Note! Payment methods must be enabled in
”Settings - Expenses” to be available in the ”Expenses View”!
© 2011 RandiRundi
14 (29)
ver. 1.4-a
Expenses settings - Quick selections groups
For expense articles there are a number of
predefined articles which can easily be selected
directly from the quick selections groups
buttons in ”Expenses View”. For each quick
selections group, six favorites can be defined
and these will be directly selectable by it’s own
button in the keypad.
The predefined articles are divided in three
groups,
fuel
maintenance
other
In ”Expenses View” you can access the
articles from the fuel or maintenance groups
via the two left quick selection buttons. The
third quick selection button can be used to
select any predefined article.
Click one of the group buttons to display
the settings for the six favorites buttons for
this group.
Click one of the six favorites buttons to
change the setting for that button.
Select article for the selected button from
the picker wheel.
➡ When group fuel is selected the picker
wheel will contain only fuel type
articles.
➡ When group maintenance is selected
the picker wheel will contain only
maintenance type articles.
➡ When group other, the star icon, is selected all predefined articles will be available in the
picker wheel.
© 2011 RandiRundi
15 (29)
ver. 1.4-a
Statistics Settings View
For ”Statistics View” the only user selectable
options are the background color of the info
display and the unit for fuel consumption.
Click the ”Info display color” button to
cycle through the available colors. The
button color and text indicates the current
choice.
Click the ”Unit for consumption” to cycle
through the available units for fuel
consumption. The text on the button
indicates the current choice. The following
consumption units are available,
mpg (US)
mpg (UK)
mi/l
gal/mi (US)
gal/mi (UK)
gal/100mi (US)
gal/100mi (UK)
l/100km
l/100mi
l/10km
km/gallon (US)
km/gallon (UK)
km/l
© 2011 RandiRundi
16 (29)
ver. 1.4-a
Reports Settings View
For the ”Reports View” you can select the
background color of the info display, enable/
disable milage rate summary calculation on
reports, milage rate and enable/disable the
inclusion of a ”Created” field in the reports.
Click the ”Info display color” button to
cycle through the available colors. The
button color and text indicates the current
choice.
Click the right mileage rate button to
enable or disable milage rate calculation
and to include this in reports. The button is
green when mileage rate is enabled.
Click the mid mileage rate button to set the
mileage rate value. The current value is
displayed on the button. When mileage rate
display is disabled also the milage rate
setting button is disabled.
Click the ”Display ”Created” in header”
button to enable or disable the display of
the ”Created” section in reports. The button
is green when display is enabled.
© 2011 RandiRundi
17 (29)
ver. 1.4-a
Vehicles Settings View
The vehicles settings defines which vehicles are
enabled and the vehicle names used in all views
and reports.
Click the right button to enable or disable a
specific vehicle. The button is green when
the vehicle is enabled.
Click the middle blue button to set the
name of the vehicle. If the vehicle is
disabled also the setting of the name is
disabled.
© 2011 RandiRundi
18 (29)
ver. 1.4-a
General Settings View
The general settings defines user selectable
options that is not specific for a certain view.
Click the ”Background” button to cycle
through the available background patterns.
Four different backgrounds are available,
light gray
dark gray
light gray metallic pattern
dark gray metallic pattern
Click the ”Confirm record delete” button to
enable or disable the popup window for
confirmation of trip or expense record
deletions.
Click the ”Suggest odometer” to enable or
disable automatic suggestions of odometer
values when trip or expense records are
created or changed.
Click the ”Warn at empty fields” button to
enable or disable a warning indication for
fields without values in trip or expense
records.
Click the ”Disable background execution”
to enable or disable background execution
of the application. When background
execution is disabled the GPS will stop the
automatic odometer update when the
application is not active.
© 2011 RandiRundi
19 (29)
ver. 1.4-a
Maintenance View
From the maintenance view you have the
possibility to perform backup/restore functions
as well as to purge old records from the trips or
expenses data.
Backup can be performed either from a web
browser on the local network or as E-mail to
any recipient.
Click the ”Backup/restore (WiFi)” button to
start a web server which makes it possible
to access the backup/restore web page from
a web browser on the local network.
Click the ”Backup (E-mail)” button to
prepare a E-mail with a database backup as
attachment.
Click the ”Purge old records” button to
display the ”Purge View” where trips or
expenses records can be purged.
© 2011 RandiRundi
20 (29)
ver. 1.4-a
Backup/restore View
When backup/restore via Wi-Fi is selected a view
with information about how to connect to the
web server from your desktop computer is
presented.
Click the ”Port 8080” button to change the
web server port between 8080 and a device
selected port number.
➡ Normally port 8080 should work good,
but in rare occasions this port might be
used by another application which
might lead to the web server not
starting properly.
If you have Bonjour installed on your
desktop computer you can reach the web
server directly under the Bonjour name
”Drivers Log”.
If you are not using Bonjour you enter the
address listed at the bottom of the info
panel into the address field of your web
browser.
To make a backup of the database you click
the ”Download” button on the web page in
your browser.
To restore a previously saved backup you
select the backup file for restore by clicking
the ”Select file” button on the web page in
your browser.
➡ The ”Select file” might have other text
depending on your current web
browser.
After selection of the restore file you click the
”Upload” button to initiate the upload of the file.
When the restore file have been uploaded a sanity check will be performed and if the file is a
valid database file you will be presented with a status table showing a summary of the content
of the uploaded database.
To perform the actual restore you click the ”Activate uploaded database”. If you click the
”Cancel” button the restore will be cancelled.
➡ If you click the ”Activate uploaded database” button on the web page the old database
will immediately be replaced with the uploaded one. This action cannot be undone!
➡ It is recommended that a download, backup, is performed before the restore procedure is
started. This might be useful if the restored database file for some reason wasn’t the
correct one.
© 2011 RandiRundi
21 (29)
ver. 1.4-a
Purge View
When the application has been used for a while
the amount of records in the internal database
can be quite a few. The purge view gives you
the possibility to remove the oldest trip or
expense records.
Select which data records to purge by
clicking either the ”Trips” button or the
”Expenses” button.
Select the period for how long data should
be saved in the app by clicking one of the
period buttons.
Click ”Purge” to perform the purge.
To make sure no unwanted purge is
performed, a confirmation window will
popup when the ”Purge” button is clicked.
Note! Purged data will be permanently deleted!
© 2011 RandiRundi
22 (29)
ver. 1.4-a
Input Methods
The following chapters describes the different ways to enter information in the Drivers Log
application.
Text input
Numeric input
Date and time input
Quick selections groups input
© 2011 RandiRundi
23 (29)
ver. 1.4-a
Text input
When text input is needed the native keyboard is displayed
together with a number of buttons and in case of accessing a
favorites list also the scrollable favorites list will be displayed.
Depending on situation the top row of buttons have different
functions.
For favorite lists (location, article and note) the top row contains
buttons for ”Cancel”, ”Edit”, ”Use” and ”Use and save”.
Click the red button to the left to cancel any input and
return to previous view.
Click the green ”Edit” button to delete or rearrange the
items in the favorite list.
Click the ”Use” button to return to previous view and use
the text entered in the text field.
Click the ”Use and save” button to return to previous view
and use the text entered in the text field. The text entered
will also be saved in the favorite list.
Click the ”return” key in the keyboard to save the entered
text in the favorite list without leaveing the current view.
For input of text from other text input fields the top row will
contain buttons for ”Cancel”, ”Clear”, ”Reset” and ”Done”.
Click the red ”Cancel” button to cancel any input and
return to previous view.
Click the mid left green ”Clear” button to clear the text
entry.
Click the mid right green ”Reset” entry to reset the text
entry to the initial value.
Click the blue ”Done” button to return to previous view
and use the current text entry.
© 2011 RandiRundi
24 (29)
ver. 1.4-a
Numeric input
When numeric input is needed either a picker wheel is
displayed or a numeric keypad.
In case of a picker wheel there will be a top row of buttons for
”Cancel”, ”Clear”, ”Reset” and ”Done”.
Click the red ”Cancel” button to cancel any input and
return to previous view.
Click the mid left green ”Clear” button to clear the value.
Click the mid right green ”Reset” entry to reset the value to
the initial one.
Click the blue ”Done” button to return to previous view and
use the current value.
If the input field is quantity and the article is a predefined
value from the fuel group there will also be three buttons
for volume unit below the picker wheel. This makes it
possible to enter some quantities in another volume unit
without the need of modifying the general settings for
volume unit.
For input when the numeric keypad is displayed there are,
except for the numeric buttons, some other buttons to the
right.
Click the red ”Cancel” button to cancel any input and
hide the keypad.
Click the mid left green ”Clear” button to clear the entry.
Click the mid right green ”Reset” entry to reset the entry to
the initial value.
Click the blue ”Done” button to return to previous view
and use the current text entry.
Click the red ”Backspace” button to delete the last entered
figure.
A green frame indicates which field is to be changed from
the keypad.
The numbers in the active field are green initially to
indicate that any new number will replace the current
one. Only button that will keep the current number is the
”Backspace” that will only delete the last figure.
© 2011 RandiRundi
25 (29)
ver. 1.4-a
Date and time input
When date and time input is needed a picker wheel is
presented. Depending on current function the view will look in
different ways.
Click the red ”Cancel” button to cancel any input and
return to previous view.
Click the mid left green ”Clear” button to reset to current
date and time.
Click the mid right green ”Reset” entry to reset the date and
time entry to the initial value.
Click the blue ”Done” button to return to previous view and
use the selected date and time entry.
When a period should be defined the picker wheel will be
used to set both the ”From” and the ”To” date.
Click the red ”Cancel” button to cancel any input and
return to previous view.
Click the mid green ”Reset” entry to reset the selected
date entry to the initial value.
Click the blue ”Done” button to return to previous view
and use the selected date and time entry.
Click the ”From” button to change or view the from date.
Click the ”To” button to change or view the to date.
© 2011 RandiRundi
26 (29)
ver. 1.4-a
Quick selections groups input
When one of the quick selections groups buttons is clicked a
keypad with the favorites is displayed.
The favorites is defined in the settings for quick selections
groups in the expenses settings.
Six favorites are available for each of the groups, fuel,
maintenance and other.
Click one of the favorites buttons to select that article.
Click the red ”Cancel” button to cancel any input and
return to previous view.
Click the mid red ”Delete” button to remove the predefined
article from the expense record.
Click the green ”Plus” button to display a picker wheel
where any of tha predefined articles for the current group
can be selected.
When the ”Plus” sign on the keypad is pressed a picker wheel
will replace the keypad.
The articles selectable from the picker wheel depends on
what quick selections groups button was pressed.
Click the red ”Cancel” button to cancel any input and
return to previous view.
Click the blue ”Done” button to return to the ”Expenses
View” and use the selected article.
© 2011 RandiRundi
27 (29)
ver. 1.4-a
Appendix - Troubleshooting
For up-to-date troubleshooting guides please visit the support web pages on
http://www.randirundi.se/support.
If the application for some reason does not start or crashes during use - always perform a
power cycle of the device as the first troubleshooting step.
If power cycle doesn’t solve the problem and the troubleshooting guides on the support web
page gives no clues about how to solve problem - please send a E-mail to the support staff
using the contact form available on the support web pages. Make sure you enter a valid Email address for yourself to make sure the support staff can reply or ask for more information.
© 2011 RandiRundi
28 (29)
ver. 1.4-a
Appendix - Report Format
The reports from Drivers Log can be exported in two formats, HTML or CSV. HTML is the standard
format used by web browsers and CSV is a standard format that can be used for import into
spreadsheet applications like Microsoft Excel, OpenOffice Calc or Apple Numbers.
The HTML report can look something like,
The CSV report will contain plain text rows where all fields are separated by a comma sign.
The content of a CSV report can look something like,
"From","Date/Time","Odometer","Trip type","To","Date/Time","Odometer","Purpose","Distance","Note"
"Office","12/08/08 08.00 AM","3721","Round trip","Customer X","12/08/08 04.30 PM","3783","Business","62",""
"Office","12/09/08 10.00 AM","3793","Round trip","Customer Y","12/09/08 05.20 PM","3862","Business","69","Meeting"
"Office","12/10/08 01.15 PM","3872","Round trip","Supplier A","12/10/08 04.20 PM","3895","Business","23",""
© 2011 RandiRundi
29 (29)
ver. 1.4-a