1
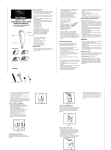
Hair Clipper Kit
KHC100
Issue 1/07
Kambrook Safety
FEATURES OF YOUR Kambrook HAIR CLIPPER
Do not pull, twist or wrap the power cord
around the casing, when using or storing the hair
clipper. Periodically check the cord for signs of
wear.
Read all instructions
before operating and save
for future reference
Do not operate the hair clipper if it has been
dropped or damaged in any manner.
Welcome to Kambrook and your new Hair
Clipper Kit.
Regularly inspect the power cord, plug
and actual appliance for any damage. If
found damaged in any way, immediately
cease use of the appliance and return
the entire appliance to the nearest
authorised Kambrook Service Centre for
examination, replacement or repair.
At Kambrook we believe that the safe
performance of our products is the first priority
in any consumer product so that you, our valued
customer, can confidently use and trust our
products.
We ask that any electrical appliance that you use
be operated in a sensible fashion with due care
and attention placed on the following important
operating instructions:
Adjustable blade
control lever for
close trimming
and finishing off
(particularly around
the neck and ears)
Blade guard – protects
blade when not in use
Please call 1300 139 798 for service
centre details.
Never drop or insert any object into any opening,
as this may cause an electrical hazard.
Ensure that the power source to be used is the
same as the voltage requirements of the product.
Always switch the hair clipper OFF before putting
down on any surface.
Never immerse the power cord or the appliance
in any form of liquid and do not use near bath
tubs, basins or other vessels containing water.
Easy hold grip
Barber’s scissors with
stainless steel blades
On/Off switch
To avoid injury, do not use the hair clipper with a
damaged or broken comb nor with teeth missing
from the blades.
This appliance is not intended to use by young
children or infirm persons without supervision.
Use the hair clipper only as described in this
instruction book. The use of attachments not
recommended by the manufacturer may cause a
hazard.
Young children should be supervised to ensure
that they do not play with this appliance.
This hair clipper is for household use only, and
not for animal clipping or shearing.
Keep blades regularly oiled and clean blades after
each use.
The hair clipper may be plugged into any
230/240V power outlet. It should not be left
unattended when plugged in.
If the appliance is connected to an extension
cord or power board then the extension cord or
power board should be positioned so that it is
not subject to splashing or contact with moisture.
Always switch the hair clipper off then switch off
and unplug from the power outlet when not in
use and before cleaning.
Blade brush – for
cleaning the cutting
blades after use
Barber’s comb – for
precise cutting control
Lubricating oil
– keeps blades in
optimal condition
The installation of a residual current (RCD)
is recommended to provide additional safety
protection when using electrical appliances.
It is also advisable that an RCD with a rated
residual operating current not exceeding 30mA
be installed in the electrical circuit supplying the
bathroom. Consult with your electrician for
professional advise.
Disconnect by gripping the plug and do not pull
the cord.
Do not place or store the hair clipper where it
can fall or be pulled into a bath tub or sink. If the
hair clipper falls into water, unplug it immediately.
Do not reach into the water.
The hair clipper has arcing or sparking parts
inside. Do not use in areas where petrol, paints,
aerosols, oxygen or other inflammable substances
are used or stored.
Trim guide #1
for short hair
Keep the power cord and unit away from hot or
heated surfaces.
Trim guide #2
for medium hair
Trim guide #3
for medium
- long hair
Trim guide #4
for longer hair
Adjustable Lever
Using Your Kambrook Hair
Clipper
Before Use
CLOSE
Before starting to cut your hair, follow these
simple steps . . .
LONG
The adjustable lever adds versatility to your hair
clipper by allowing you to gradually adjust the
closeness of your cut without using an attachment
comb.
When the lever is in the uppermost position, the
blade will give you the closest cut. To increase the
cutting length, push the lever downward gradually.
1.Always cut from the back of the neck to the
crown, using the longest attachment comb.
Holding it flat against the head, slowly move the
hair clipper up from the hair. (Diagram C-1)
against the hair with the teeth of the attachment
comb pointing up but flat against the head. Slowly
lift the hair clipper up and outward through
the hair, cutting only a small amount at a time.
(Diagram A-1)
2.Use the same technique for the sides, cutting
from the bottom to the upper side of the head.
3.Repeat around sides and back of head. (Diagram
A-2 & A-3)
1.Make sure the blades are clean and well oiled.
Unwind the cord to its full length, ensure that the
on/off switch is in the OFF position, and plug the
clipper into a 230/240V power outlet. You may
then proceed to turn the power on.
4.If you desire a shorter cut, either change to a
lower number attachment comb or apply more
pressure and less lift away from the head with the
attachment comb already in use.
2.Place a towel around the neck of the person
who’s hair is being cut to prevent hair from falling
inside the shirt collar.
5.For the top of the head, you will give a fairly
short cut if you use the #4 attachment comb.
With the teeth flat against the head, slowly start
trimming from the front to the back (Diagram A-4)
3.Position the person in a chair so that his/her
head is at your eye level
Outlining
3.From the front to the crown, cut the hair
against the direction in which it grows. Then
even it up with the sides. (Diagram C-2)
4.To taper hair down to the neckline, use closer
cutting attachment combs. Comb hair, check for
uneven spots and outline sideburns and neckline.
(Diagram C-3)
5.If a short tapered cut on the sides and back is
desired, follow the diagram below and change
attachments as illustrated. (Diagram C-4)
Maintaining your Kambrook
Hair Clipper
4.Comb the hair to remove all the tangles and
hold the clipper in a relaxed, comfortable grip to
help you maintain accurate cutting control.
The lever extends the variety of lengths that can be
achieved with each attachment comb, by using the
varying cutting edges with each attachment comb.
Cleaning
5.Ensure that the blades are free of any hair
clippings and that they are well oiled (see
maintaining your Kambrook Clipper on page 5).
Attachment COMBS
Attachment combs should be fitted to the hair
clipper by placing the top edge (comb edge) of
the attachment comb over the top of the cutting
blades.
Take special note of the following tips to ensure
you achieve the best cut possible….
1.For Uniform cutting, never push or force the
hair clipper through the hair at a fast speed. The
hair clipper works most efficiently when it runs at
its own speed.
Gently lift the tab at the other end of the
attachment comb and push down until a click is
heard.
2.Initially cut only a small amount of hair until
you become accustomed to the length each
attachment leaves the hair.
3.The entire procedure requires practice and it is
suggested to try the longest attachment comb on
their hair clipper first. Then use the shorter one
if a shorter length is desired.
B-1
After you have finished using your hair clipper,
rapidly move the adjustable lever up and down
a couple of times while the hair clipper is still
running to remove any hair that may be caught in
between the blades. Switch off the appliance and
power outlet. Then, unplug your hair clipper and
clean the blades with the brush supplied.
B-2
1.Outlining requires no attachment comb. Take
the hair clipper and push the lever up to the close
– cut position (see “adjustable lever”)
2.Comb hair into the style. Position hair clipper
between the side burns and the ear. (Diagram B-1)
Oiling
3.Make sure the corner edge of the blade is up
against the hairline. With the outline of the hair
as your guide, slowly move the hair clipper over,
around and behind the ears. (Diagram B-2)
To maintain the hair clipper in peak condition,
the blades should be regularly oiled before,
during and after every haircut. A substitute/
replacement for the clipper oil supplied in the kit
is household sewing machine oil.
4.For the back of the neck and side burns, hold the
clipper up side down, and holding it against the skin
at the length desired, move downwards.
NOTE: Do not use hair oil, grease, oil mixed with
kerosene or solvent, as these may slow down the
motion of the blade.
Short Cuts
To oil the blades, gently squeeze a few drops of
oil between the blade teeth and turn the clipper
on, checking that the clipper is running smoothly.
Cutting your hair
Medium to Long Cut (with attachment
combs)
Attachment Comb #1
leaves hair approximately 3mm (1/8”) in length
C-1
Attachment Comb #2
leaves hair approximately 6mm (1/4”) in length
Attachment Comb #3
leaves hair approximately 9mm (3/8”) in length
A-1
A-2
A-3
C-2
C-3
A-4
1.Begin by combing your hair in its natural
direction.
Attachment Comb #4
leaves hair approximately 12mm (1/2”) in length
2.Place the largest attachment comb onto the
hair clipper and start by trimming the sides from
the bottom upwards. Hold the hair clipper lightly
If the blades are dulled and have stopped cutting,
replace them with new blades from your nearest
Kambrook service centre.
C-4
Notes
KAMBROOK 12 MONTH REPLACEMENT WARRANTY
If the product includes one or a number of
accessories only the defective accessory
or product will be replaced. In the event of
Kambrook choosing to replace the appliance,
the guarantee will expire at the original
date, i.e. 12 months from the original date of
purchase.
Kambrook warrants the purchaser against
defects in workmanship and material for a
period of 12 months from the date of purchase
(3 months commercial use).
Guarantee and purchase receipt for this
product are to be retained as proof of
purchase and must be presented if making a
claim under the Kambrook guarantee.
In Australia, this KAMBROOK Guarantee is
additional to the conditions and guarantees
which are mandatory as implied by the Trade
Practises Act 1974 and State and Territory
legislation.
Kambrook reserves the right to replace or
repair the appliance within the warranty
period,
Warranty does not apply to any defect,
deterioration, loss, injury or damage
occasioned by, or as a result of the misuse
or abuse, negligent handling or if the product
has not been used in accordance with the
instructions. The guarantee excludes breakages
and consumable items such as kneading blades.
For service, spare parts or product information
in Australia, please call KAMBROOK on the
Customer Service Line; 1300 139 798.
For service, spare parts or product information
in New Zealand, please call KAMBROOK New
Zealand; 0800 273 845. For spare parts phone
0800 273 845.
This warranty is void if there is evidence of the
product being tampered with by unauthorised
persons.
If claiming this guarantee the product must be
returned freight prepaid.
KAMBROOK 12 MONTH
REPLACEMENT WARRANTY
Attach a copy of the purchase receipt here.
YOUR PURCHASE RECORD (Please complete)
DATE OF PURCHASE ___________________
MODEL NUMBER ______________________
SERIAL NUMBER ______________________
(Please don’t return purchase record until
you are making a claim)
PURCHASED FROM ____________________
Kambrook - Australia
461 Plummer Street, Port Melbourne, 3207, Australia
Customer Service Line 1300 139 798
Customer Service Fax 1800 621337
Kambrook - New Zealand
Private Bag 94411, Greenmount, Auckland, New Zealand
Customer Service Line/Spare Parts 09 271 3980
Customer Service Fax 0800 288 513
Due to continual improvement in design or otherwise, the product you purchase may differ slightly from the illustration in this book. Issue 1/07