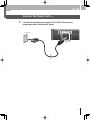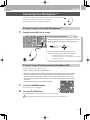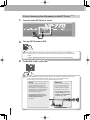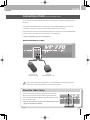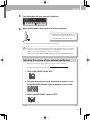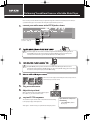
1
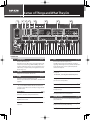
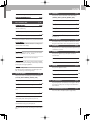
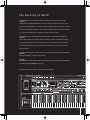
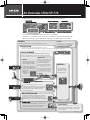
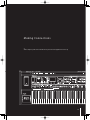
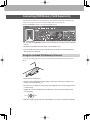
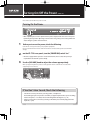
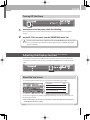
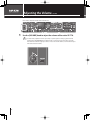
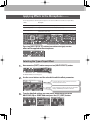
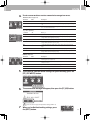
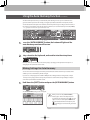
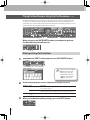
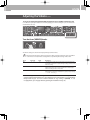
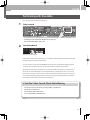
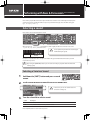
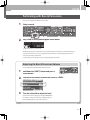
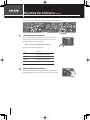
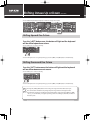
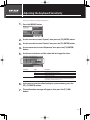
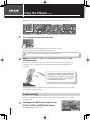
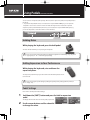
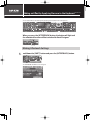
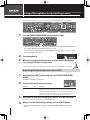
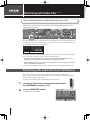
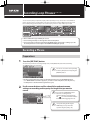
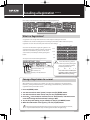
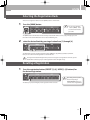
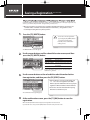
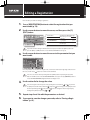
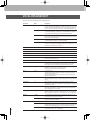
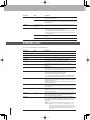
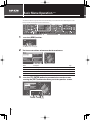
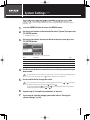
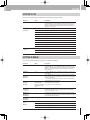
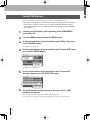
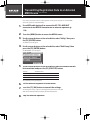
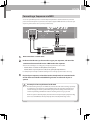
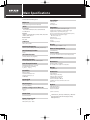
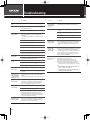
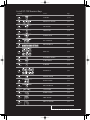
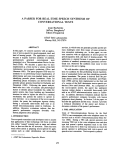
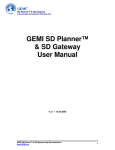
Names of Things and What They Do
1
2
3
4
5
8
9
10
15
16
16
17
11
12
13
14
Front
o t Panel
a e
1
USB MEMORY
p. 22
5
Connect USB memory here.
Audio files saved on USB memory can be played back (p. 68),
and phrases recorded using SOUND LOOPER (p. 74) can be
stored on USB memory. You can also save registration sets to
USB memory, or load previously-saved registration sets into
the VP-770 (p. 103).
2
VOLUME
MIC
p. 19
Connect the included microphone here.
The MIC input jack supports both XLR type and phone
type plugs. The XLR type connector provides 48 V phantom
power, allowing you to connect a phantom-powered
condenser microphone.
[PHANTOM] Button
p. 19
Turn this on if you’re using a phantom-powered condenser
microphone.
p. 26
Adjusts the overall volume of the VP-770.
* Turn this off if you’re using the included microphone.
3
V-LINK
p. 118
[INPUT EFFECT] Button
p. 32
This applies an effect to the microphone input. Turn this on if
you want to use an input effect.
This button turns the V-LINK function on/off.
When you press this button to turn V-LINK on, the button will
light blue.
4
[MIC ON/OFF] Button
Turn this on if you want to use the microphone.
p. 31
Here you can switch the D Beam function on/off. This lets
you apply various effects to the sound by moving your hand
above the sensor.
[DIRECT] Knob
This adjusts the volume of the live audio from the
microphone input.
p. 30
[PITCH] Button
p. 60
This lets you use the D Beam controller to control the pitch
(This is the same effect as the pitch bend lever.)
[LEVEL] Knob/Indicator
p. 28
D BEAM
p. 60
[FILTER] Button
p. 60
This lets you use the D Beam controller to control the
brightness of the sound.
[EXPRESSION] Button
p. 60
This lets you use the D Beam controller to control the
expression.
This adjusts/indicates the mic’s input level.
6
SOUND LOOPER
[AUTO START] Button
p. 74
If you’ve pressed this button to turn it on, recording will
begin the moment you start performing.
[STOP] Button
This stops recording or loop playback.
2
p. 74
This function lets you record, overdub, and loop-playback
your performance.
p. 75
7
[REC/PLAY] Button
This starts recording, overdubbing, or playback.
p. 74
[SAVE TO USB MEMORY] Button
This saves the recorded phrase to USB memory.
p. 76
AUDIO KEY/
BASS & PERCUSSION
10
p. 68
p. 48
[TONE] Slider
This adjusts the tone of the Ensemble part.
p. 45
[ATTACK] Slider
This adjusts the attack of the Ensemble part.
p. 46
[BASS] Button
p. 48
The C2–E3 keys of the keyboard will play the bass sound.
[LEVEL] Slider
This adjusts the volume of the Ensemble part.
p. 44
[PERC] Button
p. 48
The C2–E3 keys of the keyboard will play percussion.
[VOICE EXPRESSION] Button
p. 66
This lets you use your voice to adjust the volume of the
Ensemble part.
Display
Various information is shown here as you operate the VP-770.
[F1], [F2] Buttons
These buttons execute different functions according to the
contents shown in the display.
[MENU] Button
Accesses the MENU screen in the screen.
11
12
13
14
[TONE] Slider
This adjusts the tone of the Vocal Designer.
p. 52
AMBIENCE
p. 50
[TYPE] Button
This selects the type of reverberation.
p. 50
[DEPTH] Knob
This adjusts the amount of reverberation.
p. 50
VIBRATO
p. 41
Here you can adjust the vibrato.
p. 27
Here you can select a Vocal Designer sound and modify it.
[CLASSIC], [MALE & FEMALE], [GOSPEL], [POP],
[BACKGROUND], [VOCODER] Buttons
These select the sound of the Vocal Designer part.
KEYBOARD
Here you can adjust the type and depth of ambience
(reverberation).
Value Dial
Use this to modify a value.
By holding down the [SHIFT] button and turning the value
dial you can change a value in larger steps.
VOCAL DESIGNER
p. 78
Here you can raise or lower the pitch of the keyboard in steps
of semitones or octaves.
[SHIFT] Button
Use this button in conjunction with other buttons.
Cursor Buttons
These buttons move the cursor position up/down/left/right.
In the EDIT screen, you can change a value in steps of one by
pressing the cursor [ ] or [ ] button.
REGISTRATION
These buttons let you store different combinations of Vocal
Designer and Ensemble sounds along with various settings.
p. 94
[EXIT] Button
Returns to the previous screen. In some screens, this button
cancels the operation that’s being executed.
9
p. 42
[STRINGS], [BRASS], [GUITAR], [OTHERS], [PAD],
[SYNTH STRINGS], [CHOIR], [JAZZ SCAT] Buttons p. 42
These select the sound of the Ensemble part.
[AUDIO KEY] Button
p. 68
The C2–D3 keys of the keyboard will play back audio files
stored in USB memory.
8
ENSEMBLE
Here you can select an Ensemble sound and modify it.
[RATE] Knob
This adjusts the vibrato speed.
p. 41
[DELAY TIME] Knob
This adjusts the time until vibrato begins to apply.
p. 41
[DEPTH] Knob
This adjusts the vibrato depth.
p. 41
p. 27
15
[AFTERTOUCH] Button
p. 64
This lets you use aftertouch to control the Vocal Designer
tone.
[S1], [S2] Buttons
p. 58
By pressing the [S1] or [S2] button you can apply an effect to
the sound or modify it. You can assign various functions to
these switches.
p. 34
16
Pitch Bend/Modulation Lever
p. 56
You can use this to modify the pitch or apply vibrato.
[8va] Button
p. 35
This shifts the Vocal Designer one octave higher in pitch.
[AUTO HARMONY] Button
This turns on the Auto Harmony function, which
automatically adds a backing chorus to your vocal.
p. 36
[AUTO NOTE] Button
p. 38
This turns on the Auto Note function that lets you produce
sound without having to play the keyboard.
[RELEASE] Slider
p. 40
This adjusts the release of the Vocal Designer and Ensemble
part.
3
17
18
19 20 21 22 23
24
25
Rear
ea Panel
a e
17
[POWER ON] Switch
p. 24
This turns the power on/off.
25
PHONES Jack
p. 18
This is the jack for connecting headphones (sold separately).
* If you need to turn off the power completely, first turn
off the [POWER ON] switch, then unplug the power cord
from the power outlet. Refer to “Power Supply” chapter in
“Using the Unit Safely” (separate document).
18
AC IN Connector
p. 17
Connect the included power code here.
19
[DISPLAY CONTRAST] Knob
p. 25
Adjust the display’s contrast.
20
MIDI Connectors
p. 116
Connect these to external MIDI devices.
21
PEDAL Jacks
p. 21, 62
Connect these an expression pedal, foot switch and hold
pedal.
22
Cable Clamp
p. 21
Pass the microphone cable through this clamp.
23
EXT IN Jack
p. 20, 112
Connect an external synthesizer or microphone (phone
plug).
24
OUTPUT Jacks
p. 18
These jacks output the VP-770’s sound in stereo (L/R).
OUTPUT A (MIX) (L/MONO, R)
p. 18
These jacks output the audio signal in stereo to your amp or
mixer. If you’re outputting in monaural, connect to the L jack.
OUTPUT B (L, R)
p. 98
Depending on the system setting “Out B Assign” (p. 98), these
jacks can independently output the ambience component,
the ensemble part, or the audio signal of the audio key.
If you connect a plug to the OUTPUT B jack, the audio signal
specified by the system setting “Out B Assign” will not be
output from the OUTPUT A jack.
Please be aware that in the screen shots shown in this
document, the registration names and tone names differ from
the factory settings.
Before using this unit, carefully read the sections entitled:
“IMPORTANT SAFETY INSTRUCTIONS”, “USING THE UNIT
SAFELY”, and “IMPORTANT NOTES” chapter in “Using the Unit
Safely” (separate document). These sections provide important
information concerning the proper operation of the unit.
Additionally, in order to feel assured that you have gained a
good grasp of every feature provided by your new unit, Owner’
s Manual should be read in its entirety. The manual should be
saved and kept on hand as a convenient reference.
* MPEG Layer-3 audio compression technology is licensed
from Fraunhofer IIS Corporation and THOMSON Multimedia
Corporation.
* MMP (Moore Microprocessor Portfolio) refers to a patent
portfolio concerned with microprocessor architecture, which
was developed by Technology Properties Limited (TPL).
Roland has licensed this technology from the TPL Group.
* MatrixQuest™ 2009 TEPCO UQUEST, LTD. All rights reserved.
The VP-770’s USB functionality uses MatrixQuest middleware
technology from TEPCO UQUEST, LTD.
* All product names mentioned in this document are
trademarks or registered trademarks of their respective
owners.
Copyright © 2009 ROLAND CORPORATION
All rights reserved. No part of this publication may be reproduced in any form without the written permission of
ROLAND CORPORATION.
4
Contents
Names of Things and What They Do ........................................................................................................2
The Ancestry of the VP ..................................................................................................................................9
Features of the VP-770 ..................................................................................................................................10
An Overview of the VP-770 .........................................................................................................................11
About Vocal Designer ....................................................................................................................................12
Introducing the Sounds................................................................................................................................13
Making Connections
15
Placing the VP-770 on the KS-12 Stand ...............................................................16
Connect the Power Cord (AC IN) ............................................................................17
Connecting Your Amp or Speakers (OUTPUT/PHONES) ................................18
Connecting Your Microphone (MIC) .....................................................................19
Connecting a Pedal (FOOT PEDAL HOLD/CTRL 1/CTRL 2)............................21
Connecting USB Memory (Sold Separately) ......................................................22
Performing
23
Turning On/Off the Power (POWER ON).................................................................................................24
Adjusting the Display Contrast (DISPLAY CONTRAST) ...................................25
Adjusting the Volume (VOLUME)..............................................................................................................26
Performing with Vocal Designer (VOCAL DESIGNER) ........................................................................27
Selecting a Sound........................................................................................................27
Adjusting the Microphone Input Level (MIC LEVEL) .......................................28
Performing with Vocal Designer ............................................................................29
Adding Your Unprocessed Voice (DIRECT) .........................................................30
Switching Off the Microphone (MIC ON/OFF)...................................................31
Applying Effects to the Microphone (INPUT EFFECT) ....................................32
Adjusting the Vocal Designer Tone (VOCAL DESIGNER TONE) ....................34
Raising Vocal Designer’s Pitch by One Octave (8va) .......................................35
Using the Auto Harmony Function (AUTO HARMONY) .................................36
Playing the Vocal Designer Using Only the Microphone (AUTO NOTE)...38
Adding an Effect when You Apply Pressure to the Keyboard
(AFTERTOUCH) ..............................................................................................................39
Adjusting the Release of the Notes (RELEASE) ..................................................40
Adjusting the Vibrato (VIBRATO) ............................................................................41
Performing with Ensemble (ENSEMBLE) ................................................................................................42
Selecting a Sound........................................................................................................42
Performing with Ensemble ......................................................................................43
Adjusting the Ensemble Volume (ENSEMBLE LEVEL) .....................................44
Adjusting the Ensemble Tone (ENSEMBLE TONE) ............................................45
Adjusting the Ensemble Attack (ATTACK) ...........................................................46
Using the Microphone to Add Expression to the Ensemble
(VOICE EXPRESSION) ..................................................................................................47
Performing with Bass & Percussion (BASS & PERCUSSION) .............................................................48
Selecting a sound ........................................................................................................48
Performing with Bass & Percussion.......................................................................49
Adjusting the Bass & Percussion Volume ............................................................49
Adjusting the Ambience (AMBIENCE) .....................................................................................................50
5
Using Controllers
51
Shifting Octave Up or Down (+OCT/-OCT) ...........................................................................................52
Shifting Up or Down by Semitones (TRANSPOSE)..............................................................................53
Splitting the Keyboard Into Vocal Designer and Ensemble Zones (SPLIT) ................................54
Adjusting the Keyboard Sensitivity..........................................................................................................55
Using the Pitch Bend / Modulation Lever (PITCH BEND) ..................................................................56
Using the [S1]/[S2] Buttons (S1/S2) ..........................................................................................................58
Using the D Beam (D BEAM) .......................................................................................................................60
Using Pedals (HOLD PEDAL/CTRL PEDAL) .............................................................................................62
Adding an Effect by Applying Pressure to the Keyboard (AFTERTOUCH)..................................64
Using a Microphone to Control Expression (VOICE EXPRESSION) ................................................66
Using Audio Files
67
Performing with Audio Files (AUDIO KEY) .............................................................................................68
Performing with Audio Files from USB Memory ..............................................68
Selecting the Audio File Set .....................................................................................70
Changing the Audio File Settings ..........................................................................70
Adjusting the Volume of the Audio Key ..............................................................72
Types of Audio Files That the VP-770 Can Play ..................................................73
Recording Loop Phrases (SOUND LOOPER) ..........................................................................................74
Recording a Phrase......................................................................................................74
Playing Back the Recorded Phrase ........................................................................75
Overdubbing Phrases (Recording Another Layer) ...........................................75
Erasing the Phrase .......................................................................................................76
Saving the Phrase to USB Memory ........................................................................76
Adjusting the Volume of the Phrase .....................................................................76
Storing Sounds and Settings (Registration)
77
Recalling a Registration (REGISTRATION) ...............................................................................................78
Selecting the Registration Bankk ............................................................................. 79
Recalling a Registration .............................................................................................79
Initializing a Registration .............................................................................................................................80
Saving a Registration (REGISTRATION WRITE) ......................................................................................81
Editing a Registration ....................................................................................................................................82
Registration Parameters ...............................................................................................................................83
REGISTRATION EDITT .................................................................................................... 83
REGIST CONTROL .........................................................................................................83
VOCAL DESIGNER EDITT .............................................................................................. 86
ENSEMBLE EDITT ............................................................................................................ 88
BASS & PERC EDITT ........................................................................................................ 92
6
Menu Reference
93
Basic Menu Operation (MENU) ..................................................................................................................94
System Settings (SYSTEM) ...........................................................................................................................95
Saving the System Settings (SYSTEM WRITE)........................................................................................96
System Parameters .........................................................................................................................................97
SYSTEM MIDI..................................................................................................................97
SYSTEM SOUND............................................................................................................98
SYSTEM CONTROL .......................................................................................................99
Input Effect Settings (INPUT EFFECTS) ....................................................................................................102
Backing Up to USB Memory (UTILITY–PROJECT) ................................................................................103
Backing Up to USB Memory (USER BACKUP) .....................................................103
Restoring the Backup Data (USER RESTORE) .....................................................105
Format USB Memory ..................................................................................................106
Transmitting Registration Data to an External MIDI Device (UTILITY–BULK DUMP) ..............107
Checking the VP-770’s Version (UTILITY–VERSION INFO) ..............................108
Screensaver Settings (UTILITY–SCREENSAVER )...................................................................................109
Reset to Default Factory Settings (FACTORY RESET) ..........................................................................110
Applications
111
Using the Sound of an External Synthesizer (EXT IN) ........................................................................112
“Performing” Sound from Drums or a Portable Music Player..........................................................114
Appendix
115
Connecting the VP-770 with MIDI Equipment .....................................................................................116
About V-LINK
K .................................................................................................................................................... 118
MIDI Implementation Chart ........................................................................................................................120
Main Specifications ........................................................................................................................................121
Troubleshooting..............................................................................................................................................122
Error Messages.................................................................................................................................................123
Index ....................................................................................................................................................................124
Information .......................................................................................................................................................127
7
Play
8
Like Yo u’re
Singing.
The Ancestr y of the VP
1939 marks the invention of the “vocoder,” a method of compressing a vocal signal.
Subsequently used during World War II as a way to scramble communications, the vocoder
began to achieve popularity as an electronic musical instrument in the 1970’s. Most vocoders of
that time didn’t provide a keyboard or carrier signal (analogous to the vocal cords of a human),
so you had to separately provide a synthesizer in order to produce sound.
1979 was the year in which Roland released the VP-330, a new idea that combined a
vocoder with a strings-type keyboard, making it simple to produce sound without needing
to use other equipment. The VP-330 enabled you to create distinctive vocal sounds without
specialized knowledge of vocoder parameters, and still continues to be loved by musicians
around the world.
2006 saw the appearance of the VP-550, featuring Roland’s “Vocal Designer” human vocal
modeling technology—a leap beyond vocoding.
2009 now sees the birth of the VP-770, bringing you a further evolution of Vocal Designer
and cutting-edge SuperNATURAL technology.
“Ultimate vocals for all musicians” – that’s the mission of the VP.
9
Features of the VP-770
The VP-770 is a keyboard featuring cutting-edge “Vocal Designer” human vocal modeling
technology. Just connect a microphone, play the keyboard while you sing, and let the VP-770
model incredibly realistic and natural vocals.
Highest Quality Vocals
Unlike the choir sounds you’ve heard from samplers and synthesizers, the “Vocal Designer”
modeling technology built into the VP-770 lets you actually “sing the lyrics” — and it generates
natural and realistic vocals that are simply beyond all comparison with conventional vocoders.
In other words, the VP-770 lets you do it all; from beautiful choirs echoing in a cathedral, to funky
gospel, to background choruses for pop and rock bands.
No longer will you need to call multiple vocalists to your live performances or recording sessions.
Simply play the VP-770 and start enjoying the top quality vocal sounds you’ve dreamed of.
Rich Ensembles
In addition to Vocal Designer, the VP-770 features “ensemble” parts that use SuperNATURAL technology and
carefully selected high-quality PCM (digitally sampled) sounds.
Brass ensembles using SuperNATURAL technology, richly expressive strings, and a broad range of highquality choir sounds can be layered with Vocal Designer, allowing you to perform unbelievably rich
ensembles.
By using “Bass and Percussion” you can also perform voice bass or voice percussion.
In addition, you can use the “Audio Key” function to layer the playback of audio files saved on USB
memory (sold separately).
This means that all by itself, the VP-770 lets you rival an orchestra or a cappella group.
Roland SuperNATURAL Technology
Proprietary Roland sound generation technology that realistically reproduces the tonal
changes and performance techniques distinctive of an acoustic instrument, allowing
you to perform music that is natural and richly expressive.
10
An Overview of the VP-770
The VP-770 has three parts, and each part occupies its own section of the front panel.
If you turn on a sound button for a part, you’ll be able to play that part.
If you turn on a sound button for two or more parts, you’ll be able to play those parts simultaneously.
By combining these parts, you can make the VP-770 produce an incredible range of vocal sounds.
PROJECT
SYSTEM
All settings of the VP-770 can be saved to USB memory as a “project.”
System memory stores settings that apply
to the entire VP-770 such as keyboard
REGISTRATION
A registration lets you store the “sound and settings” of each part;
you can then use the four banks of eight buttons to instantly recall 32 different settings (preset: 16, user: 16).
VOCAL DESIGNER
This part uses the keyboard and the microphone input to model vocal
sounds. Use the keyboard to control the pitch, and use the microphone
to control all other aspects of the sound.
Modulator
Carrier
This has the same role that the
“vocal cords” play in a human
voice. According to the pitches
you play on the keyboard, this
generates the signal that forms
the basis of the sound (tone and
pitch). Use the sound buttons to
switch between
different vocal
characters such
as classic or pop.
From the voice you input via the
microphone input, this extracts
the resonances (formants)
that result from the shape of
your throat and larynx and the
movement of your mouth, and
uses these formants to modulate
the signal produced by the carrier.
This will reproduce not only the
loudness of your voice, but also
let the lyrics be heard clearly and
AMBIENCE
This section applies
the ambience of a hall
or studio to the sound
from the three parts.
ENSEMBLE
This part lets you play high-quality sounds from the
keyboard. You can switch sounds (such as a brass
ensemble using SuperNATURAL technology, or a strings
sound) simply by selecting a sound button. By layering
the Ensemble part with the Vocal Designer you can
create even richer sounds.
BASS & PERCUSSION
If you turn on one of these sound buttons, the seventeen
eft-most keys of the keyboard will play voice bass or voice
percussion sounds. You can easily do things such as using
your left hand to play a bass line while using your right hand
to play the melody.
If you turn on the [AUDIO KEY] button, you’ll be able to use
the fifteen keys at the left side of the keyboard to play back
audio files saved on USB memory (sold separately).
SOUND LOOPER
This lets you record a phrase you perform, and then
play it back repeatedly. You can also save this phrase to
USB memory (sold separately) and use the Audio Key
function to play it.
About Vocal Designer
“Vocal Designer” human vocal modeling technology is a further evolution of the “vocoder.” Here’s a simple
explanation of the vocoder.
What’s a Vocoder?
The “vocoder” was invented by the physicist H. Dudley in 1939 as a technology for compressing a voice
communication signal. Subsequently, musical instruments based on this technology were developed,
allowing you to play melodies and harmonies using a human voice. Of course, the audio source can be
anything (not just a human voice) but because the vocoder has its basis in the sound-producing structure
of the human voice, we’ll be talking about it in terms of how a human voice is produced.
If we ignore differences of loudness, pitch, and variation between individuals, the waveform produced
by our vocal cords is essentially identical regardless of what you’re saying (e.g., “ahh” or “eeh”). We can
distinguish spoken or sung words because of the various resonances (formants) created by our vocal
tract (the shape of our throat and the movement of the larynx and mouth) and additional sounds called
“fricatives,” “plosives,” and “sibilants” that are added in varying ways over time. The effect of the waveform
created by the vocal cords actually has a rather minimal effect on what the listener hears.
A vocoder analyzes these time-varying changes, electrically synthesizes the
shape of the throat and movements of the mouth (the formant movements),
and uses these formants to modulate a musical signal (the carrier) rather than
the waveform produced by the vocal cords. The vocoder “voice” produced in
this way was closer to that of a robot in a science fiction movie rather than the
voice of an actual human.
Vocal Designer uses cutting-edge modeling technology to bring about a
revolutionary leap in the accuracy of this synthesis, succeeding in generating
a “human voice” that is incomparably more realistic and natural than the
sounds produced by vocoders of the past.
Resonances (formants)
produced by the vocal
tract (shape of the
throat and larynx) and
movements of the mouth
Vocal cords (carrier)
Play Like You’re Singing
Vocal Designer is constructed so that elements other than pitch are expressed by your voice via the
microphone. You play the keyboard to control the pitch.
Vocal Designer won’t produce sound if you are only vocalizing into the microphone or only playing the
keyboard. This means that in order to take advantage of Vocal Designer, the timing at which you play
the keyboard and vocalize into the microphone is extremely important. When you’re performing a rapid
passage, you will probably find it best to hold down the keys (or press the hold pedal ➞ p. 62) and use your
voice to play the rhythm.
Unlike on typical synthesizers, the volume is controlled by the microphone. Use your voice to draw the
curve. Using your voice, you can produce a range of expression that you might even find extreme.
The most important technique for taking advantage of Vocal Designer is to
“Play like you’re singing”
12
Introducing the Sounds
VOCAL DESIGNER
Sound
Description
CLASSIC
Large choirs suitable for classical music. These are also a good choice for any choral sound—not
just classical—and will match nearly any style of music. They have a clear sound, and are a good
choice when you want the lyrics to be heard.
MALE &
FEMALE
Mixed choirs with independent male and female parts. With sparser chords, they produce a
deeper and more three-dimensional sound than “CLASSIC.” You’ll hear the female voices in the
high range, and the male voices in the low range. Female voices will be heard on the right side
of the stereo sound field, while male voices will be on the left side.
GOSPEL
These choirs include the distinctive phrasings and irregularities that are distinctive of gospel
music. They are an ideal choice for jazz or gospel.
POP
Choirs with a fewer number of members, broadly useful for popular music as well as songs that
contain rapid passages. The sound is clear, making these a good choice when the lyrics need to
be heard.
BACKGROUND
Sounds suitable for a backing chorus.
VOCODER
Vintage vocoder sounds.
* For some sounds, you can access a list of variation sounds by holding down the [SHIFT] button and
pressing the sound button. Use the value dial or the up/down cursor buttons to select a sound from the
list.
ENSEMBLE
Sound
Description
STRINGS
Acoustic string sounds with emphasis placed on the performance techniques that are
inherent to strings.
BRASS
Brass sounds that use SuperNATURAL technology.
GUITAR
Guitar sounds.
OTHERS
Other sounds.
PAD
Pad sounds.
SYNTH STRINGS
Synthesizer string sounds.
CHOIR
Sampled choir sounds. You can get an even more majestic effect by layering these with one
of the sounds of the Vocal Designer part.
JAZZ SCAT
This sound provides samples of jazz scat singing. It’s great for songs that contain rapid
passages and for scat soloing.
* For some sounds, you can access a list of variation sounds by holding down the [SHIFT] button
and pressing the sound button. Use the value dial or the up/down cursor buttons to select a
sound from the list.
13
BASS & PERCUSSION
Sound
Description
BASS
Bass sounds.
PERC
This provides a collection of voice percussion sounds.
* You can also select a bass sound by holding down the [SHIFT] button and pressing the [BASS] button,
and then turning the value dial.
14
M a k i n g Con ne c t ions
In this chapter you’ll connect the VP-770 to your external equipment and set it up.
15
Making Connections
Placing the VP-770 on the KS-12 Stand
If you place the VP-770 on a stand, you must use the KS-12 (sold separately).
Seen from the rear
Place the VP-770 so that the rear two of
the four rubber feet on the bottom panel
fit into the holes on the arms of the stand.
Rubber feet
Arm
Hole
Performer
Position the stand so that its arms extend
toward the performer.
* When placing the VP-770 on the stand, be careful not to pinch your fingers between the instrument
and the stand.
* Using the VP-770 with any other stand may produce an unstable situation, possibly causing the
instrument to fall or overturn, and resulting in injury or damage.
* For details on how to assemble the stand, refer to the owner’s manual that accompanied the stand.
16
Connect the Power Cord (AC IN)
1.
Connect the included power cord to the VP-770’s AC IN connector,
and plug the other end into an AC outlet.
to AC outlet
17
Connecting Your Amp or Speakers (OUTPUT/PHONES)
The VP-770 doesn’t contain an amp or speakers. In order to hear sound, you’ll need to connect it to monitor
speakers (with a built-in amp), a stereo set or other audio system, or headphones.
* To prevent malfunction and/or damage to speakers or other devices, always turn down the volume,
and turn off the power on all devices before making any connections.
1.
Make connections as shown.
Headphones
INPUT
Monitor speaker (with built-in amp)
✍
✍
18
If you’re outputting in mono, connect your equipment to the L/MONO jack.
Audio cables and headphones aren’t included with the VP-770. You’ll need to obtain them separately.
Connecting Your Microphone (MIC)
A microphone is indispensable for performing with the VP-770. The VP-770 models v
sounds by using your voice that’s input via the microphone.
A headset-type microphone is included with the VP-770.
If You’re Using the Included Microphone (MIC)
1.
Connect it to the MIC jack as shown.
* This instrument is equipped with balanced (XLR/TRS) type jacks.
Wiring diagrams for these jacks are shown below. Make connections
after first checking the wiring diagrams of other equipment you
intend to connect.
TIP:
HOT
RING: COLD
SLEEVE: GND
2: HOT
1: GND
3: COLD
* Howling could be produced depending on the location of
microphones relative to speakers. This can be remedied by:
1. Changing the direction of the microphone(s).
2. Relocating microphone(s) at a greater distance from speakers.
3. Lowering volume levels.
If You’re Using a Phantom-powered Condenser Mic
The VP-770’s MIC jack supports phantom power.
* Turn this off if you’re using the included microphone.
* Always turn the phantom power off when connecting any device other than condenser microphones
that require phantom power. You risk causing damage if you mistakenly supply phantom power to
dynamic microphones, audio playback devices, or other devices that don’t require such power. Be
sure to check the specifications of any microphone you intend to use by referring to the manual that
came with it.
(This instrument’s phantom power: 48 V DC, 10 mA Max)
1.
Press the [PHANTOM] button.
2.
Press the [F1] (OK) button.
The confirmation message will appear.
The [PHANTOM] button will light, and phantom power will be supplied.
✍
Immediately after powering up the VP-770, the phantom power supply will be off.
19
If You’re Connecting Your Microphone to the EXT IN Jack (EXT IN)
1.
Connect it to the EXT IN jack as shown.
2.
Turn the [EXT IN] knob to “MIC.”
✍
3.
This knob adjusts the level of the sound from the EXT IN jack. (Turn the knob toward “MIC” to
increase the level, or toward “LINE” to decrease it.) If you’ve connected a mic, you should turn this
to “MIC.”
➞ Refer to “Adjusting the Microphone Input Level” (p. 28) for more about this adjustment.
Set the [MIX TO MIC] switch “ON.”
✍
The [MIX TO MIC] switch setting determines whether the sound from the EXT IN jack will be used
as a microphone input (modulator; the ON setting) or as the carrier (the OFF setting).
We’ll be using it as a microphone input, so select the “ON” position here.
Carrier
Modulator
This is the signal that is the basis of the
sound and determines its timbre and
pitch. To use the sound from the rear
panel EXT IN jack as the carrier, hold down
the [SHIFT] button, press the [VOCODER]
sound button, and select the bottom
sound in the list that appears.
The tonal character (formants) of
the voice from the microphone
input is extracted, and these
formants are used to modulate
(transform) the carrier signal.
If you want the sound from the rear
panel EXT IN jack to be the carrier, set
the [MIX TO MIC] switch “OFF”
(➞ p. 112).
20
If you want the sound from the
rear panel EXT IN jack to be the
modulator, set the [MIX TO MIC]
switch “ON” (➞ p. 114).
Connecting a Pedal (FOOT PEDAL HOLD/CTRL 1/CTRL 2)
You can connect a hold pedal (sold separately: DP series) and an expression pedal (sold separately: EV-5) to
the VP-770.
If an optional hold pedal (DP series) is connected to the rear panel PEDAL HOLD jack, you can press the
hold pedal to cause notes to sustain or “hold” even after their keys have been released.
If an optional expression pedal or pedal switch (EV-5, DP series) is connected to the rear panel PEDAL CTRL
jack (1, 2), you can use the pedal to control the volume or various functions.
➞ Refer to “Using Pedals” (p. 39) for more information.
Make connections as shown.
Expression pedal
(sold separately: EV-5)
✍
Hold pedal
(sold separately: DP series)
Use only the specified expression pedal (EV-5; sold separately). By connecting any other expression pedals, you risk causing malfunction and/or damage to the unit.
About the Cable Clamp
To reduce the risk of the microphone being stolen, use the included
Allen wrench to remove the screws from the rear panel cable clamp,
pass the microphone cable through the clamp, and retighten the screws
to secure the cable clamp.
* Keep the removed screws out of the reach of small children to ensure
they are not swallowed accidentally.
21
Connecting USB Memory (Sold Separately)
Audio files saved on USB memory (sold separately) can be assigned to the keyboard for playback (p. 68),
and you can back up all of the VP-770’s settings to USB memory as a “project” (p. 103).
Open the USB MEMORY connector cover and insert the USB memory.
* Be sure to keep the USB MEMORY connector cover closed when not connecting or disconnecting USB
memory.
* Carefully insert the USB memory all the way in—until it is firmly in place.
* Connect the USB memory after you turn on the VP-770’s power. Never disconnect the USB memory
while the VP-770 is powered up.
Using the Included USB Memory Protector
You can use the included USB memory protector to prevent theft of the USB memory connected to the
VP-770.
* You must use the included screw.
* You must use the included Allen wrench to tighten or remove the screw. Using a tool that does not
match the screw head will damage it.
* Be careful not to over-tighten the screw. Doing so may damage the screw’s head, causing the wrench
to rotate uselessly.
* To tighten the screw, turn the Allen wrench clockwise. To loosen the screw, turn the Allen wrench
counter-clockwise.
loosen
tighten
* Keep the included screw out of the reach of small children to ensure it is not swallowed accidentally.
22
Per fo r m i n g
In this chapter you’ll learn the basics of playing the VP-770. When you’ve finished it, you will
have mastered the basics of the VP-770!
23
Turning On/Off the Power
(POWER ON)
Here’s how to turn the VP-770’s power on or off.
Turning On the Power
* After completing the connection explained in the previous chapter, make sure to turn on the power
by following the steps below. By turning on devices in the wrong order, you risk causing malfunction
and/or damage to speakers and other devices.
1.
2.
Before you turn on the power, check the following.
Is the VP-770 correctly connected to your peripheral equipment?
Have you turned down the volume of the VP-770 and the connected audio system to the minimum
settings?
On the VP-770’s rear panel, turn the [POWER ON] switch “on.”
* This unit is equipped with a protection circuit. A brief interval (a few seconds) after power up is
required before the unit will operate normally.
3.
Use the [VOLUME] knob to adjust the volume appropriately.
While you play the keyboard to produce sound, adjust the volume of the VP-770 and of the audio
equipment you’ve connected.
If You Don’t Hear Sound, Check the Following
• Is the VP-770 correctly connected to your amp, speaker, or headphones?
• The Vocal Designer part won’t produce sound when you play the keyboard unless you are vocalizing
into the microphone. ➞ For details, refer to “Performing with Vocal Designer” (➞ p. 27)
• If there’s no microphone connected, try selecting an Ensemble part sound and playing it from the
keyboard (➞ p. 42).
24
Turning Off the Power
1.
2.
Before you turn off the power, check the following.
Have you turned down the volume of the VP-770 and the connected audio system to the minimum
settings?
On the VP-770’s rear panel, turn the [POWER ON] switch “off.”
✍
If you need to turn off the power completely, first turn off the [POWER ON] switch, then unplug the
power cord from the power outlet. Refer to “Power Supply” chapter in “USING THE UNIT SAFELY”
(separate document).
Adjusting the Display Contrast (DISPLAY CONTRAST)
The characters in the display may be difficult to view immediately after turning on the VP-770’s power
or after extended use. If this occurs, turn the rear panel [DISPLAY CONTRAST] knob to make the display
legible.
About the Top Screen
The screen that appears first when you turn on the power shows the following information.
Information
Page
Registration number
p. 78
Tone of the Vocal Designer part
p. 27
Tone of the Ensemble part
p. 42
You can select a registration or sound by using the cursor buttons to move the cursor to each item and
then turning the value dial.
* Please be aware that in the screen shots shown in this document, the registration names and tone
names differ from the factory settings.
25
Adjusting the Volume
( VOLUME)
Here’s how to adjust the volume of the entire VP-770.
1.
26
Use the [VOLUME] knob to adjust the volume of the entire VP-770.
✍
For best results, adjust the volume of your amp or speaker system so that you get the desired
loudness when the [VOLUME] knob is between the 12 o’clock and 2 o’clock positions as shown.
Turn the knob toward the right if you want to increase the volume further, or toward the left if you
want to decrease the volume.
Performing with Vocal Designer
( VOCAL DESIGNER)
Let’s go ahead and try performing with the Vocal Designer part. While vocalizing into the microphone, play
the keyboard and you’ll hear realistic and natural voices.
For more about how Vocal Designer works, refer to “About Vocal Designer” (➞ p. 12).
Selecting a Sound
Here’s how to select a Vocal Designer sound.
To play the Vocal Designer part, press a Vocal Designer sound button to make it light.
If you press the Vocal Designer sound button that’s already lit, the button will go dark and you will no longer
hear the Vocal Designer part.
✍
You can play multiple parts simultaneously by turning on sound buttons for the Ensemble part
and/or Bass & Percussion part. If you want to play only the Vocal Designer part by itself, turn off the
sound buttons of the other parts (make the buttons go dark).
Sound
Description
CLASSIC
Large choirs suitable for classical music. These are also a good choice for any choral sound—
not just classical—and will match nearly any style of music. They have a clear sound, and are a
good choice when you want the lyrics to be heard.
MALE &
FEMALE
Mixed choirs with independent male and female parts. With sparser chords, they produce a
deeper and more three-dimensional sound than “CLASSIC.” You’ll hear the female voices in the
high range, and the male voices in the low range. Female voices will be heard on the right side
of the stereo sound field, while male voices will be on the left side.
GOSPEL
These choirs include the distinctive phrasings and irregularities that are distinctive of gospel
music. They are an ideal choice for jazz or gospel.
POP
Choirs with a fewer number of members, broadly useful for popular music as well as songs
that contain rapid passages. The sound is clear, making these a good choice when the lyrics
need to be heard.
BACKGROUND
Sounds suitable for a backing chorus.
VOCODER
Vintage vocoder sounds.
Selecting a Variation Sound
1.
Hold down the [SHIFT] button and press a sound button.
2.
Use the value dial or the up/down cursor buttons to select a sound in
the list.
3.
Press the [F2] (SELECT) button to confirm your choice of sound.
A list of sounds will appear in the display.
27
Adjusting the Microphone Input Level (MIC LEVEL)
Here’s how to adjust the input level of the microphone connected to the rear panel MIC jack.
1.
Vocalize into the microphone.
✍
2.
3.
Try to keep a consistent distance between the microphone and your mouth.
Check the indicator status.
LEVEL
Indicator significance
Red
The signal level from the microphone input is too great.
Yellow
The signal level from the microphone input is just right.
Green
A signal is being input from the microphone input.
Adjust the [LEVEL] knob so that the yellow indicator lights at the
peak of your vocalizing into the microphone.
* The front panel [LEVEL] knob doesn’t affect the rear
panel EXT IN jack. If you’ve connected your microphone
to the EXT IN jack, use the rear panel [LEVEL] knob to
adjust the input level.
Turning the knob toward “MIC” will increase the input
level, and turning the knob toward “LINE” will decrease it.
✍
✍
28
Once you’ve adjusted the microphone input level, you should generally leave it untouched. Adjust
the [VOLUME] knob if you want to raise or lower the volume of the Vocal Designer part.
You can apply an effect to the microphone input by turning on the [INPUT EFFECT] button
(➞ p. 32).
Performing with Vocal Designer
Now you’re ready to perform with Vocal Designer.
1.
Select a sound.
• To ensure that you can clearly hear the sound of Vocal Designer, turn off the sound buttons of the
Ensemble part and the Audio key/Bass & Percussion part.
• To ensure that you’re hearing just Vocal Designer and not your own voice, move the [DIRECT] knob
to the very lowest position.
• Turn the [MIC ON/OFF] button (p. 31) on (lit).
2.
3.
Hold down one or more notes on the keyboard.
While holding
g down the notes, vocalize into the microphone.
The Vocal Designer part will sound according to the volume of your vocalizing.
Even if yyou’re holding
g down notes,, Vocal Designer
g
won’t produce
p
sound unless you
y are vocalizing
g into the
microphone.
p
Conversely,
y, Vocal Designer
g
won’t produce
p
sound if you’re
y
not holding
g down notes,, even if you
y are
vocalizing.
g
Play the keyboard to control the pitch. Try vocalizing a continuous “aah” into the microphone while you
play different keys. The pitch will change according to the notes you play.
This time, hold down notes on the keyboard while you vocalize in a more staccato manner; “ah, ah, ah, ...”
Vocal Designer will produce sound at the pitches of the chord you’re holding down, but at the staccato
rhythm you vocalized. That’s right — the rhythm is produced by your voice, not by the keyboard. This
technique is particularly useful when you’re performing phrases with rapid passages.
Unlike typical synthesizers, the volume is controlled from the microphone. Use your voice to draw the
curve. Using your voice, you can produce a range of expression that you might even find extreme.
There are just two secrets to using Vocal Designer skillfully.
• Match the timing of the keyboard and your voice
(use your voice to play the rhythm)
• Use your voice to control the volume (expression)
If You Don’t Hear Sound, Check the Following
•
•
•
•
•
•
•
Is the VP-770 correctly connected to your amp, speaker, or headphones?
Is the VP-770’s volume raised?
Is one of the Vocal Designer sound buttons lit?
Is the power switch of your microphone turned on?
Is your microphone connected correctly? (➞ p. 19)
Is the microphone input level raised? (➞ p. 28)
Is the [MIC ON/OFF] button lit? (➞ p. 31)
29
Adding Your Unprocessed Voice (DIRECT)
Now let’s add your voice from the microphone directly to the output.
1.
Vocalize into the microphone.
2.
Turn the [DIRECT] knob to adjust the volume.
Your voice will be output directly from the VP-770.
This time, try singing a favorite song into the microphone. While doing so, choose one of the Vocal
Designer sounds (we recommend GOSPEL, POP or BACKGROUND) and hold down the appropriate chord
progressions on the keyboard while you sing. Turning on the [AUTO HARMONY] button (p. 36) will make
this even more effective.
Vocal Designer will add a backing chorus to your vocal according to the chords you play.
✍
30
The [DIRECT] knob adjusts the volume of the audio signal you selected in the registration
parameter Input Source (p. 86).
Switching Off the Microphone (MIC ON/OFF)
when the microphone input is on.
1.
Press the [MIC ON/OFF] button to make the button go dark; the
microphone input will turn off.
2.
Press the button again to make it light; the microphone input will
turn on.
31
Applying Effects to the Microphone
(INPUT EFFECT)
You can apply effects to the microphone input. You can use three different vocal effects as input effects.
Effect
Description
NOISE SUP (Noise suppressor)
Suppresses noise when no sound is being input.
EQ (3 Band Equalizer)
Adjusts the character of the low, mid, and high-frequency ranges.
COMP (Compressor)
Reduces high-level sounds and boosts low-level sounds, thus improving the overall
volume balance of the sound.
Press the [INPUT EFFECTS] button; the button will light, and the
effect will be applied to the microphone.
Selecting the Type of Input Effect
1.
Hold down the [SHIFT] button and press the [INPUT EFFECTS] button.
The INPUT EFFECTS screen will appear.
2.
Use the cursor buttons and the value dial to edit the effect parameters.
To select the effect type (TYPE 1–4), move the cursor to the
TYPE field and turn the value dial.
To turn each effect on/off, move the cursor to the NOISE
SUP, EQ, or COMP fields, and turn the value dial.
3.
32
To make detailed settings for each effect, move the cursor to the
NOISE SUP, EQ, or COMP fields and press the [F1] (EDIT) button.
4.
Use the cursor buttons and the value dial to change the value.
NOISE SUP (Noise suppressor)
Parameter
Value
Description
Attack
0–127
Specifies the duration over which the noise suppressor will disable muting.
Release
0–127
Specifies the time from when the noise suppressor begins operating until muting
occurs.
Thres
-60–-36 dB
Specifies the level at which the noise suppressor begins to operate. Sounds below
the specified level will be muted.
EQ (3 Band Equalizer)
Parameter
Value
Description
Hi Freq
2000–20000 Hz
Specifies the center frequency at which the high-frequency range will be adjusted.
Hi Gain
-15–+15 dB
Specifies the gain (amount of boost or cut) for the high-frequency range. Positive
settings will boost the high-frequency range.
Mid Freq
50–20000 Hz
Specifies the center frequency at which the mid-frequency range will be adjusted.
Mid Gain
-15–+15 dB
Specifies the gain (amount of boost or cut) for the mid-frequency range. Positive
settings will boost the mid-frequency range.
Mid Q
0.3–20.0
Specifies the width of the mid-frequency range. Higher settings will narrow the
range.
Low Freq
50–4000 Hz
Specifies the center frequency at which the low-frequency range will be adjusted.
Low Gain
-15–+15 dB
Specifies the gain (amount of boost or cut) for the low-frequency range. Positive
settings will boost the low-frequency range.
COMP (Compressor)
Parameter
Value
Description
Attack
0–100
Specifies the time from when the input exceeds the Threshold (Thres) until the
volume begins to be compressed.
Release
0–100
Specifies the time it is to take after the input falls below the Threshold (Thres) before
compression ceases.
Thres
-36–0 dB
Specifies the level at which compression will begin.
Ratio
1:1.0–1:INF
Specifies the compression ratio.
Gain
0–+24 dB
Specifies the output gain.
5.
If you want to save the edited settings to system memory, press the
[F2] (SYS WRITE) button.
6.
The confirmation message will appear, then press the [F1] (OK) button.
7.
✍
You can save four types of input effect settings (TYPE 1–4).
When you’ve finished making settings, press
the [EXIT] button.
33
Adjusting the Vocal Designer Tone
(VOCAL DESIGNER TONE)
You can move the [TONE] slider to adjust the tone of the Vocal Designer.
Move the [TONE] slider.
The tone setting is shown in the display while you’re moving the slider.
Moving the slider upward will strengthen the highs, producing a clearer sound.
Moving the slider downward will restrain the highs, producing a milder sound.
Setting the slider value to 0 will use the original setting of the selected sound.
34
Raising Vocal Designer’s Pitch by One Octave (8va)
Here’s how to raise Vocal Designer’s pitch by one octave.
1.
Press the [8va] button; it will light, and the pitch of Vocal Designer
will rise one octave.
2.
Press the button once again; it will go dark, and Vocal Designer will
return to its original pitch.
“8va” is a symbol meaning “play one octave higher.”
✍
Unlike the KEYBOARD [-OCT] /[+OCT] buttons, the [8va] button applies only to the Vocal Designer
part. Use this when you want to raise the Vocal Designer part one octave higher than the
ensemble part.
35
Using the Auto Harmony Function
(AUTO HARMONY)
The Auto Harmony function lets you automatically add a backing chorus to your vocal. This function
generates harmony based on the melody you sing (the pitch detected from the microphone) and the
chords detected from the keyboard. In addition, the harmony will change according to the movement of
the melody you sing. When using the Auto Harmony function, we recommend that you raise the [DIRECT]
knob (p. 30) to combine it with your own actual voice.
1.
Press the [AUTO HARMONY] button; the button will light and the
Auto Harmony function will turn on.
2.
Play a chord on the keyboard, and vocalize into the microphone.
Harmony will be produced based on the chord you play. Try singing a melody into the microphone or
changing the chord, and listen to the result.
Making Settings for Auto Harmony
You can choose from several types of harmony to determine the number of harmony voices that will be
added to your vocal and how they will be arranged.
If you choose a simple type (such as DUET or TRIO), the Vocal Designer function will generate a simple
harmony even if you play numerous keys. This prevents the sound from becoming muddy, for example
even when layered with the ensemble sound.
1.
Hold down the [SHIFT] button and press the [AUTO HARMONY] button.
The AUTO HARMONY setting screen will appear.
✍
36
When you turn on the [AUTO HARMONY]
button, play a chord on the keyboard, and
vocalize into the microphone, the [ ] icon will
appear on the on-screen keyboard to indicate
the pitch detected from the microphone, and
[ ] icons will appear to indicate the generated
harmony.
2.
Use the cursor buttons and the value dial to change the value.
Parameter Value
Description
TYPE
Switches the type of Auto Harmony.
DUET,
TRIO,
TRIO-UPPER,
QUARTET,
MANHATTAN,
JAZZ-OPEN
The notation shown below is an example of a C-major scale.
• The solid black notes indicate the pitch detected from the microphone (this note will not sound *1).
• The white notes indicate the harmony that was generated (Vocal Designer will sound with these
notes).
• For a minor chord, the third will be a minor third rather than a major third.
DUET
TRIO
TRIO-UPPER
QUARTET
MANHATTAN
JAZZ-OPEN
*1 You can sound the black notes by turning on the [AUTO NOTE] button.
3.
When you’ve finished making settings, press the [EXIT] button.
37
Playing the Vocal Designer Using Only the Microphone
(AUTO NOTE)
Normally, Vocal Designer will not sound unless you play the keyboard. However, by using the Auto Note
function, you can make Vocal Designer produce sound without your having to play the keyboard; i.e., all
you’ll need to do is vocalize into the microphone. The Auto Note function will detect the pitch of your voice
via the microphone, and automatically sound notes for that pitch.
When you press the [AUTO NOTE] button, the button will light and
the Auto Note function will turn on.
Making settings for Auto Note
1.
Hold down the [SHIFT] button and press the [AUTO NOTE] button.
The AUTO NOTE setting screen will appear.
2.
38
When you turn on the [AUTO
NOTE] button and vocalize
into the microphone, the
detected pitch is shown as
a [ ] icon on the keyboard
displayed on this screen.
Use the cursor buttons and the value dial to change the value.
Parameter
Value
Description
MODE
CHROMATIC
This is a chromatic scale. The pitch detected from the microphone is converted to
notes at semitone intervals.
DIATONIC
This is a diatonic scale. The pitch detected from the microphone is converted to notes
at diatonic intervals. You can use the KEY parameter to specify the key of the scale.
KEY
3.
✍
C, C#, D, D#, E, F, F#, G, G#, Specifies the key when MODE is set to “DIATONIC” (diatonic scale).
A, A#, B
When you’ve finished making settings, press the [EXIT] button.
Adding an Effect when You Apply Pressure to the Keyboard
(AFTERTOUCH)
You can add an effect to Vocal Designer by applying pressure (aftertouch) to the keyboard.
➞ For details, refer to “Adding an effect by applying pressure to the keyboard
(AFTERTOUCH)” (p. 64).
39
Adjusting the Release of the Notes
(RELEASE)
You can adjust the release for the Vocal Designer and Ensemble by moving the [RELEASE] slider. Release is
the time from note-off until the sound has disappeared.
Move the [RELEASE] slider.
The release value is shown in the display while you move the slider.
✍
The [RELEASE] slider applies a relative change to the release value specified for each sound. When
the [RELEASE] slider is at zero, the release value will be as specified by the settings of that sound.
Moving the slider upward will lengthen the time from note-off until the sound disappears.
Moving the slider downward will shorten the time from note-off until the sound disappears.
40
Adjusting the Vibrato
( VIBRATO)
is an effect that cyclically modulates the sound. By applying it to the Vocal Designer you can simulate the
natural vibrato of a voice.
Turn the three [VIBRATO] knobs.
The vibrato settings are shown in the display while you turn the knobs.
✍
These three knobs apply a relative change to the vibrato settings specified for each sound. When
each knob is at zero, the vibrato settings will be as specified by the settings of that sound.
Knob
Parameter
Value
Description
RATE
Vibrato Rate
-64–+63
Adjust the vibrato speed (the rate at which the sound is modulated). The
sound will be modulated more rapidly for higher settings, and more slowly
with lower settings.
DELAY TIME
Vibrato Delay
-64–+63
Adjusts the time delay until the vibrato (sound modulation) effect begins.
Higher settings will produce a longer delay time before vibrato begins,
while lower settings produce a shorter time.
DEPTH
Vibrato Depth
-64–+63
Adjusts the depth of the vibrato effect (the depth at which the sound is
modulated). The sound will be modulated more greatly for higher settings,
and less with lower settings.
* Vibrato is not applied to the solo strings (Solo Violin, Solo Cello) sounds of the Ensemble part when
you play polyphonically (multiple notes). This simulates the way in which vibrato is not applied when
multiple notes are played on a violin or similar instrument. Although turning the [VIBRATO] knobs will
not apply vibrato, you can apply vibrato by operating the modulation lever (p. 56).
41
Performing with Ensemble
(ENSEMBLE)
Here’s how to play the Ensemble part. This part lets you play high-quality sounds from the keyboard.
You can switch the sound (e.g., brass ensemble using SuperNATURAL technology, or strings) by selecting a
sound button.
Selecting a Sound
Press a button to select a sound.
To play an Ensemble sound, press one of the buttons to make it light. If you press a button that’s already lit,
it will go dark and the Ensemble part will no longer produce sound.
✍
You can simultaneously play more than one part by turning on a sound button for the Vocal
Designer and/or Bass & Percussion parts. If you want to hear only the Ensemble part, simply turn
off the sound buttons for the other parts so that they are dark.
Sound
Description
STRINGS
Acoustic string sounds with emphasis placed on the performance techniques that are
inherent to strings.
BRASS
Brass sounds that use SuperNATURAL technology.
GUITAR
Guitar sounds.
OTHERS
Other sounds.
PAD
Pad sounds.
SYNTH STRINGS
Synthesizer string sounds.
CHOIR
Sampled choir sounds. You can get an even more majestic effect by layering these with one
of the sounds of the Vocal Designer part.
JAZZ SCAT
This sound provides samples of jazz scat singing. It’s great for songs that contain rapid
passages and for scat soloing.
Selecting a Variation Sound
1.
Hold down the [SHIFT] button and press a
sound button.
A list of sounds will appear in the display.
42
2.
Use the value dial or the up/down cursor buttons to select a sound in
the list.
3.
Press the [F2] (SELECT) button to confirm your choice of sound.
Performing with Ensemble
Now let’s try performing with the Ensemble part.
1.
Select a sound.
• To ensure that you can clearly hear the sound of the Ensemble part, turn off the sound buttons of the
Vocal Designer part and the Audio Key/Bass & Percussion part.
• Raise the Ensemble [LEVEL] slider (p. 44).
2.
Play the keyboard.
You’ll hear the Ensemble part.
Playing the Ensemble part by itself will give you a wonderful sound, but layering it with the Vocal Designer
part will raise this to the level of truly amazing!
For brass ensemble sounds using SuperNATURAL technology, you’ll probably want to split the keyboard
(p. 54) and use your left hand to play the Vocal Designer while your right hand plays the brass.
By layering powerful strings or beautiful choir sounds together with Vocal Designer, your performance on
the VP-770 can sound unbelievably rich. Vocal Designer will stop sounding when your voice is not being
input from the microphone (such as when you take a breath), but the Ensemble part will sound as long as
you are playing the keyboard (regardless of the microphone input). Layering the Ensemble part with the
Vocal Designer ensures that the sound will not be interrupted.
If You Don’t Hear Sound, Check the Following
• Is the VP-770 correctly connected to your amp, speaker, or headphones?
• Is the VP-770’s volume raised?
• Is the Ensemble [LEVEL] slider raised?
• Is one of the Ensemble sound buttons lit?
43
Adjusting the Ensemble Volume (ENSEMBLE LEVEL)
Here’s how to adjust the volume of the Ensemble part.
1.
Play the keyboard.
2.
Move the [LEVEL] slider to adjust the volume.
The level setting is shown in the display while you move the slider.
Unlike the [VOLUME] knob, this slider only affects the Ensemble part. You can use this slider to make
adjustments when you want the Ensemble part to be louder (or softer) than the Vocal Designer or the
direct output of the microphone (your voice).
Step On a Pedal!
The expression pedal will vary not only the volume of the Ensemble part but
also its “tone.” This means that using the pedal will make your Ensemble part
performance enormously more expressive.
➞ For details, refer to “Using pedals” (p. 62).
44
Adjusting the Ensemble Tone
(ENSEMBLE TONE)
You can use the [TONE] slider to adjust the tone of the Ensemble sound.
Move the [TONE] slider.
The tone setting is shown in the display while you move the slider.
Moving the slider upward will strengthen the highs, producing a clearer sound.
Moving the slider downward will restrain the highs, producing a milder sound.
Setting the slider value to 0 will use the original setting of the selected sound.
45
Adjusting the Ensemble Attack
(ATTACK)
You can use the [ATTACK] slider to adjust the attack of the Ensemble sound.
The attack is the starting portion of each note. A piano or percussion instrument is said to have a sharp or
fast attack; instruments such as bowed strings are said to have a gentle or slow attack.
Move the [ATTACK] slider.
The attack setting is shown in the display while you move the slider.
✍
✍
The [ATTACK] slider applies a relative change to the attack value specified for each sound. When
the [ATTACK] slider is at zero, the attack value will be as specified by each sound’s own setting.
Setting the attack to a negative value for a BRASS or STRINGS sound will have no effect. The
sharpest attack will be when the slider is set to zero.
Moving the slider upward will make the attack more gentle.
Moving the slider downward will make the attack sharper.
You can also adjust the release.
➞ For details, refer to “Adjusting the release (RELEASE)” (p. 40).
46
Using the Microphone to Add Expression to the Ensemble (VOICE EXPRESSION)
You can use your voice via the microphone to add expression to the sound of the Ensemble part.
➞ For details, refer to “Using a microphone to control expression (VOICE EXPRESSION)”
(p. 66).
About the SuperNATURAL Brass Sounds (BRASS)
The VP-770 uses SuperNATURAL technology to bring you high-quality
brass sounds.
Various performance expressions distinctive to brass instruments that
were difficult to play from a keyboard can now be reproduced without
special operations, and expressively played with realistic tone.
In addition to playing each instrument solo, you can use the Section
feature to create and play brass sections consisting of up to six “players.”
With this function, the performance of each player in the section will take
advantage of the distinctive characteristics of the instrument being used.
For details on operation, refer to “Section Mode” (p. 90).
About the String Sounds (STRINGS)
The string sounds of the STRINGS allow even richer and more
expressive performance than ever before, without requiring
complex operations from the player. The solo strings (Solo
Violin, Solo Cello) sounds simulate the characteristics of a solo
performance.
The solo strings (Solo Violin, Solo Cello) sounds simulate the way in which a violin or other stringed instrument
is actually played, and will naturally switch between the ways in which vibrato or legato are applied when
playing monophonically or polyphonically.
47
Performing with Bass & Percussion
(BASS & PERCUSSION)
Here’s how to play the Bass & Percussion part. The left-most seventeen notes of the keyboard will play bass
and voice percussion sounds. This makes it easy to use your left hand to play a bass line while using your
right hand to play the melody.
Selecting a sound
Here’s how to select a Bass & Percussion sound.
When you press a Bass & Percussion sound button to make it light, the left-most seventeen notes of the
keyboard will play bass and percussion sounds.
You can split the keyboard for the Vocal Designer
and Ensemble parts (p. 54).
✍
BASS & PERC
VOCAL DESIGNER
ENSEMBLE
If you press a sound button that is already lit, the button will go dark and the Bass & Percussion part will
not produce any sound.
✍
By pressing the [AUDIO KEY] button you can use the same keys to play back audio files from USB
memory (p. 68).
Selecting a Variation Sound
1.
Hold down the [SHIFT] button and press a sound
button.
2.
Use the cursor buttons to move the cursor to sound name.
✍
3.
Turn the value dial to select a sound.
Sound
Description
BASS
Bass sounds.
PERC
This provides a collection of voice percussion sounds.
Press the [EXIT] button to return to the top screen.
48
In this screen you can also edit the bass and
percussion sound (p. 92).
Performing with Bass & Percussion
Now you can try playing the Bass & Percussion part.
1.
Select a sound.
2.
Play a note in the keyboar