1
CHAPTER
“GENERAL
1
INFORMATION”
Table of Contents
SAFETY
INFORMATION
Safety
During
General
Copier
Operation
Safety
INSTALLATION
DAILY
Information
Environment
To Copier
Dual Job
Display
. . . . . . . . . . . . . . .
●
. 1-4
. . . . . . . . . . . . . . . . . . . . ...1-4
. . . . . . . . . . . . . . . . . . . . . . . ...1-4
. . . . . . . . . . . . . . . . . . . . . . . . ...1-5
MAINTENANCE
Copier
. . . . . . . . . . . . . . . . . . . . . 1-3
. . . . . . . . . . . . . . . . . . . . . . ...1-4
To Avoid
Connection
Access
. . . . . . . . . . . . . . . . . . . . ...1-2
REQUIREMENTS
Environments
Power
. . . . . . . . . . . . . . . . . . . ...1-2
. . . . . . . . . . . . . . . . . . . . ...1-6
. . . . . . . . . . . . . . . . . . . . . . . . . . . . . . ...1-6
Feeder
Editor
(Option)
(Option)
. . . . . . . . . . . . . . . . . . . ...1-7
. . . . . . . . . . . . . . . . . . . . . ...1-7
1-1
-.——— . . .. —- —-.-— .—. .
SAFETY INFORMATION
SAFETY INFORMATION
When
using
Safety
your copier, the following safety precautions
During
should always be followed.
Operation
In this manual, all safety messages are identified by the words “WARNING”
These words mean the following:
WARNING:
Important
information
to alert you to a situation
that might
damage
to your property
if instructions
are not followed.
Caution:
Important
information
that tells how to prevent
situation that might cause minor injury.
damage
cause
and “Caution”.
serious
to equipment,
injury
or how
and
to avoid
a
WARNING:
Cl Since some parts of the copjer are suppl;ed
specified in this manual and the machine’s
Cl Do not modify
or replace
machjne’s
djsplay.
Cl Do not
flame.
jncjnerate
Cl Do not store
toner
toner
unjt
or toner
where
Cl Do not eat or swallow
Cl The fusing
any parts
other
wjth hjgh
display.
than
the
containers.
Toner
it wjll be exposed
to heat.
toner,
may be very
and keep
hot.
when
ones
dust
jt out of reach
Be careful
electrical
voltage,
specified
may
ignite
touch
in this
when
only the parts
manual
exposed
of chjldren.
handljng
jt.
Caution:
Cl While copying,
do not turn off the main switch.
Cl While copying,
do not open the front doors.
Cl While copying,
do not unplug
Cl Do not lay anything
Cl Keep corrosive
weighing
liquids,
Cl Do not allow paper
the power
cord.
more than 5 kg (11 lb) on the exposure
glass.
such as acid, off the machine.
clips,
staples,
or other small metallic
1-2
objects
to fall inside
the machine.
and
the
to open
SAFETY INFORMATION
General
Safety
Information
~ AJways turn the copier off when you have finished copying for the day, but leave it plugged
CJWhen the copier will not be used for a long period, disconnect
CJIf the copier must be transported
the power cord.
by vehicle, please contact your service representative.
U When the main switch is in the Stand-by position, the anticondensation
case of emergency, unplug the machine’s power cord.
CJThe main plug on this equipment
must be pulled out to disconnect
1-3
heaters are on. In
main power.
INSTALLATION
REQUIREMENTS
INSTALLATION
Copier
REQUIREMENTS
Environment
The installation location should be carefully chosen because environmental
affect the performance of a copier,
- Optimum
environment
CJTemperature:
Cl
Humidity:
conditions
conditions greatly
-
10- 32°C (50 - 89”F)
15-90%
Cl A strong and level base.
IJ The copier must be level within 5 mm (0.2”) both front to rear and left to right.
Cl To avoid possible build-up of ozone, make sure to Iocatethis copier in a large well ventilated
room which has air turnover of more than 30ms/hr/person.
Environments
To Avoid
Cl Locations exposed to direct sunlight or strong light (more than 2,000 Iux),
~ Locations directly exposed to cool air from an air conditioner or heated air from a heater.
(Sudden temperature changes may cause condensation within the copier,)
~ Places where the copier may be subjected to frequent strong vibration,
0 Dusty areas.
ClAreas with corrosive gases.
Power
Connection
IJ About the power source: see the inside of the front cover page.
CIAvoid multiwiring.
CJMake sure that the wall outlet is near the copier and easily accessible,
Cl Make sure the plug is firmly inserted in the outlet.
~ Voltage must not fluctuate more than 10?40.
Cl
Do not set anything on the power cord.
1-4
INSTALLATION
Access
To Copier
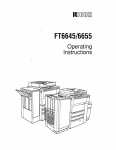
IJ Place the copier near the power source, providing clearance as shown:
I
1Ocm
(3.94”)
35cm
(13.78”)
1..t
\
L
1Ocm
(3.94”)
—
cm
1.97”
90cm
(35.43”)
I
t
1 Ocm
(3.94”)
--d
—
IOcm
,3.94”)
90cm
(35.43”)
1-5
REQUIREMENTS
DAILY MAINTENANCE
DAILY MAINTENANCE
To maintain
high copy quality, clean the following parts and units regularly.
Copier
Touch Panel Display
Clean the touch panel display with a
dry soft cloth.
Exposure
Glass
1. Lift the platen cover or dual job feeder.
2.
Clean the exposure glass with a damp
cloth and wipe it with a dry cloth.
(J
Platen
If stains do not come off, use a glass
cleaner. After using a glass cleaner, wipe
it with a dry cloth.
Cover
1. Lift the platen cover.
2.
Clean the platen cover with a damp
cloth and wipe it with a dry cloth.
1-6
DAILY MAINTENANCE
Dual Job Feeder
(Option)
Belt
.ift the dual job feeder,
1,
2. Clean the belt with a damp cloth and
wipe it with a dry cloth.
D
If stains do not come off, use belt cleaner.
Feed-in Unit
Clean
the original
table
and original
guide with a damp cloth and wipe them
with a dry cloth,
Display
Editor
(Option)
Display
Clean the display of the display editor
with a dry soft cloth.
1-7
CHAPTER
2
“USAGE”
Tab/e of Contents
WHAT
YOU CAN DO WITH THIS COPIER
Color Selection
. . . . . . . . .
Image Density Adjustment
. . .
Original Image Type (Letter/Photo)
Sorting/Stacking
. . . . . . . . .
Copy Paper Selection
. . . . . .
Reduction/Enlargement
. . . . .
Special Reduction/Enlargement
Image Shifting
. . . . . . . . . .
Erase Center/Border
. . . . . .
Series Copying
. . . . . . . . .
Color Creation
. . . . . . . . . .
Image Creation
. . . . . .
,
.
Painting An Area
. . . . .
Deleting An Area
. . . . .
.
.
Image Adjustment
. . . . .
.
.
Single Color Adjustment
.
Color Balance
. . . . . . .
.
User Color . . . . . . . . .
.
Area Editing
. . . . . . . .
.
Using The Projector
. . . .
.
Others
. . . . . . . . . . .
COLOR
SAMPLE
COMBINATION
GUIDE
CHART
CHART
TO COMPONENTS
Machine
Exterior
Advanced
Sytems
Operation
PaneI
Touch
FUNCTIONS
Panel
. . .
. .
✎
✎
✎
✎
✎
✎
✎
✎
✎
✎
✎
✎
✎
✎
✎
✎
✎
✎
✎
. . . . . .
. . . . . .
Selection
. . . . . .
. . . . . .
. . . . . .
. . . . . .
. . . . . .
. . . . . .
. . . . . .
. . . . . .
. . . . * .
. . . . . .
. . . . . .
. . . . . .
. . . . . .
. . . . . .
. . . . . .
. . . . . .
. . . . . .
. . . . . .
. . .
. . .
. .
. . .
. . .
. . .
. . .
. . .
. . .
. . .
. . .
. . .
. . .
. . .
. . .
. . .
. . .
. . .
. . .
. . .
. . .
.
.
.
.
.
.
.
.
.
.
.
.
.
.
.
.
.
.
.
.
.
.
.
.
.
.
.
.
.
.
.
.
,
.
.
.
.
.
.
.
.
.
.
.
.
.
.
.
.
.
.
.
.
.
.
.
.
.
.
.
.
.
.
.
.
.
.
.
.
.
.
.
.
.
.
.
.
.
.
.
.
.
.
.
.
.
.
.
.
.
.
.
.
.
.
.
.
.
,
.
s
a
✎
. .
✎
. .
✎
. .
✎
. .
✎
. .
✎
. .
✎
. .
✎
. .
✎
. .
✎
✎☛✎✎
✎
✎
✎
✎
✎
✎
✎
✎
✎
✎
. .
✎
. .
✎
. .
✎
. .
✎
. .
✎
. .
✎
. .
✎
. .
✎
. .
✎
. . . . . . . . . . .
. . . . . . . . . . . . . . . . . . . . . . .
. . . . . . . . . . . . . . . . . . . . .
. . . . . . . . . . . . .
2-1
.
.
.
.
.
.
.
.
.
.
.
.
.
. .
. . .
.
.
.
.
.
.
.
.
.
.
.
.
.
.
.
.
.
.
✎
✎
✎
✎
✎
✎
.
.
,
.
.
.
.
.
.
.
. 2-2
. 2-3
. 2-3
. 2-3
. 2-4
. 2-5
.2-5
. 2-6
. 2-6
.2-7
.2-7
. 2-8
.2-9
. 2-9
2-10
2-10
2-11
2-11
2-12
2-12
2-12
. 2-13
✎
. . . . . . . . . . .
. . . . . . . . . . . . . . . . . . . . . .
REFERENCE
.
.
.
.
.
.
.
.
2-2
. .
. . . . . . . . . . .
●
,.
●
. .
. . . . . . . . . . . . . . . . . . . . . . .
Display
QUICK
. .
●
. . * , . . . .
,.
2-14
. . 2-16
.0
2-16
. .
2-17
. .
2-18
. .
2-20
. . . 2-21
GUIDE TO COMPONENTS
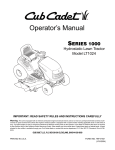
Machine Exterior
GUIDE TO COMPONENTS
Machine
Exterior
MAIN SWITCH
PLATEN COVER
Lower this cover over
OPERATION
Switches the copier
originals for copying
U=page 2-18
between on and stand-by
conditions. \
PANEL
/
\
FRONT
DOORS
Open to access the inside
of the copier.
Open these doors when:
removing misfed paper
c adding toner
●
BY-PASS
FEED
TRAY
Use to copy onto OHP
/
=
/’”
\-.
I
v
/
transparencies,
thick paper and
other non-standard
copy stock.
KEY COUNTER
HOLDER
Insert the key counter
here.
)
(option)
PAPER TRAYS 1-3
Each tray can hold 500 sheets,
Paper tray 1: Paper size and direction can
be changed by the user.
Paper tray 2 & 3: Paper size and direction
are fixed.
2-16
CHAPTER
“REPLENISHING
—
3
SUPPLIES”
—
Table of Contents
USE AND STORAGE
Use of Copy
OF SUPPLIES
. . . . . . . . . . . . . . . .
3-2
. . . . . . . . . . . . . . . . . . . . . . . . . .
3-2
Paper
Storage
. . . . . . . . . . . . . . . . . . . . . . . . . . . .
3-2
Toner
Storage
. . . . . . . . . . . . . . . . . . . . . . . . . . . .
3-3
LOADING
PAPER
SEITING
PAPER
CHANGING
ADDING
Paper
ON THE PAPER
ON THE BY-PASS
PAPER
TONER
TRAY
. . , .
m
FEED TRAY
SIZE AND DIRECTION
. . . .
. . . . . . . . . . . . . . . . . .
3-1
■
✎
✎
✎
.
.
.
.
,..
,
3-4
...
.
3-6
●
●
✎
✎
✎
✎
●
✎
✎
. . .
☛✎✌
3-8
3-10
USE AND STORAGE
OF SUPPLIES
USE AND STORAGE
OF SUPPLIES
Use of Copy Paper
tJ For good copy quality, please use the type of paper and OHP transparencies
by your sales/service representative.
- Non-recommended
copy
paper
-
The following types of copy paper are not recommended
for this copier.
Wavy or creased paper
●
Curled paper
●
●
Damp paper
QBound paper
●
Any coated paper (carbon, thermal paper, etc.)
●
Extra smooth paper or paper that tends to stick together.
●
Paper with low electrical resistance
- Others
recommended
●Torn paper
“ Tracing paper
●
Paper with low stiffness
-
#To avoid paper misfeeds or copy image problems, do not use paper that has already been
copied on as copy paper.
CJWe recommend
types
using OHP transparencies
of transparencies
Cl Adhesive
labels
might
lead to loss
and OHP transparencies
made especially for color copying.
of brightness
can be loaded
when
only
the image
Using
is projected.
other
in the by-pass feed tray. When
copying on adhesive labels, insert them one sheet at a time.
ClThick paper(104g/m
#When
2- 157g/m2 or 28-42
lb) can be loaded only in the by-pass feed tray.
copying on rough surface paper, the copy image maybe light,
Paper Storage
Paper should always be stored properly. Improperly stored paper may result in poor image
reproduction, creased copies, and paper misfeeds.
CJAvoid storing paper in humid areas. (Under high temperature
store copy paper in a vinyl bag,)
#Do
and high humidity conditions,
not store paper where it will be exposed to heat.
Cl Store on a flat surface.
Cl Use older stock first.
Cl Do not lay heavy objects
on paper.
# Keep open reams of paper in the package,
packages.
3-2
and store them as you would unopened
USE AND STORAGE
Toner
Storage
c1 Store in a cool, dark place.
CJDo not store toner where
c1 Do not lay anything
it will be exposed to heat.
heavy on toner.
3-3
OF SUPPLIES
LOADING
PAPER ON THE PAPER TRAY
LOADING
PAPER ON THE PAPER TRAY
~ Before loading paper on the paper tray, refer to the “Use Of Copy Paper”
non-recommended
types of paper.
(page 3-2) for
D Acceptable paper weight: 64 -104.7g/m2 or 17-28 lb.
If the paper is heavier than this, use the by-pass feed tray. (= pages 3-6 and 5-6)
Cl If you use OHP transparencies
(IJ=pages 3-6 and 5-6)
or adhesive labels, use the by-pass feed tray.
ClYou can than e the paper size and direction of the 1st tray.
I= “Changing B aper Size and D~rect~on” (page 3-8)
~ Paper size and direction of the 2nd and 3rd tray are fixed. Load the fixed size paper in the
paper tray.
1. Pull the paper tray out until it stops.
2. Load paper in the paper tray.
Cl
The paper stack must be flush with the
right side of the paper tray.
Cl
Make sure to read the notice on the package showing the front side (copy side) of
the paper. Load paper with the copy side
down.
Cl
Do not stack paper over the limit mark.
3-4
LOADING
3.
Push the tray in until it stops.
~
Push the tray gently; otherwise the paper
guides might move, possibly leading to
paper being in the wrong position and to
paper stewing.
3-5
PAPER ON THE PAPER TRAY
SETTING PAPER ON THE BY-PASS FEED TRAY
SETTING
PAPER ON THE BY-PASS
FEED
TRAY
~ Before setting the copy paper, read page 5-6 for detailed information about by-pass feed
copying.
+ Check if the copy paper is suitable for by-pass feed copying.
+ Check which keys should be selected to match the copy paper type.
Cl Before setting the copy paper, refer to the “use Of Copy Paper” (page 3-2) for non-recommended types of paper.
1.
Push on the upper left corner of bypass feed tray. The by-pass feed tray
will open.
2. Adjust the paper guides to match the
paper size and direction.
0
If the paper guides do no match the paper
width, the copy paper may be misfed or
skewed.
CJ If you use large copy paper such as A3 or
11” x 17“ size paper, pull out the paper
support guide.
3. Insert the paper until it stops.
IJ
Make sure to read the notice on the package showing the front side (copy side) of
the paper. Load paper with the copy side
Up.
~
Do not stack paper over the limit mark.
~
If copying on adhesive
sheet at a time.
labels, insert one
3-6
SETTING PAPER ON THE BY-PASS FEED TRAY
Cl
When using OHP transparencies,
make
sure to load the copy side up, otherwise
fusing jams might occur,
There are types of transparencies
that
have the opposite side marked “up” because some copier models apply toner
from underneath.
This machine applies
toner from above.
Check the label on the package, or contact
your supplier to find the copy side.
D
4.
OHP transparencies
should be fanned
before loading to get air between the
sheets.
Make copies.
5. After finishing copying, return the bypass feed tray to its original position.
3-7
CHANGING
PAPER SIZE AND DIRECTION
CHANGING
PAPER SIZE AND DIRECTION
You can change the paper size and direction of the 1st tray. The paper size and direction of
the 2nd and 3rd trays are fixed. If you want to change the paper size and direction of the 2nd
and 3rd trays, please contact your sales/service representative.
IJ Acceptable
Tray
paperweight:
D~
~
1stTray
n
~
2nd/3rd
Tray
LT/DLT version
A4/A3 version
A3, A4, 8112”x 13“
(F4)
11” x 17“(DLT), 11“ x 15”, 10” x 14”,
A4, A5
11“ x 8112’’
(LT),81/2” x 5112’’
(HLT)
A3, B4, A4, B5, A5, 11“ x 17’’(DLT), 11“ x 15”, 10” x 14”, 81I2” x
14’’(LG),
8112” x 13’’(F4),
x 13”, 8“ x 13’’(F), 81/2” x 1l“(LT), 8“ x 101/2”, 8“ x 10”, 51/2° x 81/2’’(HLT)
A4, 65, A5, 11” x 81/2’’(LT),
81/2°x 51/2’’(FiLT)
Remove all the copy paper.
3. While pressing the green release lever
on the front side guide, slide the front
and rear guides to the paper size you
want to use.
Cl
14’’(LG),
8“ x 13’’(F),
81/2” x 1 I“(LT),8“ x 101/2”,8“ x 10“
1. Pull the 1st paper tray out until it stops.
2.
81/2” x
81 /4”X 13“
81/4”
~
g/mz,17’-28lb
64- 104.7
Make sure that the release lever is locked
in the correct position.
3-8
4.
While pressing the left guide release
lever, slide the left guide to the paper
size you want to use.
Cl
5.
Make sure that the release lever is locked
in the correct position,
Select the paper size by adjusting the
paper size selector on the rear side of
the tray.
6. Load Paper.
7.
Cl
The paper stack must be flush with the
right side of the tray,
~
Do not stack paper over the limit mark.
Cl
Make sure to read the notice on the package showing the front copy side. The
copy side should be loaded down.
Push the tray in until it stops.
~
Push the tray gently; otherwise the paper
guides might move, possibly leading to
paper being in the wrong position and to
paper scewing.
3-9
ADDING TONER
ADDING
TONER
There are four kinds of toner (Cyan, Magenta, Yellow and Black). When the “Add Toner”
message appears on the display, it is time to add toner.
Caution:
Make sure to add the same color toner.
Caution:
Add only one bottle
WARNING:
Do not incinerate
exposed
of toner at a time.
the toner
bottle.
to open flame.
1, Open the front doors.
2. Push the toner unit. The unit will unlock and come out a little. Pull the unit
until it stops.
3. Have ready a new toner bottle of the
color indicated on the touch panel display.
4,
Tap the new toner bottle to loosen the
toner.
3-1o
Toner
dust
may ignite
when
5. Shake the new toner bottle right and
left, and up and down at least ten times
each.
s,g
6, Check the color of the toner unit and
open its cover.
~
7.
Do m loosen or tighten the cap of the
toner bottle before setting the toner bottle
in position.
Align the arrows of the unit and the
bottle. Press the toner bottle down
until it sets in position.
8. Turn the toner bottle clockwise
until it
stops (about 900). The toner will fall
into the unit.
Caution:
Do not tap the toner bottle.
do, toner may scatter.
If you
3-11
ADDING TONER
9.
Check that the bottle is empty, then
turn the bottle counterclockwise
and
remove it.
O
If toner still remains in the bottle, remove
the bottle once (steps 8 and 9), shake it
again (steps 4 and 5), and reset the toner
bottle again in position (steps 6 and 7).
WARNING:
Dispose of the empty toner bottle according
to local regulations.
10. While lifting the green lever, slowly
push the unit back in until it locks.
11. Close the front doors.
3-12
CHAPTER
4
“BASIC OPERATION
AND FUNCTIONS”
Table of Contents
SETTING
ORIGINALS
. . . . . . . . . . . . . . . . . . . . ...4-2
Setting
Originals
On The Exposure
Setting
Originals
In The Dual Job
. . . . . . . . . . . . . 4-2
Feeder
. . . . . . . . . . . . . 4-3
. . . . . . . . . . . . . . . . . . . . . . . . . . . ...4-8
COPYING
How To Make
Standard
Checking
. . . . . . . . . . . . . . . . . . . . . ...4-8
Job
Copy
BASIC
Finish
Copies
Copy
Presetting
OTHER
Glass
Settings
Jobs
During
OPERATIONS
And
Setting
Canceling
All The Job
Copy
Stopping
The Copier
Recalling
The Previous
Job
Turning
DISPLAY
Image
Shifting
4-11
Modes
. . . . . . . . . . . . .
4-11
Setting
. . , . . . . . . . . . .
4-I I
. . . . . . . . . . . . . . . . . .
4-12
4-12
One Job To Do Another
. . . . . . . . . . . . . . .
4-12
Job
Entered
Run
By The Number
For Future
Panel
BASIC
Use
Display
Keys
. . . . . . . . . .
4-12
. . . . . . . . . . . . . . .
4-13
OFF/ON
OPERATION
Image
. . . . . . . . . . .
4-13
. . . . . . . . . . . . . .4-14
. . . . . . . . . . . . . . . . .
4-I5
. . . . . . . . . . . . . . . . . . . . . . . . ...4-15
. . . . . . . . . . . . . . . . . . . . . . . . . ...4-15
. . . . . . . . . . . . . . . . . . . . . . . . ...4-15
Points
Designating
. . . . . . . . . .
A Copy
Jobs
. . . . . . . . . . . . . . .
Moving
Marking
Settings
In The Original
In/Out
Copy
Job
During
Settings
Zoom
4-10
Settings
EDITOR
Cursor
. . . . . . . . . . .
4-12
The Touch
Scanning
Run
. . . . . . . . . . . .
Data
Saving
Selected
Data Or Selecting
A Selected
Clearing
A Copy
4-9
. . . . . . . . . . . . . . . . ...4-11
Changing
Canceling
Interrupting
. . . . . . . . . . . . . . . . . . . .
(size Magnification, scan Color etc.)
Areas
(Area Editing)
Canceling
The Previously
Canceling
All Specified
. . . . . . . . .
4-15
. . . . . . . . . . . . . . . . . .
4-15
Marked
Point
Dimensions
. . . . . . . . . . . .
Or Areas
4-1
. . . . . . . . .
4-15
4-15
SETTING ORIGINALS
Settinq Originals On The Exposure Glass
SETTING
Setting
Originals
If your machine
On The Exposure
is equipped
ORIGINALS
Glass
with the platen cover:
1. Lift the platen cover.
2. Set the original face down on the exposure glass. The original must be
aligned with the rear left corner.
Cl Before pressing the Start key, lower the
platen cover.
If your machine
is equipped
with the dual job feeder:
1.
Lift the dual job feeder.
2.
Set the original face down on the exposure glass, The original must be
aligned to the rear left corner.
Cl
Before pressing the Start key, lower the
dual job feeder.
4-2
SETTING ORIGINALS
Setting Originals In The Dual Job Feeder
Setting Originals
Recommended
In The Dual Job Feeder
Originals
The following types of originals can be used with this dual job feeder.
41 – 52 g/mz
Paper Weight
11-131b
105-128
14-20
21-28
29-34
50
50
30
25
A3 W
*
●
o
*
81/2” x 14” (LG) G
*
●
0
*
81/2” x 11“ (LT) ~
*
●
0
*
81/2” x 11“ (LT) ~
*
●
o
%
.-o
~
n
~
81-104
Maximum number of
originals to be set
r
m
g
53-80
51 K!’
x 81/2” (HLT) ~
*
o
0
*
51/2”
x 81/2” (HLT) ~
*
*
*
*
8“ x 13” (F) D
*
●
o
*
81/2” x 13“ (F4) ~
*
●
o
*
*
●
o
*
8“ X 101/2”
D
81, (),,
D
81, (),,
D
+$
●
o
*
++
●
o
*
1o“ x
*
●
o
*
*
●
o
*
x
,
x
,
14“ D
11’’ XI5° D
1
Cl Available functions:
●:
~Presetting copy jobs ( ~ page 4-1 O)
~Setting a stack of original
(Both 1-sided originals and 2-sided originals can be copied. m page 4-4)
SSetting one original at a time (w page 4-6)
o:
>setting
*:
SSetting a stack of original (W page 4-4)
SSetiing one original at a time
(Only 1-sided originals can be copied. = page 4-6)
a stack of original
and 2-sided originals can be copied. m page 4-4)
(Both 1-sided originals
>Setting one original at a time (~ page 4-6)
Cl User Tool Setting (I= page 8-5): Select “Thin Paper mode” for originals less than 53g/m2 (14 lb),
4-3
SETTING ORIGINALS
Setting Originals In The Dual Job Feeder
Non-recommended
Originals
Caution:
The following types of originals are not recommended
feeder. Please place them directly on the exposure
for use with the dual job
glass.
(=
page
4-2)
c1 Originals with a paper weigh greater than 128 g/m2 or 34 lb
c1 Originals larger than A3C3, 11 “xl 7“ ~
Cl Originals smaller than A5 Q (A4/A3 machines),
or 51/2’’x8I/2° ~ ~ (LT/DLT machines)
c1 originals
CJ Non-standard
thinner than 47 g/m2 or 11 lb
sized paper
c1 Folded, curled, creased, torn, or damaged
originals.
Cl Pasted originals
c1 Damp originals
c1 Any coated paper (carbon, thermal paper, etc.)
c1 Mailing labels, or perforated originals
c1 Bound, stapled, or clipped originals
n OHP transparencies
Cl Paper with any kind of coating (such as carbon) on the
back, or originals that are taped together.
Setting A Stack Of Original
(ADF/ARDF
mode)
1. Correct any curl, fold, or crease in the
originals before setting. Square the
stack of originals.
+
2, Confirm
dicator
that the Insert
Original
in-
is lit before setting.
3. Confirm that no previous originals
remain on the exposure glass,
4. Adjust
the original
guide to the original
size.
4-4
Setting Originals In The Dual Job Feeder
5. Set originals face up into the dual job
feeder until the Insert Original
indicator
goes off.
Cl
The original guide must touch the front
side of the originals.
Cl
Do not stack
mark.
originals
above
the limit
The bottom sheet of the original stack
(last page) will be fed into the dual job
feeder.
4-5
SETTING ORIGINALS
SETTING ORIGINALS
Setting Originals In The Dual Job Feeder
Setting One Original
1
At A Time
(SADF
mode)
Q-
Correct any curl, fold, or crease in the
orig nals before setting.
Q ---+&
$@
aAb
r .—
*.
2. Confirm that the Insert Original
dicator is lit before setting.
3.
in-
Confirm that no previous original
remains on the exposure glass.
4. Adjust the original
original size.
guides
to the
5. Set the original face up into the dual
job feeder until the Insert Original
indicator goes off,
Cl Start with the last page of the originals.
Cl
The original guide must touch the front
side of the original.
4-6
v
b
7.
While the Auto Feed indicator is lit
after an original is fed, set the next
original. The original is automatically
fed and copied.
Cl
When the Auto Feed indicator lights, the
dual job feeder is ready for another
original. (You can change the time until
the mode is cleared by the User Tool.
I= page 8-3 “SADF Auto Reset”.)
8. Repeat steps 5 and 7 until copying is
completed.
4-7
How To Make Copies
COPYING
COPYING
How To Make Copies
1. Confirm that the touch panel display is
on. If not, turn on the main switch.
I
On
,............
,....:.:.”
. .....
PJ
(!)
Wrdh
II
I
~
If the touch panel display is off under the
stand by (screen saver) condition (G=page
4-1 3), press the Clear Modes/Stand
by
key.
~
If your machine is in the User Code mode
(= page 8-6), input your user code first
and then press #.
2. Select
the copy
I
To make copies with the same colors and
size as the originals,
see page 4-9.
(Standard copy job settings.)
Cl
To select advanced
see chapter 5.
cock,
then press @ key.
1
I
job settings.
0
Input uwr
#
.——
———
‘cl
0
functions
[@/c)] (=
manually,
[0;0
23
3. Enter
the
number
using the Number
of copies required
(O-9) keys.
4. Set the originals on the exposure glass
or in the dual job feeder.
(= page 4-2)
5. Press the Start key.
~
If you press the Start key during the warmup period (about 8 minutes, after the main
switch is turned on), the Start key indicator will blink. Then the copier automatically starts copying after the warm-up
period (Auto Start mode). The Start key
blinks red and green in this mode.
4-8
1
I
Standard Copy Job Settings
Standard
COPYING
Copy Job Settings
If you want to make copies identical to the originals (same colors, same size), make sure that
the standard modes listed below are selected.
1
2
3
4
5
1. Full Color mode
In this mode, copies are made with the same colors as the original.
only black images, select the Black Copy mode.
(For details
about
color selection,
If you use originals with
see page 5-3.)
2. Manual Image Density mode (Image Density Adjustment)
There are 9 levels of image density. Level 4 is the standard image density.
(For details about image density adjustment, see page 5-4.)
Cl Auto Image Density mode cannot be selected when in Auto Color Select mode or Full Color mode.
3. Auto (Letter/Photo)
mode
The copier automatically detects the letter parts and photo parts of an original. The letter
parts are copied in the Letter mode, and the photo parts are copied in the Photo mode.
(For details about original image type selection, see page !5-5.)
4. Auto
Paper Select mode
The copier selects a suitable size of copy paper based on the original
reproduction ratio. It is not necessary to select a paper tray manually.
(For details about paper selection, see page 5-6.)
Cl The copier cannot detect
original
size smaller
than A5 or
51/2”
x 81/2”.
5. Full Size mode
The copier will make copies of the same size as the originals.
(For details about reduction and enlargement, see page 5-9.)
4-9
size and the
Presetting Copy Jobs During A Copy Run
COPYING
Presetting
Copy Jobs During A Copy Run
You can set the copy settings for your next job (Preset mode).
I TtIis function
can be used only when your machine
is equip ped with the optional
dual job feeder.
The copier will start the next copy job after the current job is completed.
1. Touch the Preset
panel display.
key on the touch
2, Select the copy job settings.
3. Touch the Exit key on the touch panel
display.
4. Set the originals for your next job on
top of the originals
being copied.
Without forcing them, push them in
completely.
Cl
thm
pl-Ess
E&i’
key.
FirstOrigirlals
Do not insert the originals too strongly.
-
“
‘
Prewt Origirlals
5. Touch the Exit key on the touch panel
display.
~
After the first job is finished, the next job
will start automatically.
Changing
/ Canceling
Preset Copy Jobs
To change or cancel the preset copy jobs, touch the Preset
and follow the instructions displayed.
4-1o
key on the touch panel display
I
OTHER BASIC OPERATIONS
OTHER BASIC OPERATIONS
Checking
And Changing
m
The Selected
Copy Jobs
If you have selected modes on the operation screens, the Check
key and Change Modes key appears on the touch panel
display.
Modes
If you touch the Change
Modes
key,
you can change
the follow-
ing job settings:
Cl Color Selection
~
~
CJ
~
Image Density Adjustment
Photo/Letter Selection
Paper Selection
Sorting/Stacking
If you touch the Check Modes key, you can see at a glance all
the modes you have selected. Touch the Prev. key to return to
the display when the Check Modes key was pressed.
Finish
Setting
m
Canceling
Data Or Selecting
Modes
After you have finished setting data or selecting modes, touch the
Exit key on the touch panel display.
A Selected
Copy Job Setting
To cancel one of the job settings, touch the selected keys
Key not selected
Touch to select.
Selected key,
Touch to cancel.
[ml
If the Cancel
key appears
4-11
on the touch
panel
display,
touch
it.
OTHER BASIC OPERATIONS
Clearing
Data Entered
0(9(9
By The Number
To clear data you have just entered
press the Clear/Stop
key.
<
-40
Keys
with the Number
(O-9) keys,
I
C/@
Then re-enter the desired number with the Number
Canceling
(O-9) keys.
All The Job Settings
To cancel all the manually selected job settings, press the Clear
Modes/Stand
by key.
o
[Q/(J ] [a
23
D&
mmf%
Stopping
The Copier
piJ(5-J(’lJ
o
-4
Recalling
To stop the copier during a copy run, press the Clear/Stop
key.
The copier will finish the copy being made and stop, If you have
placed the originals into the dual job feeder, press the Clear/Stop
key again so that the original placed on the exposure glass will be
fed out automatically,
4
Cle
During A Copy Run
The Previous
Job Settings
1
This copier will automatically store the previous copy job settings
at the previous copy run. Press the Memory
Call key, You can
change the recalled job settings,
o
[$/(!)
] [=
)
pi)o
23
mmm
Interrupting
a
One Job To Do Another
Press to interrupt a multicopy run to make urgently needed copies
(Interrupt mode). The interrupted copy job settings are stored in
the copier’s memory. After interrupt copying is completed, press
this key again to recall the previous
4-12
job settings.
OTHER BASIC OPERATIONS
Saving Job Settings
~
0+
1
I
o+2
I
o@
t
OS
L
You can store up to 5frequently
memory
,
.
For Future
Use
used copy job settings
and recall them for future
use (User Program
in machine
mode),
When storing copy job settings into machine memory, make sure
to select the copy jobs settings before pressing the Program key,
-1
The following job settings cannot be stored in memory:
IEmml
I Store program[
Turning
~
Color Editing (Area Editing)
CJ Projector
The Touch
Panel Display
OFF/ON
You can turn the touch panel display off to save energy.
want to do this manually,
I
(Cxxl
)LwF’ml
press the Clear
Modes/Stand
If you
by key
more than 2 seconds. The touch panel display turns off and the
indicator for this key will be on.
Press the Clear Modes/Stand
by key again if you want to use the
machine. The touch panel display will be turned on.
~
User Tool Setting “Screen Saver” (I= page 8-3):
When the machine does not detect anyone operating it for the selected
time, the touch panel display turns off automatically.
This time can be
set from 1 second to 900 seconds, or the function can be turned off.
4-13
DISPLAY
EDITOR BASIC OPERATION
DISPLAY
EDITOR
BASIC OPERATION
-Cursor
Display ~
./’”
Full
Key
Scan
\
Key
J
Display
z
&
m
s+
—
/
Contrast Dial
/
Display Brightness
Dial
Zoom
Zoom
Zoom
Zoom
All Clear
\
Image
Shift
Key
Close
\
\
Cursor
Key
/\
Key
Clear
\
Point
Key
Key
Keys
1 key: 150% Enlargement–
2 key: 200% Enlargement
3 key: 300% Enlargement
Explanation
for each
key:
I
Scan key
Press to scan the image.
Cursor
Press to move the cursor to up and down, left and ri ht.
After pressing the Image shift key, you can also shi 8 the image up and down,
key
and right by pressing this key.
Zoom keys
Press to zoom in the image. (1: 150%, 2: 200%, 3: 30094)
Full Size key
Press to see the full image (the size of the exposure glass).
Image Shift key
Press to shift the image
Point key
Press to mark a point.
Close key
Press to close an area.
Clear key
Press to cancel the previously
All Clear key
up and
down,
left and
right.
marked point before pressing the Close key.
I Press to cancel all specified dimensions
I
4-14
or areas.
left
Key
Scanning
In The Original
Image
To scan in the original image, place the original on the exposure
key. The entire image will be shown on the display editor.
Cursor
glass and press the Scan
Moving
To move the cursor around, press the Cursor
key in the required direction.
Zoom In/Out
To zoom in on a part of the image, move the cursor to the area you want to zoom in on and
press the required Zoom In key. That part of the image will be enlarged 150Y0/200Y0/300Y0,
To see the entire image again (100?4), press the Full Image key.
Image Shifting
When the display is zoomed in, you can scroll the display around.
and select the shift direction with the Cursor key.
Marking
Points
(Size Magnification,
Move the cursor to the desired
Designating
Areas
Press the Image Shift
Scan Color,
place and mark a point by pressing
the Point
etc.)
key.
(Area Editing)
B page 7-10
Canceling
The Previously
To cancel the previously
marked
Marked Point
point (before
pressing
the Close
key), press the Clear
key.
Canceling
All Specified
To cancel the all the previously
specified
Dimensions
dimensions
4-15
Or Areas
or areas, press the All Clear
key,
key
CHAPTER
“ADVANCED
5
FUNCTIONS”
Table of Contents
COLOR
SELECTION
. . . . . . . . . . . . . ...
IMAGE
Copy
Color
Auto
ADJUSTMENT
Auto
IMAGE
selection
. . 5-3
. . . . . . . . . . . . . . . . . . . s+
. . . . . . . . . . . . . . ...5-4
& Manual
Image
Density
Selection
TYPE (PHOTO/LE~ER)
Auto(Letter/Photo)
m..
. . . . . . . . . . . . . . . . . . 5-4
Density......,..
Combined
COPY
. . . . . . . . . . . . . . . . . . ...
Image Density
Image
ORIGINAL
. . . . . . . . . . . . . . . . . . . . .m.
. . . .
DENSITY
Manual
5-3
m,,
mmm.. 5-3
. . . . . . . . . . . . . . . . . . . . . . . . . . . . .0 5-3
Full Color Copy
Single
,,
. . . . . . . . . . . . . . . . . . . . . . . . . . . 5-3
Auto Color Select
Black
.,,
mode
. . . . . . . .5-4
SELECTION
. . . . . 5-5
. . . . . . . . . . . . . . . . . . . . ..
Photo
mode
. . . . . . . . . . . . . . . . . . . . . . . . . . . ...5-5
Letter
mode
. . . . . . . . . . . . . . . . . . . . . . . . . . . ...5-5
PAPER
Auto
SELECTION
Paper
. . . . . . . . . . . . . . . . . . ...5-6
Selection
. . . . . . . . . . . . . . . . . . . . . . ...5-6
Manual
Paper
Selection
. . . . . . . . . . . . . . . . . . . . ...5-6
By-pass
Feed
Selection
. . . . . . . . . . . . . . . . . . . . ...5-6
SORTING/STACKING
Sorting
STANDARD
Auto
Zoom
Size
..,..,.....,,.5-8
. . . . . . . . . . . . . . . . . . . . . . . . . . . . . ...5-8
REDUCTION
AND
Reduction/Enlargement
Full Size Copying
Fixed
. . . . . . . . . . . . . . . . . . . . . ...5-8
. . . . . . . . . . . . . . . . . .,
Stacking
5-5
ENLARGEMENT
. . . . . . . . . . . . . . . . . . . .5-9
...,.....
Reduction/Enlargement
. . . . . . . . . 5-9
...
%
...
..m,
m,mmm,
m, g-g
, . . . . . . . . . . . . . . . . .5-9
. . . . . . . = . . . . . . . . . . . . . . . . . . . . . . ...5-10
Magnification
. . . . . . . . . . . . . . . . . . . . . . ...5-lo
(to be continued
5-1
on next page)
SPECIAL
REDUCTION
Directional
Poster
IMAGE
SHIFTING
5-11
. . . . . . . . . . . . . . . . . . . . . . . . . . .
5-12
Magnification
. . . . . . . . . . . ,
●
. . . . . . . .
✎
✎
. . . . . . . . . .
✎
✎
Centering/Cornering
Margin
ERASING
Adjustment
. . . . .
CENTER/BORDER
✎
●
✎
Erase
Center
. . . . . . . . . . . .
■
✎
✎
Erase
Border
. . . . . . . . . . . .
✎
✎
✎
Erase
Center
. . . . .
✎
✎
✎
SERIES
And
Border
. . . . . . . . . .
COPYING
Book + 1 Sided
(From book original
COLOR
Two
. . .
Color Conversion
Color
IMAGE
. . . . . . .
Background
CREATION
Outline
Shadow
Mirror
Slanted
Image
●
. .
Image . . .
Positive/Negative
Image
Image
Image
Repeat
✎
5-13
. . . . . . . . . . . . .
5-13
. . . . . . . . . . . . 5-14
. . . . , . . . , . ,
5-14
. . . . . . . . . . . . .
5-14
. . . . . . . . . . . . .
5-14
,,
. . . . . . . . . . . . 5-15
●
. . . . . . . . . .
✎
. . . . . . . . . . . . . . . . . . . . .
✎
,..
copy)
. . . . . . . . . . . . . . . . . . . . . . . .
CREATION
Color Erase
✎
. . . . . . 5-13
. . . . . . . . . . . . .
copies)
l-sided
to two l-sided
Originals
✎
. . . . .
. , . . . . .
to two
2 Sided + 1 Sided
(From 2-sided original
Combine
. . , . . . . 5-11
. . . . . . . . . . . . . . . . . .
(Size)
Making
,..
AND ENLARGEMENT
✎
✎
. .
●
✎
✎
✎
. . . . . . . . . . . . . . . . . . . .
✎
. . . . . . . . . . . .
✎
. . . . . . . . .
. . . . . . . . . .
Image
. . . . .
. . . . . .
. . . . .
. . , . . .
. . . . . . . .
m.
. .
. .
* .
. . . . . .
. ,
. .
. #
●
✎
✎
. . .
. . .
. . .
5-2
●
✎
✎
✎
✎
✎
✎
✎
. . . . . . . . . . .
✎
. . . . . . . . . . . .
✎
. . . . . . . . . . . .
. . . . . . . . . . . .
. . . . . . . . . . . .
5-16
✎
✎
✎
✎
5-17
5-17
5-18
5-18
✎
. . . . . . . . . . . .
. . . . . . . . . . . .
5-16
✎
. . . . . . . . . . . . . . . . . . . .
. . . . . . .
5-15
5-19
5-19
5-19
5-20
5-20
5-21
5-21
COLOR SELECTION
COLOR SELECTION
F
Single
Color
Black
MO Ilklr
Sdwt
3
4
2
1
Cl User Tool Setting (= page 8-4):
Normally the copier uses 4 color toners (Yellow, Magenta, Cyan, and Black). You can change this setting so
that only 3 colors of toner are used (Yellow, Magenta, and Cyan).
Auto Color
Select
(Key=l)
The copier automatically detects whether the original has color parts or not. Originals with
only black images will be copied in the Black Copy mode and originals with some color areas
will be copied in the Full Color mode.
~ The copier may detect some black and white screen images (such as from newspapers)
If copying from a newspaper original, select Black Copy (key = 3)
as a full color original.
U If you make one copy set of a black original using the dual job feeder, we recommend you select Black Copy
(key= 3). If you choose Auto Color Select mode, the copier will reset the color selection for every original page,
taking a long time to complete the job.
0 If you select the Auto Color Select mode,
Full Color Copy
Letter mode will be selected automatically,
(Key=2)
This function makes copies in full color,
Black COpy (Kq=q)
This function makes copies in black.
Single
This function
Color
(KeY.4)
makes copies in single colors.
The colors you can choose for single color
copying are as follows.
Touch the color keys on the touch panel display,
in the color circle. (The white and black keys cannot be used.)
Cl 8 Standard Single Colors:
Yellow, Orange, Red, Magenta,
or press the keys
Blue, Cyan, Green, Light-green.
IJ 3 User Colors:
Up to 3 colors can be manually mixed and stored in memory. (“User Co/oF
CJ 1 Scan Color
You can scan in a color from an original. (“Scanning in a co/ot’
5-3
I= Page 6-6)
m Page 6-6)
IMAGE DENSITY ADJUSTMENT
IMAGE DENSITY ADJUSTMENT
. . . ........ .
. . . . . . . . . . ...........
~
Dmity[
~IIt[I IIMW
CJ User Tool Setting (= page 8-4):
You can adjust the auto image density level lighter or darker.
There are three ways of setting the image density to match the type and quality of the original.
Manual
. .. ~
~Ah .~.~.
Image Density
Imtw
Dmih[
m
....,:....
...........
...............
There are nine image density levels.
To get a darker
image,
Auto Image
1
Level 4 is standard image density
To get a lighter image, touch the left keys.
touch the right keys.
Density
....
.,,.
:.:.:.:.:.
=x&
1~
.“.
selection
”.
~
I
t:’
4
4
CJThis mode is available when Black Copy mode or Single Color mode is selected.
The copier automatically
density.
controls the image density according
to the original background
Combined Auto & Manual
Image Density Selection
..
.
..x.>>.+
.,,
.,.,,,.,.
...
“.”.””
.:
.:.:..
..
....
..
..
..
..
..
..
..
..
.
..
.am
+xiw+??
I...:
-E!m!!mm
●
I
4
This setting is effective when adjusting the copy image density to keep the background
appearing.
5-4
from
ORIGINAL IMAGE TYPE
ORIGINAL
Sampk?s:
@ page
(PHOTO/LEITER)
SELECTION
IMAGE TYPE (PHOTO/LETTER)
SELECTION
2-3
3
1
2
c1 User Tool Setting (~ Page 8-4):
To improve the readability
of black lettering in colored areas, select “UCR Adjustment”.
c1 If vou select Auto Color Select mode, Letter mode will be selected automatically.
You can chanae this to
Photo mode or Auto (Letter/Photo) mode to reproduce the original’s photo part well. However, ple-ase note
that if Auto Color Select mode and Auto Letter/Photo
mode are selected together,
black parts on the black
and white original may be copied lighter.
Auto (Letter/Photo)
mode
(Key=
I,
This mode automatically detects letter parts and photo parts of an original. The letter parts
are copied in the Letter mode, and the photo parts are copied in the Photo mode.
Cl Moire patterns may appear on the screened bold letters or screened areas of the copy. To lessen this effect,
select “Soft” for the image sharpness on the image adjustment function. (~ page 6-2.)
Cl With some types of originals, the Auto (Letter/Photo) mode might not be able to recognize the letter parts and
photo parts correctly and as a result the copy might not be reproduced well (= image separation error). In
such cases, a better copy may be reproduced by selecting the Letter mode or Photo mode. If you select the
Letter mode, the background density of the copy may become lighter than the original image. If so, darken
Density Contro?’).
the background density (= page 6-2, “Background
This may occur, especially under the following conditions,
Letters/Lines that have low density or have colored/screened background,
. When making enlarged copies (eg. 200°/0).
●
. Screened
Letters
~ Border parts between letters and photo or high contrast photo may be copied with an emphasized
‘Photo: Photo means not only photo pictures but ako screened /etter and so/id areas.
Photo
mode
(Key=2)
Delicate tones of color photographs
copying photographs and pictures.
Letter
mode
outline.
and pictures can be reproduced,
Use this function when
(Key.s)
This mode is suitable for copying originals consisting of characters, line diagrams, and letters,
but without photographs.
0 If a photograph
they could.
type of original is copied in this mode, the photograph
5-5
parts will not be reproduced
as well as
COPY PAPER SELECTION
COPY PAPER SELECTION
2
Auto Paper Selection
(Kw=l)
The copier selects a suitable size of copy paper based on the original
reproduction ratio. It is not necessary to select a paper tray manually.
Cl Originals which are of a nonstandard size, or smaller than A5 or
such cases, select the paper size manually.
Manual
Paper Selection
x 81/2” size, cannot be detected.
In
(Keys =2)
You can select the copy paper manually by touching
By-pass
.51/2”
size and the
Feed Selection
(Key=
one of the paper tray keys.
3)
In addition to feeding paper from paper trays, copy paper can be fed from the by-pass feed
tray.
Cl Available paper size:
148-432
mm or 5,8”-17.0”
1
100-297
mm
or 3.9” – 11.7’’”
B Available
paper thickness:
64-
157g/m2 or 17-42
13 Check which keys should be selected according
lb
the type of copy paper (see next page).
5-6
COPY PAPER SELECTION
CJCheck the type of copy paper and touch the keys as shown below.
Note
Usage
Key
Cl The machine will detect paper of the following size
Standard paper
and direction as standard paper.
A4/A3 version
~:
A3, B4, A4, B5, A5, B6, A6
●
D
only
●
: A4, B5, A5, B6, 81/2”x 11“
LT/DLT version
: 11“ x 17’’(DLTL10” x 14”, 81/2”x 1l“(LTJ,
D
8“ x 13(F),51 L?” x 81@(HLT)
:
81/2” x 11“(LT), 51/2° x 81/2’’(HLT)
II
Non-standard
m
Cl If the machine
paper
direction,
positioned
paper size
to make of
❑
odd
Size
cannot
detect the paper
the copy image
may not be
on the copy paper.
Therefore,
and direction
data by using the
the correct size.
“User Tool - Set Bypass Paper Size”
= page 8-3.
~ Thick Paper: 104 - 157g/m2 or 28-42
-
lb.
~;:$:~:be,s
❑
Thick
Papw
ClMake sure to load adhesive
E@Eil
❑
Cl Do not stack transparencies
on the copy tray.
Whenever
a transparency
is delivered
tray, you should remove it immediately.
DHP
D
PAPER
labels one sheet at a time
0 Check which side should have the copy.
(~ page 3-7)
OHP transparencies
(METT/NG
size and
correctly
input the
user tool
ON
THE
BY-PASS
FEED
5-7
to the copy
OHP transparencies should be fanned to get the air
between the sheets before loading them.
TRAY
=
page 3-6)
SORTING/STACKING
IJ Available paper thickness
~ Available
2
1
for sorting/stacking:
52-90
Minimum: A5 or
paper size: Maximum: A3 or 11” x 17“
Cl User Tool Setting (~ page 8-5):
You can change the settings so that the sorting/stacking
mode.
sorting
lb
g/m2 or 14-24
x 81/2”
51/2”
modes cannot be selected when in full color copying
(KeY.1)
+
1
[
2
1
2
“3
:
3
2
1
3
2nd bin
1st bin
Original
QJ
1
L
2
3
3rd bin
One copy of each original is delivered to each bin. (Copies are collated into sets.)
Stacking
(K,Y.2)
t
+
3dd
2
1
1
Original
\
2
1
2nd bin
Ist bin
3
2
3
3
3rd bin
/
All copies of the same original are delivered to the same bin. (Copies are grouped together.)
5-8
STANDARD
STANDARD
REDUCTION
AND ENLARGEMENT
REDUCTION AND
ENLARGEMENT
Iwo
RMuce/ijnlarge
I
I
1
2
3
R/El Se Iect
fnmt
4
Zml
5
000%
md~(s).
000%
000%
Inimd000%
000$% 200?4
7
4CIOM
mmm!
Size
(’lag.
6
D. SiZeh’l~&
F
EPOstwlllOl~~
m777V””l-
Reduced
Enlarged
Auto Reduction/Enlargement
The copier automatically
original size.
(Kw1)
selects the proper reproduction
Full Size Copying
(Key .2,0r
KeYs
To copy the image the same size as the original,
enlargement
one
of 14 preset
ratios.
select this function.
12 of them
ratios).
Cl User Tool Setting (~ page 8-5):
2 of the preset ratios can be preset by the user.
5-9
modes and
.3,7)
Fixed Reduction/Enlargement
You can select
ratio for the selected
~0
(KeYs.3+4)
are fixed
(7 reduction
ratios
and 5
STANDARD
REDUCTION
Zoom
(Keys =3+50npage5-9)
The reproduction
to change
1. +
AND ENLARGEMENT
ratio can be changed from 25% to 400% in 1YO steps. There are two ways
ratios.
and - keys
Adjust the reproduction
2. Number
ratio by using the +and - keys.
keys
Touch the Number
Keys key and enter the desired reproduction
Number
(O-9) keys and #key.
Size Magnification
u
E
(Keys =3+60n~age5-9)
u
+
xxx%
copy
Original
length
length
/
The suitable reproduction ratio will be automatically
the original and the copy image you want.
1.
ratio by using the
selected when you enter the lengths of
Number keys
Enter the lengths of the original image and the desired copy image with the Number
keys and the # key.
(O-9)
2. Editor input
The optional
display
editor
is required
for editor
input.
This function allows you to specify the lengths of the original image and the copy image
with the optional display.
Touch the Editor Input key. Scan the original image in the display editor and specify the
lengths of the original image and desired copy image by marking points with the Point
key,
CJFor details about display editor operation, see page 4-14.
5-1o
I
SPECIAL
SPECIAL
3
ml
Directional
(Size) Magnification
You can select independent
1.
AND ENLARGEMENT
REDUCTION AND
ENLARGEMENT
=t-t’
Diree nml
Size Msg.
2
REDUCTION
ratios for vertical
(Keys= l+2+3)
and horizontal
directions,
Y. Input
Touch the ?4 Input key and enter the reproduction ratio for both the vertical and horizontal
direction by using the Number (O-9) keys and the #key.
2. Size Magnification
The machine automatically calculates the reproduction ratio,
Touch the Size Input key and enter the vertical and horizontal lengths of original image
and copy image by using the Number (O-9) keys and the #key.
3. Editor Input
I The optional
display
editor
is required
for editor input.
This function allows you to specify the length of original image and copy image by using
the optional display editor.
Touch Editor Input key. Scan the original image in the display editor and specify the
lengths of the original image and desired copy image for both the vertical and horizontal
directions by marking points with the Point key.
Cl For details about display editor operation, see
page 4-14.
5-11
I
SPECIAL REDUCTION AND ENLARGEMENT
Poster
Making
(Keys =l+2+40npage5-11)
\
You can enlarge the complete
image onto several sheets.
Cl In this mode, the copies are delivered with margins around the copy image (about 15 mm or 0.6”). If you want
to paste the sheets to make a poster (one large sheet), make sure to cut the margins out
I!!!!!l
R
s
1.
YOInput
+
NH
15mm
(06)
15mm
(0.6”)
If you enter the desired enlargement
necessary number of copy pages.
Touch the YO Input
Number
direction
ratio,
the machine
key and enter the enlargement
automatically
ratio in the Equal
calculates
YO
area
with
the
the
(O-9) keys and the # key. If the enlargement
ratio for the horizontal and vertical
differ, touch the H. (Horizontal) key or V. (Vertical) key and enter the the
enlargement
ratio for each direction.
2. Page Input
If you enter the desired number of pages, the machine
suitable enlargement ratio for copying.
automatically
calculates
the
Touch the Page Input key and enter the desired number of pages for each direction in
the Equal Pages area with the Number
(O-9) and #key,
If the number
of pages for each
direction
differs, touch H. (Horizontal) key or V. (Vertical) key and enter the number of
pages for each direction.
Cl If you input number of pages that will enlarge the original image more than 400Y0, blank sheets will be fed
out.
5-12
IMAGE SHIFTING
IMAGE SHIFTING
I~
Shift
——I—
Erase-,—SwiAhpiml
I
3
Centering/cornering
(KeYs=l+2)
#
+
Is
J
You can shift the image around or to the center.
larger than the original.
This is convenient when the copy paper is
CJ Original size smaller than A5 or 51/2” x 81/2” cannot be detected by this machine. In such case, use the
optional display editor and specify the area (Area Editing) to be centered. For details, see chapter 7.
CJ Use this function only when the original size is smaller than the copy paper size.
If the original size or the copy image size is larger than the copy paper size, the copied position might incorrect
or the ofiginal image might be corrupt,
Margin
Adjustment
(Keys =l+3)
+
You can shift the image either left or right to make a binding
CJ Maximum margin width:
A4/A3 version: O -20 mm in 1 mm steps
LT/DLT version: O - 0.8” in 0.1” steps
●
●
5-13
margin.
ERASING
CENTER/BORDER
ERASIN G CENTER/BORDER
2
1
\
H+EJ[-I
Ebmlmml
q+~lmmiq
4
The following functions are useful when copying a book original.
Erase Center
(Keys.
1+2)
This function erases the center of the original image.
Cl Width of the center margin to be erased:
A4/A3 version: 3-50 mm in 1 mm steps
Lt/DLT version: 0.1”-2.0” in 0.1” steps
●
●
Erase Border
(Keys=
1+3)
This function erases all four sides of the original image.
c1 Width of the border margin to be erased:
A4/A3 version: 3-50 fim in 1 mm steps
LT/DLT version: 0.1”- 2.0” in 0.1” steps
●
●
Erase Center
And Border
(KeYs.1+4)
This function erases all four sides and the center of the o igiral
~ Width of the center and border margin to be erased:
A4/A3 version: 3-50 mm in 1 mm steps
LT/DLT version: 0.1”-2.0” in 0.1” steps
●
●
5-14
image.
SERIES COPYING
SERIES COPYING
1
11-
Shift —,—
Erase —,—Swi=Ccmiesl
I
Book + 1 Sided (Keys=l+2)
(From book original to two 1-sided copies)
h
Izmllj
=1
h =1
L
I
(3%’ I
‘
I
[B!
“’
a
J
This function makes 1-sided
w
copies from two facing pages of bound (book) originals.
Cl The center of an original is determined according to the selected copy paper and reproduction
sure to select copy paper and reproduction ratio suitable to the original.
5-15
ratio.
Make
2 Sided + 1 Sided (Keys =l+30npage5-15)
(From 2-sided original to two l-sided
[ This function
is available
only when your rna@ine
is equipped
with the dual job feeder.
A
k—
I
I
I
II
I
I
ml
I FR I
copy)
I I
I
This function makes 1-sided copies from ~-sided originals.
Combine
Two Original~
(Ke~s=l+40n~age5-15)
I
I This function
k available
only when your rnat@ine is equipped
=.
—.
==
——
—.
EE2
.
+
t—
1
This function automatically
I
I —1
with the dual job feeder.
—1
—,
—1
—,
B
—1
ZI
—
—1
=1
I
I
~
combines two ~1-sided originals on one copy.
5-16
I
COLOR
CREATION
1
SE Iect
tmde(s).
2
Color
color
conversion
sample:
4
3
(Keys.1+2)
c@=
page 2-7
This function converts a selected color of an original into a different color on the copy.
Up to 4 colors can be converted at one time.
Cl Colors that can be converted:
Yellow, Red, Magenta, Blue, Cyan, Green, White, and Black
Closely related colors will be also converted. For example, light green may be converted when you convert
green.
CJ Colors that can be used after conversion:
Yellow, Orange, Red, Magenta, Blue, Cyan, Green, Light-green,
(Only one scan color can be selected at one time.)
White, Black, Scan Color, and User Colors.
IJ User Tool Setting (= page 8-4):
The function can be made more or less sensitive to the color to convert. It can be adjusted within 5 levels
(“Narrow” to “Wide”).
For example, suppose red is converted to a scan color, selecting “Narrow” will result in only red being
converted, and selecting “Wide” will result in other colors close to red being converted.
5-17
Color Erase VQ,,.l+,onpage,-l,,
Color Sample:
= page 2-7
This function erases a selected color from the original image. Up to 4 colors can be erased.
D Colors that can be erased:
Yellow Red, Magenta, Blue, Cyan, Green, Black, and Scan Color.
O User Tool Setting (W page 8-4):
The function can be made more or less sensitive to the color to erase. It can be adjusted within 5 levels
(“Narrow” to “Wide”).
For example, suppose red is erased, selecting “Narrow” will result in only red being erased, and selecting
“Wide” will result in other colors close to red being erased.
Color Background
Color Sample:
w,.= l+...,,,,I,J,J
U=page 2-7
This function makes copies with a selected color background.
line originals.
CJ Colors that can be selected for background:
Yellow, Orange, Red, Magenta, Blue, Cyan, Green, Light-green,
CJ In this mode, color tone of photo/picture
This mode is suitable for letter,
Black, Scan Color, User Colors.
originals is changed due to the color on the background.
Cl User Tool Setting (= page 8-4):
The color background density can be adjusted lighter or darker over 5 levels.
5-18
IMAGE CREATION
IMAGE CREATION
1
Se M
mode(s) .
lEME!nlBn~M’
Outline
~:g’~
F@mt
. ShadowMirrorSIarlkd
I
I
I
I
2
O@line
4
3
Image
5
7
(Ke~s=l+2)
1,
I
LOVE
1’
6
+
I
Low
J
1
This function copies only the outline of the image.
Cl The outline thickness can be selected:
A4/A3 version: 0.25/0.5/0.75 mm
. LT/DLT version: 0.01 “/0.02’’/0, O3’
●
CJ In the Photo mode, the Outline Image mode might not function well. In such case, select Letter mode or Auto
(Letter/Photo) mode.
Positive/Negative
Image
(Ke~s=l+3)
.
I%is function copies the original image in complementary colors. If you use a black and white
original, black and white areas of the original are reversed.
-
5-19
Shadow
Image
(Keys = l+40n
Page5-19)
.:.:.:.:.:.:.:.:.:.:
.... .....
LOVE+ lbOVIE
lbo~’1~
Block Shadow
Offset Shadow
This function adds a shadow around the edges of copy image elements.
~ You can select offset shadow or block shadow.
H The width of shadow can be adjusted:
“ A4/A3 version: 1/2/3/4mm
LT/DLT version: 0.04’’/0.08’’/0. 12“/0. 16’
●
~ Note:
Sameas Full
llri~inal
Color mode will lx automatically
selected.
You cannot change the color mode.
Full Color mode will be automatically
selected.
You can change the color mode as follows:
Color for the Shadow:
Touch the Change key.
Acceptable
Yellow, Oran e, Red, Magenta, Blue Cyan,
Green, Light- % reen, User Colos 1-3,
Scan Color
Full Color ~Same color mode as the
color selected for the shadow.
II Full Color-Black
II Black
Mirror hage
(Keys = 1+5 on page 5-19)
*
LOVE
1
I
__L
Color Mode
rOAE
L....
–
‘
J
This function makes a mirror image copy of the original.
5-20
IMAGE CREATION
Slanted Image
(Keys.
l+60npage5-19)
This function slants the copy image at a selected angle (from -45°-
+ 45°)
,1
/-,
~ The slant direction is decided
as shown in the illustration.
.“
A
.
,“
I
I
‘+
“’
K
.’
><,
.,
.’
.-
.
\—
-.
‘..
. .
. .
L
Image Repeat
(Keys = I +70n
.
..1
Page 5-19)
Part of the original image is copied repeatedly.
1. Size Input
This function allows you to reproduce the top band of an original repeatedly down the
entire copy. You specify the width of the band and it is repeated as many times as will fit
on the copy.
Touch the Size Input key, and enter the width of the band with the Number (O-9) keys,
and touch the #key.
5-21
2. Number of Images
..
O&P
$.,
:..
:/
c)
Q&
@& ——
—————
—___
@@y
——----————
@@y
D
This function also allows you to reproduce the top band of an original repeatedly down
the entire copy, but here you specify the number of image repetitions you want (2 - 9)
and the copier will determine the width of the top band.
Touch the No. of Images key, enter the number of image repetitions with the Number
(O-9) keys, and touch the #key.
3. Editor Input
I The optional
display
editor
is required
for editor
input
method.
c)
(3
J
This function allows you to select an area of the original and reproduce it repeatedly down
the copy. The repetitions are made one below the other, and are all aligned to the right,
Touch the Editor Input key. Scan the original image in the display editor and specify the
area to repeat.
~ For details about display operation, see page 4-14.
5-22
I
6
Chapter
“ADJUSTMENT AND
COLOR MEMORY”
Table of Contents
IMAGE ADJUSTMENT
●
■
✎
✎
✎
✎
✎
✎
.
✎
●
✎
. . . . . . . . . . . . . .
✎
✎
✎
Sharp/Soft
Contrast
. . . . . . . . . . .
. . . . . . . . . . . . .
Background
Pastel
Density
COLOR BALANCE
Sampling
Color
. . . . . .
Control
ADJUSTMENT
The Color Balance
Balance
Color Balance
Adjustment
Memory
Mixing
In A Color
Colors
. .
. . . . .
USER COLOR MEMORY
Scanning
a
. . .
SINGLE COLOR ADJUSTMENT
. . . . . . .
. . . . .
●
m
. . . . . .
. . . . . .
.
■
✎
✎
.
.
.
✌
.
✎
●
.
✎
✎
.
●
✎
.
.
✎
.
.
✎
.
●
m
m
.
.
.
.
.
.
.
. . . .
wn,
m
✎
.
●
●
.
. . . . . .
.
. #
m...
ri
.
. . . . . .
Manually
■
m
☛
●
✘
●
6-2
.m.
. . . .
6-2
. . . .
6-2
. .
●
. .
●
●
✎
.
m,
6-2
6-3
. . . . .
.
✎
✎
✎
✎
.
. . . . .
.
✎
✎
●
✎
.
.
✎
✎
✎
✎
. . . . . 6-4
. . . . .
. . . . 6-3
. . . .
m
m
●
✃
●
●
●
●
.
.
.
✎
■
✎
✎
. . . .
.
.
●
✎
✎
✎
✎
✎
✌
✎
✎
✎
✎
.
.
✎
✎
✎
✎
✎
✎
✎
✎
■
✎
●
6-1
. 6-2
amm
6-4
6-5
6-6
. . . . . 6-6
. . . . . 6-7
IMAGE ADJUSTMENT
IMAGE ADJUSTMENT
o&
1
E
sharp/%ft -.-[-q
I
.
~
m
“m~m
4
I
Pastel[Wl
You can change the default settings for image adjustment.
level and then touch the Exit key.
,,, ,,, ,,7
Eiizl
Touch the keys to change the
Sharp/Soft
There are 5 levels for adjusting the edges of the image to make the image sharper or softer.
0 The default setting is level 3.
Contrast
There are 9 levels for adjusting the contrast between light parts and dark parts of the image
~ The default setting is level 5.
Background
Density
Control
There are 9 steps to adjust the background
density control.
Cl If copying a newspaper, or an original with a dark background, touch the Light key and adjust the background
density to a lighter setting.
Cl If part of the original is marked with a highlighting
to a darker setting.
pen, touch the Dark key and adjust the background
Cl The default setting is level 5.
Pastel
There are 9 levels to make copies in pastel tones.
~ The default setting is level 9 which yields a normal color copy.
6-2
density
COLOR
COLOR
BALANCE
BALANCE
ADJUSTMENT
ADJUSTMENT
You can adjust the overall color tone of copies. You can change the tone of copies by
adjusting cyan, magenta, yellow (the three basic colors) and black over 9 levels.
Cl When you adjust one of the three basic colors, the two neighboring colors in the color circle are also changed.
For example,
magenta-blue.
when cyan
is lighter,
green
is changed
to Yellow-green,
and blue is also changed
to
Cl Make sure to touch the Exit kev when vou have finished adiustina
the color
balance.
,–– ~.–
—---- ——.
—-----
I
Sampling
The Color Balance
..,xBalance
Color
Balance
CdOrBalance
~,u,,www
,l,a:l~lEll
IBlackaA
D
(Key =1)
123
+ Standard
w’
v’
m
+Yellow(+4)
- .,.
+ Magenta (+4)
F’”’
‘Vq
mw
m
+ Cyan (+4)
+ Black (+4)
+ Standard
,
(Current Balance Status)
“
m
-
(Current Balance Status)
+ Yellow (4)
+ Magenta (4)
+ Cyan (-4)
+ Black (4)
Adjusting the color balance by trial and error could require many copies. The color balance
sampling mode allows you to produce 9 samples on 2 copies. The first sample of each sheet
uses the current color balance. Each sample after that changes one toner color by a fixed
number of steps.
O Standard
= Current
Color Balance Status
IJ Selecting Color Balance Sample does not reset the adjustments, aHowing you to make many samples while
progressively changing the balance. The sample might yield a color balance outside the copier’s range which
will be reproduced on the sample but not on the copy.
For example, if yellow is already adjusted to +3 and you select Sample +-4, the yellow samples will be copied
at yellow +7 and -1, but the adjustment for the final copy cannot be set to +7.
6-3
COLOR
BALANCE
ADJUSTMENT
~ The samplewill be copiedon two A4~
are loaded in this machine.
~ After making samples, A4
sizes of paper, select the
or 81/2” x 11” ~sheets.
or 81 /2” x 11” D is automatically
Make sure that A4 ~ or 81 /2” x 11” ~ sheets
selected. If you want to make copies with other
R per size manually or touch the K uto Paper Select key.
O If your machine is equipped with the optional display editor, you can select the sample area (within certain
restrictions). To select the area, mark a point with the Point key. For details about display editor operation,
see page 4-14.
If you do not have the display editor, the area shown below will be selected.
Area Position
Sampled area
r
180mm
(7.08”)
Marked point
58mm
(2.28”)
I
Sampled
area
...
.,
J
After sampling, select a sample number key and press the Exit key.
II
Ill
SeIect sampIe number key.
STD
1
S10
1
HE
~-l
@
ml
@
M-1
o
c+ I
@
c-1
SK+ t
Color Balance
Adjustment
BK-
@
1
(Ke~=20n~a~e6-3)
You can change the color balance manually.
~lllll,llllql
Decrease
key
Ill
Increase
key
.
Color Balance
Memory
(Key=
The color balance setting vill be canceled
when you press the Clear Modes/Stand by
key or turn off the main switch. You can store
the color balance setting into memory and
recall it whenever you want to use it.
Ilagwda~Tj
~m
Cyan [~J
lJ-J-m
Black [~[
,,,, ?,,,,
.. ... .. . .. ...
I
1on page 6-3)
u
Yellowa&D
Illagcntao
L
D
CyanaLo
L,
Blacka
... .
6-4
IT]
Select memory
numberkey.
(X
Ill
IEEIEEI
batance
isstored
W Adjusted
SINGLE COLOR ADJUSTMENT
SINGLE
COLOR
ADJUSTMENT
For each of the colors in the circle, you can mix in one of the two adjacent colors.
affect only image areas having the selected colors.
IJ Up to 3 colors can be adjusted.
IJ Make sure to touch the Exit key after you finish the single color adjustment.
IJ The single color adjustment
is available only when Full Color mode
/saft
strap
~
~
m Auto Color mode is selected
Em
m
f?dwd
-J..-EEl
m
myCdTol
Contrast llGiil
.&
Pastelm,..,... fl
m
1~
.......
G“.:R’.
Im ●.::.*
m
I
“c.
”’M’
md
For example, YeHow can be adjusted
either to orange (red-yellow) or yellow-green.
. . . . . . . . ....... . . . . . . . .
“. C .“” ““. M
6-5
:
This will
USER
COLOR
MEMORY
addition to the standard single colors, you can store up to 3 colors into memory
Color). The color can be scanned in from an original or mixed manually by the user.
In
(User
User colors 1, 2, and 3 can be selected for the following modes:
c1 Single Color Copying
~ Color Conversion
c1 Color Background
iJ Paint Image
m d
CW14~ Exit
K5dA-Mmr
%lp/ %ft
SingleColor
Adi~CdorBaianceErnwA@trnw
GdwMI
mJA
Contrast m
&“
-J---m
Yellow100%
Magental00 %
~m
9 y%%trolm
W
Pastelm..,,,,,.y
Cyan
m
o%
Eizlm
EEl
‘ ~‘:Adjusted
balance
is stored.
Touch the key to which
you want to store the color.
I
~11
Select color
color.
Ill
Scanning
This mode
requires
closest
to desired
——
User 3 I
It
I
Ill
[n A Color
the optional
display
editor.
I
To scan in a color from the original, touch the Scan Color key.
Scan the original image in the display editor and mark the point to scan in. After the color is
scanned in, adjust the basic color ratio with the + or - key,
~ For details about display editor operation,
see page 4-14.
6-6
Mixing Colors
Manually
To mix colors manually, touch the key for the color closest to the desired color.
if you touch the Red key,
Yellow 100% and Magenta 100% will
be selected automatically.
By touching the+ or- key, adjust the color ratio
to make the desired color,
For example,
D
II
II
Colorbalanceof selectedcolor is shown below.
Adjustbalancewith IZI El keys.
If you want to check the user color, make
a single color copy. (u= page 5-3)
Yellow
100% J -
II
Magenta 100% I – 11
*
Cyan
6-7
o%/-
II
+ I
+ I
+ I
CHAPTER
“AREA
7
EDITING”
Table of Contents
WHAT IS AREA EDITING
Creative
Color
BASIC
Editing
Editing
Color
Editing
✎
✎
✎
✎
. . . . . . . . . . . . . .
✎
✎
✎
✎
✎
✎
✎
OF AREA
EDITING
.
. . . ...
✎
✎
An Area
. . . . . .
●
CHECKING
JOB
SEITINGS
CHANGING
JOB SETTINGS
✎
mmm
. . . . . . . . . . . .
FOR OUTSIDE AREAS
✎✎✎✌
mm.
m
●
m
m
.
✎
.
.
.
✎
#
●
Delete Area
7-11
.m.
●
9
7-13
9*
.
.
.
.
.
.
✎
.
.
.
.
.
.
.
.
.
.
.
.
.
✎
.
.
.
.
.
m
●
●
s
●
■
■
.
.
.
●
●
●
●
●
.
. . . . . , .
FOR THE ENTIRE IMAGE
FOR AREA EDITING
.
.
. . . . . . . .
Paint Area . . . . . . . . . . . . . . . . . . . . . . . . .
Save Area
.
7-10
. .
.
. . . . . . . . . . . . .
7-2
. . . . . . . . 7-6
mmmw.
●
.
. . . . . . . . 7-3
. . . . . . . . . . . . . . . .
. . . . . . . . . . . . . .
ONLY
✎
✎
FOR INSIDE THE AREA
Editing
✎
✎
JOB SEITINGS
FUNCTIONS
●
m
✎
How To Designate
Creative
m..
✎
AREAS
JOB SEITINGS
●
. . . . . . . . . . . .
OPERATION
DESIGNATING
. . . ,
7-15
7-17
7-18
7-19
7-20
.
7-20
. . . .
7-20
. . . . . . . . . . . . . . . . . . . . . . . . . . . . .
7-20
. . . . . . . . . . . . . . . . . . . . . . . . .
7-1
●
.
...
7-13
WHAT IS AREA EDITING
WHAT
I Note: The optional
display
editor
is required
IS AREA
EDITING
for area editing.
I
If your machine is equipped with the optional display editor, you can designate areas on the
original and edit the areas independently from other areas.
Example
(Creative
LOVE
:
‘LOVE”:
v
-v
Area 3: Outline Image
and select Save Area
in*
.\ . ... . .
Scan
Designate
Original
Area 1: Positive/Negative
Area 2: Mirror Image
areas
Specify
modes
for
copy
each area.
Example
(Color Editing):
al
+
*
+
Group 1: Color Background
Group
Group
2: Color
3: Color
Background
Background
#
‘a
1
E
Original
Scan
a.-
Designate
areas
Specify modes for
each group of areas.
and group them,
7-2
copy
4&&b u&5
WHAT IS AREA EDITING
Creative
Editing
up to 6 areas can be designated.
1
,>
;l[A
1,
D
In Creative Editing mode, you can select up to three job patterns for at most six areas.
After you have set three patterns, the copier will only allow you to choose the pattern
of a previous area.
If you change the settings for one area, it will change the settings for all other areas
with the same job pattern.
D
Image Adjustment (Sharp/Soft, Contrast, Background Density, Pastel Image) can be
applied for the outside area only when you select the adjustment levels, as explained
in Chapter 6, before you start the area editing operation (explained in this chapter).
,“’2’”,,
~.-—-,
~3 ~––,
,,;,
;4(
~–––, ; (
,’ 5 “,’--:/--;
/“ 6 ;
/:
_____,
Cells marked O indicate modes that can be selected for inside the areas or outside all the
areas.
Cl For details
— .- about designating
page 7-10.
the shape method (Rectangle/Right
Angle Polygon/Polygon/Closed
Loop) see
InsideArea
Outside Area
Rectangle
Ri htAngle
8olygon
Polygon
Closed Loop
Full Color Copy
o
c)
3
3
3
Black Copy
o
3
c)
c1
c1
Single Color Copy
o
3
3
D
3
Auto Image Density
*1 o
*13
*1o
*1o
*13
Manual Image Density
o
0
0
3
0
Auto Letter/Photo
x
x
x
x
3
Photo mode
o
3
c1
3
0
Letter mode
o
c1
c)
3
3
Color Balance Adjustment
??0
23
?3
I
Color/Image
Adjustment
Single Color Adjustment
I
%?3
1
I
93
1
%!3
I
93
3
3
x
3
o
3
3
x
3
Shadow Image
o
3
3
x
3
Mirror Image
o
x
x
x
x
Slanted Image
o
x
x
x
93
Image Repeat
o
x
x
x
33
Color Conversion
o
0
c)
x
3
Color Erase
o
c)
3
x
3
Color Background
o
3
3
3
3
Paint Area
o
0
0
0
Positive/Negative
Color Creation
%?0
20
o
Outline Image
Image
Creation
II
23
Image
I
1
Delete Area (Delete inside of an area)
o
3
3
x
Save Area
o
3
3
x
(Delete outside all areas)
*1: Available only when Single Color Copy mode or Black Copy mode is selected.
*2: Available only when Full Color Copy mode is selected.
*3: Available only when one area is designated.
7-3
I
0
.X.:.:.:.:.:.:.:.:.:.
.
....................w.w.:.:.:.:.:.:.:.:
..........................------:.:.:.:.:
.
.
.
.
.
.
.......
.:+.:.:t.:+~-x
::::::::::::::::::::::::
........................................................
::::::::::::::::::::::::::::::::::::::::::::::::::::::::
.
.
.
.
.
.
.
.
.
.
..
.
.
.
.
.
.
.
.
.
.
.
.
.
.
.
.
.
.
.
.
.
.
.
.
.
.
.
.
.
.
.
.
.
.
.
.
..
..
..
..
..
..
.
.
.
.
.
.
.
.
..
..
..
..
.
..
..
..
..
..
..
..
..
..
..
..
..
..
..
..
..
..
..
..
..
..
..
..
..
..
..
..
..
..
..
..
..
..
..
..
..
.
.
..
..
..
..
..
..
.
.
..
.
..
.
..
.
..
.
..
..
..
..
..
..
..
..
..
..
..
..
..
..
..
..
..
..
..
..
..
..
..
..
..
..
..
..
..
..
..
..
..
..
..
..
..
..
..
..
..
..
..
..
.
..
..
..
..
..
..
..
WHAT IS AREA EDITING
The following modes can be selected
Editing mode:
~ Manual Paper Select
IJ Auto Paper Select
IJ Sorting/Stacking
for the entire original
(When the optional sorter is equipped
image when in Creative
Cl By-pass Feed Select
on your machine.)
IJ Auto Reduce/Enlarge
Cl Full Size
0 Fixed Reduction/Enlargement
Cl Zoom
~ Size Magnification
CI Directional
Size Magnification
Cl Poster Mode:
Not available when more than one area is designated.
Available only when the area is designated in the Rectangle method and Save Area is selected.
Cl Centering/Cornering
Not available when more than one area is designated.
Available only when the area is designated by the Rectangle method and Save Area is selected.
Cl Margin Adjustment
Cl Auto Start
Cl User Program
Cl Projector (When the optional projector unit is equipped
~ Memory Call
7-4
on your machine.
WHAT IS AREA EDITING
Cells marked O indicate
mode.
modes that can be selected
—
2
1
3
4
6
7
0
0
0
x
x 0
0
0
0
0
0
0
x
x 0
0
0
0
0
0
o
0
x
o
0
0
3. Single Color
copy
o
4. Auto Image
Density
o
0
0
0
6. Letter Mode
0
0
0
0
7. Photo Mode
0
0
0
0
8. Single Color
Adjustment
0
x
x
x
9. Color Balance
Adjustment
D
x
x
x
10. Outline Image
3
0
0
11 .Positive
Neaative
3
0
12. Shadow Image
0
13. Mirror Image
14. Slanted Image
0
10 11 12 13 14 15 16 17 18 19
0
0
5. Manual Image
Density
9
0
0
x
8
0
0
2. Black Copy
when in Creative
Editing
—
5
0
1. Full Color Copy
together
0
0
x
0
0
x
0
22
23
24
25
26
0
0
0
0
0
0
0
x o
0
0
0
0
0
0
0
0
0
0
0
0
0
x o
0
0
0
0
0
0
0
0
x o
21
x o
7(
0
0
0
0
0
0
o
0
0
0
0
0
0
0
0
0
0
0
0
0
0
0
0
0
0
0
0
0
0
0
0
0
0
0
0
0
0
0
0
0
0
0
z
0
0
0
0
0
0
0
0
0
0
0
0
0
0
0
0
0
x o
0
0
0
0
x o
0
0
0
0
0
0
0
0
0
0
0
0
0
0
0
0
x o
0
0
0
x 0
0
0
0
x 0
0
o
0
0
20
~
..%..
........%%.
.... x o 0
:::::::::::
:.:.:.:.:.:
.:.:.:.:.:.
—
x
x
x
x
x
0
x
0
0
0
o
0
0
0
0
0
0
o
0
0
o
o
0
0
0
x o
0
0
0
0
0
0
0
0
0
0
0
0
0
0
x o
0
0
0
3
0
0
0
0
0
0
0
o
0
0
0
x o
0
0
0
3
0
0
0
0
0
0
0
0
0
0
0
x o
0
0
0
x
x
0
x
x
x
0
0
0
0
x 0
0
I
15. Image Repeat
3
16. Color
Conversion
3
17. Color Erase
3
18. Color
Background
o
x
19. Paint Area
o
x
20, Fixed Reduce
and Enlarge
o
21. Zoom
0
0
x
0
0
0
0
0
0
0
0
0
0
0
0
0
o
x
0
0
x
0
x o
0
0
0
0
x
o
0
x
0
x o
0
0
0
x
o
0
x
0
x o
0
0
0
x
o
0
x
0
x
o
0
x
o
0
0
0
0
o
x
0
x
0
x
0
x
o
0
0
0
0
0
0
0
0
0
0
0
22. Size
Magnification
0
0
0
0
0
0
0
0
0
0
0
0
0
23. Directional Size
Magnification
0
0
0
0
0
0
0
0
0
0
0
0
0
24. Poster Mode
0
0
0
0
0
0
0
0
25, Centering
Cornering
0
0
0
0
0
0
0
0
26. Margin
Adjustment
0
x o
o
0
x o
0
0
0
0
x 0
0
x o
0
0
0
x 0
0
o
0
0
0
x 0
0
x
x 0
0
0
0
x
x
0
x
I
I
--u-000
0
0
0
I
0
0
x
x
x o
-JJ-
x o
000
x
Xoooooo
xxx
I
0
0
0
0
0
0
0
0
0
0
0
0
7-5
I
I
I
I
x
Xoooooooo
[
0
0
0
0
o
x o
x
I
x
I
I
I
I
x
WHAT IS AREA EDITING
Color Editing
Up to 6 groups of multiple areas can be edited. All the areas should belong to groups 1 to 6.
,__\
1—,
( 5 ‘,
/-,
L————
/’61
~., /––1
...
‘.
[2
!
!
I
c1 Image Adjustment
(Sharp/Soft, Contrast, Background Density, Pastel Image) can be
applied for the outside area only when you select the adjustment levels, as explained in
Chapter 6, before you start the area editing operation (explained in this chapter),
J
------,-
IJ In Color Editing mode, you can select up to three job patterns for at most six groups.
After you have set three patterns, the copier will only allow you to choose the pattern of
a previous group,
If you change the settings for one group, it will change the settings for all other groups
with the same job pattern.
However, if you used a paint setting, changing the color in one group will not affect other
groups. (Up to 6 paint colors can be selected.)
..6.
Total number of areas which can be designated:
Rectangle method:
at most
Right Angle Polygon method: at most
s Polygon method:
at most
Closed Loop method:
at most
●
●
●
Cl For details about designating
0 Areas grouped
together
250 areas
50 areas
50 areas
500 areas
method (Rectangle/Right
Angle Polygon/Polygon/Closed
must be made in compatible
Loop), see page 7-10.
modes.
Cells marked O indicate modes that can be selected for each group of areas and outside all
the designated areas,
Inside Area
Color/Image
Adjustment
Outside Area
Rectangle
Ri ht Angle
8 olygon
Polygon
Closed Loop
Full Color Copy
o
3
3
0
3
Black Copy
3
D
3
3
3
Single Color Copy
o
0
3
3
3
Auto Image Density
*1 o
*13
*1 o
*13
*13
Manual Image Density
a
3
D
3
0
Auto Letter/Photo
x
x
x
x
3
Photo mode
o
3
3
3
3
Letter mode
o
3
3
3
3
Color Balance Adjustment
%?0
Xl
Tc)
%0
93
Single ColorAdjustment
99
%23
93
%23
%23
Color Background
o
3
3
(3
3
Paint Area
o
3
3
3
o
3
3
x
0
3
3
x
Color Creation
Delete Area (Delete inside of an area)
Save Area
(Delete outside of all areas)
*1:Availableonlywhen Single Color Copy mode or Black Copy mode is selected
*2: Available only when Full Color Copy mode is selected.
7-6
3
... ..............................................
.........................................................
...
..............................................
:;:~::::::::::::::::::::::::::::::::::::::::j:
.........................................................
::::::::::::::::::::::::::::::::::::::::::::::::::::::
.:.:.:.:.:.:.:.:.:.:.:.:.:.:.:.:.:.:.:.:.
:.:.:.:+:+:
.....................
.........
......
.:::::::::::::::::
j;::::j:~.:::
........................................................
........................................................
.:.:::.;
.W..Y..;..;
.;.:.;
.:.:.:.:.
*X
WHAT IS AREA EDITING
The following modes can be selected
Editing mode:
m Auto Paper Select
c1 Sorting/Stacking
for the entire original
Cl Manual Paper Select
(When the optional sorter is equipped
image when in Color
Cl By-pass Feed Select
on your machine.)
c1 Auto Reduce/Enlarge
IJ Full Size
Cl Fixed Reduction/Enlargement
c1 Zoom
Cl Size Magnification
Cl Directional
Size Magnification
c1 Centering/Cornering
Not available when more than one area is designated.
Available only when the area is designated in the Rectangle method and Save Area is selected.
c1 Margin Adjustment
c1 Projector
~ Auto Start
(When the optional projector unit is equipped
7-7
on your machine.)
WHAT IS AREA EDITING
Cells marked
1. Full Color Copy
2. Black Copy
O indicate
12
34
........
=
,:ff<~~x
xx
...........
m.:.:!:::
.
..<.%...:$
:::fi::
:.:.:.:
W+XW+
x yj..:$..~
................. Xo
*
.::::::::::.::&:
3. Single Color
copy
4, Auto Image
Density
5. ;~;;;
Image
xx
:
Xo
+00
6. Letter Mode
010
7. Photo Mode
8. Single Color
Adjustment
I7,Centering
Cornerina
18. Margin
Adjustment
00
..:-<
-4
.-$$<::*..
.X.&w
12
13
14
15
16
17
18
00
0
0
0
0
0
0
0
0
0
0
0
-t-ox
x
x
x
0
0
0
0
0
0
0
0
0
ox
x
o
0
0
0
0
0
0
0
0
0
0
-1-ox
x
x
x
0
0
0
0
0
0
0
-1-00
0
0
0
0
0
0
O1o1o
o
0
0
0
0
0
o
0
0
0
0
0
o
o
:~::::.
...............
...........
:.:.:.:.:.%:.:.
~..~.;
0
0
0
0
0
0
0
0
0
0
0
0
0
0
o
0
0
0
::::::::::::::::
+:+:+:+:
:.:.:.:.:.:.:.:.
0
o
~........
-
0
0
0
0
0
0
0
x
o
0
o
0
o
m
#k.x.:*.j
:::::::::::.:.:.:
. . . . . ... .
:$:-24<+...
&
+ox
xx
-1-
0
0
0
0
ox
t
Xx
-4-
00
00
00
+
*
~
.:+:..
::::::::::::::::.
.-*>..
:+:+:.
3
-1--
o
ox
16. Poster Mode
0
. .. . .. . ..
. . .. . . . .
-1-
11
+00
11.Paint Area
15.Directional Size
Magnification
V...
Xo
o
0
0
0
00
0
0
00
0
0
00
0
0
0
0
o
x
.:.:.:.x::.
:+
My.
:>:: ~
x
. . . .. . . . . . . . . . . . .
00
-4-ox
o
x
00
0
o
00
-1-
0
0
0
00
0
0
0
x
0
0
0
x
x
x
0
x
x
x
x
x
x
0
0
0
0
0
3
x
0
0
0
0
0
0
Olxlo
---1-
-1--00
-1-010
--+00
-100
-100
0
0
0
0
00
4
00
-1-00
00
--t00
0
0
+00
00
Editing
10
00
ox
I4. Size
Magnification
5
o
<.:+:+
....
when in Color
9
6
0
IO.Color
Background
13. Zoom
fi$$&
:*.
.....
:.”+:+::::+
together
78
5
00
9. Color Balance
Adjustment
12, Fixed Reduce
and Enlarge
modes that can be selected
7-8
0
0
0
0
x
x
x
x
:.:+:.:.:.:.:
+:+:+:+
:.:.:.:.:.:.:.:
;::::::::::y:
x
+x+x.:
~
x
o
0
x
o
0
x
o
0
0
x
0
~
+:+:+:+
~:::~
+:+:.:+3
%....%%%%
,
:::::::::::::::
......... ......
~
BASIC OPERATION
BASIC
OPERATION
OF AREA
1. Press the Area Edit key.
EDITING
o
MI
2. Touch the Creative
Editing key or the
Color Editing key.
(L= pages 7-3 and 7-6)
3.
OF AREA EDITING
E!wZEii
iizmasl
mm
Place the original on the exposure
glass and touch the Scan key on the
touch panel display or press the Scan
key of the display editor.
The original image will appear on the
display.
Place original
on
platen/31%s then
press EEEl key.
4
4. Touch the desired
shape key for the
designated area and designate the
areas with the display editor.
(I= page 7-1 O)
,,,
,,,:.
EEl
&
,,.,.
..
<,.,.,,,
:=08
Cancel
1~
-
? AreaEdit>
II
Exit [1
II
SeIect mode(s).
1’
5. Select modes for inside the areas or
‘1
Cancel
groups. (= page 7-13)
SeIectmode(s).
Full Color
m+~
Delete
lkea
_n]
-
6. Select modes for outside the areas or
groups. (= page 7-17)
m
m
“IS-;A%
SeIect mode(s) to
m
edit outsidearea.
Or press 1=1
to finish editing.
FullColor
.
Others:
D Check job settings (I= page 7-18)
E@EQl
IJ Change default settings (E= page 7-19)
Paper Selection
Sorting/Stacking
Enlargement/Reduction
Image Shifting
●
●
●
●
7-9
I@@El
EGEl
S-;h:a
n
DESIGNATING
AREAS
DESIGNATING
The designated
AREAS
area can be one of four shapes:
0k?
m
Po
—
1. Rectangle:
A rectangle of designated
T
4
3
2
1
IHowdLoop
size.
r.........
4
41
.....*.
*
?
————
!*-----; ~-1
I
I
Marked Points
I
I
L————
2. Right Angle Polygon:
II
II
, L–––––
I
A
*
II
II
II
{-*
A polygon that has up to 10 right angles.
0“---”---”-----”--0
PQ
~
Marked Points
0---4)
3. Polygon:
A polygon that has up to 10 angles.
v–-q
.~.....................
..V.
~ LOVE-:
V
Marked Points
v -----------------------v
4.
Closed Loop:
~,
w
$
*-V
~--~~
+---
~
+V
‘,,
---v
An enclosed area which can be selected by designating
a point
within the area. The thickness of the outline should be more than
0.5 mm or 0.02 inch.
7-1o
DESIGNATING
Notes for designating
areas:
IJ Before selecting the shape for designating
the tables (- pages 7-3 and 7-6),
the area, check which functions
can be applied for each shape in
cl Do not designate an area which overlaps part of another area.
In Creative Editing mode, the job settings specified for the area designated
overlapped portion.
In Color Editing mode, the job settings might not function as specified.
c1 The more areas you designate,
c1
AREAS
last will be applied
for the
the more time copying will take.
If you designate an area in Right Angle Polygon mode, make sure to mark points that make right angles. If
you mark a point which does not match for making a right angle, the editor will automatically specify the point
to make it a right angle.
c1 If you mark a line and it overlaps another line you previously marked, the last point you marked will be canceled
automatically.
c1 Because the display editor scans at 100 dpi, the inner side of curved
c1 Under the following
The
The
. The
The
c The
●
●
●
outline
outline
outline
space
outline
condition,
the machine
might
outline
might
be jagged.
not detect a closed loop area completely.
is thinner than 0.5mm or 0.02 inch.
is not completely closed, it is too light to detect,
is not black.
between outlines is too small.
is jagged.
or the thickness
is uneven.
c1 To paint adjacent areas well, select them right to left, then top to bottom. If areas are not designated in that
order, white lines might appear between two adjacent areas. This is especially important for pie charts.
pi+
pi
)((White
O (Better result)
lines might appear)
~ For column charts, place the original so that the columns are oriented in the same way as paper moves.
~1+~
)((White
O (Better result)
lines might appear)
To Designate
Before
designating
editor.
(I= page
areas,
An Area
refer
to the
key functions
4-I 4)
\
r
c
+
+._
,.
*&
..
c
.
.?
‘i
/
\
Cursor
>Close
Point key
key
key
7-11
and
basic
operation
of the
display
DESIGNATING
AREAS
A. Rectangle
@-----------;
(
1
Move the cursor with the Cursor key
and mark 2 diagonally
opposite
corners (@,@)with the Point key.
I
,
I
I
I
,
I
I
I
I
I
I
#
1
I
.—_—
——— ———_—
b
L
B. Right Angle Polygon
@-@
1
1.
Move the cursor with the Cursor key
and mark all corners (@,@,@,@,@,@D)
one by one with the Point key. Make
sure that the corners are at right
angles.
@.@
I
+
@-_-------Q
b
2. Press the Close key. The area will be
enclosed.
+
●
+
m
C. Polygon
1.
Move the cursor with the Cursor key
and mark all corners (@,@,@,@,@)one
by one with the Point key.
2. Press the Close key. The area will be
enclosed.
D. Closed
Loop
Move the cursor with the Cursor key
and mark a point (Q within the
enclosed area.
7-12
JOB SETTINGS
JOB SETTINGS
FOR INSIDE THE AREA
FOR INSIDE THE AREA
Note:
n The available modes for area editing depend on the shape of the area. Refer to the tables on pages 7-3 and
7-6 and check if the desired modes can be selected.
c1 Check if the desired modes can be selected together.
Creative
Refer to the tables on pages 7-5 and 7-8,
Editing
Select modes for an area in the same way as for the entire image.
chapters 4, 5, and 6.
For more details, refer to
1. Select the desired modes for the area and enter data if needed.
w
page7-20
I
= page 7-20
Se I ect mode(s).
Full Color
.
o
w!
= page 5-17
page 5-18
I C=
K=
page
@El’
..............................
.....
Black
.
.........
...
;.
II “.:
$ ;?i!r
N!xi w page 5-3
.......
..
..I!!!&
...,.,.,.,.,.
.
.... *-’J
~. .
Photo
-“-
Select
“ page 5-4
& ,+~.
[:,.:,;,
m page 5-5
U=
,“-
, WI
-..,
v1
=
U=
.
mode(s).
aEH
page 6-5
page 7-20
lNH!!llzlEn’
i
v
U=
I
//////////,//
11
1
v
5-18
page 6-3
7-13
page 5-19
JOB SETTINGS
FOR INSIDE THE AREA
2. To finish
choosing modes for the
selected area, touch the Exit key.
3. To end your job settings for inside all
the designated
key.
areas, touch the No
mm
If you want to designate another area,
touch the Yes key,
~ After designating
panel display.
j
A:
the next area (Area 2), the following
If the desired mode settings for Area 2
are the same as for Area 1, touch the
Area 1 key.
message will appear on the touch
Use same tn~des as previous
an area or press IT7
~ Select
\/
If the desired mode settings are not the
same as for Area 1, press the No key.
~
EzEIl
I
In Creative Editing mode, you can select
up to three job patterns for at most six
areas. After you have set three patterns,
the copier will only allow you to choose the
pattern of a previous area.
If you change the settings for one area, it
will change the settings for all other areas
with the same pattern.
7-14
.
I
m
t—
area?
No
I
II
M
JOB SETTINGS
FOR INSIDE THE AREA
Color Editing
Select modes foragroup
ofareas inthesame
details, refer to chapter 4, 5, and 6.
wayasfor
the entire image.
For more
1. Select the desired modes for the group and enter data if needed.
B I ack
Mol&gyl:ty
I
4
U=
.... .
::..:<.
=i =‘age’-’
page
fir; :i:
(’, !,?
~..;::::
EiEEELl =
.,.. ,,,. , ..............
.
page 7-20
,,,,,,
~
~.
U=
page 7-20
12!El I“ack=
,,.
page 7-20
I
U= page 5-18
,,, ,,,,., .......
@
Photo
[J::i:~
5-4
= page 5-5
Single
tolo- Adj. lColor B\lance Adj.
4n
mm
1
1~
=
page 8-5
U=
page 6-3
2. To finish selecting
modes for the
selected group of areas, touch the Exit
key.
3. To end your job settings for inside all
groups, touch the No key.
Add new group?
mm
If you want to designate another group
of areas, touch the Yes key.
m
{
4.
7-15
JOB SETTINGS
FOR INSIDE THE AREA
~ After designating the next group of areas (Group 2), the following
the touch panel display.
If the desired mode settings for Group
2 is just the same as for Group 1, touch
the Group 1 key.
message will appear on
-------
~
1A
lJs~ same mndes as previous
group?
Select
a group or press CEl .
I
Ecl
If the desired mode settings are not the
same as for Group 1, press the No key.
[
Cl In Color Editing mode, you can select up
to three job patterns for at most six groups.
After you have set three patterns, the
copier will only allow you to choose the
pattern of a previous group.
If you change the settings for one group,
it will change the settings for all other
groups with the same pattern.
However, if you used a paint setting,
changing the color in one group will not
affect other areas. (Up to 6 paint colors
can be selected.)
7-16
No
I
(Max. 6 colors
in Paint mode. )
II
1~
JOB SETTINGS
FOR OUTSIDE AREAS
JOB SETTINGS FOR OUTSIDE AREAS
1.
Select modes for outside all the designated
Creative
areas.
Color
Editing
I
Select mode(s) to
edit outside area.
Or press [_TEFl to finish
I
Select
mode(s) to edit
outside area.
Or Dress [TXITl to f inish
m
editing.
I
Full Color
. ..
143=-K&
..
DI’H
Mgp#ity
I
=
U=
page 7-13
= page 7-13
2. To finish selecting
n xi
editing.
B I ack
-
= page 7-13
Editing
1
E’lliil
-m
G= page 7-20
page 7-13
I
G=
= page 7-20
modes for outside all the designated
3. You can start your copy job by pressing the Start key.
7-17
page 5-18
=
I
page 7-20
areas, touch the Exit key.
CHECKING
JOB SETTINGS
CHECKING
JOB SETTINGS
After you have finished selecting modes for each area, you can check the selected mode
for them.
Creative
Editing
~
Touch one of the the Area keys you want
to check.
IJ
You can also check the modes for outside
areas by touching the Outside key.
~
If you want to designate
touch the Add Area key.
another
Press Start key.
Or select area key to check or change modes.
area,
Color Editing
~
Touch one of the Group keys you want to
check.
IJ
You can also check the modes for outside
areas by touching the Outside key.
B
If you want to designate another
touch the Add Group key.
‘ress Start key. Or wl~ct
to check or change modes.
area,
EiB3Zl key
w
To finish checking the job settings, touch the Exit key.
7-18
I
CHANGING
CHANGING
JOB SETTINGS
FOR THE ENTIRE IMAGE
JOB SETTINGS FOR THE
ENTIRE IMAGE
Refer to pages 7-4 and 7-7 to check which modes you can select for the entire image.
If you want to change
Paper Selection
(= page 5-6)
the job settings
for the entire image, use the keys below:
Image Shifting
(= page 5-13)
Standard Reduction
and Enlargement
(= page 5-9)
Special Reduction
Enlargement
and
(= page 5-11)
7-19
Sorting/Stacking
(K= page 5-8)
FUNCTIONS
ONLY FOR AREA EDITING
FUNCTIONS
ONLY FOR AREA EDITING
.*
+.
.
..+
+
EHil
Paint Area
fill the designated
area with a
selected color, touch the Paint key.
To
.“
*
..
I PaintI
Paint Area mode and Color Background
Color Background
mode
Original Image
different:
Paint
Save Area
To delete
designated
Area key.
the images outside the
areas, touch the Save
’87
r
——— 1 ‘b
‘d
/
I
l____l
I
#
Delete Area
=+=
n
To delete the selected designated
area, touch the Delete Area key.
1
D131d.f2
llrea
w!
~–––,
h
d’
I
I
4(
I
k____l
.................
I
I
I
I
4!
7-20
CHAPTER
8
“USER TOOLS/USER
CODE”
Table of Contents
C1-lAIUGING
DEFAULT
User Tools Menu
How To Access
SETTINGS
. . . . . . . . . . .
. . . .
●
8-2
■
. . . . . . . . . . . . . . . . . . . . . . . . ...8-2
The User Tools . . . . . . . . . . . . . . . . . . . 8-2
Auto Reset . . . . . . . ..9~.9.
•*~09u~~~~~o””*”*”s8-3
Set Operation Modes
. . . . . . . . . . . . . . . . . . . .
Set Bypass Paper Size . . . . . . . . . . . . . . . . . . .
Sensitivity
Adjustment
. . . . . . . . . . . . . . . . . . .
Select ARDF/SORTER modes
. . . . . . . . . . . . . . .
Set User R/E . . . . . . . . . . . . . . . . . ..”=
. . ..0”
Set User Code Mode
. . . . . . . . . . . . . . . . . . . .
Set User Codes
. . . . . . . . ..~”
•.m*””~..””O”...Q68-6
s
s ==
Check/Reset
Specified COPY COUnter
Print All Copy Counters . . . . . . . . . . . . . . . . . . .
Reset All Copy Counters
. . . . . . . . . . . . . . . . . .
●
8-1
●
●
●
●
●
●
.
.
.
.
.
.
.
.
.
.
.
.
.
. . .
.
.
.
.
.
.
...8-3
...8-3
...84
. . . 8-5
...8-5
...8-6
. .
.
.8-6
. . . . ...8-6
. . . . . . . 8-6
●
●
●
CHANGING
DEFAULT SETTINGS
CHANGING
DEFAULT SETTINGS
You can change the copier’s default settings using the following user tools.
User Tools Menu
< User Tools >
m
Select one of the following items.
< User Tools >
m
%Iect one of the following items.
< User Tools >
m
Select one of the following items.
~
~
~
Auto
Reset
Set
Set Bypass Paper Size
~Sensitivity
~
~
Set User Code Mode
,x..+..,
~
Set User Codes
‘3
~
Ckk/ResetSpecifkdCopyComter
a4
~Print
Operation Irbdes
~
~
Adjustrmmt
SeIectARDF/SCf?TER
Modes
Set User R/E
IllI Copy Counters
Reset AI I COPY Counters
q~
How To Access The User Tools
1,
Press the Clear Modes/Stand
by key,
--m
0
[$,(IJ
) [9+
)
2. Press the Clear/Stop key more than 3
seconds until the User Tool Menu appears on the touch panel display.
3. Select the menu number you want to
use by touching the touch panel display.
L
T
C21
This copier has 11 user tools, You can see 5 user tools on the touch panel display
at one time. Use these keys to see other user tools.
&
u
~~
I Menu
U.etoexitfrom
the .sertool
menu.
I U= to return to the User tool menu.
8-2
CHANGING
1~[
DEFAULT
SETTINGS
Auto Reset
Auto Reset
The copier returns to its initial condition automatically after your job is
finished, The automatic reset time can be set from 10 seconds to 900
seconds, or the function can be turned off.
Cl default: 60 sec.
Screen Saver
When the machine does not detect anyone operating it for the selected
time, the touch panel display turns off automatically.
This time can be set
from 10 seconds to 900 seconds, or the function can be turned off.
Q default: OFF
In the SADF mode (Semi-Automatic Document Feed mode U= page 4-6
“Set one C)riginal At A Time”)? if the next original is not set within the
selected time, the machine will cancel the Semi-Automatic Document
Feed mode automatically.
The SADF Auto reset time can be set from 1
to 99 seconds, or the function can be turned off.
Cl default: 5 sec.
SADF Auto reset
(for
machine
with
dual job feeder only)
[ 2 [
Set Operation
Maximum
number
copy
input
Modes
The maximum copy quantity can be set from 1 to 99.
~ default: 99
In the default setting, narrow margins on all four sides will not be copied
as shown in the illustration.
3 Side Full Image
OFF
~
Paper feed direction
ON
D default: OFF
Cl You cannot cancel the leading edge margin.
Auto Tray Switching
If you load paper of the same size and in the same direction in two or
more paper trays, the machine automatically shifts to another tray when
the tray in use runs out of paper.
Q default: ON
Cl By-pass feed tray cannot be used for Auto Tray Shifting,
Panel beeper
The bee er (key tone) can be set to on or off.
Cl defau P
t: ON
Editor Grid Display
(for machine with
display editor only)
You can set the grid snap on or off in the display editor.
The rids ma help you to mark a right angle shape.
Lld#ault:
O#F
I 3 I
Set Bypass
Paper Size
If you load non-standard paper in the by-pass feed tray, the machine cannot detect the paper
size and direction and the copied image might not be correctly positioned on the copy paper.
One non-standard paper size and direction data is always specified in the user tool, and if
the non-standard paper size you are going to use is different from this, change the paper size
and direction data with this user tool to make a correct copy. (Horizontal direction: 148-432
100-297
mm or 3.9”-11.7”
mm or 5.8”- 17.0”,Vertical direction:
)
8-3
CHANGING
[
4[
DEFAULT
SETTINGS
Sensitivity
Adjustment
Color Mode
When co ying in full color, 4C (4 color toners = Yellow, MacJenta, Cyan,
and Blat [ ) is used in the default mode. You can change this so that on
3C (3 color toners = Yellow, Magenta, and Cyan) is used.
Cl default 4C (4 color toners)
U.C.R Adjust
In the Auto (Letler/Photo) mode or Photo mode, black letters and lines
might not be re reduced well. The UCR adjustment reduces or remove
the weakest co Por in order to emphasize the black parts of the image.
This is useful for improvin
the readability of:
Black lettering in colore 3 areas
Black and white originals when copying in Auto Color mode and
Auto (Letter/Photo) mode.
It can be adjusted within 9 levels (“Weak” to “Strong”).
Cl default: level 5
●
●
Color Erase
When in the Color Erase mode, the function can be made more or less
sensitive to the color to erase. It can be adjusted within 5 levels.
(“Narrow” to “Wide”).
Cl default: level 3
For example, suppose red is erased, selecting “Narrow” will result in on
red being erased, and selecting “Wide” will result in other colors close tf
red being erased.
Color Background
mode, the background
When in the Color Background
adjusted to within 5 levels (“Weak” to “Strong”),
Q default: level 3
Color Conversion
When in the Color Conversion mode, the function can be made more ot
less sensitive to the color to convert, It can be adjusted within 5 levels
(“Narrow” to “Wide”).
Cl default: level 3
For example, sup se red is converted to a scanned color, selecting
“Narrow” will resu rt in only red being converted, and selecting “Wide” wi
result in other colors close to red being converted.
UIEl%
A.D.S
density can be
1
The Auto Image Density levels can be adjusted
levels).
Q default: level 2
to lighter
or darker
(4
When in the Auto (Letter/Photo) mode, the copier can be set to lean
Letter mode (levels 1 to 4) or towards Photo mode (levels 6 to 9).
This function is useful when copying originals that have mixed image and
character areas, for example maps. Depending on the sensitivity setting,
small characters might not be detected as letters.
Q default: level 5
towards
Auto L/P
When in Auto Color Select mode, Black Cop mode will be selected
automatically for black and white originals. ? he copier sees pure grays
as black an J white. However, for many types of originals such as
Auto Color Select
magazine pages, gray is a combination
of several
to us but that appear as color to the copier,
colors
that appear
gray
The copier can be made to lean towards Black Copy (levels 1 to 2) or
towards Full Color Copy (levels 4 to 5).
Q default: level 3
8-4
CHANGING
Select ARDF/SORTER
~ 5 [
ARDF:
mode
(for
Thin
machine
paper
with
DEFAULT
SETTINGS
modes
Use when changing the type of original to be f~. Select this function
when you use thin originals (lighter than 53 gm or 14 lb).
Cl default: OFF
dual job feeder only)
SORTER: Color Copy
Sorting Prohibition
T
000
000
The machine can be set to disable the sorting or stacking modes for color
copying
D defau’lt: OFF
mode, reproduction ratios
In the Preset R/E (Reduction/Enlargement)
on12 keys are already fixed but you can register desired reproduction
ratios into additional 2 keys. Touch one of the two keys and enter the
desired reproduction ratio with the Number (O-9) keys and then touch
the #key.
8-5
CHANGING
DEFAULT
SETTINGS
USER TOOLS FOR USER CODE MODE
User tools 7,8,9,10, and 11 are for the User Code mode. When you want to use these
user tools, you should enter the key operator access code first. Please ask your
sales or service representative
for the key operator access code when the representative sets the user tools for the User Code mode.
L
1
If your
machine
is set to the User Code
code, while pressing
mode,
to prevent
others
from
making
by key, p ress the Clear/Strop
the Clear Modes/Stand
copies
key after
using your
copying.
user
Set User Code Mode
[~1
If the copier is set to use the User Code function, operators
must input their user codes before the machine can operate.
The copier keeps count of the number of copies made under
each user code. To have the machine set to the User Code
mode, please contact your sales or service representative.
You can select under which condition the user code mode
should function. (Full Color/Single
Color/Black)
R@’sd~! : “:’”; I ‘; ;+! i : !
,,..,:,.,.,,,.,,
,.,,,.,,,:,.,;.
,,..........
. ..:
.,. .,...:.
.,..,,.,,
,..:.
,.,.,,.,,
,.,,,.,,,:,,,
,,........
... .........
%.@Color
Input
user
code,
..----
~~
then
press
@ key.
#
C)
Set User Codes
Use to register your user code (maximum:6 digits).
Register
D Up to 20 user codes can be registered.
Cl Registered
user codes will be sorted in numerical order.
Change
Use to change your preset code to a new one.
Delete
Use to delete your user code.
Cl The number of copies made under the code is deleted.
(~~
Check/Reset
Specified
Copy Counter
You can check the number of copies made using each user code. Also, you can clear each
code’s counter.
I’[
Print All Copy Counters
Use to print all copy counters made under the user code modes.
~~
Reset All Copy Counters
Use to reset all user codes and counters.
8-6
1
I
I
CHAPTER
9
“REMARKS/PROBLEMS”
Table of Contents
USER REMARKS
. . . . . . . . . . . . . . . . . . . . . . . . . . 9-2
WHAT TO DO WHEN THINGS GO WRONG
●
I
m
ns,
9-3
mm
Clearing
Misfeeds
. . . . . . . . . . . . . . . . . .
✎
.
.
. . . . . . 9-3
Others
. . . . . . . . . . . . . . . . . . . . . . . .
✎
.
.
. . . . . . 9-3
Copies aredirty.
. . . . . . . . . . .
Copies are too light. . . . . . . . . .
Copy image is blurred. . . . . . . . .
Color tone of copies is not reproduced
Moire is reproduced
on copies. . . .
9-1
. . . . . . . . .
. .
. .
. .
.
,,
well.
.
. .
. . . . . .
✎
..00
.
.
.
.
.
.
.
●
●
.
.
✎
✎
.
.
☛
☛
.
.
✎
✎
.
.
.
.
.
,,
.
. . . .
. . . .
. . . .
. . .
. . . .
.
.
.
.
.
9-4
9-4
9-5
9-5
9-5
USER REMARKS
~Tomaintaintheco
yimagequality,
thecopierstops
coPyingfor 10t060seconds
andthe
“Wait” message wi PI appear on the touch panel display m the following time frames.
1. About 10 seconds after about 50 copies.
2. About 1 minute after about 150 copies.
3. When using the dual job feeder, about 10 seconds after 150 copies.
automatically resumes copying after the waiting time.
The above 3 time frames are carried out independently.
other.
Sometimes
The copier
one will follow the
ClWhen copying from a colored original, the copier will scan the original 4 times for one copy.
Be careful not to move the original during the scanning process. If the original is moved
slightly, the colors (Cyan, Magenta, Yellow, and Black) might not combine properly.
9-2
WHAT TO DO WHEN THINGS GO WRONG
WHAT TO DO WHEN THINGS
GO WRONG
When there is a machine failure or a paper misfeed, a message will appear on the touch
panel display.
Follow the instructions
to solve the problem,
Clearing
Misfeeds
When a paper misfeed occurs, the misfeed location will appear on the touch panel display.
Check the misfeed location and follow the instructions.
(Also follow the instructions inside
the machine door,)
WARNING: Since some parts of the copier are supplied with high electrical
voltage, touch only the parts specified in the instructions
inside the
machine door.
WA RN/NG: When removing misfed paper from section
fusina unit miaht be vew hot.
“ D“, use caution.
The
Notes:
c1 Do not leave any torn scraps of paper within the machine.
IJ After removing misfed paper, make sure that all units and levers are returned to their original positions and
that all covers and doors are closed.
c1 If a paper misfeed occurs, the copier automatically keeps track of the selected copy modes and how many
orlgmals have been completed. It is unnecessary to reset the copy quantity, or the copy modes, after removing
misfed paper.
Others
Problem
Action
1
Nothing happens when the
main switch ISturned on.
Q Check the power cord. If it is not plugged in properly,
plug it firmly into the outlet.
The Start key does not
change from red to reen
within 12 minutes a f er the
main switch is turned on, or
the machine stops during a
copy run.
Q Check the touch panel display and follow the
instructions.
9-3
WHAT TO DO WHEN THINGS GO WRONG
Copies are dirty.
Action
Problem
The reverse side of an
original image is copied.
Cl Adjust the ima e density level using the Manual
Image Densi % e s. (= page 5-4)
Ll If you select tXTe Back Copy mode or Single Color
mode, lace a black paper in the backside of the
origina Pand select Auto Image Density mode.
Q If you select the Full Color Copy mode, lighten the
background density. (II= page 6-2)
A shadow is copied when
copying a pasted original.
Cl Adjust the ima e density using the Manual Image
Density keys. rI= page 5-4)
The same part of a copy is
dirty whenever making
copies. An image not on the
original appears on the copy.
Cl If the exposure glass or platen cover is dirty, clean it.
(= page 1-6)
If not, please contact your service representative.
Copies are too light.
Action
Problem
When copying from a black
and white original, selecting
Auto Color Select and Auto
(Letter/Photo) modes, copies
are light.
Q Do not select Auto Color Select and Auto (Letter/
Photo modes to ether when copying from a black
and w 11ite ori ina.7
Select Black 8 opy mode or select Letter mode.
A low contrast image on an
original is copied too light.
Cl Adjust the ima e density level using the Manual
Image Density \ eys. (= page 5-4)
The add toner message
appears displayed on the
touch panel display.
Ll It is time to add toner. (= page 3-1 O)
When using rough surface
paper, or any coated paper,
the copies are light.
El Rough surface paper and any coated paper are
not recommended as a copy paper.
9-4
WHAT TO DO WHEN THINGS GO WRONG
Copy image is blurred.
Action
Problem
Cl Select the image type mode as follows (= age 5-5):
● When
copying a ma and you want to ma Ee the
letters on the map c rear, select the Letter mode.
● When
cop ing an original with letters and photo
images, se fect Auto (Letter/Photo) mode.
QWhen cop ing photo image or drawings, select
Photo mo J e.
Cl Adjust the sharpness and contrast of the image.
(= page 6-2)
Copy image is blurred.
Color tone of copies
is not reproduced
well.
Action
Problem
Color tone of copies is too
dark or too light.
Cl Adjust the ima e density level using the Manual
Image Density % eys. (E page 5-4)
Color tone of copies is
different from that of originals.
Cl Adjust the Single Color or Color Balance.
(= pages 6-3 or 6-5)
Color tone of copies is
completely different from that
of originals.
Cl Call your service representative.
Color tone of copies is
uneven.
Q If you are using damp paper, replace with dry,
undamaged paper.
Cl Press down on the platen cover where the copy
image is uneven.
Q Call your service representative.
Moire is reproduced
on copies.
Action
Problem
2 If you selected the Letter mode, cancel it and select
the Auto (Letter/Photo) mode or Photo mode.
I= page 5-5)
c1 i djust the sharpness to a softer level.
I= page 6-2)
c1 I lace the original on the exposure glass at a slight
angle.
A moire pattern is produced
on copies as shown in the
illustration.
I
I
,
1
I
9-5
CHAPTERlO
“PROJECTOR
UNIT OPERATION”
Table of Contents
GUIDE TO COMPONENTS
BEFORE OPERATING
THE PROJECTOR
●
. . . .
10-2
.
✎
. . . .
10-4
. . . . . .
Film . . . . . . . . . . . . . . . . . . . . . . .
.
✎
About
Copying
.
✎
. . . . . 10-4
. . . . . 10-5
.
✎
.
●
m
●
.
.
.,.
●
●
999.
. . . . . . . .
●
●
,.,
. , . . . . .
●
.
.
.
.
.
.*.
. 10-11
m
m
.,,
.
. . . . . . . .
.
.
. . . . 10-17
. . . . . . . . .
.
.
...
.
10-17
. . . . . . . . .
.
*
. . . .
10-18
9
●
.,,
10-18
. . . . . . . . . . . . . . . . . . . .
. . . . . . . . . . . . . . . . .
THE PROJECTOR
SEITING
PREPARING
The Filter
Selecting
The Base
. . . . . . . . . . . . .
Film (If Needed)
In The Holder
Films
Cutting
The Film Position
(If Needed)
(If Needed)
Sheet
. . . . . . . . . . . . .
. . . . . . . . . . .
Tones In Film Scanning
Color
Focus
.
✎
.
. . . . . . .
●
m
sm
●
.
.
✎
■
✎
●
m
.
■
.
. . . . . . . . . . . . .
.
.
. . . . . . . . . . . . . . .
.
.
.
.
.
.
Adjustment
SELECTING
WHAT
FUNCTIONS
TO DO NEXT
PROJECTOR
MODE
. .
. . . . . . . . . . . . . . .
MAINTENANCE
Lens
✎
...
.
COPIER
Exterior
s
✎
Adjustment
SELECTING
EXITING
.
●
. . .
Image Density
. . . .
. . . . . . . . . . . . . . . . . .
FILMS
ADJUSTMENT
. , . . . .
. . . . . . . . . . . . . . . . . .
Setting
SHADING
IN POSITION
COPYING
FOR
Selecting
SELECTING
DAILY
9
About
Notes For Operation
HINTS
. . . . . . , . . . . . . .
. . . , . .
Film Holder
. . . . . . . . . . .
Holder Slot
. . . . . . . . . . .
1o-1
...
,.
●
.,,,,
m
.
.
.
10-5
.
,,,
10-6
.
10-7
.
10-7
,,
10-8
. . . . . 10-9
. . . . 1o-1o
.
.
.
.
. . . . . . ,,
■
■
.,.
. . . . . . . .
.
.
. . . . 10-20
.m.
.
.
...
. . . . . . . .
,
.
. . . . 10-23
. . . . . . . . .
.
.
. . . .
10-23
. . . . . . . . .
.
.
■
. .
10-23
. . . . . . . . .
.
.
. . . .
10-23
.
. . . .
10-23
.
.
.
,mm
.
.
,,
.
.
. . . . . . . . .
.
.
.
.
10-12
10-19
. 10-19
,
10-21
GUIDE TO COMPONENTS
GUIDE TO COMPONENTS
FILM COVER
To protect the slots from
dust, close it when you are
not using the projector.
FOCUSING LEVER
Adjust the focus with this lever
when you make copies from a
glass mount film.
I
POWER SWITCH
FILTER SLOT
Insert the filter (“P”
or “N”) here.
/
/
II
POWER CORD
Plug the power cord to a
wall outlet.
/
Switches the power
ON or OFF.
\\
/
/
HOLDER SLOT
Set the holder here.
HOLDER LEVER
= Use to set the holder
into the holder slot.
\
\
/
MIRROR UNIT
Reflects the light
from the projector to
the copier.
/
/
MIRROR UNIT
RELEASE LEVER
Slide this to the left
when opening the
mirror unit.
\
ACCESSORY BOX
Accessories should be
stored here.
\
\
\
\
\
\
\
FRESNEL LENS
Pull this up when setting
film on the exposure
glass.
10-2
LENS ‘COVER
To protect the lens from
dust, close it when you are
not using the projector.
GUIDE TO COMPONENTS
FILM HOLDERS
/Set
35mm film in one
of these holders.
CJ Slide Holder
(This holder
is covered
with
glass.) Set mounted positive
films in this holder.
c1 Film Strip Holder
Set negative or positive strip film
and base film here.
c1 Glass Mount Film Holder
(This holder is not covered with
glass.) Set the positive glass
mount films in this holder.
\
LOCK LEVERS
Use to fix the film after setting it
in the holder.
I
SLIDE MOUNT
Use to make a
base film slide.
\
\
\
\
\
BASE FILM SLIDES
Use them when
performing shading
with Negative film.
BLOWER BRUSH
Use to clean the lens or glass.
FILTERS
P = Positive
N = Negative
One of them should
be set in the filter slot.
FILM POSITION SHEET
Use a duplicate of this sheet to place the film to the
correct position on the exposure glass.
Make a copy from the original sheet, cut the
surrounding margin on the dotted lines, and cut
away the center part corresponding to the size of
the film to be copied.
Keep the original film position sheet.
10-3
BEFORE OPERATING
THE PROJECTOR
BEFORE
About
OPERATING
THE
PROJECTOR
Film
Caution:
Do not use the same film for more than 30 minutes.
Caution:
Do not store film in rooms where the temperature
Cl For valuable images, we recommend
copying from duplicates.
IJ When using a film strip, make sure to take it out from film protecting
You can use the following
Cl
sheet.
kinds of films:
0 35mm Negative or Positive Strip Films
35mm Positive Slides
(Mount Film/Glass Mount Film)
Glass mount film is covered with glass.
●
~
is more than 30°C/860F.
Positive or Negative films of wider size
(Placing on the exposure glass):
‘60x45mm
●60x60mm
“60x70mm
‘60x80mm
c60x90mm
●6x6cm
4“ x 5“
. Maximum Size
(140 x 210 mm or 5.5” x 8.2”)
●
10-4
BEFORE OPERATING
About
THE PROJECTOR
Copying
When using the Strip Film Holder
When using the Slide Film Holder
Available film area for
copying
21.5
mm
~[~;[
~1
::-
I
The copy size when Full
Size is selected.
.;~;
;-
;;
-~1
124mm
I
I
~
19:6Tm
1
-M
I
I
~ A black line might appear on the edge of copies, This
line is caused by the holder or the edge of the film.
I
~
~
,
I
::;:.:~<:::~fi.yt~~.~fi+f
.......................................................
.......................................................
.:.~.:.:.:.:.
w.:.:.:.:.:.:.:.?..
.............
................
....................../
o...................
........-..?
:.:.
::::::::::::::::.:.:
.:.:.:.:.:.:.:
...............:..<
~::.:.>~:.~.:.~.:.:.:.:.:.:.~<
..................................+
:.:.::::::::::::::::::::::
::::::::::::::::~:*..
............................................,
.........................................................
.........................................................5
~::*:::::::~.:::::::;.::f
.:.~.:.:.:.:.:.:.:.:.:.:.:.:.:.:.:.:.:.:.:.:.:.:.:.:.:.>
.............::...................*
............................................,
Black line
IJ As the fresnel lens is used, a ring pattern on the center or
moire pattern might appear on the copy image.
*o;,8T”
+Tl
1
1
Notes For Operation
IJ First, you must perform shading to get the projector to register the condition of the film, This way, the projector
can adjust the light intensity automatically
while copying.
c1 You can adjust the color balance and color density manually.
c1 This projector
has an automatic
focus function,
but if you use the glass mount film holder, adjust the focus
manually,
IJ The shading
method differs depending on the type of film (negative or positive).
a positive film, make sure to set the film after shading.
c1 The filter and the way to set it differ depending
When making copies from
on the type of film,
c1 If you want to clear the data you just entered, touch the Cancel
key. The screen returns to the previous page.
IJ If you want to go to the next page, touch the Exit key,
IJ If you are finished using the projector
unit, press the Clear Modes/Stand
by key.
IJ Do not forget to turn off the power switch of the projector when you are not using it,
n Do not obstruct the light path from the projector. If the light path is obstructed, the image might not match the
original,
c1 The shading adjustment is very sensitive, so after the shading operation the mirror unit must be kept perfectly
still. Do not move it or allow vibrations to interfere with it. If this happens during copying, lines might appear
on the copy. In that case, you must perform shading again.
IJ To avoid the above problem,
avoid touching or leaning on the copier or the projector
put anything on the copier while it is operating.
c1 If you need to open and close the doors (to clear a jam or add toner), we recommend
after shading.
Do not
that you perform shading
again aftetvvards.
c1 Avoid multi-wiring.
The projector
should be connected
front cover.
10-5
to a power source as described
on the inside of the
SETTING THE PROJECTOR
SETTING
IN POSITION
THE
PROJECTOR
IJ Do not touch to the fresnel lens or the glass of the mirror unit. Fingerprints
copy. If the fresnel lens becomes dirty, wipe it. (= page 10-23)
1. Insert the plug of the projector
into the
wall outlet.
~
Read the notes regarding the power cord.
(I= inside page or the front cover)
2. Turn on the main switch of the projector.
3. Open the lens cover of the projector.
Cl
4.
Place the mirror unit so that the unit’s
position holes fit over the projector’s
positioning pins.
~
5.
Inside the cover, there are two pins to
position the mirror unit.
Please be careful not to scratch the exposure glass when setting the mirror unit
on it.
Slide the release lever of the mirror
unit in the direction of the arrow and
open the cover of the mirror unit.
10-6
IN POSITION
or dirty parts might appear on the
PREPARING
FOR COPYING
PREPARING
Before operation,
FOR COPYING
prepare as follows:
CJCheck the type of film you are going to use, and confirm what is required for copying.
Filter
Film Type
Slide
“P”
(Mount)
(Positive
Filter)
~,s&
x
Posih2f2hg
x
Holder
Slide Holder
Key To Select
35mmSlides
POsilivG
n
f’ositive
yi!iiss
Mount)
“Pn
(Positive
Filter)
x
x
Glass Mount
Film Holder
D
35 mm
‘trip ‘i’m
35mmSlides
Positive
&itive
Filter)
x
x
Film Strip Holder
35mmSlides
u
Negative
Others
Positive
Max.Size:
140x
5,5”
Strip Film
“NM
(Negative Filter)
0
“Pu
(Positive Filter)
x
x
Film Strip Holder
o
(Placin~on the
exposure glass)
8.2”
Negative
Selecting
“N”
(Negative Filter)
0
0
(Placin~on the
exposure glass)
The Filter
D When perform shading, you must set a filter that matches the type of film you will copy.
Use an “N” filter for Negative films
and a “P” filter for Positive films.
10-7
35rrIrn Strip
Negal ive
c1
210mm
X
Positive
PtIsitive Film
Und~r
Lens
n
NegaliveFilm
Under
Lens
c1
PREPARING
FOR COPYING
Selecting
The Base Film (If Needed)
D When you use negative film for copying,
1.
use that film’s appropriate
base film for shading.
Confirm the manufacturer,
model
name, and ASA rating of the film you
want to use.
2. Select a base film suitable for the film
to copy.
c1
The following base film slides have been
prepared as accessories.
*1
For FUJICOLOR
SUPER HG-1OO
9
For AGFA XRG-100
9
For KODACOLOR
GOLD-100
c1
*1 is a re~istered
trademark
of FUJI
PHOTO CdMPANY LIMITED.
*2 is a registered
trademark
of AGFAGEVAERT AG.
*3 is a registered trademark of EASTMAN
KODAK COMPANY,
IJ
If you use film that does not have suitable
base film, you should make the base film
yourself (u= page 10-21 .).
3. Open the film strip holder and set the
1.//-
base film in the film strip holder.
c!
The base film must be set sideways in the
strip holder,
IJ
There is no difference between both sides
of the base film.
n
You can set the negative strip film at the
same time. (= page-l O-9 “Se#ing Fi/ms h
The Ho/det’)
4. Close the holder and lock it as shown
in the illustration.
10-8
PREPARING
FOR COPYING
Setting Films In The Holder (If Needed)
~ Check which type of holder you should use.
Slide Holder/Glass
D The
slide holder
Mount Film Holder
is covered
with glass.
Set the mount films in the slide holder.
with glass.
Set the glass mount films (covered by glass) in
IJ Positive film is usually set in a slide mount or glass mount.
in the film strip holder (= Film Strip Holder).
If you use positive film not set in a mount, set it
CJThe glass mount film holder
the glass mount film holder.
1.
is not covered
Open the cover of the slide holder or
glass mount film holder, and set the
slides in the holder one by one.
~
Make the front side of the film face down
when setting in the slide holder or glass
mount film holder.
0
When setting in the slide holder, make
sure that all slides must be aligned to the
glass of the slide holder cover.
2. Close the holder and lock it as shown
in the illustration.
Film Strip Holder
U Negative film usually come in strips.
!3 Follow this procedure
for positive strip film as well.
1. Open the film strip holder.
Put the
front side of the film face down and set
it in the film strip holder.
b up
Front
>w
10-9
PREPARING
~
When setting film, leave the base film in
the film strip holder. This is convenient
when performing shading again.
2. Adjust
~
FOR COPYING
the
position
of the film.
Do not touch the image parts of the film
when adjusting.
3. Close the film strip holder and lock it
as shown in the illustration.
Cutting The Film Position
Sheet (If Needed)
IJ If you do not use the holders and position the film on the exposure glass, a positioning
The positioning sheet should be cut in
the center with the film size, so that you
can place your film in the center. Two
position
sheets
are included
as
originals in this machine, so, make a
copy from the original sheet, cut the
surrounding
margin on the dotted
lines, and cut away the center part
corresponding to the size of the film to
be copied.
?
1o-1o
sheet is required.
SELECTING
SELECTING
1. Press the Option
~
FILMS
key.
If the projector is not equipped on your
machine, or if the power switch of the
projector is not on, the Projector key will
not appear on the screen,
2. Touch
m..
the Projector
key.
Projector I
2. Check the type of film and touch one
of the keys.
Film Type
Key To Select
35mmSlides
Positive
Slide (Mount)
Go To Page...
10-12
u
Positive
Slide (Glass Mount)
35mmSlides
Positive
10-12
u
35 mm
35mmSlides
Strip Film
PosilivG
10-12
35mm Strip
N~gai iv~
u
10-13
u
Negative
Others
Strip Film
Positive
Positive
Film
Under
Lens
10-14
Negative
Film
Under
Lens
10-15
n
Max. Size:
140x 210mm
5.5”X 8,2”
Negative
c1
10-11
FILMS
SHADING
Before making copies, you must peflorm shading to get the projector to register the condition
of the film. This way, the projector can adjust the light intensity automatically while copying.
II
35mmSlides
Positive (Slide Holder/Glass
1.
Mount Film Holder/Film
Strip Holder)
Set the film (slide or strip) in the holder.
(= page 1O-9)
2. Open the film cover and insert the “P”
(Positive) filter (II= page 10-7) in the left
slot as shown in the illustration.
IJ Be carefulto insertthe filteras shown, not
the other way around.
Cl
Before going to the next step, make sure
that the fresnel lens is lowered in position.
3. Touch
the
Shading
key.
Cl The copier will start shading
12!u!El
automat-
ically.
if the film is correctly set (I=
page 10-9) in the holder. While pressing the holder lever to the right, insert
the holder slightly in the right slot.
4. Check
5. Adjust the holder by sliding it up and
down to position the correct frame for
copying.
10-12
1.
Set the base film and film str.i~ in the
holder. (= base film: pagel O-8, film
strip: page 1O-9)
2. Open the film cover and while pressing
the holder lever to the right, insert the
film strip holder slightly to the right slot.
3. Insert the holder until the M mark is
placed as shown in the illustration.
4. Insert the “N” (Negative) filter (= page
10-7) in the left slot as shown in the
illustration.
IJ
Be careful to insert the filter as shown, not
the other way around.
IJ
Before going to the next step, make sure
that the fresnel lens is lowered in position.
5. Touch the Shading
~
The copier
ically.
key.
will start shading
I Shading I
automat-
6. Adjust the holder by sliding it up and
down to position the correct frame for
copying.
10-13
SHADING
u
Positive
FilmPO~itiveFilm Under The Lens
Under
Lens
1.Insert the “P” (Positive) filter (= page
10-9) in the left slot as shown in the
illustration.
~
Becareful to insert the filter as shown, not
the other way around..
2. Cut the positioning sheet to match the
film size. (= page 10-10 “Cutting The
Film Position Sheet” )
3. Place the positioning sheet under the
mirror unit (on the exposure glass).
B
Placethe marked corner of the film position sheet at the rear left corner of the
exposure glass.
D
Before going to the next step, make sure
that the fresnel lens is lowered in position.
4. Touch the Shading
key.
k!E!!dl
D The copier will start shading automatically.
5. Lift the fresnel lens, place the film inside the film position sheet, and lower
the fresnel lens.
0
Place the film face down.
Cl
If the film is curled, the copy image may
be out of focus. In this case, make the
cutout film position sheet a little smaller
than the film size and use it to hold the film
down.
6. Check the film size, touch one of the
keys, and touch the Exit key.
10-14
Negative
Film
Under
Lens Negative Film Under The Lens
II
1.
Set the base film in the film strip holder.
(E= page 10-8)
2.
Open the film cover and while pressing
the holder lever to the right, insert the
film strip holder slightly in the right slot.
3.
Insert the holder until the * mark is
placed as shown in the illustration.
●
4.
Insert the “N” (Negative) filter (= page
10-8) in the left slot as shown in the
illustration.
Cl
Be careful to insert the filter as shown, not
the other way around..
5.
Cut the positioning sheet to match the
film size. (= page 10-10 “Cutting The
Film Position Sheet” )
6.
Place the positioning sheet under the
mirror unit (on the exposure glass).
7.
~
Place the marked corner of the film position sheet at the rear left corner of the
exposure glass.
~
Before going to the next step, make sure
that the fresnel lens is lowered in position.
Touch the Shading
~
The copier
ically.
key.
will stati
shading
automat-
10-15
8.
Pull out the film strip holder with the
base film.
9.
Lift the fresnel lens, place the film inside the positioning sheet, and lower
the fresnel lens.
~
Place the film face down.
CI If the film is curled, the copy image may
be out of focus. In this case, make the cut
out film position sheet a little smaller than
the film size and use it to hold the film
down,
10. Check the film size, touch one of the
keys, and touch the Exit key.
Select ,film size, then
f-Spec I a I S Izes-1
10-16
press
Il%R_]
key.
ADJUSTMENT
ADJUSTMENT
~ After finishing to adjust the color balance, image density, or manual focusing,
touch the Exit key.
Color Tones In Film Scanning
Use these modes when you want to adjust the overall color tone of copies. Also use this
mode when you use negative film, because the color tone of copies varies with the film brand.
You can adjust the tone of copies by adjusting Cyan, Magenta, and Yellow (three basic color- t,
CJ Area editing can be selected with the
projector mode, but color balance/image
density control for projector cannot be adjusted after area editing job setting is
selected.
Make sure to adjust the color
Red
Black
balance and image density before pressing the Area Editing key.
c1
s
a
Suppose the copied image are rather
green, there are two ways to adjust the
color tone.
● Lighten the Yellow and Cyan
●
Darken the complementary
= Magenta
color
I
Blue
Adjust the color balance with the increase key and Decrease key.
You can ad ‘ust ;$t
or press &l
I
Decrease
1
key
5
ings
I
9
Increase
Cyan ITI
key
,,, ,?, ,,, ITJ
Density [To,,,,?,,,,
~
be low,
mm
The color balance of a film corresponding to one of the three base films can varv depending on the
type of film used and on the photoprocessing
center that developed it. The color_ balance settings in
the table below are standard adjustments. Please set them first, and if required, change the settings
from these values,
FUJICOLOR
SUPER G-100
AGFA XRG-I 00
KODACOLOR
SUPER Gold-1 00
Yellow
7
5
5
Magenta
4
4
4
3
5
5
Cyan
-——
10-17
ADJUSTMENT
Notes on color tone adjustments:
Cl If the color balance differs slightly from your image, you can also change the tones with the Single Color
Adjustment
(= page 6-5) or Color Balance Adjustment
~ If dark parts are too black, change the UCR adjustment
Image Density
(-
page 6-3) function.
to level 3 (default = level 5).(=
page 8-4).
Adjustment
Cl Image density can be set not only with this display, but also as instructed on page 10-19. However, when
adjusting for the projector, we recommend you adjust the image density with this display.
Adjust
the
Image
density
with
the
in-
crease key or Decrease key.
Setting
You can ad ‘ust
or press k
Decrease
Increase
key
[--g
5rojectm—
~~~t ings
be low,
key
Focus Adjustment
~ When setting the glass mount film holder, manual focus adjustment
is required.
~ For other types of films, you can also adjust the focus manually.
1. Touch the Manual
Focus key.
[H’:
Srojectm
Setting
You can ad ‘ust ~$t ings
or press h x’
.
Yellow
Magrnta
Cyan
Dmsity
2. Place a white blank sheet under the
mirror unit and adjust the focus with
the focusing lever.
Cl
After copying,
the center.
return the focusing
lever to
10-18
be low,
—
SELECTING
SELECTING
COPIER
COPIER FUNCTIONS
FUNCTIONS
You can select copier modes together with the projector.
Modes that cannot
be selected
with the projector:
c1 User Color
Cl Preset mode
c1 Auto Image Density
IJ Memory Call (Recalling the previous job settings)
CJCombine Two Originals mode
c1 Interrupt mode
<Projector>
II
Ready
1. Select the modes you want to choose.
~
The operation is the same as described
Chapters 4 to 7.
in
2. Press the Start key.
SELECTING
WHAT
TO
DO
NEXT
After copying, you can select the next job as follows:
u 1
Next
Film
If you want to copy the same film again, or if you want to copy
which is of the same type, touch this key.
another
film
If you want to change the type of film, touch this key.
-
EEI
H
Exit
Projector
m
If the mirror unit is moved, or if some lines appear on the copy,
touch this key and perform shading again.
If you want to adjust the color tone, image density, or adjust the
focus manually, touch this key.
If you want to finish using the projector, touch this key.
O If you do not touch the Exit Projector
key, all of the selected job settings remain.
10-19
EXITING PROJECTOR
MODE
EXITING PROJECTOR
1. Touch the Exit Projector key (or touch
the Clear Modes/Stand by key).
MODE
Exit
Proiector
2. Replace the mirror unit to its original
position.
~
Be careful not to touch the fresnel lens. If
you do touch it, clean it (= page 10-23)
3, Return the holders, filters, and other
accessories in the accessory box.
1
I
4. Close the lens cover.
5. Turn off the power switch,
0
Though the power switch is turned off, the
cooling fan may be still working. Therefore, please wait a few moments before
unplugging the power cord.
10-20
I
II
1
HINTS
HINTS
1. If the color balance k improper.
n
If the color density leans to red or blue, or isn’t properly balanced, perform the color
density adjustment, and the color balance adjustments for Yellow, Magenta, and
Cyan (= page 10-18).
2. If the film
you
want
to copy
does
not
D
If you do not plan on copying from
this type of film often, use an unexposed frame of the same film strip,
if available, when performing shading.
n
If you plan on copying from this
type of film often, make a base
slide
using
an unexposed,
developed frame of the film.
n
If you have no blank unexposed
frame of the same type of film, you
can use an unexposed frame from
film produced by the same company, but the colors might differ a
bit.
match
the
types
of base
part
film
included.
Mount
3. If the copy image is out of focus
IJ Check if the image on the film is focused or not. If it is, make sure the film is correctly
set in the holder.
n If you reset the film correctly in the holder and the image is still out of focus, or if you
use a different image, and the copy image is out of focus in every case, please call
your service representative.
IJ You can adjust the focus manually with the focusing lever (= page 10-18).
4. If the edge of the original
~
n
a
image does not appear on the copy,
Check the size of the area that can be copied (I= page 10-15).
When setting film in the holder, make sure to position the desired frame properly.
To extend the area that can be copied, use the glass mount film holder and focus
manually.
10-21
HINTS
5. If the projection
n
lamp does not light.
If the projection lamp does not light and a service message appears on the screen,
the lamp might be burned out. In this case, please call you service representative.
6. If you move the mirror
unit.
c1 Make sure to penform the shading operation once again.
7. If lines
appear
on the
copy.
IJ Perform the shading operation
again.
CJ Some possible causes for the lines are:
1. A long
time
has passed
since
shading.
Many copies were made since shading and the mirror unit was moved by copier
operation.
3. Someone might have leaned on the machine or put something on it.
CJ If copying from negative film, thin black lines might appear on the lighter
part of the
—
copy, even after shading,
2.
8. Black lines appear on the edge.
n
n
lines are shadows caused by the film holder and cannot be eliminated.
If you have the optional display editor, you can improve this by saving the area.
(= page 7-20.)
These
9. If a ring pattern appears
n
o
on the copy.
The ring pattern is present on the film itself, and the copier is sensitive enough to
pick it up. Try to change the film setting direction.
Adjusting the focusing Iever so
that the image is slightly out of focus will eliminate
most of the pattern.
Also, try to change the film status as follows:
c Open and close the film cover.
●
Slide the film in the holder a bit.
● Turn
the film around in the holder. (Do not flip it over,)
10-22
DAILY MAINTENANCE
DAILY
Exterior
Wipe with a dry soft cloth.
Lens
Blow off any dust using the blower
brush. If there are fingerprints on the
lens, wipe them with a soft cloth.
Film Holder
Blow off any dust using the blower
brush. If there are finger prints on the
glass, wipe with a soft cloth.
Holder Slot
Blow off any dust using the blower
brush.
10-23
MAINTENANCE
CHAPTER
11
“SPECIFICATIONS”
Table of Contents
Main Frame
.
Copier
. .
Optional
mmmm.
m
.
.
.
●
m.
.
.
.
.
.
m
●
.
✎
m
■
✎
.
.
✎
.
.
.
✎
●
✎
.
Equipments
. . . . .
Dual Job Feeder
. , . . . .
9
.
m
Sorter
. . . . . . . . . . . .
Display
Editor
. . . . . . . .
.
.
✎
.
Unit
. . . . . . . .
.
,
✎
.
Projector
11-1
●
✌✌
.
✎✎✌✎
. . . . . . . . .
●
a..,,,
. . . . . . . .
●
✎
. . . . .
11-2
. . . . . .
11-2
11-5
●
●
✎
✎
. . . . . .
✎
✎
✎
✎
✎
mm
.
.
.
. . . . . . . .
✎
✎
●
...
●
✎
✎
✎
✎
✎
✎
✎
✎
✎
✎
✎
✎
✎
,,.
. .
. . . . . . . . . .
11-5
11-6
11-7
11-8
Main Frame
Main Frame
IJ Specifications
are subject to change without notice.
Copier
Configuration:
Console
Copy Process:
Dry electrostatic
Resolutions:
400 dpi
Gradations:
256 gradations
Original Type:
Sheet/Book/Objects
Original Size:
Maximum: A3~,
Original Alignment:
Rear-left corner
transfer system
(less than 5 Kg/A4 or 11 lb/81/2’
11” x 17“ ~
“ Paper Tray: 64- 104.7g/m2 or 17-28 lb
Bypass Feed Tray: 64-157 glm2 or 17-42
Copy Paper Weight:
lb
●
0
x 11”)
When heavier than 104.7g/m2 or 28 lb, use the bypass feed tray and
select Thick Paper mode. -
Available Copy Paper Size:
Tray
IQDI
A4/A3 version
D
A3, A4, 8112”x 13“ (F4)
81/4” X 13“
11“ x 17’’(DLT),
10“ x 14”,
11“ x 15”,
81/2” x 14’’(LG),
8“ X 101/2”, 8“ X 10“
I
Q
D
Tray
Callyour
I A4, A5
11” x 81/2’’(LT),
81/2” x 51/2’’(HLT)
A3, B4, A4, B5, A5, 11“ x 17’’(DLT), 11“ x 15”,
10” x 14”, 81/2” x 14’’(LG),8112”x 13’’(F4), 8114” x 13”,
8“ x 13’’(F), 81/2” x 11 “(LT),8“ x 101/2”, 8“ x 10“,
!51/2” x 81/2’’(HLT)
service
representative
D
~
A4,
B5, A5,
f+;, :;,
11” x 8112’’(LT), 8112” x 5112’’(HLT)
A4, B5, A5,
1
Bypass
Feed Tray
LT/DLT version
8“ x 13’’(F), 81/2” x 11 “(LT),
1st Tray
2nd/3rd
I
~
CMct
Size
A4, B5, A5, B6,
81/2” x 11” (LT)
11“ x 17” (DLT), 10” X 14”,
81/2” x 11“ (LT), 8“ x 13” (F),
51/2” x 81/2” (HLT)
81/2” x 11“ (LT),
51/2’ x 81/2” (HLT)
Horizontal Direction: 148-432 mm or 5.8”- 17“
ve~ical Direction: 100-297 mm or 3.9”- I 1,7”
11-2
Warm-up Time:
About 8.5 minutes (at 20”C or 68”F)
First Copy Time:
(A4 or 81/2” x 11”)
Full Color (4 scans): 15.5 seconds
s Single Color:
Black.Yellow,Magenta,Cyan: 9.O seconds
Red,Green, Blue, Orange, Light Green: 11.0 seconds
●
Copying Speed:
(Standard modes)
0
When selecting OHP/Thick
~
After changing some modes, the first copy time will
usual.
●
●
●
Cl
Non-reproduction
Area:
Paper modes, copying speed is reduced.
take longer than
Full Color (4 scans):
A4~or 81/2” x 11” c: 6 copies/minute
A3 or 11” x 17“: 3 copies/minute
single COIOr(Black,Yellow, Magenta,Cyan):
A4~or 81/2” x 11” ~: 31 copies/minute
A3 or 11” x 17”:15 copies/minute
Single COIOr (Red, Green, Blue, Orange, Light Green):
A4~ or 81/2” x 11 “D 10 copies/minute
A3 or 11” x 17“: 5 copies/minute
When selecting OHP/Thick
Paper modes, copying speed is reduced.
QLeading edge: 5f2 mm or 0.2’’f0. O8°
● Side: 2i2
mm or 0.08’’tO.O8”, Total less than 4 mm or 0.16“
● Trailing
edge: 2t2mm or 0.08’’~0. O8°
Copy Number Input:
Number keys, 1 to 99
Automatic
1 minute standard setting; can also be set to 10 to 999
seconds in 1 second steps, or to no auto reset.
Reset:
Paper Feed:
Paper Tray x 3 (500 sheets of paper each)
Bypass Feed Tray (50 sheets of paper when lighter than
104.7g/m2 or 28 lb)
Copy Tray Capacity:
100 sheets of paper
Toner Replenishment:
Bottle type (340g/bottle)
Reproduction
QA4/A3 version:
Ratio:
25Y0, 50?40, 65%, 71 yO,
100%
75$X0,82Y0, 93Y0,
(Full Size), 115’ZO,122%,
200?4., 400%
141 ‘XO,
+ User ratio x 2
. LT/DLT version: 25Y0, 50Y0, 65?40, 74Vo, 77$Zo85?40, 93?40,
100% (Full Size), 121%, 129%,
200?40, 400% + User ratio x 2
Zoom:
From 25% to 400% in 1% steps
11-3
155Y0,
Main Frame
Power Source:
= inside page of the front cover.
Power Consumption:
(Copier only)
Maximum:
Warm-up:
Stand-by:
Copy Cycle:
B inside page of the front cover.
1.25kW
0.5kW
1.15kW
Noise Emission
Sound PressureLevel:
The measurementsare made
according to 1S07779.
Maximum:
Copier Only: less than 62 dB (A)
Full System: less than 69 dB (A)
Copier Only: ess than 40 dB (A)
Full System: ess than 44 dB (A)
Copier Only: ess than 56 dB (A)
Full System: ess than 58 dB (A)
Stand-by:
Copy-cycle:
Dimensions
(W x D x H):
Copier Only:
692 x 685 x 1026 mm or 27.3” x 27.0” x 40.4”
Full System*:
1524 x 685 x 1099mm or 60.0” x 27.0” x 43.2”
(*= Copier + Dual Job Feeder +Sorter + Display Editor + Holder)
Weight:
Copier Only: 200 kg or 440.8 lb
Optional Equipment:
Dual Job Feeder
Sorter
Sorter Adapter
Projector Unit
Display Editor
Holder for Projector Unit/Display Editor
Key Counter
11-4
Optional
Optional
Cl Specifications
Equipments
are subject to change without notice.
Dual Job Feeder
Original Size:
~ page 4-3
Original Thickness:
= page 4-3
Original Feed:
●
●
Automatic
Feed - ADF mode
Manual feed One by One - SADF mode
●
Auto Reverse Feed - ARDF mode
Original Type Capacity:
50 sheets (A4 or 81/2” x 11”, 80g/m2 or 20 lb)
Original Set:
Face up - First sheet on top
Original Transport:
One flat belt
Power Source:
DC24V, less than 2A (average) from copier
Power Consumption:
70W
Weight:
Approximately
Dimensions
(W x D x H):
13 kg or 28.7 lb
680 x 508 x 116 mm or 26.8” x 20.0” x 4.6”
11-5
Equipments
Optional
Equipments
Sorter
Paper Size for Bins:
Maximum: A3~ or 11“ x 17“ CI
Minimum: A5~ or 51/2” x 81/2” ~~
Paper Thickness:
52-90
Number of Bins:
10 bins+
g/m20r14-241b
print bin + interrupt bin (total 12 bins)
Sort mode: 50 sheets/bin (A4 or 81/2” x 11”)
mode: 40 sheets/bin (A4 or 81/2” x 11”)
Bin Capacity:
Stack
Top Bin Capacity:
150 sheets (A4 or 81/2” x 11”)
Print Bin Capacity:
500 sheets (A4 or 81/2” x 11”)
150 sheets (other size)
Interrupt Bin Capacity:
100 sheets (A4 or 81/2” x 11”)
Power Source:
DC 24V from the copier
Power Consumption:
30W
Dimensions
499 x
535 x 600 mm
19.6”
X
(W x D x H):
21.1”
X
23.6”
Weight:
Approximately
22 Kg or 49 lb
Interface Requirement:
A sorter adapter (850 g) is needed.
11-6
Optional
Display
Equipments
Editor
Original Size:
Display:
Maximum: A3cJ, or 11” x 17“~
(Scanned through the copier.)
LCD (Monochrome),
X 480 dots
8 gradations
640
Zoom In/Out:
100% (33 dpi), 150% (50 dpi), 200% (67 dpi), 300% (100 dpi)
Display Speed:
Less than 2 seconds
Editing:
Screen and cursor
Power Consumption:
19.5W
Power Source:
5V/less than 1.5A and 24V/less than 10.5 from the copier.
Dimensions
280 x 232 x 50 mm
11.0” x 9.14” x 1.97”
Weight:
(W x D x H):
less than 1,5 Kg or 33.1 lb
CJ Remarks: The holder is required for installation.
11-7
Optional
Equipments
Projector
Acceptable
Unit
Film Type:
●
●
●
●
Positive film/Negative film
35 mm
Others: 60 x 45 mm, 60x 60 mm, 60 x 70 mm
60x80 mm,60x90mm,6cmx6cm
4“ x 5“
Max: 140 x 210 mm or 5.5” x 8.2”
Yes (Up to 5 frames can be set in a film holder.)
Yes (A series of 6 frames can be set in a film holder.)
Type:
Size:
Mount:
Strip:
Focusing:
Fixed/Manual
Effective Film Area:
●
Projection Ratio
●
Copy Image Size
Approx. 22.2x
Full Size
35 mm:
. Other Sizes:
Approx. x 6
xl
. 35mm mount:
● 35mm strip:
● Other Sizes:
124x 195mm
133 x 200 mm
Full Size
~
features of the copier are available.
The reproduction
page of the front cover.
Power Source:
U= inside
Power Consumption:
Maximum:
Dimensions
Projector:
300 x 442x
Mirror Unit:
295 x 232x
(W x D x H):
55W
204 mm
11.8” X 17.4” X 8.03”
11.61”
Weight:
33.3 mm
35 mm:
. Other Sizes:
11 kg or 24.3 lb
Cl Remarks: The holder is required for installation.
11-8
X
50 mm
9.13”
X
1.97”